
:max_bytes(150000):strip_icc():format(webp)/dualsenseedge-749ef030e3c84376926d817913be924b.jpg)
"2024 Approved Expanding Digital Presence Stream to YouTube + Additional Platforms"
Expanding Digital Presence: Stream to YouTube + Additional Platforms
How to Stream to YouTube, Facebook, Twitch and Over 30 Platforms

Richard Bennett
Mar 27, 2024• Proven solutions
- Part1.How to Stream to YouTube, Twitch, Hitbox and other Platforms at the same time?
- Part2.How to Stream to YouTube and Facebook at the same time Without Restream Platform?
- Part3.About Restream.io
How to Stream to YouTube, Twitch, Hitbox and other Platforms at the same time?
Step 1: To begin with the process, first of all you need to go to <https://restream.io/ >. Sign up here and login with your account.

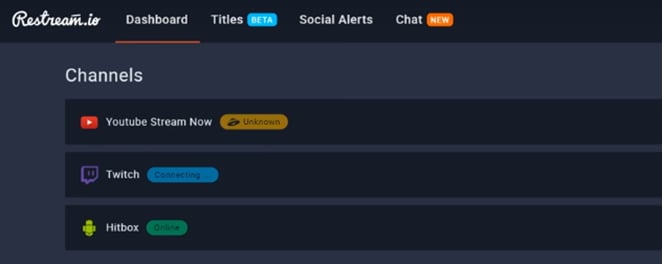
Step 2: Now go to the dashboard and simply add your channel.
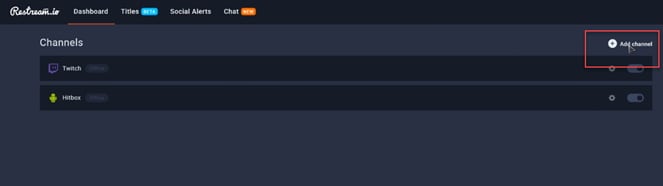
Step 3: Here you will find so many streaming platforms like YouTube, uStream, Dailymotion, HitBox etc.

Step 4: Select your desired platform out of this wide list and then sign in.

Step 5: The screen will proceed with simple to follow steps; go with specified instructions and sign in to your desired streaming platform.
Step 6: Now you can easily turn On-Off your channels for streaming.
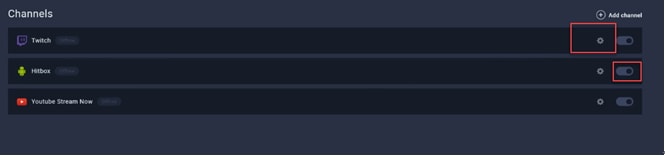
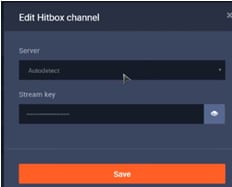
Step 7: It is time to edit your channel.
Step 8: Now put eye catching title for your live stream.
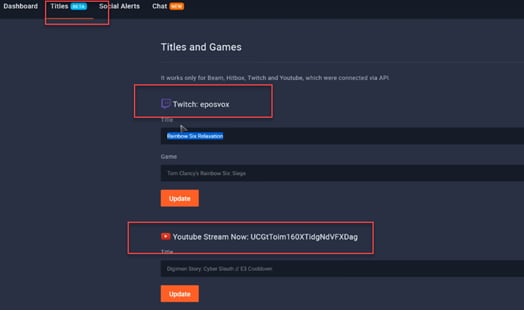
Step 9: This platform also allow users to get connected to their SNS account for the social alerts.
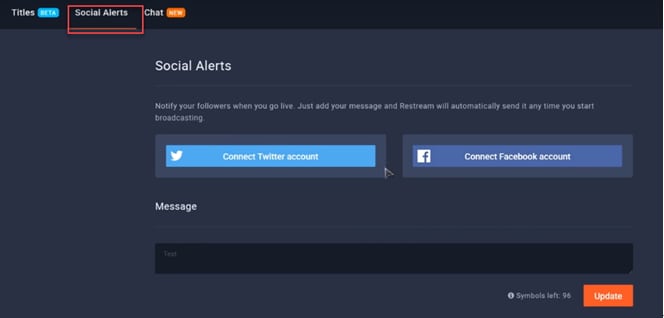
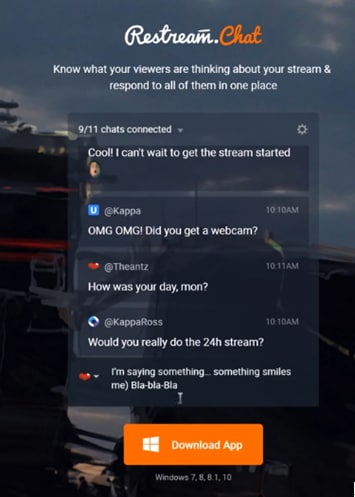
Step 10: Users can also manage their chats using interactive chat tools.
Step 11: Once you are done with all above settings on restream.io then it is time to start with streaming software. Professionals recommend using OBS, Wirecast or xSplit for best results and easy interface.

Step 12: Let us considered OBS for current restream.io services.
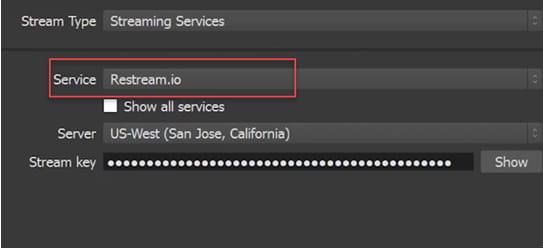
Step 13: Now simply copy your RTMP URL as well as the stream key from restream.io platform and paste it in the specified field on streaming software.
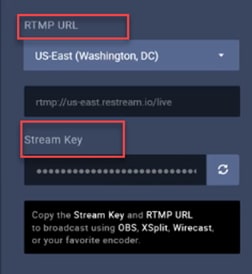
Step 14: As soon as you finished these settings then hit the Stream Button. Soon you will be able to find your videos on selected live stream platforms.
How to Stream to YouTube and Facebook at the same time Without Restream Platform?
Step 1: First of all you need to download Wirecast software tool on your device. Choose anyone from Wirecast Studio and Wirecast Pro as per your budget and needs. Get it installed.
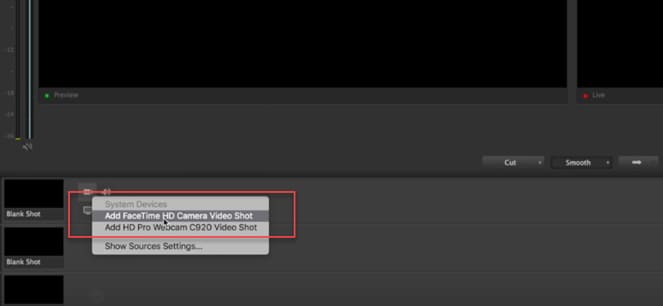
Step 2: Launch wirecast on your system and then add your camera.
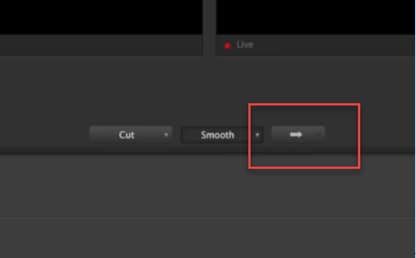
Step 3: Once you have added your camera to this tool then simply hit the Go Live button.
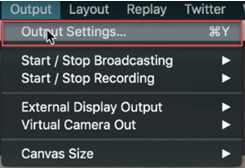
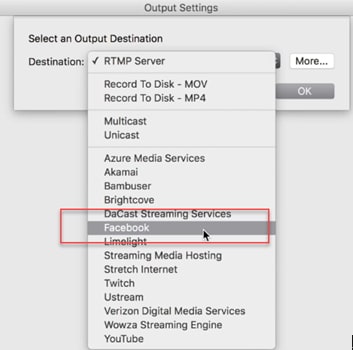
Step 4: Move to Output and adjust settings.
Step 5: From the drop down menu appearing on screen, choose Facebook as your destination.
Step 6: It is time to enter name and then click on Authenticate.
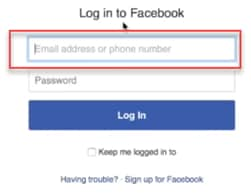
Step 7: You need to login to facebook now.

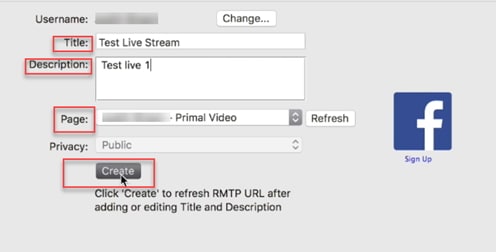
Step 8: Add your live stream title and an eye catching description.
Step 9: Select page for streaming and then hit the Create button.
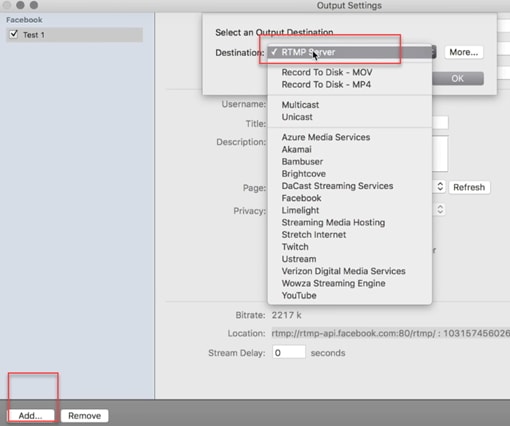
Step 10: As soon as your facebook stream is developed, then go to bottom left corner of your screen and then click add. Create another live stream but instead of choosing YouTube as your preferences, select RTMP.
Step 11: Now add name for your YouTube stream and adjust the encoding quality to 720p. After this you need to move to YouTube and get your stream name as well as address from this platform.
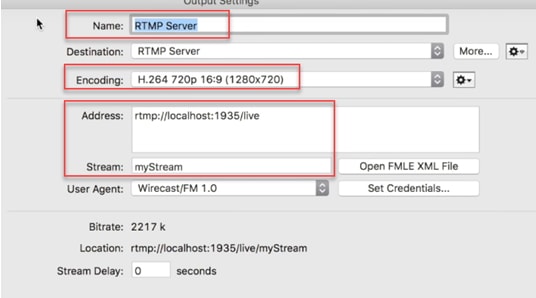
Step 12: Move to YouTube creator studio and then select live streaming. Choose live stream now option and then find encoder setup.

Step 13: It is time to copy the server URL and paste it on Wirecast address. Also copy the stream name and paste it on Wirecast platform.
Step 14: Once all these settings are complete then hit OK.
Step 15: Now click Stream button on Wirecast platform.

About Restream.io
Restream.io allows streaming over 30 plus platforms with easy processing and intuitive interface. The best thing to know about this platform is that it never creates watermarks or pre-roll ads and there is no specific limit or restriction for stream duration. It not even forces users on specific bitrate limits. In simple words, here users can work with freedom and enjoy streaming with best results.
Restream Chats are highly interactive where users can add interesting imojies to grab more attention. It can be accessed on Window platform with all interactive features.
Richard Bennett
Richard Bennett is a writer and a lover of all things video.
Follow @Richard Bennett
Richard Bennett
Mar 27, 2024• Proven solutions
- Part1.How to Stream to YouTube, Twitch, Hitbox and other Platforms at the same time?
- Part2.How to Stream to YouTube and Facebook at the same time Without Restream Platform?
- Part3.About Restream.io
How to Stream to YouTube, Twitch, Hitbox and other Platforms at the same time?
Step 1: To begin with the process, first of all you need to go to <https://restream.io/ >. Sign up here and login with your account.
Step 2: Now go to the dashboard and simply add your channel.
Step 3: Here you will find so many streaming platforms like YouTube, uStream, Dailymotion, HitBox etc.
Step 4: Select your desired platform out of this wide list and then sign in.
Step 5: The screen will proceed with simple to follow steps; go with specified instructions and sign in to your desired streaming platform.
Step 6: Now you can easily turn On-Off your channels for streaming.
Step 7: It is time to edit your channel.
Step 8: Now put eye catching title for your live stream.
Step 9: This platform also allow users to get connected to their SNS account for the social alerts.
Step 10: Users can also manage their chats using interactive chat tools.
Step 11: Once you are done with all above settings on restream.io then it is time to start with streaming software. Professionals recommend using OBS, Wirecast or xSplit for best results and easy interface.
Step 12: Let us considered OBS for current restream.io services.
Step 13: Now simply copy your RTMP URL as well as the stream key from restream.io platform and paste it in the specified field on streaming software.
Step 14: As soon as you finished these settings then hit the Stream Button. Soon you will be able to find your videos on selected live stream platforms.
How to Stream to YouTube and Facebook at the same time Without Restream Platform?
Step 1: First of all you need to download Wirecast software tool on your device. Choose anyone from Wirecast Studio and Wirecast Pro as per your budget and needs. Get it installed.
Step 2: Launch wirecast on your system and then add your camera.
Step 3: Once you have added your camera to this tool then simply hit the Go Live button.
Step 4: Move to Output and adjust settings.
Step 5: From the drop down menu appearing on screen, choose Facebook as your destination.
Step 6: It is time to enter name and then click on Authenticate.
Step 7: You need to login to facebook now.
Step 8: Add your live stream title and an eye catching description.
Step 9: Select page for streaming and then hit the Create button.
Step 10: As soon as your facebook stream is developed, then go to bottom left corner of your screen and then click add. Create another live stream but instead of choosing YouTube as your preferences, select RTMP.
Step 11: Now add name for your YouTube stream and adjust the encoding quality to 720p. After this you need to move to YouTube and get your stream name as well as address from this platform.
Step 12: Move to YouTube creator studio and then select live streaming. Choose live stream now option and then find encoder setup.
Step 13: It is time to copy the server URL and paste it on Wirecast address. Also copy the stream name and paste it on Wirecast platform.
Step 14: Once all these settings are complete then hit OK.
Step 15: Now click Stream button on Wirecast platform.
About Restream.io
Restream.io allows streaming over 30 plus platforms with easy processing and intuitive interface. The best thing to know about this platform is that it never creates watermarks or pre-roll ads and there is no specific limit or restriction for stream duration. It not even forces users on specific bitrate limits. In simple words, here users can work with freedom and enjoy streaming with best results.
Restream Chats are highly interactive where users can add interesting imojies to grab more attention. It can be accessed on Window platform with all interactive features.
Richard Bennett
Richard Bennett is a writer and a lover of all things video.
Follow @Richard Bennett
Perfecting Audio Quality for Your YouTube Channel
How to Edit Audio on YouTube
Richard Bennett
Mar 27, 2024• Proven solutions
In this article, we are going to show you how to edit audio with YouTube Video Editor, and the tips on adding your own audio file to YouTube.
- Part 1: Add your Own Audio File to YouTube Video
- Part 2: How to Edit Audio with YouTube Video Editor
Part 1: Add your Own Audio File to YouTube Video
Tools You Are Going to Need
YouTube video editor is far from meeting the needs of people who want to have more control on their audio. On the bright side, if you are interested in learning how to edit audio on YouTube, there is a solution. There are many video editors in the market that allow you to add your own music or audio files to a video. Windows Movie Maker, iMovie, Adobe Premiere, and Magisto are some of the video editors available for you to choose from. In this guide, we recommend the Wondershare Filmora video editor. Below is a quick tutorial about how to edit audio in Filmora.
 Download Mac Version ](https://tools.techidaily.com/wondershare/filmora/download/ )
Why Should You Choose Wondershare Filmora?
There are many advantages associated with the use of Wondershare Filmora. You will see that it allows you to fully edit any audio file and gain 100% control over your files. It is an integrated solution that lacks nothing in terms of efficiency and quality standards. To be more specific, Filmora offers the following unique features:
- Built-in audio editing tools that allow you to gain full control of your audio in an easy way
- Exclusive audio track that enables you to mute, detach or even de-noise the audio from video
- All audio effects can easily be adjusted with one click only
- The built-in Equalizer is capable enough to create amazing audio effects
- Directly upload your video to YouTube, Facebook or Vimeo from Wondershare Filmora
How to add audio files to YouTube video with Wondershare Filmora
Do you want to know more about audio editing? Please read this article: How to add audio to video.
Step 1 Import Video Clips into Filmora
Filmora supports a wide range of video formats, such as MKV, MOV, AVI, WebM and MP4, you can import the video clip shot with Camera, smartphone or camcorder easily to it.
Step 2 Detach Audio
If you want to edit the original audio of the video, you can choose to split the audio file from the video by using the Audio Detach option on Wondershare Filmora. Then, the audio file will be shown in the audio track, and you can cut or trim it.

Note: If you do not want to keep the original audio file in the video, you can delete it from the audio track directly.
Step 3Add Audio Files
Wondershare Filmora offers you multiple royalty free audio effects and music in its rich audio library. What is more, you can also import your own music or audio file from your computer or iTunes. Of course, you should know that the audio should be royalty free for you to make use of. In a different situation, you cannot upload it and benefit from its quality and nature.
Step 4Edit Audio
In this step, you can adjust the audio volume and pitch, etc. There are multiple options for you to benefit from, including the Audio Equalizer, Music, Mix Audio. In this way, you can make sure that the audio is exactly like you have wanted it to be. For further information as to how you can improve the sound quality of your recorded videos, you can check out: How to improve sound quality of recorded videos.
Step 5Save Your Work and Upload on YouTube
If you are satisfied with your work on the audio file and you wish to publish it, the process is quite simple. You just hit Export and select to upload the video to YouTube. After signing in to your YouTube account, you will be ready to start uploading the audio file.

In case you wish to edit the audio from an already published video, you have to download the video first. Then, you can follow the steps above to edit the audio file in Filmora. As one of the widely used video editing software for YouTubers, Filmora is here to empower your imagination. Just download the free trial version and try it now.

Part 2: How to Edit Audio with YouTube Video Editor
Unfortunately, YouTube does not allow users to upload audio files such as MP3, WAV, etc. Instead, you can only upload audio files which are offered by YouTube in the first place. Since YouTube has got a plentiful audio library, you can find a lot of audio there. In this part, we will show you how to add and edit audio with YouTube Video Editor.
You may also like: How to Add Music to YouTube Videos >>
Note: From 20th September 2017 users will no longer be able to use the complimentary editing suite. Check the best YouTube video editor alternatives from this complete guide. In the following part, I will show you how to add audio track , replace the original audio and adjust the audio position and length as well.
- Step 1: Sign in to your YouTube account
- **Step 2:**Click your profile avatar and select Creator Studio option.
- Step 3: In the left pane, go to Video Manager and then click Videos. In the Videos list, choose the video that you want to add new audio track, and then select Audio from the Edit button.

- Step 4: Now you can add or replace the audio in your video. Here you will find that there are various songs and audio files you can choose from. Click ADD TO VIDEO and the audio track will be added to the video directly.

- Step 5: Now you will see the audio track appears at the bottom of the player. Here you can trim and drag the audio bar to adjust the audio positon and length. To Trim the audio, click the beginning or the end of the audio bar and then drag it to the left or right. After trimming, drag it to meet the target position.

Conclusion
Normally, it would be better to add and edit audio to video before updating to YouTube. In this case, Filmora is highly recommended as one of the best video editor for YouTubers , which provides some royalty free music sound in the Music Library to choose from and also the audio editing tools like remove background noise from the video, add fade in and fade out effects with ease or play the video backward or fast forward.
Richard Bennett
Richard Bennett is a writer and a lover of all things video.
Follow @Richard Bennett
Richard Bennett
Mar 27, 2024• Proven solutions
In this article, we are going to show you how to edit audio with YouTube Video Editor, and the tips on adding your own audio file to YouTube.
- Part 1: Add your Own Audio File to YouTube Video
- Part 2: How to Edit Audio with YouTube Video Editor
Part 1: Add your Own Audio File to YouTube Video
Tools You Are Going to Need
YouTube video editor is far from meeting the needs of people who want to have more control on their audio. On the bright side, if you are interested in learning how to edit audio on YouTube, there is a solution. There are many video editors in the market that allow you to add your own music or audio files to a video. Windows Movie Maker, iMovie, Adobe Premiere, and Magisto are some of the video editors available for you to choose from. In this guide, we recommend the Wondershare Filmora video editor. Below is a quick tutorial about how to edit audio in Filmora.
Download Mac Version ](https://tools.techidaily.com/wondershare/filmora/download/ )
Why Should You Choose Wondershare Filmora?
There are many advantages associated with the use of Wondershare Filmora. You will see that it allows you to fully edit any audio file and gain 100% control over your files. It is an integrated solution that lacks nothing in terms of efficiency and quality standards. To be more specific, Filmora offers the following unique features:
- Built-in audio editing tools that allow you to gain full control of your audio in an easy way
- Exclusive audio track that enables you to mute, detach or even de-noise the audio from video
- All audio effects can easily be adjusted with one click only
- The built-in Equalizer is capable enough to create amazing audio effects
- Directly upload your video to YouTube, Facebook or Vimeo from Wondershare Filmora
How to add audio files to YouTube video with Wondershare Filmora
Do you want to know more about audio editing? Please read this article: How to add audio to video.
Step 1 Import Video Clips into Filmora
Filmora supports a wide range of video formats, such as MKV, MOV, AVI, WebM and MP4, you can import the video clip shot with Camera, smartphone or camcorder easily to it.
Step 2 Detach Audio
If you want to edit the original audio of the video, you can choose to split the audio file from the video by using the Audio Detach option on Wondershare Filmora. Then, the audio file will be shown in the audio track, and you can cut or trim it.
Note: If you do not want to keep the original audio file in the video, you can delete it from the audio track directly.
Step 3Add Audio Files
Wondershare Filmora offers you multiple royalty free audio effects and music in its rich audio library. What is more, you can also import your own music or audio file from your computer or iTunes. Of course, you should know that the audio should be royalty free for you to make use of. In a different situation, you cannot upload it and benefit from its quality and nature.
Step 4Edit Audio
In this step, you can adjust the audio volume and pitch, etc. There are multiple options for you to benefit from, including the Audio Equalizer, Music, Mix Audio. In this way, you can make sure that the audio is exactly like you have wanted it to be. For further information as to how you can improve the sound quality of your recorded videos, you can check out: How to improve sound quality of recorded videos.
Step 5Save Your Work and Upload on YouTube
If you are satisfied with your work on the audio file and you wish to publish it, the process is quite simple. You just hit Export and select to upload the video to YouTube. After signing in to your YouTube account, you will be ready to start uploading the audio file.
In case you wish to edit the audio from an already published video, you have to download the video first. Then, you can follow the steps above to edit the audio file in Filmora. As one of the widely used video editing software for YouTubers, Filmora is here to empower your imagination. Just download the free trial version and try it now.
Part 2: How to Edit Audio with YouTube Video Editor
Unfortunately, YouTube does not allow users to upload audio files such as MP3, WAV, etc. Instead, you can only upload audio files which are offered by YouTube in the first place. Since YouTube has got a plentiful audio library, you can find a lot of audio there. In this part, we will show you how to add and edit audio with YouTube Video Editor.
You may also like: How to Add Music to YouTube Videos >>
Note: From 20th September 2017 users will no longer be able to use the complimentary editing suite. Check the best YouTube video editor alternatives from this complete guide. In the following part, I will show you how to add audio track , replace the original audio and adjust the audio position and length as well.
- Step 1: Sign in to your YouTube account
- **Step 2:**Click your profile avatar and select Creator Studio option.
- Step 3: In the left pane, go to Video Manager and then click Videos. In the Videos list, choose the video that you want to add new audio track, and then select Audio from the Edit button.
- Step 4: Now you can add or replace the audio in your video. Here you will find that there are various songs and audio files you can choose from. Click ADD TO VIDEO and the audio track will be added to the video directly.
- Step 5: Now you will see the audio track appears at the bottom of the player. Here you can trim and drag the audio bar to adjust the audio positon and length. To Trim the audio, click the beginning or the end of the audio bar and then drag it to the left or right. After trimming, drag it to meet the target position.
Conclusion
Normally, it would be better to add and edit audio to video before updating to YouTube. In this case, Filmora is highly recommended as one of the best video editor for YouTubers , which provides some royalty free music sound in the Music Library to choose from and also the audio editing tools like remove background noise from the video, add fade in and fade out effects with ease or play the video backward or fast forward.
Richard Bennett
Richard Bennett is a writer and a lover of all things video.
Follow @Richard Bennett
- Title: "2024 Approved Expanding Digital Presence Stream to YouTube + Additional Platforms"
- Author: Thomas
- Created at : 2024-05-31 12:38:32
- Updated at : 2024-06-01 12:38:32
- Link: https://youtube-help.techidaily.com/2024-approved-expanding-digital-presence-stream-to-youtube-plus-additional-platforms/
- License: This work is licensed under CC BY-NC-SA 4.0.
