
"2024 Approved From Favorites to Featured The Journey to a Unique YouTube List"
From Favorites to Featured: The Journey to a Unique YouTube List
YouTube is one of the biggest video-sharing websites where you can find unlimited videos of your favorite songs in various genres for free. However, due to the thousands of channels on YouTube, remember a soundtrack you once liked.
To tackle this issue, you must create a playlist containing only those you prefer to listen to.
So, if you are looking for information on creating a YouTube music playlist on your Windows or Mac PC, Android, or iPhone web browser, read this article and follow the steps carefully.
How to Create a YouTube Music Playlist?
Are you one of those who want to listen to their favorite tracks while working out or carrying on their work-related tasks? If that’s the case, a YouTube Playlist might come in handy as you don’t have to search again and again for your songs on your device.
How To Create a YouTube Music Playlist on the Web?
If you are using a Windows or Mac computer and want to create a YouTube music playlist on a web browser, follow the below steps:
Step1 In the first step, turn on your PC, launch a web browser from the desktop or Dock, and head to theYouTube website. Next, Sign into your account with your Google email ID if you are not already logged in.

![]()
Note: It is only possible to create a YouTube music playlist by signing into your account.
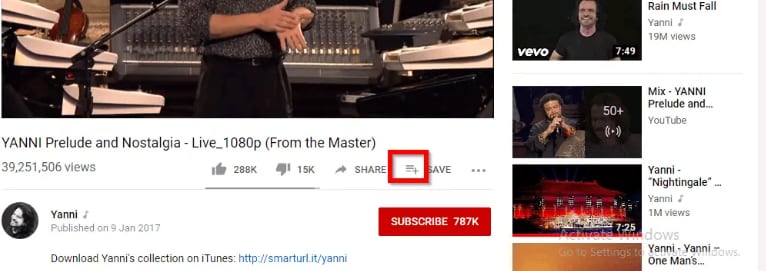
Step2 When you have signed in, look for your favorite track on the YouTube live feed page or search for it in the search bar at the top of the screen. Once you have found the song, click on it to play it, click the three horizontal dots at the bottom right-hand side of the video, and select the “Save” option from the small pop-up.
Step3
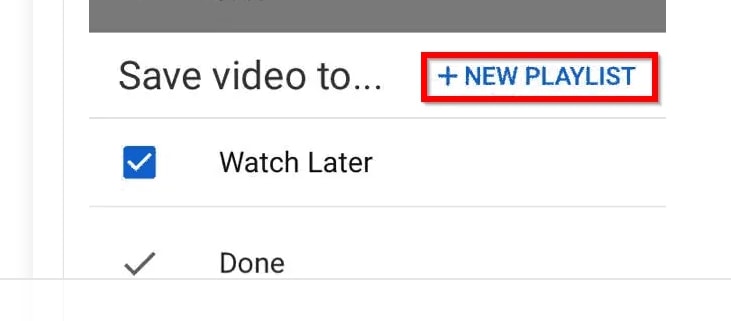
- Now, select the “Create a new playlist”
- Type in the name of your playlist.
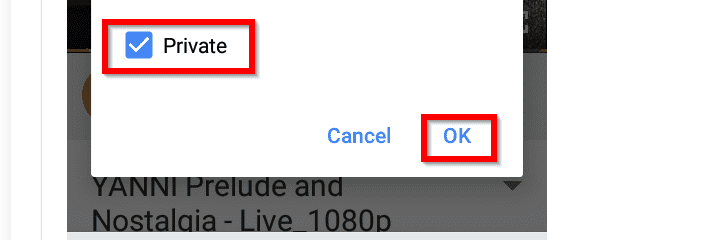
- Choose to make it Public, Unlisted, or Private.

The differences between the three options are:
- A Public playlist is a list of videos that any random person can see, access, or use it.
- An Unlisted playlist can be shared with others by using its link to access it.
- A Private playlist cannot be seen, accessed or used by anyone except you.
Finally, click the “Create” button, and your YouTube music playlist will be saved automatically.
Step4 Repeat the second and third steps to save all the other songs you wish to add to the same playlist. Once done, head back to the main YouTube feed page, click “Library,” and scroll to the middle of the page in the right pane to access and play the music playlist at your will.

![]()
Note: You can always edit your YouTube music playlist by changing its name, privacy, and description or adding and removing any tracks. It is also possible to delete any of your playlists or create and save multiple playlists on your device’s web browser.
How to Create a YouTube Music playlist on iPhone?
To create a YouTube music playlist on your iPhone, follow these quick steps.:
Step1 Download and launch the YouTube Music app on your iPhone , sign into your account, and tap a song you want to add to your playlist. Next, tap on the music video once for the create a playlist option to pop up.

Step2 Now tap the three horizontal lines with the Plus icon, tap “+ NEW PLAYLIST” at the bottom right corner of the screen, and type in the name of the new music playlist.
Step3 In the next step, type in the name of your new playlist, select your privacy preferences, i.e., Private, Public, or unlisted, and tap “Create” to complete the process.

Finally, close the video, tap “Library” at the bottom of the screen, scroll down and see your new YouTube music playlist.
How to Create a YouTube Music playlist on Android?
YouTube Music app interface for Android is different than for iPhone, so do the following steps to create a new playlist quickly.
Step1 Download and launch the YouTube Music app on your Android , sign into your account, and tap a song to open it. Next, tap on the music video once and tap the three horizontal lines with the Plus icon.
Then, tap “Create a new playlist” at the bottom right corner of the screen, and type in the name of the new music playlist.

Step2 In the next step, choose your privacy preferences and tap “OK” to create the new YouTube music playlist.
Now tap to close the video, tap “Library” at the bottom of the screen, scroll down in the middle of the app and view your new YouTube music playlist.
![]()
Note: You may see an option to create a new channel during the YouTube music playlist process. If so, tap “Create Channel” to see the “+ NEW PLAYLIST” option on your iPhone and the “Create a new playlist” option on your Android YouTube app.
Bonus Video Tutorial: From a YouTube User to Creator - How To Make Music Video
You know how to create a YouTube playlist on the web or on your mobile. However, as you are a music lover and use YouTube frequently, are you interested in creating music videos by yourself? If yes, please watch the video below. It will show you how to make music videos with a user-friendly video editor, Filmora . We hope you can enjoy your YouTube music while exploring more creative possibilities:
Free Download For Win 7 or later(64-bit)
Free Download For macOS 10.14 or later
Conclusion
Listening to YouTube’s free music tracks is more fun when you do not have to go and forth to search for your favorite songs. You can enjoy the experience more when you have personalized playlists for situations like a long drive, studying, or working in an office.
So, in this article, we have discussed a step-by-step process for creating a YouTube music playlist on a web browser, Android, and iPhone, and hopefully, you can dance to your favorite beats without searching for them first on YouTube.
Step2 When you have signed in, look for your favorite track on the YouTube live feed page or search for it in the search bar at the top of the screen. Once you have found the song, click on it to play it, click the three horizontal dots at the bottom right-hand side of the video, and select the “Save” option from the small pop-up.
Step3
- Now, select the “Create a new playlist”
- Type in the name of your playlist.
- Choose to make it Public, Unlisted, or Private.
The differences between the three options are:
- A Public playlist is a list of videos that any random person can see, access, or use it.
- An Unlisted playlist can be shared with others by using its link to access it.
- A Private playlist cannot be seen, accessed or used by anyone except you.
Finally, click the “Create” button, and your YouTube music playlist will be saved automatically.
Step4 Repeat the second and third steps to save all the other songs you wish to add to the same playlist. Once done, head back to the main YouTube feed page, click “Library,” and scroll to the middle of the page in the right pane to access and play the music playlist at your will.
![]()
Note: You can always edit your YouTube music playlist by changing its name, privacy, and description or adding and removing any tracks. It is also possible to delete any of your playlists or create and save multiple playlists on your device’s web browser.
How to Create a YouTube Music playlist on iPhone?
To create a YouTube music playlist on your iPhone, follow these quick steps.:
Step1 Download and launch the YouTube Music app on your iPhone , sign into your account, and tap a song you want to add to your playlist. Next, tap on the music video once for the create a playlist option to pop up.
Step2 Now tap the three horizontal lines with the Plus icon, tap “+ NEW PLAYLIST” at the bottom right corner of the screen, and type in the name of the new music playlist.
Step3 In the next step, type in the name of your new playlist, select your privacy preferences, i.e., Private, Public, or unlisted, and tap “Create” to complete the process.
Finally, close the video, tap “Library” at the bottom of the screen, scroll down and see your new YouTube music playlist.
How to Create a YouTube Music playlist on Android?
YouTube Music app interface for Android is different than for iPhone, so do the following steps to create a new playlist quickly.
Step1 Download and launch the YouTube Music app on your Android , sign into your account, and tap a song to open it. Next, tap on the music video once and tap the three horizontal lines with the Plus icon.
Then, tap “Create a new playlist” at the bottom right corner of the screen, and type in the name of the new music playlist.
Step2 In the next step, choose your privacy preferences and tap “OK” to create the new YouTube music playlist.
Now tap to close the video, tap “Library” at the bottom of the screen, scroll down in the middle of the app and view your new YouTube music playlist.
![]()
Note: You may see an option to create a new channel during the YouTube music playlist process. If so, tap “Create Channel” to see the “+ NEW PLAYLIST” option on your iPhone and the “Create a new playlist” option on your Android YouTube app.
Bonus Video Tutorial: From a YouTube User to Creator - How To Make Music Video
You know how to create a YouTube playlist on the web or on your mobile. However, as you are a music lover and use YouTube frequently, are you interested in creating music videos by yourself? If yes, please watch the video below. It will show you how to make music videos with a user-friendly video editor, Filmora . We hope you can enjoy your YouTube music while exploring more creative possibilities:
Free Download For Win 7 or later(64-bit)
Free Download For macOS 10.14 or later
Conclusion
Listening to YouTube’s free music tracks is more fun when you do not have to go and forth to search for your favorite songs. You can enjoy the experience more when you have personalized playlists for situations like a long drive, studying, or working in an office.
So, in this article, we have discussed a step-by-step process for creating a YouTube music playlist on a web browser, Android, and iPhone, and hopefully, you can dance to your favorite beats without searching for them first on YouTube.
Audio Purging Techniques for Streaming Success
How To Remove Background Noise from Your Youtube Video

Richard Bennett
Mar 27, 2024• Proven solutions
There are few things more annoying to viewers on YouTube than background noise. It is distracting and makes it difficult to engage with the content of a video. If there is noticeable background noise in a video, even a small noise like the faint hum of a computer fan, then it will increase the chances of viewers clicking away. The good news is that these kinds of noises are fairly easy to get rid of.
In order to remove background noise from your video clip, you will first need to create an MP3 of your audio. Then you will be able to take out the unwanted noise in a free program called Audacity and reintroduce your corrected audio into your Filmora project. This article will walk you through the audio editing process.

How To Remove Background Noise from Your Youtube Video
Background Noise Removal


Open up Filmora, import your clip, and drag it into the timeline. Then, play your clip and listen for background noise. If you hear a noise that you wish to remove move on to the first step of background noise removal .
1. Creating An MP3
If you do not already have it you will need to download VLC Media Player from videoLAN.org. VLC is a completely free media player that can play almost any type of file, is great for converting files, and can even be used as a screen recorder. If you consume a lot of media online then chances are you already have VLC. You could also use is Free Video to MP3 Converter by DVDVideoSoft.
If you choose to use VLC, open it up and select Convert/Save under Media. Select your video in the Open Media window that pops up. After you click Convert/Save you will be able to choose your format, in this case, MP3, under Save as type.
2. Removing Background Noise in Audacity
You can download Audacity for free at Audacityteam.org.
Once you have Audacity use it to open your MP3. Then, find a section of your audio that is silent aside from your background noise and highlight it by clicking and dragging. The idea is to point out to the program exactly what sound is a problem for you so it knows what to remove. If you have trouble finding a significant stretch of background noise that does not also include dialogue remember to record a pause before or after the content of your video next time you film.
With your section of background noise highlighted, go to Effect and then Noise Reduction. Then, click on Get Noise Profile. After that, you will select your entire audio timeline before going back to Noise Reduction under Effect. This time click on OK (the default settings are the best in most situations so you do not need to worry about changing them).
Audacity will remove everything that sounds like the sound profile, eliminating your background noise. Sometimes this method will also dull your dialogue, which can be fixed by selecting your entire track and then going to Effect and Amplify. Increasing amplification will fix any muffling of your audio.
3. Syncing in Filmora
Export your corrected MP3 from Audacity and import it into Filmora. Then, drag it into your music track. Syncing your audio should not be difficult, but you can always use your original audio to help you line it up properly if you need to. Just look for a significant spike in your audio waves in both your MP3 and the original audio and make sure they are right on top of each other.
Then, since you no longer need your original audio, you can delete it. Right-click on your clip and select Audio Detach. Once your audio is on its own track just select it and click delete.
Covering Background Noise
Sometimes background noise is so minor that you do not want to bother going through the process of removing it. In these situations, it may be easier to cover up your background noise than to remove it. This is as simple as dragging a song into the music track of your timeline and adjusting its volume so it is not loud enough to draw attention away from your dialogue. Chances are you want to add background music anyways and this is not even an extra step.
Richard Bennett
Richard Bennett is a writer and a lover of all things video.
Follow @Richard Bennett
Richard Bennett
Mar 27, 2024• Proven solutions
There are few things more annoying to viewers on YouTube than background noise. It is distracting and makes it difficult to engage with the content of a video. If there is noticeable background noise in a video, even a small noise like the faint hum of a computer fan, then it will increase the chances of viewers clicking away. The good news is that these kinds of noises are fairly easy to get rid of.
In order to remove background noise from your video clip, you will first need to create an MP3 of your audio. Then you will be able to take out the unwanted noise in a free program called Audacity and reintroduce your corrected audio into your Filmora project. This article will walk you through the audio editing process.
How To Remove Background Noise from Your Youtube Video
Background Noise Removal
Open up Filmora, import your clip, and drag it into the timeline. Then, play your clip and listen for background noise. If you hear a noise that you wish to remove move on to the first step of background noise removal .
1. Creating An MP3
If you do not already have it you will need to download VLC Media Player from videoLAN.org. VLC is a completely free media player that can play almost any type of file, is great for converting files, and can even be used as a screen recorder. If you consume a lot of media online then chances are you already have VLC. You could also use is Free Video to MP3 Converter by DVDVideoSoft.
If you choose to use VLC, open it up and select Convert/Save under Media. Select your video in the Open Media window that pops up. After you click Convert/Save you will be able to choose your format, in this case, MP3, under Save as type.
2. Removing Background Noise in Audacity
You can download Audacity for free at Audacityteam.org.
Once you have Audacity use it to open your MP3. Then, find a section of your audio that is silent aside from your background noise and highlight it by clicking and dragging. The idea is to point out to the program exactly what sound is a problem for you so it knows what to remove. If you have trouble finding a significant stretch of background noise that does not also include dialogue remember to record a pause before or after the content of your video next time you film.
With your section of background noise highlighted, go to Effect and then Noise Reduction. Then, click on Get Noise Profile. After that, you will select your entire audio timeline before going back to Noise Reduction under Effect. This time click on OK (the default settings are the best in most situations so you do not need to worry about changing them).
Audacity will remove everything that sounds like the sound profile, eliminating your background noise. Sometimes this method will also dull your dialogue, which can be fixed by selecting your entire track and then going to Effect and Amplify. Increasing amplification will fix any muffling of your audio.
3. Syncing in Filmora
Export your corrected MP3 from Audacity and import it into Filmora. Then, drag it into your music track. Syncing your audio should not be difficult, but you can always use your original audio to help you line it up properly if you need to. Just look for a significant spike in your audio waves in both your MP3 and the original audio and make sure they are right on top of each other.
Then, since you no longer need your original audio, you can delete it. Right-click on your clip and select Audio Detach. Once your audio is on its own track just select it and click delete.
Covering Background Noise
Sometimes background noise is so minor that you do not want to bother going through the process of removing it. In these situations, it may be easier to cover up your background noise than to remove it. This is as simple as dragging a song into the music track of your timeline and adjusting its volume so it is not loud enough to draw attention away from your dialogue. Chances are you want to add background music anyways and this is not even an extra step.
Richard Bennett
Richard Bennett is a writer and a lover of all things video.
Follow @Richard Bennett
Also read:
- [Updated] 2024 Approved How to Survive and Thrive on the Streak Frontier
- [Updated] What Is Screencasting and How to Choose the Right Screencasting Software?
- 2024 Approved Unleashing Video Potential with Effective Tagging Techniques on YouTube
- Banish Blurry Footage Keeping Your GoPro Crisp
- Can I use iTools gpx file to catch the rare Pokemon On Motorola Edge 40 Neo | Dr.fone
- Clarity Restored: Discover the Best 2021 Apps to Correct and Enhance Fuzzy Images
- Exploring the Past Top 10 Educational History YT Channels for 2024
- How to Unlock a Network Locked Samsung Galaxy A25 5G Phone?
- In 2024, Generating Attention-Grabbing Video Teasers
- In 2024, Maximizing Earnings on YouTube Shorts Essentials & Prospective Income
- In 2024, Minimizing Moments Edit Longer Videos for YouTube
- In 2024, Open Source Video Template Ideas for YouTube
- In 2024, Unveiling the Secrets of LUT Customization in Premiere
- Mastering Window 11: Reinitializing Unwanted Apps
- Title: 2024 Approved From Favorites to Featured The Journey to a Unique YouTube List
- Author: Thomas
- Created at : 2025-02-07 05:17:31
- Updated at : 2025-02-09 16:24:24
- Link: https://youtube-help.techidaily.com/2024-approved-from-favorites-to-featured-the-journey-to-a-unique-youtube-list/
- License: This work is licensed under CC BY-NC-SA 4.0.