
:max_bytes(150000):strip_icc()/GettyImages-881503284-5c0f8762c9e77c0001d46bf2.jpg)
"2024 Approved How to Elevate YouTube Broadcasts Select the Right Webcam"
How to Elevate YouTube Broadcasts: Select the Right Webcam
Best Webcams for YouTube Livestreaming

Max Wales
Mar 27, 2024• Proven solutions
Broadcasting videos in real time on social media can be a great way to share some of the best moments of your life with your friends or to reach new customers for the products your company offers. YouTube is the world’s biggest video sharing platform that already allows its users to stream live videos through third-party applications such as Wirecast Play or OBS. Less than a month ago, YouTube has finally made possible live streaming directly from a computer’s webcam. The option is currently only available on Chrome browsers, but the company claims that more browsers will start offering this feature soon.
In this article, we are going to provide you with all the information you’ll need to create seamless live streams using a webcam and introduce you to some of the best webcam models in 2021.
Best webcams for YouTube Livestreaming in 2021
The quality of the video recording you intend to broadcast live is essential for the success of your live streams. Most built-in laptop webcams produce low-quality videos, and for that reason using an external webcam that captures high-resolution videos can help you create live streams that attract a lot of attention from YouTube’s community.
How to choose the right webcam for live streaming on YouTube?
Compatability: Even the best webcams on the market are completely useless if they are not compatible with your computer. Finding a webcam that works with a PC or a Mac shouldn’t be too difficult because both Windows and iOS platforms offer support for a wide range of models.
Video Resolution: YouTubers that just want to produce simple live streams don’t have to pay a lot of attention to the video resolution, because their videos don’t show too many details. Vloggers and gamers, on the other hand, should consider using webcams that produce 4K or HD footage since lower-priced options have a hard time realistically depicting colors. The quality of the video output a webcam produces can increase its price significantly, so there’s no reason investing in it if you don’t have the intention of utilizing its features to the fullest.
Sound Quality: Besides the video features, you should also look into the webcam’s audio options, because no one wants to watch a video with a terrible sound. Buying an external microphone is probably the best solution to this issue, but if you can’t afford one, then purchasing a webcam with decent audio recording features is the second best option.
Adjustable Location: Although the angle from which you are recording a stream may not seem important, poorly framed live streams are more likely to go unnoticed. A webcam that is easily adjustable can grant you the freedom of choosing your shots on every live stream you share online and it will enable you to control each and every detail in the video.
![]()

The All-in-One Screen Recorder & Video Editor
- Record desktop screen, voiceover, and webcam simultaneously
- Edit recorded clips quickly with a wide range of professional tools
- Built-in plentiful templates and effects
- Export to MP4, MOV, MKV, GIF and multiple formats
For Win 7 or later (64-bit)
For macOS 10.12 or later
 Secure Download
4 Best Webcams for YouTube Live streaming in 2021
There are thousands of different webcams you can use to record a live stream, but the models featured below are some of the very best currently available on the market.
1. Logitech 4K Pro webcam
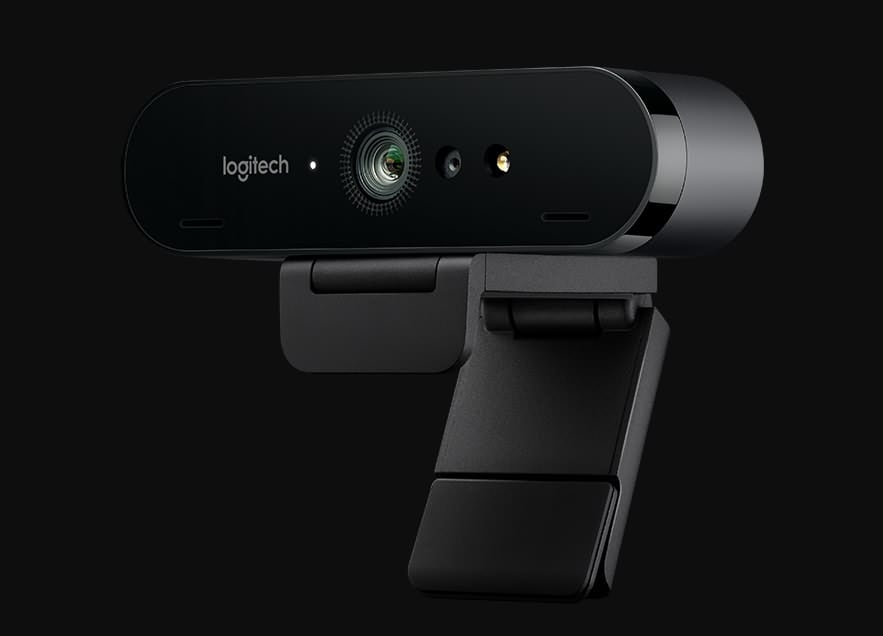
OS: Windows, macOS, Chrome OS
Price: $199
This is currently the only webcam on the market that supports 4K video recording, which makes it a forerunner of innovation and change. Besides the 4K option, the webcam’s features include a 5X digital zoom, infrared facial recognition and the amazing Right Light with HDR option that helps users record videos even under difficult light conditions.
The webcam can perform basic functions, like Skype calls, without the aid of third-party apps, which means that you can use it to create live streams on YouTube even if you don’t have a broadcasting software. The webcam’s stand is designed to fit almost any surface, so mounting the Logitech 4K Pro webcam to a laptop or monitor is quick and simple. The background replacement feature this Logitech’s webcam model offers can be quite useful if you want to use a different background in your YouTube live stream.
Pros:
- Produces incredibly clear and sharp images
- Superb background replacement options
- Expansive field of view
Cons:
- Poor audio recording options
- Internal software is basic
- A limited number of programs can capture 4K footage
2. Logitech HD Pro C920
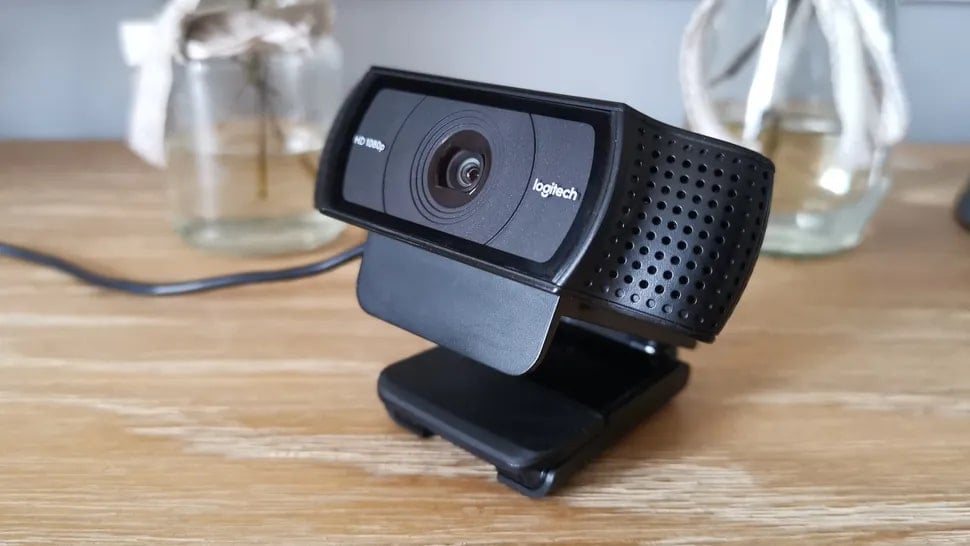
OS: macOS, Windows
Price: $99,99
Vloggers and all other YouTubers who care about video resolution will love using this webcam. Besides being capable of producing crystal clear videos in 1080p or HD 720 resolution at 30 or 60 fps, Logitech HD Pro C922 is also optimized for live streaming, which makes it a perfect webcam for live streaming on YouTube and all other video sharing platforms.
The webcam is equipped with two omnidirectional microphones that can record clear audio, but they pick up background noises easily, so using an external microphone for your live stream is still a much better option. The automatic low-light correction feature is designed to detect flickering lights in a video or increase visibility when streaming from a dimmed location. A foldable stand makes mounting the webcam easy, and you can also use a tripod if you want to record a live stream from an unusual perspective.
Pros:
- Produces 1080p and 720p resolution videos at 30 and 60 fps
- Allows users to integrate live images into their live streams
- Very easy to use
Cons
- Below average audio recording features
- Pricey
- Works only with OBS and XSplit broadcasting software
3. Logitech C922 Pro Stream webcam
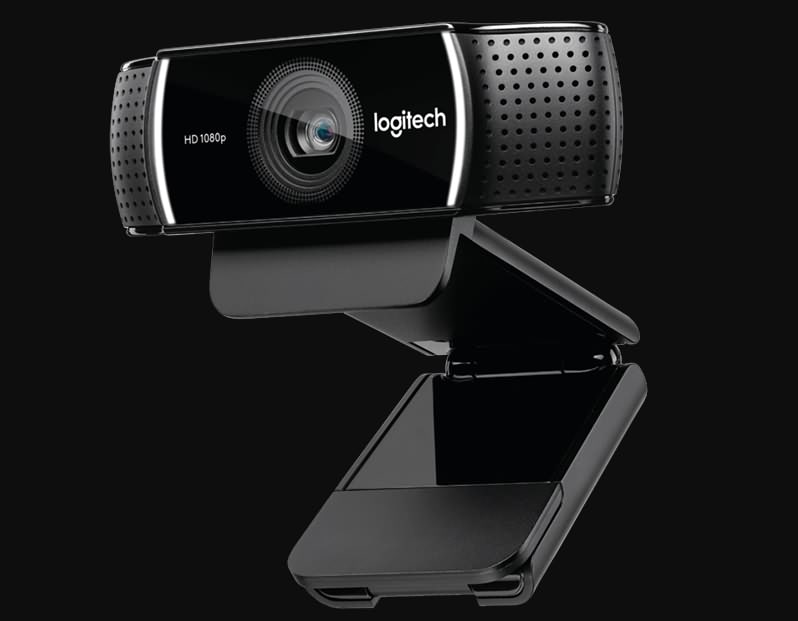
OS: Windows, macOS, Xbox, Chrome OS, Android 5.0 or above
Price: $99,99
Professional streamers, who want to capture impeccable live streams, should look no further. Logitech C922 Pro Stream webcam is the premier option for anyone who wants to be regarded as a professional streamer. This Logitech’s webcam lets you capture live streams in 1080p at 30 fps or 720p at 60 fps, while also providing the background removal feature for live streams on Twitch and YouTube. The video compression ensures that your live streams don’t take up too much of your network’s resources.
The webcam’s microphones enable users to record clear audio and reduce the need to use an external mic on every live stream you make. The Logitech C922 Pro Stream webcam delivers stunning performances in low light conditions, and it also has a 78-degree field of view lens. The webcam’s mounting options are somewhat limited, which can have a negative effect on the visual appeal of your YouTube live streams.
Pros:
- Offers a solid support for audio recording
- Delivers stunning picture quality
- Compatible with a wide range of operating systems
Cons:
- Limited mounting options
- Not plug-and-play friendly on Mac devices
- More expensive than webcams with similar capabilities
4. Microsoft LifeCam Studio
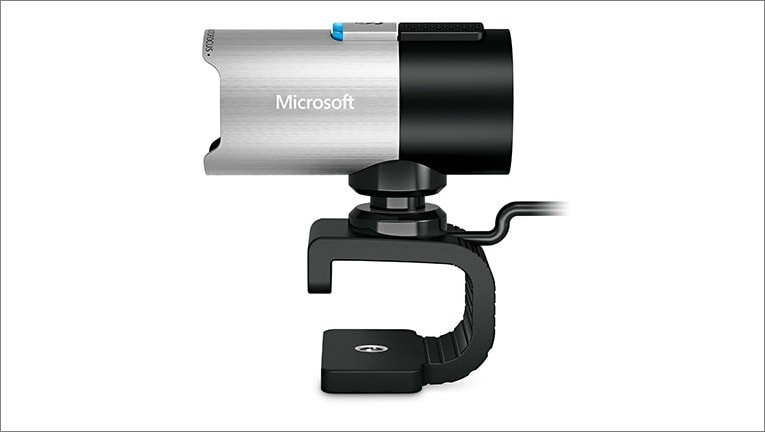
OS: Windows
Price: $99,95
The high-precision glass element lens this webcam features produces clear and sharp images. The Microsoft LifeCam Studio webcam has a 1080p HD sensor and it offers 720p HD video chat option. In addition to these remarkable features, the webcam is also equipped with TrueColor technology with face tracking that automatically adjusts the camera’s exposure to the environment and ensures that your live streams are always bright and colorful.
The Microsoft LifeCam Studio has a wide angle lens and an autofocus feature that guarantees that all live streams are always in focus. The webcam is Skype certified which means that it performs best when used with this software. Audio recording features exceed all expectations since the webcam can record natural audio recordings with no background noises. However, the limited compatibility narrows down the spectrum of its potential users.
Pros:
- Excellent video recording features.
- Crystal clear audio
- Great mounting options
Cons:
- Available only on Windows OS
- Demanding system requirements
- Not optimized for live streaming.
How to live stream from a webcam on YouTube in 2020
Although producing your own live stream on YouTube is easy, there are still a few steps you will have to take before you can start streaming from the webcam on your computer. If you don’t have a YouTube channel, you must make one, in order to be able to create your first live steam.
Step 1
Go to youtube.com/webcam , then complete the channel verification process and make sure that your channel doesn’t have any live streaming restrictions in the last 90 days. Head over to your channel, click on the Create a Video or Post icon in the upper right corner of the web page and select the GoLive option.
Afterward, you should give Chrome permission to access your webcam and the microphone you intend on using to record audio.
Step 2
Immediately after, the platform will ask you to give a title to your stream and it will let you choose whether or not you want the stream to be public or unlisted. It may be a good idea to create a few unlisted streams before you go public if you are still trying to figure out how this feature works.
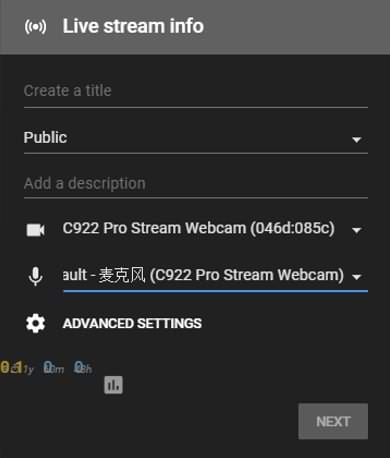
Proceed to select the camera and the microphone you intend to use to record the live stream, and you can also click on the Advanced Settings icon if you want to disable chat during the session or to specify that the live stream includes paid promotions.
Step 3
Once you’ve finished fine-tuning the advanced settings, you should click on the Next button. The platform will offer you to take or upload a thumbnail for your live stream.
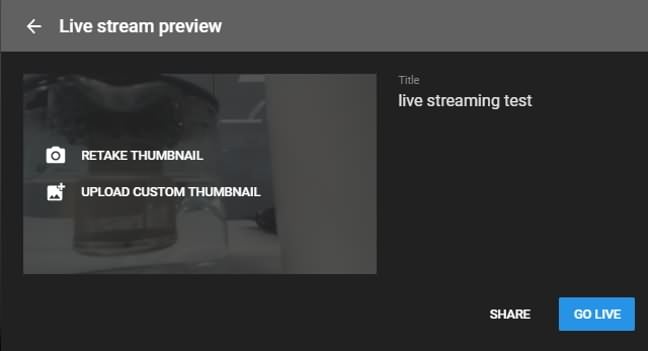
Clicking on the Share icon will enable you to share a live stream on social media, copy the link or access the embed code. Using the Share option is a great way to check if your live stream is functioning properly and to make sure that you are all set to begin the streaming session.
Step 4
Start your live stream by hitting the Go Live button. During the stream, you’ll be able to see and reply to comments people posted, the duration of the stream as well as the number of people following your live stream. If you haven’t shared your live stream before you started a new session you can do so while you are live. Click on the End Stream button to finish your webcam live stream on YouTube.
Step 5
After each live streaming session, YouTube will display some important statistics like the total and average watch time for the particular stream, the number of new subscribers or the number of playbacks of your live stream. The stream will be available for review in YouTube’s Creator Studio in the Events menu.
Max Wales
Max Wales is a writer and a lover of all things video.
Follow @Max Wales
Max Wales
Mar 27, 2024• Proven solutions
Broadcasting videos in real time on social media can be a great way to share some of the best moments of your life with your friends or to reach new customers for the products your company offers. YouTube is the world’s biggest video sharing platform that already allows its users to stream live videos through third-party applications such as Wirecast Play or OBS. Less than a month ago, YouTube has finally made possible live streaming directly from a computer’s webcam. The option is currently only available on Chrome browsers, but the company claims that more browsers will start offering this feature soon.
In this article, we are going to provide you with all the information you’ll need to create seamless live streams using a webcam and introduce you to some of the best webcam models in 2021.
Best webcams for YouTube Livestreaming in 2021
The quality of the video recording you intend to broadcast live is essential for the success of your live streams. Most built-in laptop webcams produce low-quality videos, and for that reason using an external webcam that captures high-resolution videos can help you create live streams that attract a lot of attention from YouTube’s community.
How to choose the right webcam for live streaming on YouTube?
Compatability: Even the best webcams on the market are completely useless if they are not compatible with your computer. Finding a webcam that works with a PC or a Mac shouldn’t be too difficult because both Windows and iOS platforms offer support for a wide range of models.
Video Resolution: YouTubers that just want to produce simple live streams don’t have to pay a lot of attention to the video resolution, because their videos don’t show too many details. Vloggers and gamers, on the other hand, should consider using webcams that produce 4K or HD footage since lower-priced options have a hard time realistically depicting colors. The quality of the video output a webcam produces can increase its price significantly, so there’s no reason investing in it if you don’t have the intention of utilizing its features to the fullest.
Sound Quality: Besides the video features, you should also look into the webcam’s audio options, because no one wants to watch a video with a terrible sound. Buying an external microphone is probably the best solution to this issue, but if you can’t afford one, then purchasing a webcam with decent audio recording features is the second best option.
Adjustable Location: Although the angle from which you are recording a stream may not seem important, poorly framed live streams are more likely to go unnoticed. A webcam that is easily adjustable can grant you the freedom of choosing your shots on every live stream you share online and it will enable you to control each and every detail in the video.
![]()
The All-in-One Screen Recorder & Video Editor
- Record desktop screen, voiceover, and webcam simultaneously
- Edit recorded clips quickly with a wide range of professional tools
- Built-in plentiful templates and effects
- Export to MP4, MOV, MKV, GIF and multiple formats
For Win 7 or later (64-bit)
For macOS 10.12 or later
Secure Download
4 Best Webcams for YouTube Live streaming in 2021
There are thousands of different webcams you can use to record a live stream, but the models featured below are some of the very best currently available on the market.
1. Logitech 4K Pro webcam
OS: Windows, macOS, Chrome OS
Price: $199
This is currently the only webcam on the market that supports 4K video recording, which makes it a forerunner of innovation and change. Besides the 4K option, the webcam’s features include a 5X digital zoom, infrared facial recognition and the amazing Right Light with HDR option that helps users record videos even under difficult light conditions.
The webcam can perform basic functions, like Skype calls, without the aid of third-party apps, which means that you can use it to create live streams on YouTube even if you don’t have a broadcasting software. The webcam’s stand is designed to fit almost any surface, so mounting the Logitech 4K Pro webcam to a laptop or monitor is quick and simple. The background replacement feature this Logitech’s webcam model offers can be quite useful if you want to use a different background in your YouTube live stream.
Pros:
- Produces incredibly clear and sharp images
- Superb background replacement options
- Expansive field of view
Cons:
- Poor audio recording options
- Internal software is basic
- A limited number of programs can capture 4K footage
2. Logitech HD Pro C920
OS: macOS, Windows
Price: $99,99
Vloggers and all other YouTubers who care about video resolution will love using this webcam. Besides being capable of producing crystal clear videos in 1080p or HD 720 resolution at 30 or 60 fps, Logitech HD Pro C922 is also optimized for live streaming, which makes it a perfect webcam for live streaming on YouTube and all other video sharing platforms.
The webcam is equipped with two omnidirectional microphones that can record clear audio, but they pick up background noises easily, so using an external microphone for your live stream is still a much better option. The automatic low-light correction feature is designed to detect flickering lights in a video or increase visibility when streaming from a dimmed location. A foldable stand makes mounting the webcam easy, and you can also use a tripod if you want to record a live stream from an unusual perspective.
Pros:
- Produces 1080p and 720p resolution videos at 30 and 60 fps
- Allows users to integrate live images into their live streams
- Very easy to use
Cons
- Below average audio recording features
- Pricey
- Works only with OBS and XSplit broadcasting software
3. Logitech C922 Pro Stream webcam
OS: Windows, macOS, Xbox, Chrome OS, Android 5.0 or above
Price: $99,99
Professional streamers, who want to capture impeccable live streams, should look no further. Logitech C922 Pro Stream webcam is the premier option for anyone who wants to be regarded as a professional streamer. This Logitech’s webcam lets you capture live streams in 1080p at 30 fps or 720p at 60 fps, while also providing the background removal feature for live streams on Twitch and YouTube. The video compression ensures that your live streams don’t take up too much of your network’s resources.
The webcam’s microphones enable users to record clear audio and reduce the need to use an external mic on every live stream you make. The Logitech C922 Pro Stream webcam delivers stunning performances in low light conditions, and it also has a 78-degree field of view lens. The webcam’s mounting options are somewhat limited, which can have a negative effect on the visual appeal of your YouTube live streams.
Pros:
- Offers a solid support for audio recording
- Delivers stunning picture quality
- Compatible with a wide range of operating systems
Cons:
- Limited mounting options
- Not plug-and-play friendly on Mac devices
- More expensive than webcams with similar capabilities
4. Microsoft LifeCam Studio
OS: Windows
Price: $99,95
The high-precision glass element lens this webcam features produces clear and sharp images. The Microsoft LifeCam Studio webcam has a 1080p HD sensor and it offers 720p HD video chat option. In addition to these remarkable features, the webcam is also equipped with TrueColor technology with face tracking that automatically adjusts the camera’s exposure to the environment and ensures that your live streams are always bright and colorful.
The Microsoft LifeCam Studio has a wide angle lens and an autofocus feature that guarantees that all live streams are always in focus. The webcam is Skype certified which means that it performs best when used with this software. Audio recording features exceed all expectations since the webcam can record natural audio recordings with no background noises. However, the limited compatibility narrows down the spectrum of its potential users.
Pros:
- Excellent video recording features.
- Crystal clear audio
- Great mounting options
Cons:
- Available only on Windows OS
- Demanding system requirements
- Not optimized for live streaming.
How to live stream from a webcam on YouTube in 2020
Although producing your own live stream on YouTube is easy, there are still a few steps you will have to take before you can start streaming from the webcam on your computer. If you don’t have a YouTube channel, you must make one, in order to be able to create your first live steam.
Step 1
Go to youtube.com/webcam , then complete the channel verification process and make sure that your channel doesn’t have any live streaming restrictions in the last 90 days. Head over to your channel, click on the Create a Video or Post icon in the upper right corner of the web page and select the GoLive option.
Afterward, you should give Chrome permission to access your webcam and the microphone you intend on using to record audio.
Step 2
Immediately after, the platform will ask you to give a title to your stream and it will let you choose whether or not you want the stream to be public or unlisted. It may be a good idea to create a few unlisted streams before you go public if you are still trying to figure out how this feature works.
Proceed to select the camera and the microphone you intend to use to record the live stream, and you can also click on the Advanced Settings icon if you want to disable chat during the session or to specify that the live stream includes paid promotions.
Step 3
Once you’ve finished fine-tuning the advanced settings, you should click on the Next button. The platform will offer you to take or upload a thumbnail for your live stream.
Clicking on the Share icon will enable you to share a live stream on social media, copy the link or access the embed code. Using the Share option is a great way to check if your live stream is functioning properly and to make sure that you are all set to begin the streaming session.
Step 4
Start your live stream by hitting the Go Live button. During the stream, you’ll be able to see and reply to comments people posted, the duration of the stream as well as the number of people following your live stream. If you haven’t shared your live stream before you started a new session you can do so while you are live. Click on the End Stream button to finish your webcam live stream on YouTube.
Step 5
After each live streaming session, YouTube will display some important statistics like the total and average watch time for the particular stream, the number of new subscribers or the number of playbacks of your live stream. The stream will be available for review in YouTube’s Creator Studio in the Events menu.
Max Wales
Max Wales is a writer and a lover of all things video.
Follow @Max Wales
Film School at Home: Mastering Video Editing via YouTube & Alternatives
Do you want to convert video clips into intriguing movies? If yes, then you should download and install an advanced movie maker on your computer and creatively compile your video clips and photos. Movie Makers have multiple features such as transition overlays, timeline narration, audio options, and animations. This guide is about YouTube movie makers and how you can get started with this application.
What Is YouTube Movie Maker?
YouTube Movie Maker is a video editing program. It enables video editors to create videos for their YouTube channel. Furthermore, you can upload and manage your videos on YouTube using this software. You can perform all these tasks with a single interface. Creating videos using YouTube movie makers is entertaining as it includes interesting tools to express creative instinct. Furthermore, the moviemaker YouTube uploading process is also simpler than ever. Here are some features of YouTube movie maker:
1. Video Creation
YouTube movie maker is a simple-to-use video editing tool with wide-ranging features. You can add multiple images, video clips, audio, and icons and align them on the timeline. Beginners can use Movie Wizard to understand the platform interface and develop video editing skills.

3. Publishing
This tool has standard and special features. Using YouTube movie maker, you can upload videos on your YouTube channel and attract more audience with your content. This video editing tool makes it easy for YouTube content creators to publish their content on the platform. Furthermore, you can save the content on your computer and publish it later on.
3. Boost Productivity
Video editors such as YouTube movie maker improve productivity for video editors. With convenient features and tools, content creators can create more videos with efficiency and increase their content reach.
YouTube Movie Maker Tutorial
YouTube Movie Maker download process is simple. To download and install the application follow these steps:
Step 1: Visit MakeYouTubeVideo.com and choose the download option.
Step 2: This tool is compatible with every Windows version, so you don’t have to worry about compatibility.

Step 3: While downloading the application you need to evaluate the plans.
Step 4: The Platinum version of YouTube Movie Maker will cost $399. With this plan, you will get high-quality transition effects and audio materials.
Step 5: After choosing the plan, you have to enter the payment options and download the tool.
Step 6: A setup file will download to your computer.
Step 7: You need to open that file and run the installation process.
Here are some tips to use YouTube Movie Maker:
Step 1: When you open the application a clear interface will appear with easy-to-use options.

Step 2: From the left panel, you can browse through your computer storage and import content
Step 3: Also, you can drag and drop the media on your workspace.

Step 4: Align the content on different channels and add music.
Step 5: Once you align the content as required, you can publish the video on YouTube from the button on the bottom right.
4 Best Alternatives for YouTube Movie Maker
A plethora of video editing tools are available on the internet. Whether you are a marketing manager or a film producer, you would need a movie marker to boost your productivity and become a professional video content creator. If you want an alternate option for YouTube movie maker, you can check this list:
1. Wondershare Filmora
Filmora is one of the best video editing tools out there. Other than Filmora, Wondershare also offers Filmora (a video editing tool for mobile), and FilmStock with wide-ranging video effects and unique soundtracks. Filmora offers a simple and intuitive interface with lots of exciting overlays, filters, transitions, and motion elements. Since Filmora has a dedicated films tock, users can easily download royalty-free music and video clips. Some basic features of Filmora are:
- Noise removal
- Speed control
- GIF support
- 4K editing support
- Frame by frame preview
- Color tuning

For Win 7 or later (64-bit)
For macOS 10.12 or later
Only a few video editing tools offer 4K and GIF support, and Filmora is one of them. Filmora enables video editors to include engaging titles on their videos. This video editor offers a super easy and flexible interface to video editors so they can drag and drop relevant clips, select interesting music, and choose a striking theme.
The interface is clean, uncluttered, and organized with easy-to-access features. It includes basic as well as advanced features to enhance video quality and add outstanding effects. There are vast numbers of effects and transitions to make your video smooth and engaging. Color matching and motion tracker tools will completely change your video quality.
2. Nero Video
Nero Video is a cheap yet effective tool for YouTubers. This tool comes with a wide array of effects and tricks to create outstanding content. This tool is perfect for beginners because of its simple editing tools. Nero Video offers the finest functionalities and speed to video editors so they can create more engaging content and publish it on their YouTube channel. Some features of Nero Video are:
- Keyframe animation tools
- Movie templates
- Wide range of templates
- 4K support

4. InVideo
InVideo is different than other platforms as content creators can create interesting videos on the cloud using this tool. This means that you don’t have to download InVideo software. Instead, you can just log into your account and start editing. Furthermore, the tool is stocked with many frames, stickers, features, tricks, and transitions. This software is suitable for beginner as well as professional users. With more than 4000 templates, anyone can create a video on this platform. InVideo doesn’t irritate its users with a watermark, even if you are using the free version of this application. Here are some features of using the InVideo editing tool:
- No watermark
- More than 4000 templates
- More than 8Mn and iStock videos and images
- Intelligent frames
- Automate voice-overs
- Multiple layers
- Power transitions

5. Clipchamp Create
Clipchamp Create is a free video editing tool with wide-ranging transitional effects, and an export option without a watermark. Watermarks only appear when you use stock videos and images in your video. Premium and Business plans are available in this software that offer access to a vast stock library. Using stock library, you can download and add high-resolution images and videos to your project. The tool is incredibly handy as it offers you unique options webcam recorder, video converter, and video compressor. Clipchamp also offers the following features:
- Camera recorder
- Stock library
- Text to speech
- Brand kit
- Trimming videos

Closing Word
Now that you have notable information about the YouTube movie maker tool, you can easily download and install it on your computer. Many YouTube content creators find this application basic. If you want a more advanced tool, you can check the list of alternative movie makers and download the one that offers the best features.
3. Publishing
This tool has standard and special features. Using YouTube movie maker, you can upload videos on your YouTube channel and attract more audience with your content. This video editing tool makes it easy for YouTube content creators to publish their content on the platform. Furthermore, you can save the content on your computer and publish it later on.
3. Boost Productivity
Video editors such as YouTube movie maker improve productivity for video editors. With convenient features and tools, content creators can create more videos with efficiency and increase their content reach.
YouTube Movie Maker Tutorial
YouTube Movie Maker download process is simple. To download and install the application follow these steps:
Step 1: Visit MakeYouTubeVideo.com and choose the download option.
Step 2: This tool is compatible with every Windows version, so you don’t have to worry about compatibility.
Step 3: While downloading the application you need to evaluate the plans.
Step 4: The Platinum version of YouTube Movie Maker will cost $399. With this plan, you will get high-quality transition effects and audio materials.
Step 5: After choosing the plan, you have to enter the payment options and download the tool.
Step 6: A setup file will download to your computer.
Step 7: You need to open that file and run the installation process.
Here are some tips to use YouTube Movie Maker:
Step 1: When you open the application a clear interface will appear with easy-to-use options.
Step 2: From the left panel, you can browse through your computer storage and import content
Step 3: Also, you can drag and drop the media on your workspace.
Step 4: Align the content on different channels and add music.
Step 5: Once you align the content as required, you can publish the video on YouTube from the button on the bottom right.
4 Best Alternatives for YouTube Movie Maker
A plethora of video editing tools are available on the internet. Whether you are a marketing manager or a film producer, you would need a movie marker to boost your productivity and become a professional video content creator. If you want an alternate option for YouTube movie maker, you can check this list:
1. Wondershare Filmora
Filmora is one of the best video editing tools out there. Other than Filmora, Wondershare also offers Filmora (a video editing tool for mobile), and FilmStock with wide-ranging video effects and unique soundtracks. Filmora offers a simple and intuitive interface with lots of exciting overlays, filters, transitions, and motion elements. Since Filmora has a dedicated films tock, users can easily download royalty-free music and video clips. Some basic features of Filmora are:
- Noise removal
- Speed control
- GIF support
- 4K editing support
- Frame by frame preview
- Color tuning
For Win 7 or later (64-bit)
For macOS 10.12 or later
Only a few video editing tools offer 4K and GIF support, and Filmora is one of them. Filmora enables video editors to include engaging titles on their videos. This video editor offers a super easy and flexible interface to video editors so they can drag and drop relevant clips, select interesting music, and choose a striking theme.
The interface is clean, uncluttered, and organized with easy-to-access features. It includes basic as well as advanced features to enhance video quality and add outstanding effects. There are vast numbers of effects and transitions to make your video smooth and engaging. Color matching and motion tracker tools will completely change your video quality.
2. Nero Video
Nero Video is a cheap yet effective tool for YouTubers. This tool comes with a wide array of effects and tricks to create outstanding content. This tool is perfect for beginners because of its simple editing tools. Nero Video offers the finest functionalities and speed to video editors so they can create more engaging content and publish it on their YouTube channel. Some features of Nero Video are:
- Keyframe animation tools
- Movie templates
- Wide range of templates
- 4K support
4. InVideo
InVideo is different than other platforms as content creators can create interesting videos on the cloud using this tool. This means that you don’t have to download InVideo software. Instead, you can just log into your account and start editing. Furthermore, the tool is stocked with many frames, stickers, features, tricks, and transitions. This software is suitable for beginner as well as professional users. With more than 4000 templates, anyone can create a video on this platform. InVideo doesn’t irritate its users with a watermark, even if you are using the free version of this application. Here are some features of using the InVideo editing tool:
- No watermark
- More than 4000 templates
- More than 8Mn and iStock videos and images
- Intelligent frames
- Automate voice-overs
- Multiple layers
- Power transitions
5. Clipchamp Create
Clipchamp Create is a free video editing tool with wide-ranging transitional effects, and an export option without a watermark. Watermarks only appear when you use stock videos and images in your video. Premium and Business plans are available in this software that offer access to a vast stock library. Using stock library, you can download and add high-resolution images and videos to your project. The tool is incredibly handy as it offers you unique options webcam recorder, video converter, and video compressor. Clipchamp also offers the following features:
- Camera recorder
- Stock library
- Text to speech
- Brand kit
- Trimming videos
Closing Word
Now that you have notable information about the YouTube movie maker tool, you can easily download and install it on your computer. Many YouTube content creators find this application basic. If you want a more advanced tool, you can check the list of alternative movie makers and download the one that offers the best features.
- Title: "2024 Approved How to Elevate YouTube Broadcasts Select the Right Webcam"
- Author: Thomas
- Created at : 2024-05-31 12:48:28
- Updated at : 2024-06-01 12:48:28
- Link: https://youtube-help.techidaily.com/2024-approved-how-to-elevate-youtube-broadcasts-select-the-right-webcam/
- License: This work is licensed under CC BY-NC-SA 4.0.
