
:max_bytes(150000):strip_icc()/projectorheadlights-5c252a8446e0fb0001500eef.jpg)
"2024 Approved How to Shave Seconds Off Your YouTube Video Submission"
How to Shave Seconds Off Your YouTube Video Submission
How to Render and Upload YouTube Videos Faster?

Richard Bennett
Oct 26, 2023• Proven solutions
You’ve shot a video you’re proud of and you can’t wait to post it! But, slow down, you have to edit all your clips together first. And then you have to export your video from the editing program, which can take a while. Then you have to wait for it to upload to YouTube, and once it’s up you have to write your description, add cards, and do a handful of other things.
The period between finishing a video and actually posting it for your subscribers to see can be long and tiresome. A lot of videos have probably died in these stages because their creators ran out of energy and patience.
Don’t let this happen to your videos! Here are 4 ways you can save time and avoid headaches during post-production:
3. Use default descriptions and tags
4. TubeBuddy’s bulk features and tagging tools
1. Create mini-projects
When you have alarge editing project with lots of different titles, animations, clip sequences, and PIP tracks it can get hard to keep track of everything. That’s especially true if you need to go back and make changes. A change to one part of your video could affect other parts of it.
Also, the more complex your video is the longer it will take to render/export.
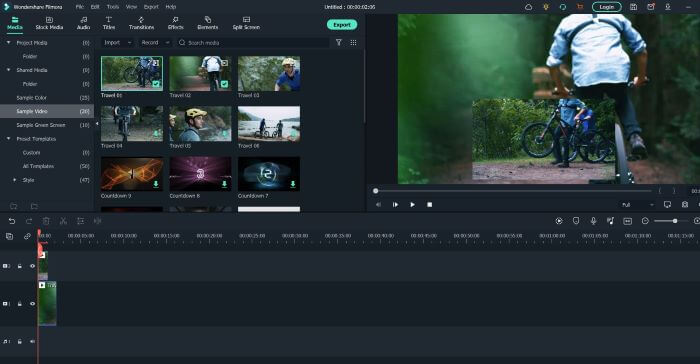
There is a way you can keep your project more organized, save time making minor adjustments, and speed up rendering: create sub-projects of different segments of your video and import them into your main project as their own clips.
This helps you in 3 ways:
1. If there are a lot of effects it’ll be faster to render a shorter video.
2. If you import your sequence as its own clip you won’t have to worry about adjusting little parts of it whenever you change earlier sections of your video.
3. If you do want to make adjustments to your sequence you can open up your mini-project and change it without affecting anything in your main project.
2. Optimize your upload speed
At home, your videos will upload fastest if all of your internet resources are devoted to the upload. That means you should not have any other windows open on your computer while you are uploading. You should also make sure there aren’t other devices competing for wifi like smart tvs, cell phones, or really fancy coffee makers.
If you have neighbors on the same wifi signal as you and they are online at the same time, this will slow you down too.
Because there is so much that can interfere with wifi, you might want to consider a wired Ethernet cable. Ethernet connections are faster in general, and you won’t have any problems with other devices competing for resources like you get with wifi.
If you’re doing everything you can to optimize your upload speed at home and still find that it takes an unreasonable amount of time to upload videos to YouTube, go somewhere with a better connection. Save your video to a USB drive and take it to a library or college to upload. Connections in these kinds of places tend to be very strong.
3. Use default descriptions and tags
In your Creator Studio, go to Channel > Upload defaults. Here you can write in titles, descriptions, and tags which will automatically be applied to every video you upload.

Note: in the latest YouTube Studio, the upload interface is changed but the main process is similar.

You probably have tags you use for almost every video you post. For example, if your channel is about vegan cooking then every one of your videos is probably tagged ‘vegan’, ‘food’, and ‘cooking’. If you type those tags in here then you don’t have to keep adding them to every new video, and you can still add or remove tags from individual uploads so you aren’t stuck using the exact same set of tags every time.
Similarly, you probably have some default text that goes in the description of every one of your videos (i.e. a link to your personal website or a brief introduction of yourself). If you type in a default description then that text will appear automatically in every new video description and you can just add to it when you need to for individual videos.
Using defaults might only save you a couple of minutes per video, but those minutes add up.
4. TubeBuddy’s bulk features and tagging tools
TubeBuddy is a channel management tool for YouTube. Most of its features are more geared towards very large channels or companies with a YouTube presence, but there are also features that can help small or mid-sized YouTubers save time and stay organized.
Some of these tools include templates for things like cards and end screens and bulk processing tools for when you want to change a lot of things at once. For example, if you wanted to update the links in every card in every one of your videos at once then TubeBuddy could help with that.
Some of TubeBuddy’s best features for growing channels are the tagging features. TubeBuddy will help you discover tags, suggest new tags, and even copy whole lists of tags from rival videos.
There are different levels of pricing for TubeBuddy (including a free version, although it’s very limited) and you get a discount on the Pro version if you have less than 50,000 lifetime views on your channel. It ends up being $4.50USD a month (or $3.60 USD a month if you pay for a year in advance). It’s a good investment for someone who’s starting to see some growth on YouTube, but probably not if you’re still trying to reach milestones like 500 subs or 10,000 views.
You have to work hard to get anywhere on YouTube, but that doesn’t mean you should be toiling away at tedious stuff like typing in the same tags over and over. If you have any time-saving tips then make sure to share them with everyone in the comments!
Remember that your time is valuable =)

If you are using Filmora to edit YouTube videos, you can upload the video to YouTube directly from Filmora without download it again first, which can save you time. Besides, if you don’t want the video to be public, you can change Privacy to unlisted or private in Filmora.


Richard Bennett
Richard Bennett is a writer and a lover of all things video.
Follow @Richard Bennett
Richard Bennett
Oct 26, 2023• Proven solutions
You’ve shot a video you’re proud of and you can’t wait to post it! But, slow down, you have to edit all your clips together first. And then you have to export your video from the editing program, which can take a while. Then you have to wait for it to upload to YouTube, and once it’s up you have to write your description, add cards, and do a handful of other things.
The period between finishing a video and actually posting it for your subscribers to see can be long and tiresome. A lot of videos have probably died in these stages because their creators ran out of energy and patience.
Don’t let this happen to your videos! Here are 4 ways you can save time and avoid headaches during post-production:
3. Use default descriptions and tags
4. TubeBuddy’s bulk features and tagging tools
1. Create mini-projects
When you have alarge editing project with lots of different titles, animations, clip sequences, and PIP tracks it can get hard to keep track of everything. That’s especially true if you need to go back and make changes. A change to one part of your video could affect other parts of it.
Also, the more complex your video is the longer it will take to render/export.
There is a way you can keep your project more organized, save time making minor adjustments, and speed up rendering: create sub-projects of different segments of your video and import them into your main project as their own clips.
This helps you in 3 ways:
1. If there are a lot of effects it’ll be faster to render a shorter video.
2. If you import your sequence as its own clip you won’t have to worry about adjusting little parts of it whenever you change earlier sections of your video.
3. If you do want to make adjustments to your sequence you can open up your mini-project and change it without affecting anything in your main project.
2. Optimize your upload speed
At home, your videos will upload fastest if all of your internet resources are devoted to the upload. That means you should not have any other windows open on your computer while you are uploading. You should also make sure there aren’t other devices competing for wifi like smart tvs, cell phones, or really fancy coffee makers.
If you have neighbors on the same wifi signal as you and they are online at the same time, this will slow you down too.
Because there is so much that can interfere with wifi, you might want to consider a wired Ethernet cable. Ethernet connections are faster in general, and you won’t have any problems with other devices competing for resources like you get with wifi.
If you’re doing everything you can to optimize your upload speed at home and still find that it takes an unreasonable amount of time to upload videos to YouTube, go somewhere with a better connection. Save your video to a USB drive and take it to a library or college to upload. Connections in these kinds of places tend to be very strong.
3. Use default descriptions and tags
In your Creator Studio, go to Channel > Upload defaults. Here you can write in titles, descriptions, and tags which will automatically be applied to every video you upload.
Note: in the latest YouTube Studio, the upload interface is changed but the main process is similar.
You probably have tags you use for almost every video you post. For example, if your channel is about vegan cooking then every one of your videos is probably tagged ‘vegan’, ‘food’, and ‘cooking’. If you type those tags in here then you don’t have to keep adding them to every new video, and you can still add or remove tags from individual uploads so you aren’t stuck using the exact same set of tags every time.
Similarly, you probably have some default text that goes in the description of every one of your videos (i.e. a link to your personal website or a brief introduction of yourself). If you type in a default description then that text will appear automatically in every new video description and you can just add to it when you need to for individual videos.
Using defaults might only save you a couple of minutes per video, but those minutes add up.
4. TubeBuddy’s bulk features and tagging tools
TubeBuddy is a channel management tool for YouTube. Most of its features are more geared towards very large channels or companies with a YouTube presence, but there are also features that can help small or mid-sized YouTubers save time and stay organized.
Some of these tools include templates for things like cards and end screens and bulk processing tools for when you want to change a lot of things at once. For example, if you wanted to update the links in every card in every one of your videos at once then TubeBuddy could help with that.
Some of TubeBuddy’s best features for growing channels are the tagging features. TubeBuddy will help you discover tags, suggest new tags, and even copy whole lists of tags from rival videos.
There are different levels of pricing for TubeBuddy (including a free version, although it’s very limited) and you get a discount on the Pro version if you have less than 50,000 lifetime views on your channel. It ends up being $4.50USD a month (or $3.60 USD a month if you pay for a year in advance). It’s a good investment for someone who’s starting to see some growth on YouTube, but probably not if you’re still trying to reach milestones like 500 subs or 10,000 views.
You have to work hard to get anywhere on YouTube, but that doesn’t mean you should be toiling away at tedious stuff like typing in the same tags over and over. If you have any time-saving tips then make sure to share them with everyone in the comments!
Remember that your time is valuable =)
If you are using Filmora to edit YouTube videos, you can upload the video to YouTube directly from Filmora without download it again first, which can save you time. Besides, if you don’t want the video to be public, you can change Privacy to unlisted or private in Filmora.
Richard Bennett
Richard Bennett is a writer and a lover of all things video.
Follow @Richard Bennett
A Step-by-Step Approach to YouTube Gold: Music Reaction Magic
Create High-Quality Video - Wondershare Filmora
An easy and powerful YouTube video editor
Numerous video and audio effects to choose from
Detailed tutorials are provided by the official channel
Reaction videos are slowly taking over YouTube as the most popular type of channel. Everyone loves when someone reacts to something, and it can be anything from music, games, trending topics, or even random things like orange juice. They are so popular that people tag their friends to react to the series.
Music reaction videos are becoming increasingly more popular. Instead of a standard lyric video, music reaction videos show a fan listening and singing to their favorite album or single from start to finish. There are tons of fan-made music reaction videos on YouTube, but some get hundreds of thousands or even millions of views!
In this article
01 What is a music reaction video?
02 10 Best YouTube Music Reaction Video
03 How to make a Youtube music reaction video with Filmora
What is a music reaction video?
When you are on YouTube, you will see many music reaction videos. The music reaction video is the video that is based on the song. According to the situation, the person who uploads the video reacts to the song and does something funny or crazy. Many people enjoy watching these kinds of videos because they are funny and entertaining in many ways.
The best thing about these videos is that you can learn from them. You can learn how to react in certain situations, but these situations might arise only once in your life. So, it is good to react to these funny videos and make yourself aware of what should be done in such a situation.
You can even make your music reaction video and share it with your friends on social media platforms like Facebook, Twitter, and Instagram. People will love it and appreciate it, and you can also learn how to make these kinds of videos by watching other people’s reactions.
10 Best YouTube Music Reaction Video
#1. [BANGTAN BOMB] ‘Dynamite’ MV Reaction
In this video, a famous Korean Band named BTS reacts to many different music videos from the past. People love to see their reactions, and the video has over 25M views on Youtube.
#2. Rappers React to Rich Brian ft. Ghostface Killah, Desiigner, Tory Lanez & More
In this video, many street rappers react to many famous rappers and give their views about them. The video became quite popular on Youtube and got 23M+ views.
#3. Dixie D’Amelio’s Family and Friends React to her Be Happy Music Video
In this video, many people who are relatives of Dixie D’Amelio react to her music video. She recorded the reach of each one of them and shared it with the youtube community. The video got over 20M views on youtube.
#4. Elders React To Lil Dicky - Earth
In this video, many elders react to the Lil Dick’s Music video. Their reactions are quite amusing to the audience, and the video got over 19M views on Youtube.
#5. Kids React To Eminem
In this video, some kids react to the Eminem rap music videos and give their views about rap. Some of them are amused by the rap, and some of them find it difficult to understand. Overall their reaction is worth watching. The video got over 13M views on Youtube.
#6. Do Teens Know 90s Hip Hop?
In this video, many teens listen to ‘90s hip-hop music videos, and their reactions are recorded. They are familiar with some of the songs, and some are totally new and amusing to them. The video got over 11M Views on Youtube.
#7. Big Shaq - Mans Not Hot (Music Video)- Reaction
In this video, a couple of friends react to the Mans Not Hot Music video and record their reactions. They have reacted to the video quite funny, and their reactions are very amusing. People enjoy watching their reactions. The video has over 11M views on Youtube.
#8 BTS React To Fans Watching “Boy With Luv” Music Video For The First Time
In this video, The famous Koran Band BTS reacts to their fan’s videos, watching Boy With Luv Music video for the first time. So, in this video, you will see the reaction of BTS to the reaction of their fans. The video was a hit on Youtube, and it got over 9M views.
#9 “Don’t Forget” Minecraft FNAF Animation Music Video
This is a reaction mashup video in which a lot of creators are reacting to the Don’t forget music video. You rarely get to see soo many reactions in a single video. The video is a hit and has over 9M views on Youtube.
#10 Youtubers React To Top 10 Most Disliked Music Videos Of All Time
In this video, many YouTubers react to the top 10 most disliked music videos in Youtube’s history. Their reactions are priceless, and this video is definitely worth watching. The video has over 6M views on Youtube.
How to make a Youtube music reaction video with Filmora
Reaction videos are the latest trend in the world of YouTube. So many people want to create their own reaction videos but either doesn’t have the skills to do so or don’t know how to get started. This guide should give you everything you need to get started on creating your very next reaction video.
Step 1: First of all, make sure that you have downloaded and installed the latest version of Filmora on your computer. If you haven’t already downloaded it, then you can install it from their official website.
Step 2: Run the Filmora software and when a window appears on your screen, click on the new project and select the 16:9 aspect ratio of your project.
Step 3: Now first, you need to record your reaction to a music video . You can use Filmora’s Built-In screen recorder to record your reaction along with your cam. You can also record your reactions separately and then merge them with the original music video using Filmora.
Step 4: Now import the music video on which you want to react to the Filmora library along with your reaction video. You can do this by clicking on the file, import, and import media.
Step 5: Now drag the music video from the Library and drop it into the Filmora timeline.
Step 6: Now drag your reaction video and drop it above the original music video in the track.
Step 7: Decrease the size of your reaction video by using the canvas controls in the preview window and adjusting it to any side of the window.
Step 8: If you want to keep your reaction video in a big frame and your music video in a small one, you can do the opposite.
Step 9: If you want to add any effects or call-outs to your video, you can use the rich elements library of Filmora, where you can find hundreds of interactive elements.
Step 10: Once you have finalized the video, click on the import button and save the video to your computer in your desired format. Once the video is imported, you can share it on Youtube with your audience.
For Win 7 or later (64-bit)
For macOS 10.12 or later
Conclusion
● By following the steps above and using Filmora, you will be able to produce a high-quality music reaction video that can be shared with family, friends, or even your favorite artists. All of the steps above may look complicated when separated into different actions, but they became much easier and quicker when completed together and practiced in order.
- Title: "2024 Approved How to Shave Seconds Off Your YouTube Video Submission"
- Author: Thomas
- Created at : 2024-05-31 12:40:33
- Updated at : 2024-06-01 12:40:33
- Link: https://youtube-help.techidaily.com/2024-approved-how-to-shave-seconds-off-your-youtube-video-submission/
- License: This work is licensed under CC BY-NC-SA 4.0.
