
:max_bytes(150000):strip_icc()/185267882-56a0e1e03df78cafdaa603c6.jpg)
"2024 Approved Legality of Reproducing Your Watched YouTube Videos"
Legality of Reproducing Your Watched YouTube Videos
YouTube is currently the most useful video streaming platform. This platform has a wide range of amazing videos that make it one of the most subscribed platforms in the world today. This is why thousands of people do screen recordings on YouTube every day for various uses. Some of them record content to use in studies, to share with friends, for offline entertainment and other acceptable ways. There are those that record YouTube content, edit and re-upload it in their own accounts.
However, since YouTube is the most streaming platform in the world today, it has set guidelines and strict rules to be followed to make sure that people do not misuse the platform at all. The YouTube content is protected by US copyright law, and it indicates that any form of recording or conversion of this copyrighted content is illegal. Other issues related to video and audio recording come from various copyright laws and intellectual property rights.
Is Screen Recording YouTube Illegal?
The legality and illegality of recording YouTube content depend on the purpose of recording. It is absolutely legal to record videos for personal purposes such as sharing content with your friends or keeping them for offline enjoyment.
However, if you have been asking is screen recording on YouTube illegal? Yes it is, if your aim is other than the mentioned above. Some people record YouTube videos for malicious purposes such as reuploading them on YouTube or on other platforms to earn money from it. Such acts are illegal and are punishable.
If YouTube detects any illegal upload, it will suspend the subscriber’s account. The illegal content is removed from the YouTube platform within 24 hours. It is advisable for all the users to comply with the set policy strictly and do the screen recording in legal ways and allowed purposes. Before recording any content on YouTube, you must ask yourself this question first; is screen recording on YouTube illegal?
How to Record YouTube Videos
With the above in mind, it is important to know how to record YouTube videos on PC in the right way. To be able to record the videos in the right way, you need to use one of the many available screen recording programs available in the market today.
However, since there are many screen recording programs available that can record YouTube videos with audio, it is important to choose the most suitable for your tasks. Filmora is an all-in-one video and audio recorder capable of recording, editing, and converting videos without losing quality. This software is quite intuitive and very easy to use. By choosing Filmora, you are halfway to knowing if; it is illegal to record music from YouTube. This is because it is a YouTube supporting program. Filmora is a recording and editing tool with many features to help you know how to record YouTube videos on pc. Such are;
- Screen recording
- Audio duking.
- Screen detection.
- Video stabilization.
- Export to YouTube and Vimeo.
- Green screen support.
- Media library.
- GIF support.
- Record HD video in 4K/1080P/720p, support frame
- Previewing rendering
- Silence detection.
- Auto-ripple.
- Split-screen presets.
- Advanced text editing.
- Tilt-shift.
- Chroma key.
- Video and audio control.
- Auto mix.
Follow the following steps when you want to record screen with Wondershare Filmora;
Step1: Download and install Wondershare Filmora.
If you do not have this software installed on your computer, you need to start by downloading and installing it on your device and then launch it. Having downloaded Filmora, you are halfway to knowing whether it is legal or is it illegal to record music from YouTube.
For Win 7 or later (64-bit)
For macOS 10.12 or later
Step 2: Launch Filmora.

Now that you have installed this software, launch the Wondershare Filmora program and the main interface of the Filmora application will pop up to get you to the recording options. This interface has about four options; Audio reframe, Audio Best Sync, PC screen, and AI portrait. All these are set to make your work easier when recording videos and audio. Click on the new project from the welcome screen.
Step 3: Click on the record PC screen option.

You can customize your recording options to suit your interest and then open your browser and open the YouTube video you want to record. After this is done, click on the red button to start recording the screen. Now you are aware of the steps you need to take when you want to record a YouTube video with audio.

How to Edit Recorded YouTube Video
Regardless of the software, you are using to edit your YouTube videos, there are common steps that you can follow to make your journey a success. Filmora is efficient and reliable software that you can easily operate when editing your videos. This is why I will take you through the steps that you need to take when editing YouTube videos with this program.
Step 1: Split or combine your video clips
Just like other alternative editing programs, the Wondershare Filmora video editing program has a timeline view of the project you are working on. This is where you can cut or drop your shots as each of the shots are in separate files that you should combine with others to make one complete video.

Filmora has an effective split feature, that can help you cut footage into parts, and after, you can move the splits into the correct position or delete the unwanted parts. The Quick Trim feature can help you to choose any part of your video quickly when previewing.
Filmora supports almost all the formats used to make videos and photos and this will help you reduce obstacles when you want to combine footage shot with different devices. With such capabilities, it is easy to add video clips, photos, and audio when editing Your YouTube Videos.
For you to combine several footages into one, you need to place all clips in the video track in an orderly way. Then set the timeline view and move the shots around, cut or trim to shorten as you prefer. To give your final production a professional look, you can add transitions between shots.
Step 2: Rotate, Crop, Pan, and Zoom

At this point, you can rotate the video at any angle, or direction and you can as well change the scale of your video footage. If you want the viewers to focus on a certain part of the video frame, apply the Pan & Zoom feature.
Step 3: Add audio, texts, and more effects.

Now that you have edited your different video shots into a single video, you can now take the step of adding some more effects to your video. At this point, you can add different staff such as music, texts, and different other effects that you would prefer your viewers to see in your video. Some may think this is difficult to do if they have not tried it before.
The Wondershare Filmora screen editor has appropriate features to help you add all the effect you need without wasting time at all. This program will guide you through how to add effects to your YouTube videos. This is an important step in answering the question asked by many; is it illegal to record music from YouTube? If you adhere to YouTube rules and policy, you can incorporate music and other effects into your YouTube videos without fear.
Step 4: Save and Export

After adding all the special effects, you are almost at the final stage. The next important thing to do is to choose the format of saving your video file. After making sure that your video format is set, and then you can export your video file.
Remember to save your file in a format acceptable to the platform that you are intending to upload your videos. Some of the major video formats accepted by YouTube include MP4, AVI, and VMA. You can use any of these formats to save your YouTube video files.
You don’t need to upload your videos later as the Filmora features will allow you to upload YouTube videos directly. It will choose the appropriate format, frame, and codec that suit your video files.
When editing your YouTube videos on your computer, remember to follow the above steps carefully, and remember to use the right widescreen format, and render your video files in either 1080p or 720p high definition.
Having equipped yourself with such knowledge, you can download the Filmora software and install it on your computer as it is one of the very best software when it comes to recording and editing videos and audio.
Conclusion
Now you know what to do and what not to do when it comes to recording and editing YouTube videos. Remember, for you to avoid problems with the YouTube platform, work in the brackets of the set policy. Find the right and fitting video editor such as Filmora to assist you in recording and editing videos for YouTube. There are many Filmora tutorial guides that can help you know how to download and install it on your PC.
Follow the following steps when you want to record screen with Wondershare Filmora;
Step1: Download and install Wondershare Filmora.
If you do not have this software installed on your computer, you need to start by downloading and installing it on your device and then launch it. Having downloaded Filmora, you are halfway to knowing whether it is legal or is it illegal to record music from YouTube.
For Win 7 or later (64-bit)
For macOS 10.12 or later
Step 2: Launch Filmora.
Now that you have installed this software, launch the Wondershare Filmora program and the main interface of the Filmora application will pop up to get you to the recording options. This interface has about four options; Audio reframe, Audio Best Sync, PC screen, and AI portrait. All these are set to make your work easier when recording videos and audio. Click on the new project from the welcome screen.
Step 3: Click on the record PC screen option.
You can customize your recording options to suit your interest and then open your browser and open the YouTube video you want to record. After this is done, click on the red button to start recording the screen. Now you are aware of the steps you need to take when you want to record a YouTube video with audio.
How to Edit Recorded YouTube Video
Regardless of the software, you are using to edit your YouTube videos, there are common steps that you can follow to make your journey a success. Filmora is efficient and reliable software that you can easily operate when editing your videos. This is why I will take you through the steps that you need to take when editing YouTube videos with this program.
Step 1: Split or combine your video clips
Just like other alternative editing programs, the Wondershare Filmora video editing program has a timeline view of the project you are working on. This is where you can cut or drop your shots as each of the shots are in separate files that you should combine with others to make one complete video.
Filmora has an effective split feature, that can help you cut footage into parts, and after, you can move the splits into the correct position or delete the unwanted parts. The Quick Trim feature can help you to choose any part of your video quickly when previewing.
Filmora supports almost all the formats used to make videos and photos and this will help you reduce obstacles when you want to combine footage shot with different devices. With such capabilities, it is easy to add video clips, photos, and audio when editing Your YouTube Videos.
For you to combine several footages into one, you need to place all clips in the video track in an orderly way. Then set the timeline view and move the shots around, cut or trim to shorten as you prefer. To give your final production a professional look, you can add transitions between shots.
Step 2: Rotate, Crop, Pan, and Zoom
At this point, you can rotate the video at any angle, or direction and you can as well change the scale of your video footage. If you want the viewers to focus on a certain part of the video frame, apply the Pan & Zoom feature.
Step 3: Add audio, texts, and more effects.
Now that you have edited your different video shots into a single video, you can now take the step of adding some more effects to your video. At this point, you can add different staff such as music, texts, and different other effects that you would prefer your viewers to see in your video. Some may think this is difficult to do if they have not tried it before.
The Wondershare Filmora screen editor has appropriate features to help you add all the effect you need without wasting time at all. This program will guide you through how to add effects to your YouTube videos. This is an important step in answering the question asked by many; is it illegal to record music from YouTube? If you adhere to YouTube rules and policy, you can incorporate music and other effects into your YouTube videos without fear.
Step 4: Save and Export
After adding all the special effects, you are almost at the final stage. The next important thing to do is to choose the format of saving your video file. After making sure that your video format is set, and then you can export your video file.
Remember to save your file in a format acceptable to the platform that you are intending to upload your videos. Some of the major video formats accepted by YouTube include MP4, AVI, and VMA. You can use any of these formats to save your YouTube video files.
You don’t need to upload your videos later as the Filmora features will allow you to upload YouTube videos directly. It will choose the appropriate format, frame, and codec that suit your video files.
When editing your YouTube videos on your computer, remember to follow the above steps carefully, and remember to use the right widescreen format, and render your video files in either 1080p or 720p high definition.
Having equipped yourself with such knowledge, you can download the Filmora software and install it on your computer as it is one of the very best software when it comes to recording and editing videos and audio.
Conclusion
Now you know what to do and what not to do when it comes to recording and editing YouTube videos. Remember, for you to avoid problems with the YouTube platform, work in the brackets of the set policy. Find the right and fitting video editor such as Filmora to assist you in recording and editing videos for YouTube. There are many Filmora tutorial guides that can help you know how to download and install it on your PC.
Effective Visual Branding: Crafting Compelling YouTube Logos
How To Make Good YouTube Banner - Dos and Don’ts

Richard Bennett
Oct 26, 2023• Proven solutions
It’s important to learn how to make a good YouTube banner because, when you click into a channel, the first thing you usually see and pay attention to is the channel art.
Channel art gives viewers a first impression of who you are and allows viewers to know what your channel is all about. Channel art can be a great way to show creativity, and there are also ways you can design your banner to help your channel grow.
Here are the Dos and Don’ts of YouTube Channel Art.
- What Kind of Background Should I Use?
- Should I Use My Face?
- What Should I Write on Banner?
- How Can I Make My Channel Art Look Good?


Part 1: What Kind of Background Should I Use?
DO: High-Quality Photos
It’s easy to take pictures with our phones, but not all of these pictures will look great blown up for channel art.
When choosing great photos for your background, pick ones that are high quality and don’t become pixelated once they are blown up. There are tons of free stock photo websites out there to help you find a high-quality picture that’s perfect for your channel.
DON’T: Use Chaotic Patterns
Using patterns for the background of your channel banner can help your channel look super creative and stand out from others. However, if you use a pattern that is chaotic and hard on the eyes, you may not attract many subscribers. When using patterns, choose patterns that are not heavy in color and have too many lines or shapes. There should be an evenness to the shapes and negative space within the pattern itself. Try to stay away from patterns that are 3D which can conflict with the viewer’s eyesight and make them dizzy.
Part 2: Should I Use My Face?
Whether you should use your face on your channel banner depends on what your channel is about. If you have a channel focused on beauty, fashion, fitness, or family vlogs then it’s a good idea to include your face. It comes off personable and helps viewers relate to you. If you have a channel that is about something like gaming, tech reviews, or book reviews then it isn’t necessary to include your face because the focus of your content isn’t you as a personality.
If you do include pictures, here are some tips:
Don’t: Use Blurry Photos
If your photos are blurry, pixilated, or poor quality then don’t use them. Using blurry pictures comes off as unprofessional.
That doesn’t mean you have to hire a photographer to take pictures for your channel. The average smartphone takes really great pictures, so long as you have enough light. If you need a great picture, use a high-quality selfie or ask a friend to take a nice picture of you.
Don’t: Use Outdated Pictures
It is always best to use a current photo of yourself. Many times viewers will go and follow you on social media as well. If they see that you have current photos on your social media but not on your channel, they are become confused and perhaps lose interest.
Part 3: What Should I Write on My Banner?

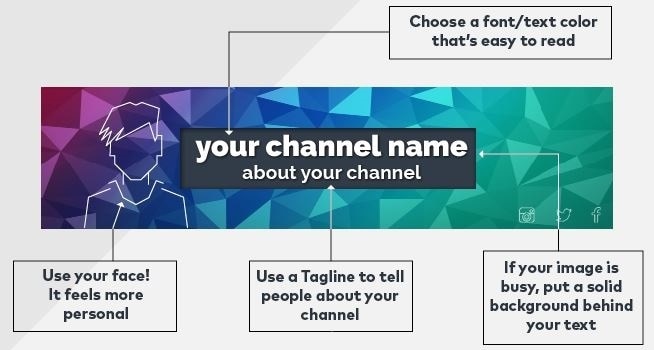
Do: Include Your Channel Name
While including your channel name in your banner seems like a no brainer, it is often left out by aspiring YouTubers. Displaying your channel name in a large font allows it to be more visible for viewers - your channel name is already on the page, but it is underneath your channel art and doesn’t stand out.
Seeing your channel name included in your banner also helps viewers to know they are on the right page, if there are YouTubers out there with similar names to yours.
Do: Include Upload Days
Consistent upload days are highly important for gaining more views and subscribers. Including your exact upload days helps viewers know when they should expect new videos from you. I made the mistake of not including upload days when I first started my channel 3 years ago. I had drops in views because my subscribers didn’t know when I would upload videos.
If you find that you cannot stick to a certain upload day, try to include how often you will post instead. For example, you can say, “New Videos Posted Weekly.” Viewers will respect you more and even be more likely to subscribe when you tell them your upload days. They want a guarantee that you’re going to post again in the near future.
Do: Include Social Media
Social media accounts are important to include in your channel art because we live in a social media generation. People are on social media every second of the day. If you are looking to take your YouTube channel seriously, it is good practice to ask viewers to follow you on your social media.
Including social media icons in your channel art lets people know where they can find you. Another good reason to include your current social media in your banner is that sometimes you might join a new platform or quit an old one. You may be using Twitter for months and then decide that you like Facebook better. Your current social media handles keep subscribers from having to guess which one to follow you on.
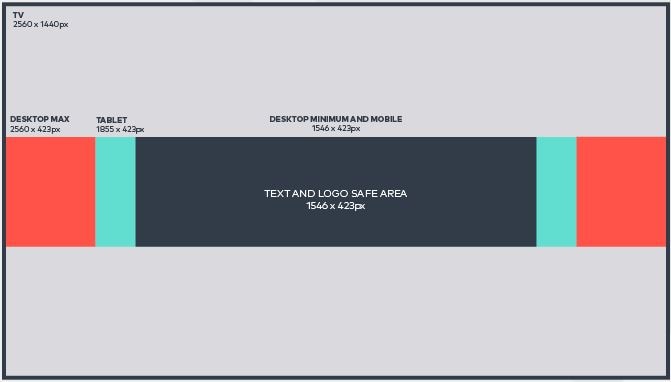
Make sure everything important fits in the safe area!
Do: Include Brief Channel Description or Tag Line
Aside from your channel name, you should also include a brief channel description or tag line to tell your viewers what your channel is all about. If you’re an aspiring beauty guru, you may include something like Makeup Tutorials, Product Reviews, or Mommy Makeovers. Or, you may include a cool tag line that describes the goal of your channel, like “Empowering Mother’s Through Makeup.”
I’ve noticed that YouTubers that use 2-3 descriptive words in their channel art make many different types of videos on their channel but they all full under those categories.
YouTubers that use tag lines are using their channel as a platform to carry out a specific mission on giving help or educating others.
Whether you decide to use descriptive words or a tag line, they will help your channel tremendously by setting expectations for your viewers.
Part 4: How Can I Make My Channel Art Look Good?
Do: Create Consistent Branding
Since becoming a YouTuber myself, I’ve come to learn that paying attention to your branding is very important. Focus attention to what colors and fonts you use. The colors you use for your channel can influence your audience to feel a certain way. For example, using yellow can show that you’re happy and upbeat while using blue can show you’re more calm and relaxed. Whatever color you choose, make sure it’s a true representation of who you are.
Using the right font can also be important to your channel. There are many different fonts available now. When choosing a font, choose one that goes with your channel that is easy to read. You might choose a very pretty cursive font, but if your viewers can’t read it, it can be useless.
Don’t: Include Images That Have Nothing to Do with Your Channel
This simple mistake can cost you many subscribers. For example, if your channel is about Beauty videos, then your channel art shouldn’t include pictures of food or you eating a burger. Your channel art is the first thing that viewers see when clicking on your page. You want them to instantly know what your channel is all about without having to find it in the description box. If your channel is about a few different things, then include all of those images in the channel art so they still know what your channel about. Just don’t confuse your viewers as to what your channel is really about.
Don’t: Have Images and Text That Cut Off
YouTube helps YouTubers by giving them a free channel art template to use as a guide when creating channel art. The template includes 3 different perspectives on how your channel art will be viewed by people looking at mobile devices, computer screens, and TVs. Many people make the mistake of creating art on the TV perspective which then cuts off images and text for the mobile and computer views. To save you the trouble of having images that cut off, it’s best to create your channel in the mobile dimensions that way it will be seen in the computer and TV dimensions with no problem.
Joshelle is a YouTuber from Atlanta, GA. She has a YouTube channel called ElleToshea where she shows viewers how to improve their homes and spaces on an affordable budget through DIY home decor. ElleToshea features minimalist home decor styles based off popular stores such as Anthropologie and Urban Outfitters.
Now that you know how to make a good YouTube banner, what will you do next?
Touch Up YouTube Videos with Filmora
Wondershare Filmora features lots of utilities for both video and audio editing. You can change the video speed or change the aspect ratio easily. Besides, there are plentiful filters, elements, effects and overlays built, so you can use them without costing any extra fee.
Richard Bennett
Richard Bennett is a writer and a lover of all things video.
Follow @Richard Bennett
Richard Bennett
Oct 26, 2023• Proven solutions
It’s important to learn how to make a good YouTube banner because, when you click into a channel, the first thing you usually see and pay attention to is the channel art.
Channel art gives viewers a first impression of who you are and allows viewers to know what your channel is all about. Channel art can be a great way to show creativity, and there are also ways you can design your banner to help your channel grow.
Here are the Dos and Don’ts of YouTube Channel Art.
- What Kind of Background Should I Use?
- Should I Use My Face?
- What Should I Write on Banner?
- How Can I Make My Channel Art Look Good?
Part 1: What Kind of Background Should I Use?
DO: High-Quality Photos
It’s easy to take pictures with our phones, but not all of these pictures will look great blown up for channel art.
When choosing great photos for your background, pick ones that are high quality and don’t become pixelated once they are blown up. There are tons of free stock photo websites out there to help you find a high-quality picture that’s perfect for your channel.
DON’T: Use Chaotic Patterns
Using patterns for the background of your channel banner can help your channel look super creative and stand out from others. However, if you use a pattern that is chaotic and hard on the eyes, you may not attract many subscribers. When using patterns, choose patterns that are not heavy in color and have too many lines or shapes. There should be an evenness to the shapes and negative space within the pattern itself. Try to stay away from patterns that are 3D which can conflict with the viewer’s eyesight and make them dizzy.
Part 2: Should I Use My Face?
Whether you should use your face on your channel banner depends on what your channel is about. If you have a channel focused on beauty, fashion, fitness, or family vlogs then it’s a good idea to include your face. It comes off personable and helps viewers relate to you. If you have a channel that is about something like gaming, tech reviews, or book reviews then it isn’t necessary to include your face because the focus of your content isn’t you as a personality.
If you do include pictures, here are some tips:
Don’t: Use Blurry Photos
If your photos are blurry, pixilated, or poor quality then don’t use them. Using blurry pictures comes off as unprofessional.
That doesn’t mean you have to hire a photographer to take pictures for your channel. The average smartphone takes really great pictures, so long as you have enough light. If you need a great picture, use a high-quality selfie or ask a friend to take a nice picture of you.
Don’t: Use Outdated Pictures
It is always best to use a current photo of yourself. Many times viewers will go and follow you on social media as well. If they see that you have current photos on your social media but not on your channel, they are become confused and perhaps lose interest.
Part 3: What Should I Write on My Banner?
Do: Include Your Channel Name
While including your channel name in your banner seems like a no brainer, it is often left out by aspiring YouTubers. Displaying your channel name in a large font allows it to be more visible for viewers - your channel name is already on the page, but it is underneath your channel art and doesn’t stand out.
Seeing your channel name included in your banner also helps viewers to know they are on the right page, if there are YouTubers out there with similar names to yours.
Do: Include Upload Days
Consistent upload days are highly important for gaining more views and subscribers. Including your exact upload days helps viewers know when they should expect new videos from you. I made the mistake of not including upload days when I first started my channel 3 years ago. I had drops in views because my subscribers didn’t know when I would upload videos.
If you find that you cannot stick to a certain upload day, try to include how often you will post instead. For example, you can say, “New Videos Posted Weekly.” Viewers will respect you more and even be more likely to subscribe when you tell them your upload days. They want a guarantee that you’re going to post again in the near future.
Do: Include Social Media
Social media accounts are important to include in your channel art because we live in a social media generation. People are on social media every second of the day. If you are looking to take your YouTube channel seriously, it is good practice to ask viewers to follow you on your social media.
Including social media icons in your channel art lets people know where they can find you. Another good reason to include your current social media in your banner is that sometimes you might join a new platform or quit an old one. You may be using Twitter for months and then decide that you like Facebook better. Your current social media handles keep subscribers from having to guess which one to follow you on.
Make sure everything important fits in the safe area!
Do: Include Brief Channel Description or Tag Line
Aside from your channel name, you should also include a brief channel description or tag line to tell your viewers what your channel is all about. If you’re an aspiring beauty guru, you may include something like Makeup Tutorials, Product Reviews, or Mommy Makeovers. Or, you may include a cool tag line that describes the goal of your channel, like “Empowering Mother’s Through Makeup.”
I’ve noticed that YouTubers that use 2-3 descriptive words in their channel art make many different types of videos on their channel but they all full under those categories.
YouTubers that use tag lines are using their channel as a platform to carry out a specific mission on giving help or educating others.
Whether you decide to use descriptive words or a tag line, they will help your channel tremendously by setting expectations for your viewers.
Part 4: How Can I Make My Channel Art Look Good?
Do: Create Consistent Branding
Since becoming a YouTuber myself, I’ve come to learn that paying attention to your branding is very important. Focus attention to what colors and fonts you use. The colors you use for your channel can influence your audience to feel a certain way. For example, using yellow can show that you’re happy and upbeat while using blue can show you’re more calm and relaxed. Whatever color you choose, make sure it’s a true representation of who you are.
Using the right font can also be important to your channel. There are many different fonts available now. When choosing a font, choose one that goes with your channel that is easy to read. You might choose a very pretty cursive font, but if your viewers can’t read it, it can be useless.
Don’t: Include Images That Have Nothing to Do with Your Channel
This simple mistake can cost you many subscribers. For example, if your channel is about Beauty videos, then your channel art shouldn’t include pictures of food or you eating a burger. Your channel art is the first thing that viewers see when clicking on your page. You want them to instantly know what your channel is all about without having to find it in the description box. If your channel is about a few different things, then include all of those images in the channel art so they still know what your channel about. Just don’t confuse your viewers as to what your channel is really about.
Don’t: Have Images and Text That Cut Off
YouTube helps YouTubers by giving them a free channel art template to use as a guide when creating channel art. The template includes 3 different perspectives on how your channel art will be viewed by people looking at mobile devices, computer screens, and TVs. Many people make the mistake of creating art on the TV perspective which then cuts off images and text for the mobile and computer views. To save you the trouble of having images that cut off, it’s best to create your channel in the mobile dimensions that way it will be seen in the computer and TV dimensions with no problem.
Joshelle is a YouTuber from Atlanta, GA. She has a YouTube channel called ElleToshea where she shows viewers how to improve their homes and spaces on an affordable budget through DIY home decor. ElleToshea features minimalist home decor styles based off popular stores such as Anthropologie and Urban Outfitters.
Now that you know how to make a good YouTube banner, what will you do next?
Touch Up YouTube Videos with Filmora
Wondershare Filmora features lots of utilities for both video and audio editing. You can change the video speed or change the aspect ratio easily. Besides, there are plentiful filters, elements, effects and overlays built, so you can use them without costing any extra fee.
Richard Bennett
Richard Bennett is a writer and a lover of all things video.
Follow @Richard Bennett
- Title: "2024 Approved Legality of Reproducing Your Watched YouTube Videos"
- Author: Thomas
- Created at : 2024-05-31 12:47:38
- Updated at : 2024-06-01 12:47:38
- Link: https://youtube-help.techidaily.com/2024-approved-legality-of-reproducing-your-watched-youtube-videos/
- License: This work is licensed under CC BY-NC-SA 4.0.
