
"2024 Approved Pro Tools, Pro Results Elevating Video Quality in YouTube Editing"
Pro Tools, Pro Results: Elevating Video Quality in YouTube Editing
How to Edit Youtube Videos by the YouTube Video Editor

Richard Bennett
Mar 27, 2024• Proven solutions
Note: From 20th September 2017 users will no longer be able to use the complimentary editing suite. Check the best YouTube video editor alternatives from this complete guide. Now, it is back again.
Video editing usually requires a fair amount of technical knowledge and professional software. But YouTube has introduced its new YouTube Video Editor. It’s deceptively simple compared to the traditional desktop editing programs.
If you haven’t tried the YouTube editor , it’s time to get started.
It’s easy to learn and the guide below will give you an introduction for editing videos on YouTube.
You May Also Like:
Royalty free music for YouTube Videos >>
Best Screen Recorders for YouTube >>
YouTube Video Dimensions/Size: Guide for Upload Settings >>
The Best Video Editors for YouTube >>
How to edit a YouTube video with Filmora
If you want to have more controls on editing YouTube video, here we recommend using Filmora .
You can use it to trim/cut/split YouTube videos with handy tools. It also offer more than 50 royal free music to use. Various video filters and effects are available to make your videos amazing. The best part is you can apply animated text/titles to videos like a pro. After editing, you can directly upload videos to YouTube.
Now, download it now to have a try!
 Download Mac Version ](https://tools.techidaily.com/wondershare/filmora/download/ )
How to Use YouTube Video Editor to Edit Video on YouTube
Step 1. Get access to YouTube Video Editor
Sign in to your YouTube (or Google) account. To get access to YouTube Video Editor, you can go directly to YouTube studio (video editor) . Or click avatar icon in your YouTube site > YouTube Studio.
Learn more about Upload MP3 to YouTube

Step 2. Add your videos to the timeline
After getting to the editor, all your YouTube videos will appear. If you want to add a clip from the pool of videos into the project, simply drag it onto the timeline or hit the plus icon in the top right hand corner of each clip. You can also add any YouTube videos that were uploaded with a “Creative Commons” license.
To do this, go to the CC tab, find a video and drag it to the timeline.

Looking for best YouTube video editor alternatives? Check this complete guide here >>
Step 3. Edit the videos as you like
With the YouTube video editor, you can quick fix your videos, add audio track of your video, add texts, use various filters and more. Below is a detailed guide on how to use YouTube video Editor.
#1 Trim/Cut/Split video
To cut or split your video, hover over the target clip and hit the scissor icon to cut the clip into pieces. You can also cursor over the edge of your video in the timeline and drag the handle to shorten or trim your video.

#2 Change video settings
YouTube Video Editor also provides the “Quick fixes” function which does a quick analysis of the video and tweaks its color, brightness, and contrast settings automatically.
You can just double click the video to enter the “Quick fixes” tab and easily change brightness and contrast, add slow motion and pan zoom effect, and stabilize, audio fix or rotate video.

#3 Add filters
You can also add stunning video filters provided by this editor. To get access this function, double click the video and switch to the “Filter” tab.

#4 Add text to video
To add text to video, go to the “Text” tab, tick “Enable text” and enter the text to the text column. Then customize the font, size, color, position of the text as you like.

#5 Add music to video
YouTube also allows you to swap out the audio with one of its licensed tracks. To do this, go back to the main interface of the editor and click the Audio tab. Then select a song from the library and either drag it to the soundtrack timeline or press the plus sign to the right of each title.

Note: You should note that some are songs are subject to licensing agreements, which means YouTube will automatically add advertisements to the video clip.
Another short coming is that you can’t edit the audio track at all. If a song is longer than your video, you can do nothing but let it play from the beginning until your video stops.
#6 Add transitions to video
If several video clips have been added to the timeline, you need transition to make the whole project smoother. To add transition, go to the Transition tab and choose from 16 transition effects.

YouTube Video Editor is really easy to use, but it only provides some basic video editing functions and is really easy to crash when dealing with large file. If you want to make your video more professional, try Wondershare Filmora .
This desktop video editing tool can help you easily complete video editing tasks.
Download it now to have a try!
Download Mac Version ](https://tools.techidaily.com/wondershare/filmora/download/ )
Richard Bennett
Richard Bennett is a writer and a lover of all things video.
Follow @Richard Bennett
Richard Bennett
Mar 27, 2024• Proven solutions
Note: From 20th September 2017 users will no longer be able to use the complimentary editing suite. Check the best YouTube video editor alternatives from this complete guide. Now, it is back again.
Video editing usually requires a fair amount of technical knowledge and professional software. But YouTube has introduced its new YouTube Video Editor. It’s deceptively simple compared to the traditional desktop editing programs.
If you haven’t tried the YouTube editor , it’s time to get started.
It’s easy to learn and the guide below will give you an introduction for editing videos on YouTube.
You May Also Like:
Royalty free music for YouTube Videos >>
Best Screen Recorders for YouTube >>
YouTube Video Dimensions/Size: Guide for Upload Settings >>
The Best Video Editors for YouTube >>
How to edit a YouTube video with Filmora
If you want to have more controls on editing YouTube video, here we recommend using Filmora .
You can use it to trim/cut/split YouTube videos with handy tools. It also offer more than 50 royal free music to use. Various video filters and effects are available to make your videos amazing. The best part is you can apply animated text/titles to videos like a pro. After editing, you can directly upload videos to YouTube.
Now, download it now to have a try!
Download Mac Version ](https://tools.techidaily.com/wondershare/filmora/download/ )
How to Use YouTube Video Editor to Edit Video on YouTube
Step 1. Get access to YouTube Video Editor
Sign in to your YouTube (or Google) account. To get access to YouTube Video Editor, you can go directly to YouTube studio (video editor) . Or click avatar icon in your YouTube site > YouTube Studio.
Learn more about Upload MP3 to YouTube
Step 2. Add your videos to the timeline
After getting to the editor, all your YouTube videos will appear. If you want to add a clip from the pool of videos into the project, simply drag it onto the timeline or hit the plus icon in the top right hand corner of each clip. You can also add any YouTube videos that were uploaded with a “Creative Commons” license.
To do this, go to the CC tab, find a video and drag it to the timeline.
Looking for best YouTube video editor alternatives? Check this complete guide here >>
Step 3. Edit the videos as you like
With the YouTube video editor, you can quick fix your videos, add audio track of your video, add texts, use various filters and more. Below is a detailed guide on how to use YouTube video Editor.
#1 Trim/Cut/Split video
To cut or split your video, hover over the target clip and hit the scissor icon to cut the clip into pieces. You can also cursor over the edge of your video in the timeline and drag the handle to shorten or trim your video.
#2 Change video settings
YouTube Video Editor also provides the “Quick fixes” function which does a quick analysis of the video and tweaks its color, brightness, and contrast settings automatically.
You can just double click the video to enter the “Quick fixes” tab and easily change brightness and contrast, add slow motion and pan zoom effect, and stabilize, audio fix or rotate video.
#3 Add filters
You can also add stunning video filters provided by this editor. To get access this function, double click the video and switch to the “Filter” tab.
#4 Add text to video
To add text to video, go to the “Text” tab, tick “Enable text” and enter the text to the text column. Then customize the font, size, color, position of the text as you like.
#5 Add music to video
YouTube also allows you to swap out the audio with one of its licensed tracks. To do this, go back to the main interface of the editor and click the Audio tab. Then select a song from the library and either drag it to the soundtrack timeline or press the plus sign to the right of each title.
Note: You should note that some are songs are subject to licensing agreements, which means YouTube will automatically add advertisements to the video clip.
Another short coming is that you can’t edit the audio track at all. If a song is longer than your video, you can do nothing but let it play from the beginning until your video stops.
#6 Add transitions to video
If several video clips have been added to the timeline, you need transition to make the whole project smoother. To add transition, go to the Transition tab and choose from 16 transition effects.
YouTube Video Editor is really easy to use, but it only provides some basic video editing functions and is really easy to crash when dealing with large file. If you want to make your video more professional, try Wondershare Filmora .
This desktop video editing tool can help you easily complete video editing tasks.
Download it now to have a try!
Download Mac Version ](https://tools.techidaily.com/wondershare/filmora/download/ )
Richard Bennett
Richard Bennett is a writer and a lover of all things video.
Follow @Richard Bennett
Enhancing Your Game Time with YouTube Live Broadcasts
How to Live Stream on YouTube Gaming?
Richard Bennett
Mar 27, 2024• Proven solutions
1. Live Stream on YouTube Gaming with OBS
You need to follow these simple Step s to use OBS for YouTube Live Streaming:
**Step 1:**First of all you need to login to your YouTube account. You might be aware of the fact that same YouTube account is used for YouTube gaming needs.
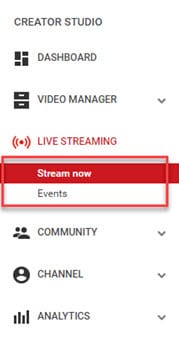
**Step 2:**Once entered inside your account then you need to visit the Go live streaming options and then from drop down menu simply choose Stream Now option.
**Step 3:**It is time to fill the details on screen; put impressive words for your live stream description so that it can grab attention of more viewers. Then select category as ‘Gaming’.

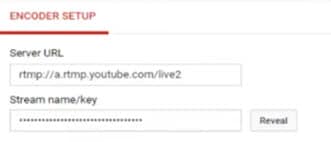
**Step 4:**Now you need to copy the stream key.
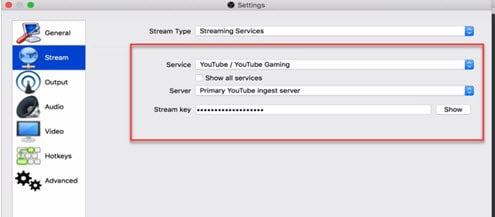
**Step 5:**Now open your OBS tool and then select YouTube as your active game streaming service. Users here need to paste that copied streaming key of Step 5 into the space provided on OBS settings page.
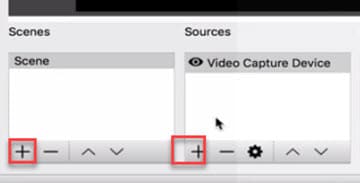
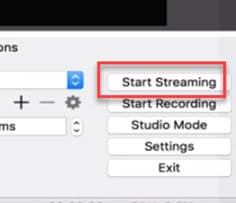
**Step 6:**It is time to make your desktop a video source.
**Step 7:**Once all these settings are completed then you need to hit the start streaming option.
**Step 8:**The service may take few seconds to bring your live on YouTube and after this small duration you will be connected to your channel with your streamed content. Then change your url from youtube.com to gaming.youtube.com
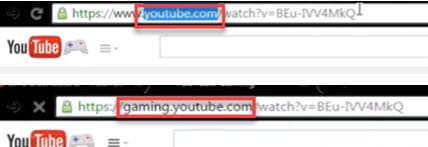
**Step 9:**You are all set to be live on your YouTube gaming profile.
2. Live Stream on YouTube with Elgato Game Capture HD
A: Basic Settings for Elgato Game Capture HD
The Step s below will help you to get ready for streaming with all basic settings that are required by Elgato Game Capture HD tool.
**Step 1:**First of all, you need to open your browser, search for Elgato Game Capture HD software on its official website and then download it for your system. Get it installed.
**Step 2:**Once installation process is complete then launch your software.
**Step 3:**Now you need to hit the add button on screen and select YouTube from drop down menu.
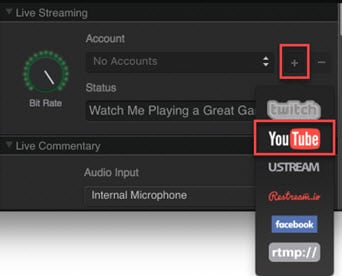
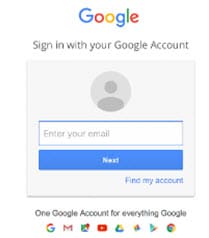
Step 4: It is time to sign in with your Google Account.
**Step 5:**After sign up process, allow the Elgato Game Capture tool to make connection with your YouTube account.

**Step 6:**Soon you will be able to access you account from Elgato platform.

**Step 7:**It is time to make adjustments for streaming settings.
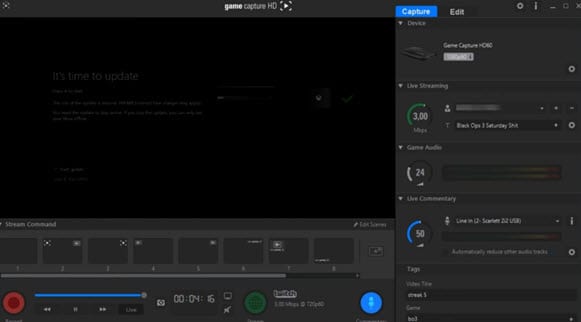
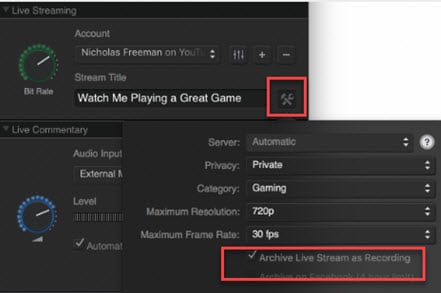
B: Test your Bandwidth and make adjustments for Stream settings
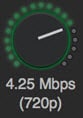
It is essential to check speed of your internet connection during live streaming because if it goes slow then your content will become annoying to viewers and it will decay the reputation of your channel. So prefer to use following Step s to complete the basic settings and to test your internet connection.
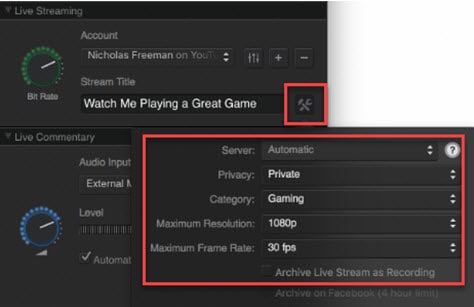
**Step 1:**Open your browser and then visit the speedtest.net platform. You can also use other similar kind of websites to ensure the speed of your internet. Note that you will find a Bit Rate dial in the live streaming section, here you can make adjustments for bit rates to bring it to desired level.
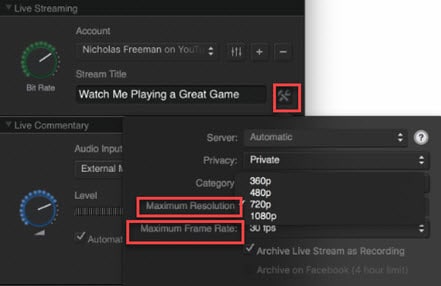
**Step 2:**It is also possible to make customized settings for frame rate and resolution as per need of your stream content.
**Step 3:**One can also prefer to archive his streaming.
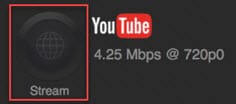
**Step 4:**As soon as you have completed all above settings then you need to hit the stream button on screen.
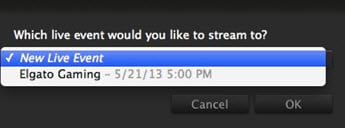
**Step 5:**Soon your software will ask you to select the event that you want to stream, choose your desired event and then press Ok. Soon you will be live on YouTube.
Richard Bennett
Richard Bennett is a writer and a lover of all things video.
Follow @Richard Bennett
Richard Bennett
Mar 27, 2024• Proven solutions
1. Live Stream on YouTube Gaming with OBS
You need to follow these simple Step s to use OBS for YouTube Live Streaming:
**Step 1:**First of all you need to login to your YouTube account. You might be aware of the fact that same YouTube account is used for YouTube gaming needs.
**Step 2:**Once entered inside your account then you need to visit the Go live streaming options and then from drop down menu simply choose Stream Now option.
**Step 3:**It is time to fill the details on screen; put impressive words for your live stream description so that it can grab attention of more viewers. Then select category as ‘Gaming’.
**Step 4:**Now you need to copy the stream key.
**Step 5:**Now open your OBS tool and then select YouTube as your active game streaming service. Users here need to paste that copied streaming key of Step 5 into the space provided on OBS settings page.
**Step 6:**It is time to make your desktop a video source.
**Step 7:**Once all these settings are completed then you need to hit the start streaming option.
**Step 8:**The service may take few seconds to bring your live on YouTube and after this small duration you will be connected to your channel with your streamed content. Then change your url from youtube.com to gaming.youtube.com
**Step 9:**You are all set to be live on your YouTube gaming profile.
2. Live Stream on YouTube with Elgato Game Capture HD
A: Basic Settings for Elgato Game Capture HD
The Step s below will help you to get ready for streaming with all basic settings that are required by Elgato Game Capture HD tool.
**Step 1:**First of all, you need to open your browser, search for Elgato Game Capture HD software on its official website and then download it for your system. Get it installed.
**Step 2:**Once installation process is complete then launch your software.
**Step 3:**Now you need to hit the add button on screen and select YouTube from drop down menu.
Step 4: It is time to sign in with your Google Account.
**Step 5:**After sign up process, allow the Elgato Game Capture tool to make connection with your YouTube account.
**Step 6:**Soon you will be able to access you account from Elgato platform.
**Step 7:**It is time to make adjustments for streaming settings.
B: Test your Bandwidth and make adjustments for Stream settings
It is essential to check speed of your internet connection during live streaming because if it goes slow then your content will become annoying to viewers and it will decay the reputation of your channel. So prefer to use following Step s to complete the basic settings and to test your internet connection.
**Step 1:**Open your browser and then visit the speedtest.net platform. You can also use other similar kind of websites to ensure the speed of your internet. Note that you will find a Bit Rate dial in the live streaming section, here you can make adjustments for bit rates to bring it to desired level.
**Step 2:**It is also possible to make customized settings for frame rate and resolution as per need of your stream content.
**Step 3:**One can also prefer to archive his streaming.
**Step 4:**As soon as you have completed all above settings then you need to hit the stream button on screen.
**Step 5:**Soon your software will ask you to select the event that you want to stream, choose your desired event and then press Ok. Soon you will be live on YouTube.
Richard Bennett
Richard Bennett is a writer and a lover of all things video.
Follow @Richard Bennett
Also read:
- [New] Excellent 7 DSLRs Elevating Live-Stream Cinematic Style
- [Updated] Ultimate Unadorned Screen Recorder 2023
- 2024 Approved Elevate Video Exposure Mastering the Art of Appropriate Tags
- 2024 Approved Maximizing YouTube Earning Potential Insights From Sourav Joshi
- 2024 Approved Uniting Subscribers Through Shared Playlists
- Audiophile' Writers Premier Talk Shows From GooGloud for 2024
- Geautomatiseerde Konvertering Von MOV Zu M4R-Dateien Kostenlos Online - Videowechsel
- In 2024, How to Fix Life360 Shows Wrong Location On Samsung Galaxy A54 5G? | Dr.fone
- In 2024, How to Transfer Contacts from Motorola Edge 40 Neo to Outlook | Dr.fone
- In 2024, Interpreting the Functionality Behind Facebook's Blue Video Icon
- In 2024, Navigate the Melody Maze Crafting a Personalized YouTube Playlist
- In 2024, Navigate YouTube Gaming Success with Right Tags
- Mastering Motion Control - Top Camera Gadgets for 2024
- Uniting Digital and Physical Worlds
- Title: 2024 Approved Pro Tools, Pro Results Elevating Video Quality in YouTube Editing
- Author: Thomas
- Created at : 2025-02-04 21:01:19
- Updated at : 2025-02-10 00:13:41
- Link: https://youtube-help.techidaily.com/2024-approved-pro-tools-pro-results-elevating-video-quality-in-youtube-editing/
- License: This work is licensed under CC BY-NC-SA 4.0.