
:max_bytes(150000):strip_icc()/ScreenShot2022-01-13at12.25.09PM-aa52f1508d6b489b84df85c774669e89.png)
"2024 Approved Ranking YouTube Download Apps for Android Users"
Ranking YouTube Download Apps for Android Users
9 Powerful YouTube Video Downloader for Android

Ollie Mattison
Mar 27, 2024• Proven solutions
Streaming online videos on YouTube has become a lifestyle for almost all of us now. But time and data usage are huge constraints. Isn’t it annoying when you find free Wi-Fi but lack a suitable video downloader or you have a downloader but no Wi-Fi access at the moment to stream the videos. You may already know how to download mp3 on Android , to solve your dilemma and let you download YouTube videos on your Android phone, we have collected the most popular YouTube video downloader for Android in this article.
Note: We resolutely oppose all forms of copyright-infringing downloads. This tutorial is only for downloading YouTube videos/audio materials from your own channel.
Part 1: Online Video Downloader App Only Supporting YouTube video
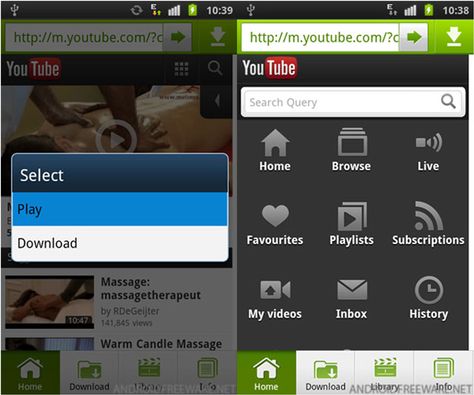
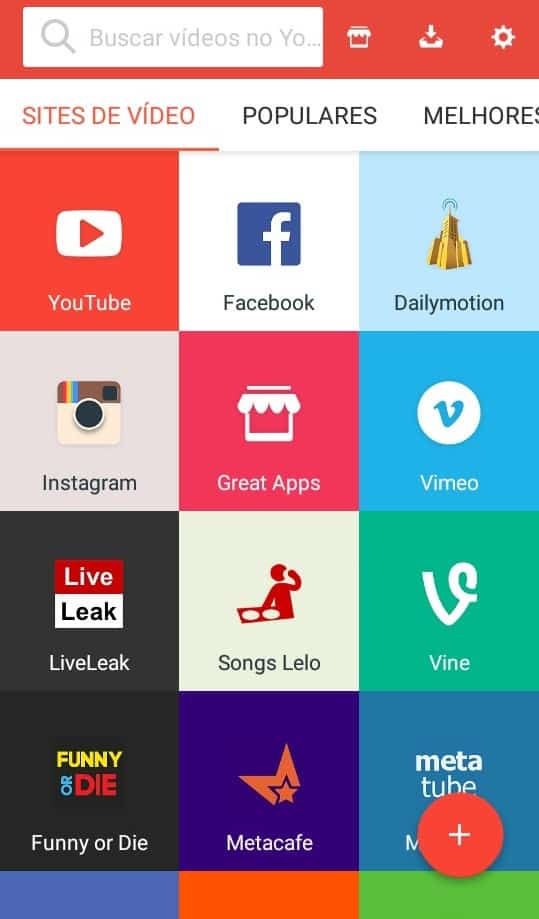
1. TubeMate
Using TubeMate, you can now save your favorite YouTube videos directly on your phone and cherish them anywhere offline. You can choose the quality of the video as this tool supports different resolutions. If you are a novice user this App is simple as one two three, you need to search the video on YouTube and tap the green arrow at the bottom of the screen to download it.

Pros:
- Multiple download options are available, along with the background download option to carry on with other routine work on your phone.
- It can download the video as well as audio.
- Videos can be converted to MP3 format.
Cons:
- It cannot download in 4K format.
- TubeMate doesn’t download the original YouTube video, but rather a video encoded video by YouTube. Hence, the video sometimes fails to play, and downloading a low-resolution video to save YouTube videos on Android might help.
![]()
A cross-platform for making videos anywhere for all creators

Why your video editing isn’t good enough? How about some creative inspo?
- 100 Million+ Users
- 150+ Countries and Regions
- 4 Million+ Social Media Followers
- 5 Million+ Stock Media for Use
* Secure Download

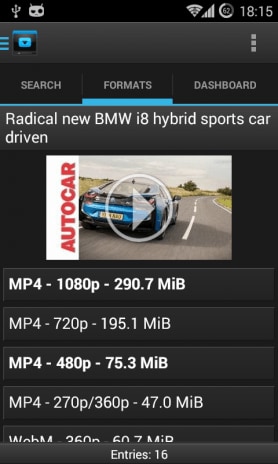
2. Dentex YouTube Downloader
Dentex is a YouTube video downloader for Android that allows you to download YouTube videos within seconds. The interface is divided into 3 parts. In the first part, you can search the YouTube video and see the results, the second part shows the quality and format options, whereas the third part lists the previously downloaded videos.
Pros:
- You can change the format of any video even after downloading.
- You can extract audio files from the videos and later convert them to MP3 format.
- You can remote download through SSH.
Cons:
- An additional plug-in is required to change the format of the video.
- The app is not compatible with lower Android versions such as Gingerbread, Froyo and Éclair.
- The downloading process might sometimes stop, requiring you to resume the process.
3. InsTube Free Video & Music Downloader
InsTube Free Video & Music Downloader allows you to download YouTube videos at high speed supporting MP3, MP4, 3GP, as well as M4A formats. With this tool, downloading YouTube videos in HD, Full HD, or 4K is at your fingertips. You can download videos from more than 40 websites apart from YouTube and enjoy them offline.
Pros:
- It has an inbuilt locker to protect videos and keep them private.
- The hassle-free and neat interface allows easy operation.
- Faster downloading options across 40 plus websites and free YouTube video download is also possible.
Cons:
- Unwanted Ads popup on the screen forcing you to install updates.
- You see the clipboard identifier icon only for few seconds on the screen.
4. WonTube
With WonTube, you can stock and save YouTube videos on Android. Its high conversion speed saves your time. The simple interface of the App makes it user friendly. The App can merge videos and convert the result to any format is a very unique feature.
Pros:
- It supports AVI, WMV, MP4, MKV, FLV, 3GP, and MPG.
- It works well with poor internet connectivity compared to other video downloaders.
- It can convert videos into 20+ formats.
Cons:
- Even though multiple videos can be downloaded simultaneously, the same batch of videos can be converted only to one output format.
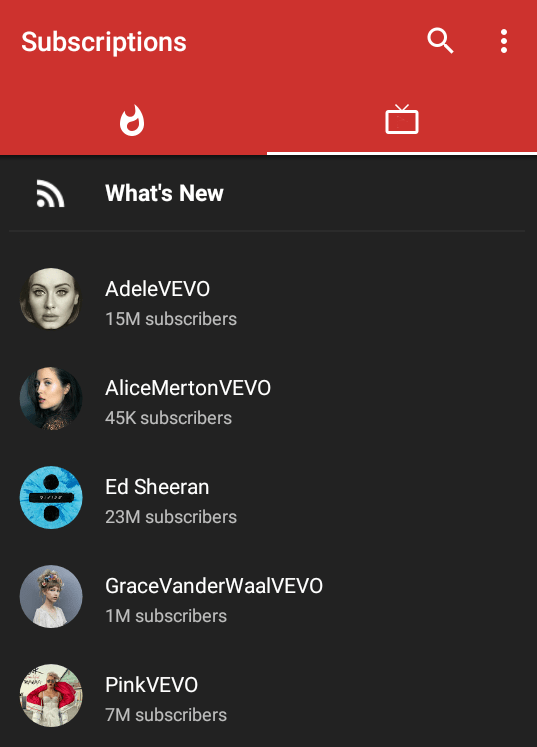
5. NewPipe
NewPipe analyses YouTube videos by itself to obtain the necessary information for downloading the videos. This downloader can thus work with phones that do not have Google Services installed in them. In addition, the app allows you to download audio and video with different formats and resolutions. NewPipe also keeps you updated about your favorite YouTube channels while you save YouTube videos on Android.
Pros:
- It is merely 2MB.
- It has a pop-up mode that is movable and resizable, using which you can watch the videos while carrying out other activities on your mobile.
- There are no Ads.
Cons:
- It doesn’t have a log in option, so you cannot view your history.
- It requires additional settings.
![]()

Best YouTube Video Editor for PC - Filmora
- Cut, Trim, Split and Deatch audio from YouTube videos
- Edit Videos with key frame, motion track, green screen ect.
- Built-in plentiful YouTube templates and effects
- Export to MP4, MOV, MKV, GIF and multiple formats
For Win 7 or later (64-bit)
For macOS 10.12 or later
 Secure Download


Part 2: YouTube Video Downloader App Supporting multiple video site
1. SnapTube
SnapTube is yet another amazing video and audio downloading app to download audio in MP3 format and video in MP4 format. The app is organized in itself, carrying a section of popular videos, most viewed videos and a daily recommendation section. The app also allows video downloading option from popular social media sites such as Instagram and Facebook.
Pros:
- It does not require an additional plug-in.
- It does not have malware and Ads.
Cons:
- YouTube multimedia download is restricted in India and China.
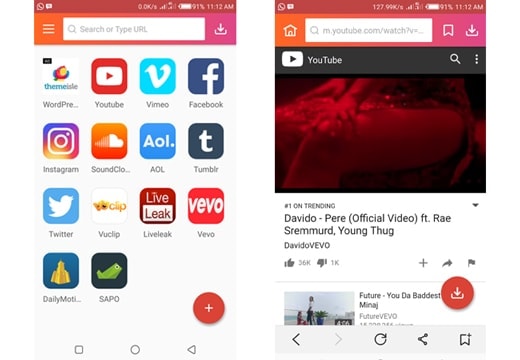
2. Videoder
Videoder is the app for you when you want to broaden your horizon and download videos from Facebook, Instagram, YouTube, Hotstar etc. in MP3 or MP4 format. It comes with an inbuilt feature to convert videos to MP3 format. You can personalize the app by using themes, setting cover art, and tag editor to organize your playlist in a visually attractive way.

Pros:
- Looking for HD quality viewing? You have 4K quality videos with Videoder.
- Multiple downloading is possible with a single tap.
- Downloading speed is accelerated by the number of network connections and utilizing it to the maximum.
Cons:
- Because of the numerous features, it may take time to learn all the functionalities.
- An audio encoding pop-up may sometimes appear asking to install a plug-in.
- It doesn’t support files other than MP3 and MP4 format.
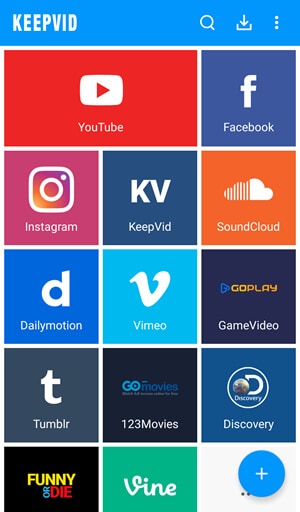
3. KeepVid
KeepVid is a handy YouTube downloader that can download videos from YouTube and 27 other sites. It is a fantastic downloading tool that comes with a user-friendly interface and allows you to download videos from many sites, including YouTube, Vimeo, and Dailymotion. KeepVid also allows you to download multiple videos simultaneously with the option of selecting the quality of the videos.
Pros:
- The app does not have any size limit to the video.
- It does not have any Ads.
- It can download videos as good as 4K.
Cons:
- The only disadvantage is that you must download the app from the official site KeepVid.com.
Conclusion
In the end, we would like to say that as time passes by and with the tight schedules a YouTube video downloader on your phone frees you from your computer. For all those offline viewing needs of yours, the above-mentioned downloaders are excellent alternatives and help you save YouTube videos on Android.
Ollie Mattison
Ollie Mattison is a writer and a lover of all things video.
Follow @Ollie Mattison
Ollie Mattison
Mar 27, 2024• Proven solutions
Streaming online videos on YouTube has become a lifestyle for almost all of us now. But time and data usage are huge constraints. Isn’t it annoying when you find free Wi-Fi but lack a suitable video downloader or you have a downloader but no Wi-Fi access at the moment to stream the videos. You may already know how to download mp3 on Android , to solve your dilemma and let you download YouTube videos on your Android phone, we have collected the most popular YouTube video downloader for Android in this article.
Note: We resolutely oppose all forms of copyright-infringing downloads. This tutorial is only for downloading YouTube videos/audio materials from your own channel.
Part 1: Online Video Downloader App Only Supporting YouTube video
1. TubeMate
Using TubeMate, you can now save your favorite YouTube videos directly on your phone and cherish them anywhere offline. You can choose the quality of the video as this tool supports different resolutions. If you are a novice user this App is simple as one two three, you need to search the video on YouTube and tap the green arrow at the bottom of the screen to download it.
Pros:
- Multiple download options are available, along with the background download option to carry on with other routine work on your phone.
- It can download the video as well as audio.
- Videos can be converted to MP3 format.
Cons:
- It cannot download in 4K format.
- TubeMate doesn’t download the original YouTube video, but rather a video encoded video by YouTube. Hence, the video sometimes fails to play, and downloading a low-resolution video to save YouTube videos on Android might help.
![]()
A cross-platform for making videos anywhere for all creators
Why your video editing isn’t good enough? How about some creative inspo?
- 100 Million+ Users
- 150+ Countries and Regions
- 4 Million+ Social Media Followers
- 5 Million+ Stock Media for Use
* Secure Download
2. Dentex YouTube Downloader
Dentex is a YouTube video downloader for Android that allows you to download YouTube videos within seconds. The interface is divided into 3 parts. In the first part, you can search the YouTube video and see the results, the second part shows the quality and format options, whereas the third part lists the previously downloaded videos.
Pros:
- You can change the format of any video even after downloading.
- You can extract audio files from the videos and later convert them to MP3 format.
- You can remote download through SSH.
Cons:
- An additional plug-in is required to change the format of the video.
- The app is not compatible with lower Android versions such as Gingerbread, Froyo and Éclair.
- The downloading process might sometimes stop, requiring you to resume the process.
3. InsTube Free Video & Music Downloader
InsTube Free Video & Music Downloader allows you to download YouTube videos at high speed supporting MP3, MP4, 3GP, as well as M4A formats. With this tool, downloading YouTube videos in HD, Full HD, or 4K is at your fingertips. You can download videos from more than 40 websites apart from YouTube and enjoy them offline.
Pros:
- It has an inbuilt locker to protect videos and keep them private.
- The hassle-free and neat interface allows easy operation.
- Faster downloading options across 40 plus websites and free YouTube video download is also possible.
Cons:
- Unwanted Ads popup on the screen forcing you to install updates.
- You see the clipboard identifier icon only for few seconds on the screen.
4. WonTube
With WonTube, you can stock and save YouTube videos on Android. Its high conversion speed saves your time. The simple interface of the App makes it user friendly. The App can merge videos and convert the result to any format is a very unique feature.
Pros:
- It supports AVI, WMV, MP4, MKV, FLV, 3GP, and MPG.
- It works well with poor internet connectivity compared to other video downloaders.
- It can convert videos into 20+ formats.
Cons:
- Even though multiple videos can be downloaded simultaneously, the same batch of videos can be converted only to one output format.
5. NewPipe
NewPipe analyses YouTube videos by itself to obtain the necessary information for downloading the videos. This downloader can thus work with phones that do not have Google Services installed in them. In addition, the app allows you to download audio and video with different formats and resolutions. NewPipe also keeps you updated about your favorite YouTube channels while you save YouTube videos on Android.
Pros:
- It is merely 2MB.
- It has a pop-up mode that is movable and resizable, using which you can watch the videos while carrying out other activities on your mobile.
- There are no Ads.
Cons:
- It doesn’t have a log in option, so you cannot view your history.
- It requires additional settings.
![]()
Best YouTube Video Editor for PC - Filmora
- Cut, Trim, Split and Deatch audio from YouTube videos
- Edit Videos with key frame, motion track, green screen ect.
- Built-in plentiful YouTube templates and effects
- Export to MP4, MOV, MKV, GIF and multiple formats
For Win 7 or later (64-bit)
For macOS 10.12 or later
Secure Download
Part 2: YouTube Video Downloader App Supporting multiple video site
1. SnapTube
SnapTube is yet another amazing video and audio downloading app to download audio in MP3 format and video in MP4 format. The app is organized in itself, carrying a section of popular videos, most viewed videos and a daily recommendation section. The app also allows video downloading option from popular social media sites such as Instagram and Facebook.
Pros:
- It does not require an additional plug-in.
- It does not have malware and Ads.
Cons:
- YouTube multimedia download is restricted in India and China.
2. Videoder
Videoder is the app for you when you want to broaden your horizon and download videos from Facebook, Instagram, YouTube, Hotstar etc. in MP3 or MP4 format. It comes with an inbuilt feature to convert videos to MP3 format. You can personalize the app by using themes, setting cover art, and tag editor to organize your playlist in a visually attractive way.
Pros:
- Looking for HD quality viewing? You have 4K quality videos with Videoder.
- Multiple downloading is possible with a single tap.
- Downloading speed is accelerated by the number of network connections and utilizing it to the maximum.
Cons:
- Because of the numerous features, it may take time to learn all the functionalities.
- An audio encoding pop-up may sometimes appear asking to install a plug-in.
- It doesn’t support files other than MP3 and MP4 format.
3. KeepVid
KeepVid is a handy YouTube downloader that can download videos from YouTube and 27 other sites. It is a fantastic downloading tool that comes with a user-friendly interface and allows you to download videos from many sites, including YouTube, Vimeo, and Dailymotion. KeepVid also allows you to download multiple videos simultaneously with the option of selecting the quality of the videos.
Pros:
- The app does not have any size limit to the video.
- It does not have any Ads.
- It can download videos as good as 4K.
Cons:
- The only disadvantage is that you must download the app from the official site KeepVid.com.
Conclusion
In the end, we would like to say that as time passes by and with the tight schedules a YouTube video downloader on your phone frees you from your computer. For all those offline viewing needs of yours, the above-mentioned downloaders are excellent alternatives and help you save YouTube videos on Android.
Ollie Mattison
Ollie Mattison is a writer and a lover of all things video.
Follow @Ollie Mattison
Mastering YT: Techniques for Fading Out Unwanted Backgrounds
How to Blur Background of Your YouTube Video

Richard Bennett
Mar 27, 2024• Proven solutions
A lot of YouTubers like to vlog in front of blurred backgrounds. Blurring the background of your YouTube video is a fast way to make it look more professional – you stand out when you are entirely in focus, and everything behind you is blurry. Plus, it is an easy way to disguise the room you are vlogging from.

Even if your set is clean, there could be things like books behind you, which will distract viewers; they will be trying to read the spines. Blurring out the background of your shot makes your video look polished and keeps people’s focus entirely on you.
- Part 1: Blur YouTube Video Background in Shooting Videos
- Part 2: Add Tilt-Shift Effects to Video in Editing
Part 1: How to Blur Background of Your YouTube Video in Shooting Videos
Blurring your background is also how you create a beautiful bokeh lighting effect. Bokeh is when you blur lights in the background of your shot, creating halo-like circles of light. By attaching a filter with a shape cut out to the camera lens, you can even generate bokeh lights in other shapes, like hearts or stars.
Aperture refers to the hole in your lens which allows light into your camera. A narrow aperture lets in less light, and a wide aperture lets in more. The wider your aperture is, the shallower your depth of field will be. Widening your aperture also helps your camera perform better in low-light situations. Widening your aperture too much under the wrong circumstances can let in too much light and result in your footage being overexposed.
Depth of Field is the area of your image that is in focus. If you have a large depth of field, then objects close to and far away from your camera will all be in focus. Only a select area will be focused and the rest will be blurred if you have a shallow depth of field.
F-Stops are the measurement of an aperture’s width. The higher your f-stop, the narrower your aperture will be. To create a blurred background or a bokeh effect, you need a wide aperture, and thus a small f-stop. F-stops are written like ‘f/1.4’. You need an f-stop of less than f/4 to blur your background, and less than f/2.8 for bokeh.
1. Blurring and Bokeh
Blurred backgrounds and bokeh are very closely related. A bokeh effect is essentially a blurred background that includes lights.
To achieve a blurred background or a bokeh effect, you need to have a shallow depth of field. That means a wide aperture and a low f-stop.
2. How to Blur your Background
Place your subject – in the case of a vlog, your subject is probably yourself – in a shallow depth of field, and they will remain sharply in focus while everything behind them is blurred.
If the subject is yourself, you might need a helper to either operate your camera or stand in for you while you set up your camera. You will need to be able to check that the place you plan to stand or sit is in focus.
To get a shallow depth of field, make sure your aperture is wide. Do this by setting a low f-stop. Ideally, your f-stop will be 2.8 or lower, but if your camera cannot go that low, then f/3 or f/4 can also work.
Creating a bokeh effect is mostly the same, except that it works best when your subject/depth of field is very close to the camera, and you have a light source off in the background. Zoom Lenses do not usually have wide enough apertures to create bokeh backgrounds.
Blur Video Background in Post-Production with Wondershare Filmora Video Editor
If you need to blur the video background after shooting, you can use some video editing software to add the bokeh effect or the tilt-off effect in post-production. Here, I will show you how to do that in Filmora.
Filmora is one of the most widely used video editing software among YouTubers. Its user-friendly interface and tutorial guide enables green-hands to start video editing quickly. Besides, you can find many free filters, effects, and elements pre-programmed, so you can use them directly without looking for presets and templates somewhere else.
1. Add Bokeh Filter to Video in Filmora
There are about 20 bokeh effects available in filters and overlays. You can find them easily by typing bokeh in the search bar in Effects.
Note: you should select Included to see all bokeh effects pre-programmed in Filmora. If you need more visual effects, just go to the Filmstock effects store.

Double click the bokeh effect to preview the result, and if you find the bokeh effect fits the video, just drop it to the track above the video. And the bokeh filter or overlay will be applied to the video automatically.
2. Use Tilt-Shift Circle/Linear Effect to Blur Video Background
Filmora features two tilt effects, tilt-shift circle and tilt-shift linear, which allows you to highlight people in the video, blur, and conceal the video background.
Go to the Effects tab and then switch to the Utility menu under Included category.

Here, I will select the Tilt-Shift Circle effect and drop it to the track above the video. Now, you can adjust the size, position, and intensity of the tilt-shift circle effect

You see, the video background is blurred, and the people are highlighted. Now it’s your turn to download the Filmora video editor and try it yourself.


Richard Bennett
Richard Bennett is a writer and a lover of all things video.
Follow @Richard Bennett
Richard Bennett
Mar 27, 2024• Proven solutions
A lot of YouTubers like to vlog in front of blurred backgrounds. Blurring the background of your YouTube video is a fast way to make it look more professional – you stand out when you are entirely in focus, and everything behind you is blurry. Plus, it is an easy way to disguise the room you are vlogging from.
Even if your set is clean, there could be things like books behind you, which will distract viewers; they will be trying to read the spines. Blurring out the background of your shot makes your video look polished and keeps people’s focus entirely on you.
- Part 1: Blur YouTube Video Background in Shooting Videos
- Part 2: Add Tilt-Shift Effects to Video in Editing
Part 1: How to Blur Background of Your YouTube Video in Shooting Videos
Blurring your background is also how you create a beautiful bokeh lighting effect. Bokeh is when you blur lights in the background of your shot, creating halo-like circles of light. By attaching a filter with a shape cut out to the camera lens, you can even generate bokeh lights in other shapes, like hearts or stars.
Aperture refers to the hole in your lens which allows light into your camera. A narrow aperture lets in less light, and a wide aperture lets in more. The wider your aperture is, the shallower your depth of field will be. Widening your aperture also helps your camera perform better in low-light situations. Widening your aperture too much under the wrong circumstances can let in too much light and result in your footage being overexposed.
Depth of Field is the area of your image that is in focus. If you have a large depth of field, then objects close to and far away from your camera will all be in focus. Only a select area will be focused and the rest will be blurred if you have a shallow depth of field.
F-Stops are the measurement of an aperture’s width. The higher your f-stop, the narrower your aperture will be. To create a blurred background or a bokeh effect, you need a wide aperture, and thus a small f-stop. F-stops are written like ‘f/1.4’. You need an f-stop of less than f/4 to blur your background, and less than f/2.8 for bokeh.
1. Blurring and Bokeh
Blurred backgrounds and bokeh are very closely related. A bokeh effect is essentially a blurred background that includes lights.
To achieve a blurred background or a bokeh effect, you need to have a shallow depth of field. That means a wide aperture and a low f-stop.
2. How to Blur your Background
Place your subject – in the case of a vlog, your subject is probably yourself – in a shallow depth of field, and they will remain sharply in focus while everything behind them is blurred.
If the subject is yourself, you might need a helper to either operate your camera or stand in for you while you set up your camera. You will need to be able to check that the place you plan to stand or sit is in focus.
To get a shallow depth of field, make sure your aperture is wide. Do this by setting a low f-stop. Ideally, your f-stop will be 2.8 or lower, but if your camera cannot go that low, then f/3 or f/4 can also work.
Creating a bokeh effect is mostly the same, except that it works best when your subject/depth of field is very close to the camera, and you have a light source off in the background. Zoom Lenses do not usually have wide enough apertures to create bokeh backgrounds.
Blur Video Background in Post-Production with Wondershare Filmora Video Editor
If you need to blur the video background after shooting, you can use some video editing software to add the bokeh effect or the tilt-off effect in post-production. Here, I will show you how to do that in Filmora.
Filmora is one of the most widely used video editing software among YouTubers. Its user-friendly interface and tutorial guide enables green-hands to start video editing quickly. Besides, you can find many free filters, effects, and elements pre-programmed, so you can use them directly without looking for presets and templates somewhere else.
1. Add Bokeh Filter to Video in Filmora
There are about 20 bokeh effects available in filters and overlays. You can find them easily by typing bokeh in the search bar in Effects.
Note: you should select Included to see all bokeh effects pre-programmed in Filmora. If you need more visual effects, just go to the Filmstock effects store.
Double click the bokeh effect to preview the result, and if you find the bokeh effect fits the video, just drop it to the track above the video. And the bokeh filter or overlay will be applied to the video automatically.
2. Use Tilt-Shift Circle/Linear Effect to Blur Video Background
Filmora features two tilt effects, tilt-shift circle and tilt-shift linear, which allows you to highlight people in the video, blur, and conceal the video background.
Go to the Effects tab and then switch to the Utility menu under Included category.
Here, I will select the Tilt-Shift Circle effect and drop it to the track above the video. Now, you can adjust the size, position, and intensity of the tilt-shift circle effect
You see, the video background is blurred, and the people are highlighted. Now it’s your turn to download the Filmora video editor and try it yourself.
Richard Bennett
Richard Bennett is a writer and a lover of all things video.
Follow @Richard Bennett
- Title: "2024 Approved Ranking YouTube Download Apps for Android Users"
- Author: Thomas
- Created at : 2024-05-31 12:46:59
- Updated at : 2024-06-01 12:46:59
- Link: https://youtube-help.techidaily.com/2024-approved-ranking-youtube-download-apps-for-android-users/
- License: This work is licensed under CC BY-NC-SA 4.0.
