"2024 Approved Shine a Light on Your Content Creation"
Shine a Light on Your Content Creation
Lighting Tips for Vlogging: How to Light

Richard Bennett
Mar 27, 2024• Proven solutions
One of the best things you can do for your video quality is to ensure you have great lighting. Viewers find poor lighting distracting and it’s hard for them to see how great your content is if they are busy thinking about why your video is so dark. By creating a great lighting set up you can ensure that the people watching your videos are only thinking about how much they’re enjoying them.
Going outside and using natural light is the cheapest way to get a lot of light for your videos. If your vlog is not suited to the great outdoors then you need to get more strategic. You can turn on all the lights in your living room and still end up with a dark, grainy, video.
Video Lighting Basics: Three Point Lighting

The most common technique of lighting a scene is called three-point lighting. It involves three different sources of light in the shot and is used by portrait photographers, which is also a great method for lighting your vlog.
The brightest source of light is also known as the key light which need to be high quality. A window will work, but if you do not have access to one where you are filming then consider an LED panel light or a softbox light like the ones used in portrait photography.
This first light will create a dramatic shadow across half of your face. You want to reduce this shadow, but not get rid of it completely.
Rather than setting up another light source on the opposite side of the camera, put up a reflector to bounce some light back onto your face. This reflector is called your ‘Fill Light’.
The fill light is less bright than the primary source of light and it is placed on the side opposite to the key light. Its purpose is to reduce shadows produced by the key light and the reflector will need to be mounted on a stand.
The final step to creating three point lighting is to set up another light behind you. This is your ‘Backlight’, and it will help you stand out from your background. Backlight or Hair light is always placed behind and above the subject to create separation between the subject in the shot and the background. This basic lighting technique can be applied in almost every scene you shoot, which is why it is important to keep an open mind and to continue experimenting with possible light setups.
Watch Video! Top Lighting Tips for Vlogging
Lightning Tips for Aspiring YouTube Videographers
Becoming the master of light will take some time and practice, so it is crucial to remain curious and anxious to learn new tricks throughout that process if you want to continually become better. These tips will help you make the first steps on that journey.
1. Focus Your Key Light
Try to focus your Key Light so that it lights only you and not your background. Do this by mounting anything that can cast a shadow onto your Key Light to control the area where the light hits. If you are using a window for your Key Light then you can use a curtain. If you use a softbox light then your light will already be somewhat focused.
2. Use Natural Lighting
The light provided by the Sun is still the best light source, you can have in your video. The trouble is that natural light changes quickly, which makes it highly unpredictable. The best way to deal with this challenge is to come prepared to the set and to get the shot you want as quickly as you can.
3. Try DIY Lightning
Literally, anything from candles to LED light bulbs can serve as a source of light in a shot. You just need to pay attention to the light temperature, because warmer light sources may highlight reds and yellows that can make your footage look less realistic.
4. Use Lightning Kits
This is by far the best option if you want to be in complete control of the light on your set. You can adjust the intensity of the lights, use filters, diffusers and all sorts of other accessories to create the light that flatters the subjects of your videos. The only downside is that you’ll have to spend a considerable amount of money if you want to have a professional lighting kit.
5. Set up reflectors
Sets of reflectors are often under $50, so they are fairly affordable. However, some vloggers choose to forgo purchasing reflectors and make their own out of tinfoil.

If your strong main light is too hard on your eyes then you can use a translucent ‘reflector’ to soften it. Set your translucent reflector, or other screen, up in front of your main light to diffuse it.
If you are hosting a beauty vlog then you might consider a slightly different set up. Instead of having your main light off to one side set it up directly in front of you so your entire face is lit evenly. It is still a good idea to use fill lights in this set up to give you some dimension, and a backlight is even more essential for helping you stand out from the background. The even light hitting your face will also make you look flat if you do not use a backlight.

If you are using all of the lighting options available to you and your video still looks too dark then you can try brightening it by opening up the aperture of your camera lens/setting a lower f-stop. Letting more light into your camera can help your footage look brighter, although you also run the risk of making things look overexposed/ washed out if you are not careful.
If you are stuck shooting in low light conditions it is best to use a lens with a wider aperture/lower f-stop. This will make the best of the light you do have.
Richard Bennett
Richard Bennett is a writer and a lover of all things video.
Follow @Richard Bennett
Richard Bennett
Mar 27, 2024• Proven solutions
One of the best things you can do for your video quality is to ensure you have great lighting. Viewers find poor lighting distracting and it’s hard for them to see how great your content is if they are busy thinking about why your video is so dark. By creating a great lighting set up you can ensure that the people watching your videos are only thinking about how much they’re enjoying them.
Going outside and using natural light is the cheapest way to get a lot of light for your videos. If your vlog is not suited to the great outdoors then you need to get more strategic. You can turn on all the lights in your living room and still end up with a dark, grainy, video.
Video Lighting Basics: Three Point Lighting
The most common technique of lighting a scene is called three-point lighting. It involves three different sources of light in the shot and is used by portrait photographers, which is also a great method for lighting your vlog.
The brightest source of light is also known as the key light which need to be high quality. A window will work, but if you do not have access to one where you are filming then consider an LED panel light or a softbox light like the ones used in portrait photography.
This first light will create a dramatic shadow across half of your face. You want to reduce this shadow, but not get rid of it completely.
Rather than setting up another light source on the opposite side of the camera, put up a reflector to bounce some light back onto your face. This reflector is called your ‘Fill Light’.
The fill light is less bright than the primary source of light and it is placed on the side opposite to the key light. Its purpose is to reduce shadows produced by the key light and the reflector will need to be mounted on a stand.
The final step to creating three point lighting is to set up another light behind you. This is your ‘Backlight’, and it will help you stand out from your background. Backlight or Hair light is always placed behind and above the subject to create separation between the subject in the shot and the background. This basic lighting technique can be applied in almost every scene you shoot, which is why it is important to keep an open mind and to continue experimenting with possible light setups.
Watch Video! Top Lighting Tips for Vlogging
Lightning Tips for Aspiring YouTube Videographers
Becoming the master of light will take some time and practice, so it is crucial to remain curious and anxious to learn new tricks throughout that process if you want to continually become better. These tips will help you make the first steps on that journey.
1. Focus Your Key Light
Try to focus your Key Light so that it lights only you and not your background. Do this by mounting anything that can cast a shadow onto your Key Light to control the area where the light hits. If you are using a window for your Key Light then you can use a curtain. If you use a softbox light then your light will already be somewhat focused.
2. Use Natural Lighting
The light provided by the Sun is still the best light source, you can have in your video. The trouble is that natural light changes quickly, which makes it highly unpredictable. The best way to deal with this challenge is to come prepared to the set and to get the shot you want as quickly as you can.
3. Try DIY Lightning
Literally, anything from candles to LED light bulbs can serve as a source of light in a shot. You just need to pay attention to the light temperature, because warmer light sources may highlight reds and yellows that can make your footage look less realistic.
4. Use Lightning Kits
This is by far the best option if you want to be in complete control of the light on your set. You can adjust the intensity of the lights, use filters, diffusers and all sorts of other accessories to create the light that flatters the subjects of your videos. The only downside is that you’ll have to spend a considerable amount of money if you want to have a professional lighting kit.
5. Set up reflectors
Sets of reflectors are often under $50, so they are fairly affordable. However, some vloggers choose to forgo purchasing reflectors and make their own out of tinfoil.
If your strong main light is too hard on your eyes then you can use a translucent ‘reflector’ to soften it. Set your translucent reflector, or other screen, up in front of your main light to diffuse it.
If you are hosting a beauty vlog then you might consider a slightly different set up. Instead of having your main light off to one side set it up directly in front of you so your entire face is lit evenly. It is still a good idea to use fill lights in this set up to give you some dimension, and a backlight is even more essential for helping you stand out from the background. The even light hitting your face will also make you look flat if you do not use a backlight.
If you are using all of the lighting options available to you and your video still looks too dark then you can try brightening it by opening up the aperture of your camera lens/setting a lower f-stop. Letting more light into your camera can help your footage look brighter, although you also run the risk of making things look overexposed/ washed out if you are not careful.
If you are stuck shooting in low light conditions it is best to use a lens with a wider aperture/lower f-stop. This will make the best of the light you do have.
Richard Bennett
Richard Bennett is a writer and a lover of all things video.
Follow @Richard Bennett
Richard Bennett
Mar 27, 2024• Proven solutions
One of the best things you can do for your video quality is to ensure you have great lighting. Viewers find poor lighting distracting and it’s hard for them to see how great your content is if they are busy thinking about why your video is so dark. By creating a great lighting set up you can ensure that the people watching your videos are only thinking about how much they’re enjoying them.
Going outside and using natural light is the cheapest way to get a lot of light for your videos. If your vlog is not suited to the great outdoors then you need to get more strategic. You can turn on all the lights in your living room and still end up with a dark, grainy, video.
Video Lighting Basics: Three Point Lighting
The most common technique of lighting a scene is called three-point lighting. It involves three different sources of light in the shot and is used by portrait photographers, which is also a great method for lighting your vlog.
The brightest source of light is also known as the key light which need to be high quality. A window will work, but if you do not have access to one where you are filming then consider an LED panel light or a softbox light like the ones used in portrait photography.
This first light will create a dramatic shadow across half of your face. You want to reduce this shadow, but not get rid of it completely.
Rather than setting up another light source on the opposite side of the camera, put up a reflector to bounce some light back onto your face. This reflector is called your ‘Fill Light’.
The fill light is less bright than the primary source of light and it is placed on the side opposite to the key light. Its purpose is to reduce shadows produced by the key light and the reflector will need to be mounted on a stand.
The final step to creating three point lighting is to set up another light behind you. This is your ‘Backlight’, and it will help you stand out from your background. Backlight or Hair light is always placed behind and above the subject to create separation between the subject in the shot and the background. This basic lighting technique can be applied in almost every scene you shoot, which is why it is important to keep an open mind and to continue experimenting with possible light setups.
Watch Video! Top Lighting Tips for Vlogging
Lightning Tips for Aspiring YouTube Videographers
Becoming the master of light will take some time and practice, so it is crucial to remain curious and anxious to learn new tricks throughout that process if you want to continually become better. These tips will help you make the first steps on that journey.
1. Focus Your Key Light
Try to focus your Key Light so that it lights only you and not your background. Do this by mounting anything that can cast a shadow onto your Key Light to control the area where the light hits. If you are using a window for your Key Light then you can use a curtain. If you use a softbox light then your light will already be somewhat focused.
2. Use Natural Lighting
The light provided by the Sun is still the best light source, you can have in your video. The trouble is that natural light changes quickly, which makes it highly unpredictable. The best way to deal with this challenge is to come prepared to the set and to get the shot you want as quickly as you can.
3. Try DIY Lightning
Literally, anything from candles to LED light bulbs can serve as a source of light in a shot. You just need to pay attention to the light temperature, because warmer light sources may highlight reds and yellows that can make your footage look less realistic.
4. Use Lightning Kits
This is by far the best option if you want to be in complete control of the light on your set. You can adjust the intensity of the lights, use filters, diffusers and all sorts of other accessories to create the light that flatters the subjects of your videos. The only downside is that you’ll have to spend a considerable amount of money if you want to have a professional lighting kit.
5. Set up reflectors
Sets of reflectors are often under $50, so they are fairly affordable. However, some vloggers choose to forgo purchasing reflectors and make their own out of tinfoil.
If your strong main light is too hard on your eyes then you can use a translucent ‘reflector’ to soften it. Set your translucent reflector, or other screen, up in front of your main light to diffuse it.
If you are hosting a beauty vlog then you might consider a slightly different set up. Instead of having your main light off to one side set it up directly in front of you so your entire face is lit evenly. It is still a good idea to use fill lights in this set up to give you some dimension, and a backlight is even more essential for helping you stand out from the background. The even light hitting your face will also make you look flat if you do not use a backlight.
If you are using all of the lighting options available to you and your video still looks too dark then you can try brightening it by opening up the aperture of your camera lens/setting a lower f-stop. Letting more light into your camera can help your footage look brighter, although you also run the risk of making things look overexposed/ washed out if you are not careful.
If you are stuck shooting in low light conditions it is best to use a lens with a wider aperture/lower f-stop. This will make the best of the light you do have.
Richard Bennett
Richard Bennett is a writer and a lover of all things video.
Follow @Richard Bennett
Mastering the Art of Design: Selecting Ideal Dimensions for YT Branding
Best YouTube Banner Size and Channel Art Dimension (The Ultimate Guide)
Richard Bennett
Oct 26, 2023• Proven solutions
YouTube is a social platform that relies on visually exciting material to attract the audience. Just like a book with an appealing cover compels a person to pick it up and read, it is significant to display and advertise your YouTube channel in a way that makes viewers click and browse through the channel.
Despite creating a beautiful banner on your desktop screen, it might end up distorted on a mobile screen if the recommended sizes for all kinds of gadgets are not followed. Hence, choosing your YouTube channel art dimension is essential since it is the viewer’s first impression. To commence with, you must be careful about your YouTube banner size and channel art dimensions. Are you wondering how to create the perfect banner or cover photo as we know it? Worry not as we are going to tell you the exact details to achieve an ideal YouTube banner size that fits all devices from computers to phones.
- Part 1: The Recommended YouTube Banner Size
- Part 2: The Best YouTube Banner Size on Different Devices
- Part 3: The Best YouTube Video Maker–Wondershare Filmora
Part 1: The Recommended YouTube Banner Size
According to YouTube’s official standards, the recommended banner size is 2560×1440 pixels. However, the minimum image dimensions are 2048×1152 pixels. To ensure that your text is visible regardless of the screen size, sticking to the “safe area” of 2560×423 pixels is the best option. Why are these sizes significant? Well, it’s essential to keep in mind the fact that people worldwide will be using different kinds of gadgets to access YouTube, and it is crucial to optimize your YouTube banner size for it to be ideal.
Part 2: The Best YouTube Banner Size on Different Devices
For the best results on all devices, your YouTube banner size should be:
YouTube Channel Art/Banner Dimensions Displayed on TVs
2560 x 1440 px
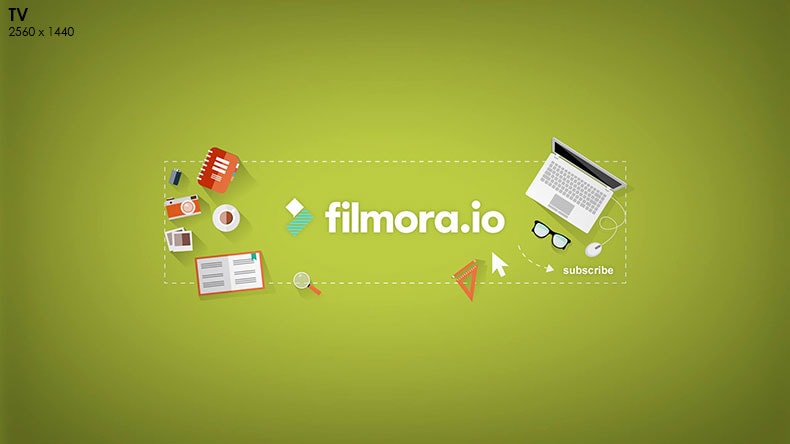
YouTube will display your entire channel art on TVs
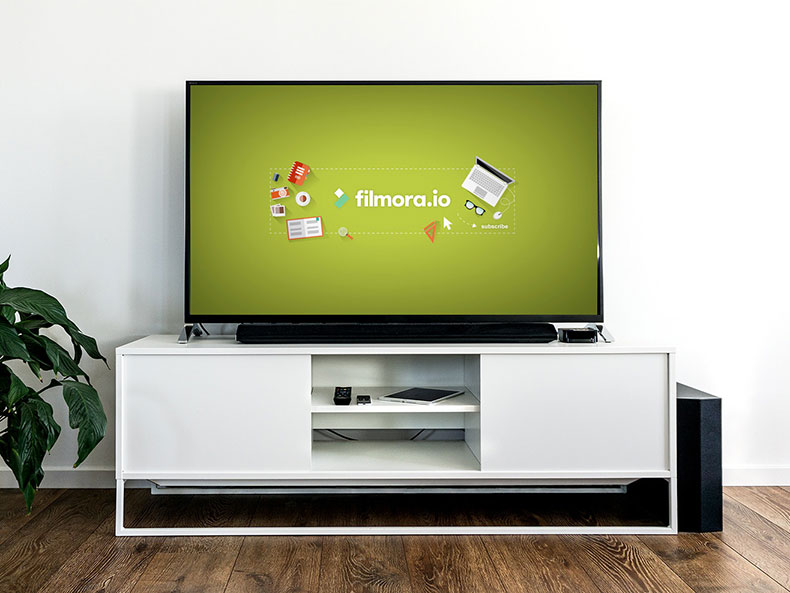
Here’s what our YouTube channel art example would look like on a TV.
YouTube Channel Art/Banner Dimensions Displayed on Smaller Desktop Monitors and Mobile Phones
1546 x 423 px
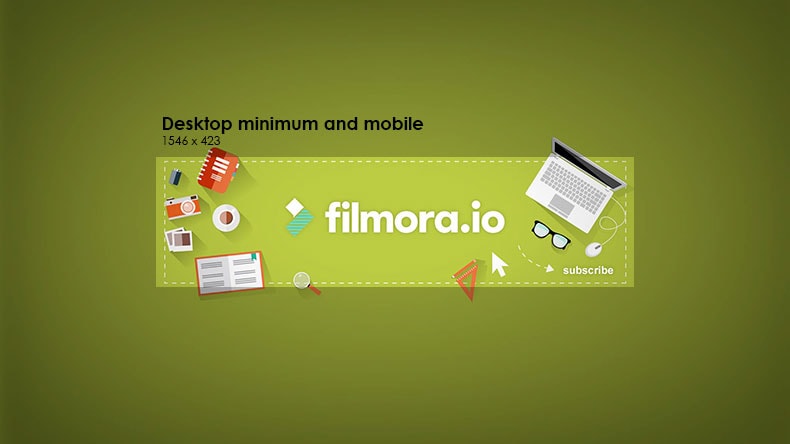
On small desktop monitors and mobile devices, YouTube will display less than 20% of your entire channel art, the center area measuring a width of 1546 pixels and a height of 423 pixels. You want to make sure that your text and logo make it into this part.
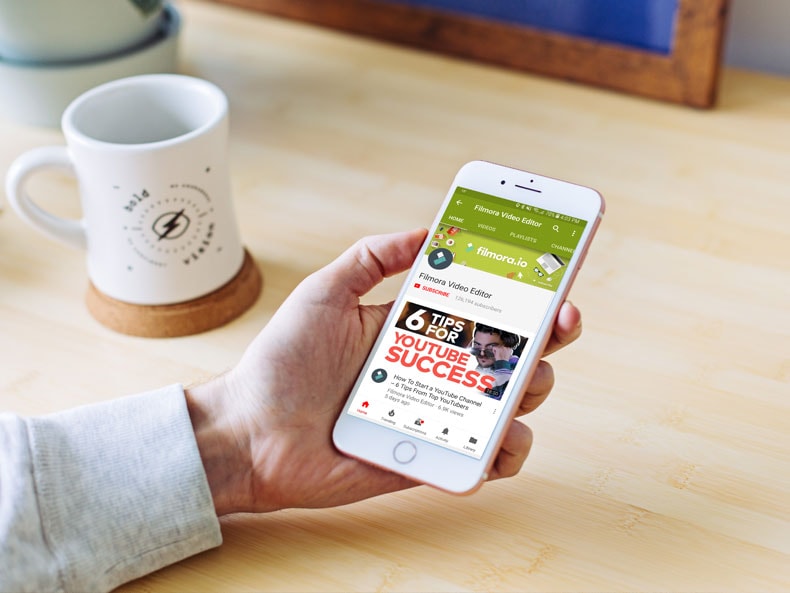
Here’s what our YouTube channel art example would look like on a mobile phone.
YouTube Channel Art/Banner Dimensions Displayed on Tablets
1855 x 423 px
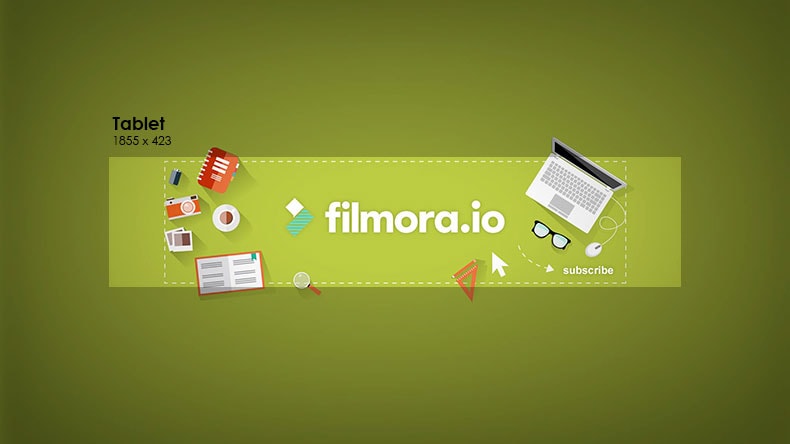
On tablet devices, YouTube will display around 20% more of your channel art, just to the sides of your smaller desktop monitor and mobile device area.
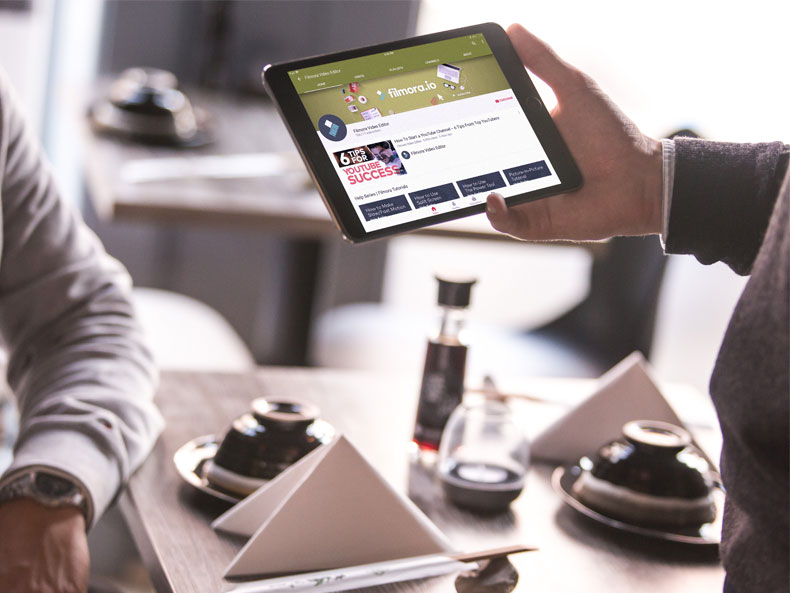
Here’s what our YouTube channel art example would look like on a tablet device.
YouTube Channel Art/Banner Dimensions Displayed on Larger Desktop Monitors
2560 x 423 px
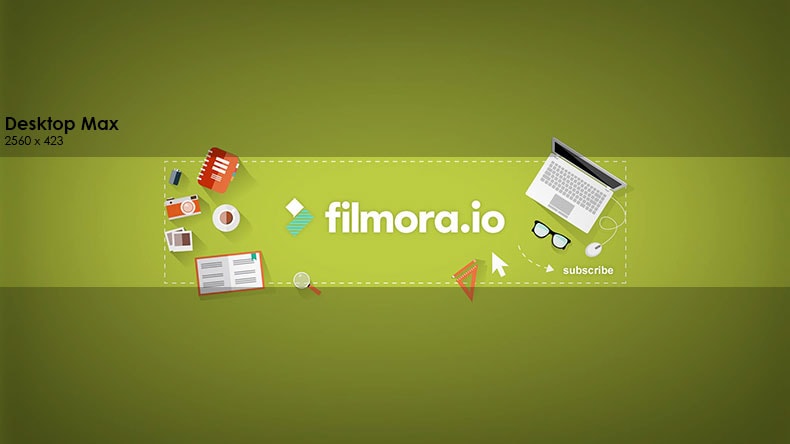
On larger desktop monitors, YouTube will display the entire width of your channel art but not the upper and lower part.

Here’s what our YouTube channel art example would look like on a large desktop monitor.
By following these dimensions in the design of your YouTube channel art/banner, you can be sure to have a responsive image that works best across different devices.
Have you ever had trouble with your YouTube banner size?
If you’d like to make your own channel art, check out our list of Top 9 YouTube Channel Art Makers .
Part 3: The Best YouTube Video Maker–Wondershare Filmora
Want to create a spectacular YouTube video with excellent graphics but lack the expertise? Don’t stress! Wondershare Filmora is here to save the day with its incredible video editing features. Despite the professional outcome it provides, it has been customized for easy use by the beginners.


Key Features:
- Supports GIF and 4K Resolution with advanced text editing features.
- Directly import files from any social media platform, for example, Facebook.
- Transform your video by layering multiple video clips and adding titles, filters, and overlays.
- Time-lapse, noise reduction, and split-screen preset available.
Compatibility:
- Windows: Microsoft Windows 7/Windows 8/Windows 10 (64 bit OS recommended).
- Processor: Intel i3 or better multicore processor, 2GHz or above.
- RAM: 4 GB RAM (8GB required for HD and 4K videos).
To Sum Up
So, are you ready to optimize your channel by following the YouTube banner size’s basic requirements? We hope you are now aware of the importance your YouTube channel art dimension has.
Also, for your channel to be distinctive and attractive enough, it must be edited, which is now relatively easy through video editing apps like the Wondershare Filmora. What are you waiting for? Invest in this pocket-friendly application to create stunning videos in no time and take your channel to the next level.
Richard Bennett
Richard Bennett is a writer and a lover of all things video.
Follow @Richard Bennett
Richard Bennett
Oct 26, 2023• Proven solutions
YouTube is a social platform that relies on visually exciting material to attract the audience. Just like a book with an appealing cover compels a person to pick it up and read, it is significant to display and advertise your YouTube channel in a way that makes viewers click and browse through the channel.
Despite creating a beautiful banner on your desktop screen, it might end up distorted on a mobile screen if the recommended sizes for all kinds of gadgets are not followed. Hence, choosing your YouTube channel art dimension is essential since it is the viewer’s first impression. To commence with, you must be careful about your YouTube banner size and channel art dimensions. Are you wondering how to create the perfect banner or cover photo as we know it? Worry not as we are going to tell you the exact details to achieve an ideal YouTube banner size that fits all devices from computers to phones.
- Part 1: The Recommended YouTube Banner Size
- Part 2: The Best YouTube Banner Size on Different Devices
- Part 3: The Best YouTube Video Maker–Wondershare Filmora
Part 1: The Recommended YouTube Banner Size
According to YouTube’s official standards, the recommended banner size is 2560×1440 pixels. However, the minimum image dimensions are 2048×1152 pixels. To ensure that your text is visible regardless of the screen size, sticking to the “safe area” of 2560×423 pixels is the best option. Why are these sizes significant? Well, it’s essential to keep in mind the fact that people worldwide will be using different kinds of gadgets to access YouTube, and it is crucial to optimize your YouTube banner size for it to be ideal.
Part 2: The Best YouTube Banner Size on Different Devices
For the best results on all devices, your YouTube banner size should be:
YouTube Channel Art/Banner Dimensions Displayed on TVs
2560 x 1440 px
YouTube will display your entire channel art on TVs
Here’s what our YouTube channel art example would look like on a TV.
YouTube Channel Art/Banner Dimensions Displayed on Smaller Desktop Monitors and Mobile Phones
1546 x 423 px
On small desktop monitors and mobile devices, YouTube will display less than 20% of your entire channel art, the center area measuring a width of 1546 pixels and a height of 423 pixels. You want to make sure that your text and logo make it into this part.
Here’s what our YouTube channel art example would look like on a mobile phone.
YouTube Channel Art/Banner Dimensions Displayed on Tablets
1855 x 423 px
On tablet devices, YouTube will display around 20% more of your channel art, just to the sides of your smaller desktop monitor and mobile device area.
Here’s what our YouTube channel art example would look like on a tablet device.
YouTube Channel Art/Banner Dimensions Displayed on Larger Desktop Monitors
2560 x 423 px
On larger desktop monitors, YouTube will display the entire width of your channel art but not the upper and lower part.
Here’s what our YouTube channel art example would look like on a large desktop monitor.
By following these dimensions in the design of your YouTube channel art/banner, you can be sure to have a responsive image that works best across different devices.
Have you ever had trouble with your YouTube banner size?
If you’d like to make your own channel art, check out our list of Top 9 YouTube Channel Art Makers .
Part 3: The Best YouTube Video Maker–Wondershare Filmora
Want to create a spectacular YouTube video with excellent graphics but lack the expertise? Don’t stress! Wondershare Filmora is here to save the day with its incredible video editing features. Despite the professional outcome it provides, it has been customized for easy use by the beginners.
Key Features:
- Supports GIF and 4K Resolution with advanced text editing features.
- Directly import files from any social media platform, for example, Facebook.
- Transform your video by layering multiple video clips and adding titles, filters, and overlays.
- Time-lapse, noise reduction, and split-screen preset available.
Compatibility:
- Windows: Microsoft Windows 7/Windows 8/Windows 10 (64 bit OS recommended).
- Processor: Intel i3 or better multicore processor, 2GHz or above.
- RAM: 4 GB RAM (8GB required for HD and 4K videos).
To Sum Up
So, are you ready to optimize your channel by following the YouTube banner size’s basic requirements? We hope you are now aware of the importance your YouTube channel art dimension has.
Also, for your channel to be distinctive and attractive enough, it must be edited, which is now relatively easy through video editing apps like the Wondershare Filmora. What are you waiting for? Invest in this pocket-friendly application to create stunning videos in no time and take your channel to the next level.
Richard Bennett
Richard Bennett is a writer and a lover of all things video.
Follow @Richard Bennett
Also read:
- [New] Essential Software to Rip YouTube Trailers for 2024
- 2024 Approved From One-Off to Firm Follower An Ethical Approach
- 2024 Approved How to Execute Flawless WireCast Broadcasts on YouTube
- Green Screen Mastery on YouTube - Ideas Unleashed for 2024
- How to Prevent and Resolve 'Tribes of Midgard' Freezing Issues - Expert Tips & Tricks
- How to See Your Subscribers on YouTube, In 2024
- In 2024, Audio Purging Techniques for Streaming Success
- In 2024, Filmmaker Tips YouTube Trailers Using Filmora
- In 2024, How to Stop My Spouse from Spying on My Google Pixel 8 Pro | Dr.fone
- In 2024, Unleash Creativity with YouTube Clips - Make Animation GIFs Easily
- Legal Implications & Tips When Archiving WhatsApp Call Recordings
- OBS Studio for Gamers PS4 Screenshots & Recordings Guide for 2024
- Proven Ways to Fix There Was A Problem Parsing the Package on Infinix Hot 40 | Dr.fone
- Step by Step From Graphic Geniuses to Sticker Stars in All Chat Apps
- Updated 2024 Approved Online Acoustic Magic The Ultimate Guide to Implementing Effective Echo in Windows-Based Audio Workspaces
- Title: 2024 Approved Shine a Light on Your Content Creation
- Author: Thomas
- Created at : 2024-10-06 02:50:20
- Updated at : 2024-10-06 23:46:06
- Link: https://youtube-help.techidaily.com/2024-approved-shine-a-light-on-your-content-creation/
- License: This work is licensed under CC BY-NC-SA 4.0.