
:max_bytes(150000):strip_icc():format(webp)/HotelTransylvaniaTransformania-71f0792728254936864ad509c847c73c.jpg)
"2024 Approved Silence's Symphony Strategies for Capturing Pristine Audio"
Silence’s Symphony: Strategies for Capturing Pristine Audio
10 Recording Tips for Recording Audio with High Quality

Richard Bennett
Oct 26, 2023• Proven solutions
Getting the best sound for your recording is not as simplistic as buying an expensive microphone. There are many different things you can do to record your audio more clearly. Here are 10 recording tips to record high-quality audio.
1. Silence everything you don’t want your microphone to record
2. Put your mobile phone in airplane mode
3. Minimize echo
4. Block wind from reaching your microphone
5. Upgrade your microphone
6. Adjust your levels
7. Start with a sound cue if you’re planning to do some syncing in post
8. Get close to the sound
9. ADR
10. Record Ambient Sound
Bonus Tip-Record Your Audio with Wondershare Filmora
Wondershare Filmora has great recording features that enable you to record screen , voiceover, and webcam. Just connect the recording device to your computer, and start the recording in Wondershare Filmora and you will get high-quality audio. And you can also easily pick a song from the royalty-free music library on Wondershare Filmora. These audio features on Filmora are rare and very simple to use, you only need to click a few times and your video will have a new sound and background song.


1. Silence everything you don’t want your microphone to record
When you’re recording audio, you have to be more aware of the subtle sounds that drone on in your background. These sounds may include humming from machines with fans, buzzing from lights, and jingling from your pet’s collar. Observe your recording space and find ways to silence everything that you don’t want in your audio recording.
2. Put your mobile phone in airplane mode
Although it may be quite obvious to turn your phone’s ring tone off when you’re recording, it may not be as obvious to put your phone in airplane mode. When phones receive calls or perform searches as part of their background processes, they emit signals that can get picked up by your recording system. Avoid ruining good takes with unwanted sounds of phone signals by putting your phones in airplane mode.
3. Minimize echo
If you are recording yourself talk or sing, make sure to set up your recording space in a way where the sound projected from your voice bounces minimally off the walls and back to your microphone. Bare walls and hardwood floors will cause a lot of bouncing. Make use of materials that will absorb your sound rather than bounce it, like a thick rug or a comforter. If you want your voice to echo, that’s something you should do in post-production.
4. Block wind from reaching your microphone
Although it might not sound so loud and distracting to the naked ear, wind sounds terribly loud through a microphone recording and can cause your audio to clip (distortion of waveform due to output of sound exceeding maximum capacity or 0 dB point). This includes the “wind” that comes out of your mouth when you pronounce words starting with the letter “p.” Use pop filters, windscreens, and deadcats to block wind from reaching your microphone.
5. Upgrade your microphone
As much as you try to control all the noise in your surroundings, your greatest recording limitation will come from the hardware that you use. Improve your recordings by plugging in an external microphone into your camera’s microphone jack or record audio completely separately with a professional microphone.
Need help with deciding on a microphone to buy? Check out our recommended list of microphones.
6. Adjust your levels
Before pressing the record button, see how loudly your microphone picks up the sound you wish to record. Adjust your levels (sensitivity of your microphone) until the sound sits in between -6 dBs and -12dBs. This range gives the source of your sound some room to get louder without the recorded audio getting clipped. When you first listen to audio recorded within this range, it may sound very quiet. No need to worry though because you can increase the volume later in editing.
7. Start with a sound cue if you’re planning to do some syncing in post
If you’re recording separate audio that you plan to sync to your video later in editing, start your recording with a short and loud sound cue like a clap or a high pitched “beep” tone. Later, when you’re editing, it’ll be much easier for you to find the section where your video and additional audio match.
8. Get close to the sound
Unless you’re aiming to record ambient sound, bring your microphone close to the source of sound you are wanting to record. The closer your microphone is to the source of sound, the lower your sensitivity setting can be on your microphone. As a result of lowering your levels, sounds you are not meaning to record will also sound fainter.
9. ADR
When you need to record a scene in a loud setting where you have very little control over the noise, record additional vocals later and replace the original vocals through a process called automated dialogue replacement.
10. Record Ambient Sound
Remember to record ambient sound or “room tone.” You can use these recordings to fill in the blanks if you run out of audio and also smooth out parts of your audio where you hear pops, clicks, and other unwanted noise.
Richard Bennett
Richard Bennett is a writer and a lover of all things video.
Follow @Richard Bennett
Richard Bennett
Oct 26, 2023• Proven solutions
Getting the best sound for your recording is not as simplistic as buying an expensive microphone. There are many different things you can do to record your audio more clearly. Here are 10 recording tips to record high-quality audio.
1. Silence everything you don’t want your microphone to record
2. Put your mobile phone in airplane mode
3. Minimize echo
4. Block wind from reaching your microphone
5. Upgrade your microphone
6. Adjust your levels
7. Start with a sound cue if you’re planning to do some syncing in post
8. Get close to the sound
9. ADR
10. Record Ambient Sound
Bonus Tip-Record Your Audio with Wondershare Filmora
Wondershare Filmora has great recording features that enable you to record screen , voiceover, and webcam. Just connect the recording device to your computer, and start the recording in Wondershare Filmora and you will get high-quality audio. And you can also easily pick a song from the royalty-free music library on Wondershare Filmora. These audio features on Filmora are rare and very simple to use, you only need to click a few times and your video will have a new sound and background song.
1. Silence everything you don’t want your microphone to record
When you’re recording audio, you have to be more aware of the subtle sounds that drone on in your background. These sounds may include humming from machines with fans, buzzing from lights, and jingling from your pet’s collar. Observe your recording space and find ways to silence everything that you don’t want in your audio recording.
2. Put your mobile phone in airplane mode
Although it may be quite obvious to turn your phone’s ring tone off when you’re recording, it may not be as obvious to put your phone in airplane mode. When phones receive calls or perform searches as part of their background processes, they emit signals that can get picked up by your recording system. Avoid ruining good takes with unwanted sounds of phone signals by putting your phones in airplane mode.
3. Minimize echo
If you are recording yourself talk or sing, make sure to set up your recording space in a way where the sound projected from your voice bounces minimally off the walls and back to your microphone. Bare walls and hardwood floors will cause a lot of bouncing. Make use of materials that will absorb your sound rather than bounce it, like a thick rug or a comforter. If you want your voice to echo, that’s something you should do in post-production.
4. Block wind from reaching your microphone
Although it might not sound so loud and distracting to the naked ear, wind sounds terribly loud through a microphone recording and can cause your audio to clip (distortion of waveform due to output of sound exceeding maximum capacity or 0 dB point). This includes the “wind” that comes out of your mouth when you pronounce words starting with the letter “p.” Use pop filters, windscreens, and deadcats to block wind from reaching your microphone.
5. Upgrade your microphone
As much as you try to control all the noise in your surroundings, your greatest recording limitation will come from the hardware that you use. Improve your recordings by plugging in an external microphone into your camera’s microphone jack or record audio completely separately with a professional microphone.
Need help with deciding on a microphone to buy? Check out our recommended list of microphones.
6. Adjust your levels
Before pressing the record button, see how loudly your microphone picks up the sound you wish to record. Adjust your levels (sensitivity of your microphone) until the sound sits in between -6 dBs and -12dBs. This range gives the source of your sound some room to get louder without the recorded audio getting clipped. When you first listen to audio recorded within this range, it may sound very quiet. No need to worry though because you can increase the volume later in editing.
7. Start with a sound cue if you’re planning to do some syncing in post
If you’re recording separate audio that you plan to sync to your video later in editing, start your recording with a short and loud sound cue like a clap or a high pitched “beep” tone. Later, when you’re editing, it’ll be much easier for you to find the section where your video and additional audio match.
8. Get close to the sound
Unless you’re aiming to record ambient sound, bring your microphone close to the source of sound you are wanting to record. The closer your microphone is to the source of sound, the lower your sensitivity setting can be on your microphone. As a result of lowering your levels, sounds you are not meaning to record will also sound fainter.
9. ADR
When you need to record a scene in a loud setting where you have very little control over the noise, record additional vocals later and replace the original vocals through a process called automated dialogue replacement.
10. Record Ambient Sound
Remember to record ambient sound or “room tone.” You can use these recordings to fill in the blanks if you run out of audio and also smooth out parts of your audio where you hear pops, clicks, and other unwanted noise.
Richard Bennett
Richard Bennett is a writer and a lover of all things video.
Follow @Richard Bennett
Unlock YouTube’s Full Potential: Top 6 Tactics for Improved Viewership Retention
6 Ways To Increase Audience Retention on YouTube
Richard Bennett
Mar 27, 2024• Proven solutions
Audience retention is one of your most important stats on YouTube. It is even more important than your view count. Your view count really only tells you how many people are finding and clicking on your videos, not whether they are actually watching them. Audience retention refers to how much of a video a viewer watches before clicking away, which is very useful information to have. If you know when people are leaving your videos then you know what you need to work on.
You May Also Like: How to analyse your and your competitors’ YouTube Channel >>
How to structure a YouTube video >>
- Part 1: What is Audience Retention?
- Part 2: How to See Your Audience Retention Report in YouTube?
- Part 3: What is a Good Audience Retention Rate on YouTube?
- Part 4: 6 Ways to Increase YouTube Audience Retention
Part 1: What is Audience Retention?
To put it in simple terms, YouTube audience retention is about how much of each video your viewers watch. It’s usually expressed as a percentage, so if your viewer gets half way through, they will have a retention of 50 per cent.
For YouTube analytics, audience retention is taken as a mean of the retention figures for each of your viewers. For example, if you post a ten-minute video and half your viewers get to the five-minute mark, that’s a retention of 50 per cent. If the other half watch it right to the end, that’s a retention of 100 per cent. The mean of these two figures is 75 per cent, and that’s what YouTube will use as your audience retention figure.
This retention rate affects how highly your video is ranked on YouTube, with videos boasting higher audience retention rates appearing higher in the search results than those which do not. This is because both YouTube and Google are highly focussed on customer satisfaction, and a long watch time means a very happy customer was watching that video. For this reason, it’s well worth considering how to increase YouTube audience retention as it demonstrates that you’re making great content as well as helping you get more viewers.
Part 2: How to See Your Audience Retention Report in YouTube?
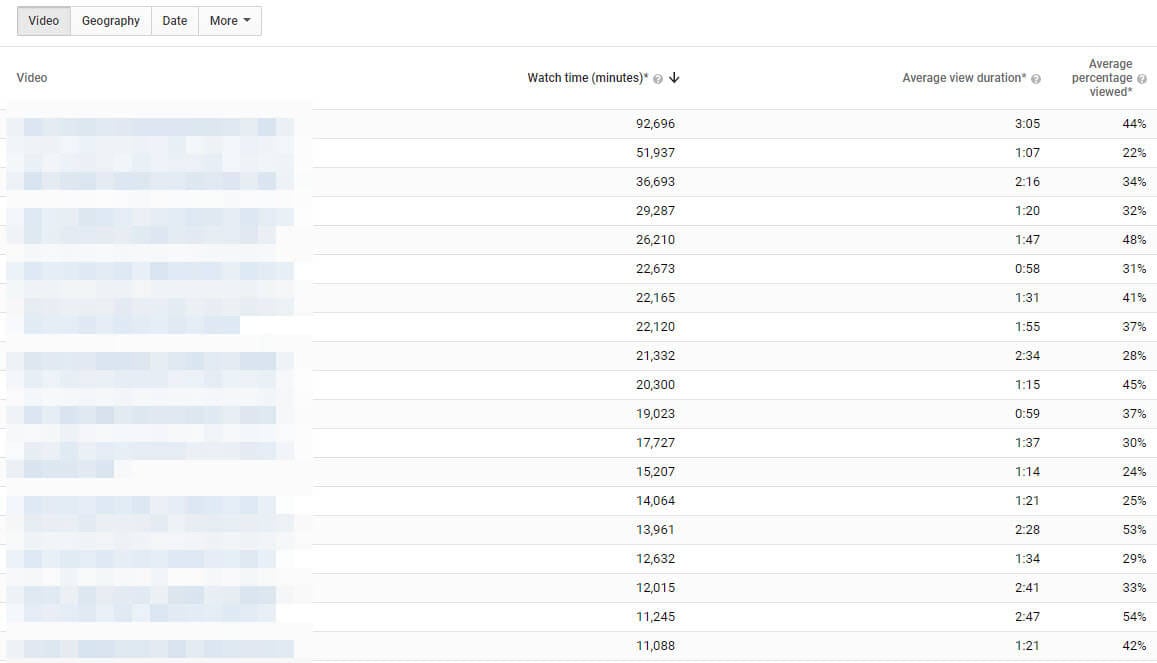
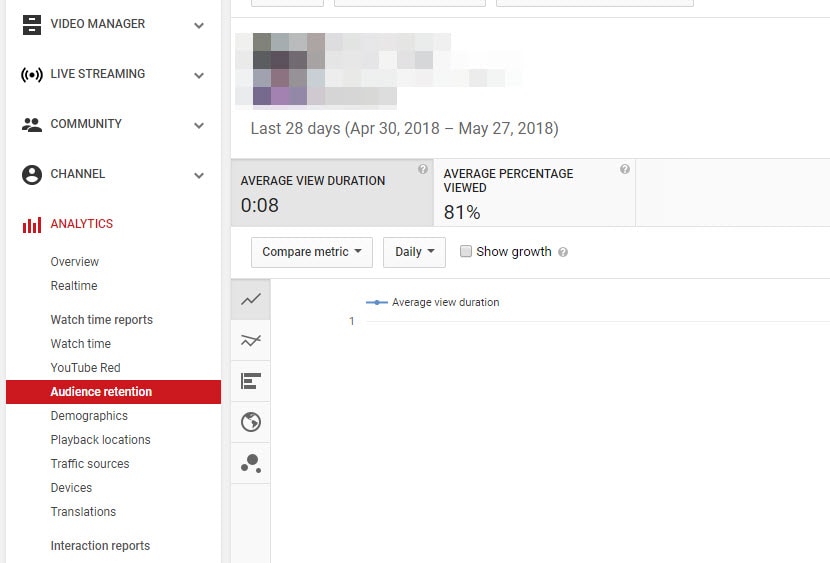
YouTube will produce reports to help you keep track of your audience retention. There are two types of audience retention reports; absolute and relative. Absolute allows you to view a graph of your video’s retention and see when people might be clicking away, or if they are skipping to later parts of your video. If you lose a lot of viewers in the first 15 seconds of your videos then that is a clear indication that your content is not what the viewers who find your videos really want. The relative report is where your video is compared to the average retention of similar videos.
Note that by ‘similar videos’, YouTube means videos of a similar length. There is no way to compare your videos only to other videos in your genre. The relative report will always be somewhat skewed because your videos will be measured against very different content.
To see an audience retention report log into your YouTube account and go to yourCreator Studio. There, selectAudience RetentionunderAnalytics.
Part 3: What is a Good Audience Retention Rate on YouTube?
When you’re considering how to increase YouTube audience retention, it can be good to have a goal in mind. Obviously 100 per cent is going to be the Holy Grail of retention rates, but how many videos are actually going to achieve that? It only takes for one person to ‘accidentally’ click on your video and rapidly click away, or for someone to have to stop for outside reasons, to drag your average down.
According to the YouTube community, a good goal to aim for is around 50 per cent, but as there is a lot which can affect your retention rate, that number may be different for you. Low view numbers sometimes get higher retention rates because it’s mainly subscribers watching, whereas channels with millions of views may suffer due to more people abandoning. Rather than setting yourself a golden number, focus instead on increasing your retention rate from wherever it is now, and celebrate your own success instead of measuring yourself against others.
Part 4: 6 Ways to Increase YouTube Audience Retention
If you’re serious about learning how to increase YouTube audience retention, here are five of the best ideas for you:
1. Compare your videos
Investigating your audience retention report will highlight the videos where you achieved maximum success. Think about what you did here, and work to replicate that technique. Perhaps you were talking about a product, or maybe your structured your video slightly differently. It’s up to you to dissect your video and find out what it was that kept people watching for longer, so that you can repeat this success in the future. You can also use some influencer marketing platform such as InflueNex to take a look at the videos in your similar channels, and learn the popular videos on their channels.
2. Get on with it
Research shows that YouTube viewers have an incredibly short attention span. Depending on who you believe, you could have as much as six seconds or as little as just three to grab their attention and compel them to carry on watching. If you want to improve your audience retention, coming in with an engaging, attention grabbing statement right at the start is crucial to your success. Nobody wants to waste their time watching someone waffle on for ages about their granny or their favorite hobbies, so get right down to it straight away, by telling them what’s in store.
3. Make it visually engaging
Perhaps all you’ve got is a presentation to make. You’re not a gamer, you’re not showing clips of your cat and you’re not doing a makeup tutorial, so surely all you need is a camera, good lighting and your face, right? Wrong. Viewers like to see the visual content changing, and videos which have a range of scenes are usually far more successful than those where it’s just a person talking to camera. Think about how you can insert cutaways, pop up text, different footage and other graphics to keep it interesting for your viewers.
4. Make it shorter
This one is a no brainer really. If you make a one-minute video, how hard is it going to be to keep viewers watching to the end compared to a 20-minute marathon. However, going too short can be negative too, unless you really do have something very quick and simple to showcase. Long videos work well for YouTubers in the gaming niche, in particular, because viewers want to know the end result, but for most of us, these sorts of viewing statistics are hard to reach.
If you consider a viewer who watches three minutes of your content, would you rather they watched three minutes of a ten-minute video and then clicked away bored, or would you rather they finished an entire video that was only three minutes long? Both in terms of audience retention and of your own reputation, having a viewer finish a short video is much more valuable to you than losing someone half way through a long one. That person probably enjoyed your content to the end and will more than likely watch another one of your videos. Conversely, the one you lost half way through was bored enough to stop watching and will probably not bother viewing any other videos of yours in future.
5. Keep them hooked
Think carefully about your YouTube video structure. Ideally, you will tell them at the very start that you’ve got something amazing to share with them later on. This could be a tip, a tutorial, a new product reveal or even something funny. Whatever it is, tell them they’re going to love it from the start, and keep reminding them to watch from the end to get this gift. That doesn’t mean you shouldn’t give them great content all the way through, just that you should save a carrot for the end of the ride to reward those loyal viewers.
So, now you know how to increase YouTube audience retention, what are you going to do about it? Have a go at modifying your videos to boost the numbers who will watch to the end and let us know how you got on.
6. Use an Excellent Video Editor
Content is the king. It is necessary to use a powerful video editor to help you edit videos. With an excellent video editor like Filmora, you can custom stunning videos effortlessly.
Richard Bennett
Richard Bennett is a writer and a lover of all things video.
Follow @Richard Bennett
Richard Bennett
Mar 27, 2024• Proven solutions
Audience retention is one of your most important stats on YouTube. It is even more important than your view count. Your view count really only tells you how many people are finding and clicking on your videos, not whether they are actually watching them. Audience retention refers to how much of a video a viewer watches before clicking away, which is very useful information to have. If you know when people are leaving your videos then you know what you need to work on.
You May Also Like: How to analyse your and your competitors’ YouTube Channel >>
How to structure a YouTube video >>
- Part 1: What is Audience Retention?
- Part 2: How to See Your Audience Retention Report in YouTube?
- Part 3: What is a Good Audience Retention Rate on YouTube?
- Part 4: 6 Ways to Increase YouTube Audience Retention
Part 1: What is Audience Retention?
To put it in simple terms, YouTube audience retention is about how much of each video your viewers watch. It’s usually expressed as a percentage, so if your viewer gets half way through, they will have a retention of 50 per cent.
For YouTube analytics, audience retention is taken as a mean of the retention figures for each of your viewers. For example, if you post a ten-minute video and half your viewers get to the five-minute mark, that’s a retention of 50 per cent. If the other half watch it right to the end, that’s a retention of 100 per cent. The mean of these two figures is 75 per cent, and that’s what YouTube will use as your audience retention figure.
This retention rate affects how highly your video is ranked on YouTube, with videos boasting higher audience retention rates appearing higher in the search results than those which do not. This is because both YouTube and Google are highly focussed on customer satisfaction, and a long watch time means a very happy customer was watching that video. For this reason, it’s well worth considering how to increase YouTube audience retention as it demonstrates that you’re making great content as well as helping you get more viewers.
Part 2: How to See Your Audience Retention Report in YouTube?
YouTube will produce reports to help you keep track of your audience retention. There are two types of audience retention reports; absolute and relative. Absolute allows you to view a graph of your video’s retention and see when people might be clicking away, or if they are skipping to later parts of your video. If you lose a lot of viewers in the first 15 seconds of your videos then that is a clear indication that your content is not what the viewers who find your videos really want. The relative report is where your video is compared to the average retention of similar videos.
Note that by ‘similar videos’, YouTube means videos of a similar length. There is no way to compare your videos only to other videos in your genre. The relative report will always be somewhat skewed because your videos will be measured against very different content.
To see an audience retention report log into your YouTube account and go to yourCreator Studio. There, selectAudience RetentionunderAnalytics.
Part 3: What is a Good Audience Retention Rate on YouTube?
When you’re considering how to increase YouTube audience retention, it can be good to have a goal in mind. Obviously 100 per cent is going to be the Holy Grail of retention rates, but how many videos are actually going to achieve that? It only takes for one person to ‘accidentally’ click on your video and rapidly click away, or for someone to have to stop for outside reasons, to drag your average down.
According to the YouTube community, a good goal to aim for is around 50 per cent, but as there is a lot which can affect your retention rate, that number may be different for you. Low view numbers sometimes get higher retention rates because it’s mainly subscribers watching, whereas channels with millions of views may suffer due to more people abandoning. Rather than setting yourself a golden number, focus instead on increasing your retention rate from wherever it is now, and celebrate your own success instead of measuring yourself against others.
Part 4: 6 Ways to Increase YouTube Audience Retention
If you’re serious about learning how to increase YouTube audience retention, here are five of the best ideas for you:
1. Compare your videos
Investigating your audience retention report will highlight the videos where you achieved maximum success. Think about what you did here, and work to replicate that technique. Perhaps you were talking about a product, or maybe your structured your video slightly differently. It’s up to you to dissect your video and find out what it was that kept people watching for longer, so that you can repeat this success in the future. You can also use some influencer marketing platform such as InflueNex to take a look at the videos in your similar channels, and learn the popular videos on their channels.
2. Get on with it
Research shows that YouTube viewers have an incredibly short attention span. Depending on who you believe, you could have as much as six seconds or as little as just three to grab their attention and compel them to carry on watching. If you want to improve your audience retention, coming in with an engaging, attention grabbing statement right at the start is crucial to your success. Nobody wants to waste their time watching someone waffle on for ages about their granny or their favorite hobbies, so get right down to it straight away, by telling them what’s in store.
3. Make it visually engaging
Perhaps all you’ve got is a presentation to make. You’re not a gamer, you’re not showing clips of your cat and you’re not doing a makeup tutorial, so surely all you need is a camera, good lighting and your face, right? Wrong. Viewers like to see the visual content changing, and videos which have a range of scenes are usually far more successful than those where it’s just a person talking to camera. Think about how you can insert cutaways, pop up text, different footage and other graphics to keep it interesting for your viewers.
4. Make it shorter
This one is a no brainer really. If you make a one-minute video, how hard is it going to be to keep viewers watching to the end compared to a 20-minute marathon. However, going too short can be negative too, unless you really do have something very quick and simple to showcase. Long videos work well for YouTubers in the gaming niche, in particular, because viewers want to know the end result, but for most of us, these sorts of viewing statistics are hard to reach.
If you consider a viewer who watches three minutes of your content, would you rather they watched three minutes of a ten-minute video and then clicked away bored, or would you rather they finished an entire video that was only three minutes long? Both in terms of audience retention and of your own reputation, having a viewer finish a short video is much more valuable to you than losing someone half way through a long one. That person probably enjoyed your content to the end and will more than likely watch another one of your videos. Conversely, the one you lost half way through was bored enough to stop watching and will probably not bother viewing any other videos of yours in future.
5. Keep them hooked
Think carefully about your YouTube video structure. Ideally, you will tell them at the very start that you’ve got something amazing to share with them later on. This could be a tip, a tutorial, a new product reveal or even something funny. Whatever it is, tell them they’re going to love it from the start, and keep reminding them to watch from the end to get this gift. That doesn’t mean you shouldn’t give them great content all the way through, just that you should save a carrot for the end of the ride to reward those loyal viewers.
So, now you know how to increase YouTube audience retention, what are you going to do about it? Have a go at modifying your videos to boost the numbers who will watch to the end and let us know how you got on.
6. Use an Excellent Video Editor
Content is the king. It is necessary to use a powerful video editor to help you edit videos. With an excellent video editor like Filmora, you can custom stunning videos effortlessly.
Richard Bennett
Richard Bennett is a writer and a lover of all things video.
Follow @Richard Bennett
- Title: "2024 Approved Silence's Symphony Strategies for Capturing Pristine Audio"
- Author: Thomas
- Created at : 2024-05-31 12:40:54
- Updated at : 2024-06-01 12:40:54
- Link: https://youtube-help.techidaily.com/2024-approved-silences-symphony-strategies-for-capturing-pristine-audio/
- License: This work is licensed under CC BY-NC-SA 4.0.
