
"2024 Approved Start Saving YouTube Videos as Screen Captures Today - Completely Free"
Start Saving YouTube Videos as Screen Captures Today - Completely Free
How To Record Screencast From YouTube For Free

Max Wales
Mar 27, 2024• Proven solutions
Screencasting is a simple task anyone can do it with ease. All that you need to do is download a software program, press the record button and soon all movements on your device screen video will be recorded. Crazy video gamers do the same thing to share their interesting game videos on YouTube channels.
There is a wide range of software tools that can assists you with screencasting needs. Even YouTube itself has the ability to capture device screens without the need for additional software tool. If you are interested to know how it can be done, simply go through the details below.
Note: We resolutely oppose all forms of copyright-infringing downloads. This tutorial is only for downloading YouTube videos/audio materials from your own channel.
![]()

The All-in-One Screen Recorder & Video Editor
- Record desktop screen, voiceover, and webcam simultaneously
- Edit recorded clips quickly with a wide range of professional tools
- Built-in plentiful templates and effects
- Export to MP4, MOV, MKV, GIF and multiple formats
For Win 7 or later (64-bit)
For macOS 10.12 or later
 Secure Download
Recording Screencast Video with YouTube
Step 1: Open YouTube on your computer and sign by using your Google Account. On the top left corner, you will find the Upload button, press it and go to live streaming section and choose events from the drop-down menu. When you are doing this for the very first time, YouTube will ask your phone number to verify the streaming process. You can also click here to get to the Livestreaming page directly.
Step 2: On the create an event page, add a title for your screencast video; set privacy terms and then hit “Go Live Now” option.

Step 3: The Hangout on Air page will get opened. It will allow you to select-deselect webcam recording as well as mic recording.
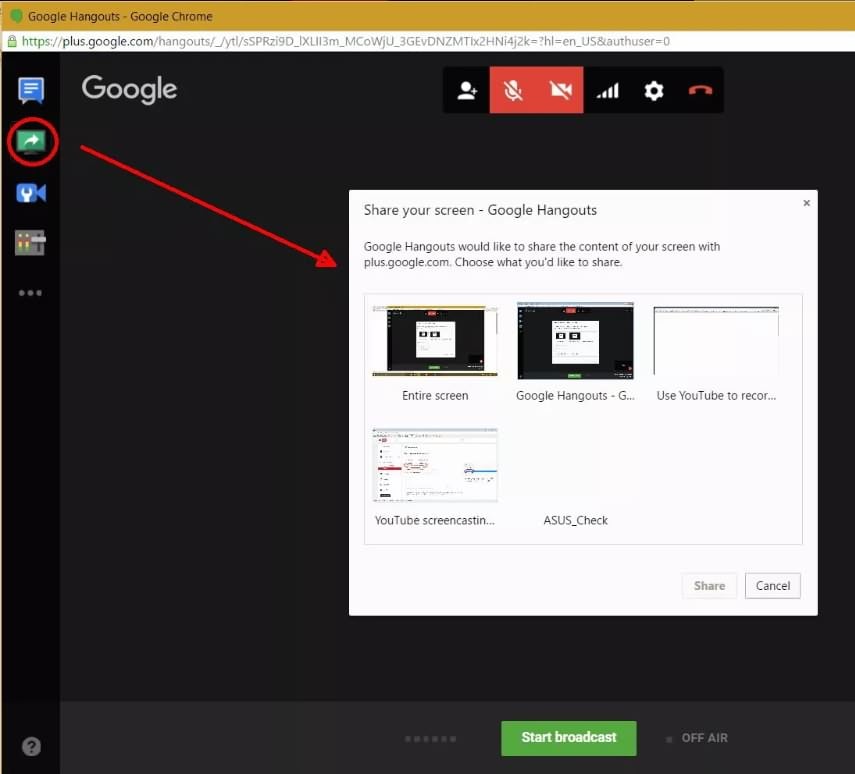
Step 4: Hit the screen share button from the left toolbox and choose the desktop window that you wish to record. Now press start the Broadcast button to start screen recording. Note that it is a private session that cannot be watched by anyone else.
Step 5: When your video is ready to go to YouTube video dashboard and choose your recent screencast video. Download it to Google Drive and share it with the world.
A better way to record Screencast and Upload to YouTube
For those who are interested in capturing screencast with high-quality videos and need an easy to use the built-in editor to customize these videos; it is good to look for some dedicated screencast tools. Experts recommend using Wondershare Filmora due to its advanced features and interactive software platform.


Top Features
- Filmora is one of the most interactive software tools that works perfectly on Windows and Mac platforms.
- It supports more than 50 media file formats.
- Filmora allows users to record with Webcam and PC simultaneously.
- It is possible to record audio from mic input and internal computer audio as well.
- With Filmora users can record high paced videos at 120fps.
- Add markers to important frames during recording.
There are so many benefits of using Filmora for YouTube screencast video recordings. The biggest trouble with YouTube based recording is that when you try it for the very first time, YouTube will take 24 hours to verify your account for the live streaming. But by using Filmora, you can do this task instantly at any hour of the day. Another great news is that Fillmore Scrn comes with a built-in video editor that allows users to customize videos with ease. Once your videos are ready, you can share them directly to social media platforms including YouTube, Facebook, Twitch, and Vimeo etc.
Let’s watch the video below to check how to record your screen with Filmora and upload the recorded video to YouTube.
Conclusion
With all impressive features, there is no doubt to say that Filmora can serve your screencasting needs in the best possible manner. Whether you are a crazy gamer interested to share your adventure videos with the world or want to create useful tutorials for your audience, Filmora is your best companion for all your needs.
Max Wales
Max Wales is a writer and a lover of all things video.
Follow @Max Wales
Max Wales
Mar 27, 2024• Proven solutions
Screencasting is a simple task anyone can do it with ease. All that you need to do is download a software program, press the record button and soon all movements on your device screen video will be recorded. Crazy video gamers do the same thing to share their interesting game videos on YouTube channels.
There is a wide range of software tools that can assists you with screencasting needs. Even YouTube itself has the ability to capture device screens without the need for additional software tool. If you are interested to know how it can be done, simply go through the details below.
Note: We resolutely oppose all forms of copyright-infringing downloads. This tutorial is only for downloading YouTube videos/audio materials from your own channel.
![]()
The All-in-One Screen Recorder & Video Editor
- Record desktop screen, voiceover, and webcam simultaneously
- Edit recorded clips quickly with a wide range of professional tools
- Built-in plentiful templates and effects
- Export to MP4, MOV, MKV, GIF and multiple formats
For Win 7 or later (64-bit)
For macOS 10.12 or later
Secure Download
Recording Screencast Video with YouTube
Step 1: Open YouTube on your computer and sign by using your Google Account. On the top left corner, you will find the Upload button, press it and go to live streaming section and choose events from the drop-down menu. When you are doing this for the very first time, YouTube will ask your phone number to verify the streaming process. You can also click here to get to the Livestreaming page directly.
Step 2: On the create an event page, add a title for your screencast video; set privacy terms and then hit “Go Live Now” option.
Step 3: The Hangout on Air page will get opened. It will allow you to select-deselect webcam recording as well as mic recording.
Step 4: Hit the screen share button from the left toolbox and choose the desktop window that you wish to record. Now press start the Broadcast button to start screen recording. Note that it is a private session that cannot be watched by anyone else.
Step 5: When your video is ready to go to YouTube video dashboard and choose your recent screencast video. Download it to Google Drive and share it with the world.
A better way to record Screencast and Upload to YouTube
For those who are interested in capturing screencast with high-quality videos and need an easy to use the built-in editor to customize these videos; it is good to look for some dedicated screencast tools. Experts recommend using Wondershare Filmora due to its advanced features and interactive software platform.
Top Features
- Filmora is one of the most interactive software tools that works perfectly on Windows and Mac platforms.
- It supports more than 50 media file formats.
- Filmora allows users to record with Webcam and PC simultaneously.
- It is possible to record audio from mic input and internal computer audio as well.
- With Filmora users can record high paced videos at 120fps.
- Add markers to important frames during recording.
There are so many benefits of using Filmora for YouTube screencast video recordings. The biggest trouble with YouTube based recording is that when you try it for the very first time, YouTube will take 24 hours to verify your account for the live streaming. But by using Filmora, you can do this task instantly at any hour of the day. Another great news is that Fillmore Scrn comes with a built-in video editor that allows users to customize videos with ease. Once your videos are ready, you can share them directly to social media platforms including YouTube, Facebook, Twitch, and Vimeo etc.
Let’s watch the video below to check how to record your screen with Filmora and upload the recorded video to YouTube.
Conclusion
With all impressive features, there is no doubt to say that Filmora can serve your screencasting needs in the best possible manner. Whether you are a crazy gamer interested to share your adventure videos with the world or want to create useful tutorials for your audience, Filmora is your best companion for all your needs.
Max Wales
Max Wales is a writer and a lover of all things video.
Follow @Max Wales
Creating Compelling Solo Videos on a Budget
4 Ways To Set Up Your Talking-Head Shots For YouTube

Richard Bennett
Oct 26, 2023• Proven solutions
A big part of being a YouTuber involves talking to the camera. How you set up your talking-head shot depends on many factors, including how much space you have, what kind of look you’re going for, and how many people you want to fit in one frame. Here are four ways to set up your talking-head shots for YouTube.
| Table of Contents 1. Close Quarters Wide-Angle Vlog Set-Up2. Medium Vlog Set-Up3. Two Person Vlog Set-Up4. Long Teleprompter Vlog Set-Up |
|---|
How to Set Up Your Talking Heads Shots for YouTube Video [Infographic]
We’ve summarized the key points about setting up talking head style video shots with the Infographic below. It is welcomed to share on social media.

How to Set Up Your Talking-Head Shots for YouTube [4 Ways]
1. Close Quarters Wide-Angle Vlog Set-Up
Don’t have a lot of space to set up your camera and lighting equipment? No problem! You can be within an arm’s length away from your camera with a close quarters wide-angle vlog set-up.
With this set-up, you’re going to need a camera with a wide-angle lens, a tripod, a camera-mounted shotgun mic for sound, and a ring light for light.
Set your camera on the tripod and mount the shotgun mic directly on the camera shoe (the electronic bracket on the top of the camera). Inside the circular space of your ring light, position your camera right in the middle of it so that you can shoot your video through it without getting any part of the lighting equipment in your shot.
In the video above, Sean Cannell demonstrates this set-up. As you can see from this example, the wide-angle lens is able to squeeze in a lot of what’s in front of the camera into the shot.
Objects and people that just make it into the sides of the frame will appear more stretched out as the wide-angle causes distortion and enhances perspectives.
If you look closely into Sean’s eyes, you can also see a specular highlight in the shape of a circle. Many people like the way eyes look against a ring light.
2. Medium Vlog Set-Up
If you have more space and want to shoot a more professional-looking talking-head shot with more realistic perspectives, a medium vlog set-up may be a better alternative for you.
For this set-up, you’ll be using a slightly longer standard/normal lens (like a 35mm or a 50mm lens) attached to your camera which would be set on a tripod. Since this longer lens will show less of the surrounding areas as it “zooms” closer into whatever is in front, you will need to sit further back, away from your camera.
Now that you’re further away from your camera, a camera-mounted shotgun mic may not be the best mic for you. For better sound recording, you’ll need a shotgun mic fixed on a mic stand that is set up like a boom mic, positioned just outside of your camera frame.
At the 39 second mark of the above video, electronic music producer deadmau5 is positioned right in the center of this particular set-up.
You can see from how even the background and couch looks across the entire camera frame that there is no distortion or enhanced perspective.
It appears that, to the right of deadmau5 (camera left), there is a key light and to his left (camera right) there may be a fill light for additional lighting. Behind the couch, there’s also a background uplight to create depth between the subject and the background. At the 1:30 mark of this trailer video, you can briefly see how the Masterclass camera crew set up their shot.
3. Two Person Vlog Set-Up
If your talking-head shot has got to include two people, you can use a similar set-up as the medium vlog set-up detailed above.
If you look back at the 39-second mark of deadmau5’s Masterclass trailer, you can see that there’s a lot of space to the left and right of deadmau5. Now imagine the same shot but with two people.
With two people, though, you’ll want to set up your mic slightly differently. Rather than using a directional shotgun mic with a narrow area of sensitivity, you’ll want to use a directional mic with a wider area of sensitivity.
4. Long Teleprompter Vlog Set-Up
If you want to read over a script but still make it appear like you’re looking straight into the camera, you’ll need to use a long teleprompter vlog set-up.
For this set-up, you’ll need all the same equipment as the medium vlog set-up, but you’ll additionally need a teleprompter placed in front of your camera equipped with a long telephoto lens.
You will have to sit much further back away from your camera for two main reasons. Firstly, you want to be able to fit yourself in your much more zoomed-in camera frame (effect of the long telephoto lens). Secondly, you want to be far enough that the camera cannot detect your eyes reading from left to right. You’ll want to be around six meters away from a 17” teleprompter monitor or around four meters away from a 10” teleprompter monitor.
In the above video, Jared Polin uses a long teleprompter vlog set-up.
In the video, he says there’s about 8 feet (2.4 meters) between himself and his lens. At the 1:15 mark of his video, Jared demonstrates how this set-up works.
It is difficult to know whether the movement in his eyes is caused by not being far enough from the lens or from his horizontal nystagmus condition in his eyes.
Looking to find the right lights for your video recording set? Check out our Top 17 Video Lighting Equipment For YouTubers .
Tips for Making a Talking Head Video Better
To make a talking-head video more interesting, you can add some background music to the video, apply some interesting texts or elements. Filmora has built-in royalty-free music tracks and sound effects as well as text templates , filters and motivating elements. Download the free trial version below and release your creativity.
Richard Bennett
Richard Bennett is a writer and a lover of all things video.
Follow @Richard Bennett
Richard Bennett
Oct 26, 2023• Proven solutions
A big part of being a YouTuber involves talking to the camera. How you set up your talking-head shot depends on many factors, including how much space you have, what kind of look you’re going for, and how many people you want to fit in one frame. Here are four ways to set up your talking-head shots for YouTube.
| Table of Contents 1. Close Quarters Wide-Angle Vlog Set-Up2. Medium Vlog Set-Up3. Two Person Vlog Set-Up4. Long Teleprompter Vlog Set-Up |
|---|
How to Set Up Your Talking Heads Shots for YouTube Video [Infographic]
We’ve summarized the key points about setting up talking head style video shots with the Infographic below. It is welcomed to share on social media.
How to Set Up Your Talking-Head Shots for YouTube [4 Ways]
1. Close Quarters Wide-Angle Vlog Set-Up
Don’t have a lot of space to set up your camera and lighting equipment? No problem! You can be within an arm’s length away from your camera with a close quarters wide-angle vlog set-up.
With this set-up, you’re going to need a camera with a wide-angle lens, a tripod, a camera-mounted shotgun mic for sound, and a ring light for light.
Set your camera on the tripod and mount the shotgun mic directly on the camera shoe (the electronic bracket on the top of the camera). Inside the circular space of your ring light, position your camera right in the middle of it so that you can shoot your video through it without getting any part of the lighting equipment in your shot.
In the video above, Sean Cannell demonstrates this set-up. As you can see from this example, the wide-angle lens is able to squeeze in a lot of what’s in front of the camera into the shot.
Objects and people that just make it into the sides of the frame will appear more stretched out as the wide-angle causes distortion and enhances perspectives.
If you look closely into Sean’s eyes, you can also see a specular highlight in the shape of a circle. Many people like the way eyes look against a ring light.
2. Medium Vlog Set-Up
If you have more space and want to shoot a more professional-looking talking-head shot with more realistic perspectives, a medium vlog set-up may be a better alternative for you.
For this set-up, you’ll be using a slightly longer standard/normal lens (like a 35mm or a 50mm lens) attached to your camera which would be set on a tripod. Since this longer lens will show less of the surrounding areas as it “zooms” closer into whatever is in front, you will need to sit further back, away from your camera.
Now that you’re further away from your camera, a camera-mounted shotgun mic may not be the best mic for you. For better sound recording, you’ll need a shotgun mic fixed on a mic stand that is set up like a boom mic, positioned just outside of your camera frame.
At the 39 second mark of the above video, electronic music producer deadmau5 is positioned right in the center of this particular set-up.
You can see from how even the background and couch looks across the entire camera frame that there is no distortion or enhanced perspective.
It appears that, to the right of deadmau5 (camera left), there is a key light and to his left (camera right) there may be a fill light for additional lighting. Behind the couch, there’s also a background uplight to create depth between the subject and the background. At the 1:30 mark of this trailer video, you can briefly see how the Masterclass camera crew set up their shot.
3. Two Person Vlog Set-Up
If your talking-head shot has got to include two people, you can use a similar set-up as the medium vlog set-up detailed above.
If you look back at the 39-second mark of deadmau5’s Masterclass trailer, you can see that there’s a lot of space to the left and right of deadmau5. Now imagine the same shot but with two people.
With two people, though, you’ll want to set up your mic slightly differently. Rather than using a directional shotgun mic with a narrow area of sensitivity, you’ll want to use a directional mic with a wider area of sensitivity.
4. Long Teleprompter Vlog Set-Up
If you want to read over a script but still make it appear like you’re looking straight into the camera, you’ll need to use a long teleprompter vlog set-up.
For this set-up, you’ll need all the same equipment as the medium vlog set-up, but you’ll additionally need a teleprompter placed in front of your camera equipped with a long telephoto lens.
You will have to sit much further back away from your camera for two main reasons. Firstly, you want to be able to fit yourself in your much more zoomed-in camera frame (effect of the long telephoto lens). Secondly, you want to be far enough that the camera cannot detect your eyes reading from left to right. You’ll want to be around six meters away from a 17” teleprompter monitor or around four meters away from a 10” teleprompter monitor.
In the above video, Jared Polin uses a long teleprompter vlog set-up.
In the video, he says there’s about 8 feet (2.4 meters) between himself and his lens. At the 1:15 mark of his video, Jared demonstrates how this set-up works.
It is difficult to know whether the movement in his eyes is caused by not being far enough from the lens or from his horizontal nystagmus condition in his eyes.
Looking to find the right lights for your video recording set? Check out our Top 17 Video Lighting Equipment For YouTubers .
Tips for Making a Talking Head Video Better
To make a talking-head video more interesting, you can add some background music to the video, apply some interesting texts or elements. Filmora has built-in royalty-free music tracks and sound effects as well as text templates , filters and motivating elements. Download the free trial version below and release your creativity.
Richard Bennett
Richard Bennett is a writer and a lover of all things video.
Follow @Richard Bennett
Also read:
- [New] Reverse the Norm Creative Methods for Backward Youtube Watching
- [New] Simplified Avatars Navigating the Metaverse Realm for 2024
- [Updated] 2024 Approved Minute Video Crafters
- 2024 Approved The Complete Guide to Decluttered Image Designs on Canva
- 2024 Approved Tips and Tricks to Elevate Your YouTube Production Through Subtitle Integration
- 7 Solutions to Fix Error Code 963 on Google Play Of Lava Yuva 3 | Dr.fone
- Best Chrome OS TTS Tools Top 5 Online Speech Converters for 2024
- Comprehveiw of the Best Minecraft Game - An Engaging Blocky World for Everyone.
- In 2024, How To Streamline the Integration of YouTube Playlists Into a Site's Layout
- In 2024, Masterful Tag Utilization Boosting Video Performance
- In 2024, Scoping Out Superior Cloud Platforms for Secure Storing
- Is There a Science to YouTube's Quick Subscribe Tactic for 2024
- Learn Quickly YouTube Audio to High-Quality MP3 on Mac OS for 2024
- New Filmora Scrn Tutorial Recording Your Desktop Made Easy
- Unleashing the Power of YouTube-to-MP3 Conversion for 2024
- Title: 2024 Approved Start Saving YouTube Videos as Screen Captures Today - Completely Free
- Author: Thomas
- Created at : 2025-01-25 01:39:22
- Updated at : 2025-01-30 00:25:33
- Link: https://youtube-help.techidaily.com/2024-approved-start-saving-youtube-videos-as-screen-captures-today-completely-free/
- License: This work is licensed under CC BY-NC-SA 4.0.