"2024 Approved Step-by-Step Methodology Assembling YouTube Playlists"
Step-by-Step Methodology: Assembling YouTube Playlists
YouTube is one of the biggest video-sharing websites where you can find unlimited videos of your favorite songs in various genres for free. However, due to the thousands of channels on YouTube, remember a soundtrack you once liked.
To tackle this issue, you must create a playlist containing only those you prefer to listen to.
So, if you are looking for information on creating a YouTube music playlist on your Windows or Mac PC, Android, or iPhone web browser, read this article and follow the steps carefully.
How to Create a YouTube Music Playlist?
Are you one of those who want to listen to their favorite tracks while working out or carrying on their work-related tasks? If that’s the case, a YouTube Playlist might come in handy as you don’t have to search again and again for your songs on your device.
How To Create a YouTube Music Playlist on the Web?
If you are using a Windows or Mac computer and want to create a YouTube music playlist on a web browser, follow the below steps:
Step1 In the first step, turn on your PC, launch a web browser from the desktop or Dock, and head to theYouTube website. Next, Sign into your account with your Google email ID if you are not already logged in.

![]()
Note: It is only possible to create a YouTube music playlist by signing into your account.
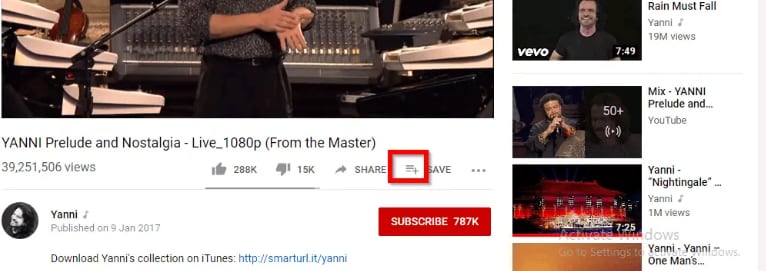
Step2 When you have signed in, look for your favorite track on the YouTube live feed page or search for it in the search bar at the top of the screen. Once you have found the song, click on it to play it, click the three horizontal dots at the bottom right-hand side of the video, and select the “Save” option from the small pop-up.
Step3
- Now, select the “Create a new playlist”
- Type in the name of your playlist.
- Choose to make it Public, Unlisted, or Private.

The differences between the three options are:
- A Public playlist is a list of videos that any random person can see, access, or use it.
- An Unlisted playlist can be shared with others by using its link to access it.
- A Private playlist cannot be seen, accessed or used by anyone except you.
Finally, click the “Create” button, and your YouTube music playlist will be saved automatically.
Step4 Repeat the second and third steps to save all the other songs you wish to add to the same playlist. Once done, head back to the main YouTube feed page, click “Library,” and scroll to the middle of the page in the right pane to access and play the music playlist at your will.

![]()
Note: You can always edit your YouTube music playlist by changing its name, privacy, and description or adding and removing any tracks. It is also possible to delete any of your playlists or create and save multiple playlists on your device’s web browser.
How to Create a YouTube Music playlist on iPhone?
To create a YouTube music playlist on your iPhone, follow these quick steps.:
Step1 Download and launch the YouTube Music app on your iPhone , sign into your account, and tap a song you want to add to your playlist. Next, tap on the music video once for the create a playlist option to pop up.

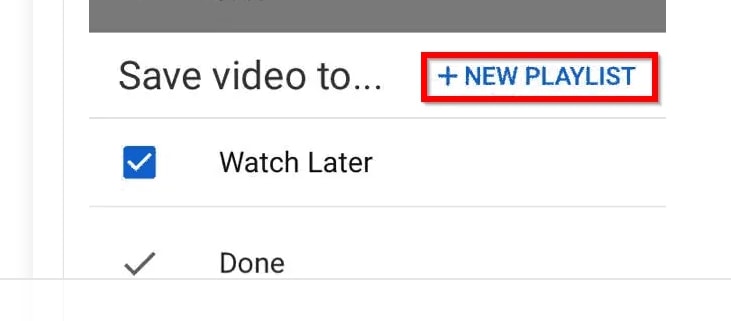
Step2 Now tap the three horizontal lines with the Plus icon, tap “+ NEW PLAYLIST” at the bottom right corner of the screen, and type in the name of the new music playlist.
Step3 In the next step, type in the name of your new playlist, select your privacy preferences, i.e., Private, Public, or unlisted, and tap “Create” to complete the process.

Finally, close the video, tap “Library” at the bottom of the screen, scroll down and see your new YouTube music playlist.
How to Create a YouTube Music playlist on Android?
YouTube Music app interface for Android is different than for iPhone, so do the following steps to create a new playlist quickly.
Step1 Download and launch the YouTube Music app on your Android , sign into your account, and tap a song to open it. Next, tap on the music video once and tap the three horizontal lines with the Plus icon.
Then, tap “Create a new playlist” at the bottom right corner of the screen, and type in the name of the new music playlist.

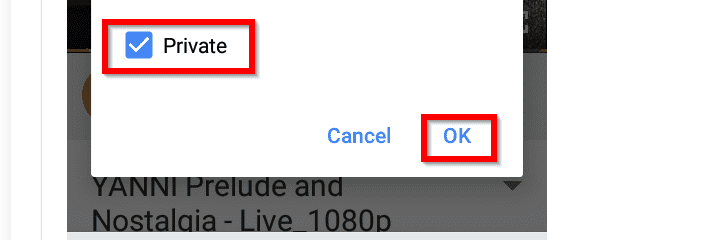
Step2 In the next step, choose your privacy preferences and tap “OK” to create the new YouTube music playlist.
Now tap to close the video, tap “Library” at the bottom of the screen, scroll down in the middle of the app and view your new YouTube music playlist.
![]()
Note: You may see an option to create a new channel during the YouTube music playlist process. If so, tap “Create Channel” to see the “+ NEW PLAYLIST” option on your iPhone and the “Create a new playlist” option on your Android YouTube app.
Bonus Video Tutorial: From a YouTube User to Creator - How To Make Music Video
You know how to create a YouTube playlist on the web or on your mobile. However, as you are a music lover and use YouTube frequently, are you interested in creating music videos by yourself? If yes, please watch the video below. It will show you how to make music videos with a user-friendly video editor, Filmora . We hope you can enjoy your YouTube music while exploring more creative possibilities:
Free Download For Win 7 or later(64-bit)
Free Download For macOS 10.14 or later
Conclusion
Listening to YouTube’s free music tracks is more fun when you do not have to go and forth to search for your favorite songs. You can enjoy the experience more when you have personalized playlists for situations like a long drive, studying, or working in an office.
So, in this article, we have discussed a step-by-step process for creating a YouTube music playlist on a web browser, Android, and iPhone, and hopefully, you can dance to your favorite beats without searching for them first on YouTube.
Step2 When you have signed in, look for your favorite track on the YouTube live feed page or search for it in the search bar at the top of the screen. Once you have found the song, click on it to play it, click the three horizontal dots at the bottom right-hand side of the video, and select the “Save” option from the small pop-up.
Step3
- Now, select the “Create a new playlist”
- Type in the name of your playlist.
- Choose to make it Public, Unlisted, or Private.
The differences between the three options are:
- A Public playlist is a list of videos that any random person can see, access, or use it.
- An Unlisted playlist can be shared with others by using its link to access it.
- A Private playlist cannot be seen, accessed or used by anyone except you.
Finally, click the “Create” button, and your YouTube music playlist will be saved automatically.
Step4 Repeat the second and third steps to save all the other songs you wish to add to the same playlist. Once done, head back to the main YouTube feed page, click “Library,” and scroll to the middle of the page in the right pane to access and play the music playlist at your will.
![]()
Note: You can always edit your YouTube music playlist by changing its name, privacy, and description or adding and removing any tracks. It is also possible to delete any of your playlists or create and save multiple playlists on your device’s web browser.
How to Create a YouTube Music playlist on iPhone?
To create a YouTube music playlist on your iPhone, follow these quick steps.:
Step1 Download and launch the YouTube Music app on your iPhone , sign into your account, and tap a song you want to add to your playlist. Next, tap on the music video once for the create a playlist option to pop up.
Step2 Now tap the three horizontal lines with the Plus icon, tap “+ NEW PLAYLIST” at the bottom right corner of the screen, and type in the name of the new music playlist.
Step3 In the next step, type in the name of your new playlist, select your privacy preferences, i.e., Private, Public, or unlisted, and tap “Create” to complete the process.
Finally, close the video, tap “Library” at the bottom of the screen, scroll down and see your new YouTube music playlist.
How to Create a YouTube Music playlist on Android?
YouTube Music app interface for Android is different than for iPhone, so do the following steps to create a new playlist quickly.
Step1 Download and launch the YouTube Music app on your Android , sign into your account, and tap a song to open it. Next, tap on the music video once and tap the three horizontal lines with the Plus icon.
Then, tap “Create a new playlist” at the bottom right corner of the screen, and type in the name of the new music playlist.
Step2 In the next step, choose your privacy preferences and tap “OK” to create the new YouTube music playlist.
Now tap to close the video, tap “Library” at the bottom of the screen, scroll down in the middle of the app and view your new YouTube music playlist.
![]()
Note: You may see an option to create a new channel during the YouTube music playlist process. If so, tap “Create Channel” to see the “+ NEW PLAYLIST” option on your iPhone and the “Create a new playlist” option on your Android YouTube app.
Bonus Video Tutorial: From a YouTube User to Creator - How To Make Music Video
You know how to create a YouTube playlist on the web or on your mobile. However, as you are a music lover and use YouTube frequently, are you interested in creating music videos by yourself? If yes, please watch the video below. It will show you how to make music videos with a user-friendly video editor, Filmora . We hope you can enjoy your YouTube music while exploring more creative possibilities:
Free Download For Win 7 or later(64-bit)
Free Download For macOS 10.14 or later
Conclusion
Listening to YouTube’s free music tracks is more fun when you do not have to go and forth to search for your favorite songs. You can enjoy the experience more when you have personalized playlists for situations like a long drive, studying, or working in an office.
So, in this article, we have discussed a step-by-step process for creating a YouTube music playlist on a web browser, Android, and iPhone, and hopefully, you can dance to your favorite beats without searching for them first on YouTube.
YouTube Introduction Design Made Simple and Inexpensive
How to Create YouTube Intros & End Cards - Free and Easy

Shanoon Cox
Oct 26, 2023• Proven solutions
Part1: Intros
Elements of an Intro
Intros should only last about five seconds, and that can be cut down to two or three if you have a larger following.
When your intro video is longer than five seconds viewers are more likely to click away. The first 15 seconds of a video is when viewers are most likely to decide to click on one of the recommended videos, or go back to their search results and choose something else. The odds of them leaving within these first 15 seconds are greater if you do not get right to the main point of your video. That is why long intro sequences are bad for your watch time.
Whether it is better to put your intro at the very beginning of your video, or after you introduce your topic, will depend on your viewers. You may want to try it both ways and then look at your retention report (found in your YouTube Creator Studio under Analytics) to see which works best for you.
Top Intro Sites
There are a few different sites where you can download animated intros, customized to include your username or logo. Here are two of the best:
FlixPress.com
This is probably the most popular intro site. There are a lot of great animated intros available for under $5, or even for free.
IntroMaker.net
This is another site with really professional looking intros for $5. They only have two free options, though.
Creating an Intro in Filmora
You can create a simple intro card in Filmora.


- Choose your background. You may want to use a short clip as your intro, or you may just want a colored background.
- Drag your clip or background into the video track of your timeline and trim it down to five seconds.
- If you have a logo, import it into Filmora and drag it into your picture-in-picture track.
- With your logo selected, click on the Green Screen icon. In the pop-up, select the background of your logo to make it transparent. For this to work your logo cannot be the same color as its background.
- Click on the editing icon with your logo selected and choose an animation.
- Go to the Text/Titles menu and choose an animated title that suits your channel. Drag it into your text track and edit it to include your name.
- The last piece of your intro is sound. You can choose a song from Filmora’s library and cut it down to five seconds, or import your sound effect.
- Export your video and save it for use in all of your other videos.
Part 2: End Cards
When your video ends, YouTube will recommend a selection of videos users may want to watch next. Often, these recommendations will not include more of your videos.
To keep viewers on your channel, you can create your End Card which recommends other content you have created.
Elements of an End Card
An end card includes clips from two or three of your videos, muted, and shrunk down to thumbnail-size. Using spotlight annotations you can make these thumbnails click-able.
It is also important that your end card includes multiple calls to action. A call to action is meant to spur a viewer to some kind of action. Writing ‘Check out this video’ above one of your thumbnails is a call to action.
You should also have a subscribe link somewhere in your end card, ideally a very noticeable button with a proven call to action like ‘Subscribe Now!’.
Some creators will leave their end cards at that and play music overtop, but it can be even more effective to include a voiceover where you ask viewers to subscribe and watch your other videos.
How To Make an End Card
- Choose a static background. You may want to download an end card template or create one in a drawing program. If you do, make sure to include calls to action like ‘Watch more!’ and ‘Subscribe’.
- Drag your background into your timeline at the end of your video.
- Import two or three of your previous videos and drag them into your picture in picture tracks. Each clip should be on its track.
- Trim the clips in your picture in picture track down to the same length as your end card.
- Shrink your clips down to thumbnail-size by dragging their corners in the preview window.
- Position your clips so they are spaced evenly by dragging them in the preview screen.
- Mute your clips.
- If your background does not include any calls to action, choose a title from the Text/Titles menu in Filmora and create at least two – one asking viewers to subscribe, and one asking them to watch your suggested videos.
- Export your video from Filmora and upload it to YouTube.
- Go to your Video Manager and select Annotations in the drop-down menu next to your video.
- Go to your end card in the previewer, as that is where you want to add your annotations.
- Click Add Annotation and add a spotlight annotation to your video. Stretch it over one of your thumbnails and then check the Link box under your Annotation’s timing. Insert a link to the video you are previewing.
- Repeat for any other thumbnails. For your subscribe button, change where it said ‘Video’ to ‘Subscribe’ and enter your channel URL.
- Click Apply Changes.
Shanoon Cox
Shanoon Cox is a writer and a lover of all things video.
Follow @Shanoon Cox
Shanoon Cox
Oct 26, 2023• Proven solutions
Part1: Intros
Elements of an Intro
Intros should only last about five seconds, and that can be cut down to two or three if you have a larger following.
When your intro video is longer than five seconds viewers are more likely to click away. The first 15 seconds of a video is when viewers are most likely to decide to click on one of the recommended videos, or go back to their search results and choose something else. The odds of them leaving within these first 15 seconds are greater if you do not get right to the main point of your video. That is why long intro sequences are bad for your watch time.
Whether it is better to put your intro at the very beginning of your video, or after you introduce your topic, will depend on your viewers. You may want to try it both ways and then look at your retention report (found in your YouTube Creator Studio under Analytics) to see which works best for you.
Top Intro Sites
There are a few different sites where you can download animated intros, customized to include your username or logo. Here are two of the best:
FlixPress.com
This is probably the most popular intro site. There are a lot of great animated intros available for under $5, or even for free.
IntroMaker.net
This is another site with really professional looking intros for $5. They only have two free options, though.
Creating an Intro in Filmora
You can create a simple intro card in Filmora.
- Choose your background. You may want to use a short clip as your intro, or you may just want a colored background.
- Drag your clip or background into the video track of your timeline and trim it down to five seconds.
- If you have a logo, import it into Filmora and drag it into your picture-in-picture track.
- With your logo selected, click on the Green Screen icon. In the pop-up, select the background of your logo to make it transparent. For this to work your logo cannot be the same color as its background.
- Click on the editing icon with your logo selected and choose an animation.
- Go to the Text/Titles menu and choose an animated title that suits your channel. Drag it into your text track and edit it to include your name.
- The last piece of your intro is sound. You can choose a song from Filmora’s library and cut it down to five seconds, or import your sound effect.
- Export your video and save it for use in all of your other videos.
Part 2: End Cards
When your video ends, YouTube will recommend a selection of videos users may want to watch next. Often, these recommendations will not include more of your videos.
To keep viewers on your channel, you can create your End Card which recommends other content you have created.
Elements of an End Card
An end card includes clips from two or three of your videos, muted, and shrunk down to thumbnail-size. Using spotlight annotations you can make these thumbnails click-able.
It is also important that your end card includes multiple calls to action. A call to action is meant to spur a viewer to some kind of action. Writing ‘Check out this video’ above one of your thumbnails is a call to action.
You should also have a subscribe link somewhere in your end card, ideally a very noticeable button with a proven call to action like ‘Subscribe Now!’.
Some creators will leave their end cards at that and play music overtop, but it can be even more effective to include a voiceover where you ask viewers to subscribe and watch your other videos.
How To Make an End Card
- Choose a static background. You may want to download an end card template or create one in a drawing program. If you do, make sure to include calls to action like ‘Watch more!’ and ‘Subscribe’.
- Drag your background into your timeline at the end of your video.
- Import two or three of your previous videos and drag them into your picture in picture tracks. Each clip should be on its track.
- Trim the clips in your picture in picture track down to the same length as your end card.
- Shrink your clips down to thumbnail-size by dragging their corners in the preview window.
- Position your clips so they are spaced evenly by dragging them in the preview screen.
- Mute your clips.
- If your background does not include any calls to action, choose a title from the Text/Titles menu in Filmora and create at least two – one asking viewers to subscribe, and one asking them to watch your suggested videos.
- Export your video from Filmora and upload it to YouTube.
- Go to your Video Manager and select Annotations in the drop-down menu next to your video.
- Go to your end card in the previewer, as that is where you want to add your annotations.
- Click Add Annotation and add a spotlight annotation to your video. Stretch it over one of your thumbnails and then check the Link box under your Annotation’s timing. Insert a link to the video you are previewing.
- Repeat for any other thumbnails. For your subscribe button, change where it said ‘Video’ to ‘Subscribe’ and enter your channel URL.
- Click Apply Changes.
Shanoon Cox
Shanoon Cox is a writer and a lover of all things video.
Follow @Shanoon Cox
Also read:
- [New] In 2024, Laughter Lab Top 7 Sketches & Vignettes for YouTubers
- [New] Nifty Editing Edits Discover the Top 5 Online Strategies for Cutting & Condensing Videos
- [New] Quick Steps to Validate Your YouTube Login
- [Updated] 2024 Approved Crafting Unique Instagrams with Flawless Image Borders
- 2024 Approved Evaluating SNS HDR's Value & Alternatives for HDR Editing
- 2024 Approved From Scripts to Screens Your Ultimate YouTube Production Plan
- Effective Methods for Sharing Big Videos via WhatsApp on Your iPhone
- Filmmaker's Toolkit Making Compelling YouTube Trailers for 2024
- Guide Facilité À Utiliser Comment Installer Handbrake Avec Libdvdcss Pour Windows/MacOSX Et Extraction De DVD
- In 2024, Eyes on the Digital Winners Top Channels
- In 2024, Gain Massive Audience on YouTube in Minutes (2 Ways)
- In 2024, Innovative Chroma Techniques for Stunning Visual Storytelling
- In 2024, Mastering YouTube Money Policy Overhaul Details
- In 2024, Simplified Playlist Crafting for YouTube Fans on Desktop & Mobile Devices
- In 2024, The Infographic Spectacle of YouTube's 2017 Data
- In the Spotlight Top Viewers' Choice for 2024
- New Chroma Keying in FCP X Tips, Tricks, and Best Practices for 2024
- Step-by-Step Tutorial on Restoring, Downloading, or Removing Lost Videos From Your Nest Device
- WonderFox DVDコンバーターのセットアップ完了 - お使いいただきありがとうございます!
- Title: 2024 Approved Step-by-Step Methodology Assembling YouTube Playlists
- Author: Thomas
- Created at : 2024-12-30 20:14:39
- Updated at : 2025-01-03 20:14:46
- Link: https://youtube-help.techidaily.com/2024-approved-step-by-step-methodology-assembling-youtube-playlists/
- License: This work is licensed under CC BY-NC-SA 4.0.