
"2024 Approved Streamline Shorter Optimizing YouTube Videos for Less Time"
Streamline Shorter: Optimizing YouTube Videos for Less Time
How to Edit the Length of a Video on YouTube

Richard Bennett
Mar 27, 2024• Proven solutions
Apart from providing video hosting and sharing features, the YouTube platform also has an online editor which is going to provide you with the possibility to make changes and additions online without having to download any particular program. In this guide, we are going to show you how to make your video shorter or longer with YouTube online video editor.
A Better Alternative on How to Edit YouTube Video Length - Wondershare Filmora is a perfect alternative to edit every single clip frame by frame. Not just to shorten or lengthen the video. It offers quite a lot of opportunities. Watch the video below to know more:
 Download Mac Version ](https://tools.techidaily.com/wondershare/filmora/download/ )
For instance, the application is offering non-linear ripple video editing. This is going to allow you to combine multiple video clips and pin them together conveniently. What is more, you can also apply PIP and Green Screen professional effects with just a few clicks. Sure, the YouTube video editor is a perfect solution for those who don’t want to achieve professional quality, but if you do, Wondershare Filmora is without a doubt the far better alternative. This is something that’s going to enable you to edit and re-touch your videos as well as to size them appropriately. Instead of dragging two bars together, you will be able to touch every single frame and size it according to your own particular needs. This is going to result in flawless videos.
How to Edit YouTube Video Length Using the built-in Video Editor
The YouTube video editor is easy to use, and you can easily learn how to do all sorts of changes to your video. Let’s see the things that you need to go through in order to edit the length.
Note: From 20th September 2017 users will no longer be able to use the complimentary editing suite. Check the best YouTube video editor alternatives from this complete guide.
Step 1 Get to the video editor

In order to do so, you would have to go ahead and login into your account. Then, go to the “My Channel” panel and select the video that you want to cut. Once you’ve done this, click on the “Video manager” option and click on the “create” tab which should be located on the right side for the page. There, you will be able to find the “Video Editor”. Of course, you can also add “/editor” to YouTube’s URL, and you would be good to go.
Step 2 Import Your Video
Once you’ve done all of the above, you would have to drag your video in order to cut it’s time. Keep in mind that the videos are made out of a maximum of 50 clips. The site is going to save every single video that you upload as a particular clip which could be properly combined with the rest in order to make one larger video. This is important.
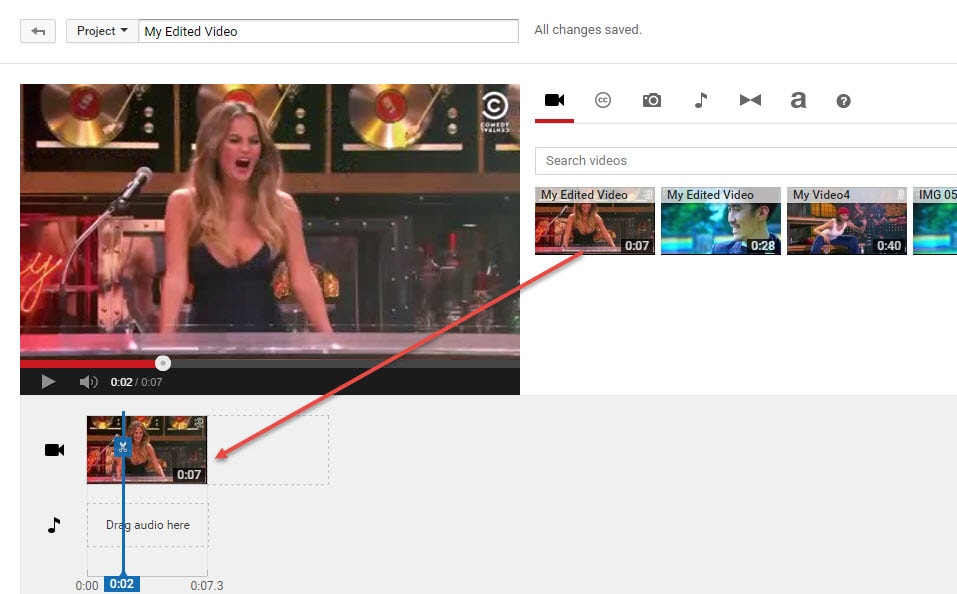
Step 3 Edit the Length
This is the part where you actually get to edit the length of your video. In order to do so effectively, you have to drag the bar at either end of your clip towards the other end in order to shorten the clip conveniently.
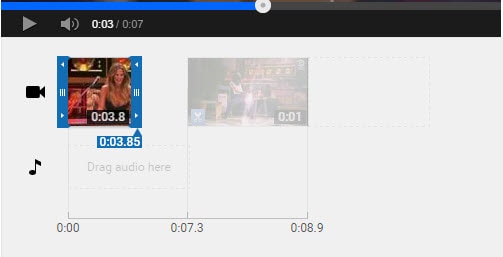
What is more, if you want to increase the length, you have to drag the bar to the opposite end – outwards. There is going to be an indicator which is going to appear at the bottom of the clip, and it’s going to show you the overall duration of the file, and it’s going to adjust itself as you slide the bars accordingly.
Step 4 Save the Clip
Of course, you would have to save the clip in order for the changes to reflect. Even though this might seem like a particularly obvious thing to do, you would be surprise to find out that a lot of people get everything done and then discard the changes by forgetting to save them and their effort goes to waste.
Richard Bennett
Richard Bennett is a writer and a lover of all things video.
Follow @Richard Bennett
Richard Bennett
Mar 27, 2024• Proven solutions
Apart from providing video hosting and sharing features, the YouTube platform also has an online editor which is going to provide you with the possibility to make changes and additions online without having to download any particular program. In this guide, we are going to show you how to make your video shorter or longer with YouTube online video editor.
A Better Alternative on How to Edit YouTube Video Length - Wondershare Filmora is a perfect alternative to edit every single clip frame by frame. Not just to shorten or lengthen the video. It offers quite a lot of opportunities. Watch the video below to know more:
Download Mac Version ](https://tools.techidaily.com/wondershare/filmora/download/ )
For instance, the application is offering non-linear ripple video editing. This is going to allow you to combine multiple video clips and pin them together conveniently. What is more, you can also apply PIP and Green Screen professional effects with just a few clicks. Sure, the YouTube video editor is a perfect solution for those who don’t want to achieve professional quality, but if you do, Wondershare Filmora is without a doubt the far better alternative. This is something that’s going to enable you to edit and re-touch your videos as well as to size them appropriately. Instead of dragging two bars together, you will be able to touch every single frame and size it according to your own particular needs. This is going to result in flawless videos.
How to Edit YouTube Video Length Using the built-in Video Editor
The YouTube video editor is easy to use, and you can easily learn how to do all sorts of changes to your video. Let’s see the things that you need to go through in order to edit the length.
Note: From 20th September 2017 users will no longer be able to use the complimentary editing suite. Check the best YouTube video editor alternatives from this complete guide.
Step 1 Get to the video editor
In order to do so, you would have to go ahead and login into your account. Then, go to the “My Channel” panel and select the video that you want to cut. Once you’ve done this, click on the “Video manager” option and click on the “create” tab which should be located on the right side for the page. There, you will be able to find the “Video Editor”. Of course, you can also add “/editor” to YouTube’s URL, and you would be good to go.
Step 2 Import Your Video
Once you’ve done all of the above, you would have to drag your video in order to cut it’s time. Keep in mind that the videos are made out of a maximum of 50 clips. The site is going to save every single video that you upload as a particular clip which could be properly combined with the rest in order to make one larger video. This is important.
Step 3 Edit the Length
This is the part where you actually get to edit the length of your video. In order to do so effectively, you have to drag the bar at either end of your clip towards the other end in order to shorten the clip conveniently.
What is more, if you want to increase the length, you have to drag the bar to the opposite end – outwards. There is going to be an indicator which is going to appear at the bottom of the clip, and it’s going to show you the overall duration of the file, and it’s going to adjust itself as you slide the bars accordingly.
Step 4 Save the Clip
Of course, you would have to save the clip in order for the changes to reflect. Even though this might seem like a particularly obvious thing to do, you would be surprise to find out that a lot of people get everything done and then discard the changes by forgetting to save them and their effort goes to waste.
Richard Bennett
Richard Bennett is a writer and a lover of all things video.
Follow @Richard Bennett
Richard Bennett
Mar 27, 2024• Proven solutions
Apart from providing video hosting and sharing features, the YouTube platform also has an online editor which is going to provide you with the possibility to make changes and additions online without having to download any particular program. In this guide, we are going to show you how to make your video shorter or longer with YouTube online video editor.
A Better Alternative on How to Edit YouTube Video Length - Wondershare Filmora is a perfect alternative to edit every single clip frame by frame. Not just to shorten or lengthen the video. It offers quite a lot of opportunities. Watch the video below to know more:
Download Mac Version ](https://tools.techidaily.com/wondershare/filmora/download/ )
For instance, the application is offering non-linear ripple video editing. This is going to allow you to combine multiple video clips and pin them together conveniently. What is more, you can also apply PIP and Green Screen professional effects with just a few clicks. Sure, the YouTube video editor is a perfect solution for those who don’t want to achieve professional quality, but if you do, Wondershare Filmora is without a doubt the far better alternative. This is something that’s going to enable you to edit and re-touch your videos as well as to size them appropriately. Instead of dragging two bars together, you will be able to touch every single frame and size it according to your own particular needs. This is going to result in flawless videos.

How to Edit YouTube Video Length Using the built-in Video Editor
The YouTube video editor is easy to use, and you can easily learn how to do all sorts of changes to your video. Let’s see the things that you need to go through in order to edit the length.
Note: From 20th September 2017 users will no longer be able to use the complimentary editing suite. Check the best YouTube video editor alternatives from this complete guide.
Step 1 Get to the video editor
In order to do so, you would have to go ahead and login into your account. Then, go to the “My Channel” panel and select the video that you want to cut. Once you’ve done this, click on the “Video manager” option and click on the “create” tab which should be located on the right side for the page. There, you will be able to find the “Video Editor”. Of course, you can also add “/editor” to YouTube’s URL, and you would be good to go.
Step 2 Import Your Video
Once you’ve done all of the above, you would have to drag your video in order to cut it’s time. Keep in mind that the videos are made out of a maximum of 50 clips. The site is going to save every single video that you upload as a particular clip which could be properly combined with the rest in order to make one larger video. This is important.
Step 3 Edit the Length
This is the part where you actually get to edit the length of your video. In order to do so effectively, you have to drag the bar at either end of your clip towards the other end in order to shorten the clip conveniently.
What is more, if you want to increase the length, you have to drag the bar to the opposite end – outwards. There is going to be an indicator which is going to appear at the bottom of the clip, and it’s going to show you the overall duration of the file, and it’s going to adjust itself as you slide the bars accordingly.
Step 4 Save the Clip
Of course, you would have to save the clip in order for the changes to reflect. Even though this might seem like a particularly obvious thing to do, you would be surprise to find out that a lot of people get everything done and then discard the changes by forgetting to save them and their effort goes to waste.
Richard Bennett
Richard Bennett is a writer and a lover of all things video.
Follow @Richard Bennett
Enhancing User Experience: A Quick How-To for YouTube CC & Subtitles
How to Easily Add Subtitles and Closed Captions to YouTube Video
Richard Bennett
Mar 27, 2024• Proven solutions
In this article, we are going to show you how important it is to add subtitle and closed captions in your YouTube video, and how to add them.
The best video editor for YouTubers - Wondershare Filmora , not only allows you to cut, crop, rotate, reverse videos, but also offers your advanced features like PIP, Green Screen, or audio mixing. What’s more, you can find lots of effects for Fashion, gaming, education, tutorial, sports, etc. Check this article to know more.

Why subtitle and closed captions are important for YouTube videos?
- Forced closed captions and subtitles actually help the viewers to understand the content in your video if the audio quality of your video is bad, muffled or barely audible. Reading makes it easier for them to understand.
- This also helps people with hearing impairments. People with troubled ears can still watch and understand your content.
- It’s a great aid to such videos which have been recorded in other foreign languages that you don’t understand. Hence it will increase the number of viewers all around the world.
- They both are generally added for easy accessibility to the viewers who wish to watch in sound sensitive environments.
So, here we are going to show you two ways to add subtittles to video: directly or uploading caption or transcript files
Adding subtitles and closed captions manually
To add subtitles and closed captions to your YouTube video, fisrt, you should sign in to your YouTube account. On left right below ‘Home’ you will find ‘My Channel’. It will direct you to your personal YouTube page. On the top, right next to your subscribers lays the ‘Video manager’, giving you the list of your uploaded videos.
Select the video and click on edit to get a drop down menu. Click on subtitles and CC. This will take you to the subtitling interface. To the right of video select ‘add new subtitles’ and then ‘create new subtitles’. Select the subtitle language. Play the video to listen to the content and type down in the box. Click on ‘+’ button once you are done.
This will create a subtitle timeline right beneath the video. You can manage by dragging and expanding the subtitle duration according to the audio of the video. The subtitle will appear at the bottom of the video screen. Click ‘publish’ once done.
An interruption might occur with appearing of subtitles in accordance with video. Hence a lot precision is required while doing so.
Uploading Caption or Transcript Files automatically
To upload Caption or Transcript Files to YouTube Videos you first need to create a format on a text editor. For windows use Notepad and for Mac you may use TextEdit. Create a format of putting the number of subtitle first, time stamp and then text of the subtitle. For example
1\
00:02:34:12 using a format of (hour : minute : second : millisecond)
2. *text*
This is the sample text for first subtitle at zero hours, two minutes, thirty four seconds and twelve milliseconds. Once done with this. Go to file, select ‘save as’. Write the file name with an extension of .srt and select ‘All files’ for type of file. Click encoding menu and select UTF-8. Once saved, sign in to your YouTube account.
On left right below ‘Home’ you will find ‘My Channel’. It will direct you to your personal YouTube page. On the top, right next to your subscribers lays the ‘Video manager’, giving you the list of your uploaded videos.
Select the video and click on edit to get a drop down menu. Click on subtitles and CC. Go to ‘add subtitles’ and then ‘upload a file’. A pop-up menu will appear select ‘subtitles file’. Click upload. The file will send subtitles to your video.
This will create a subtitle timeline right beneath the video. You can manage by dragging and expanding the subtitle duration according to the audio of the video. The subtitle will appear at the bottom of the video screen. Click ‘publish’ once done.
3 Best Tools for add/managing video Subtitles/CC
1. Amara
Amara is a smart video editor which helps insert captions and subtitles to videos. It also helps in transcribing the videos. It takes help of crowd sourcing to subtitle any YouTube video. They take help from viewers to subtitle the videos. By making crowd subtitling available for any YouTube creator, they are allowing them to reach more viewers in more languages
2. DIY Captions
DIY captions help you to transcribe the YouTube videos, if not in most accurate manner, then in a little easier way. All you have to do is just paste the URL of the YouTube video and it will provide you all the subtitles. These may not be accurate but will provide you major base material which can be tweaked a bit here and there and is far better than making all the subtitles starting from scratch.
3 Subtitles for YouTube
Subtitles for YouTube is a Google Chrome extension which provides subtitles for YouTube videos. For this you will have to provide a subtitle file with .srt extension. The attractive feature of this is that you won’t have to download the video and still run the subtitles on it. This is very much helpful for people who work on YouTube or watch movies without subtitles.
Richard Bennett
Richard Bennett is a writer and a lover of all things video.
Follow @Richard Bennett
Richard Bennett
Mar 27, 2024• Proven solutions
In this article, we are going to show you how important it is to add subtitle and closed captions in your YouTube video, and how to add them.
The best video editor for YouTubers - Wondershare Filmora , not only allows you to cut, crop, rotate, reverse videos, but also offers your advanced features like PIP, Green Screen, or audio mixing. What’s more, you can find lots of effects for Fashion, gaming, education, tutorial, sports, etc. Check this article to know more.
Why subtitle and closed captions are important for YouTube videos?
- Forced closed captions and subtitles actually help the viewers to understand the content in your video if the audio quality of your video is bad, muffled or barely audible. Reading makes it easier for them to understand.
- This also helps people with hearing impairments. People with troubled ears can still watch and understand your content.
- It’s a great aid to such videos which have been recorded in other foreign languages that you don’t understand. Hence it will increase the number of viewers all around the world.
- They both are generally added for easy accessibility to the viewers who wish to watch in sound sensitive environments.
So, here we are going to show you two ways to add subtittles to video: directly or uploading caption or transcript files
Adding subtitles and closed captions manually
To add subtitles and closed captions to your YouTube video, fisrt, you should sign in to your YouTube account. On left right below ‘Home’ you will find ‘My Channel’. It will direct you to your personal YouTube page. On the top, right next to your subscribers lays the ‘Video manager’, giving you the list of your uploaded videos.
Select the video and click on edit to get a drop down menu. Click on subtitles and CC. This will take you to the subtitling interface. To the right of video select ‘add new subtitles’ and then ‘create new subtitles’. Select the subtitle language. Play the video to listen to the content and type down in the box. Click on ‘+’ button once you are done.
This will create a subtitle timeline right beneath the video. You can manage by dragging and expanding the subtitle duration according to the audio of the video. The subtitle will appear at the bottom of the video screen. Click ‘publish’ once done.
An interruption might occur with appearing of subtitles in accordance with video. Hence a lot precision is required while doing so.
Uploading Caption or Transcript Files automatically
To upload Caption or Transcript Files to YouTube Videos you first need to create a format on a text editor. For windows use Notepad and for Mac you may use TextEdit. Create a format of putting the number of subtitle first, time stamp and then text of the subtitle. For example
1\
00:02:34:12 using a format of (hour : minute : second : millisecond)
2. *text*
This is the sample text for first subtitle at zero hours, two minutes, thirty four seconds and twelve milliseconds. Once done with this. Go to file, select ‘save as’. Write the file name with an extension of .srt and select ‘All files’ for type of file. Click encoding menu and select UTF-8. Once saved, sign in to your YouTube account.
On left right below ‘Home’ you will find ‘My Channel’. It will direct you to your personal YouTube page. On the top, right next to your subscribers lays the ‘Video manager’, giving you the list of your uploaded videos.
Select the video and click on edit to get a drop down menu. Click on subtitles and CC. Go to ‘add subtitles’ and then ‘upload a file’. A pop-up menu will appear select ‘subtitles file’. Click upload. The file will send subtitles to your video.
This will create a subtitle timeline right beneath the video. You can manage by dragging and expanding the subtitle duration according to the audio of the video. The subtitle will appear at the bottom of the video screen. Click ‘publish’ once done.
3 Best Tools for add/managing video Subtitles/CC
1. Amara
Amara is a smart video editor which helps insert captions and subtitles to videos. It also helps in transcribing the videos. It takes help of crowd sourcing to subtitle any YouTube video. They take help from viewers to subtitle the videos. By making crowd subtitling available for any YouTube creator, they are allowing them to reach more viewers in more languages
2. DIY Captions
DIY captions help you to transcribe the YouTube videos, if not in most accurate manner, then in a little easier way. All you have to do is just paste the URL of the YouTube video and it will provide you all the subtitles. These may not be accurate but will provide you major base material which can be tweaked a bit here and there and is far better than making all the subtitles starting from scratch.
3 Subtitles for YouTube
Subtitles for YouTube is a Google Chrome extension which provides subtitles for YouTube videos. For this you will have to provide a subtitle file with .srt extension. The attractive feature of this is that you won’t have to download the video and still run the subtitles on it. This is very much helpful for people who work on YouTube or watch movies without subtitles.
Richard Bennett
Richard Bennett is a writer and a lover of all things video.
Follow @Richard Bennett
Also read:
- [Updated] 2024 Approved Boosting Video Quality The Best Cameras for Vloggers' Dreams
- [Updated] Advanced Guide to Using LUTs for Professional Image Editors
- 2024 Approved Raising the Bar YouTube's Live Streaming Excellence
- 2024 Approved Startup Success on YouTubing Free Beginner Courses
- 2024 Approved Step-by-Step Guide to Producing Quality Mobile Videos
- 2024 Approved Ultimate Choice Top Screen Capturer for Video Uploads
- Elevating Your Instagram Presence with Watermarks for 2024
- Guaranteed Safety: Mastering Norton PC Cloud Backup to Prevent Any Data Disasters
- In 2024, Master Online Engagement with Proficient Use of Snap in Teams
- Money-Making Moves Now With Over 500 Subscribers for 2024
- The Duality of Online Names: Profiles Vs Displayed IDs
- Title: 2024 Approved Streamline Shorter Optimizing YouTube Videos for Less Time
- Author: Thomas
- Created at : 2024-11-10 09:11:12
- Updated at : 2024-11-14 23:28:18
- Link: https://youtube-help.techidaily.com/2024-approved-streamline-shorter-optimizing-youtube-videos-for-less-time/
- License: This work is licensed under CC BY-NC-SA 4.0.