
:max_bytes(150000):strip_icc()/Recycle-laptop-battery-94eeae5ae45246b2801317b86b868cb0.jpg)
"2024 Approved Streamline Your Content Top 8 YouTube-to-AVI Solutions"
Streamline Your Content: Top 8 YouTube-to-AVI Solutions
YouTube to AVI: Tutorial + 8 Best YouTube to AVI Converters

Richard Bennett
Mar 27, 2024• Proven solutions
Playing AVI (audio video interleave) files on VLC media player or Windows media player costs nothing, and the number of free YouTube to AVI converters is innumerable. Then, why misuse your data or money viewing videos on YouTube? To download and convert a video to AVI file takes less than a minute.
And the biggest advantage: you can stream AVI audios and videos files online on your computer the whole day.
In this article, I’ll show you how to convert YouTube videos to AVI file formats in three easy ways. Also included are the best 10 YouTube to AVI converters.
You will Learn :
- What is an AVI File?
- How To Convert YouTube To AVI?
- Best AVI Video Players For Windows, Mac, iPhone, and Android
- 8 Best YouTube to AVI Converters
What is an AVI File?
Before we get into the full episode, let’s start by understanding the definition of .AVI file.
AVI stands for audio video interleave. An AVI is a video container format that capture, store and play audio- videos. The AVI file extensions are abbreviated as .avi.
It was developed by Microsoft in 1992 and works based on Resource Interchange File Format (RIFF). Its users enjoy built-in support in every Microsoft Windows application.
AVI encodes its audio and video data on codecs like XviD, DivX and MPEG-2. A codec is a software or hardware used to compress or decompress digital video.
If you have limited storage, avoid AVI files because they are non-compressed and occupy large space. Conversely, AVI format stores high-quality videos since they are less compressed.
Streaming videos from YouTube is expensive. To watch your favorite videos repeatedly, you have to download the YouTube videos and convert to AVI file.
How To Convert YouTube To AVI: Best Solutions For Windows And Mac?
Have you ever tried to convert YouTube videos to AVI online? It’s next to impossibility! The easiest and fastest way is to start by downloading the video.
To convert YouTube to AVI, you require software that supports all file formats. Why? YouTube videos are uploaded in many formats. To avoid trial and error methods, the best-recommended software to use is Filmora.
Filmora works pretty well with Windows10/8/7 and mac. Do you want to know how to download and convert YouTube videos to AVI using Filmora for free? Follow the steps below.
Step 1: On the Filmora product page, select Windows or Mac, and then click the Free Download button below. Follow the prompts to install it.


Step 2: Search for the YouTube video to convert. To download a YouTube video easily subscribers to YouTube Premium. Otherwise, download directly from your browser directly using plugins like Dlnowsoft .
Step 3: Now double-click the Filmora icon to start your new video conversion project. You can change the aspect ratio if necessary.

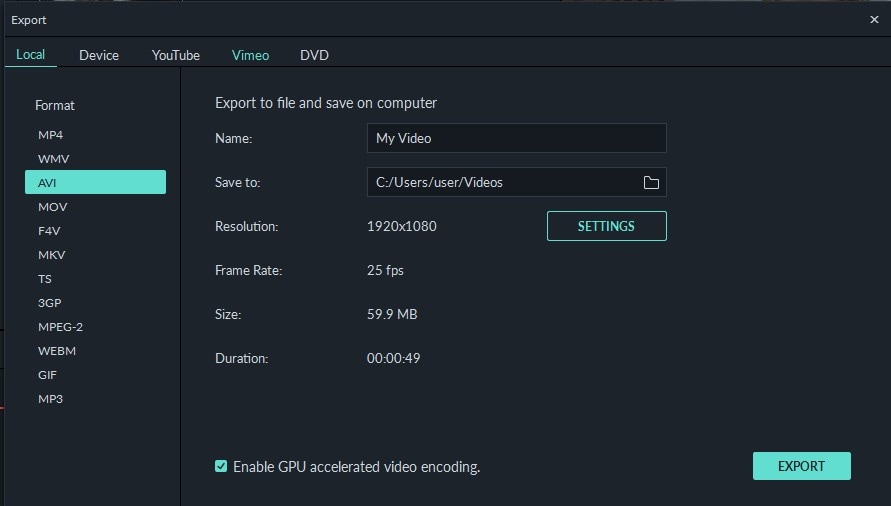
Step 4: Tap on the new project timeline for the editor menu to load. Head over to the Import menu and drop down to Import files to select your downloaded YouTube video. Click the “EXPORT” to open the file format options.
Step 5: Select AVI, rename the project and choose where to save the converted YouTube video.
Click the Export menu at the bottom and wait for the video to convert.
To learn more about Wondershare Filmora video editor in 60 seconds, click the video below.
Back to our main topic. Not every media player can play AVI files. Likewise, you cannot use any video converting software to convert YouTube to AVI.
Therefore, to quickly understand the YouTube to AVI converter to use and the AVI video media players for windows, mac, iPhone or Android, I’ve subdivided this part into two parts.
- Part 1: Best AVI Video Players
- Part 2: 8 Best YouTube to AVI Converter
Best AVI Video Players For Windows, Mac, iPhone, and Android
Days are gone when Windows Media Player was the most commonly preferred media player. The launch of devices like Mac, iPhone, and Android has led to the development of AVI players that are compatible with the in-built systems.
You may also like: 10 Best Free Outro Makers Online to Create Perfect Outro Templates >>
Top AVI Players For Windows 10/8/7
Microsoft Windows is the most used operating system. The top AVI video players for Windows are:
- JetVideo
- KM Player
- Rules Player
- VLC Player
- Real Player
- FreeSmith Video Player
Best 6 AVI Players For iPhone/iPad
Today’s technological advancements have placed the iOS operating system on a global competition with other systems. To play AVI videos on iPhone or iPad, use the following video players:
- RockPlayer2
- VLC Media Player
- Video Stream
- AirPlayit
- Oplayer Lite
- Infuse3
Top 5 AVI Players for Android
The majority of smartphone owners have Android phones. The Android operating system supports a myriad of AVI media players. Here the top AVI players for Android to download:
- Dice Player
- BS Player
- VLC Media Player
- GPlayer
6 Best Free AVI Player For Mac
Mac is renowned for its simplicity and compatibility with many third-party applications. The best and easiest AVI players for mac include:
- 5KPlayer
- Gom Player
- QuickTime
- VLC Media Player
- Plex
- Elmedia
Now that you know which player to download, which AVI converters are suitable for your device? Select the best from the next part.
8 Best YouTube to AVI Converters
Without a doubt, the number of YouTube to AVI converters available online surpasses everyone’s demand. Whereas some works best for mac and Windows, others are developed for Android and iPad.
A reliable YouTube video converter should have options for you to save and reset the resolution. Online video converters are the best for you only have copy-paste the URL and then convert. They also negate YouTube video download policies.
You may also like: YouTube Outro Complete Guide [+Best Makers & Free Templates] >>
1. OnlineVideoConverter
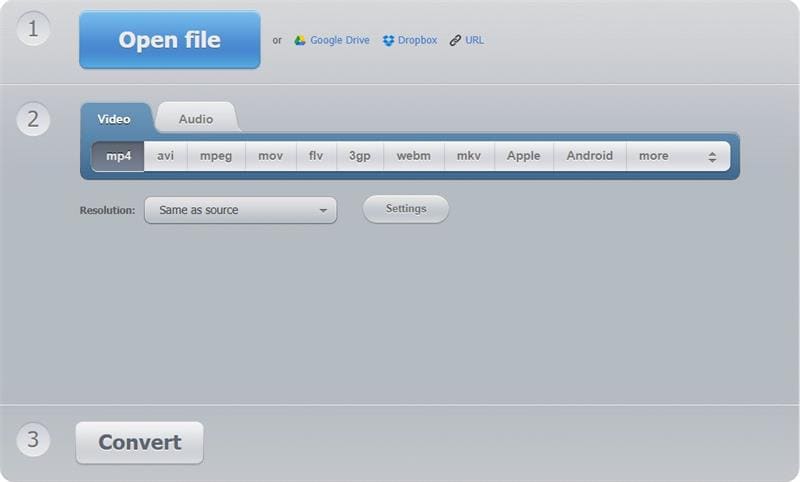
Besides the AVI format OnlineVideoConverter, converts videos into MPEG, MP4, OGG, M4A, WMA, MP3, FLV, and MOV. It’s a versatile application that’s suitable for both Windows and Android devices.
As a powerful online video converting app, you can download any video or file format and convert it within a minute. Start by copying any video file URL and then select the file format you want. Click start to convert your Youtube to AVI.
Features
- Works smoothly with modern browsers
- It’s compatible with many video portals like Vimeo, Facebook, Ted, YouTube, and Dailymotion.
- It has a high-speed download and conversion rate
- No installation nor registration is required
- No conversion limits
You may also like: How to Convert YouTube to MP4 Safely? [Step by Step Guide] >>
2. iConvert Media
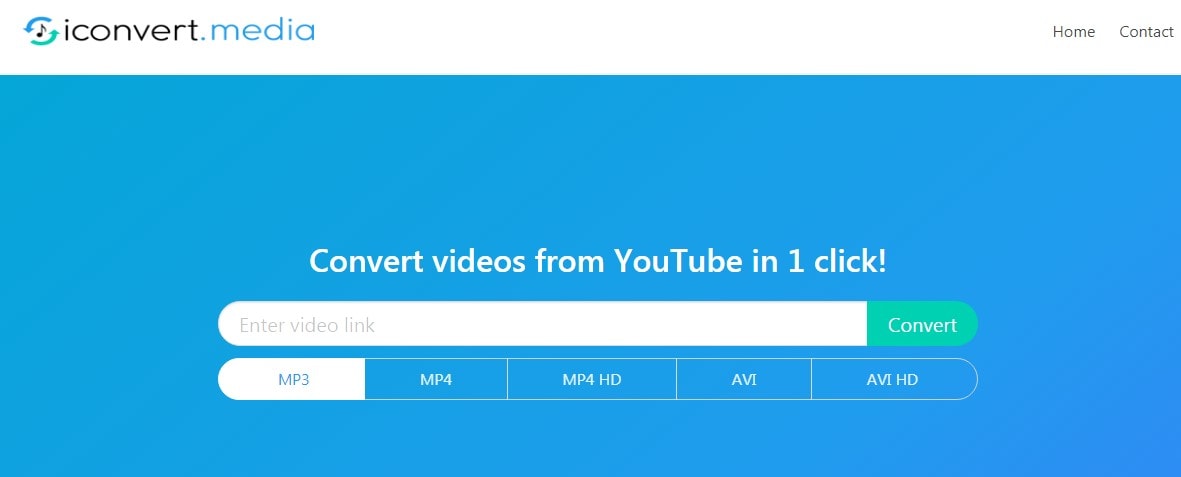
iConvert.Media is a free online video converting tool that produces high-quality videos. The biggest advantage with this tool is you can use on Android, iPhone, iPad, Windows, and Mac. Type any YouTube file format and it will be transformed into the file you want.
To convert a YouTube video, enter the video link on the blank space, select AVI and click “Convert” to convert and download your video.
Features
- No registration requirements or conditions
- Can converts YouTube videos into MP3, AVI, MP4 HD and AVI HD
- Provides high definition audio-video clips
- Offers YouTube video download option
3. y2mate
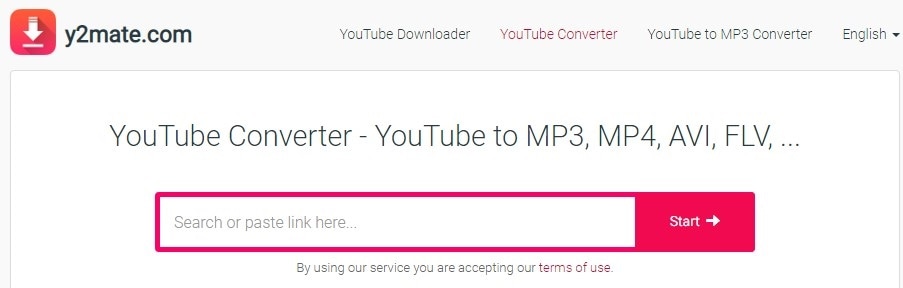
With over 162.2 million monthly visitors, y2mate is among the most used YouTube to AVI converter in the world. This is because of its ease of use, user-friendly interface and speed of video conversion.
Apart from converting YouTube videos to AVI, you can also download MP3, M4A, MP4, 3GP videos from YouTube. Want to convert YouTube to MP3 files? Use y2mate and you won’t regret. It’s compatible with windows, Mac, iOS, Linux and Android.
Features
- Free to download and convert YouTube videos
- Easy to use
- High-speed conversion rate
- Supports innumerable file formats
4. FLVTO
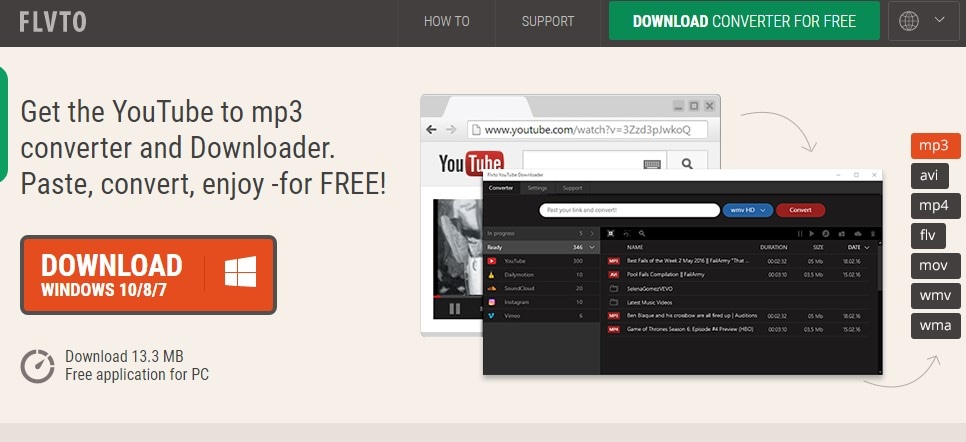
You’ll get these offers after downloading FLVTO; YouTube video downloader, YouTube converter, YouTube song downloader and YouTube video ripper. You can convert any YouTube video file to formats like MP3, AVI, MP4, MOV, and WMV.
FLVTO works on Windows 8, Linux and Mac. Among its amazing features are the inbuilt media player and ID3 tag for quick identification of downloaded videos. If you want to get crystal clear videos, download FLVTO now.
Features
- Works will all video and audio file formats
- Allows download and conversion of up to 99 files at once
- Amazing fast video download and conversion speed
- Download and transfer YouTube music to iTunes
5. 2CONV
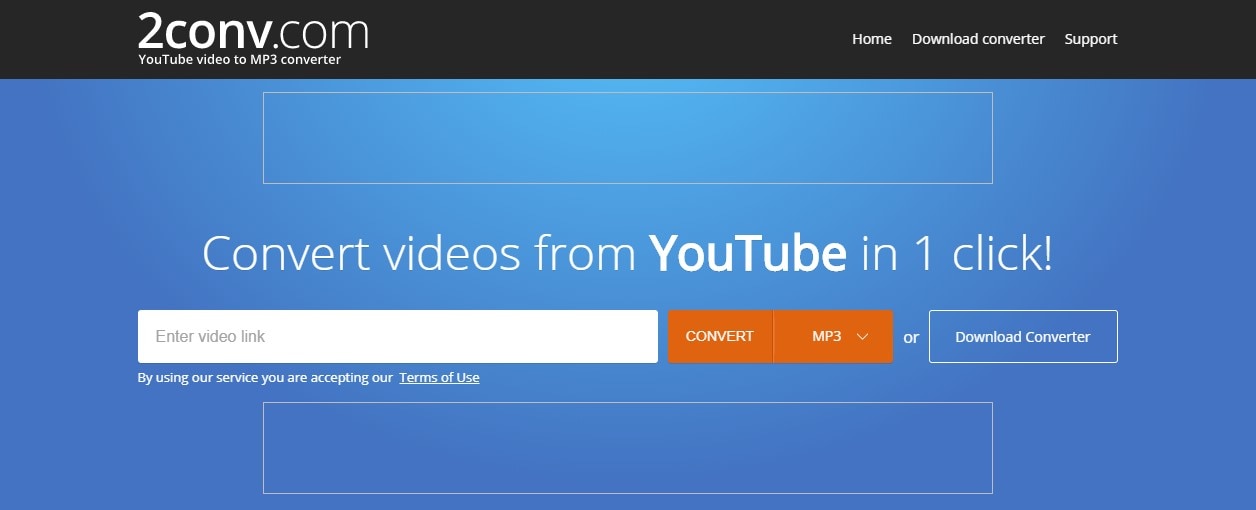
You can either convert YouTube to AVI online by copy-pasting video URL or downloading the app and then converting videos. 2CONV runs on Windows, Linux, Mac OS, Android, and iPhones. Apart from converting videos to AVI/ AVI HD, you can also convert videos to MP3, MP4 HD, and MP4.
No registration and personal details are required to download or convert videos to any format. Whether new or a tech expert, you don’t need any tutorial to use this app.
Features
- Ultra-fast download and conversion speed
- YouTube Video downloader option
- Comes in different languages
6. VideoMP3Converter
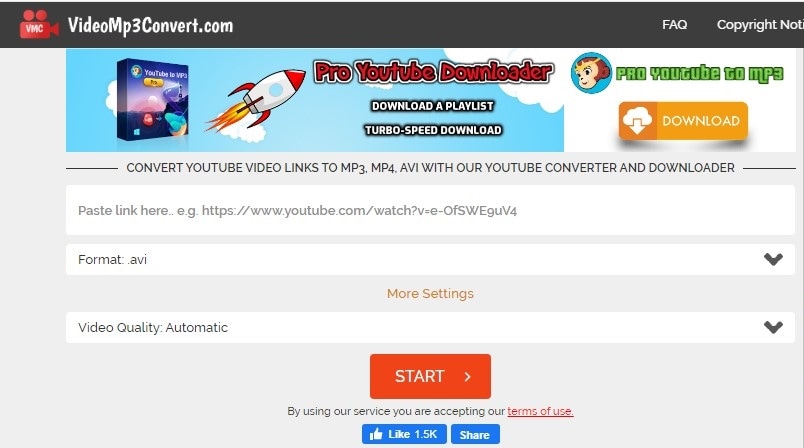
Exceptionally, this web application allows you to select your desired output video bitrate and supports over 10 conversion file formats. No fee, registration or installation is required to use this app.
VideoMP3Converter is not limited to YouTube videos. You can also download videos from Vimeo, Dailymotion, and Liveleak. Do you own a smartphone? VMC is compatible with Androids, iPhone and iPad.
Features
- Compatibility with all modern browsers
- Unlimited free video downloads and conversions in a format of your choice from different hosting platforms.
7. YouTube2Video
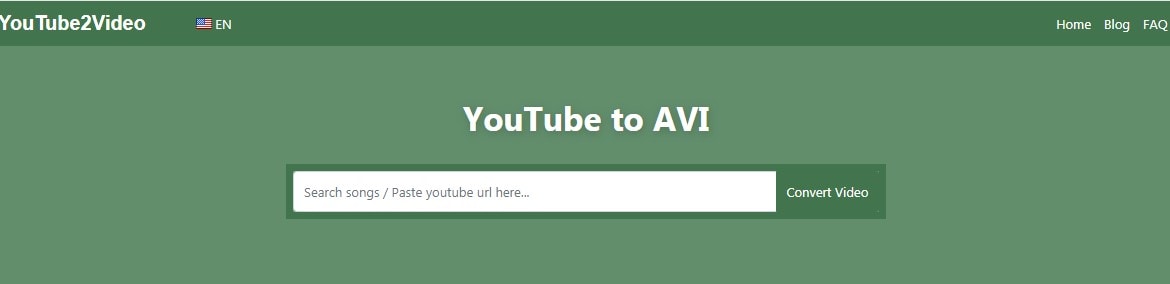
This is the most sought free video conversion app due to its ease of use and compatibility with every operating system. You can download YouTube videos to AVI by searching, copying, pasting and converting its URL on the blank field. With YouTube2Video, MacBook users can download videos directly from YouTube.
YouTube2Video supports video downloads from platforms like Reddit, Facebook, Flickr, Tumbler and VK.Com. The accepted file formats include MKV, MP3, AVI, MAV, and MP4. Its multi-functional platform supports YouTube to MP3 and MP4 downloads.
Features
- Simple and straight forward user interface
- Plenty of videos and song suggestion on the website
- Unlimited free YouTube video downloads
8. ClipConverter
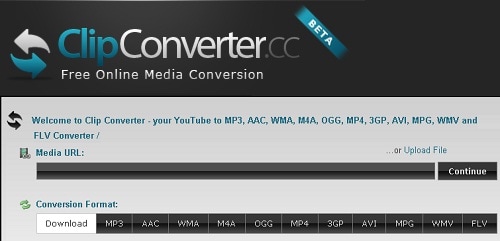
The Clip Converter interface format is clearly showing its simplicity of use. I recommend this app if it’s your first time to convert YouTube to AVI. This is how to convert YouTube to AVI in three easy steps:
- Search for a video on YouTube, copy its URL and paste at “Video URL” on the app
- Choose AVI and select output video resolution then press start.
- Wait to convert and save to your files
Clip Converter supports services like Facebook and Vimeo. It’s pretty good for producing HD, 1080p, 2K, and 4K videos.
Features
- Supports immerse a number of file conversion formats
- Option to choose a video output bitrate
- Absolutely free to use online
- File upload options from Google Drive, DropBox, My Computer and One Drive.
With all the YouTube to Avi converters above at your disposal, how do you convert YouTube videos without compromising its quality?
You may also like: How to Record YouTube Videos on Your PC [Only 5 Steps] >>
Tips of YouTube To AVI Converting For Beginners
To convert YouTube videos to AVI, there are factors you have to consider. Otherwise, the video won’t play or may cause malfunction to your device.
Here are the tips;
- Know your device features- This factor tops our list because it’s where all the actions will take place. Know its operating system, memory status, and screen resolution.
- Choose a multi-functional YouTube to AVI converter- Don’t waste your device memory by downloading a YouTube video downloader that cannot convert the video to AVI.
- Choose a converter that supports many file formats- YouTube supports a large number of file formats. To be able to select any video, the converting app should be able to convert the uploaded video.
- Video resolution- Compare the video resolution and those supported by the converting app. Some converters can only handle low bitrate videos.
Converting YouTube Videos to AVI is more simplified by the above-listed apps and software. But the biggest question is, can you upload AVI to YouTube? Check for the next article to learn more.
Before that, It’s good to learn how to download youtube videos without any Software. To read more, click here >>>>How to Download YouTube Videos without Any Software [12 Proven Ways]
Bottom Line
We all love to watch videos on YouTube. I know, if you knew how to download the videos, convert their file formats and then play on your smart TV, computer or smartphone, watching videos would become a hobby.
Only ignorance is baring you from this. Converting YouTube to AVI costs nothing. Some apps can convert a dozen YouTube videos at an extreme speed. With others, you can download and convert the videos to any format and even change their resolution to suit your device.
Use this article to convert and watch your most favorite videos. Was this article helpful to you? Kindly share your comments and views below.
f
Richard Bennett
Richard Bennett is a writer and a lover of all things video.
Follow @Richard Bennett
Richard Bennett
Mar 27, 2024• Proven solutions
Playing AVI (audio video interleave) files on VLC media player or Windows media player costs nothing, and the number of free YouTube to AVI converters is innumerable. Then, why misuse your data or money viewing videos on YouTube? To download and convert a video to AVI file takes less than a minute.
And the biggest advantage: you can stream AVI audios and videos files online on your computer the whole day.
In this article, I’ll show you how to convert YouTube videos to AVI file formats in three easy ways. Also included are the best 10 YouTube to AVI converters.
You will Learn :
- What is an AVI File?
- How To Convert YouTube To AVI?
- Best AVI Video Players For Windows, Mac, iPhone, and Android
- 8 Best YouTube to AVI Converters
What is an AVI File?
Before we get into the full episode, let’s start by understanding the definition of .AVI file.
AVI stands for audio video interleave. An AVI is a video container format that capture, store and play audio- videos. The AVI file extensions are abbreviated as .avi.
It was developed by Microsoft in 1992 and works based on Resource Interchange File Format (RIFF). Its users enjoy built-in support in every Microsoft Windows application.
AVI encodes its audio and video data on codecs like XviD, DivX and MPEG-2. A codec is a software or hardware used to compress or decompress digital video.
If you have limited storage, avoid AVI files because they are non-compressed and occupy large space. Conversely, AVI format stores high-quality videos since they are less compressed.
Streaming videos from YouTube is expensive. To watch your favorite videos repeatedly, you have to download the YouTube videos and convert to AVI file.
How To Convert YouTube To AVI: Best Solutions For Windows And Mac?
Have you ever tried to convert YouTube videos to AVI online? It’s next to impossibility! The easiest and fastest way is to start by downloading the video.
To convert YouTube to AVI, you require software that supports all file formats. Why? YouTube videos are uploaded in many formats. To avoid trial and error methods, the best-recommended software to use is Filmora.
Filmora works pretty well with Windows10/8/7 and mac. Do you want to know how to download and convert YouTube videos to AVI using Filmora for free? Follow the steps below.
Step 1: On the Filmora product page, select Windows or Mac, and then click the Free Download button below. Follow the prompts to install it.
Step 2: Search for the YouTube video to convert. To download a YouTube video easily subscribers to YouTube Premium. Otherwise, download directly from your browser directly using plugins like Dlnowsoft .
Step 3: Now double-click the Filmora icon to start your new video conversion project. You can change the aspect ratio if necessary.
Step 4: Tap on the new project timeline for the editor menu to load. Head over to the Import menu and drop down to Import files to select your downloaded YouTube video. Click the “EXPORT” to open the file format options.
Step 5: Select AVI, rename the project and choose where to save the converted YouTube video.
Click the Export menu at the bottom and wait for the video to convert.
To learn more about Wondershare Filmora video editor in 60 seconds, click the video below.
Back to our main topic. Not every media player can play AVI files. Likewise, you cannot use any video converting software to convert YouTube to AVI.
Therefore, to quickly understand the YouTube to AVI converter to use and the AVI video media players for windows, mac, iPhone or Android, I’ve subdivided this part into two parts.
- Part 1: Best AVI Video Players
- Part 2: 8 Best YouTube to AVI Converter
Best AVI Video Players For Windows, Mac, iPhone, and Android
Days are gone when Windows Media Player was the most commonly preferred media player. The launch of devices like Mac, iPhone, and Android has led to the development of AVI players that are compatible with the in-built systems.
You may also like: 10 Best Free Outro Makers Online to Create Perfect Outro Templates >>
Top AVI Players For Windows 10/8/7
Microsoft Windows is the most used operating system. The top AVI video players for Windows are:
- JetVideo
- KM Player
- Rules Player
- VLC Player
- Real Player
- FreeSmith Video Player
Best 6 AVI Players For iPhone/iPad
Today’s technological advancements have placed the iOS operating system on a global competition with other systems. To play AVI videos on iPhone or iPad, use the following video players:
- RockPlayer2
- VLC Media Player
- Video Stream
- AirPlayit
- Oplayer Lite
- Infuse3
Top 5 AVI Players for Android
The majority of smartphone owners have Android phones. The Android operating system supports a myriad of AVI media players. Here the top AVI players for Android to download:
- Dice Player
- BS Player
- VLC Media Player
- GPlayer
6 Best Free AVI Player For Mac
Mac is renowned for its simplicity and compatibility with many third-party applications. The best and easiest AVI players for mac include:
- 5KPlayer
- Gom Player
- QuickTime
- VLC Media Player
- Plex
- Elmedia
Now that you know which player to download, which AVI converters are suitable for your device? Select the best from the next part.
8 Best YouTube to AVI Converters
Without a doubt, the number of YouTube to AVI converters available online surpasses everyone’s demand. Whereas some works best for mac and Windows, others are developed for Android and iPad.
A reliable YouTube video converter should have options for you to save and reset the resolution. Online video converters are the best for you only have copy-paste the URL and then convert. They also negate YouTube video download policies.
You may also like: YouTube Outro Complete Guide [+Best Makers & Free Templates] >>
1. OnlineVideoConverter
Besides the AVI format OnlineVideoConverter, converts videos into MPEG, MP4, OGG, M4A, WMA, MP3, FLV, and MOV. It’s a versatile application that’s suitable for both Windows and Android devices.
As a powerful online video converting app, you can download any video or file format and convert it within a minute. Start by copying any video file URL and then select the file format you want. Click start to convert your Youtube to AVI.
Features
- Works smoothly with modern browsers
- It’s compatible with many video portals like Vimeo, Facebook, Ted, YouTube, and Dailymotion.
- It has a high-speed download and conversion rate
- No installation nor registration is required
- No conversion limits
You may also like: How to Convert YouTube to MP4 Safely? [Step by Step Guide] >>
2. iConvert Media
iConvert.Media is a free online video converting tool that produces high-quality videos. The biggest advantage with this tool is you can use on Android, iPhone, iPad, Windows, and Mac. Type any YouTube file format and it will be transformed into the file you want.
To convert a YouTube video, enter the video link on the blank space, select AVI and click “Convert” to convert and download your video.
Features
- No registration requirements or conditions
- Can converts YouTube videos into MP3, AVI, MP4 HD and AVI HD
- Provides high definition audio-video clips
- Offers YouTube video download option
3. y2mate
With over 162.2 million monthly visitors, y2mate is among the most used YouTube to AVI converter in the world. This is because of its ease of use, user-friendly interface and speed of video conversion.
Apart from converting YouTube videos to AVI, you can also download MP3, M4A, MP4, 3GP videos from YouTube. Want to convert YouTube to MP3 files? Use y2mate and you won’t regret. It’s compatible with windows, Mac, iOS, Linux and Android.
Features
- Free to download and convert YouTube videos
- Easy to use
- High-speed conversion rate
- Supports innumerable file formats
4. FLVTO
You’ll get these offers after downloading FLVTO; YouTube video downloader, YouTube converter, YouTube song downloader and YouTube video ripper. You can convert any YouTube video file to formats like MP3, AVI, MP4, MOV, and WMV.
FLVTO works on Windows 8, Linux and Mac. Among its amazing features are the inbuilt media player and ID3 tag for quick identification of downloaded videos. If you want to get crystal clear videos, download FLVTO now.
Features
- Works will all video and audio file formats
- Allows download and conversion of up to 99 files at once
- Amazing fast video download and conversion speed
- Download and transfer YouTube music to iTunes
5. 2CONV
You can either convert YouTube to AVI online by copy-pasting video URL or downloading the app and then converting videos. 2CONV runs on Windows, Linux, Mac OS, Android, and iPhones. Apart from converting videos to AVI/ AVI HD, you can also convert videos to MP3, MP4 HD, and MP4.
No registration and personal details are required to download or convert videos to any format. Whether new or a tech expert, you don’t need any tutorial to use this app.
Features
- Ultra-fast download and conversion speed
- YouTube Video downloader option
- Comes in different languages
6. VideoMP3Converter
Exceptionally, this web application allows you to select your desired output video bitrate and supports over 10 conversion file formats. No fee, registration or installation is required to use this app.
VideoMP3Converter is not limited to YouTube videos. You can also download videos from Vimeo, Dailymotion, and Liveleak. Do you own a smartphone? VMC is compatible with Androids, iPhone and iPad.
Features
- Compatibility with all modern browsers
- Unlimited free video downloads and conversions in a format of your choice from different hosting platforms.
7. YouTube2Video
This is the most sought free video conversion app due to its ease of use and compatibility with every operating system. You can download YouTube videos to AVI by searching, copying, pasting and converting its URL on the blank field. With YouTube2Video, MacBook users can download videos directly from YouTube.
YouTube2Video supports video downloads from platforms like Reddit, Facebook, Flickr, Tumbler and VK.Com. The accepted file formats include MKV, MP3, AVI, MAV, and MP4. Its multi-functional platform supports YouTube to MP3 and MP4 downloads.
Features
- Simple and straight forward user interface
- Plenty of videos and song suggestion on the website
- Unlimited free YouTube video downloads
8. ClipConverter
The Clip Converter interface format is clearly showing its simplicity of use. I recommend this app if it’s your first time to convert YouTube to AVI. This is how to convert YouTube to AVI in three easy steps:
- Search for a video on YouTube, copy its URL and paste at “Video URL” on the app
- Choose AVI and select output video resolution then press start.
- Wait to convert and save to your files
Clip Converter supports services like Facebook and Vimeo. It’s pretty good for producing HD, 1080p, 2K, and 4K videos.
Features
- Supports immerse a number of file conversion formats
- Option to choose a video output bitrate
- Absolutely free to use online
- File upload options from Google Drive, DropBox, My Computer and One Drive.
With all the YouTube to Avi converters above at your disposal, how do you convert YouTube videos without compromising its quality?
You may also like: How to Record YouTube Videos on Your PC [Only 5 Steps] >>
Tips of YouTube To AVI Converting For Beginners
To convert YouTube videos to AVI, there are factors you have to consider. Otherwise, the video won’t play or may cause malfunction to your device.
Here are the tips;
- Know your device features- This factor tops our list because it’s where all the actions will take place. Know its operating system, memory status, and screen resolution.
- Choose a multi-functional YouTube to AVI converter- Don’t waste your device memory by downloading a YouTube video downloader that cannot convert the video to AVI.
- Choose a converter that supports many file formats- YouTube supports a large number of file formats. To be able to select any video, the converting app should be able to convert the uploaded video.
- Video resolution- Compare the video resolution and those supported by the converting app. Some converters can only handle low bitrate videos.
Converting YouTube Videos to AVI is more simplified by the above-listed apps and software. But the biggest question is, can you upload AVI to YouTube? Check for the next article to learn more.
Before that, It’s good to learn how to download youtube videos without any Software. To read more, click here >>>>How to Download YouTube Videos without Any Software [12 Proven Ways]
Bottom Line
We all love to watch videos on YouTube. I know, if you knew how to download the videos, convert their file formats and then play on your smart TV, computer or smartphone, watching videos would become a hobby.
Only ignorance is baring you from this. Converting YouTube to AVI costs nothing. Some apps can convert a dozen YouTube videos at an extreme speed. With others, you can download and convert the videos to any format and even change their resolution to suit your device.
Use this article to convert and watch your most favorite videos. Was this article helpful to you? Kindly share your comments and views below.
f
Richard Bennett
Richard Bennett is a writer and a lover of all things video.
Follow @Richard Bennett
Enliven YouTube Images: A Burst of Neon Flair
Your YouTube video, or any other clip published on any forum, gets a larger number of hits if it has an attractive thumbnail. And, the fact is, a thumbnail becomes 10x more attractive when the main character that the image has have a neon border around it.
With that said, in the following sections, you will learn a couple of methods on how to add a YouTube thumbnail border around the main characters and/or objects that are significant to the clip.
In this article
01 Add Glowing Neon Border to YouTube Thumbnail with Filmora
02 Add a Glowing Neon Border in YouTube Thumbnail with Canva
03 Outline a Person in a YouTube Thumbnail with Photoshop
Part 1: How to Add Neon Border to YouTube Thumbnail for Free with Filmora
Being one of the most versatile and intuitive post-production tools available in the market today, Wondershare Filmora X allows you to add a neon border to a YouTube thumbnail quite conveniently. You can learn how to get this done on Windows or Mac by following the steps given below.
For Win 7 or later (64-bit)
For macOS 10.12 or later
Step 1: Define Project Settings and Add Image to the Timeline
Launch Wondershare Filmora X on your PC (a MacBook Pro M1 is used here), ensure that the project aspect ratio is set to 16:9 (Widescreen) on the splash screen, and click New Project. On the main interface, click the Preview quality and display settings icon from the upper-right area of the Timeline, click Change Project Aspect Ratio, click to select 1280 x 720 (HD) from the Resolution menu of the Project Settings box, and click OK to save the custom project settings.

Then select My Media from the menu bar if not already selected, click Project Media from the navigation pane, and click Import from the Media box to select and import the image of the main character or object that you want to use in the thumbnail.

Now, drag the image from the Media box to the Timeline at the bottom.

Step 2: Clear Image Background, Add Border, and Add Custom Background
Go to Effects from the menu bar, click to select the Default tab and then AI Portrait from the navigation pane, and click and drag the Human Segmentation preset from the right box, and place it over the image track in the Timeline.

Double-click the image layer, scroll down the upper-left box to the Video Effects section, and use the Edge Thickness and Edge Feather sliders to adjust the character’s edges to make them as realistic as possible. Click OK when done.

Next, click and drag the Human Border preset over the image track in the Timeline, and follow the same procedure to customize the border. This will give the character a neon border effect.

Now, use the method explained earlier to import a custom image for the background, and drag and place it under the previous track in the Timeline.

If you are running the latest version of Filmora, you will find there are some neon light effects available under AI Portrait as well.

Step 3: Add Titles to Thumbnail
Go to Titles from the menu bar, click to select the Default tab and then Lower 3rds from the navigation pane, and click and drag your preferred lower-third preset from the right window to a separate layer in the Timeline. Double-click the lower-third layer, and use the available options in the upper-left window to change the text, its color, etc., and drag the textbox to place it to your preferred position on the image as well. Click OK to save the changes.
Next, click to select Titles from the navigation pane, and drag your preferred title from the right window to the upper-most track in the Timeline. Now use the method explained earlier to edit the text, its color, position, etc. to make it look professional.

For more tips and tricks for creating YouTube thumbnail, you can check this You Tube thumbnail creating guide.
Step 4: Get the Neon Border Thumbnail
Click the Snapshot (Camera) icon from the upper-right area of the Timeline, go to My Media from the menu bar, right-click the thumbnail of the screenshot you captured, and click Reveal in Finder (on Mac) or Reveal in Explorer (on Windows) to get to the folder the YouTube thumbnail border is saved in.

Part 2: How to Add a Glowing Neon Border in Your YouTube Thumbnail with Canva
Canva is another intuitive editing program that works on the web interface rather than having you download and install an app on your PC. You can add a neon border for YouTube thumbnails using Canva by following the instructions given below:
Step 1: Define Project Settings and Add a Background
After signing in to your Canva account, click Create a design from the top-right corner of the page, click Custom size from the bottom, define 1280 and 720 in the Width and Height fields on the box that appears respectively, and click Create new design.

Now, click to select Background from the navigation bar on the left (if the Background tool is not visible, click More and then choose Background from the expanded list), and click to select a background from the images available in the center pane.

Step 2: Upload an Image and Add Effects
Click Uploads from the navigation bar, click the More icon from the right of the Upload media button present at the top of the center pane, choose your preferred method to upload the image (with the transparent background) that you want to use, upload the image, and drag it from the center pane to the Canvas.
Note: You can use any of the tools available online to remove the background from your image for free.

To add a YouTube thumbnail border, make sure that the image that you added to the Canvas is selected, click the Duplicate icon from the upper-right area, and use the scaling handles of the copy of the image to increase its size a bit. Reposition the image back to its original location as well.
Then, click Edit image from the upper-left corner of the Canvas, click Duotone from the Edit image pane at the center, if need be, click See all, choose your preferred duotone effect to apply on the image, choose your preferred highlight and shadow colors from the box that appears next, and click Back from the top of the pane.

Next, click See all next to the Adjust section from the center pane, and drag the Blur slider to the right to increase the blur effect on the image.

Step 3: Position the Layers
While keeping the duplicate image selected, click the Position button from the upper-right area of the Canvas, and click Background to send the second image behind the first one to get the neon border effect for the photo.

Part 3: How to Outline a Person in a YouTube Thumbnail with Photoshop
Because YouTube thumbnails are nothing but static images, creating YouTube thumbnail border with Adobe Photoshop is comparatively easier. The process of doing this is given below:
Step 1: Define Document Preferences and Import an Image
Launch Adobe Photoshop on your PC, click Create new, and on the New Document customization box, define the width and height values to 1280 and 720 pixels respectively. Select Transparent from the Background Contents menu as well if not already selected. Click Create from the bottom to create a new Photoshop document with the specified document settings. Next, open the folder that contains the source image, drag the photo to Photoshop, and press Enter to place the photo.

Step 2: Remove Background from the Image
Make sure that the image layer is selected in the Layers panel on the right, go to Select from the menu bar at the top, and click Subject. From the bottom of the Layers panel, click the Add a mask icon to get rid of the background, leaving only the human on the Canvas.

Step 3: Add a Custom Background and an Outline Around the Subject
Use the method explained earlier to import a background image of your choice to Photoshop. Drag the background image layer to the bottom in the Layers panel. Double-click the masked layer, click to select Stroke from the left pane of the Layer Style box, and use the options available on the right to manage the size, color, position, etc. of the stroke that has been added around the human subject. Click OK when done, and then export the image normally to use it as a YouTube thumbnail border.

Summary
It is important to know that the default resolution of a YouTube thumbnail is 1280 x 720 pixels that is usually written and referred to as 720p. While adding a YouTube thumbnail border, it is also imperative to have a good sense of color combination and fonts. Furthermore, a decent tool like Wondershare Filmora X must be used to add an appealing neon border around the main subject in the thumbnail image easily and quickly.
02 Add a Glowing Neon Border in YouTube Thumbnail with Canva
03 Outline a Person in a YouTube Thumbnail with Photoshop
Part 1: How to Add Neon Border to YouTube Thumbnail for Free with Filmora
Being one of the most versatile and intuitive post-production tools available in the market today, Wondershare Filmora X allows you to add a neon border to a YouTube thumbnail quite conveniently. You can learn how to get this done on Windows or Mac by following the steps given below.
For Win 7 or later (64-bit)
For macOS 10.12 or later
Step 1: Define Project Settings and Add Image to the Timeline
Launch Wondershare Filmora X on your PC (a MacBook Pro M1 is used here), ensure that the project aspect ratio is set to 16:9 (Widescreen) on the splash screen, and click New Project. On the main interface, click the Preview quality and display settings icon from the upper-right area of the Timeline, click Change Project Aspect Ratio, click to select 1280 x 720 (HD) from the Resolution menu of the Project Settings box, and click OK to save the custom project settings.
Then select My Media from the menu bar if not already selected, click Project Media from the navigation pane, and click Import from the Media box to select and import the image of the main character or object that you want to use in the thumbnail.
Now, drag the image from the Media box to the Timeline at the bottom.
Step 2: Clear Image Background, Add Border, and Add Custom Background
Go to Effects from the menu bar, click to select the Default tab and then AI Portrait from the navigation pane, and click and drag the Human Segmentation preset from the right box, and place it over the image track in the Timeline.
Double-click the image layer, scroll down the upper-left box to the Video Effects section, and use the Edge Thickness and Edge Feather sliders to adjust the character’s edges to make them as realistic as possible. Click OK when done.
Next, click and drag the Human Border preset over the image track in the Timeline, and follow the same procedure to customize the border. This will give the character a neon border effect.
Now, use the method explained earlier to import a custom image for the background, and drag and place it under the previous track in the Timeline.
If you are running the latest version of Filmora, you will find there are some neon light effects available under AI Portrait as well.
Step 3: Add Titles to Thumbnail
Go to Titles from the menu bar, click to select the Default tab and then Lower 3rds from the navigation pane, and click and drag your preferred lower-third preset from the right window to a separate layer in the Timeline. Double-click the lower-third layer, and use the available options in the upper-left window to change the text, its color, etc., and drag the textbox to place it to your preferred position on the image as well. Click OK to save the changes.
Next, click to select Titles from the navigation pane, and drag your preferred title from the right window to the upper-most track in the Timeline. Now use the method explained earlier to edit the text, its color, position, etc. to make it look professional.
For more tips and tricks for creating YouTube thumbnail, you can check this You Tube thumbnail creating guide.
Step 4: Get the Neon Border Thumbnail
Click the Snapshot (Camera) icon from the upper-right area of the Timeline, go to My Media from the menu bar, right-click the thumbnail of the screenshot you captured, and click Reveal in Finder (on Mac) or Reveal in Explorer (on Windows) to get to the folder the YouTube thumbnail border is saved in.
Part 2: How to Add a Glowing Neon Border in Your YouTube Thumbnail with Canva
Canva is another intuitive editing program that works on the web interface rather than having you download and install an app on your PC. You can add a neon border for YouTube thumbnails using Canva by following the instructions given below:
Step 1: Define Project Settings and Add a Background
After signing in to your Canva account, click Create a design from the top-right corner of the page, click Custom size from the bottom, define 1280 and 720 in the Width and Height fields on the box that appears respectively, and click Create new design.
Now, click to select Background from the navigation bar on the left (if the Background tool is not visible, click More and then choose Background from the expanded list), and click to select a background from the images available in the center pane.
Step 2: Upload an Image and Add Effects
Click Uploads from the navigation bar, click the More icon from the right of the Upload media button present at the top of the center pane, choose your preferred method to upload the image (with the transparent background) that you want to use, upload the image, and drag it from the center pane to the Canvas.
Note: You can use any of the tools available online to remove the background from your image for free.
To add a YouTube thumbnail border, make sure that the image that you added to the Canvas is selected, click the Duplicate icon from the upper-right area, and use the scaling handles of the copy of the image to increase its size a bit. Reposition the image back to its original location as well.
Then, click Edit image from the upper-left corner of the Canvas, click Duotone from the Edit image pane at the center, if need be, click See all, choose your preferred duotone effect to apply on the image, choose your preferred highlight and shadow colors from the box that appears next, and click Back from the top of the pane.
Next, click See all next to the Adjust section from the center pane, and drag the Blur slider to the right to increase the blur effect on the image.
Step 3: Position the Layers
While keeping the duplicate image selected, click the Position button from the upper-right area of the Canvas, and click Background to send the second image behind the first one to get the neon border effect for the photo.
Part 3: How to Outline a Person in a YouTube Thumbnail with Photoshop
Because YouTube thumbnails are nothing but static images, creating YouTube thumbnail border with Adobe Photoshop is comparatively easier. The process of doing this is given below:
Step 1: Define Document Preferences and Import an Image
Launch Adobe Photoshop on your PC, click Create new, and on the New Document customization box, define the width and height values to 1280 and 720 pixels respectively. Select Transparent from the Background Contents menu as well if not already selected. Click Create from the bottom to create a new Photoshop document with the specified document settings. Next, open the folder that contains the source image, drag the photo to Photoshop, and press Enter to place the photo.
Step 2: Remove Background from the Image
Make sure that the image layer is selected in the Layers panel on the right, go to Select from the menu bar at the top, and click Subject. From the bottom of the Layers panel, click the Add a mask icon to get rid of the background, leaving only the human on the Canvas.
Step 3: Add a Custom Background and an Outline Around the Subject
Use the method explained earlier to import a background image of your choice to Photoshop. Drag the background image layer to the bottom in the Layers panel. Double-click the masked layer, click to select Stroke from the left pane of the Layer Style box, and use the options available on the right to manage the size, color, position, etc. of the stroke that has been added around the human subject. Click OK when done, and then export the image normally to use it as a YouTube thumbnail border.
Summary
It is important to know that the default resolution of a YouTube thumbnail is 1280 x 720 pixels that is usually written and referred to as 720p. While adding a YouTube thumbnail border, it is also imperative to have a good sense of color combination and fonts. Furthermore, a decent tool like Wondershare Filmora X must be used to add an appealing neon border around the main subject in the thumbnail image easily and quickly.
- Title: "2024 Approved Streamline Your Content Top 8 YouTube-to-AVI Solutions"
- Author: Thomas
- Created at : 2024-05-31 12:41:30
- Updated at : 2024-06-01 12:41:30
- Link: https://youtube-help.techidaily.com/2024-approved-streamline-your-content-top-8-youtube-to-avi-solutions/
- License: This work is licensed under CC BY-NC-SA 4.0.
