
"2024 Approved Streamlining Video Production Merging YouTube Editing & iMovie's Best Practices"
Streamlining Video Production: Merging YouTube Editing & iMovie’s Best Practices
Easy Way to Edit YouTube Videos in iMovie

Richard Bennett
Mar 27, 2024• Proven solutions
iMovie is the built-in video editor that allows you to combine several video clips. It is available for both Mac and iOS devices. This app was first released in 1999 when it came with the iMac DV model.
With the use of the iMovie, you are able to create movies that include sound effects, menus, transitions, titles, themes, and music, just to name a few. The resulting movie can be saved onto physical media or as a file on the hard drive.
If you are a Mac user, then you can easily edit YouTube videos in iMovie. All you need to do is to follow the simple steps below. In this article, you will learn how to import videos, organize videos, add YouTube titles and add transitions.
 OtsAV Radio Webcaster
Part 1. Steps on Editing YouTube Videos Using iMovie
To edit a video for YouTube with iMovie, you can follow these steps.

Step 1: Import Video Clips into iMovie
If you have recorded the video clips with the use of a videocam, then connect the camera to the Mac and open the app. You can import the videos by manually selecting the clips that will be part of the YouTube video.
Note: If you want to import videos that you have already published on your YouTube channel, then you can download them from the channel, and save them as MP4. However, if the videos were uploaded by other users, then you need to use a video converter, this article will let you know the 8 best video converters to convert video to MP4.
Step 2: Edit the Video Clips
Once you have all the clips that you need, the next step is to edit YouTube videos in iMovie. When you import the clips, you have created an Event in the app. If you want to include a clip in your final video, just drag the file to the project browser, where you can edit the video.

You can also add videos from other Events into the current project. You can select the parts of the video by dragging across the video from the chosen start to stop points. Edit the video until you are satisfied with the results.
Step 3: Enhance the Video
Once you have edited the video, you can then add background music, themes, sound effects, onscreen text, transitions between clips, and photos. The best thing about iMovie is that it comes with a sound effects library. It also allows you to upload audio from your iTunes library, iLife, and GarageBand.
iMovie allows you to add text to any part of the video, whether it is a title screen at the start, credits at the end, and everything in between. Try to enhance the video until you think it is ready to be uploaded to YouTube.
- Add YouTube title : If you want to add a title for YouTube Video, all you need to do is click Title in the toolbar, and then highlight My Movie on the left. From here, enter the title you like.
- Organize videos : You also can rearrange video clips in the timeline. Just drag the video on the timeline to wherever you want.
- Add transitions : If you have more than one video clip, you definitely need transitions between them. Click the Transitions tab, and then select one transition you like. In the end, drag it to stop between two clips.
Step 4: Export and Upload the Video to YouTube

When you edit YouTube videos in iMovie, you have the option to export the video straight to the video streaming website. All you need to do is to click on the Share button found at the top of the screen. Then select YouTube. Add your YouTube account in iMovie by entering your username and password. Then you choose a title, description, and tags for the video.
You can choose the resolution and size of the video that includes HD 720p and HD 1080p, mobile, medium, and large. Click on Publish to upload the video to YouTube. Uploading the video will take several minutes to a couple of hours, depending on the resolution and size of the video.

Part 2. A Better Choice to Edit YouTube Videos
There’s a better way to edit YouTube videos. It involves the use of Wondershare Filmora . It is user-friendly and allows beginners to make videos professional-looking videos.


This software has more than 300 video effects for family, weddings, love, and travel, etc. You can also add animated captions to photos that will help tell the story. It comes with an array of intro and credit templates that will enhance your video.
Lastly, you can easily share the resulting movie on YouTube, DVD, other devices, and a lot more.
 Project Manager - Asset Browser for 3Ds Max
Richard Bennett
Richard Bennett is a writer and a lover of all things video.
Follow @Richard Bennett
Richard Bennett
Mar 27, 2024• Proven solutions
iMovie is the built-in video editor that allows you to combine several video clips. It is available for both Mac and iOS devices. This app was first released in 1999 when it came with the iMac DV model.
With the use of the iMovie, you are able to create movies that include sound effects, menus, transitions, titles, themes, and music, just to name a few. The resulting movie can be saved onto physical media or as a file on the hard drive.
If you are a Mac user, then you can easily edit YouTube videos in iMovie. All you need to do is to follow the simple steps below. In this article, you will learn how to import videos, organize videos, add YouTube titles and add transitions.
Part 1. Steps on Editing YouTube Videos Using iMovie
To edit a video for YouTube with iMovie, you can follow these steps.
 vMix Basic HD - Software based live production. vMix Basic HD includes 4 inputs, 3 cameras, streaming, recording, playlist.
Step 1: Import Video Clips into iMovie
If you have recorded the video clips with the use of a videocam, then connect the camera to the Mac and open the app. You can import the videos by manually selecting the clips that will be part of the YouTube video.
Note: If you want to import videos that you have already published on your YouTube channel, then you can download them from the channel, and save them as MP4. However, if the videos were uploaded by other users, then you need to use a video converter, this article will let you know the 8 best video converters to convert video to MP4.
Step 2: Edit the Video Clips
Once you have all the clips that you need, the next step is to edit YouTube videos in iMovie. When you import the clips, you have created an Event in the app. If you want to include a clip in your final video, just drag the file to the project browser, where you can edit the video.
You can also add videos from other Events into the current project. You can select the parts of the video by dragging across the video from the chosen start to stop points. Edit the video until you are satisfied with the results.
 KoolReport Pro is an advanced solution for creating data reports and dashboards in PHP. Equipped with all extended packages , KoolReport Pro is able to connect to various datasources, perform advanced data analysis, construct stunning charts and graphs and export your beautiful work to PDF, Excel, JPG or other formats. Plus, it includes powerful built-in reports such as pivot report and drill-down report which will save your time in building ones.
 It will help you to write dynamic data reports easily, to construct intuitive dashboards or to build a whole business intelligence cockpit.
KoolReport Pro package goes with Full Source Code, Royal Free, ONE (1) Year Priority Support, ONE (1) Year Free Upgrade and 30-Days Money Back Guarantee.
Developer License allows Single Developer to create Unlimited Reports, deploy on Unlimited Servers and able deliver the work to Unlimited Clients.
Step 3: Enhance the Video
Once you have edited the video, you can then add background music, themes, sound effects, onscreen text, transitions between clips, and photos. The best thing about iMovie is that it comes with a sound effects library. It also allows you to upload audio from your iTunes library, iLife, and GarageBand.
iMovie allows you to add text to any part of the video, whether it is a title screen at the start, credits at the end, and everything in between. Try to enhance the video until you think it is ready to be uploaded to YouTube.
- Add YouTube title : If you want to add a title for YouTube Video, all you need to do is click Title in the toolbar, and then highlight My Movie on the left. From here, enter the title you like.
- Organize videos : You also can rearrange video clips in the timeline. Just drag the video on the timeline to wherever you want.
- Add transitions : If you have more than one video clip, you definitely need transitions between them. Click the Transitions tab, and then select one transition you like. In the end, drag it to stop between two clips.
Step 4: Export and Upload the Video to YouTube
When you edit YouTube videos in iMovie, you have the option to export the video straight to the video streaming website. All you need to do is to click on the Share button found at the top of the screen. Then select YouTube. Add your YouTube account in iMovie by entering your username and password. Then you choose a title, description, and tags for the video.
You can choose the resolution and size of the video that includes HD 720p and HD 1080p, mobile, medium, and large. Click on Publish to upload the video to YouTube. Uploading the video will take several minutes to a couple of hours, depending on the resolution and size of the video.
Part 2. A Better Choice to Edit YouTube Videos
There’s a better way to edit YouTube videos. It involves the use of Wondershare Filmora . It is user-friendly and allows beginners to make videos professional-looking videos.
 Power Tools add-on for Google Sheets, Lifetime subscription
This software has more than 300 video effects for family, weddings, love, and travel, etc. You can also add animated captions to photos that will help tell the story. It comes with an array of intro and credit templates that will enhance your video.
Lastly, you can easily share the resulting movie on YouTube, DVD, other devices, and a lot more.
Richard Bennett
Richard Bennett is a writer and a lover of all things video.
Follow @Richard Bennett
Richard Bennett
Mar 27, 2024• Proven solutions
iMovie is the built-in video editor that allows you to combine several video clips. It is available for both Mac and iOS devices. This app was first released in 1999 when it came with the iMac DV model.
With the use of the iMovie, you are able to create movies that include sound effects, menus, transitions, titles, themes, and music, just to name a few. The resulting movie can be saved onto physical media or as a file on the hard drive.
If you are a Mac user, then you can easily edit YouTube videos in iMovie. All you need to do is to follow the simple steps below. In this article, you will learn how to import videos, organize videos, add YouTube titles and add transitions.
Part 1. Steps on Editing YouTube Videos Using iMovie
To edit a video for YouTube with iMovie, you can follow these steps.
.png) Kanto Player Professional
Kanto Player ProfessionalStep 1: Import Video Clips into iMovie
If you have recorded the video clips with the use of a videocam, then connect the camera to the Mac and open the app. You can import the videos by manually selecting the clips that will be part of the YouTube video.
Note: If you want to import videos that you have already published on your YouTube channel, then you can download them from the channel, and save them as MP4. However, if the videos were uploaded by other users, then you need to use a video converter, this article will let you know the 8 best video converters to convert video to MP4.
Step 2: Edit the Video Clips
Once you have all the clips that you need, the next step is to edit YouTube videos in iMovie. When you import the clips, you have created an Event in the app. If you want to include a clip in your final video, just drag the file to the project browser, where you can edit the video.

WPS Office Premium ( File Recovery, Photo Scanning, Convert PDF)–Yearly
You can also add videos from other Events into the current project. You can select the parts of the video by dragging across the video from the chosen start to stop points. Edit the video until you are satisfied with the results.
Step 3: Enhance the Video
Once you have edited the video, you can then add background music, themes, sound effects, onscreen text, transitions between clips, and photos. The best thing about iMovie is that it comes with a sound effects library. It also allows you to upload audio from your iTunes library, iLife, and GarageBand.
iMovie allows you to add text to any part of the video, whether it is a title screen at the start, credits at the end, and everything in between. Try to enhance the video until you think it is ready to be uploaded to YouTube.
- Add YouTube title : If you want to add a title for YouTube Video, all you need to do is click Title in the toolbar, and then highlight My Movie on the left. From here, enter the title you like.
- Organize videos : You also can rearrange video clips in the timeline. Just drag the video on the timeline to wherever you want.
- Add transitions : If you have more than one video clip, you definitely need transitions between them. Click the Transitions tab, and then select one transition you like. In the end, drag it to stop between two clips.
Step 4: Export and Upload the Video to YouTube
When you edit YouTube videos in iMovie, you have the option to export the video straight to the video streaming website. All you need to do is to click on the Share button found at the top of the screen. Then select YouTube. Add your YouTube account in iMovie by entering your username and password. Then you choose a title, description, and tags for the video.
You can choose the resolution and size of the video that includes HD 720p and HD 1080p, mobile, medium, and large. Click on Publish to upload the video to YouTube. Uploading the video will take several minutes to a couple of hours, depending on the resolution and size of the video.
Part 2. A Better Choice to Edit YouTube Videos
There’s a better way to edit YouTube videos. It involves the use of Wondershare Filmora . It is user-friendly and allows beginners to make videos professional-looking videos.
This software has more than 300 video effects for family, weddings, love, and travel, etc. You can also add animated captions to photos that will help tell the story. It comes with an array of intro and credit templates that will enhance your video.
Lastly, you can easily share the resulting movie on YouTube, DVD, other devices, and a lot more.
Richard Bennett
Richard Bennett is a writer and a lover of all things video.
Follow @Richard Bennett
Richard Bennett
Mar 27, 2024• Proven solutions
iMovie is the built-in video editor that allows you to combine several video clips. It is available for both Mac and iOS devices. This app was first released in 1999 when it came with the iMac DV model.
With the use of the iMovie, you are able to create movies that include sound effects, menus, transitions, titles, themes, and music, just to name a few. The resulting movie can be saved onto physical media or as a file on the hard drive.
If you are a Mac user, then you can easily edit YouTube videos in iMovie. All you need to do is to follow the simple steps below. In this article, you will learn how to import videos, organize videos, add YouTube titles and add transitions.
Part 1. Steps on Editing YouTube Videos Using iMovie
To edit a video for YouTube with iMovie, you can follow these steps.
Step 1: Import Video Clips into iMovie
If you have recorded the video clips with the use of a videocam, then connect the camera to the Mac and open the app. You can import the videos by manually selecting the clips that will be part of the YouTube video.
Note: If you want to import videos that you have already published on your YouTube channel, then you can download them from the channel, and save them as MP4. However, if the videos were uploaded by other users, then you need to use a video converter, this article will let you know the 8 best video converters to convert video to MP4.
Step 2: Edit the Video Clips
Once you have all the clips that you need, the next step is to edit YouTube videos in iMovie. When you import the clips, you have created an Event in the app. If you want to include a clip in your final video, just drag the file to the project browser, where you can edit the video.
You can also add videos from other Events into the current project. You can select the parts of the video by dragging across the video from the chosen start to stop points. Edit the video until you are satisfied with the results.
Step 3: Enhance the Video
Once you have edited the video, you can then add background music, themes, sound effects, onscreen text, transitions between clips, and photos. The best thing about iMovie is that it comes with a sound effects library. It also allows you to upload audio from your iTunes library, iLife, and GarageBand.
iMovie allows you to add text to any part of the video, whether it is a title screen at the start, credits at the end, and everything in between. Try to enhance the video until you think it is ready to be uploaded to YouTube.
- Add YouTube title : If you want to add a title for YouTube Video, all you need to do is click Title in the toolbar, and then highlight My Movie on the left. From here, enter the title you like.
- Organize videos : You also can rearrange video clips in the timeline. Just drag the video on the timeline to wherever you want.
- Add transitions : If you have more than one video clip, you definitely need transitions between them. Click the Transitions tab, and then select one transition you like. In the end, drag it to stop between two clips.
Step 4: Export and Upload the Video to YouTube

When you edit YouTube videos in iMovie, you have the option to export the video straight to the video streaming website. All you need to do is to click on the Share button found at the top of the screen. Then select YouTube. Add your YouTube account in iMovie by entering your username and password. Then you choose a title, description, and tags for the video.
You can choose the resolution and size of the video that includes HD 720p and HD 1080p, mobile, medium, and large. Click on Publish to upload the video to YouTube. Uploading the video will take several minutes to a couple of hours, depending on the resolution and size of the video.
 Jet Profiler for MySQL, Enterprise Version: Jet Profiler for MySQL is real-time query performance and diagnostics tool for the MySQL database server. Its detailed query information, graphical interface and ease of use makes this a great tool for finding performance bottlenecks in your MySQL databases.
 Part 2. A Better Choice to Edit YouTube Videos
There’s a better way to edit YouTube videos. It involves the use of Wondershare Filmora . It is user-friendly and allows beginners to make videos professional-looking videos.
This software has more than 300 video effects for family, weddings, love, and travel, etc. You can also add animated captions to photos that will help tell the story. It comes with an array of intro and credit templates that will enhance your video.
Lastly, you can easily share the resulting movie on YouTube, DVD, other devices, and a lot more.

Richard Bennett
Richard Bennett is a writer and a lover of all things video.
Follow @Richard Bennett
Branding Excellence: YouTube Naming Masterclass
Best YouTube Names Generators [+ How to Brainstorm]

Liza Brown
Oct 26, 2023• Proven solutions
It’s important to have a good name for your YouTube channel – something that people will remember. The following is a list of the 3 best YouTube name generators, an easy step-by-step for brainstorming, and instructions for updating your YouTube name.
Whether you’re a YouTuber beginner or want to improve your YouTube videos to the next level, a good YouTube video editing software will be a good helper. Wondershare Filmora is a video editor for all YouTube creators with plentiful effects and templates, and you can download it directly and have a try before purchasing.
- YouTube Name Generators
- How to Come Up With a Good YouTube Name
- How to Change Your YouTube Name
- Requesting a Custom URL for YouTube
 Glarysoft File Recovery Pro - Helps to recover your lost file/data, even permanently deleted data.
Part 1: 3 Awesome YouTube Name Generators
Need some help brainstorming your channel name? Here are 3 tools for getting started. Even if you don’t use one of the names you generate you’ll get some great inspiration.
1. SpinXO
Key points:
- Lots of options
- Checks availability
This is a great generator. If you were brainstorming yourself, you’d probably write out a bunch of words related to yourself and the kinds of videos you want to make and see what goes together. SpinXO does that for you, and mixes in other words that sound good in usernames.
Here’s what happened when I tried to name a hypothetical baking channel:
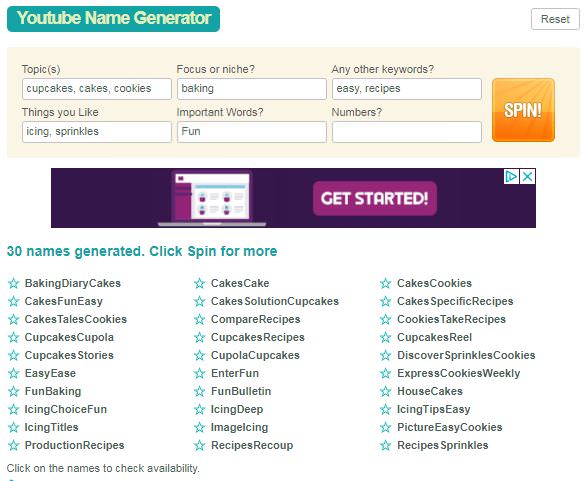
Not all of the results are great, but there are some cool sounding options in there.
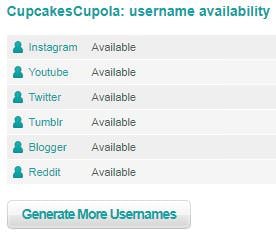
One of the most useful features of SpinXO is that you can check the availability of the usernames. I liked the sound of CupcakesCupola, and when I clicked on it I was able to see that nobody else was using it on other sites.
2. Name Generator
Key points:
- Can be hilarious
- Names tend to be a bit long
This is a fairly limited generator. You plunk in a prefix and a suffix, and it generates a random word or term to stuff between them. Here’s what I got for my fictional cupcake channel:
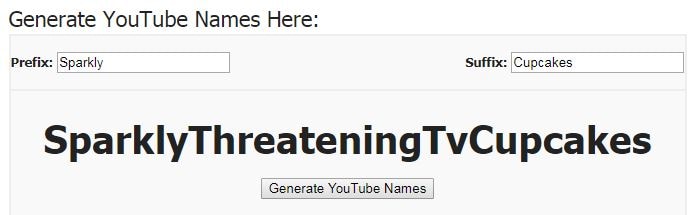
So, on one hand - that’s hilarious and I’m considering legally changing my name. On the other hand, all of the results look exactly like this (which means they’re all a bit too long). It shows you a longer list if you scroll down:
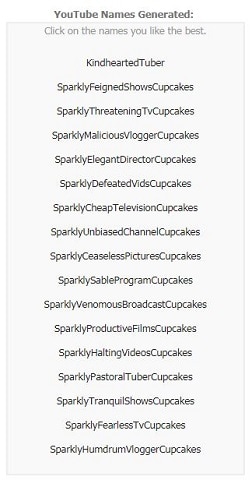
You can pick your favorite names and it’ll list them out so you can easily copy them into a word document. That’ll be useful if you’re collecting options from several sites.
3. Username Generator
Key points:
- Can generate a huge number of names at once
- You only input one word
For this name generator, you type in one important word and choose how many results you want to see. You can see up to 300 at once.

The generator will take your keyword and add endings (and occasional beginnings) to it. Some endings are words, and some are just suffixes. Here’s what I got:

Part 2: How to Come Up With a Good YouTube Name – 3 Easy Steps
The name of your YouTube channel needs to accomplish two things:
- Tell viewers what your channel is about
- Stick in viewer’s heads by being catchy and unique
Here’s how you can brainstorm the perfect name for your channel!
Step 1: Gather up relevant words
Open up a journal (or a word document) and start writing down words that relate to you and your channel.
You may want to make one list of ‘you’ words (personality traits, nicknames, titles, etc.) and another of words related to your channel’s category (i.e. gaming, makeup, or baking).
Step 2: Combinations
Start combining your ‘you’ words with your category words to see what sounds good. You may want to use one of the name generators above (anchor) for this part.
Try to keep your name fairly short (3 words or less) so it’s easier for people to remember. Don’t include numbers if you can avoid it.
Step 3: Say it out loud
Once you have a shortlist of potential names, read them aloud to yourself to make sure they sound good. Ideally, you want to get that ‘oh, that has a nice ring to it!’ feeling.
Part 3: How to Change Your YouTube Name
In the early days of YouTube, you couldn’t change your name, but now you can!
- Click on your account icon in the top right corner of YouTube and choose settings.
- Click Edit on Google.
- Update your name and click OK.
Part 4: Requesting a Custom URL for YouTube
Here are several types of YouTube channel URL , wouldn’t it be nice if, instead of a string of numbers and letters, your channel URL included your name? YouTube can do that for you!
You need…
- 100 Subscribers
- to have been on YouTube for 30 days
- use a photo as your channel icon/profile picture
- have uploaded channel art
Here’s how to get your custom URL:
- Click on your icon in the top right corner of YouTube and choose Advanced under Settings / the gear icon.
- If you meet the qualifications above, you’ll see ‘You’re eligible for a custom URL’ under Channel Settings.
- YouTube will show you the custom URL you’re approved for in the Get a custom URL box. You can’t change what’s there, but you can add to the end of it.
- Click Change URL after reading the terms of use.
You can delete your custom URL and claim a new one, but doing this might be confusing for your followers.
If you already have a YouTube channel name – are you happy with it? How did you choose it?
Liza Brown
Liza Brown is a writer and a lover of all things video.
Follow @Liza Brown
Liza Brown
Oct 26, 2023• Proven solutions
It’s important to have a good name for your YouTube channel – something that people will remember. The following is a list of the 3 best YouTube name generators, an easy step-by-step for brainstorming, and instructions for updating your YouTube name.
Whether you’re a YouTuber beginner or want to improve your YouTube videos to the next level, a good YouTube video editing software will be a good helper. Wondershare Filmora is a video editor for all YouTube creators with plentiful effects and templates, and you can download it directly and have a try before purchasing.

- YouTube Name Generators
- How to Come Up With a Good YouTube Name
- How to Change Your YouTube Name
- Requesting a Custom URL for YouTube
Part 1: 3 Awesome YouTube Name Generators
Need some help brainstorming your channel name? Here are 3 tools for getting started. Even if you don’t use one of the names you generate you’ll get some great inspiration.
1. SpinXO
Key points:
- Lots of options
- Checks availability
This is a great generator. If you were brainstorming yourself, you’d probably write out a bunch of words related to yourself and the kinds of videos you want to make and see what goes together. SpinXO does that for you, and mixes in other words that sound good in usernames.
Here’s what happened when I tried to name a hypothetical baking channel:
 Easy GIF Animator is a powerful animated GIF editor and the top tool for creating animated pictures, banners, buttons and GIF videos. You get extensive animation editing features, animation effects, unmatched image quality and optimization for the web. No other GIF animation software matches our features and ease of use, that’s why Easy GIF Animator is so popular.
Not all of the results are great, but there are some cool sounding options in there.
One of the most useful features of SpinXO is that you can check the availability of the usernames. I liked the sound of CupcakesCupola, and when I clicked on it I was able to see that nobody else was using it on other sites.
2. Name Generator
Key points:
- Can be hilarious
- Names tend to be a bit long
This is a fairly limited generator. You plunk in a prefix and a suffix, and it generates a random word or term to stuff between them. Here’s what I got for my fictional cupcake channel:
So, on one hand - that’s hilarious and I’m considering legally changing my name. On the other hand, all of the results look exactly like this (which means they’re all a bit too long). It shows you a longer list if you scroll down:
 /a>
/a>
You can pick your favorite names and it’ll list them out so you can easily copy them into a word document. That’ll be useful if you’re collecting options from several sites.
3. Username Generator
Key points:
- Can generate a huge number of names at once
- You only input one word
For this name generator, you type in one important word and choose how many results you want to see. You can see up to 300 at once.
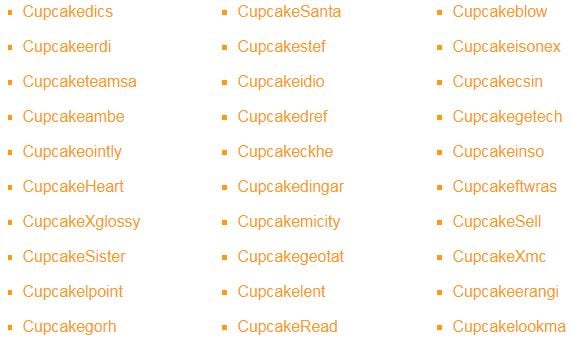
The generator will take your keyword and add endings (and occasional beginnings) to it. Some endings are words, and some are just suffixes. Here’s what I got:
 DLNow Video Downloader
Part 2: How to Come Up With a Good YouTube Name – 3 Easy Steps
The name of your YouTube channel needs to accomplish two things:
- Tell viewers what your channel is about
- Stick in viewer’s heads by being catchy and unique
Here’s how you can brainstorm the perfect name for your channel!
Step 1: Gather up relevant words
Open up a journal (or a word document) and start writing down words that relate to you and your channel.
You may want to make one list of ‘you’ words (personality traits, nicknames, titles, etc.) and another of words related to your channel’s category (i.e. gaming, makeup, or baking).
Step 2: Combinations
Start combining your ‘you’ words with your category words to see what sounds good. You may want to use one of the name generators above (anchor) for this part.
Try to keep your name fairly short (3 words or less) so it’s easier for people to remember. Don’t include numbers if you can avoid it.
Step 3: Say it out loud
Once you have a shortlist of potential names, read them aloud to yourself to make sure they sound good. Ideally, you want to get that ‘oh, that has a nice ring to it!’ feeling.
Part 3: How to Change Your YouTube Name
In the early days of YouTube, you couldn’t change your name, but now you can!
- Click on your account icon in the top right corner of YouTube and choose settings.
- Click Edit on Google.
- Update your name and click OK.

Part 4: Requesting a Custom URL for YouTube
Here are several types of YouTube channel URL , wouldn’t it be nice if, instead of a string of numbers and letters, your channel URL included your name? YouTube can do that for you!
You need…
- 100 Subscribers
- to have been on YouTube for 30 days
- use a photo as your channel icon/profile picture
- have uploaded channel art
Here’s how to get your custom URL:
- Click on your icon in the top right corner of YouTube and choose Advanced under Settings / the gear icon.
- If you meet the qualifications above, you’ll see ‘You’re eligible for a custom URL’ under Channel Settings.
- YouTube will show you the custom URL you’re approved for in the Get a custom URL box. You can’t change what’s there, but you can add to the end of it.
- Click Change URL after reading the terms of use.
You can delete your custom URL and claim a new one, but doing this might be confusing for your followers.
If you already have a YouTube channel name – are you happy with it? How did you choose it?
Liza Brown
Liza Brown is a writer and a lover of all things video.
Follow @Liza Brown
Liza Brown
Oct 26, 2023• Proven solutions
It’s important to have a good name for your YouTube channel – something that people will remember. The following is a list of the 3 best YouTube name generators, an easy step-by-step for brainstorming, and instructions for updating your YouTube name.
Whether you’re a YouTuber beginner or want to improve your YouTube videos to the next level, a good YouTube video editing software will be a good helper. Wondershare Filmora is a video editor for all YouTube creators with plentiful effects and templates, and you can download it directly and have a try before purchasing.

Key features:
• Import from any devices and cams, including GoPro and drones. All formats supported. Сurrently the only free video editor that allows users to export in a new H265/HEVC codec, something essential for those working with 4K and HD.
• Everything for hassle-free basic editing: cut, crop and merge files, add titles and favorite music
• Visual effects, advanced color correction and trendy Instagram-like filters
• All multimedia processing done from one app: video editing capabilities reinforced by a video converter, a screen capture, a video capture, a disc burner and a YouTube uploader
• Non-linear editing: edit several files with simultaneously
• Easy export to social networks: special profiles for YouTube, Facebook, Vimeo, Twitter and Instagram
• High quality export – no conversion quality loss, double export speed even of HD files due to hardware acceleration
• Stabilization tool will turn shaky or jittery footage into a more stable video automatically.
• Essential toolset for professional video editing: blending modes, Mask tool, advanced multiple-color Chroma Key
- YouTube Name Generators
- How to Come Up With a Good YouTube Name
- How to Change Your YouTube Name
- Requesting a Custom URL for YouTube
Part 1: 3 Awesome YouTube Name Generators
Need some help brainstorming your channel name? Here are 3 tools for getting started. Even if you don’t use one of the names you generate you’ll get some great inspiration.
1. SpinXO
Key points:
- Lots of options
- Checks availability
This is a great generator. If you were brainstorming yourself, you’d probably write out a bunch of words related to yourself and the kinds of videos you want to make and see what goes together. SpinXO does that for you, and mixes in other words that sound good in usernames.
Here’s what happened when I tried to name a hypothetical baking channel:
Not all of the results are great, but there are some cool sounding options in there.
One of the most useful features of SpinXO is that you can check the availability of the usernames. I liked the sound of CupcakesCupola, and when I clicked on it I was able to see that nobody else was using it on other sites.
 WonderFox DVD Ripper Pro
2. Name Generator
Key points:
- Can be hilarious
- Names tend to be a bit long
This is a fairly limited generator. You plunk in a prefix and a suffix, and it generates a random word or term to stuff between them. Here’s what I got for my fictional cupcake channel:
So, on one hand - that’s hilarious and I’m considering legally changing my name. On the other hand, all of the results look exactly like this (which means they’re all a bit too long). It shows you a longer list if you scroll down:
 vMix 4K - Software based live production. vMix 4K includes everything in vMix HD plus 4K support, PTZ control, External/Fullscreen output, 4 Virtual Outputs, 1 Replay, 4 vMix Call, and 2 Recorders.
You can pick your favorite names and it’ll list them out so you can easily copy them into a word document. That’ll be useful if you’re collecting options from several sites.
3. Username Generator
Key points:
- Can generate a huge number of names at once
- You only input one word
For this name generator, you type in one important word and choose how many results you want to see. You can see up to 300 at once.
The generator will take your keyword and add endings (and occasional beginnings) to it. Some endings are words, and some are just suffixes. Here’s what I got:


Part 2: How to Come Up With a Good YouTube Name – 3 Easy Steps
The name of your YouTube channel needs to accomplish two things:
- Tell viewers what your channel is about
- Stick in viewer’s heads by being catchy and unique
Here’s how you can brainstorm the perfect name for your channel!
Step 1: Gather up relevant words
Open up a journal (or a word document) and start writing down words that relate to you and your channel.
You may want to make one list of ‘you’ words (personality traits, nicknames, titles, etc.) and another of words related to your channel’s category (i.e. gaming, makeup, or baking).
Step 2: Combinations
Start combining your ‘you’ words with your category words to see what sounds good. You may want to use one of the name generators above (anchor) for this part.
Try to keep your name fairly short (3 words or less) so it’s easier for people to remember. Don’t include numbers if you can avoid it.
Step 3: Say it out loud
Once you have a shortlist of potential names, read them aloud to yourself to make sure they sound good. Ideally, you want to get that ‘oh, that has a nice ring to it!’ feeling.
 CollageIt Pro
Part 3: How to Change Your YouTube Name
In the early days of YouTube, you couldn’t change your name, but now you can!
- Click on your account icon in the top right corner of YouTube and choose settings.
- Click Edit on Google.
- Update your name and click OK.
Part 4: Requesting a Custom URL for YouTube
Here are several types of YouTube channel URL , wouldn’t it be nice if, instead of a string of numbers and letters, your channel URL included your name? YouTube can do that for you!
You need…
- 100 Subscribers
- to have been on YouTube for 30 days
- use a photo as your channel icon/profile picture
- have uploaded channel art
Here’s how to get your custom URL:
- Click on your icon in the top right corner of YouTube and choose Advanced under Settings / the gear icon.
- If you meet the qualifications above, you’ll see ‘You’re eligible for a custom URL’ under Channel Settings.
- YouTube will show you the custom URL you’re approved for in the Get a custom URL box. You can’t change what’s there, but you can add to the end of it.
- Click Change URL after reading the terms of use.
You can delete your custom URL and claim a new one, but doing this might be confusing for your followers.
If you already have a YouTube channel name – are you happy with it? How did you choose it?
Liza Brown
Liza Brown is a writer and a lover of all things video.
Follow @Liza Brown
Liza Brown
Oct 26, 2023• Proven solutions
It’s important to have a good name for your YouTube channel – something that people will remember. The following is a list of the 3 best YouTube name generators, an easy step-by-step for brainstorming, and instructions for updating your YouTube name.
Whether you’re a YouTuber beginner or want to improve your YouTube videos to the next level, a good YouTube video editing software will be a good helper. Wondershare Filmora is a video editor for all YouTube creators with plentiful effects and templates, and you can download it directly and have a try before purchasing.
- YouTube Name Generators
- How to Come Up With a Good YouTube Name
- How to Change Your YouTube Name
- Requesting a Custom URL for YouTube
Part 1: 3 Awesome YouTube Name Generators
Need some help brainstorming your channel name? Here are 3 tools for getting started. Even if you don’t use one of the names you generate you’ll get some great inspiration.
1. SpinXO
Key points:
- Lots of options
- Checks availability
This is a great generator. If you were brainstorming yourself, you’d probably write out a bunch of words related to yourself and the kinds of videos you want to make and see what goes together. SpinXO does that for you, and mixes in other words that sound good in usernames.
Here’s what happened when I tried to name a hypothetical baking channel:
Not all of the results are great, but there are some cool sounding options in there.
One of the most useful features of SpinXO is that you can check the availability of the usernames. I liked the sound of CupcakesCupola, and when I clicked on it I was able to see that nobody else was using it on other sites.

2. Name Generator
Key points:
- Can be hilarious
- Names tend to be a bit long
This is a fairly limited generator. You plunk in a prefix and a suffix, and it generates a random word or term to stuff between them. Here’s what I got for my fictional cupcake channel:

company, user or members of the same household. Action! - screen and game recorder</a>
So, on one hand - that’s hilarious and I’m considering legally changing my name. On the other hand, all of the results look exactly like this (which means they’re all a bit too long). It shows you a longer list if you scroll down:
You can pick your favorite names and it’ll list them out so you can easily copy them into a word document. That’ll be useful if you’re collecting options from several sites.
3. Username Generator
Key points:
- Can generate a huge number of names at once
- You only input one word
For this name generator, you type in one important word and choose how many results you want to see. You can see up to 300 at once.
The generator will take your keyword and add endings (and occasional beginnings) to it. Some endings are words, and some are just suffixes. Here’s what I got:

WPS Office Premium ( File Recovery, Photo Scanning, Convert PDF)–Yearly
Part 2: How to Come Up With a Good YouTube Name – 3 Easy Steps
The name of your YouTube channel needs to accomplish two things:
- Tell viewers what your channel is about
- Stick in viewer’s heads by being catchy and unique
Here’s how you can brainstorm the perfect name for your channel!
Step 1: Gather up relevant words
Open up a journal (or a word document) and start writing down words that relate to you and your channel.
You may want to make one list of ‘you’ words (personality traits, nicknames, titles, etc.) and another of words related to your channel’s category (i.e. gaming, makeup, or baking).
Step 2: Combinations
Start combining your ‘you’ words with your category words to see what sounds good. You may want to use one of the name generators above (anchor) for this part.
Try to keep your name fairly short (3 words or less) so it’s easier for people to remember. Don’t include numbers if you can avoid it.
Step 3: Say it out loud
Once you have a shortlist of potential names, read them aloud to yourself to make sure they sound good. Ideally, you want to get that ‘oh, that has a nice ring to it!’ feeling.
 Forex Robotron Basic Package
Part 3: How to Change Your YouTube Name
In the early days of YouTube, you couldn’t change your name, but now you can!
- Click on your account icon in the top right corner of YouTube and choose settings.
- Click Edit on Google.
- Update your name and click OK.
 Allavsoft Batch Download Online Videos, Music Offline to MP4, MP3, MOV, etc format
Part 4: Requesting a Custom URL for YouTube
Here are several types of YouTube channel URL , wouldn’t it be nice if, instead of a string of numbers and letters, your channel URL included your name? YouTube can do that for you!
You need…
- 100 Subscribers
- to have been on YouTube for 30 days
- use a photo as your channel icon/profile picture
- have uploaded channel art
Here’s how to get your custom URL:
- Click on your icon in the top right corner of YouTube and choose Advanced under Settings / the gear icon.
- If you meet the qualifications above, you’ll see ‘You’re eligible for a custom URL’ under Channel Settings.
- YouTube will show you the custom URL you’re approved for in the Get a custom URL box. You can’t change what’s there, but you can add to the end of it.
- Click Change URL after reading the terms of use.
You can delete your custom URL and claim a new one, but doing this might be confusing for your followers.
If you already have a YouTube channel name – are you happy with it? How did you choose it?

Liza Brown
Liza Brown is a writer and a lover of all things video.
Follow @Liza Brown
- Title: 2024 Approved Streamlining Video Production Merging YouTube Editing & iMovie's Best Practices
- Author: Thomas
- Created at : 2024-07-29 18:39:57
- Updated at : 2024-07-30 18:39:57
- Link: https://youtube-help.techidaily.com/2024-approved-streamlining-video-production-merging-youtube-editing-and-imovies-best-practices/
- License: This work is licensed under CC BY-NC-SA 4.0.