
:max_bytes(150000):strip_icc()/GettyImages-12489005711-a34c10ab34b54fec94a92bf181c0f456.jpg)
"2024 Approved Successful YouTubing Master End Credits and Makers' Sources"
Successful YouTubing: Master End Credits and Makers’ Sources
YouTube Outro Complete Guide [+Best Makers & Templates]

Richard Bennett
Mar 27, 2024• Proven solutions
The key reason your YouTube videos have a hundred views a year after publication is because they lack good YouTube intro and outro.
How interactive is your YouTube channel? Or, what’s the bounce rate of your YouTube videos? As you answer this, you’ll realize how important YouTube outro is. Very few people know to add outro to YouTube videos is the best YouTube SEO technique.
In this guide, I’ll demystify what YouTube outro is and how to make outro and add it to a YouTube video. If you are not a tech expert, use intro and outro makers highlighted herein to make your videos as interactive pas possible.
To get a sneak preview of what is entailed here; this guide has been subdivided into five parts:
- Part 1: YouTube Outro Prerequisites
- Part 2: Best 8 Intro And Outro Makers For YouTube
- Part 3: How To Make And Add Outro To YouTube Video
- Part 4: How To Add An Outro To A Youtube Video
- Part 5: Frequently Asked Questions about YouTube Outro
Part 1: YouTube Outro Prerequisites
In this part, we will learn what outros for YouTube are, the importance of land that distinguishes them from the intro. Also included are expert tips on how to make YouTube outro that attracts a hundred thousand subscribers in seven days included.
To understand what YouTube outro is and why you should add it to your videos, here is a detailed explanation.
Section 1: What is a Youtube Outro?
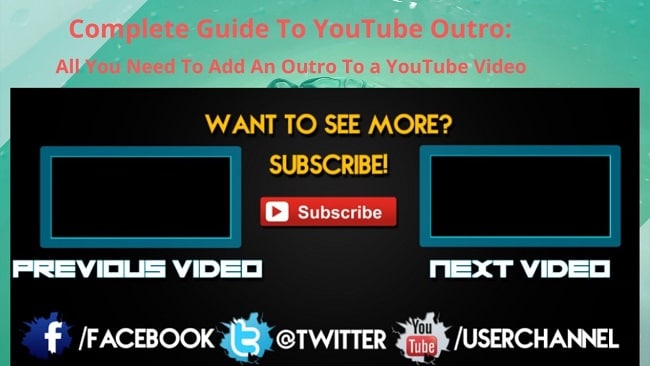
YouTube outro aka end screen is the last part of a video with a call to action statement, button or video suggestion to view other YouTube videos. In other words, it’s the last part of a video with calls to action links.
One of the most effective technical methods of optimizing YouTube videos is by adding an outro. This helps attract huge traffic, increase conversion and engage viewers.
Why spend your time adding outro? You can add Outro to YouTube videos to direct viewers to your website, other selected videos, engage viewers for longer and to persuade them to subscribe to the channel. In short, most end screens have four elements incorporated into an outro: Channel, subscribe, Video playlist and a website link.
Section 2: Difference Between Outro and Intro
Most YouTube videos have an intro and an outro. In this case, an intro is a short clip at the beginning of a YouTube video that introduces you to the viewers and your brand.
Even though video creators attach more emphasis on intros, both are both very critical. For your videos to achieve meaningful results, it’s important to view each as distinct from the other. Equally important to know, both intros and outros have different purposes.
| Differences Between YouTube Intro And Outro | |
|---|---|
| Intro | Outro |
| Inserted at the begging of a video | Inserted at the end of a video |
| Used to capture audience attention | Directs the audience to the next step |
| Introduces the topic | Suggests new topics to viewers |
| Attract viewers to the video | Contains a call-action button |
| Showcases a brand, logo, business slogan or a statement mission |
Section 3: YouTube Outro Requirements
Just as their requirements for any video uploaded on YouTube, outros are no exception. For your outro to be interactive, observe the following requirements:
1. Outro Resolution
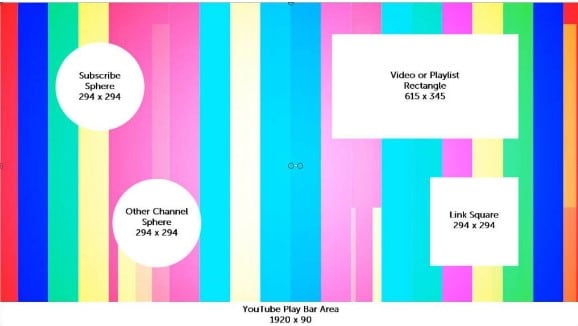
Outros for YouTube should have an aspect ratio of 16:9 and a resolution of 1920px X 1080px.
2. Outro Element Sizes and Dimensions
End screen templates comprise elements that are in different shapes and sizes. When using a YouTube outro size of 1920px X 1080px, here are the element dimensions to use:
- Subscribe – 294px X 294px
- Channel – 294px X 294px
- Website link - 294px X 294px
- Video playlist – 615px X 345px
3. Outro Length
If you want to make your outro boring, make it long. So, how long should YouTube outro be? For your outros to have a high conversation rate, they should be approximately 10-20 seconds long. However, the length of your video should be the determining factor. A one-hour YouTube video can have a longer outro.
Don’t be challenged by setting the above sizes because nearly all intro and outro makers have already set dimensions for the elements. The major requirements are done for you
Section 4: Best Practices When Making A YouTube Outro
Imagine given 10 seconds to showcase your YouTube channel and direct viewers on the next move without breaking the engagement! Different YouTube outros come in different styles; certainly a show of one’s degree of creativity.
At this point, you should be already be having the best outro maker in mind - Filmora. The below YouTube outro tips should coincide with the features of your selected outro maker.
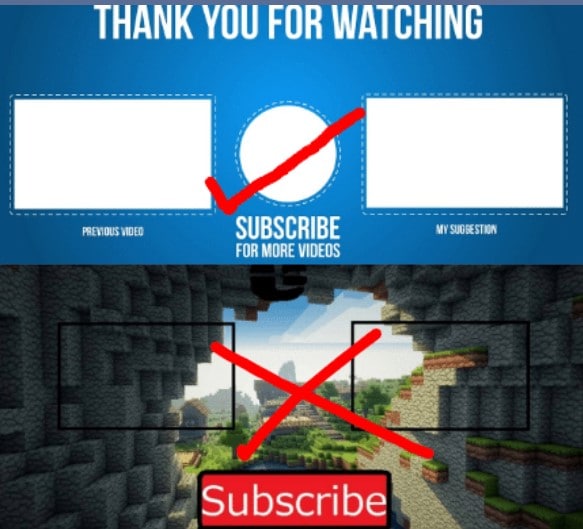
- Be relevant
The featured elements should be related to the video. Adding irrelevant elements your outro will most likely make the viewer click away.
- Keep to your goals
The big question is; what do you want to achieve from the YouTube end screen? Draw your attention to the subject matter of that particular video, your channel or the product highlighted in the video. Try to align your thoughts with those of the viewer.
Every video creator wishes for the following goals, increasing your channel subscribers, sending traffic to another site, viewing more videos and sharing to social media. Each YouTube outro element should have its own goal.
- Simple, clear and easy to interpret
Your outro will be meaningless if the audience cannot take action due to the complexity of either the language used or the ambiguity of words used. Use colors that pop out the elements making them the center of focus. Make them clear and avoid anything distractive.
- Use similar outro templates
Apart from being a good method of branding your channel, using similar outro on your videos adds credibility. It is, therefore, a good practice to have the consistency of colors, elements, images, and logos.
It’s absolutely important to understand all the prerequisites related to YouTube outros. Make use of the tips and requirements explained above when making and adding YouTube end screens to achieve the best results.
Part 2: Best 8 Intro And Outro Makers For YouTube
If you are wondering how to make the best magnetic intro and converting outro for your YouTube videos, this is your best article for you. Whether it’s the free online intro maker or the YouTube outro maker free no watermark, just select one that suits you most from the below list.
1. Wondershare Filmora
Quick fact – Using Filmora as an outro maker, allows you to select your admired background and outro template.
Do you want to make HD YouTube intros and outros that will grow your channel? I recommend Wondershare Filmora.


This software has the simplest friendly interface that any new and expert video editor would understand easily. This is very important for you; to use the best intro or outro for your YouTube videos, download Filmora video editor to get access to Filmstock. There are plenty of free and editable YouTube intro and outro templates ready for download.
Filmora is an all in one YouTube outro maker: you can download intro and outro templates, edit, add to your YouTube video and publish to your channel. There are innumerable backgrounds, transitions and effects to make an outro that matches the video colors, speed, and theme.
2. Outromaker
Quick fact – Outromaker is highly preferred for adding YouTube end screens with animated backgrounds that are mobile-friendly.
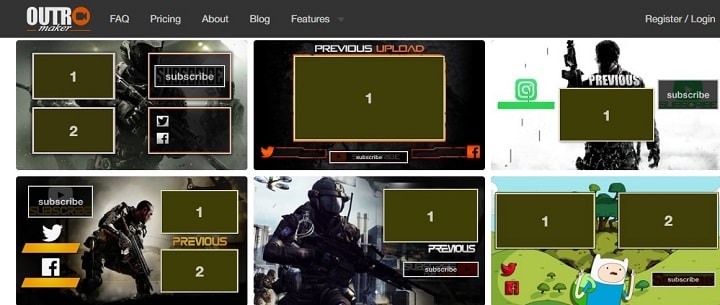
In spite of its pricey plans, Outro Maker continues to be more and more users due to its high genre of outro templates. Among the features included in this app are outro templates, YouTube mobile cards, and YouTube graphics.
To insert a Pokémon Go or animated cartoon background that rhymes with your videos, you have to register an account. Secondly, you must have a registered YouTube channel with videos. Lastly, subscribe to a paid plan.
3. MotionDen
Quick fact – MotionDen is an online into and outro maker. To create YouTube intro and outro without watermark, you have to first pay.
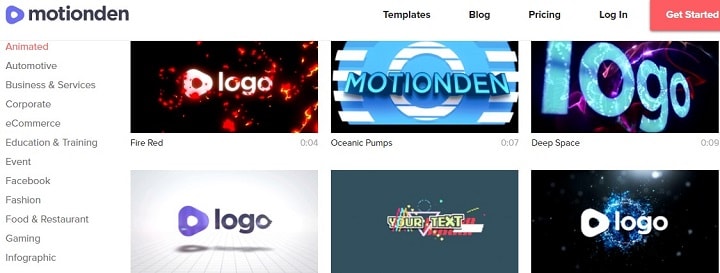
There are plenty of YouTube intro and outro templates for your marketing videos, showdown movies or hard sports videos. Only two pricing plans are available, namely $9.0/Video and $39/ month. Both plans produce HD intros and outros for YouTube and give access to directly publish to YouTube.
To start creating end screens, creating an account is a requirement. MotionDen has rich text editing features and direct typography to edit your logo.
4. Snappa
Quick fact- With Snappa as your YouTube outro maker, only 60 seconds are enough to create a professional high-quality outro.

This is the perfect YouTube outro maker online free with over a 5000+ outro template and million-plus royalty-free HD photos and graphics. Among the features it’s renowned for include, thousands of templates in different sizes, resizable graphics, a huge library of HD intros and outros and seamless integration with uploaded logos and custom fonts.
Most of the YouTube outro requirements like dimensions have been done for you. To access more features, subscribe to either the Pro plan for $10/month or the Team plan for $20/month.
5. Biteable
Quick fact- Biteable is a free online YouTube outro creator. It’s compatible with mobile phones and computers and is highly used by content marketing experts.

The clarity of the interface is enough to prove its simplicity and user-friendliness. The only requirement to use this app is registration. However, the free plan is limited to 10 projects per month, the basic content and 24/7 customer support. Its main limitation is any project under the free plan bears the Biteable watermark.
Biteable Youtube outro template download feature contains 85,000 Shutterstock clips. There are four optional pricing plans. The free plan with limited features, Starter Plan for $29/mo, Pro Plan for $29/mo and Unlimited Plan for $49/mo. You can also subscribe annually.
6. Tube Arsenal
Quick fact – Tube Arsenal is among the best HD intro and outro maker for YouTube. No monthly/annual subscription plans. Each outro template can be customized online.
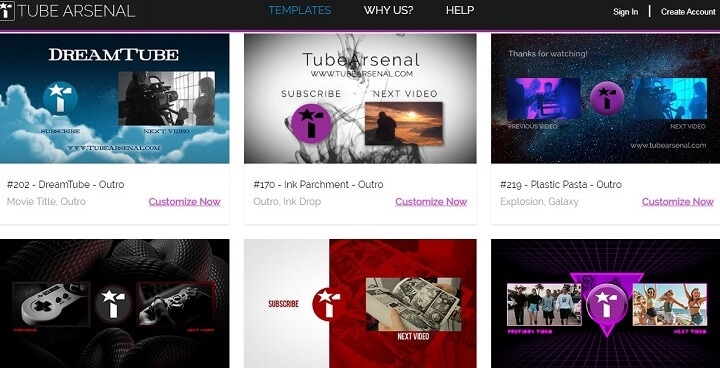
Despite its high quality and professional templates, Tube Arsenal is suitable for both beginners and experts. Would you like to add the best YouTube outro songs to your videos? Select any intro or outro and on the customizing chart to the left, scroll to the bottom and click “Music”.
Some of the features include unlimited downloads, free downloads, online template customization and curated collection of intros and outros. Each outros’ price is determined by its resolution (720px for $9 and 180px for $11).
7. Animaker
Quick fact – Animaker takes cognizance of human creative ability. You can, therefore, create your own intro from scratch or edit the provided templates.

Animaker is among the world’s most used YouTube intro maker. It’s trusted by over 1000 big brands like Adidas, Google, UNICEF, and Uber. You can start with the free plan if it’s your first time then upgrade to the complex paid plans. The paid plans are Personal for $19/mo, Startup for $35/mo and Business for $59/mo.
There are many features to look out for in Animaker. Some include 50+ backgrounds YouTube intro music, over 175 sound effects, custom font support and pre-designed templates.
8. Video Jaguar
Quick fact – Video Jaguar is a cloud-based software used creating YouTube intros and outros. You can, therefore, use it from any location without downloading it.

This app’s outro maker interface comes equipped with easy to use features like full HD intro and outro templates, licensed music and text editor. There are also plenty of royalty-free photos.
Video Jaguar is majorly designed for marketers who specialize in video ads to grow their brand awareness.
You may also like: How to Convert YouTube to MP4 Safely? [Step by Step Guide] >>
Part 3: How To Make And Add Outro To YouTube Video
How to make a YouTube outro was comprehensively answered by the launch Filmora video editor. Why say Filmora? We all know how the best professional YouTube outros should look like, right? Go to the Filmora products page then click download. Among the features, you’ll find include transitions, backgrounds, effects, rich text editor and free audio and voiceover recorder among others.
Step 1: Start by downloading and installing Filmora on your Windows or Mac by clicking any of the below icons.
Step 2: Once it’s fully installed, double-click on the Filmora icon on your desktop to open a welcome screen for you to start a new project. Adjust the project aspect ratio to 16:9.
Step 3: Click the new project and wait for the software full interface to open. On the Filmora Filmstock page, search and select a YouTube outro template of your choice, download and save to your media.
Before importing the template, click “Sample Colours” to choose a color that rhymes with your video and set it as the background.
Click “Media” on the top menu and import your outro template to the timeline.
Step 4: Use the screen blind mode to edit the YouTube outro elements at the preview window. Also, you can select audio and add it as outro music for YouTube. Click “Title” to select your preferred font editor. Once you are done, export the outro to the media file.
Check this video tutorial. It’s very easy and simple to make a YouTube outro. Free to download the video maker and have a try now!
Part 4: How To Add An Outro To A Youtube Video
To understand the whole end screen process we will continue with the Filmora video editing procedure.
Step 1: Upload your video to the timeline and create a space for the video outro.
Step 2: Import the YouTube outro created earlier and drag it down to the timeline. Now that you have two imports on your timeline, drag the outro to the videos end section.

Step 3: Click “Export” to save or upload the video on YouTube. You now have your video with an end screen.
Part 5: Frequently Asked Questions about YouTube Outro

Best Websites for YouTube Outro Template Download
YouTube Outro templates are helping websites grow their revenue by setting pricing plans. Nevertheless, there are some websites with even better free outro templates for download. Here is a combination of both paid and free websites to download YouTube outros:
Best Websites to Find YouTube Outro Songs
Finding outro songs for YouTube is a bit challenging partly because not many YouTube outro makers have also songs on the website. Video creators also tend to use video audio in their end screens thereby reducing the demand for outro songs.
Despite their low demand, few websites continue to create YouTube outro songs like:
You may also like: 10 Best Sources to Download Free Outro Music [No Copyright] >>
Conclusion
We all wish to create YouTube videos that attract many viewers and eventually subscribers! To grow your YouTube channel, start adding outros to your videos before uploading them to YouTube. YouTube outro engages viewers for longer by clicking the suggested videos or helps grow the channel.
It’s not a surprise to find some of your videos with no outros despite the high number of free intro and outro YouTube makers. Use the above list to make a stunning outro for YouTube.
Was this guide helpful to you? Kindly share your comments or thoughts on the social media platforms on this site.
Richard Bennett
Richard Bennett is a writer and a lover of all things video.
Follow @Richard Bennett
Richard Bennett
Mar 27, 2024• Proven solutions
The key reason your YouTube videos have a hundred views a year after publication is because they lack good YouTube intro and outro.
How interactive is your YouTube channel? Or, what’s the bounce rate of your YouTube videos? As you answer this, you’ll realize how important YouTube outro is. Very few people know to add outro to YouTube videos is the best YouTube SEO technique.
In this guide, I’ll demystify what YouTube outro is and how to make outro and add it to a YouTube video. If you are not a tech expert, use intro and outro makers highlighted herein to make your videos as interactive pas possible.
To get a sneak preview of what is entailed here; this guide has been subdivided into five parts:
- Part 1: YouTube Outro Prerequisites
- Part 2: Best 8 Intro And Outro Makers For YouTube
- Part 3: How To Make And Add Outro To YouTube Video
- Part 4: How To Add An Outro To A Youtube Video
- Part 5: Frequently Asked Questions about YouTube Outro
Part 1: YouTube Outro Prerequisites
In this part, we will learn what outros for YouTube are, the importance of land that distinguishes them from the intro. Also included are expert tips on how to make YouTube outro that attracts a hundred thousand subscribers in seven days included.
To understand what YouTube outro is and why you should add it to your videos, here is a detailed explanation.
Section 1: What is a Youtube Outro?
YouTube outro aka end screen is the last part of a video with a call to action statement, button or video suggestion to view other YouTube videos. In other words, it’s the last part of a video with calls to action links.
One of the most effective technical methods of optimizing YouTube videos is by adding an outro. This helps attract huge traffic, increase conversion and engage viewers.
Why spend your time adding outro? You can add Outro to YouTube videos to direct viewers to your website, other selected videos, engage viewers for longer and to persuade them to subscribe to the channel. In short, most end screens have four elements incorporated into an outro: Channel, subscribe, Video playlist and a website link.
Section 2: Difference Between Outro and Intro
Most YouTube videos have an intro and an outro. In this case, an intro is a short clip at the beginning of a YouTube video that introduces you to the viewers and your brand.
Even though video creators attach more emphasis on intros, both are both very critical. For your videos to achieve meaningful results, it’s important to view each as distinct from the other. Equally important to know, both intros and outros have different purposes.
| Differences Between YouTube Intro And Outro | |
|---|---|
| Intro | Outro |
| Inserted at the begging of a video | Inserted at the end of a video |
| Used to capture audience attention | Directs the audience to the next step |
| Introduces the topic | Suggests new topics to viewers |
| Attract viewers to the video | Contains a call-action button |
| Showcases a brand, logo, business slogan or a statement mission |
Section 3: YouTube Outro Requirements
Just as their requirements for any video uploaded on YouTube, outros are no exception. For your outro to be interactive, observe the following requirements:
1. Outro Resolution
Outros for YouTube should have an aspect ratio of 16:9 and a resolution of 1920px X 1080px.
2. Outro Element Sizes and Dimensions
End screen templates comprise elements that are in different shapes and sizes. When using a YouTube outro size of 1920px X 1080px, here are the element dimensions to use:
- Subscribe – 294px X 294px
- Channel – 294px X 294px
- Website link - 294px X 294px
- Video playlist – 615px X 345px
3. Outro Length
If you want to make your outro boring, make it long. So, how long should YouTube outro be? For your outros to have a high conversation rate, they should be approximately 10-20 seconds long. However, the length of your video should be the determining factor. A one-hour YouTube video can have a longer outro.
Don’t be challenged by setting the above sizes because nearly all intro and outro makers have already set dimensions for the elements. The major requirements are done for you
Section 4: Best Practices When Making A YouTube Outro
Imagine given 10 seconds to showcase your YouTube channel and direct viewers on the next move without breaking the engagement! Different YouTube outros come in different styles; certainly a show of one’s degree of creativity.
At this point, you should be already be having the best outro maker in mind - Filmora. The below YouTube outro tips should coincide with the features of your selected outro maker.
- Be relevant
The featured elements should be related to the video. Adding irrelevant elements your outro will most likely make the viewer click away.
- Keep to your goals
The big question is; what do you want to achieve from the YouTube end screen? Draw your attention to the subject matter of that particular video, your channel or the product highlighted in the video. Try to align your thoughts with those of the viewer.
Every video creator wishes for the following goals, increasing your channel subscribers, sending traffic to another site, viewing more videos and sharing to social media. Each YouTube outro element should have its own goal.
- Simple, clear and easy to interpret
Your outro will be meaningless if the audience cannot take action due to the complexity of either the language used or the ambiguity of words used. Use colors that pop out the elements making them the center of focus. Make them clear and avoid anything distractive.
- Use similar outro templates
Apart from being a good method of branding your channel, using similar outro on your videos adds credibility. It is, therefore, a good practice to have the consistency of colors, elements, images, and logos.
It’s absolutely important to understand all the prerequisites related to YouTube outros. Make use of the tips and requirements explained above when making and adding YouTube end screens to achieve the best results.
Part 2: Best 8 Intro And Outro Makers For YouTube
If you are wondering how to make the best magnetic intro and converting outro for your YouTube videos, this is your best article for you. Whether it’s the free online intro maker or the YouTube outro maker free no watermark, just select one that suits you most from the below list.
1. Wondershare Filmora
Quick fact – Using Filmora as an outro maker, allows you to select your admired background and outro template.
Do you want to make HD YouTube intros and outros that will grow your channel? I recommend Wondershare Filmora.
This software has the simplest friendly interface that any new and expert video editor would understand easily. This is very important for you; to use the best intro or outro for your YouTube videos, download Filmora video editor to get access to Filmstock. There are plenty of free and editable YouTube intro and outro templates ready for download.
Filmora is an all in one YouTube outro maker: you can download intro and outro templates, edit, add to your YouTube video and publish to your channel. There are innumerable backgrounds, transitions and effects to make an outro that matches the video colors, speed, and theme.
2. Outromaker
Quick fact – Outromaker is highly preferred for adding YouTube end screens with animated backgrounds that are mobile-friendly.
In spite of its pricey plans, Outro Maker continues to be more and more users due to its high genre of outro templates. Among the features included in this app are outro templates, YouTube mobile cards, and YouTube graphics.
To insert a Pokémon Go or animated cartoon background that rhymes with your videos, you have to register an account. Secondly, you must have a registered YouTube channel with videos. Lastly, subscribe to a paid plan.
3. MotionDen
Quick fact – MotionDen is an online into and outro maker. To create YouTube intro and outro without watermark, you have to first pay.
There are plenty of YouTube intro and outro templates for your marketing videos, showdown movies or hard sports videos. Only two pricing plans are available, namely $9.0/Video and $39/ month. Both plans produce HD intros and outros for YouTube and give access to directly publish to YouTube.
To start creating end screens, creating an account is a requirement. MotionDen has rich text editing features and direct typography to edit your logo.
4. Snappa
Quick fact- With Snappa as your YouTube outro maker, only 60 seconds are enough to create a professional high-quality outro.
This is the perfect YouTube outro maker online free with over a 5000+ outro template and million-plus royalty-free HD photos and graphics. Among the features it’s renowned for include, thousands of templates in different sizes, resizable graphics, a huge library of HD intros and outros and seamless integration with uploaded logos and custom fonts.
Most of the YouTube outro requirements like dimensions have been done for you. To access more features, subscribe to either the Pro plan for $10/month or the Team plan for $20/month.
5. Biteable
Quick fact- Biteable is a free online YouTube outro creator. It’s compatible with mobile phones and computers and is highly used by content marketing experts.
The clarity of the interface is enough to prove its simplicity and user-friendliness. The only requirement to use this app is registration. However, the free plan is limited to 10 projects per month, the basic content and 24/7 customer support. Its main limitation is any project under the free plan bears the Biteable watermark.
Biteable Youtube outro template download feature contains 85,000 Shutterstock clips. There are four optional pricing plans. The free plan with limited features, Starter Plan for $29/mo, Pro Plan for $29/mo and Unlimited Plan for $49/mo. You can also subscribe annually.
6. Tube Arsenal
Quick fact – Tube Arsenal is among the best HD intro and outro maker for YouTube. No monthly/annual subscription plans. Each outro template can be customized online.
Despite its high quality and professional templates, Tube Arsenal is suitable for both beginners and experts. Would you like to add the best YouTube outro songs to your videos? Select any intro or outro and on the customizing chart to the left, scroll to the bottom and click “Music”.
Some of the features include unlimited downloads, free downloads, online template customization and curated collection of intros and outros. Each outros’ price is determined by its resolution (720px for $9 and 180px for $11).
7. Animaker
Quick fact – Animaker takes cognizance of human creative ability. You can, therefore, create your own intro from scratch or edit the provided templates.
Animaker is among the world’s most used YouTube intro maker. It’s trusted by over 1000 big brands like Adidas, Google, UNICEF, and Uber. You can start with the free plan if it’s your first time then upgrade to the complex paid plans. The paid plans are Personal for $19/mo, Startup for $35/mo and Business for $59/mo.
There are many features to look out for in Animaker. Some include 50+ backgrounds YouTube intro music, over 175 sound effects, custom font support and pre-designed templates.
8. Video Jaguar
Quick fact – Video Jaguar is a cloud-based software used creating YouTube intros and outros. You can, therefore, use it from any location without downloading it.
This app’s outro maker interface comes equipped with easy to use features like full HD intro and outro templates, licensed music and text editor. There are also plenty of royalty-free photos.
Video Jaguar is majorly designed for marketers who specialize in video ads to grow their brand awareness.
You may also like: How to Convert YouTube to MP4 Safely? [Step by Step Guide] >>
Part 3: How To Make And Add Outro To YouTube Video
How to make a YouTube outro was comprehensively answered by the launch Filmora video editor. Why say Filmora? We all know how the best professional YouTube outros should look like, right? Go to the Filmora products page then click download. Among the features, you’ll find include transitions, backgrounds, effects, rich text editor and free audio and voiceover recorder among others.
Step 1: Start by downloading and installing Filmora on your Windows or Mac by clicking any of the below icons.
Step 2: Once it’s fully installed, double-click on the Filmora icon on your desktop to open a welcome screen for you to start a new project. Adjust the project aspect ratio to 16:9.
Step 3: Click the new project and wait for the software full interface to open. On the Filmora Filmstock page, search and select a YouTube outro template of your choice, download and save to your media.
Before importing the template, click “Sample Colours” to choose a color that rhymes with your video and set it as the background.
Click “Media” on the top menu and import your outro template to the timeline.
Step 4: Use the screen blind mode to edit the YouTube outro elements at the preview window. Also, you can select audio and add it as outro music for YouTube. Click “Title” to select your preferred font editor. Once you are done, export the outro to the media file.
Check this video tutorial. It’s very easy and simple to make a YouTube outro. Free to download the video maker and have a try now!
Part 4: How To Add An Outro To A Youtube Video
To understand the whole end screen process we will continue with the Filmora video editing procedure.
Step 1: Upload your video to the timeline and create a space for the video outro.
Step 2: Import the YouTube outro created earlier and drag it down to the timeline. Now that you have two imports on your timeline, drag the outro to the videos end section.
Step 3: Click “Export” to save or upload the video on YouTube. You now have your video with an end screen.
Part 5: Frequently Asked Questions about YouTube Outro
Best Websites for YouTube Outro Template Download
YouTube Outro templates are helping websites grow their revenue by setting pricing plans. Nevertheless, there are some websites with even better free outro templates for download. Here is a combination of both paid and free websites to download YouTube outros:
Best Websites to Find YouTube Outro Songs
Finding outro songs for YouTube is a bit challenging partly because not many YouTube outro makers have also songs on the website. Video creators also tend to use video audio in their end screens thereby reducing the demand for outro songs.
Despite their low demand, few websites continue to create YouTube outro songs like:
You may also like: 10 Best Sources to Download Free Outro Music [No Copyright] >>
Conclusion
We all wish to create YouTube videos that attract many viewers and eventually subscribers! To grow your YouTube channel, start adding outros to your videos before uploading them to YouTube. YouTube outro engages viewers for longer by clicking the suggested videos or helps grow the channel.
It’s not a surprise to find some of your videos with no outros despite the high number of free intro and outro YouTube makers. Use the above list to make a stunning outro for YouTube.
Was this guide helpful to you? Kindly share your comments or thoughts on the social media platforms on this site.
Richard Bennett
Richard Bennett is a writer and a lover of all things video.
Follow @Richard Bennett
Advanced Filmmaking Techniques: Selecting Top-Notch Lenses
Best Camera Lenses for YouTube
Richard Bennett
Mar 27, 2024• Proven solutions
A DSLR is the ideal camera for some vlogs, and using a DSLR means you get to customize the look of your vlog by choosing the perfect lens. Choosing the best camera lens for your YouTube channel can be tricky because there are so many options. This article will walk you through some of them, and make two recommendations of great vlogging lenses. If you already have a good understanding of how camera lenses work then feel free to scroll down to the lens recs.
Part 1. Understanding Lenses: Zoom lens, Fixed lens, aperture, f-stop
There are two main categories of camera lenses: ‘zoom’ – lenses that allow you to zoom in and out – and ‘fixed’. If your lenses are tools then zoom lenses are Swiss army knives; they are very versatile. Fixed lenses, also called prime lenses, have more specific purposes. Do you need a tool that can do a lot of things, or a tool that is perfect for one specific job? Sometimes it is useful to have access to both.
We have explained the differences between Fixed lens and Zoom lens and advantages of using each lens, check this article: Zoom Lens vs. Fixed Lenses: Which one is best for YouTuber? for the detailed information.
Before we get into the recommendations here is a little background information on lenses in general:
Beginner’s Guide to Aperture and F-Stops
In order to be able to select the lens you’ll be using to record your YouTube videos, you first need to understand a few very basic concepts, such as aperture or f-stops.
1.What is a lens’s aperture?
The aperture of your lens is the hole through which light reaches your camera’s sensor, or the film if you are using a film camera. The wider your aperture is the more light you are letting into your camera. In low light it is better to have a wide aperture, and when you are working with a lot of light it is better to have a narrow aperture so your footage is not overexposed.
Aperture is simply an opening in the lens that lets the light through. If you want to increase the amount of the light that is reaching the camera’s sensor you need to open up the aperture blades that are located in the lens. The f-values like f/1.2 or f/1.8 indicate that the aperture is wide open and that the camera is receiving the maximum amount of light a lens you’re using can provide.
2.What is an ‘f-stop’?
Light passes through your lens’s aperture on its way to your camera’s sensor, and the f-stop of your lens relates to the amount of light it lets in. The lower your f-stop, the wider your aperture, and the more light you are letting into your camera. The more light you let into your camera the easier it is to achieve a blurred background. A lot of vloggers love blurring their backgrounds because it is a quick way to disguising the rooms they are shooting in.
F-stops are written like ‘f/1.8’ or ‘f/4’ on your lens. For more information on f-stops and blurring your background read “The Best Bokeh Lens - How to Get the Blurred Background for YouTube Videos” and watch Tasha’s video.
F-stops or f-numbers indicate how open the aperture is, so for example if your camera is displaying f/32 value it means that your camera is letting very little light to get through to the camera’s sensor. The f-number depends on a few other parameters such as shutter speed, exposure or ISO values. Large apertures provide a shallow depth of field which creates a smooth and artistic background blur, while a small aperture enables you to keep both the background and the foreground of your shot in focus.
Part 2: Types of Camera Lenses
The visual aspect of a video may not be the only thing you’ll have to dedicate special attention to while recording your YouTube video, but it is surely one of the most important factors of the video production process. A lens you are using will largely contribute to the aesthetics of the video. That’s why you need to know which type of lens will deliver the best results when shooting different types of scenes. Here are some of the most common types of lenses you’ll encounter.
Standard lenses
These lenses are featured in almost all camera kits, so the chances are that if you have a DSLR camera you already have a standard, mid-range lens. These lenses commonly have a fixed 50mm focal length, although zoom lenses with focal lengths in the range between 35mm and 75mm are also considered standard. You can use them to capture medium shots, single or multiple figure shots, and in some cases establishing shots, because they offer enough versatility to cover a multitude of different scenes. Standard lenses often have large apertures, which makes them quite useful if you often shoot videos under light conditions you can’t control.
Macro lenses
Details, product shots or any other subject that can be filmed from close proximity looks better if they are recorded with macro lenses. The high contrast and sharpness these lenses provide allow you to create stunning close-ups of all hosts, guests or actors in your YouTube videos. What’s more, if you are presenting a new product to your audience you can use the macro lens to make some captivating shots that will attract more audience. Zoom lenses can also be used for macro photography and video, although prime macro lenses produce better results.
Telephoto lenses
The subjects of your videos don’t always have to be in your immediate surroundings, because telephoto lenses let you capture scenes that are several miles away from you. Wildlife or sports videographers frequently use telephoto lenses because they don’t have another way of getting close to their subjects. However, telephoto lenses with 70-300mm focal length can also be used to take stunning portraits or close up shots. The biggest downside of telephoto lenses is their weight because the lenses with higher focal lengths can weigh up to 10lbs, which makes them a bit inconvenient to always carry with you.
Wide-angle lenses
Recording videos of vast open spaces, breathtaking vistas or beautiful city views is much easier if you have a wide-angle lens. The short focal length allows the lens to have a wider field of view which covers more space than standard or telephoto lenses. Wide-angle lenses also have lower apertures than lenses with longer focal lengths which results in images that have a shallow depth of field. Ultra-wide lenses like fisheye distort the view so the videos recorded with these lenses often suffer from the lack of realism.
Specialist lenses
YouTubers who are working on demanding projects can try to solve their troubles by using a specialist lens. Soft-focus lenses can help you take better portraits while tilt-shift lenses allow you to control the perspective. However, it is hard to imagine a scenario in which you’ll need a specialist lense if you are just starting out since even experienced videographers only use special lenses when they have absolutely no better way to record a scene.
Part 3: Recommended Best Camera Lenses for Shooting YouTube Videos
Here are a couple great lenses that might be good fits for you and your YouTube channel. The thing that makes them both ideal for vlogging is that they have low enough f-stops to blur out your background.
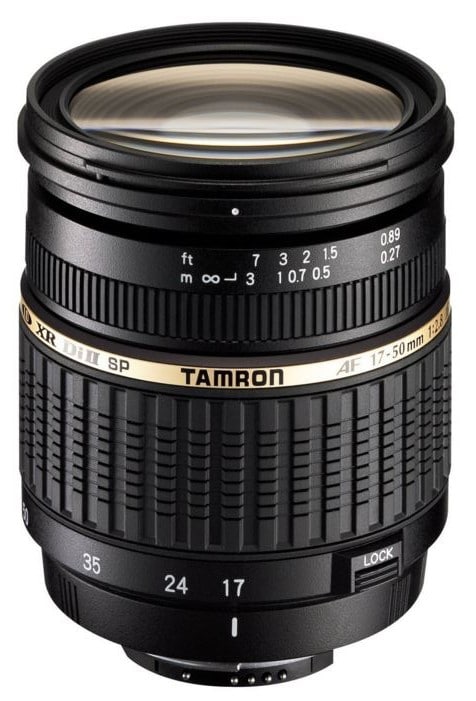
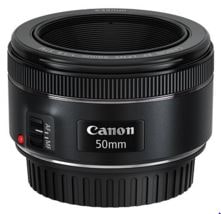
| Camera Lens | Type | Price | Aperture | Focal Length |
|---|---|---|---|---|
| Canon EF-S 10-18mm f/4.5-5.6 IS STM Lens | Wide angle | $279 | f/4.5-5.6 | 10 -18mm |
| Rokinon 8mm f/3.5 | Fisheye | $249 | f/3.5 | 8mm |
| Canon 50mm f/1.8 STM Lens | Prime | $125 | f/1.8 | 50mm |
| Canon EF 135mm f/2L USM Lens | Telephoto | $999 | f/2 | 135mm |
| Tamron SP AF 17-50mm f/2.8 | Standard Zoom | $299 | f/2.8 | 17 -50mm |
| Sony 30mm f/3.5 Macro | Macro | $278 | f/3.5 | 30mm |
1.Canon EF-S 10-18mm f/4.5-5.6 IS STM Lens
Canon released this lens in 2014 and shortly after it has gained the reputation of one of the most reliable wide to ultra-wide lenses for Canon cameras. Like most STM lenses, it offers incredibly fast autofocus technology that makes it a great choice for fast-paced action videos. The lens is equipped with an image stabilization system which guarantees that your videos are going to remain sharp even if the camera wasn’t perfectly still while you were recording. Somewhat smaller aperture range makes this lens poor choice for low light scenes, although you can get decent results if you manage to keep the camera still.
2. Rokinon 8mm Ultra Wide f/3.5 Fisheye Lens
Outdoor videos look much cooler when they are recorded with a wide-angle lens because the wider field of view enables you to capture more space in a shot. Fisheye lenses were made popular by GoPro cameras because they make the videos look more fun while producing high image quality. Rokinon 8mm lens allows you to adjust focus and aperture manually so you can fine-tune your shot before hitting the record button. To make things even better this model is compatible with a wide range of cameras including Pentax, Canon or Nikon DSLRs. It has a relatively fast aperture that enables it to deliver solid performances under low light conditions.
3.Canon EF 50mm f/1.8 STM Lens
The EF 50mm is a fixed lens with an f-stop of 1.8, which means it is great for blurring your background and performs well even in poorer lighting conditions. This is a really great lens for an opinion or beauty vlog, where you do not need to move around. You can stay put right where the focus is sharpest and stand out by blurring everything behind you. If you tend to reuse the same sets then you do not really need a zoom feature. If your shooting conditions rarely change then it is just as easy to use a reliable fixed lens like the EF 50mm since you will not need to be rethinking your set up and adjusting.
If you are looking for an inexpensive prime lens that lets you create sharp videos with shallow depth of field, you should look no further. This model is one of three Canon’s 50mm prime lenses, although the 50mm f/1.4 USM and 50mm f/1.2 ‘L’ USM models are much more expensive. You can use it to record a lot of different types of YouTube videos, like product reviews or makeup tutorials. The 50 mm f/1.8 STM lens doesn’t have image stabilization technology so you should try to be as still as you can possibly be when shooting handheld videos in order to avoid recording footage that has a lot of camera shakes.
4.Canon EF 135mm f/2L USM Lens
Recording moving objects from a distance requires you to have a lens that allows you to smoothly track their movements while keeping the subject in focus. The Canon EF 135mm f2/L USM lens is perhaps one of the best telephoto lenses on the market because it uses L glass that is widely accepted as the best in the industry. The Canon’s telephoto lens is compatible with ASP-C and Full Frame EF mount cameras. Keep in mind that this is also a prime lens and you can’t increase or decrease its focal length, but even so, it is a perfect choice for documentary-style videos.
5.Tamron SP AF 17-50mm f/2.8 XR Di II LD Aspherical (IF) Lens
The Tamron’s standard zoom lens offers good value at a very reasonable price. The maximum aperture is f/2.8, while the minimum aperture value this lens supports is f/32, which means that its users can easily experiment with different depths of field. The lens is compatible with most Canon cameras so if you have a camera from another manufacturer you may have to use the lens adapter in order to mount it onto your camera. Like most standard zoom lenses, Tamron SP AF model is highly versatile and you can use it to record a wide range of different scenes.
A lot of zoom lenses do not have wide enough apertures to create blurred backgrounds, but this Tamron lens is an exception at f/2.8. This low f-stop also means that it performs better in poor lighting conditions than a lot of other zoom lenses. If your shooting conditions change a lot – if you often change locations, for example – then it will be good to have a sturdy, well-built, zoom lens like the AF 17-mm that can be quickly adapted to new angles and distances.
6.Sony 30mm f/3.5 Macro
All Sony’s APS-C format E mount cameras are compatible with this multi-purpose lens. When mounted the 30mm lens provides a 45mm focal length equivalent, which means that you can use it to take macro shots of products or to record medium or close-up shots. This is a prime lens, so changing the focal length isn’t really an option, but the 1:1 life-size magnification, as well as the 0.9-inch working distance, allow you to get close to the subjects in the video. The aperture range is between f/3.5 and f/22 which means that you can choose how shallow the depth of field in your shot should be.
If you are using a 4k camera to shoot your YouTube video, check out best camera lens for 4k professional production.
Richard Bennett
Richard Bennett is a writer and a lover of all things video.
Follow @Richard Bennett
Richard Bennett
Mar 27, 2024• Proven solutions
A DSLR is the ideal camera for some vlogs, and using a DSLR means you get to customize the look of your vlog by choosing the perfect lens. Choosing the best camera lens for your YouTube channel can be tricky because there are so many options. This article will walk you through some of them, and make two recommendations of great vlogging lenses. If you already have a good understanding of how camera lenses work then feel free to scroll down to the lens recs.
Part 1. Understanding Lenses: Zoom lens, Fixed lens, aperture, f-stop
There are two main categories of camera lenses: ‘zoom’ – lenses that allow you to zoom in and out – and ‘fixed’. If your lenses are tools then zoom lenses are Swiss army knives; they are very versatile. Fixed lenses, also called prime lenses, have more specific purposes. Do you need a tool that can do a lot of things, or a tool that is perfect for one specific job? Sometimes it is useful to have access to both.
We have explained the differences between Fixed lens and Zoom lens and advantages of using each lens, check this article: Zoom Lens vs. Fixed Lenses: Which one is best for YouTuber? for the detailed information.
Before we get into the recommendations here is a little background information on lenses in general:
Beginner’s Guide to Aperture and F-Stops
In order to be able to select the lens you’ll be using to record your YouTube videos, you first need to understand a few very basic concepts, such as aperture or f-stops.
1.What is a lens’s aperture?
The aperture of your lens is the hole through which light reaches your camera’s sensor, or the film if you are using a film camera. The wider your aperture is the more light you are letting into your camera. In low light it is better to have a wide aperture, and when you are working with a lot of light it is better to have a narrow aperture so your footage is not overexposed.
Aperture is simply an opening in the lens that lets the light through. If you want to increase the amount of the light that is reaching the camera’s sensor you need to open up the aperture blades that are located in the lens. The f-values like f/1.2 or f/1.8 indicate that the aperture is wide open and that the camera is receiving the maximum amount of light a lens you’re using can provide.
2.What is an ‘f-stop’?
Light passes through your lens’s aperture on its way to your camera’s sensor, and the f-stop of your lens relates to the amount of light it lets in. The lower your f-stop, the wider your aperture, and the more light you are letting into your camera. The more light you let into your camera the easier it is to achieve a blurred background. A lot of vloggers love blurring their backgrounds because it is a quick way to disguising the rooms they are shooting in.
F-stops are written like ‘f/1.8’ or ‘f/4’ on your lens. For more information on f-stops and blurring your background read “The Best Bokeh Lens - How to Get the Blurred Background for YouTube Videos” and watch Tasha’s video.
F-stops or f-numbers indicate how open the aperture is, so for example if your camera is displaying f/32 value it means that your camera is letting very little light to get through to the camera’s sensor. The f-number depends on a few other parameters such as shutter speed, exposure or ISO values. Large apertures provide a shallow depth of field which creates a smooth and artistic background blur, while a small aperture enables you to keep both the background and the foreground of your shot in focus.
Part 2: Types of Camera Lenses
The visual aspect of a video may not be the only thing you’ll have to dedicate special attention to while recording your YouTube video, but it is surely one of the most important factors of the video production process. A lens you are using will largely contribute to the aesthetics of the video. That’s why you need to know which type of lens will deliver the best results when shooting different types of scenes. Here are some of the most common types of lenses you’ll encounter.
Standard lenses
These lenses are featured in almost all camera kits, so the chances are that if you have a DSLR camera you already have a standard, mid-range lens. These lenses commonly have a fixed 50mm focal length, although zoom lenses with focal lengths in the range between 35mm and 75mm are also considered standard. You can use them to capture medium shots, single or multiple figure shots, and in some cases establishing shots, because they offer enough versatility to cover a multitude of different scenes. Standard lenses often have large apertures, which makes them quite useful if you often shoot videos under light conditions you can’t control.
Macro lenses
Details, product shots or any other subject that can be filmed from close proximity looks better if they are recorded with macro lenses. The high contrast and sharpness these lenses provide allow you to create stunning close-ups of all hosts, guests or actors in your YouTube videos. What’s more, if you are presenting a new product to your audience you can use the macro lens to make some captivating shots that will attract more audience. Zoom lenses can also be used for macro photography and video, although prime macro lenses produce better results.
Telephoto lenses
The subjects of your videos don’t always have to be in your immediate surroundings, because telephoto lenses let you capture scenes that are several miles away from you. Wildlife or sports videographers frequently use telephoto lenses because they don’t have another way of getting close to their subjects. However, telephoto lenses with 70-300mm focal length can also be used to take stunning portraits or close up shots. The biggest downside of telephoto lenses is their weight because the lenses with higher focal lengths can weigh up to 10lbs, which makes them a bit inconvenient to always carry with you.
Wide-angle lenses
Recording videos of vast open spaces, breathtaking vistas or beautiful city views is much easier if you have a wide-angle lens. The short focal length allows the lens to have a wider field of view which covers more space than standard or telephoto lenses. Wide-angle lenses also have lower apertures than lenses with longer focal lengths which results in images that have a shallow depth of field. Ultra-wide lenses like fisheye distort the view so the videos recorded with these lenses often suffer from the lack of realism.
Specialist lenses
YouTubers who are working on demanding projects can try to solve their troubles by using a specialist lens. Soft-focus lenses can help you take better portraits while tilt-shift lenses allow you to control the perspective. However, it is hard to imagine a scenario in which you’ll need a specialist lense if you are just starting out since even experienced videographers only use special lenses when they have absolutely no better way to record a scene.
Part 3: Recommended Best Camera Lenses for Shooting YouTube Videos
Here are a couple great lenses that might be good fits for you and your YouTube channel. The thing that makes them both ideal for vlogging is that they have low enough f-stops to blur out your background.
| Camera Lens | Type | Price | Aperture | Focal Length |
|---|---|---|---|---|
| Canon EF-S 10-18mm f/4.5-5.6 IS STM Lens | Wide angle | $279 | f/4.5-5.6 | 10 -18mm |
| Rokinon 8mm f/3.5 | Fisheye | $249 | f/3.5 | 8mm |
| Canon 50mm f/1.8 STM Lens | Prime | $125 | f/1.8 | 50mm |
| Canon EF 135mm f/2L USM Lens | Telephoto | $999 | f/2 | 135mm |
| Tamron SP AF 17-50mm f/2.8 | Standard Zoom | $299 | f/2.8 | 17 -50mm |
| Sony 30mm f/3.5 Macro | Macro | $278 | f/3.5 | 30mm |
1.Canon EF-S 10-18mm f/4.5-5.6 IS STM Lens
Canon released this lens in 2014 and shortly after it has gained the reputation of one of the most reliable wide to ultra-wide lenses for Canon cameras. Like most STM lenses, it offers incredibly fast autofocus technology that makes it a great choice for fast-paced action videos. The lens is equipped with an image stabilization system which guarantees that your videos are going to remain sharp even if the camera wasn’t perfectly still while you were recording. Somewhat smaller aperture range makes this lens poor choice for low light scenes, although you can get decent results if you manage to keep the camera still.
2. Rokinon 8mm Ultra Wide f/3.5 Fisheye Lens
Outdoor videos look much cooler when they are recorded with a wide-angle lens because the wider field of view enables you to capture more space in a shot. Fisheye lenses were made popular by GoPro cameras because they make the videos look more fun while producing high image quality. Rokinon 8mm lens allows you to adjust focus and aperture manually so you can fine-tune your shot before hitting the record button. To make things even better this model is compatible with a wide range of cameras including Pentax, Canon or Nikon DSLRs. It has a relatively fast aperture that enables it to deliver solid performances under low light conditions.
3.Canon EF 50mm f/1.8 STM Lens
The EF 50mm is a fixed lens with an f-stop of 1.8, which means it is great for blurring your background and performs well even in poorer lighting conditions. This is a really great lens for an opinion or beauty vlog, where you do not need to move around. You can stay put right where the focus is sharpest and stand out by blurring everything behind you. If you tend to reuse the same sets then you do not really need a zoom feature. If your shooting conditions rarely change then it is just as easy to use a reliable fixed lens like the EF 50mm since you will not need to be rethinking your set up and adjusting.
If you are looking for an inexpensive prime lens that lets you create sharp videos with shallow depth of field, you should look no further. This model is one of three Canon’s 50mm prime lenses, although the 50mm f/1.4 USM and 50mm f/1.2 ‘L’ USM models are much more expensive. You can use it to record a lot of different types of YouTube videos, like product reviews or makeup tutorials. The 50 mm f/1.8 STM lens doesn’t have image stabilization technology so you should try to be as still as you can possibly be when shooting handheld videos in order to avoid recording footage that has a lot of camera shakes.
4.Canon EF 135mm f/2L USM Lens
Recording moving objects from a distance requires you to have a lens that allows you to smoothly track their movements while keeping the subject in focus. The Canon EF 135mm f2/L USM lens is perhaps one of the best telephoto lenses on the market because it uses L glass that is widely accepted as the best in the industry. The Canon’s telephoto lens is compatible with ASP-C and Full Frame EF mount cameras. Keep in mind that this is also a prime lens and you can’t increase or decrease its focal length, but even so, it is a perfect choice for documentary-style videos.
5.Tamron SP AF 17-50mm f/2.8 XR Di II LD Aspherical (IF) Lens
The Tamron’s standard zoom lens offers good value at a very reasonable price. The maximum aperture is f/2.8, while the minimum aperture value this lens supports is f/32, which means that its users can easily experiment with different depths of field. The lens is compatible with most Canon cameras so if you have a camera from another manufacturer you may have to use the lens adapter in order to mount it onto your camera. Like most standard zoom lenses, Tamron SP AF model is highly versatile and you can use it to record a wide range of different scenes.
A lot of zoom lenses do not have wide enough apertures to create blurred backgrounds, but this Tamron lens is an exception at f/2.8. This low f-stop also means that it performs better in poor lighting conditions than a lot of other zoom lenses. If your shooting conditions change a lot – if you often change locations, for example – then it will be good to have a sturdy, well-built, zoom lens like the AF 17-mm that can be quickly adapted to new angles and distances.
6.Sony 30mm f/3.5 Macro
All Sony’s APS-C format E mount cameras are compatible with this multi-purpose lens. When mounted the 30mm lens provides a 45mm focal length equivalent, which means that you can use it to take macro shots of products or to record medium or close-up shots. This is a prime lens, so changing the focal length isn’t really an option, but the 1:1 life-size magnification, as well as the 0.9-inch working distance, allow you to get close to the subjects in the video. The aperture range is between f/3.5 and f/22 which means that you can choose how shallow the depth of field in your shot should be.
If you are using a 4k camera to shoot your YouTube video, check out best camera lens for 4k professional production.
Richard Bennett
Richard Bennett is a writer and a lover of all things video.
Follow @Richard Bennett
- Title: "2024 Approved Successful YouTubing Master End Credits and Makers' Sources"
- Author: Thomas
- Created at : 2024-05-31 12:39:35
- Updated at : 2024-06-01 12:39:35
- Link: https://youtube-help.techidaily.com/2024-approved-successful-youtubing-master-end-credits-and-makers-sources/
- License: This work is licensed under CC BY-NC-SA 4.0.
