
:max_bytes(150000):strip_icc()/panos-sakalakis-525108-unsplash-5c76011f46e0fb00019b8cda.jpg)
"2024 Approved The Art of Video Integration YouTube Meets Microsoft PowerPoint"
The Art of Video Integration: YouTube Meets Microsoft PowerPoint
How to Embed a YouTube Video in PowerPoint

Richard Bennett
Mar 27, 2024• Proven solutions
There might be several instances where you want your audiences to watch a video so that you can elaborate your idea or explain your point more clearly. You may want to do this without leaving the presentation window in order to avoid losing focus from the agenda of the meeting. To make this happen, it is imperative to learn how to embed a YouTube video in PowerPoint.
When talking about PowerPoint, it is an efficient and powerful tool to prepare animated and static presentations, and embedding videos is yet another useful option that the app offers to its users.
That said, here you will learn a couple of methods to embed YouTube video in PowerPoint.
How to Insert YouTube Video into PowerPoint? (4 Methods)
After understanding the benefits of have a video embedded to your presentation, it is now time to learn how to add YouTube video to PowerPoint.
The four most used methods of getting this done are discussed in detailed in the following sections:
Method 1: Using YouTube Video’s URL
Because every YouTube video has a URL (Uniform Resource Locator) that is unique for that particular clip, PowerPoint allows you to use it to embed the footage to any of its slides. The process is simple, and you can follow the steps given below to get this done:
Step 1: Copy the URL
Open your default web browser, go to the YouTube video you want to embed to PowerPoint, and copy its URL from the address bar at the top.
Step 2: Add URL to PowerPoint

Launch PowerPoint if it is not already open, go to the slide you want to embed the YouTube video to, click Insert from menu bar present above the Ribbon, click Video from the Media section at the right end of the Ribbon, click Online Video from the list that appears, in the Enter the URL for the online video field on the Online Video box, paste the URL that you copied earlier, and click Insert to insert YouTube video into PowerPoint.

Step 3: Position the Player
Once the video is added to the PowerPoint slide, drag its frame and reposition it to a suitable location.
Method 2: Embed a YouTube Video with Embed Code (For Microsoft PowerPoint 2016)
Unlike PowerPoint 2019 that accepts URLs and embed codes in a single URL field, MS PowerPoint 2016 lets you choose how you want to insert a video. The step-by-step instructions given below explain how this can be done:
Step 1: Obtain Embed Code
Go to the YouTube video you want to embed to your PowerPoint slide, click the SHARE icon from the left area under the video player, click the Embed icon in the Share box, and click COPY from the bottom-right corner of the Embed Video box that appears next.

Step 2: Get to the PowerPoint’s Insert Video Box
Launch MS PowerPoint 2016, click Insert from the menu bar at the top, from the Media section in the right of the Ribbon, click Video, and then click Online Video to open the Insert Video box.
Step 3: Embed the Video
Paste the embed code you copied earlier in the Paste embed code here field present next to the From a Video Embed Code option, and press Enter to embed YouTube video in PowerPoint.
Method 3: Insert YouTube Video into PowerPoint by Searching Names (For Microsoft PowerPoint 2016)
Microsoft Office 2016 has another lucrative feature that allows users to embed YouTube video in PowerPoint by searching its name. You can follow the steps given below to find the videos published on YouTube, and insert them to your presentation:
Step 1: Get to the Insert Video Box
Use the process explained in Step 2 of Method 2 to get to the Insert Video box after selecting the slide you want to add a video to.
Step 2: Search and Embed a Video
In the Search YouTube field next to the YouTube option, type the name of the video you want to search on YouTube, press Enter, select the video you want to embed, and click Insert to insert YouTube video into PowerPoint.
Method 4: Insert Video from PC
Another method to embed YouTube video in PowerPoint is by downloading the clip to your PC, and then inserting the footage from there. You can use any free YouTube downloader to obtain a video that is available on YouTube.
Once the file is on your computer, the following steps explain how it can be embedded to your PowerPoint slide:
WARNING: YouTube videos may be subject to copyright. Therefore, before downloading and embedding a video to your PowerPoint slide, make sure that you have proper rights to do so, or that the video can be used for the purpose without any written permission from its creator.
Step 1: Get to the Insert Ribbon
Open PowerPoint and select the slide you want to embed a YouTube video to. Go to Insert from the menu bar at the top.
Step 2: Insert the Video
Click the Video icon from the Media section of the Ribbon, click Video on My PC from the list, and use the Insert Video box that appears to select and insert the video to your PowerPoint slide.
Step 3: Resize and/or Modify the Video
Grab any of the six handles of the video you inserted, and drag it inward to decrease the size of the frame. It is advisable to use the corner handle and drag them diagonally to maintain proper aspect ratio of the player’s frame. Next, right-click anywhere inside the frame, click Format Video from the context menu, and use the options that appear in the right pane to make necessary adjustments to the clip like color correction, manage brightness and contrast, etc.
YouTube Embedding Supported PowerPoint Version Checklist
Depending on the version of Microsoft Office you are using, you may or may not be able to embed a YouTube video in PowerPoint. Also, if your version of PowerPoint allows you to do so, the interface and the options may vary from those you see on your friends’ computer or in some online tutorials.
That said, the following table gives a clear picture of which version of Microsoft Office has video embedding option, and/or what level of integration does it allow:
| MS Office Version | Insert YouTube Via URL | Insert an Online Video with an Embed Code | Insert by Searching for the YouTube Video | Play Embedded YouTube Video Offline |
|---|---|---|---|---|
| Microsoft 365 | Yes | No | No | No |
| PowerPoint 2019 | Yes | Yes | No | No |
| PowerPoint 2016 | No | Yes | Yes | No |
| PowerPoint 2013 | No | No | Yes | No |
| PowerPoint 2010 | No | No (Adobe Flash Player Support Discontinued) | No (Adobe Flash Player Support Discontinued) | No |
| PowerPoint 365/2019 for Mac | Yes | No | No | No |
Frequently Asked Questions About Embedding YouTube Videos in PowerPoint
1. Why Can’t I Embed a YouTube Video in PowerPoint 2010?
PowerPoint 2010 uses Adobe Flash Player to play YouTube videos. Since support for Flash Player is discontinued, PowerPoint 2010 isn’t able to play the videos anymore. To resolve this issue, you need to upgrade your version of Microsoft Office to 2013 or later.
2. Why Can’t I Embed YouTube Videos in PowerPoint for Mac?
You can insert YouTube videos only in Office 365 and Office 2019 versions for Mac. If you are using Office 2016 for Mac, you are required to install an add-in called Web Video Player that can be downloaded from the https://appsource.microsoft.com/en-us/product/office/WA104221182 link. However, if it is PowerPoint 2011 for Mac that you are using, you can’t insert YouTube video to it, and you need to upgrade your MS Office to a higher version for that purpose.
3. Why Can’t I Embed a YouTube Video in PowerPoint 2013?
The version of PowerPoint 2013 that was released initially didn’t allow YouTube video embedding. However, with an update 4018374 that Microsoft rolled out in August 2018, the feature got enabled. You can download and install the update from https://support.microsoft.com/en-us/help/4018374/august-7-2018-update-for-powerpoint-2013-kb4018374 link, and then try inserting a YouTube video to your version of PowerPoint.
4. How Do I Embed a YouTube Video in PowerPoint without Being Online?
YouTube videos that you embed to your PowerPoint presentations can’t be played in offline mode. However, there is a workaround to this. You can download the video from YouTube to your computer using any YouTube downloader, and then use the process explained in Method 4 to insert the clip from your PC.
Conclusion
Although the above sections explain how to embed a YouTube video in PowerPoint, the process to do so may vary in different versions of Microsoft Office. Also, depending on what edition of the program you are using, embedding YouTube videos may or may not be supported according to the availability of the add-ins or updates that Microsoft has rolled out for that particular built of the app.
Richard Bennett
Richard Bennett is a writer and a lover of all things video.
Follow @Richard Bennett
Richard Bennett
Mar 27, 2024• Proven solutions
There might be several instances where you want your audiences to watch a video so that you can elaborate your idea or explain your point more clearly. You may want to do this without leaving the presentation window in order to avoid losing focus from the agenda of the meeting. To make this happen, it is imperative to learn how to embed a YouTube video in PowerPoint.
When talking about PowerPoint, it is an efficient and powerful tool to prepare animated and static presentations, and embedding videos is yet another useful option that the app offers to its users.
That said, here you will learn a couple of methods to embed YouTube video in PowerPoint.
How to Insert YouTube Video into PowerPoint? (4 Methods)
After understanding the benefits of have a video embedded to your presentation, it is now time to learn how to add YouTube video to PowerPoint.
The four most used methods of getting this done are discussed in detailed in the following sections:
Method 1: Using YouTube Video’s URL
Because every YouTube video has a URL (Uniform Resource Locator) that is unique for that particular clip, PowerPoint allows you to use it to embed the footage to any of its slides. The process is simple, and you can follow the steps given below to get this done:
Step 1: Copy the URL
Open your default web browser, go to the YouTube video you want to embed to PowerPoint, and copy its URL from the address bar at the top.
Step 2: Add URL to PowerPoint
Launch PowerPoint if it is not already open, go to the slide you want to embed the YouTube video to, click Insert from menu bar present above the Ribbon, click Video from the Media section at the right end of the Ribbon, click Online Video from the list that appears, in the Enter the URL for the online video field on the Online Video box, paste the URL that you copied earlier, and click Insert to insert YouTube video into PowerPoint.
Step 3: Position the Player
Once the video is added to the PowerPoint slide, drag its frame and reposition it to a suitable location.
Method 2: Embed a YouTube Video with Embed Code (For Microsoft PowerPoint 2016)
Unlike PowerPoint 2019 that accepts URLs and embed codes in a single URL field, MS PowerPoint 2016 lets you choose how you want to insert a video. The step-by-step instructions given below explain how this can be done:
Step 1: Obtain Embed Code
Go to the YouTube video you want to embed to your PowerPoint slide, click the SHARE icon from the left area under the video player, click the Embed icon in the Share box, and click COPY from the bottom-right corner of the Embed Video box that appears next.
Step 2: Get to the PowerPoint’s Insert Video Box
Launch MS PowerPoint 2016, click Insert from the menu bar at the top, from the Media section in the right of the Ribbon, click Video, and then click Online Video to open the Insert Video box.
Step 3: Embed the Video
Paste the embed code you copied earlier in the Paste embed code here field present next to the From a Video Embed Code option, and press Enter to embed YouTube video in PowerPoint.
Method 3: Insert YouTube Video into PowerPoint by Searching Names (For Microsoft PowerPoint 2016)
Microsoft Office 2016 has another lucrative feature that allows users to embed YouTube video in PowerPoint by searching its name. You can follow the steps given below to find the videos published on YouTube, and insert them to your presentation:
Step 1: Get to the Insert Video Box
Use the process explained in Step 2 of Method 2 to get to the Insert Video box after selecting the slide you want to add a video to.
Step 2: Search and Embed a Video
In the Search YouTube field next to the YouTube option, type the name of the video you want to search on YouTube, press Enter, select the video you want to embed, and click Insert to insert YouTube video into PowerPoint.
Method 4: Insert Video from PC
Another method to embed YouTube video in PowerPoint is by downloading the clip to your PC, and then inserting the footage from there. You can use any free YouTube downloader to obtain a video that is available on YouTube.
Once the file is on your computer, the following steps explain how it can be embedded to your PowerPoint slide:
WARNING: YouTube videos may be subject to copyright. Therefore, before downloading and embedding a video to your PowerPoint slide, make sure that you have proper rights to do so, or that the video can be used for the purpose without any written permission from its creator.
Step 1: Get to the Insert Ribbon
Open PowerPoint and select the slide you want to embed a YouTube video to. Go to Insert from the menu bar at the top.
Step 2: Insert the Video
Click the Video icon from the Media section of the Ribbon, click Video on My PC from the list, and use the Insert Video box that appears to select and insert the video to your PowerPoint slide.
Step 3: Resize and/or Modify the Video
Grab any of the six handles of the video you inserted, and drag it inward to decrease the size of the frame. It is advisable to use the corner handle and drag them diagonally to maintain proper aspect ratio of the player’s frame. Next, right-click anywhere inside the frame, click Format Video from the context menu, and use the options that appear in the right pane to make necessary adjustments to the clip like color correction, manage brightness and contrast, etc.
YouTube Embedding Supported PowerPoint Version Checklist
Depending on the version of Microsoft Office you are using, you may or may not be able to embed a YouTube video in PowerPoint. Also, if your version of PowerPoint allows you to do so, the interface and the options may vary from those you see on your friends’ computer or in some online tutorials.
That said, the following table gives a clear picture of which version of Microsoft Office has video embedding option, and/or what level of integration does it allow:
| MS Office Version | Insert YouTube Via URL | Insert an Online Video with an Embed Code | Insert by Searching for the YouTube Video | Play Embedded YouTube Video Offline |
|---|---|---|---|---|
| Microsoft 365 | Yes | No | No | No |
| PowerPoint 2019 | Yes | Yes | No | No |
| PowerPoint 2016 | No | Yes | Yes | No |
| PowerPoint 2013 | No | No | Yes | No |
| PowerPoint 2010 | No | No (Adobe Flash Player Support Discontinued) | No (Adobe Flash Player Support Discontinued) | No |
| PowerPoint 365/2019 for Mac | Yes | No | No | No |
Frequently Asked Questions About Embedding YouTube Videos in PowerPoint
1. Why Can’t I Embed a YouTube Video in PowerPoint 2010?
PowerPoint 2010 uses Adobe Flash Player to play YouTube videos. Since support for Flash Player is discontinued, PowerPoint 2010 isn’t able to play the videos anymore. To resolve this issue, you need to upgrade your version of Microsoft Office to 2013 or later.
2. Why Can’t I Embed YouTube Videos in PowerPoint for Mac?
You can insert YouTube videos only in Office 365 and Office 2019 versions for Mac. If you are using Office 2016 for Mac, you are required to install an add-in called Web Video Player that can be downloaded from the https://appsource.microsoft.com/en-us/product/office/WA104221182 link. However, if it is PowerPoint 2011 for Mac that you are using, you can’t insert YouTube video to it, and you need to upgrade your MS Office to a higher version for that purpose.
3. Why Can’t I Embed a YouTube Video in PowerPoint 2013?
The version of PowerPoint 2013 that was released initially didn’t allow YouTube video embedding. However, with an update 4018374 that Microsoft rolled out in August 2018, the feature got enabled. You can download and install the update from https://support.microsoft.com/en-us/help/4018374/august-7-2018-update-for-powerpoint-2013-kb4018374 link, and then try inserting a YouTube video to your version of PowerPoint.
4. How Do I Embed a YouTube Video in PowerPoint without Being Online?
YouTube videos that you embed to your PowerPoint presentations can’t be played in offline mode. However, there is a workaround to this. You can download the video from YouTube to your computer using any YouTube downloader, and then use the process explained in Method 4 to insert the clip from your PC.
Conclusion
Although the above sections explain how to embed a YouTube video in PowerPoint, the process to do so may vary in different versions of Microsoft Office. Also, depending on what edition of the program you are using, embedding YouTube videos may or may not be supported according to the availability of the add-ins or updates that Microsoft has rolled out for that particular built of the app.
Richard Bennett
Richard Bennett is a writer and a lover of all things video.
Follow @Richard Bennett
Creating Compelling Content with Powerful YouTube Titles
How to Use Video Titles and YouTube Tags for More Views?
Richard Bennett
Nov 01, 2022• Proven solutions
In order to make sure that your videos get the appreciation they deserve, you will need to optimize your titles and YouTube tags for more views. By optimizing your titles and tags, I mean using the right keywords so that YouTube knows how to sort your videos and the viewers who are interested in your content can find it.
YouTube videos rank on Google just like any other piece of content, and YouTube itself is a lot of people’s go-to search engine. The success of your YouTube videos will largely depend on your ability to optimize your videos so they are ranked in people’s search results. People can’t fall in love with your videos they never stumble across them.
If you optimize your titles, tags, and descriptions to include relevant keywords you will see much better traffic from Google as well as from YouTube’s search results. Here are some tips:
Find the Best Keywords
One of the most important steps to ensuring SEO success is to identify the keywords that you should be using.
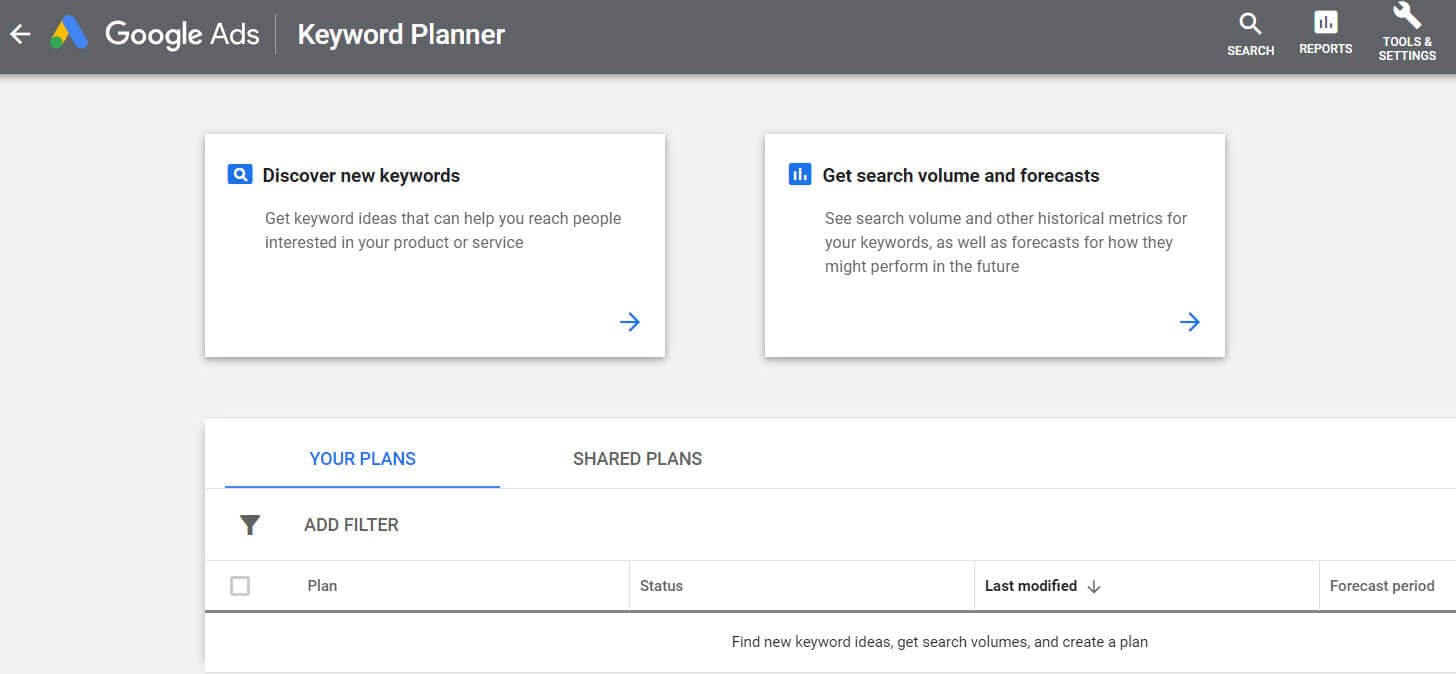
You can use the Google keyword planner to find keywords related to your video’s topic. Input one of your competitors’ video links to detect some of the top searches that were used to find the video. The keyword planner will scan through the top searches for that video link and determine the keywords that are used most often.
The keyword list can be a bit overwhelming the first time. Remember to use keywords that get at least 300 searches per month on Google. Using popular keywords will help you match up against competitors in your niche.
How to Optimize Your Titles, Descriptions, and Tags
Your keyword research will help you craft title, description, and tags of your videos.
How to Optimize YouTube Titles
The ideal YouTube title intrigues the potential viewer, drawing them in and making them want to click the link.
A video title should include your most important keyword. Usually, your most important keyword will be the first word in your title. Great titles are accurate and descriptive, but also exciting and captivating.
You should also consider using general keywords that are popular on Google like “funny video” “Tutorial” “Review” and “Fitness”.
How to Optimize Your Video’s Description
The description of your video is the next big important challenge. The text description of your video is how Google and other search engines determine the subject matter of your video for ranking.
Some tips for success with your description include; using 2-3 important keywords in the first 25 words and making each YouTube description more than 250 words.
Your ideal description will help to index your video without over-utilizing keywords and being flagged as spam.
How to Optimize YouTube Tags
Tags will help decide which videos your video will be displayed beside as similar content and which searches it will appear in.
By using targeted and optimized tags you can gain more traffic and views. Some of the top rules that you should consider with tags are; using 8-12 in every video and making sure the top keyword you used in your title is included as a tag.
Tags on previous videos can also be rearranged and edited as you do keyword research. This will help improve the ranking of some of your older videos. If you all the tags you usually use to a notepad or text edit file and separate them with commas you can paste them all back into YouTube in the new order. This is the simplest way to mass edit tags.
Click here for more tips about YouTube search optimization.
These tips will help you optimize your YouTube tags for more views, as well as your other YouTube metadata.
Richard Bennett
Richard Bennett is a writer and a lover of all things video.
Follow @Richard Bennett
Richard Bennett
Nov 01, 2022• Proven solutions
In order to make sure that your videos get the appreciation they deserve, you will need to optimize your titles and YouTube tags for more views. By optimizing your titles and tags, I mean using the right keywords so that YouTube knows how to sort your videos and the viewers who are interested in your content can find it.
YouTube videos rank on Google just like any other piece of content, and YouTube itself is a lot of people’s go-to search engine. The success of your YouTube videos will largely depend on your ability to optimize your videos so they are ranked in people’s search results. People can’t fall in love with your videos they never stumble across them.
If you optimize your titles, tags, and descriptions to include relevant keywords you will see much better traffic from Google as well as from YouTube’s search results. Here are some tips:
Find the Best Keywords
One of the most important steps to ensuring SEO success is to identify the keywords that you should be using.
You can use the Google keyword planner to find keywords related to your video’s topic. Input one of your competitors’ video links to detect some of the top searches that were used to find the video. The keyword planner will scan through the top searches for that video link and determine the keywords that are used most often.
The keyword list can be a bit overwhelming the first time. Remember to use keywords that get at least 300 searches per month on Google. Using popular keywords will help you match up against competitors in your niche.
How to Optimize Your Titles, Descriptions, and Tags
Your keyword research will help you craft title, description, and tags of your videos.
How to Optimize YouTube Titles
The ideal YouTube title intrigues the potential viewer, drawing them in and making them want to click the link.
A video title should include your most important keyword. Usually, your most important keyword will be the first word in your title. Great titles are accurate and descriptive, but also exciting and captivating.
You should also consider using general keywords that are popular on Google like “funny video” “Tutorial” “Review” and “Fitness”.
How to Optimize Your Video’s Description
The description of your video is the next big important challenge. The text description of your video is how Google and other search engines determine the subject matter of your video for ranking.
Some tips for success with your description include; using 2-3 important keywords in the first 25 words and making each YouTube description more than 250 words.
Your ideal description will help to index your video without over-utilizing keywords and being flagged as spam.
How to Optimize YouTube Tags
Tags will help decide which videos your video will be displayed beside as similar content and which searches it will appear in.
By using targeted and optimized tags you can gain more traffic and views. Some of the top rules that you should consider with tags are; using 8-12 in every video and making sure the top keyword you used in your title is included as a tag.
Tags on previous videos can also be rearranged and edited as you do keyword research. This will help improve the ranking of some of your older videos. If you all the tags you usually use to a notepad or text edit file and separate them with commas you can paste them all back into YouTube in the new order. This is the simplest way to mass edit tags.
Click here for more tips about YouTube search optimization.
These tips will help you optimize your YouTube tags for more views, as well as your other YouTube metadata.
Richard Bennett
Richard Bennett is a writer and a lover of all things video.
Follow @Richard Bennett
- Title: "2024 Approved The Art of Video Integration YouTube Meets Microsoft PowerPoint"
- Author: Thomas
- Created at : 2024-05-31 12:42:37
- Updated at : 2024-06-01 12:42:37
- Link: https://youtube-help.techidaily.com/2024-approved-the-art-of-video-integration-youtube-meets-microsoft-powerpoint/
- License: This work is licensed under CC BY-NC-SA 4.0.
