
:max_bytes(150000):strip_icc():format(webp)/samsungvoiceassistant-1c59910bc4614b2a8531fc5b7a754e7d.jpg)
"2024 Approved The Ultimate List Innovative Youtube Channel Titles For Blogging & Filming (No More than 156 Characters)"
The Ultimate List: Innovative Youtube Channel Titles For Blogging & Filming (No More than 156 Characters)
50+ Youtube Channel Names for Vloggers [100% New]

Richard Bennett
Mar 27, 2024• Proven solutions


Want to make a lasting impression on your YouTube fans? Have a great name! One of the vital decisions you have to take while beginning your vlog channel is selecting a vlog channel name. Believe it or not, your vlog channel name can impact the channel’s success, so choosing the ideal one is essential. If you’re unsure of how to have the best vlog channel names or are just looking for channel rebranding, you’ve come to the right place!
Here, we’ve 50+ lists of the best YouTube channel names for vloggers, along with sections discussing how you can select the ideal one plus their importance for the channel’s growth.
- Part 1: Why are Vlog Channel Names Important?
- Part 2: What to Consider Before Picking YouTube channel names for Vloggers?
- Part 3: 50+ Vlog Channel Names Ideas in 2021
- Part 4: Top 5 Free Vlog Channel Name Generators in 2021
- Part 5: Versatile YouTube Vlogs Editor
Part 1: Why are Vlog Channel Names Important?
Your Channel Name appears on your channel page, videos, and in YouTube’s search results.
Just like a boring title, a generic vlog channel name will not last in the viewer’s memory, precisely when there’s so much competition vying for their YouTube engagement and attention. However, using attention-grabbing, punchy words can make for an entertaining YouTube channel name for vloggers. Remember, if your YouTube channel becomes successful, this will be the name that everyone knows you.
Part 2: What to Consider Before Picking YouTube channel names for Vloggers?
Selecting a vlog channel name might not be simple as it seems. There are multiple options out there, so how will you know if you’ve chosen the right one?
To help you decide better, we’ve designed a step-by-step guide that shows you exactly how to develop some excellent vlog channel name ideas.
Step 1: Consider the Image You Want to Portray
Vlog channel names often highlight the brand or person on the other end. While not the case for all, you will notice how many define their overall objective or mission. This can be ideal to begin when thinking of new Youtube channel names for vloggers. Don’t pretend to be someone you’re not when you select your vlog channel name.
It’s pretty vital that you, the channel owner, portray a message or an image that feels natural and provides your audience with an opportunity for best relation and recognition.
Step 2: Stay Consistent with Your YouTube Niche
The name you select must also reflect the niche upon which you based your channel. If you have a new channel, it can be hard to compete with more prominent vlog channels that cover important content topics. That’s why you should try to be particular and become the best at designing topics for the subject you’ve selected.
While you may get required exposure with a random name to grow your channel, it’s better, to begin with, something focal to the point.
Step 3: Get a Feel for Your Target Audience
Your target audience could be a huge factor in selecting the best name for a vlogging channel. Also, consider other vlog channels in the niche you’ve chosen and read through their video comments. Search out what your audience likes and vice versa. A precise scenario of your audience’s interests will allow you to choose the best name for a vlogging channel.
Step 4: Keep Your Channel Name Short
A YouTube channel name, or username, is max up to 60 characters, but generally, you get nowhere near that! Long channel names are not essential and can also be confusing to the viewers. They can also be tough to replicate or spell while searching. A concise, short username for your YouTube vlog channel can also give you the image of having more authority.
Step 5: Make Your Channel Name Memorable
Remember, if your YouTube vlog channel namebecomes excellent, this will be the name that everyone knows you by. It will be there with your videos, your playlists, and thumbnails. You don’t want a bad image that drags you downwards, but add creative writing tools like word plays, abbreviations, sibilance, alliteration, and puns to increase memorability.
Part 3: 50+ Vlog Channel Names Ideas in 2022
Strictly Cyber
Top Song Critic
Hashtag Hits
All Things Sports
The Virtual Coach
Game Hub
CyberLife
The Daily Cloud
Inner Sphere
Fashion Channel
Button Smasher
Numb thumbs
Gentle Gamer
Headset Hero
Headset Heaven
Headset Habitat / Home
Headset Hub
Gorgeous Gamer
Avatar auditions
3D Josh
abroad broad
adventures abroad
van life
[country] life
van fan
suitcase suckers
hotel hobbyists
travel treats
transit travel
travel tricks
life (long) lovers
love [name]
lovebirds
hug my husband / housewife / boyfriend / girlfriend
husband at home
cuddle my girlfriend
couples paradise
trouble in paradise
couple productions
couples therapy
in a nutshell
tutorial hero
info nuggets
[name] teaches [topic]
[topic] by [name]
learning [topic]
curiosity satisfied
[topic] academy / school / tutorials / teacher / made easy / explained / for beginners
edu owl
nothing too difficult
Part 4: Top 5 Free Vlog Channel Name Generators in 2022
There are numerous ways to personalizing a cool YouTube vlog channel nameor brainstorm fantastic vlog channel name ideas. Check out some of the most used YouTube name generator tools that got the higher ranking even from professionals.
1.Spinxo

This platform helps users search for cool names as per their characters, descriptions, niche, etc. You can begin the search with universal keywords and a set of specific details. Spinxo also helps YouTubers to manage contests online and grab the best suggestions for vlog names.
Queries Required: They can be raised based on multiple things you like, such as Niche, Keywords, and Topics.
Ideal for: Those who have few specific directions about the name.
No. of Results: 30 names.
2.Screen Name Generator
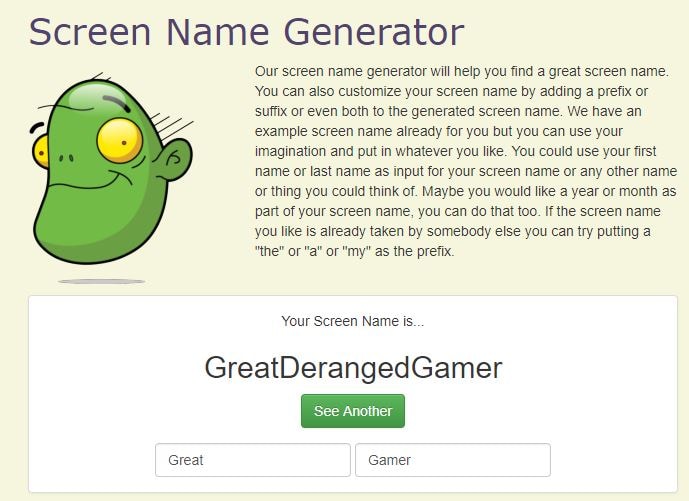
Gamers will admire this YouTube name generator tool that works based on the YouTubers’ provided prefix. It has sections like fantasy name generators, place name generators, username generators, thing names, etc.
Queries Required: It can be with prefix and suffix.
Ideal for: Those who have a specific direction and need for the name.
No. of Results: One name.
3.Username Generator
Username Generator makes it simpler to look for game-specific usernames. Users can put in the keywords and number of lines as their preferences. Then, the software will get you the most appropriate vlog channel names ideas.
Queries Needed: Based on the keywords only.
Best for: those of all genres.
No. of Results: Hundreds of names.
4.Name Generator
This name generator tool also helps people to get the best random combo names where details are pretty particular to content related to your entered works like “vids,” “director,” “TV,” “channel,” etc. Every time you tap the Generate tab provided, it will offer you the most random names.
Queries Required: Based on Prefix and Suffix
Ideal for: Those who have particular directions with the name.
No. of Results: 1
5.Scratch
With this software, you can get the best names for vlogging channels with caps specifications that look awesome. You can select game highlights for your channel name. And, one can also prefer to put several words into the list to get finer results.
Queries Needed: Works with keywords only.
Best for: Those of all genres.
No. of Results: One name.
Part 5: Versatile YouTube Vlogs Editor
After you have decided to develop your YouTube vlog channel, the first thing you’ll look for is premium-looking video editing. And, here, we recommend using Filmora9 to edit YouTube vlogs easily.
You can use Filmora to make YouTube vlogs with built-in royalty-free audio. The software also can help you create fantastic YouTube intros. It consists of 500 plus templates, text resources, and transition effects.
Filmora is the ideal editing tool to make a green screen and split-screen video for YouTubers. Free Download it now to watch if it’s the best for you!
Conclusion
So, now, do you think you got some cool YouTube channel names for vloggers? Share your feedback towards the end of the blog, and let us know if you’ve ever used a free YouTube name generator!
Richard Bennett
Richard Bennett is a writer and a lover of all things video.
Follow @Richard Bennett
Richard Bennett
Mar 27, 2024• Proven solutions
Want to make a lasting impression on your YouTube fans? Have a great name! One of the vital decisions you have to take while beginning your vlog channel is selecting a vlog channel name. Believe it or not, your vlog channel name can impact the channel’s success, so choosing the ideal one is essential. If you’re unsure of how to have the best vlog channel names or are just looking for channel rebranding, you’ve come to the right place!
Here, we’ve 50+ lists of the best YouTube channel names for vloggers, along with sections discussing how you can select the ideal one plus their importance for the channel’s growth.
- Part 1: Why are Vlog Channel Names Important?
- Part 2: What to Consider Before Picking YouTube channel names for Vloggers?
- Part 3: 50+ Vlog Channel Names Ideas in 2021
- Part 4: Top 5 Free Vlog Channel Name Generators in 2021
- Part 5: Versatile YouTube Vlogs Editor
Part 1: Why are Vlog Channel Names Important?
Your Channel Name appears on your channel page, videos, and in YouTube’s search results.
Just like a boring title, a generic vlog channel name will not last in the viewer’s memory, precisely when there’s so much competition vying for their YouTube engagement and attention. However, using attention-grabbing, punchy words can make for an entertaining YouTube channel name for vloggers. Remember, if your YouTube channel becomes successful, this will be the name that everyone knows you.
Part 2: What to Consider Before Picking YouTube channel names for Vloggers?
Selecting a vlog channel name might not be simple as it seems. There are multiple options out there, so how will you know if you’ve chosen the right one?
To help you decide better, we’ve designed a step-by-step guide that shows you exactly how to develop some excellent vlog channel name ideas.
Step 1: Consider the Image You Want to Portray
Vlog channel names often highlight the brand or person on the other end. While not the case for all, you will notice how many define their overall objective or mission. This can be ideal to begin when thinking of new Youtube channel names for vloggers. Don’t pretend to be someone you’re not when you select your vlog channel name.
It’s pretty vital that you, the channel owner, portray a message or an image that feels natural and provides your audience with an opportunity for best relation and recognition.
Step 2: Stay Consistent with Your YouTube Niche
The name you select must also reflect the niche upon which you based your channel. If you have a new channel, it can be hard to compete with more prominent vlog channels that cover important content topics. That’s why you should try to be particular and become the best at designing topics for the subject you’ve selected.
While you may get required exposure with a random name to grow your channel, it’s better, to begin with, something focal to the point.
Step 3: Get a Feel for Your Target Audience
Your target audience could be a huge factor in selecting the best name for a vlogging channel. Also, consider other vlog channels in the niche you’ve chosen and read through their video comments. Search out what your audience likes and vice versa. A precise scenario of your audience’s interests will allow you to choose the best name for a vlogging channel.
Step 4: Keep Your Channel Name Short
A YouTube channel name, or username, is max up to 60 characters, but generally, you get nowhere near that! Long channel names are not essential and can also be confusing to the viewers. They can also be tough to replicate or spell while searching. A concise, short username for your YouTube vlog channel can also give you the image of having more authority.
Step 5: Make Your Channel Name Memorable
Remember, if your YouTube vlog channel namebecomes excellent, this will be the name that everyone knows you by. It will be there with your videos, your playlists, and thumbnails. You don’t want a bad image that drags you downwards, but add creative writing tools like word plays, abbreviations, sibilance, alliteration, and puns to increase memorability.
Part 3: 50+ Vlog Channel Names Ideas in 2022
Strictly Cyber
Top Song Critic
Hashtag Hits
All Things Sports
The Virtual Coach
Game Hub
CyberLife
The Daily Cloud
Inner Sphere
Fashion Channel
Button Smasher
Numb thumbs
Gentle Gamer
Headset Hero
Headset Heaven
Headset Habitat / Home
Headset Hub
Gorgeous Gamer
Avatar auditions
3D Josh
abroad broad
adventures abroad
van life
[country] life
van fan
suitcase suckers
hotel hobbyists
travel treats
transit travel
travel tricks
life (long) lovers
love [name]
lovebirds
hug my husband / housewife / boyfriend / girlfriend
husband at home
cuddle my girlfriend
couples paradise
trouble in paradise
couple productions
couples therapy
in a nutshell
tutorial hero
info nuggets
[name] teaches [topic]
[topic] by [name]
learning [topic]
curiosity satisfied
[topic] academy / school / tutorials / teacher / made easy / explained / for beginners
edu owl
nothing too difficult
Part 4: Top 5 Free Vlog Channel Name Generators in 2022
There are numerous ways to personalizing a cool YouTube vlog channel nameor brainstorm fantastic vlog channel name ideas. Check out some of the most used YouTube name generator tools that got the higher ranking even from professionals.
1.Spinxo
This platform helps users search for cool names as per their characters, descriptions, niche, etc. You can begin the search with universal keywords and a set of specific details. Spinxo also helps YouTubers to manage contests online and grab the best suggestions for vlog names.
Queries Required: They can be raised based on multiple things you like, such as Niche, Keywords, and Topics.
Ideal for: Those who have few specific directions about the name.
No. of Results: 30 names.
2.Screen Name Generator
Gamers will admire this YouTube name generator tool that works based on the YouTubers’ provided prefix. It has sections like fantasy name generators, place name generators, username generators, thing names, etc.
Queries Required: It can be with prefix and suffix.
Ideal for: Those who have a specific direction and need for the name.
No. of Results: One name.
3.Username Generator
Username Generator makes it simpler to look for game-specific usernames. Users can put in the keywords and number of lines as their preferences. Then, the software will get you the most appropriate vlog channel names ideas.
Queries Needed: Based on the keywords only.
Best for: those of all genres.
No. of Results: Hundreds of names.
4.Name Generator
This name generator tool also helps people to get the best random combo names where details are pretty particular to content related to your entered works like “vids,” “director,” “TV,” “channel,” etc. Every time you tap the Generate tab provided, it will offer you the most random names.
Queries Required: Based on Prefix and Suffix
Ideal for: Those who have particular directions with the name.
No. of Results: 1
5.Scratch
With this software, you can get the best names for vlogging channels with caps specifications that look awesome. You can select game highlights for your channel name. And, one can also prefer to put several words into the list to get finer results.
Queries Needed: Works with keywords only.
Best for: Those of all genres.
No. of Results: One name.
Part 5: Versatile YouTube Vlogs Editor
After you have decided to develop your YouTube vlog channel, the first thing you’ll look for is premium-looking video editing. And, here, we recommend using Filmora9 to edit YouTube vlogs easily.
You can use Filmora to make YouTube vlogs with built-in royalty-free audio. The software also can help you create fantastic YouTube intros. It consists of 500 plus templates, text resources, and transition effects.
Filmora is the ideal editing tool to make a green screen and split-screen video for YouTubers. Free Download it now to watch if it’s the best for you!
Conclusion
So, now, do you think you got some cool YouTube channel names for vloggers? Share your feedback towards the end of the blog, and let us know if you’ve ever used a free YouTube name generator!
Richard Bennett
Richard Bennett is a writer and a lover of all things video.
Follow @Richard Bennett
Expert Video Upload Techniques for YouTube via Premiere
How Do I Use Adobe Premiere To Upload YouTube Videos?

Benjamin Arango
Mar 27, 2024• Proven solutions
Whilst getting the editing and post work just right on any project is what we all aim for, the ultimate aim is for other people to see our creations, and the most popular way to achieve that is YouTube . Chances are, if you are producing video, you will be putting some of it on YouTube at some point, so let’s have a look at the most efficient way to get your work from Premiere to YouTube.
Check if your computer meet the Premiere System Requirements >>
This is a basic tutorial about Adobe Premiere, professional video editing software. However, if video editing is new to you, consider Wondershare Filmora , which is a powerful but easy-to-use tool for users just starting out. Download the free trial version below.
Download Mac Version ](https://tools.techidaily.com/wondershare/filmora/download/ )
How Do I Use Adobe Premiere To Upload YouTube Videos
1. Master Copy
Before exporting your work, it is important to first create a master copy of your project that is ‘as is’, in that it reflects the settings and codecs used in the original footage.
To do this you simply select the sequence within the Timeline or in the Project Panel, and go through the menu tree via File > Export > Media to bring up the export dialogue.

To create your Master Copy, simply select the first option of ‘Match Sequence Settings’, this exports a file that is of the same quality as your original footage, essentially producing a digital copy of the work for archiving before anything else is done.
With you work safe and secure it is now time to look at ensuring the project is suitable for YouTube. With our sequence selected in the Timeline or Project Panel again, we go through the same File > Export > Media path to bring up the media export dialogue as before.
2. Container
The first option we have to consider is the file format that our finished video needs to be in. Here you should refer to YouTube for its guidelines, whilst they do accept a number of file formats, digging through the YouTube help system to find the settings for highest quality we find that they recommend MPEG4 as the container, using the codec.

We can also see further recommended settings in this screenshot that will be covered later.
The good news is that Premiere automatically selects the appropriate container for us when we select our codec, however it is worth knowing the file type YouTube is expecting just to check yourself.
3. Video Codec
So having established that YouTube recommends the MPEG4 container using the codec, the first option we need to look for in the media export dialogue is to select the appropriate Format.
This is the first drop down in the dialogue box, and in this case we simply select from the list.

Once you select you can check the ‘output name’ field and see that premiere is automatically set the output file to .mp4 which is exactly what we need.
4. Preset
The next field we come to is the ‘Preset’ dropdown menu. This is a major help to most people, as Adobe have very kindly included large numbers of presets to quickly adapt video settings to suit specific uses. They vary depending on the exact version of Premiere you are using, and each format type does have its own list of presets, as we can see has a large number for YouTube, but also has many presets for specific devices (presets for iPad, Kindle, Nook, various other tablets and phones, Vimeo and a host of others) to make getting the right settings that bit easier for us.

It is important here to select the correct preset from the various YouTube options. You want to select the resolution and frame rate that match your source file, for the best results. So, if your source file is 1080p with a frame rate of 29.97 fps then that is the YouTube setting you would select.
Once a preset is selected a summary of the settings is displayed below, normally these will be well suited to your project, however you can fine tune anything you wish by selecting the video or audio tabs at the bottom which give you the chance to adjust each parameter individually. If you do this, you can save these changes as a custom preset by clicking the button at the side of the Preset dropdown menu and simply use it on later projects by selecting it from the list the same as any other, a great time saving tool.

5. Rendering
Once you are satisfied with the settings, either from the Preset alone or if you have adjusted anything yourself, you are nearly ready to render the file and export it.
For YouTube it is recommended you select the ‘Use Maximum Render Quality’ option to maintain the best output you can, it does add time to the render process but if you value the quality of your work it is worthwhile.
Finally you can choose a suitable filename and the destination of the file by clicking on the ‘Output Name’ field.
I normally use a filename that includes the destination medium so I can differentiate between different versions of a project and know which one to upload where, in this case I include ‘youtube’, but if I were planning on uploading clips of the project to vimeo as well for instance there may be a cut of the project with ‘vimeo’ in the name too. The destination is personal preference, because I do use filenames to differentiate versions I can put the various iterations into a single project file, others have folder structures for each type of file , so all YouTube output goes into a single folder and so on, how you organize is entirely dependent on how you work.

Once those are selected clicking ‘Export’ starts the rendering process, and eventually (how long depends on the speed of your computer and the size and type of file involved), you will end up with your YouTube optimized video in the location you chose.
Here I created 4 key frames that let the ‘Animation’ object move around the ‘Demo Text’ Object and finally come to rest below it. Whilst this type of effect does look very effective on screen, such is the ease of use of After Effects it really is just a few minutes work to achieve.
Learn more details about How to add text in Premiere >>
6. Uploading
Now you have your file, the next step is to go to your YouTube account and log in if you need to.
On the top of your homepage on the right is the upload button, selecting that brings up the select file menu as below.

You can either drag your file into the window or click on it to open a standard file browser to locate the desired file, click and the upload will begin. The dropdown underneath allows you to set the video as Public, Unlisted or Private. You can change this at any time once the video is uploaded as well.
This opens the upload progress window, where you can add in a name, description and tags as well as add the video to a playlist or adjust the privacy settings as the video is uploading.

Once the upload as finished, you can do final adjustments to settings and choose a thumbnail for the video. The final step is to click the ‘Publish’ button and your video will be processed and go live.
Benjamin Arango
Benjamin Arango is a writer and a lover of all things video.
Follow @Benjamin Arango
Benjamin Arango
Mar 27, 2024• Proven solutions
Whilst getting the editing and post work just right on any project is what we all aim for, the ultimate aim is for other people to see our creations, and the most popular way to achieve that is YouTube . Chances are, if you are producing video, you will be putting some of it on YouTube at some point, so let’s have a look at the most efficient way to get your work from Premiere to YouTube.
Check if your computer meet the Premiere System Requirements >>
This is a basic tutorial about Adobe Premiere, professional video editing software. However, if video editing is new to you, consider Wondershare Filmora , which is a powerful but easy-to-use tool for users just starting out. Download the free trial version below.
Download Mac Version ](https://tools.techidaily.com/wondershare/filmora/download/ )
How Do I Use Adobe Premiere To Upload YouTube Videos
1. Master Copy
Before exporting your work, it is important to first create a master copy of your project that is ‘as is’, in that it reflects the settings and codecs used in the original footage.
To do this you simply select the sequence within the Timeline or in the Project Panel, and go through the menu tree via File > Export > Media to bring up the export dialogue.
To create your Master Copy, simply select the first option of ‘Match Sequence Settings’, this exports a file that is of the same quality as your original footage, essentially producing a digital copy of the work for archiving before anything else is done.
With you work safe and secure it is now time to look at ensuring the project is suitable for YouTube. With our sequence selected in the Timeline or Project Panel again, we go through the same File > Export > Media path to bring up the media export dialogue as before.
2. Container
The first option we have to consider is the file format that our finished video needs to be in. Here you should refer to YouTube for its guidelines, whilst they do accept a number of file formats, digging through the YouTube help system to find the settings for highest quality we find that they recommend MPEG4 as the container, using the codec.
We can also see further recommended settings in this screenshot that will be covered later.
The good news is that Premiere automatically selects the appropriate container for us when we select our codec, however it is worth knowing the file type YouTube is expecting just to check yourself.
3. Video Codec
So having established that YouTube recommends the MPEG4 container using the codec, the first option we need to look for in the media export dialogue is to select the appropriate Format.
This is the first drop down in the dialogue box, and in this case we simply select from the list.
Once you select you can check the ‘output name’ field and see that premiere is automatically set the output file to .mp4 which is exactly what we need.
4. Preset
The next field we come to is the ‘Preset’ dropdown menu. This is a major help to most people, as Adobe have very kindly included large numbers of presets to quickly adapt video settings to suit specific uses. They vary depending on the exact version of Premiere you are using, and each format type does have its own list of presets, as we can see has a large number for YouTube, but also has many presets for specific devices (presets for iPad, Kindle, Nook, various other tablets and phones, Vimeo and a host of others) to make getting the right settings that bit easier for us.
It is important here to select the correct preset from the various YouTube options. You want to select the resolution and frame rate that match your source file, for the best results. So, if your source file is 1080p with a frame rate of 29.97 fps then that is the YouTube setting you would select.
Once a preset is selected a summary of the settings is displayed below, normally these will be well suited to your project, however you can fine tune anything you wish by selecting the video or audio tabs at the bottom which give you the chance to adjust each parameter individually. If you do this, you can save these changes as a custom preset by clicking the button at the side of the Preset dropdown menu and simply use it on later projects by selecting it from the list the same as any other, a great time saving tool.
5. Rendering
Once you are satisfied with the settings, either from the Preset alone or if you have adjusted anything yourself, you are nearly ready to render the file and export it.
For YouTube it is recommended you select the ‘Use Maximum Render Quality’ option to maintain the best output you can, it does add time to the render process but if you value the quality of your work it is worthwhile.
Finally you can choose a suitable filename and the destination of the file by clicking on the ‘Output Name’ field.
I normally use a filename that includes the destination medium so I can differentiate between different versions of a project and know which one to upload where, in this case I include ‘youtube’, but if I were planning on uploading clips of the project to vimeo as well for instance there may be a cut of the project with ‘vimeo’ in the name too. The destination is personal preference, because I do use filenames to differentiate versions I can put the various iterations into a single project file, others have folder structures for each type of file , so all YouTube output goes into a single folder and so on, how you organize is entirely dependent on how you work.
Once those are selected clicking ‘Export’ starts the rendering process, and eventually (how long depends on the speed of your computer and the size and type of file involved), you will end up with your YouTube optimized video in the location you chose.
Here I created 4 key frames that let the ‘Animation’ object move around the ‘Demo Text’ Object and finally come to rest below it. Whilst this type of effect does look very effective on screen, such is the ease of use of After Effects it really is just a few minutes work to achieve.
Learn more details about How to add text in Premiere >>
6. Uploading
Now you have your file, the next step is to go to your YouTube account and log in if you need to.
On the top of your homepage on the right is the upload button, selecting that brings up the select file menu as below.
You can either drag your file into the window or click on it to open a standard file browser to locate the desired file, click and the upload will begin. The dropdown underneath allows you to set the video as Public, Unlisted or Private. You can change this at any time once the video is uploaded as well.
This opens the upload progress window, where you can add in a name, description and tags as well as add the video to a playlist or adjust the privacy settings as the video is uploading.
Once the upload as finished, you can do final adjustments to settings and choose a thumbnail for the video. The final step is to click the ‘Publish’ button and your video will be processed and go live.
Benjamin Arango
Benjamin Arango is a writer and a lover of all things video.
Follow @Benjamin Arango
- Title: "2024 Approved The Ultimate List Innovative Youtube Channel Titles For Blogging & Filming (No More than 156 Characters)"
- Author: Thomas
- Created at : 2024-05-31 12:38:22
- Updated at : 2024-06-01 12:38:22
- Link: https://youtube-help.techidaily.com/2024-approved-the-ultimate-list-innovative-youtube-channel-titles-for-blogging-and-filming-no-more-than-156-characters/
- License: This work is licensed under CC BY-NC-SA 4.0.
