
"2024 Approved Toddler's Fortune on Screen Young Ryan As Top YouTuber Earner"
Toddler’s Fortune on Screen: Young Ryan As Top YouTuber Earner
If you are curious about Ryan Kaji’s net worth and what led to it, you are at the right place. YouTube as a platform is accessible to a vast global audience, and anyone, regardless of age or lifestyle, can earn high amounts with the right type of content. Ryan Kaji is one such individual who has achieved a lot in his short life with his YouTube channel, Ryan’s World.
Read ahead to get deep knowledge of how much does ryan’s world make, career graph, and how you can emulate a similar path on YouTube.

Part 1: The Biography Box on Ryan Kaji
Before going into this in detail, here is an overall summary of Ryan Kaji and his income structure for a quick look.
| Name | Ryan Kaji |
|---|---|
| Real Name | Ryan Naruto Nguyen |
| Net Worth (as of 2022) | USD 35 million |
| Monthly Income/Salary (approx.) | USD 1.11 million |
| Yearly Income (approx.) | USD 16.66 million |
| Age | 11 years |
| Gender | Male |
| Height | 1.28 m or 128 cm or 4 ft 2 inches |
| Nationality | Asian-American |
| Profession | YouTuber, Influencer |
| YouTube Channel | Ryan’s World |
| Awards and Recognition | · Ranked No. 23 on Top Creators List, Forbes 2022.· Ryan’s World ranks as one of the top 100 YouTube channels. |
Now that we know the primary data about Ryan, read on to learn about how he became famous on YouTube and his overall income, in more detail.
Part 2: Ryan Kaji YouTube Earning and Stats
After seeing the notes about Ryan’s World’s yearly income and other points, you must wonder how it has increased over the years. To simplify, most of his income comes from YouTube in terms of views and ad revenue, like most YouTubers.
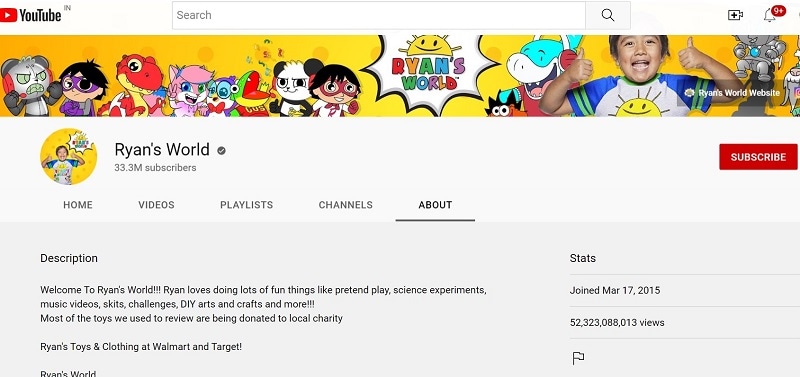
Other than that, his subscriber count also accounts for a portion of what the YouTube algorithm calculates for the income evaluation. Currently, the subscriber counts for the Ryan’s World channel sits at 33.3 million, spread across different age demographics.
To calculate Ryan World net worth in 2020, the jump from 2022, and how it grew since 2015 overall, the ads play a major role. Typically, YouTubers earn around USD 3-7 for every 1000 views. His videos get around 277.59 million views per month. So, the overall count can extend to USD 1.11 million per month.
If he earns higher, like USD 7 for every 1000 views, his annual average can increase reach around USD 29.98 million instead of the estimated USD 16.66 million.
Moreover, YouTubers earn from other sources besides the ads on their videos, so the overall Ryan YouTube income is likely even higher monthly and yearly. These additional sources include affiliate commissions, sponsorships, interviews at other platforms, and product sales/merchandise.

Here is a quantified average of the earning statistics for Ryan’s World income in tabular format.
| Ryan Kaji Ryan’s World Income | |
|---|---|
| Estimated Earnings per Month | USD 1.11 million |
| Estimated Earnings per Year | USD 16.66 million |
| Total Video Uploads (Approx) | 52.323 billion |
| Subscribers | 33.3 million |
| Video Views (on average) | 800,000+ |
| Views for the last 30 days (on average) | 277.59 million |
Ryan Kaji’s Annual Income between 2016-2022
For a better understanding of how much does Ryan ToysReview make, which is the most popular segment in his channel, let’s look at his earning graph over the years.
Here is a bar chart showing the growth in Raji Kaji’s net worth from 2016 to the present.
Since Ryan Kaji started his channel in 2015, he has focused mainly on posting reviews and critiques on toys in videos. His personable characteristics and demeanor, plus the type of content he presented, helped him increase his earnings, raking in USD 11 million in 2016 and 2017.
As he grew in age, his content shifted to fit his interests at 6 years of age, which revolved around DIY science, adding animated co-stars, and doodles. He also started his custom merchandise for the subscribers, had his AdSense revenue, and a proprietary toy line. Therefore, regarding how much money did Ryan ToysReview make in 2018, the channel saw growth to USD 22 million, which further increased to USD 26 million in 2019.
In 2020, he earned around USD 29.5 million and USD 27 million in 2021. The Ryan ToysReview income further grew to USD 35 million in 2022, and it is expected to increase in the upcoming time, especially with his videos raking in millions of views in recent times.
Popularity across social media
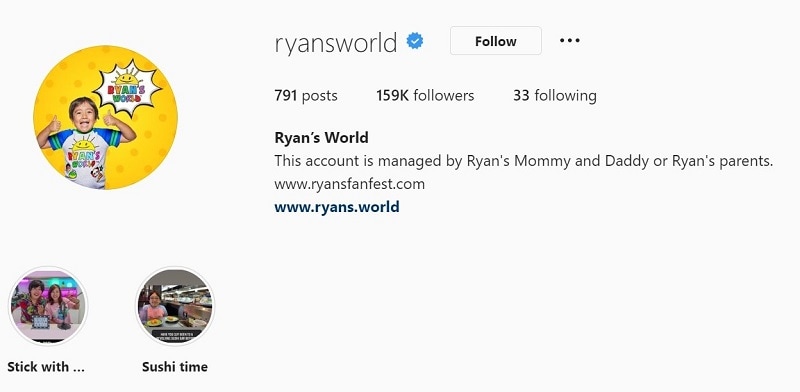
The leading social media platform where Ryan Kaji grew his strength is YouTube, and he currently enjoys a massive fan following. His channel, Ryan’s World, has an overall subscriber base of around 33.3 million YouTube users. These include primarily children as well as other adults, either who enjoy his content or those who watch along with their kids. He also has an Instagram account for his channel with around 159k followers.
Besides that, the total Ryan’s World earnings also come from his other YouTube channels, managed under the company his parents established afterward. These include Ryan ToysReview, The Studio Space, Ryan’s Family Review, EK Doodles, and three more.
All of these channels combined get a substantial overall following base, though there are overlaps between all or some of them. Ryan Kaji also has a television series and video game under the brand, increasing his overall popularity. The series name is “Ryan’s Mystery Playdate” on Nick Jr.
Part 3: Why is Ryan Kaji Trending on YouTube?
The overall view of how much money does Ryan have throughout the years and his social media popularity will surely give you an idea of how he amassed his impressive net worth. However, why exactly is he so popular on the platform when he focuses mainly on kid’s toys instead of other things that appeal to the primarily adult userbase on YouTube?
Charming personality
Ryan has a fun and enthusiastic approach to his videos, showing a bright and adorable personality. This shines through all of his videos, and his excitement translates across the screen to the viewers to captivate their attention well.
Interactive and engaging videos
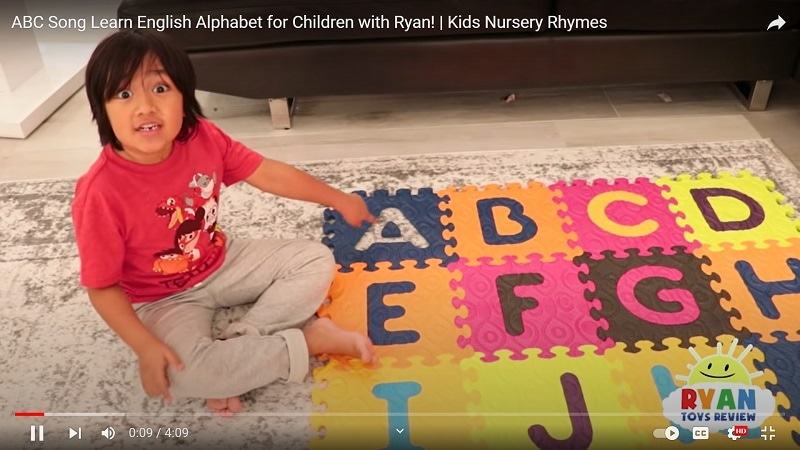
The way the content is presented is engaging, with Ryan speaking to the viewers like friends. That creates a light-hearted environment for his subscribers, who are mostly kids. His videos also include information they learn, like the “ABC Song Learn English Alphabet for Children with Ryan!” video.
High-quality visuals and effects
The videos on the channel are well edited, with bright color scape and high-resolution imagery. The editor also adds fun effects in video, image, and audio format to engage all senses of viewers.
Consistent delivery/updates
The team behind Ryan’s World has the timing of their releases well-planned and relatively consistent with the posting schedule. Subscribers stay engaged since they get the videos they want regularly.
Engaging and eye-catching titles-
The titles of the videos on this channel are framed with the main keywords of what content one can expect. The title card design with effects and other areas where text pop up is properly set.
Top videos on Ryan’s World
To understand these points, you should take a look at his top videos on YouTube. The best videos on Ryan’s World channel include “HUGE EGGS Surprise Toys Challenge with Inflatable Water Slide” with 2 billion views, “Giant Lightning McQueen Egg Surprise with 100+ Disney Cars Toys” with 1.1 billion views, and “ABC Song Learn English Alphabet for Children with Ryan!” with 384 million views.
Video Link: https://www.youtube.com/watch?v=GcmDiyk3NJs
Each video has an engaging title that speaks on the central theme while keeping consistent with his content type, i.e., toys review. Plus, he has visually appealing thumbnails with edited imagery, and his vibrant personality is appealing as well. All in all, he covers all the main points necessary to create engaging content, and that naturally adds to Ryan World salary.

Bonus Tip: How to be a YouTuber and Make Videos like Ryan Kaji
Yes, the quality and presentation of the videos on the channel are one of critical pieces that caused the high Ryan Kaji net worth. If you plan to start your YouTube channel, you should focus on video editing to optimize its quality. In this context, the Filmora software is an excellent tool to use.
Filmora- Why should you use it?
Wondershare Filmora is a high-grade video editing software that allows users to create dynamic, eye-grabbing, and intuitive videos efficiently. You can use the features available in this Mac and Windows-based software to merge, cut, split, and more your video clips into one cohesive project. It is simple to add filters with pre-set FX plugins like Boris FX, among other available options, for a unique video look.
Additionally, you can adjust the coloring of your videos with Color Matching and Color Correction features and add titles/transitions, among others. You can add voiceover and audio effects and adjust the video’s volume, tone, and soundtrack. AI-based features are also available here for quick automated edits (Instant Mode), removing background by focusing on only the subject (AI Portrait), and more.
How to use Filmora to create engaging videos for YouTube?
Free Download For Win 7 or later(64-bit)
Free Download For macOS 10.14 or later
Step1 Download and launch the Filmora software on Mac or Windows PC.
Step2 Tap on New Project > Click here to import media.
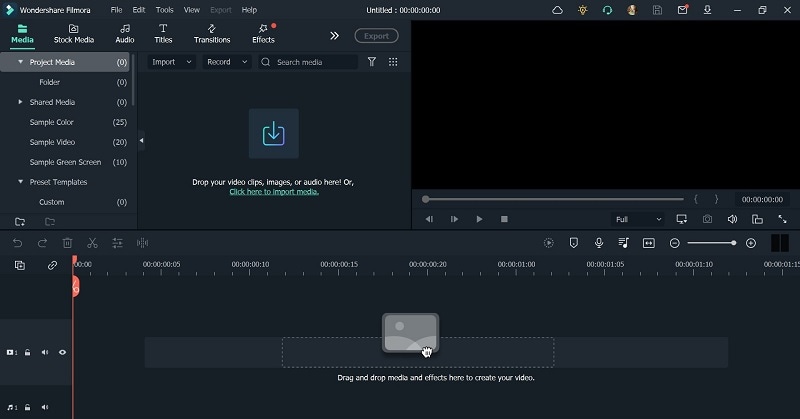
Step3 After choosing the video file or files from your device, drag them to the editor timeline below.
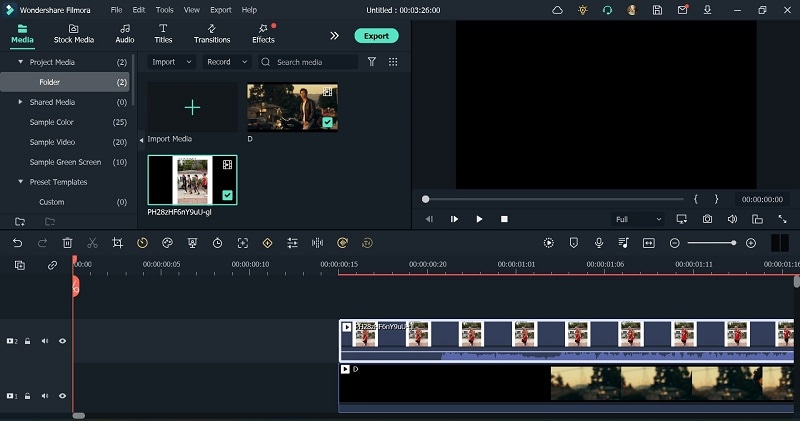
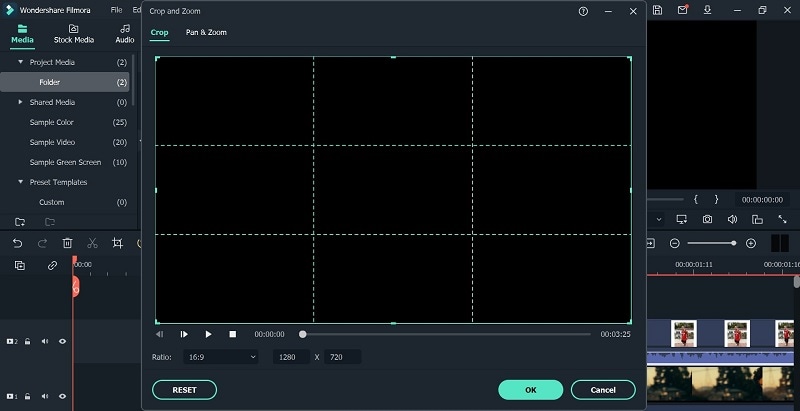
Step4 From the toolbar just above the timeline, click on the standard functions you want to use for editing the video. For example, click on the file and press the Crop icon.
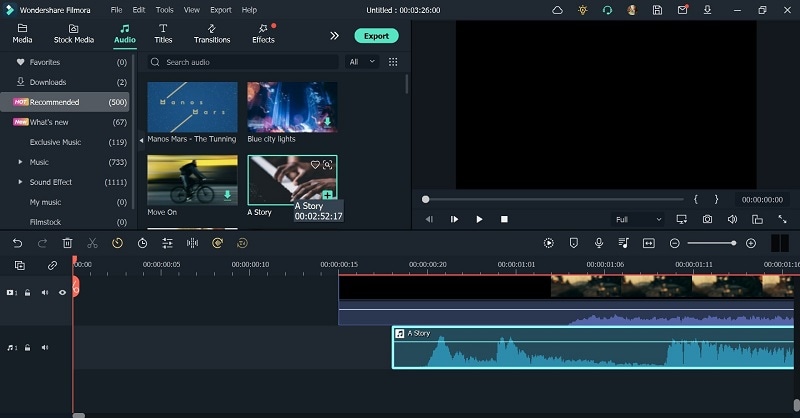
Step5 At the top-most toolbar, you can see many tabs for editing, like Effects, Audio, Titles, etc. Click on them to get the drop-down menu of available effects, audio clips, and more. Add the ones you choose by dragging them to the video on the timeline.
Continue with further editing work using other tools available, like speed adjustment, background removal (chroma key), and more.
Step6 After completing the edits, click the Export button. Choose to download it offline by selecting Local and choosing your preferred format. Make further changes in the settings.
Or, you can directly post the video to your linked YouTube account.
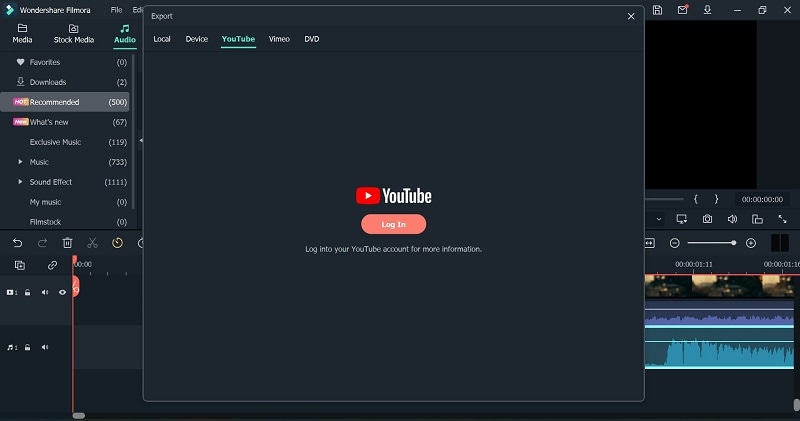
Step7 Tap the Export button.
Final Words
Overall, Ryan Kaji saw great success with his stunning and engaging videos on his YouTube channel over the years. Also, he focused on other ventures, with the support of the team behind his channel, for income and editing work.
But, while starting, your funding will be less. It would help if you handled the video editing work on your own first, with reliable software like Filmora . Also, use other analytics tools and strategies to improve your channel further.
Free Download For Win 7 or later(64-bit)
Free Download For macOS 10.14 or later
Part 1: The Biography Box on Ryan Kaji
Before going into this in detail, here is an overall summary of Ryan Kaji and his income structure for a quick look.
| Name | Ryan Kaji |
|---|---|
| Real Name | Ryan Naruto Nguyen |
| Net Worth (as of 2022) | USD 35 million |
| Monthly Income/Salary (approx.) | USD 1.11 million |
| Yearly Income (approx.) | USD 16.66 million |
| Age | 11 years |
| Gender | Male |
| Height | 1.28 m or 128 cm or 4 ft 2 inches |
| Nationality | Asian-American |
| Profession | YouTuber, Influencer |
| YouTube Channel | Ryan’s World |
| Awards and Recognition | · Ranked No. 23 on Top Creators List, Forbes 2022.· Ryan’s World ranks as one of the top 100 YouTube channels. |
Now that we know the primary data about Ryan, read on to learn about how he became famous on YouTube and his overall income, in more detail.
Part 2: Ryan Kaji YouTube Earning and Stats
After seeing the notes about Ryan’s World’s yearly income and other points, you must wonder how it has increased over the years. To simplify, most of his income comes from YouTube in terms of views and ad revenue, like most YouTubers.
Other than that, his subscriber count also accounts for a portion of what the YouTube algorithm calculates for the income evaluation. Currently, the subscriber counts for the Ryan’s World channel sits at 33.3 million, spread across different age demographics.
To calculate Ryan World net worth in 2020, the jump from 2022, and how it grew since 2015 overall, the ads play a major role. Typically, YouTubers earn around USD 3-7 for every 1000 views. His videos get around 277.59 million views per month. So, the overall count can extend to USD 1.11 million per month.
If he earns higher, like USD 7 for every 1000 views, his annual average can increase reach around USD 29.98 million instead of the estimated USD 16.66 million.
Moreover, YouTubers earn from other sources besides the ads on their videos, so the overall Ryan YouTube income is likely even higher monthly and yearly. These additional sources include affiliate commissions, sponsorships, interviews at other platforms, and product sales/merchandise.
Here is a quantified average of the earning statistics for Ryan’s World income in tabular format.
| Ryan Kaji Ryan’s World Income | |
|---|---|
| Estimated Earnings per Month | USD 1.11 million |
| Estimated Earnings per Year | USD 16.66 million |
| Total Video Uploads (Approx) | 52.323 billion |
| Subscribers | 33.3 million |
| Video Views (on average) | 800,000+ |
| Views for the last 30 days (on average) | 277.59 million |
Ryan Kaji’s Annual Income between 2016-2022
For a better understanding of how much does Ryan ToysReview make, which is the most popular segment in his channel, let’s look at his earning graph over the years.
Here is a bar chart showing the growth in Raji Kaji’s net worth from 2016 to the present.
Since Ryan Kaji started his channel in 2015, he has focused mainly on posting reviews and critiques on toys in videos. His personable characteristics and demeanor, plus the type of content he presented, helped him increase his earnings, raking in USD 11 million in 2016 and 2017.
As he grew in age, his content shifted to fit his interests at 6 years of age, which revolved around DIY science, adding animated co-stars, and doodles. He also started his custom merchandise for the subscribers, had his AdSense revenue, and a proprietary toy line. Therefore, regarding how much money did Ryan ToysReview make in 2018, the channel saw growth to USD 22 million, which further increased to USD 26 million in 2019.
In 2020, he earned around USD 29.5 million and USD 27 million in 2021. The Ryan ToysReview income further grew to USD 35 million in 2022, and it is expected to increase in the upcoming time, especially with his videos raking in millions of views in recent times.
Popularity across social media
The leading social media platform where Ryan Kaji grew his strength is YouTube, and he currently enjoys a massive fan following. His channel, Ryan’s World, has an overall subscriber base of around 33.3 million YouTube users. These include primarily children as well as other adults, either who enjoy his content or those who watch along with their kids. He also has an Instagram account for his channel with around 159k followers.
Besides that, the total Ryan’s World earnings also come from his other YouTube channels, managed under the company his parents established afterward. These include Ryan ToysReview, The Studio Space, Ryan’s Family Review, EK Doodles, and three more.
All of these channels combined get a substantial overall following base, though there are overlaps between all or some of them. Ryan Kaji also has a television series and video game under the brand, increasing his overall popularity. The series name is “Ryan’s Mystery Playdate” on Nick Jr.
Part 3: Why is Ryan Kaji Trending on YouTube?
The overall view of how much money does Ryan have throughout the years and his social media popularity will surely give you an idea of how he amassed his impressive net worth. However, why exactly is he so popular on the platform when he focuses mainly on kid’s toys instead of other things that appeal to the primarily adult userbase on YouTube?
Charming personality
Ryan has a fun and enthusiastic approach to his videos, showing a bright and adorable personality. This shines through all of his videos, and his excitement translates across the screen to the viewers to captivate their attention well.
Interactive and engaging videos
The way the content is presented is engaging, with Ryan speaking to the viewers like friends. That creates a light-hearted environment for his subscribers, who are mostly kids. His videos also include information they learn, like the “ABC Song Learn English Alphabet for Children with Ryan!” video.
High-quality visuals and effects
The videos on the channel are well edited, with bright color scape and high-resolution imagery. The editor also adds fun effects in video, image, and audio format to engage all senses of viewers.
Consistent delivery/updates
The team behind Ryan’s World has the timing of their releases well-planned and relatively consistent with the posting schedule. Subscribers stay engaged since they get the videos they want regularly.
Engaging and eye-catching titles-
The titles of the videos on this channel are framed with the main keywords of what content one can expect. The title card design with effects and other areas where text pop up is properly set.
Top videos on Ryan’s World
To understand these points, you should take a look at his top videos on YouTube. The best videos on Ryan’s World channel include “HUGE EGGS Surprise Toys Challenge with Inflatable Water Slide” with 2 billion views, “Giant Lightning McQueen Egg Surprise with 100+ Disney Cars Toys” with 1.1 billion views, and “ABC Song Learn English Alphabet for Children with Ryan!” with 384 million views.
Video Link: https://www.youtube.com/watch?v=GcmDiyk3NJs
Each video has an engaging title that speaks on the central theme while keeping consistent with his content type, i.e., toys review. Plus, he has visually appealing thumbnails with edited imagery, and his vibrant personality is appealing as well. All in all, he covers all the main points necessary to create engaging content, and that naturally adds to Ryan World salary.
Bonus Tip: How to be a YouTuber and Make Videos like Ryan Kaji
Yes, the quality and presentation of the videos on the channel are one of critical pieces that caused the high Ryan Kaji net worth. If you plan to start your YouTube channel, you should focus on video editing to optimize its quality. In this context, the Filmora software is an excellent tool to use.
Filmora- Why should you use it?
Wondershare Filmora is a high-grade video editing software that allows users to create dynamic, eye-grabbing, and intuitive videos efficiently. You can use the features available in this Mac and Windows-based software to merge, cut, split, and more your video clips into one cohesive project. It is simple to add filters with pre-set FX plugins like Boris FX, among other available options, for a unique video look.
Additionally, you can adjust the coloring of your videos with Color Matching and Color Correction features and add titles/transitions, among others. You can add voiceover and audio effects and adjust the video’s volume, tone, and soundtrack. AI-based features are also available here for quick automated edits (Instant Mode), removing background by focusing on only the subject (AI Portrait), and more.
How to use Filmora to create engaging videos for YouTube?
Free Download For Win 7 or later(64-bit)
Free Download For macOS 10.14 or later
Step1 Download and launch the Filmora software on Mac or Windows PC.
Step2 Tap on New Project > Click here to import media.
Step3 After choosing the video file or files from your device, drag them to the editor timeline below.
Step4 From the toolbar just above the timeline, click on the standard functions you want to use for editing the video. For example, click on the file and press the Crop icon.
Step5 At the top-most toolbar, you can see many tabs for editing, like Effects, Audio, Titles, etc. Click on them to get the drop-down menu of available effects, audio clips, and more. Add the ones you choose by dragging them to the video on the timeline.
Continue with further editing work using other tools available, like speed adjustment, background removal (chroma key), and more.
Step6 After completing the edits, click the Export button. Choose to download it offline by selecting Local and choosing your preferred format. Make further changes in the settings.
Or, you can directly post the video to your linked YouTube account.
Step7 Tap the Export button.
Final Words
Overall, Ryan Kaji saw great success with his stunning and engaging videos on his YouTube channel over the years. Also, he focused on other ventures, with the support of the team behind his channel, for income and editing work.
But, while starting, your funding will be less. It would help if you handled the video editing work on your own first, with reliable software like Filmora . Also, use other analytics tools and strategies to improve your channel further.
Free Download For Win 7 or later(64-bit)
Free Download For macOS 10.14 or later
Quick Refresher: Green Screen Film Tech Basics
The world of video-making owes much of its magic to small leaps of innovation. One of these leaps is the use of the chroma key background, which most people know by the more colloquial term—green screen.

Chroma key, also known as green screen or blue screen, is a cool hack for seamless visual storytelling, allowing content creators to replace backgrounds with any image or video they want. This technique is widely embraced in film, television, and online content, and has opened the door to limitless creative possibilities. Aside from its ability to maximize creativity, it is also cheap to employ and convenient to set up, which has made it a staple for everyone who works with visuals.
In this simple guide, we’ll delve into the fundamentals of the chroma key effect, how it is used for video making, and how to leverage that as you perfect your visual content.
YouTube Video Background Creating realistic video scenes at your will is easy to complete with Filmora green screen removal.
Create Video Backgrounds Create Video Backgrounds Learn Green Screen

How Does Chroma Key Work?

Chroma Keying is done by singling out a specific color (usually green or blue) from the foreground, removing it, and replacing it with a different background (for example, a sunset). This process typically follows a series of steps:
- Background Selection:
A solid, single-color background, often green or blue, that contrasts well with the subject must be used. The color chosen should not be present in the subject or any props in the camera field to avoid unintentional transparency.
- Color Keying:
This requires the use of specialized visual effects software to key out the chosen color. The green or blue background is designated as transparent, making everything of that color see-through. The software distinguishes between the keyed color and the subject, creating a mask for the transparent areas.
- Foreground Filming:
This involves filming the subject against the live chroma key background. During filming, the chosen background color (green or blue) won’t appear in the final result due to its transparency. The subject is captured as if separately from the isolated background.
- Post-Processing:
In post-production processing, the editor takes the keyed-out color and replaces it with the new background of their choice. This step creates the illusion that the subject is in a different setting or environment. The transparent areas become filled with the chosen background which, if done right, results in a cohesive and visually appealing composition.
Why Green?
Theoretically, the chroma key background can be any solid color. However, the most commonly used colors are studio blue and bright green, with the latter far more common.
The choice of background color depends on the specific requirements of the production and the colors present in the scenes being filmed.
Free Download For Win 7 or later(64-bit)
Free Download For macOS 10.14 or later
Contrast
The less similar your chosen background color is to natural skin tones, the easier to isolate and replace in your footage. Bright green provides a strong contrast to most human skin tones and is less likely to be present in costumes or natural surroundings, making it easier to isolate subjects during the color separation.
Luminance
The color green emits light with greater intensity than blue, allowing for far more effective isolation by cameras during filming. This also means that blue screens demand increased lighting for proper exposure compared to green. This situation may be less than ideal if you lack powerful lighting or you don’t have the big bucks for them.
Digital Sensors
Many digital cameras and sensors are more sensitive to green wavelengths, resulting in cleaner and more accurate color keying during post-processing. Modern technology has also evolved to optimize for a green background, making it a more practical choice for the chroma key effect.
Wardrobe and Set Design
Bright green occurs less naturally in costumes and set designs than other colors, making green the optimal choice for reducing the likelihood of color spill and keying issues. However, if you know your scene will have lots of green, it is probably best to film with a blue screen, so there’s less risk of color spill and less post-production work.
Setting up Your Own Chroma Key Studio
Setting up your chroma key is convenient and straightforward, but there are some key factors to consider while setting up to ensure maximal performance.
Choosing the Right Background Color
The first step in the chroma key setup is selecting the right background color to be keyed out. This choice determines your effective color separation and ensures a smooth keying process during editing. Choosing a chroma-key background color that contrasts distinctly with the subject’s colors is essential for effective color separation. This prevents unintentional transparency, color spill, and ensures a polished final result.
Lighting Considerations
Lighting is an important part of the chroma-keying process. Bold, uniform, and consistent lighting on both the subject and the background makes it easy to delineate one from the other fully. This minimizes shadows and variations in color, creating a smooth and seamless keying process. Multiple diffuse lights from different angles are often used to illuminate the green screen evenly.
Positioning/Camera
Proper subject and camera placement are necessary to ensure an even color-keying process during post-production. To prevent shadow interference, the green screen should be smooth, tense, and without wrinkles or shadows.
High-quality cameras are essential every time, especially for chroma keying. Images with better definition are easier to key, so camera quality significantly affects the outcome. Even if your camera isn’t the best, merely shooting well can ensure a clean color-keying process during editing, resulting in professional-looking visuals.
Recording Tips for Chroma Key
- Proper Lighting
Maintaining uniform and well-defined lighting during recording is essential for a successful chroma-keying process. This consistency ensures a seamless keying process during post-production.
- Keep Distance from the Green Screen
The optimal distance between the subject and the green screen minimizes color spill and allows for natural movements. Proper distance between subject and background allows for easier isolation of the background and much smoother post-editing. A recommended starting point for the issue is around 6 to 10 feet from the background.
- Subjects and Clothing
As mentioned before, the choice of costume for Selecting appropriate clothing that doesn’t match the chroma key color prevents transparency issues. Subjects also have to be positioned in such a way that there is minimal light interference and reflection. These contribute to a flawless chroma key outcome.
3 Basic Troubleshooting Strategies
- Color Spill
Sometimes, reflected light from your green background can be cast on your subject and may remain so when the background light is keyed out. This phenomenon is known as a color spill. It is usually because of uneven lighting or shooting around reflecting surfaces. Avoiding spill can differentiate between good and lousy chroma key aftereffects.
Human hair is one area where color spill can show up unsuspectingly. Due to the translucency of hair, it is common for some unintended light to seep through. This allows some background visibility, which you do not want with a chroma key. This is especially notable with lighter hair colors like blond hair.
There are ways to account for this. Many video-editing software have features such as spill suppression and screen matte adjustments that can enhance the final footage. Specialized plugins also go a long way in ensuring minimizing spill. Addressing spill correction tackles unwanted green artifacts and ensures a clean keying process.
- Poor Lighting
Suboptimal green screen lighting can lead to inconsistencies in keying and editing, undermining your product. One way to avoid this is to light the screen and subject separately. Another tip, although expensive, is using multiple diffuse light sources and trying to maintain even lighting across every square foot of your scene. Super bright or dark spots can ruin your output, so it’s worth the extra effort if you don’t want to deal with problematic post-production.
- Poorly Refined Edges
Chroma keying should leave your videos with crisp, defined, natural-looking edges. But post-production editing can make all the difference if it doesn’t come out to your taste. Softening and refining edges make a smoother transition between the foreground object and the new background. Light adjustments to edge thickness and screen matte settings can also help enhance overall visual quality and add finesse to your work.
Conclusion
Green screen photography produces excellent results, and its ease of use makes it indispensable for videographers of all levels. In this guide, we’ve discussed chroma key technology, its role in the industry, and how to apply it to your craft to elevate visual content.
Chroma key, also known as green screen or blue screen, is a cool hack for seamless visual storytelling, allowing content creators to replace backgrounds with any image or video they want. This technique is widely embraced in film, television, and online content, and has opened the door to limitless creative possibilities. Aside from its ability to maximize creativity, it is also cheap to employ and convenient to set up, which has made it a staple for everyone who works with visuals.
In this simple guide, we’ll delve into the fundamentals of the chroma key effect, how it is used for video making, and how to leverage that as you perfect your visual content.
YouTube Video Background Creating realistic video scenes at your will is easy to complete with Filmora green screen removal.
Create Video Backgrounds Create Video Backgrounds Learn Green Screen
How Does Chroma Key Work?
Chroma Keying is done by singling out a specific color (usually green or blue) from the foreground, removing it, and replacing it with a different background (for example, a sunset). This process typically follows a series of steps:
- Background Selection:
A solid, single-color background, often green or blue, that contrasts well with the subject must be used. The color chosen should not be present in the subject or any props in the camera field to avoid unintentional transparency.
- Color Keying:
This requires the use of specialized visual effects software to key out the chosen color. The green or blue background is designated as transparent, making everything of that color see-through. The software distinguishes between the keyed color and the subject, creating a mask for the transparent areas.
- Foreground Filming:
This involves filming the subject against the live chroma key background. During filming, the chosen background color (green or blue) won’t appear in the final result due to its transparency. The subject is captured as if separately from the isolated background.
- Post-Processing:
In post-production processing, the editor takes the keyed-out color and replaces it with the new background of their choice. This step creates the illusion that the subject is in a different setting or environment. The transparent areas become filled with the chosen background which, if done right, results in a cohesive and visually appealing composition.
Why Green?
Theoretically, the chroma key background can be any solid color. However, the most commonly used colors are studio blue and bright green, with the latter far more common.
The choice of background color depends on the specific requirements of the production and the colors present in the scenes being filmed.
Free Download For Win 7 or later(64-bit)
Free Download For macOS 10.14 or later
Contrast
The less similar your chosen background color is to natural skin tones, the easier to isolate and replace in your footage. Bright green provides a strong contrast to most human skin tones and is less likely to be present in costumes or natural surroundings, making it easier to isolate subjects during the color separation.
Luminance
The color green emits light with greater intensity than blue, allowing for far more effective isolation by cameras during filming. This also means that blue screens demand increased lighting for proper exposure compared to green. This situation may be less than ideal if you lack powerful lighting or you don’t have the big bucks for them.
Digital Sensors
Many digital cameras and sensors are more sensitive to green wavelengths, resulting in cleaner and more accurate color keying during post-processing. Modern technology has also evolved to optimize for a green background, making it a more practical choice for the chroma key effect.
Wardrobe and Set Design
Bright green occurs less naturally in costumes and set designs than other colors, making green the optimal choice for reducing the likelihood of color spill and keying issues. However, if you know your scene will have lots of green, it is probably best to film with a blue screen, so there’s less risk of color spill and less post-production work.
Setting up Your Own Chroma Key Studio
Setting up your chroma key is convenient and straightforward, but there are some key factors to consider while setting up to ensure maximal performance.
Choosing the Right Background Color
The first step in the chroma key setup is selecting the right background color to be keyed out. This choice determines your effective color separation and ensures a smooth keying process during editing. Choosing a chroma-key background color that contrasts distinctly with the subject’s colors is essential for effective color separation. This prevents unintentional transparency, color spill, and ensures a polished final result.
Lighting Considerations
Lighting is an important part of the chroma-keying process. Bold, uniform, and consistent lighting on both the subject and the background makes it easy to delineate one from the other fully. This minimizes shadows and variations in color, creating a smooth and seamless keying process. Multiple diffuse lights from different angles are often used to illuminate the green screen evenly.
Positioning/Camera
Proper subject and camera placement are necessary to ensure an even color-keying process during post-production. To prevent shadow interference, the green screen should be smooth, tense, and without wrinkles or shadows.
High-quality cameras are essential every time, especially for chroma keying. Images with better definition are easier to key, so camera quality significantly affects the outcome. Even if your camera isn’t the best, merely shooting well can ensure a clean color-keying process during editing, resulting in professional-looking visuals.
Recording Tips for Chroma Key
- Proper Lighting
Maintaining uniform and well-defined lighting during recording is essential for a successful chroma-keying process. This consistency ensures a seamless keying process during post-production.
- Keep Distance from the Green Screen
The optimal distance between the subject and the green screen minimizes color spill and allows for natural movements. Proper distance between subject and background allows for easier isolation of the background and much smoother post-editing. A recommended starting point for the issue is around 6 to 10 feet from the background.
- Subjects and Clothing
As mentioned before, the choice of costume for Selecting appropriate clothing that doesn’t match the chroma key color prevents transparency issues. Subjects also have to be positioned in such a way that there is minimal light interference and reflection. These contribute to a flawless chroma key outcome.
3 Basic Troubleshooting Strategies
- Color Spill
Sometimes, reflected light from your green background can be cast on your subject and may remain so when the background light is keyed out. This phenomenon is known as a color spill. It is usually because of uneven lighting or shooting around reflecting surfaces. Avoiding spill can differentiate between good and lousy chroma key aftereffects.
Human hair is one area where color spill can show up unsuspectingly. Due to the translucency of hair, it is common for some unintended light to seep through. This allows some background visibility, which you do not want with a chroma key. This is especially notable with lighter hair colors like blond hair.
There are ways to account for this. Many video-editing software have features such as spill suppression and screen matte adjustments that can enhance the final footage. Specialized plugins also go a long way in ensuring minimizing spill. Addressing spill correction tackles unwanted green artifacts and ensures a clean keying process.
- Poor Lighting
Suboptimal green screen lighting can lead to inconsistencies in keying and editing, undermining your product. One way to avoid this is to light the screen and subject separately. Another tip, although expensive, is using multiple diffuse light sources and trying to maintain even lighting across every square foot of your scene. Super bright or dark spots can ruin your output, so it’s worth the extra effort if you don’t want to deal with problematic post-production.
- Poorly Refined Edges
Chroma keying should leave your videos with crisp, defined, natural-looking edges. But post-production editing can make all the difference if it doesn’t come out to your taste. Softening and refining edges make a smoother transition between the foreground object and the new background. Light adjustments to edge thickness and screen matte settings can also help enhance overall visual quality and add finesse to your work.
Conclusion
Green screen photography produces excellent results, and its ease of use makes it indispensable for videographers of all levels. In this guide, we’ve discussed chroma key technology, its role in the industry, and how to apply it to your craft to elevate visual content.
Also read:
- [New] 2024 Approved Secure and Sync Your Cinematic Recordings Across Platforms
- [New] Pocket Playlist Portraits Actors & Audio Art
- [New] Selecting Sounds for Success Top Microphones for Multifacited YouTube Professionals
- [New] Unleashing Full Potential Nikon 1J5 in 4K Videography
- [Updated] 2024 Approved Tailoring Humor with 9GAG Your Personal Meme Making Manual
- 2024 Approved Skyrocket Subscribers and Engagement - Top 12 Video Promotion Tactics
- 2024 Approved Unveiling the Power of YouTube Backlinks for Creators
- Expert Tips for Manually Applying Patches and Updates in Windows 11
- How and Where to Find a Shiny Stone Pokémon For Poco F5 Pro 5G? | Dr.fone
- In 2024, Strategic Backlink Building for Enhanced Online Traction
- PowerToys: The Ultimate Guide to International, In-Depth Mouse Control
- Say Goodbye to Frustrating Response Rates: Correcting Your Windows 11 Keyboard's Sluggishness
- The Little Book for Crystal Lovers | Free Book
- Unlock Vivo S18 Pro Phone Password Without Factory Reset Full Guide Here
- Title: 2024 Approved Toddler's Fortune on Screen Young Ryan As Top YouTuber Earner
- Author: Thomas
- Created at : 2024-12-04 04:04:12
- Updated at : 2024-12-10 05:12:05
- Link: https://youtube-help.techidaily.com/2024-approved-toddlers-fortune-on-screen-young-ryan-as-top-youtuber-earner/
- License: This work is licensed under CC BY-NC-SA 4.0.