
:max_bytes(150000):strip_icc()/GettyImages-1407509890-920de041a49448b4970783337d3d00ff.jpg)
"2024 Approved Top Screen Recorders for Live Broadcasts on YouTube"
Top Screen Recorders for Live Broadcasts on YouTube
Best YouTube Livestreaming Screen Recorders

Richard Bennett
Oct 26, 2023• Proven solutions
The global pandemic has changed the way we live for the time being, and right now, we cannot attend events in the same way we did at the beginning of the year.
A growing number of cultural organizations, businesses, and influential YouTubers are turning towards YouTube’s Live feature because it provides a simple way of broadcasting different types of content in real-time. YouTube Live is by no means a new option, since the platform first introduced live streaming features in 2008, and some twelve years later, the feature has never been more popular.
However, the live streams you broadcast on YouTube are stored for just a brief period of time, which means you have to search for alternative methods of saving them. That’s why in this article we are going to take you through the best YouTube Live screen recorders you can use to capture the video content you are sharing with your followers.
Note: We resolutely oppose all forms of copyright-infringing downloads. This tutorial is only for downloading YouTube videos/audio materials from your own channel.
Top 10+ YouTube Live Screen Recorders
The maximum resolution in which you can record computer screen , audio recording options, or customization of the recording area are some of the most important features you need to consider while choosing a YouTube Live screen recorder.
We have selected some of the best YouTube Live screen recorders that enable you to do much more than just record live streams. So, let’s take a look at what they have to offer.
1. OBS Studio
Price: Free
Compatibility: Windows, Linux, macOS
The vast majority of live streams you can find on Twitch and YouTube are made with OBS Studio, but besides broadcasting videos, the software also gives you access to screencasting tools. This means that you can specify the area of the screen you want to record, choose the recording’s resolution and frame rate, or adjust the audio recording options.
OBS Studio is the best free, open-source screen recording program you can download. You shouldn’t use a software just because it’s free, but OBS Studio is also an extremely versatile tool. You can both record and stream in high definition and it comes with the ability to record either through your webcam or through your screen. It records directly through the graphics card , which means it can capture games even when in full-screen mode whereas a lot of other screen-recording software forces you to play games in windowed mode. The high quality can be seen easily in whatever you choose to broadcast.
OBS Studio allows you to record videos from a variety of sources, which makes it a perfect option for capturing the content you share through YouTube Live since you can select a browser window you want to capture in just a few clicks. What’s more, this open-source software is equipped with basic video editing tools, which enables you to preview the video you recorded before publishing it, apply transitions between cuts, or perform basic color correction.
Check the detailed guide to How to Record with OBS .
2. XSplit
Price: $24.95 for a three-month license
Compatibility: Windows
This is yet another broadcasting software that is equipped with powerful screen recording tools. Setting up a new screencasting session with XSplit is a simple and intuitive process that is not going to take much more than a few moments of your time.
All you need to do is define a workspace, then pick the preferred resolution and frame rate. The software allows you to capture screens in 4K resolution and at 60 fps, but it also offers a variety of resolution and frame rate options so that you can choose the one that best fits your needs. Furthermore, you can record the computer audio, which enables you to capture the live stream’s audio in excellent quality. Besides YouTube Live, XSplit can be used with Zoom , Skype, Google Hangouts, and numerous other live streaming and video calling apps.
3. Filmora
Price: Free, pricing plans start at $49.99/year
Compatibility: macOS, Windows


If you are looking for a screen recorder that is stacked with powerful video editing features, then Filmora is a great option for you. Customizing a YouTube Live or any other screencasting session with this video editing software is easy, and you can choose the resolution, frame rate, or even if you want to show mouse clicks in the recording.
Capturing the webcam feed and the computer’s screen simultaneously is also an option, while you can also decide whether or not you want to record audio from a microphone, computer audio, or both at the same time.
What’s more Filmora lets you set up the maximum duration of a screen recording and you start, pause, resume or stop a screen recording session by using hotkeys. Once you are done recording the live stream you shared on YouTube, you can edit the footage you created before uploading it to your YouTube channel.
4. Wondershare DemoCreator
Compatibility: Windows
Price: Start from $9.99
DemoCreator is a recorder that focuses its overall user experience. It is able to easily record high-quality videos at up to 120 FPS (60 FPS for Mac) and allows you to simultaneously record both your screen and webcam. This software is incredibly user friendly and makes for an easy experience for new streamers. The dual recording makes it great for gamers who are also looking to film their reactions.
5. CloudApp
Price: Free, $10 per month for an individual user
Compatibility: Windows, macOS, Linux, Chrome
Starting a new screen capturing session with the CloudApp requires you to just specify the portion of the screen you want to capture and hit the record button. Moreover, you can choose if you want to record with or without a webcam and you have the option to enable or disable the audio recording option.
However, you can only create 90-second screen recordings with the free version of the CloudApp and you cannot set resolution or frame rate of the recording. That’s why you need to upgrade to the Pro version if you want to use it to record live streams on YouTube. The Pro subscription model also grants you access to basic video editing tools and a variety of file sharing options. In addition, CloudApp lets you create and annotate still images and GIFs, which makes it a great option for digital marketers.
6. Techsmith Camtasia
Price: Free trial, $269.05 one-time fee
Compatibility: Windows, macOS
You don’t need years of video editing experience to start a new screen recording session in Camtasia. In fact, you just have to click on the Record button that is located in the software’s tool panel and then customize the settings.
Camtasia lets you choose if you want to record the full screen or just a selected portion of the screen or decide if you want to switch the webcam or the microphone off. You should make sure that the System Audio feature is enabled in order to record the sound of the live stream you’re sharing on YouTube. Pausing or stopping a screencasting session requires you to either click on the appropriate buttons or use the keyboard-based hotkeys. After you are done recording a live stream you can edit the footage using Camtasia’s video editing tools.
7. ScreenRec
Price: Free
Compatibility: Windows, macOS, Linux
Recording any live stream or TV show you play on your computer with ScreenRec is a straightforward process that can be completed in just a few clicks. Simply drag the mouse cursor over the area you want to record, then hit the Record button when you are ready and ScreenRec will start capturing the computer screen.
Once the screencasting session is completed you will get a sharable link that can be embedded to a website or used to save an MP4 file on your hard drive. Furthermore, ScreenRec is equipped with analytics tools that show you how many views your videos attracted or for how long each visitor watched them. All of these features make ScreenRec an excellent option for anyone who wants to record a live stream on YouTube or any other on-screen activity.
8. Flashback Express
Price: Free
Compatibility: Windows
Flashback Express is a simple screen recorder that lets you create high-res videos effortlessly. Setting up a new screencasting session requires you to just specify the area of the screen you want to record, choose whether or not you want to record the webcam feed and hit the Record button.
There are no restrictions in terms of the duration of screen recordings you can make with Flashback Express and the software doesn’t watermark the video you create.
However, you can only save the files in MP4, AVI, or WMW formats and you cannot adjust the video’s frame rate or resolution. What’s more, editing videos or applying effects with Flashback Express isn’t possible and you must upgrade to FlashBack Pro if you want to edit the live streams you broadcast on YouTube.
This piece of software is user friendly, but it doesn’t have as many features as other products on the market. Having said that, it is still an excellent tool that will help you live stream gameplay easily. Although it doesn’t come with built-in video editing software, it is possible to download another program to do this for you (i.e. Filmora). Flashback Express has the ability to record through your headset or microphone as well.
9. VLC
Price: Free
Compatibility: macOS, Linux, Windows
This is an iconic media player that became famous for its versatility and support for nearly all video file formats. Besides being one of the best media players ever created, VLC is also equipped with screen recording and video editing tools.
In order to start a new screencasting session, you will have to go to the Media menu and then select the Open Capture Device option. Once the new window pops up on the screen you should change the Capture Mode to Desktop and then adjust the frame rate in accordance with your needs.
Click on the Play button, and then hit the Record button after the screen recording window appears on the screen. You can only record the entire screen with VLC, since customizing the recording area isn’t an option, and all your files will be captured in the RAW format which means that you may have to resize them before you upload them to YouTube.
10. Screencast-o-matic
Price: Free, pricing options start at $1.65 per month
Compatibility: macOS, Windows
As its name suggests, this software product makes the screen recording process almost automatic. You can choose if you want to record an entire screen or just a window you selected. In addition, Screencast-o-matic lets you record the desktop and webcam footage at the same time, and you can even zoom in while the screencasting session is still in progress.
The free version of the software offers only a basic set of features that doesn’t include the option to record system audio. This means that you have to opt for one of the available subscription models if you want to record your live streams on YouTube with Screencast-o-matic. What’s more, you will be to create videos that are longer than 15 minutes, create recordings without watermarks or add music to your recordings if you opt for Deluxe or Premiere pricing options.
11. QuickTime Player
Price: Free
Compatibility: macOS, Windows
Mac users who want to record content that is broadcasted via YouTube Live can do so without having to install a third-party app. Apple ceased the support for the Windows-based version of QuickTime Player in 2016 and PC users can only capture their screens with this software if they have some of its earlier versions.
In order to start a new screen recording session in QuickTime Player, you just have to go to the File menu and select the New Screen Recording option. The Screen Recording window where you can choose if you want to record audio or show mouse click in the recording will pop up on the screen. QuickTime Player lets you choose if you want to capture the entire screen or just a portion of it, and you can click on the Record button to start a new screencasting session. In order to save a video file you created, you just have to go to the File menu and pick the Save option.
How to Record a YouTube Live Stream with Filmora
Recording a YouTube Live stream with Filmora is easy even if you never went through this process before. You can set up a new screencasting session in just a few easy steps that won’t take more than a few moments to complete. Here’s what you need to do:
Step 1: Launch Filmora and create a new project. Go to the Media tab once the video editor’s main window loads and click on the Record drop-down menu that is located next to the Import drop-down menu.
Choose the Record PC Screen option and then proceed to customize the settings for your screencasting session.

Step 2: Click on the Rectangular icon in the upper left corner of the Wondershare Filmora Scrn window and choose either Full Screen, Custom, or Target Window option, depending on how you want to record a YouTube Live stream to define the area of the screen that is going to be recorded.
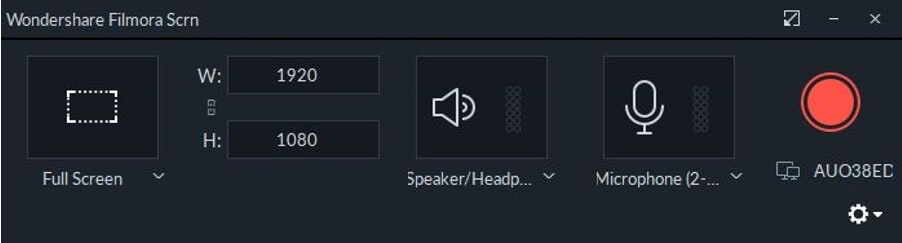
You can then proceed to insert the resolution your screen recording is going to have, and choose if you want to record system audio and sound from an external microphone.
Step 3: Click on the Gear icon below the Record button to gain access to additional settings, and then proceed to set the frame rate, adjust the video’s quality or activate the Show Mouse Clicks in Recording option.
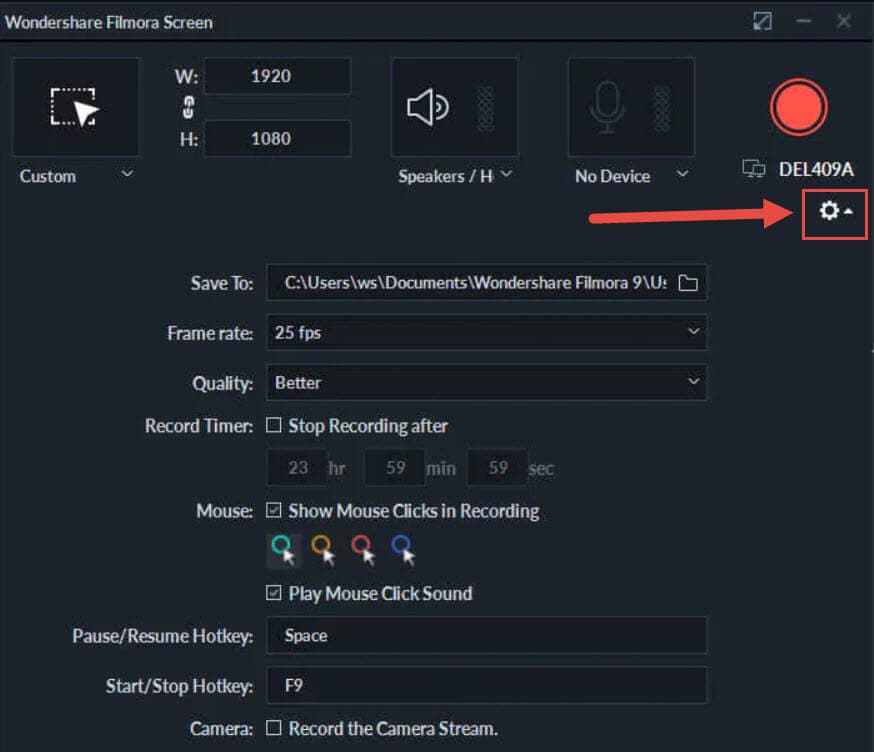
Make sure that the checkbox next to the Record the Camera Stream is marked if you want to record webcam feed and computer desktop at the same time.
Step 4: Press the red Record button in the upper right corner of the window and jump to the live stream. Once the broadcast is completed, you should click on the Stop button and use Filmora’s editing tools to remove all imperfections from the recording.
Filmora allows you to export all of your projects directly to your YouTube channel immediately after the rendering process is completed.
Frequently Asked Questions about YouTube Live Screen Recorders
1. Does YouTube Save Live Videos?
Stream Now, Mobile, Webcam, and Events streams can be stored automatically for 12 hours after they end. You can access all of your live streams by clicking on the Videos menu in the YouTube Studio and selecting the Live option and then change the Privacy setting in the Visibility menu.
2. How to use YouTube to Archive a Live Stream?
Once the live stream ends, you should go to the Dashboard and click on the Live feature, and then choose the Stream option. Check the Make Archive Unlisted When Complete checkbox and the live stream video will be saved accordingly.
Richard Bennett
Richard Bennett is a writer and a lover of all things video.
Follow @Richard Bennett
Richard Bennett
Oct 26, 2023• Proven solutions
The global pandemic has changed the way we live for the time being, and right now, we cannot attend events in the same way we did at the beginning of the year.
A growing number of cultural organizations, businesses, and influential YouTubers are turning towards YouTube’s Live feature because it provides a simple way of broadcasting different types of content in real-time. YouTube Live is by no means a new option, since the platform first introduced live streaming features in 2008, and some twelve years later, the feature has never been more popular.
However, the live streams you broadcast on YouTube are stored for just a brief period of time, which means you have to search for alternative methods of saving them. That’s why in this article we are going to take you through the best YouTube Live screen recorders you can use to capture the video content you are sharing with your followers.
Note: We resolutely oppose all forms of copyright-infringing downloads. This tutorial is only for downloading YouTube videos/audio materials from your own channel.
Top 10+ YouTube Live Screen Recorders
The maximum resolution in which you can record computer screen , audio recording options, or customization of the recording area are some of the most important features you need to consider while choosing a YouTube Live screen recorder.
We have selected some of the best YouTube Live screen recorders that enable you to do much more than just record live streams. So, let’s take a look at what they have to offer.
1. OBS Studio
Price: Free
Compatibility: Windows, Linux, macOS
The vast majority of live streams you can find on Twitch and YouTube are made with OBS Studio, but besides broadcasting videos, the software also gives you access to screencasting tools. This means that you can specify the area of the screen you want to record, choose the recording’s resolution and frame rate, or adjust the audio recording options.
OBS Studio is the best free, open-source screen recording program you can download. You shouldn’t use a software just because it’s free, but OBS Studio is also an extremely versatile tool. You can both record and stream in high definition and it comes with the ability to record either through your webcam or through your screen. It records directly through the graphics card , which means it can capture games even when in full-screen mode whereas a lot of other screen-recording software forces you to play games in windowed mode. The high quality can be seen easily in whatever you choose to broadcast.
OBS Studio allows you to record videos from a variety of sources, which makes it a perfect option for capturing the content you share through YouTube Live since you can select a browser window you want to capture in just a few clicks. What’s more, this open-source software is equipped with basic video editing tools, which enables you to preview the video you recorded before publishing it, apply transitions between cuts, or perform basic color correction.
Check the detailed guide to How to Record with OBS .
2. XSplit
Price: $24.95 for a three-month license
Compatibility: Windows
This is yet another broadcasting software that is equipped with powerful screen recording tools. Setting up a new screencasting session with XSplit is a simple and intuitive process that is not going to take much more than a few moments of your time.
All you need to do is define a workspace, then pick the preferred resolution and frame rate. The software allows you to capture screens in 4K resolution and at 60 fps, but it also offers a variety of resolution and frame rate options so that you can choose the one that best fits your needs. Furthermore, you can record the computer audio, which enables you to capture the live stream’s audio in excellent quality. Besides YouTube Live, XSplit can be used with Zoom , Skype, Google Hangouts, and numerous other live streaming and video calling apps.
3. Filmora
Price: Free, pricing plans start at $49.99/year
Compatibility: macOS, Windows
If you are looking for a screen recorder that is stacked with powerful video editing features, then Filmora is a great option for you. Customizing a YouTube Live or any other screencasting session with this video editing software is easy, and you can choose the resolution, frame rate, or even if you want to show mouse clicks in the recording.
Capturing the webcam feed and the computer’s screen simultaneously is also an option, while you can also decide whether or not you want to record audio from a microphone, computer audio, or both at the same time.
What’s more Filmora lets you set up the maximum duration of a screen recording and you start, pause, resume or stop a screen recording session by using hotkeys. Once you are done recording the live stream you shared on YouTube, you can edit the footage you created before uploading it to your YouTube channel.
4. Wondershare DemoCreator
Compatibility: Windows
Price: Start from $9.99
DemoCreator is a recorder that focuses its overall user experience. It is able to easily record high-quality videos at up to 120 FPS (60 FPS for Mac) and allows you to simultaneously record both your screen and webcam. This software is incredibly user friendly and makes for an easy experience for new streamers. The dual recording makes it great for gamers who are also looking to film their reactions.
5. CloudApp
Price: Free, $10 per month for an individual user
Compatibility: Windows, macOS, Linux, Chrome
Starting a new screen capturing session with the CloudApp requires you to just specify the portion of the screen you want to capture and hit the record button. Moreover, you can choose if you want to record with or without a webcam and you have the option to enable or disable the audio recording option.
However, you can only create 90-second screen recordings with the free version of the CloudApp and you cannot set resolution or frame rate of the recording. That’s why you need to upgrade to the Pro version if you want to use it to record live streams on YouTube. The Pro subscription model also grants you access to basic video editing tools and a variety of file sharing options. In addition, CloudApp lets you create and annotate still images and GIFs, which makes it a great option for digital marketers.
6. Techsmith Camtasia
Price: Free trial, $269.05 one-time fee
Compatibility: Windows, macOS
You don’t need years of video editing experience to start a new screen recording session in Camtasia. In fact, you just have to click on the Record button that is located in the software’s tool panel and then customize the settings.
Camtasia lets you choose if you want to record the full screen or just a selected portion of the screen or decide if you want to switch the webcam or the microphone off. You should make sure that the System Audio feature is enabled in order to record the sound of the live stream you’re sharing on YouTube. Pausing or stopping a screencasting session requires you to either click on the appropriate buttons or use the keyboard-based hotkeys. After you are done recording a live stream you can edit the footage using Camtasia’s video editing tools.
7. ScreenRec
Price: Free
Compatibility: Windows, macOS, Linux
Recording any live stream or TV show you play on your computer with ScreenRec is a straightforward process that can be completed in just a few clicks. Simply drag the mouse cursor over the area you want to record, then hit the Record button when you are ready and ScreenRec will start capturing the computer screen.
Once the screencasting session is completed you will get a sharable link that can be embedded to a website or used to save an MP4 file on your hard drive. Furthermore, ScreenRec is equipped with analytics tools that show you how many views your videos attracted or for how long each visitor watched them. All of these features make ScreenRec an excellent option for anyone who wants to record a live stream on YouTube or any other on-screen activity.
8. Flashback Express
Price: Free
Compatibility: Windows
Flashback Express is a simple screen recorder that lets you create high-res videos effortlessly. Setting up a new screencasting session requires you to just specify the area of the screen you want to record, choose whether or not you want to record the webcam feed and hit the Record button.
There are no restrictions in terms of the duration of screen recordings you can make with Flashback Express and the software doesn’t watermark the video you create.
However, you can only save the files in MP4, AVI, or WMW formats and you cannot adjust the video’s frame rate or resolution. What’s more, editing videos or applying effects with Flashback Express isn’t possible and you must upgrade to FlashBack Pro if you want to edit the live streams you broadcast on YouTube.
This piece of software is user friendly, but it doesn’t have as many features as other products on the market. Having said that, it is still an excellent tool that will help you live stream gameplay easily. Although it doesn’t come with built-in video editing software, it is possible to download another program to do this for you (i.e. Filmora). Flashback Express has the ability to record through your headset or microphone as well.
9. VLC
Price: Free
Compatibility: macOS, Linux, Windows
This is an iconic media player that became famous for its versatility and support for nearly all video file formats. Besides being one of the best media players ever created, VLC is also equipped with screen recording and video editing tools.
In order to start a new screencasting session, you will have to go to the Media menu and then select the Open Capture Device option. Once the new window pops up on the screen you should change the Capture Mode to Desktop and then adjust the frame rate in accordance with your needs.
Click on the Play button, and then hit the Record button after the screen recording window appears on the screen. You can only record the entire screen with VLC, since customizing the recording area isn’t an option, and all your files will be captured in the RAW format which means that you may have to resize them before you upload them to YouTube.
10. Screencast-o-matic
Price: Free, pricing options start at $1.65 per month
Compatibility: macOS, Windows
As its name suggests, this software product makes the screen recording process almost automatic. You can choose if you want to record an entire screen or just a window you selected. In addition, Screencast-o-matic lets you record the desktop and webcam footage at the same time, and you can even zoom in while the screencasting session is still in progress.
The free version of the software offers only a basic set of features that doesn’t include the option to record system audio. This means that you have to opt for one of the available subscription models if you want to record your live streams on YouTube with Screencast-o-matic. What’s more, you will be to create videos that are longer than 15 minutes, create recordings without watermarks or add music to your recordings if you opt for Deluxe or Premiere pricing options.
11. QuickTime Player
Price: Free
Compatibility: macOS, Windows
Mac users who want to record content that is broadcasted via YouTube Live can do so without having to install a third-party app. Apple ceased the support for the Windows-based version of QuickTime Player in 2016 and PC users can only capture their screens with this software if they have some of its earlier versions.
In order to start a new screen recording session in QuickTime Player, you just have to go to the File menu and select the New Screen Recording option. The Screen Recording window where you can choose if you want to record audio or show mouse click in the recording will pop up on the screen. QuickTime Player lets you choose if you want to capture the entire screen or just a portion of it, and you can click on the Record button to start a new screencasting session. In order to save a video file you created, you just have to go to the File menu and pick the Save option.
How to Record a YouTube Live Stream with Filmora
Recording a YouTube Live stream with Filmora is easy even if you never went through this process before. You can set up a new screencasting session in just a few easy steps that won’t take more than a few moments to complete. Here’s what you need to do:
Step 1: Launch Filmora and create a new project. Go to the Media tab once the video editor’s main window loads and click on the Record drop-down menu that is located next to the Import drop-down menu.
Choose the Record PC Screen option and then proceed to customize the settings for your screencasting session.
Step 2: Click on the Rectangular icon in the upper left corner of the Wondershare Filmora Scrn window and choose either Full Screen, Custom, or Target Window option, depending on how you want to record a YouTube Live stream to define the area of the screen that is going to be recorded.
You can then proceed to insert the resolution your screen recording is going to have, and choose if you want to record system audio and sound from an external microphone.
Step 3: Click on the Gear icon below the Record button to gain access to additional settings, and then proceed to set the frame rate, adjust the video’s quality or activate the Show Mouse Clicks in Recording option.
Make sure that the checkbox next to the Record the Camera Stream is marked if you want to record webcam feed and computer desktop at the same time.
Step 4: Press the red Record button in the upper right corner of the window and jump to the live stream. Once the broadcast is completed, you should click on the Stop button and use Filmora’s editing tools to remove all imperfections from the recording.
Filmora allows you to export all of your projects directly to your YouTube channel immediately after the rendering process is completed.
Frequently Asked Questions about YouTube Live Screen Recorders
1. Does YouTube Save Live Videos?
Stream Now, Mobile, Webcam, and Events streams can be stored automatically for 12 hours after they end. You can access all of your live streams by clicking on the Videos menu in the YouTube Studio and selecting the Live option and then change the Privacy setting in the Visibility menu.
2. How to use YouTube to Archive a Live Stream?
Once the live stream ends, you should go to the Dashboard and click on the Live feature, and then choose the Stream option. Check the Make Archive Unlisted When Complete checkbox and the live stream video will be saved accordingly.
Richard Bennett
Richard Bennett is a writer and a lover of all things video.
Follow @Richard Bennett
Charting a Course to Success: Understanding YouTube Income
Video site YouTube, owned by Google, is one of the biggest money makers for the internet giant. YouTube has changed how content creators share their work, becoming a multi-billion dollar business.
So how does YouTube pay you? It’s simple. YouTube pays you when you watch videos, view ads, search, etc. YouTube also pays you when you are a part of a video’s revenue.
In this article, we’re going to walk you through our 4-step process to outline to illustrate exactly how youtube pays you. First, let’s see the minimum eligibility requirements to join Youtube Partner Program.
- Emma Chamberlain - $12 million
- Roman Atwood – $14.5 million
- JJ Olatunji (AKA KSI) – $15 million
- Stevin John (AKA Blippi) – $16 million
- Sean McLoughlin (AKA Jacksepticeye) – $16 million
- David Dobrik – $20 million
- Anastasia Radzinskaya (AKA Like Nastya) – $20 million
- Rhett McLaughlin and Link Neal – $20 million
- Lilly Singh – $20 million
- Preston Arsement – $20 million
- James Charles – $22 million
- Evan Fong – $25 million
- Jimmy Donaldson (AKA MrBeast) – $25 million
- Daniel Middleton – $35 million
- Mark Fischbach (AKA Markiplier) – $35 million
- Felix Kjellberg (AKA PewDiePie) – $40 million
- Logan Paul – $45 million
- Dude Perfect - $50 million
- Jake Paul – $60 million
- Ryan Kaji – $100 million
Part 1: When does youtube pay you [threshold to meet]
As a YouTuber, do you feel like you’re always struggling to reach some “threshold” where YouTube finally starts rewarding your efforts with some financial reward? You came to the right place; here’s a list of Youtube minimum criteria to reach the threshold.
1. 1K subscribers
The first requirement to monetize your channel is to increase your subscribers to at least 1000.
2. Follow all the YouTube channel monetization policies
These policies are a collection of documents containing all the policies, guidelines, and terms that apply to the YouTube Partner Program and advertising programs.
3. Availability in your region
It would be best if you were in the listed countries where Youtube Partner Program is available.
4. Strike free channel
Remember to avoid any strikes if you are planning to monetize your channel.
5. 4,000 watch hours
To qualify as a creator with a sustainable audience, you’ll need at least 4,000 public watch hours within 12 months in your channel.
6. AdSense account
You’ll need to ensure that you have a Google Adsense account set up and ready to go. Without an Adsense account, the video isn’t eligible to be monetized.
Part 2: How Do You Get Paid on YouTube?
We know that making money from YouTube can be challenging but not impossible. We’ll help you figure out how to get paid. Whether you want to create your videos and monetize them or you want to take advantage of the huge pool of talent. We’ll show you what the impact of the Youtube Partner program is on the revenue of YouTube channel owners:
Video length
One of the most noteworthy characteristics of a YouTube video is its length. A longer video provides a greater amount of information, which means a greater likelihood of the viewer actually watching it to completion.
Ad Quality
The two main qualities that differentiate high-quality YouTube ads are relevance and timeliness. It would be best if you tailored the ad to what’s happening within the video to be relevant. For instance, an ad about a new study may be relevant if the video is about health or science. The ad should also be timely. If you’re looking to get more revenue out of your channel, the quality of your ads should be high.
Number of clicks each ad receives
The number of times your video ad is shown is an important factor in how much it makes. You can increase your ads’ revenue potential by increasing the ad’s number of clicks. Advertisers use this metric to gauge the effectiveness of their campaigns, which is why optimizing the number of clicks your ads get is so important.
Ad Blockers
And there are two problems with ad blocking. The first is that it cuts off revenue. The second problem is that it reduces user engagement. Ad blocking decreases the amount of time that users spend watching videos. Youtube videos that rely on advertising to generate revenue may decrease their income.
Bonus: See how much you can get by YouTube Pay Calculator
Calculating your potential earnings from YouTube is a great way to see if it is worth your time to start a channel and create videos for certain niches. It can also help you set realistic expectations for the average earnings you can expect.
A YouTube pay calculator is a simple way to estimate how much money you can make from your YouTube channel. These calculators will help you better understand how much money your youtube channel is making. Based on your view count, engagement and various other factors, it can help you to calculate your earnings from a YouTube Video or Channel.

Drag the YouTube Video Views Slider right or left based on your daily video views. It’s important to set your Estimated Click-Through Rate based on your channels. All that combined, you can view your monthly estimated earnings potential in seconds.

This tool only requires your channel URL. Copy and paste the URL and click ‘Check.’ You’ll get a short report of your channel that includes your total subscribers, the last 90 days’ progress, and an estimated earning per video.

The Youtube money calculator will show you the exact profit you are earning per day and will let you track your earnings daily, weekly and monthly. You can use the youtube money calculator to see if you should stop or continue your videos. You will also get to know how to improve your income.
How does YouTube send you money? Illustrate the mechanism
To receive money from Youtube, you must have an AdSense account linked with google and your Youtube channel. Let us find out how YouTube sends you money. Follow the steps mentioned below:
- Connect your AdSense account to your Google account and YouTube channel
- Make sure monetization is enabled.
- Check out the different kinds of video and ad formats you can monetize.
The videos and the ads you’ll put on your channel will get you money from Youtube in your AdSense account. When you have earned $10 in ads using your AdSense account linked to your Google account, Google will send you a confirmation email. Once all the verification has been done, Youtube will send you money in your AdSense account.
Part 3: Top YouTube Earners in 2022
When you think about the top YouTube earners, most name recognition is due to big-name influencers like PewDiePie and T-Series. Both these Youtubers, and the rest of the big names like Emma Chamberlain, Ryan Higa, Markiplier, and Hannah Hart, have significantly impacted the world of YouTube by becoming some of the best at what they do.
Now you must be wondering who the richest YouTubers are. We rounded up the top of the richest YouTubers in 2022. Read on to see which YouTube celebrities are worth the most.
20. Emma Chamberlain – $12 million
Emma Chamberlain, a vlogger and a social media personality, has a net worth of $12 million. Her personality has amassed over 11.8 million subscribers and over 1.5 billion views.
19. Roman Atwood – $14.5 million
Roman Atwood became famous with prank videos on his YouTube channel back in 2009. He started another channel, “RomanAtwoodVlogs”, which now has over 15.5 million subscribers and 5.5 billion views. Total of all his endeavors is a staggering net worth of $14.5 million.
18. JJ Olatunji (AKA KSI) – $15 million
KSI is number 18 on our list, with a net worth of $15 million. In 2009, he created a new channel under the name moniker KSI. Now his channel has about 23.7 million subscribers and over 5.8 billion views.
17. Stevin John (AKA Blippi) – $16 million
Blippihis is a fun character for kids who make educational videos for them. His channel is available in several languages and has over 16.4 million subscribers, leaving Stevin with a net worth of $16 million.
16. Sean McLoughlin (AKA Jacksepticeye) – $16 million
This Irish YouTube personality has a vlogging and video games channel. This year, he has over 28 million subscribers and makes about $300,000 per month, making his net worth around $16 million.
15. David Dobrik – $20 million
David, a viral social media star, has gathered 18.2 million subscribers and over 8 billion views. His combined followers from different social media platforms are over 45 million. David’s other business endeavors and social media success explain his worth of $20 million.
14. Anastasia Radzinskaya (AKA Like Nastya) – $20 million
Nastya is an eight-year-old Russian girl who, in just a few years, has become one of the known children’s YouTubers in the world. Nowadays, she has over 110 million subscribers combining her six channels with over 42 billion views. In 2017, she partnered with Yoolato to monetize the content. It was worth it – Radzinskaya is now worth a massive $20 million.
13. Rhett McLaughlin and Link Neal – $20 million
They are Best known as the comedy duo Rhett and Link, one of the best comedy channels on youtube. Their YouTube channel has made them a combined $20 million fortune thanks to the success of their TV show Good Mythical Morning, which currently has around 17.5 million subscribers and over 7.8 billion views.
12. Lilly Singh – $20 million
Lilly Singh has comedic sketches featuring other YouTubers and celebrities in her YouTube videos. She released his first YouTube video in 2010, and his comedy sketches have attracted more than 14 million subscribers. Her total worth is $20 million.
11. Preston Arsement – $20 million
Preston Arsement has made it to Forbes magazine as one of the most paid internet entrepreneurs of 2022. His channel PrestonPlayz has attracted 21 million subscribers; now, he has a net worth of $20 million.
10. James Charles – $22 million
James Charles is a makeup artist who started by making YouTube videos about makeup tutorials and has since made a career. His makeup collection and clothing line business, along with youtube tutorials, made him a fortune of $22 million.
9. Evan Fong – $25 million
Evan Fong started the channel VanossGaming, which produces gaming videos on YouTube. His channel was launched in 2011 and now has over 25 million subscribers and over 7 billion views. His career as a star in computer animated series and directory in games made him an estimated worth of $25 million.
8. Jimmy Donaldson (AKA MrBeast) – $25 million
Jimmy’s YouTube career started in 2012 at the age of 13. With over 100 million subscribers and more than 22.5 billion views on his multiple channels, this social media king is in a league of his own. MrBeast, who can afford to give away $1 million in a single video, has a net worth of $25 million.
7. Daniel Middleton – $35 million
Daniel Middleton has made millions from his gaming YouTube channel DanTDM. He’s got 26 million subscribers and 10 billion views. This man also amassed a fortune of more than $35 million and set many world records in the most popular games.
6. Mark Fischbach (AKA Markiplier) – $35 million
Mark’s channel is one of the top 100 most subscribed Youtube channels. His career as a writer, actor, director and producer made him a fortune of $35 million.
5.Felix Kjellberg (AKA PewDiePie) – $40 million
Pewdiepie channel is often among the most subscribed channels on YouTube, and today it has around a whopping 111 million subscribers and over 28.2 billion views. Despite some setbacks, he still earned a staggering net worth of $40 million.
4. Logan Paul – $45 million
Logan is one of the most popular YouTubers of today’s generation. His channel of 23.6 million subscribers, along with successful merchandise and boxing career, make a total worth of $45 million.
3. Dude Perfect - $50 million
Dude Perfect is an entertainment, sports, and comedy brand that creates high-quality entertainment content that makes a whopping net worth of $50 million. Their channel boasts over 58 million YouTube subscribers.
2. Jake Paul – $60 million
Logan’s little brother Jake Paul started his content creation career at 16. His Youtube channel got hit early, and now he boasts over 20.4 million subscribers and 8.1 billion views.
1. Ryan Kaji – $100 million
You don’t normally meet a 10-year-old with a $100 million fortune, but Ryan Kaji is a rare exception. Ryan’s toy reviews have attracted more than two million subscribers and more than 50.7 billion views.
Part 4: Alternative ways to earn more money from YouTube
Some people think they can’t make money from YouTube…but that’s not true. You can make good money from YouTube, even as a newbie. It just takes some persistence and hard work to make that happen. We’ll show you some alternative ways to make more money on YouTube.
Make Good Content Continuously
Making good content that people love to watch repeatedly is a great way to earn more money. The key is improving the content continuously every week, month, or year.
Creating content that is both entertaining and informative helps people to make decisions. An audience can get a lot of information from the video, but if it is not of good quality, it will not have a good impression.
Bonus: Spice up your videos with Wondershare Filmora
A powerful video editing software can help you a lot. With an impactful editor software like Filmora, it allows you to add titles, music, and transition effects to give your video more visual appeal.

The current most popular video editing software application on the market is, hands down, Wondershare Filmora. Editing is incredibly easy with Filmora. Even the most inexperienced user can create a compelling, professional-looking video with Filmora in minutes. With Filmora’s video creation tools, anyone can easily edit, add effects, change text, and even make voiceovers. Filmora’s intuitive interface is a dream for non-experts as well. Some of its unique features include:
Stock Media
A royalty-free stock media, smart templates, and visual effects plug-ins will help you add more variety to your videos.
AI Portrait
Remove backgrounds from photographs with great accuracy, plus includes 80+ artificial intelligence portraits and photo editing stickers.
Green Screen
The green screen doesn’t just change your background but creates special effects, too.
Keyframing
It helps your videos look more energetic with smooth animation.
Color Correction
Add or make your own stunning 3D LUTs with color correction.
Join Affiliate
Affiliate marketing is a relatively easy way to turn YouTube viewers into customers. You can join many successful affiliate programs, but if you’re looking for the most money, go for the ones that offer a recurring commission.
Get Brand sponsorships
If you’re wondering if getting brand sponsorships for Youtube is worth the money, the answer is a resounding yes. Sponsorships on Youtube generate tons of views and even more engagement than ads do.
But brands tend to sponsor only content deemed relevant to the brand. So if you want to be a sponsored content creator, you must get to know your audience first and then build out your social media strategy around the products you sell and the messages you want to communicate.
Hot FAQs on YouTube channel monetization
1. What if I don’t meet the program threshold?
While trying to meet the threshold, focus on making content that will stand out from the competition and build your channel.
2. If I meet the threshold, do I automatically get into the YouTube Partner Program (YPP)?
No, the Youtube team will review every channel that passes the threshold. You cannot apply to join the YPP if your account has any active Community Guidelines strike. Plus, your channel must follow Youtube policies and guidelines.
3. How much money does 1 million views make?
For every one million views a YouTube video gets, a YouTuber can make upwards of $5000, based on Forbes’s estimated pay rate of $5. However, these are estimates, and the amount YouTubers earn from Youtube varies wildly.
Final Words
This article is a pretty good overview of the “how” of YouTube monetization, though we would also add that it can take a while to build up a following on YouTube if you’re starting. You’ll want to ensure that you put enough time and effort into your videos.
Your content must be unique so your viewers will want to stick around and engage with you. And lastly, if you’re looking to monetize your YouTube channel, focus on building your channel and growing your audience.
Free Download For Win 7 or later(64-bit)
Free Download For macOS 10.14 or later
Part 1: When does youtube pay you [threshold to meet]
As a YouTuber, do you feel like you’re always struggling to reach some “threshold” where YouTube finally starts rewarding your efforts with some financial reward? You came to the right place; here’s a list of Youtube minimum criteria to reach the threshold.
1. 1K subscribers
The first requirement to monetize your channel is to increase your subscribers to at least 1000.
2. Follow all the YouTube channel monetization policies
These policies are a collection of documents containing all the policies, guidelines, and terms that apply to the YouTube Partner Program and advertising programs.
3. Availability in your region
It would be best if you were in the listed countries where Youtube Partner Program is available.
4. Strike free channel
Remember to avoid any strikes if you are planning to monetize your channel.
5. 4,000 watch hours
To qualify as a creator with a sustainable audience, you’ll need at least 4,000 public watch hours within 12 months in your channel.
6. AdSense account
You’ll need to ensure that you have a Google Adsense account set up and ready to go. Without an Adsense account, the video isn’t eligible to be monetized.
Part 2: How Do You Get Paid on YouTube?
We know that making money from YouTube can be challenging but not impossible. We’ll help you figure out how to get paid. Whether you want to create your videos and monetize them or you want to take advantage of the huge pool of talent. We’ll show you what the impact of the Youtube Partner program is on the revenue of YouTube channel owners:
Video length
One of the most noteworthy characteristics of a YouTube video is its length. A longer video provides a greater amount of information, which means a greater likelihood of the viewer actually watching it to completion.
Ad Quality
The two main qualities that differentiate high-quality YouTube ads are relevance and timeliness. It would be best if you tailored the ad to what’s happening within the video to be relevant. For instance, an ad about a new study may be relevant if the video is about health or science. The ad should also be timely. If you’re looking to get more revenue out of your channel, the quality of your ads should be high.
Number of clicks each ad receives
The number of times your video ad is shown is an important factor in how much it makes. You can increase your ads’ revenue potential by increasing the ad’s number of clicks. Advertisers use this metric to gauge the effectiveness of their campaigns, which is why optimizing the number of clicks your ads get is so important.
Ad Blockers
And there are two problems with ad blocking. The first is that it cuts off revenue. The second problem is that it reduces user engagement. Ad blocking decreases the amount of time that users spend watching videos. Youtube videos that rely on advertising to generate revenue may decrease their income.
Bonus: See how much you can get by YouTube Pay Calculator
Calculating your potential earnings from YouTube is a great way to see if it is worth your time to start a channel and create videos for certain niches. It can also help you set realistic expectations for the average earnings you can expect.
A YouTube pay calculator is a simple way to estimate how much money you can make from your YouTube channel. These calculators will help you better understand how much money your youtube channel is making. Based on your view count, engagement and various other factors, it can help you to calculate your earnings from a YouTube Video or Channel.
Drag the YouTube Video Views Slider right or left based on your daily video views. It’s important to set your Estimated Click-Through Rate based on your channels. All that combined, you can view your monthly estimated earnings potential in seconds.
This tool only requires your channel URL. Copy and paste the URL and click ‘Check.’ You’ll get a short report of your channel that includes your total subscribers, the last 90 days’ progress, and an estimated earning per video.
The Youtube money calculator will show you the exact profit you are earning per day and will let you track your earnings daily, weekly and monthly. You can use the youtube money calculator to see if you should stop or continue your videos. You will also get to know how to improve your income.
How does YouTube send you money? Illustrate the mechanism
To receive money from Youtube, you must have an AdSense account linked with google and your Youtube channel. Let us find out how YouTube sends you money. Follow the steps mentioned below:
- Connect your AdSense account to your Google account and YouTube channel
- Make sure monetization is enabled.
- Check out the different kinds of video and ad formats you can monetize.
The videos and the ads you’ll put on your channel will get you money from Youtube in your AdSense account. When you have earned $10 in ads using your AdSense account linked to your Google account, Google will send you a confirmation email. Once all the verification has been done, Youtube will send you money in your AdSense account.
Part 3: Top YouTube Earners in 2022
When you think about the top YouTube earners, most name recognition is due to big-name influencers like PewDiePie and T-Series. Both these Youtubers, and the rest of the big names like Emma Chamberlain, Ryan Higa, Markiplier, and Hannah Hart, have significantly impacted the world of YouTube by becoming some of the best at what they do.
Now you must be wondering who the richest YouTubers are. We rounded up the top of the richest YouTubers in 2022. Read on to see which YouTube celebrities are worth the most.
20. Emma Chamberlain – $12 million
Emma Chamberlain, a vlogger and a social media personality, has a net worth of $12 million. Her personality has amassed over 11.8 million subscribers and over 1.5 billion views.
19. Roman Atwood – $14.5 million
Roman Atwood became famous with prank videos on his YouTube channel back in 2009. He started another channel, “RomanAtwoodVlogs”, which now has over 15.5 million subscribers and 5.5 billion views. Total of all his endeavors is a staggering net worth of $14.5 million.
18. JJ Olatunji (AKA KSI) – $15 million
KSI is number 18 on our list, with a net worth of $15 million. In 2009, he created a new channel under the name moniker KSI. Now his channel has about 23.7 million subscribers and over 5.8 billion views.
17. Stevin John (AKA Blippi) – $16 million
Blippihis is a fun character for kids who make educational videos for them. His channel is available in several languages and has over 16.4 million subscribers, leaving Stevin with a net worth of $16 million.
16. Sean McLoughlin (AKA Jacksepticeye) – $16 million
This Irish YouTube personality has a vlogging and video games channel. This year, he has over 28 million subscribers and makes about $300,000 per month, making his net worth around $16 million.
15. David Dobrik – $20 million
David, a viral social media star, has gathered 18.2 million subscribers and over 8 billion views. His combined followers from different social media platforms are over 45 million. David’s other business endeavors and social media success explain his worth of $20 million.
14. Anastasia Radzinskaya (AKA Like Nastya) – $20 million
Nastya is an eight-year-old Russian girl who, in just a few years, has become one of the known children’s YouTubers in the world. Nowadays, she has over 110 million subscribers combining her six channels with over 42 billion views. In 2017, she partnered with Yoolato to monetize the content. It was worth it – Radzinskaya is now worth a massive $20 million.
13. Rhett McLaughlin and Link Neal – $20 million
They are Best known as the comedy duo Rhett and Link, one of the best comedy channels on youtube. Their YouTube channel has made them a combined $20 million fortune thanks to the success of their TV show Good Mythical Morning, which currently has around 17.5 million subscribers and over 7.8 billion views.
12. Lilly Singh – $20 million
Lilly Singh has comedic sketches featuring other YouTubers and celebrities in her YouTube videos. She released his first YouTube video in 2010, and his comedy sketches have attracted more than 14 million subscribers. Her total worth is $20 million.
11. Preston Arsement – $20 million
Preston Arsement has made it to Forbes magazine as one of the most paid internet entrepreneurs of 2022. His channel PrestonPlayz has attracted 21 million subscribers; now, he has a net worth of $20 million.
10. James Charles – $22 million
James Charles is a makeup artist who started by making YouTube videos about makeup tutorials and has since made a career. His makeup collection and clothing line business, along with youtube tutorials, made him a fortune of $22 million.
9. Evan Fong – $25 million
Evan Fong started the channel VanossGaming, which produces gaming videos on YouTube. His channel was launched in 2011 and now has over 25 million subscribers and over 7 billion views. His career as a star in computer animated series and directory in games made him an estimated worth of $25 million.
8. Jimmy Donaldson (AKA MrBeast) – $25 million
Jimmy’s YouTube career started in 2012 at the age of 13. With over 100 million subscribers and more than 22.5 billion views on his multiple channels, this social media king is in a league of his own. MrBeast, who can afford to give away $1 million in a single video, has a net worth of $25 million.
7. Daniel Middleton – $35 million
Daniel Middleton has made millions from his gaming YouTube channel DanTDM. He’s got 26 million subscribers and 10 billion views. This man also amassed a fortune of more than $35 million and set many world records in the most popular games.
6. Mark Fischbach (AKA Markiplier) – $35 million
Mark’s channel is one of the top 100 most subscribed Youtube channels. His career as a writer, actor, director and producer made him a fortune of $35 million.
5.Felix Kjellberg (AKA PewDiePie) – $40 million
Pewdiepie channel is often among the most subscribed channels on YouTube, and today it has around a whopping 111 million subscribers and over 28.2 billion views. Despite some setbacks, he still earned a staggering net worth of $40 million.
4. Logan Paul – $45 million
Logan is one of the most popular YouTubers of today’s generation. His channel of 23.6 million subscribers, along with successful merchandise and boxing career, make a total worth of $45 million.
3. Dude Perfect - $50 million
Dude Perfect is an entertainment, sports, and comedy brand that creates high-quality entertainment content that makes a whopping net worth of $50 million. Their channel boasts over 58 million YouTube subscribers.
2. Jake Paul – $60 million
Logan’s little brother Jake Paul started his content creation career at 16. His Youtube channel got hit early, and now he boasts over 20.4 million subscribers and 8.1 billion views.
1. Ryan Kaji – $100 million
You don’t normally meet a 10-year-old with a $100 million fortune, but Ryan Kaji is a rare exception. Ryan’s toy reviews have attracted more than two million subscribers and more than 50.7 billion views.
Part 4: Alternative ways to earn more money from YouTube
Some people think they can’t make money from YouTube…but that’s not true. You can make good money from YouTube, even as a newbie. It just takes some persistence and hard work to make that happen. We’ll show you some alternative ways to make more money on YouTube.
Make Good Content Continuously
Making good content that people love to watch repeatedly is a great way to earn more money. The key is improving the content continuously every week, month, or year.
Creating content that is both entertaining and informative helps people to make decisions. An audience can get a lot of information from the video, but if it is not of good quality, it will not have a good impression.
Bonus: Spice up your videos with Wondershare Filmora
A powerful video editing software can help you a lot. With an impactful editor software like Filmora, it allows you to add titles, music, and transition effects to give your video more visual appeal.
The current most popular video editing software application on the market is, hands down, Wondershare Filmora. Editing is incredibly easy with Filmora. Even the most inexperienced user can create a compelling, professional-looking video with Filmora in minutes. With Filmora’s video creation tools, anyone can easily edit, add effects, change text, and even make voiceovers. Filmora’s intuitive interface is a dream for non-experts as well. Some of its unique features include:
Stock Media
A royalty-free stock media, smart templates, and visual effects plug-ins will help you add more variety to your videos.
AI Portrait
Remove backgrounds from photographs with great accuracy, plus includes 80+ artificial intelligence portraits and photo editing stickers.
Green Screen
The green screen doesn’t just change your background but creates special effects, too.
Keyframing
It helps your videos look more energetic with smooth animation.
Color Correction
Add or make your own stunning 3D LUTs with color correction.
Join Affiliate
Affiliate marketing is a relatively easy way to turn YouTube viewers into customers. You can join many successful affiliate programs, but if you’re looking for the most money, go for the ones that offer a recurring commission.
Get Brand sponsorships
If you’re wondering if getting brand sponsorships for Youtube is worth the money, the answer is a resounding yes. Sponsorships on Youtube generate tons of views and even more engagement than ads do.
But brands tend to sponsor only content deemed relevant to the brand. So if you want to be a sponsored content creator, you must get to know your audience first and then build out your social media strategy around the products you sell and the messages you want to communicate.
Hot FAQs on YouTube channel monetization
1. What if I don’t meet the program threshold?
While trying to meet the threshold, focus on making content that will stand out from the competition and build your channel.
2. If I meet the threshold, do I automatically get into the YouTube Partner Program (YPP)?
No, the Youtube team will review every channel that passes the threshold. You cannot apply to join the YPP if your account has any active Community Guidelines strike. Plus, your channel must follow Youtube policies and guidelines.
3. How much money does 1 million views make?
For every one million views a YouTube video gets, a YouTuber can make upwards of $5000, based on Forbes’s estimated pay rate of $5. However, these are estimates, and the amount YouTubers earn from Youtube varies wildly.
Final Words
This article is a pretty good overview of the “how” of YouTube monetization, though we would also add that it can take a while to build up a following on YouTube if you’re starting. You’ll want to ensure that you put enough time and effort into your videos.
Your content must be unique so your viewers will want to stick around and engage with you. And lastly, if you’re looking to monetize your YouTube channel, focus on building your channel and growing your audience.
Free Download For Win 7 or later(64-bit)
Free Download For macOS 10.14 or later
- Title: "2024 Approved Top Screen Recorders for Live Broadcasts on YouTube"
- Author: Thomas
- Created at : 2024-05-31 12:38:49
- Updated at : 2024-06-01 12:38:49
- Link: https://youtube-help.techidaily.com/2024-approved-top-screen-recorders-for-live-broadcasts-on-youtube/
- License: This work is licensed under CC BY-NC-SA 4.0.
