
:max_bytes(150000):strip_icc()/1205159Womanholdinggenericsmartphone-9733a5bbd64041d298df8da874a9005d.jpg)
"2024 Approved Top Techniques Uploading YouTube Videos on iPhone/iPad"
Top Techniques: Uploading YouTube Videos on iPhone/iPad
Create High-Quality Video - Wondershare Filmora
An easy and powerful YouTube video editor
Numerous video and audio effects to choose from
Detailed tutorials provided by the official channel
Initially, iOS users had the option to load videos directly to YouTube via the tap-to-upload feature. However, this option is missing in the recent iOS devices versions. Therefore, many users search for possible ways to post a video on YouTube from iPhone. For this, you have to put some considerations into place before moving on. The video title length should not exceed 100 characters, while the description is maintained at 5,000 characters. Also, ensure the video length doesn’t exceed 15 minutes. Let’s roll out the best ways to upload your videos and make that big catch on subscribers.

In this article
01 [ How to upload a video to YouTube from iPhone or iPad](#Part 1)
02 [Why your phone doesn’t post videos to YouTube](#Part 2)
03 [Make your YouTube video better with Filmora](#Part 3)
How to upload a video to YouTube from iPhone or iPad
Are you ready to start on that big adventure and share your videos on YouTube? Follow these steps to learn how to upload a video to YouTube from your iPhone.
Method 1: Upload using the YouTube iOS app
Using the YouTube app is the simplest way to upload your YouTube videos. The YouTube app should be installed on your iOS device.
Step 1. Launch the YouTube app on your device, then sign in to your account. If you don’t have an account yet, you will need to “Sign up” for a new one before continuing the upload process.
Step 2. Click on the “+” icon found at the bottom of the screen.
Step 3. Then choose the “Upload a video” option from the populated list of options.
Step 4. Check out the pop-up that appears and “Allow access” to it.
Step 5. Edit your video to your preference by trimming or cropping as you desire. Then click on the “Next” option.

Step 6. Add “title and description” to your video. Remember, the title should contain less than 100 characters and the description no more than 500 characters.
Step 7. Then set the visibility mode as “Public” to enable you to share your video over the internet.
Step 8. Click on the “Upload” button to finally upload your video to YouTube.

Method 2: Upload using Photo App
The Photo App has a “Share” option that you can use to upload your videos to YouTube. Here is the guide.
Step 1. Go to your iOS device and tap on the “Photos” app.
Step 2. Then tap on the “Videos Folder” to locate the video you wish to upload to YouTube.

Step 3. Next, tap on the video that you want to upload.
Step 4. Then tap on the “Share” icon located at the bottom left of your iOS device screen.
Step 5. You’ll then access a “Share” menu from where you have various share options for your video.
Step 6. Choose the “YouTube” option to continue to share your video there. At this juncture, ensure you have logged in to your Google Account.

Step 7. You need to provide a “Title” and “Description” of your video. Then go to the “Privacy” Options and make your video “Public.”
Step 8. Finally, tap on the “Publish” tab found at the top-right corner of your screen to make your video viewable by the public.

Method 3: Upload video to YouTube using Safari
Safari is another alternative method to upload a video to YouTube.
Step 1. First, go to “youtube.com” on Safari and sign in.

Step 2. Then tap on the “account” icon at the top right side of the screen.
Step 3. Hit on the “Upload” icon and wait to be redirected to the YouTube Studio desktop site.
Step 4. Click on the “Select Files” option.
Step 5. Choose the video you wish to add to YouTube from the “Photo” library and tap on the “Add” button.

Step 6. Add your video’s “title and description” and hit the “Next” button.
Step 7. Tap on the “Next” button once more to go to the “Visibility” page.
Step 8. Select the “Public” option to upload your video to the public.
Why your phone doesn’t post videos to YouTube
Despite learning how to upload to YouTube from iPhone, you may be perplexed to realize that your phone refuses to post videos to YouTube. What could be the reason?
1) YouTube issues
In most cases, the problem doesn’t arise from your phone but from YouTube. This streaming app may also experience some hitches along the way. Remember that even if your phone sync with your YouTube account to upload videos from the “Camera Roll,” YouTube isn’t managed from the Camera Roll but the YouTube app directly. You can solve the issue by signing out of your YouTube account and signing back in.
2) Connection Strength
Some videos may appear quite large and cause a time-out during the upload process. Check your Wi-Fi or internet connection strength to determine if it needs a boost or wait until the streaming strength is strong for a quick upload. Test your internet speed by searching “internet test speed” on Google. Then click the “Run Speed Test” in the search box. A window will open and give you an estimate of the Mbps that your connection is operating at. If too low, switch to other alternatives.
3) Verify your YouTube account
Verifying your account will help you to enjoy YouTube’s full features. It’s then that you’ll manage to upload videos without any drawbacks. Also, that’s when you’ll manage to upload longer videos that go beyond the 15-minute duration.
4) Pay attention to the video size
There is a limit for videos to post to YouTube. If it is too large or long, the upload will cancel before completion.
5) Be patient
YouTube can save your partial upload for 24 hours. So, you can continue to upload from where you left. Learn to be patient as there could be a surge of user traffic, especially during evenings.
Make your YouTube video better with Filmora
Good video quality will make you go miles ahead of your marketing gig. You can use Filmora mobile application to make your videos look better before uploading them to YouTube. This intuitive video editing app has advanced features and several ways to compose creative videos.
- Stunning video effects that let you add animated text to video
- Easily record your voice-overs with its perfect sound effects
- Split functionality that allows you to slice your video footage into two or more separate video clips
- Playback your clips in reverse and adjust the speed for fast or slow motion
- Select the best aspect ratio for your video
- Advanced camera to create emoji selfies and other video beautification
- Directly share your videos to social media sites like YouTube and Facebook.
Check out the steps to edit your video with Filmora on your iOS device
Step 1. Download and install Filmora
For iOS devices, go to the “Apple Store” to download and install the app. Also, allow it to access your videos, camera, and pictures in the process.
Step 2. Import video
You may already have a video in your library that you wish to upload to YouTube. Nonetheless, you can shoot a video afresh to add. To shoot one, you need to settle on a topic before recording and downloading other images you may need. Ensure you watch what you are filming and use adequate lighting during the shooting process.
Next, begin to import your video file. Just open the application and select the “Create new video” option. Then choose the “Video” icon and select a folder that contains the video to be added. Hit the “Add” button from the bottom right corner.
Step 3. Edit video
Filmora has several editing features to make your video better. Use the “Edit tools” feature to turn your video into an impeccable piece. Easily add filters, adjust the speed, or create subtitles, among other functions. You can also split, trim, or delete the unwanted clip parts.
It is important to add a title and description to your video. Just use the “Titles” button to add the title. Other precepts that you can add include transitions, sound like voice-over,
Step 4. Export and share
You’ve just finished creating and editing your video. Click on the “Save” tab and let the application export your video. Then select the “Save to Camera Roll” option to save the video to your iPhone. Finally, you can upload and share the video directly to your YouTube account.
Conclusion
● However, it appears to be a difficult task; you must have found relief after going through these procedures. You don’t need prior knowledge on how to upload a video to YouTube from your iPhone. Several options are at your disposal. You can use the Safari, YouTube app, or the Photo app to upload your videos. The better part is that you can create top-notch videos with Filmora. This mobile video editing app has a lot to offer, ensuring quality content.
Initially, iOS users had the option to load videos directly to YouTube via the tap-to-upload feature. However, this option is missing in the recent iOS devices versions. Therefore, many users search for possible ways to post a video on YouTube from iPhone. For this, you have to put some considerations into place before moving on. The video title length should not exceed 100 characters, while the description is maintained at 5,000 characters. Also, ensure the video length doesn’t exceed 15 minutes. Let’s roll out the best ways to upload your videos and make that big catch on subscribers.
In this article
01 [ How to upload a video to YouTube from iPhone or iPad](#Part 1)
02 [Why your phone doesn’t post videos to YouTube](#Part 2)
03 [Make your YouTube video better with Filmora](#Part 3)
How to upload a video to YouTube from iPhone or iPad
Are you ready to start on that big adventure and share your videos on YouTube? Follow these steps to learn how to upload a video to YouTube from your iPhone.
Method 1: Upload using the YouTube iOS app
Using the YouTube app is the simplest way to upload your YouTube videos. The YouTube app should be installed on your iOS device.
Step 1. Launch the YouTube app on your device, then sign in to your account. If you don’t have an account yet, you will need to “Sign up” for a new one before continuing the upload process.
Step 2. Click on the “+” icon found at the bottom of the screen.
Step 3. Then choose the “Upload a video” option from the populated list of options.
Step 4. Check out the pop-up that appears and “Allow access” to it.
Step 5. Edit your video to your preference by trimming or cropping as you desire. Then click on the “Next” option.
Step 6. Add “title and description” to your video. Remember, the title should contain less than 100 characters and the description no more than 500 characters.
Step 7. Then set the visibility mode as “Public” to enable you to share your video over the internet.
Step 8. Click on the “Upload” button to finally upload your video to YouTube.
Method 2: Upload using Photo App
The Photo App has a “Share” option that you can use to upload your videos to YouTube. Here is the guide.
Step 1. Go to your iOS device and tap on the “Photos” app.
Step 2. Then tap on the “Videos Folder” to locate the video you wish to upload to YouTube.
Step 3. Next, tap on the video that you want to upload.
Step 4. Then tap on the “Share” icon located at the bottom left of your iOS device screen.
Step 5. You’ll then access a “Share” menu from where you have various share options for your video.
Step 6. Choose the “YouTube” option to continue to share your video there. At this juncture, ensure you have logged in to your Google Account.
Step 7. You need to provide a “Title” and “Description” of your video. Then go to the “Privacy” Options and make your video “Public.”
Step 8. Finally, tap on the “Publish” tab found at the top-right corner of your screen to make your video viewable by the public.
Method 3: Upload video to YouTube using Safari
Safari is another alternative method to upload a video to YouTube.
Step 1. First, go to “youtube.com” on Safari and sign in.
Step 2. Then tap on the “account” icon at the top right side of the screen.
Step 3. Hit on the “Upload” icon and wait to be redirected to the YouTube Studio desktop site.
Step 4. Click on the “Select Files” option.
Step 5. Choose the video you wish to add to YouTube from the “Photo” library and tap on the “Add” button.
Step 6. Add your video’s “title and description” and hit the “Next” button.
Step 7. Tap on the “Next” button once more to go to the “Visibility” page.
Step 8. Select the “Public” option to upload your video to the public.
Why your phone doesn’t post videos to YouTube
Despite learning how to upload to YouTube from iPhone, you may be perplexed to realize that your phone refuses to post videos to YouTube. What could be the reason?
1) YouTube issues
In most cases, the problem doesn’t arise from your phone but from YouTube. This streaming app may also experience some hitches along the way. Remember that even if your phone sync with your YouTube account to upload videos from the “Camera Roll,” YouTube isn’t managed from the Camera Roll but the YouTube app directly. You can solve the issue by signing out of your YouTube account and signing back in.
2) Connection Strength
Some videos may appear quite large and cause a time-out during the upload process. Check your Wi-Fi or internet connection strength to determine if it needs a boost or wait until the streaming strength is strong for a quick upload. Test your internet speed by searching “internet test speed” on Google. Then click the “Run Speed Test” in the search box. A window will open and give you an estimate of the Mbps that your connection is operating at. If too low, switch to other alternatives.
3) Verify your YouTube account
Verifying your account will help you to enjoy YouTube’s full features. It’s then that you’ll manage to upload videos without any drawbacks. Also, that’s when you’ll manage to upload longer videos that go beyond the 15-minute duration.
4) Pay attention to the video size
There is a limit for videos to post to YouTube. If it is too large or long, the upload will cancel before completion.
5) Be patient
YouTube can save your partial upload for 24 hours. So, you can continue to upload from where you left. Learn to be patient as there could be a surge of user traffic, especially during evenings.
Make your YouTube video better with Filmora
Good video quality will make you go miles ahead of your marketing gig. You can use Filmora mobile application to make your videos look better before uploading them to YouTube. This intuitive video editing app has advanced features and several ways to compose creative videos.
- Stunning video effects that let you add animated text to video
- Easily record your voice-overs with its perfect sound effects
- Split functionality that allows you to slice your video footage into two or more separate video clips
- Playback your clips in reverse and adjust the speed for fast or slow motion
- Select the best aspect ratio for your video
- Advanced camera to create emoji selfies and other video beautification
- Directly share your videos to social media sites like YouTube and Facebook.
Check out the steps to edit your video with Filmora on your iOS device
Step 1. Download and install Filmora
For iOS devices, go to the “Apple Store” to download and install the app. Also, allow it to access your videos, camera, and pictures in the process.
Step 2. Import video
You may already have a video in your library that you wish to upload to YouTube. Nonetheless, you can shoot a video afresh to add. To shoot one, you need to settle on a topic before recording and downloading other images you may need. Ensure you watch what you are filming and use adequate lighting during the shooting process.
Next, begin to import your video file. Just open the application and select the “Create new video” option. Then choose the “Video” icon and select a folder that contains the video to be added. Hit the “Add” button from the bottom right corner.
Step 3. Edit video
Filmora has several editing features to make your video better. Use the “Edit tools” feature to turn your video into an impeccable piece. Easily add filters, adjust the speed, or create subtitles, among other functions. You can also split, trim, or delete the unwanted clip parts.
It is important to add a title and description to your video. Just use the “Titles” button to add the title. Other precepts that you can add include transitions, sound like voice-over,
Step 4. Export and share
You’ve just finished creating and editing your video. Click on the “Save” tab and let the application export your video. Then select the “Save to Camera Roll” option to save the video to your iPhone. Finally, you can upload and share the video directly to your YouTube account.
Conclusion
● However, it appears to be a difficult task; you must have found relief after going through these procedures. You don’t need prior knowledge on how to upload a video to YouTube from your iPhone. Several options are at your disposal. You can use the Safari, YouTube app, or the Photo app to upload your videos. The better part is that you can create top-notch videos with Filmora. This mobile video editing app has a lot to offer, ensuring quality content.
Experience Beyond Reality with These Immersive Titles
Versatile YouTube Video Editor - Filmora
An easy yet powerful editor
Numerous effects to choose from
Detailed tutorials provided by the official channel
The pandemic in 2020 was a significant event that disrupted everyone globally. Video calls and virtual events became the run-to for most workers. This caused a lot of people to embrace the idea of virtualization.
Viewers needed new ways to experience performances and shows. Then, new virtual reality (VR) headsets entered the market, making people amazed as they did the best of what an average standalone headset could do. VR videos give real-like visual effects that will amaze and make you feel in the same surrounding as in the video background. And with the arrival of futuristic VR video Youtubers, creative videos are coming all around. Through this article, let’s look over the best YouTube VR Videos and understand how YouTube VR 360 videos differ from each other.
In this article
01 What is a VR video on YouTube?
02 10 Best VR Videos on YouTube for 2021
03 Where to Watch VR Videos besides YouTube?
04 Choose High-Quality VR Headsets
Part 1: What is a VR video on YouTube?
Firstly, it is essential to understand a VR Video on YouTube and how it differs from 360 videos?
VR Videos YouTube – For VR Videos with the YouTube mobile app, you can watch VR videos alongside cardboard. You will have an immersive feeling while watching this as you feel present in the scene actions while having your field of vision covered with a viewing device.
Though both YouTube VR and 360 give an immersive viewing experience with 360-degree coverage, still YouTube 360 videos reflect live actions with modified cameras accessible through 360-degree video-compatible devices. YouTube 360 videos are also viewable on devices such as smartphones, computers, etc., that are compatible. However, here, video progression is not under viewers’ control.
On the other hand, VR videos with VR headsets give options to control the viewing experience, such as interacting, running, walk with the video from the viewer’s end.
Part 2: 10 Best VR Videos on YouTube for 2021
You must be eager to start your voyage to VR YouTube videos. So let’s move ahead with the below-mentioned options that cover the ten best YouTuber VR Videos.
1. 360° VR GALACTUS EVENT | The End of season Fortnite Event
The production of VR videos from the 360 worlds games is becoming a live event model, making video creators keep these incredible experiences with this end-of-season Fortnite event.
2. Around the Planet in 2 Minutes
This video offers viewers a glimpse of other travel videos on the channel while leading them to various locations worldwide.
3. Ascension by David Blaine (YouTube 360 Video)
This version of the YouTube 360 video gives viewers a view of it from the first-person point of view. This video broke YouTube records with its 22+million views within a short while.
4. Beautifully Broken by Warren Haynes and Danny Louis
In this video, Warren Haynes and Danny Louis mirrored the constraints of the moment implicitly, taking their craft outdoors.
5. China, One week before Coronavirus Lockdown
This experience gives one the view of different structures like plants, people, and nature at large.
6. The Dawn of Art; AVirtual Journey inside Chauvet Cave
This animated tour is being narrated into a cave by Daisy Ridley. The video is known for holding the best figurative cave painting in the world kept for 36,000 years.
7. Guardians of the Kingdom
This video exposes the relationship between whales and humans by the incidences between two mothers; a human and a whale.
8. HowVolcanoes Affect Earth’s Climate over Millions of Years
Here, viewers get to see how volcanoes spew carbon dioxide and other gases into the air, changing the earth’s climate through that.
9. Inside NYC’s Skinniest Supertall Skyscraper
In this video, the viewers see the views of the central park and the iconic US metropolis.
10. Lockdown Around the World | National Geographic
This video is from National Geographic. It exposes a view of crowded cities in an unprecedented period like the lockdown.
Part 3: Where to Watch VR Videos besides YouTube?
You may wonder whether there are other platforms where you can watch VR videos.
The good news is: Yes! Besides YouTube, we have platforms where viewers can watch VR videos and have an immersive experience. Read on to know them.
1. Vimeo 360
This platform allows users to upload, play, and even share their VR videos with their friends on apps like Facebook and YouTube.
2. Oculus Gear VR store
Users can watch their YouTube VR Oculus videos on this platform with apps like Samsung XR, Skybox VR video player, etc. They are also allowed to download games apps.
3. Steam Powered
Steam Powered is known for VR titles and gets support from good VR headsets.
Part 4: Choose High-Quality VR Headsets
There are quite a good number of VR Headsets, but we have the option of choosing a high-quality VR headset that should be able to deliver a wonderful experience. This is what every user wants. Let’s take a good look at a few of them.
1. Oculus Quest 2
This VR headset is top-notch. Its impressive flexibility, backed by its shocking price, will make one not want to look elsewhere.
No need to worry about screen-door effects as the headset possesses a high per-eye resolution—smooth 90Hz refreshing rate just like the Rift CV1 Oculus. Based on the Qualcomm Snapdragon chipset, XR2 resulted in excellent standalone performance. It’s also capable of linking up with gaming PC for desktop experiences.

2. PlayStation VR
A lot of VR games have come out on PlayStation VR. The PlayStation VR gives PS4 users an excellent and quality experience. However, it doesn’t have the highest resolution displays and cannot go for wild, room-scale tracking.
It has a 960 x 1,080 per-eye resolution and offers a 120Hz refresh rate for quality experiences. Its 100-degree field of view, motion controllers, and separate camera are suitable for unlocking immersive gameplay. A fantastic thing about it is that although it was for the PS4 and PS4 Pro, Sony ensured it’ll also run on the PS5.

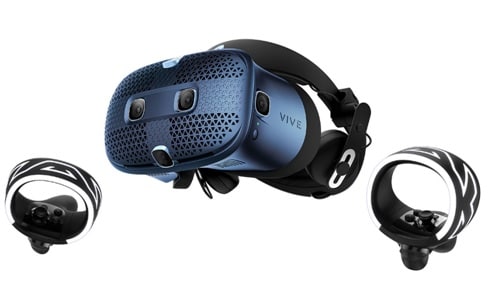
3. HTC Vive Cosmos
The HTC Vive Cosmos is the latest HTC headset in town. Overall combined 2,880 x 1,700 resolution provides optimally sharp resolution for the eyes that is 1,440 x 1,700.
This headset has an easy-to-wear halo-style headband and attached headphones for spatial audio. It’s a highly versatile headset that allows users to switch which version of the Cosmos they’re using by simply swapping out the faceplate, controllers, and any tracking base station.
Part 5: FAQs about VR Videos
Let’s take a look at some questions by VR viewers.
Who is the Most Popular VR YouTuber?
‘Nathie’ is the most popular VR YouTuber today. He is a Netherland-based content creator whose niche is VR technology. His channel has stupendous 600k subscribers.
Is VR Bad for Your Eyes?
According to research, there is evidence that wearing VR Headsets can cause the eyesight to deteriorate, causing eye strain, discomfort, and making the vision blur.
What is the Future of VR?
VR is known for giving immersive experiences in various aspects of life and career. Education, Sports events, technology, and lots more are fields where VR is in use with artificial intelligence.
Over time, it has been a lifesaver, being helpful to many in various locations worldwide and has been even more accessible than it used to be. The future of VR holds more opportunities for us as it evolves daily.
So, the end is not coming to it anytime soon.
Conclusion
In the world today, everyone has the opportunity to experience technology at its best through VR, and the good thing is that its rapid evolvement is an assurance that it’s not ending soon. Every man and business needs VR to grow as its opportunities are massive. Whether with YouTube VR Oculus or any other platform, getting the real essence of visualization creates a big difference.
The future holds more great ways and opportunities to make things easy for us with VR. Thus, through the article, you will get to know many YouTube 360 videos and VR Videos YouTube platforms so that entertainment does not end with simple videos but goes beyond expectations.
The pandemic in 2020 was a significant event that disrupted everyone globally. Video calls and virtual events became the run-to for most workers. This caused a lot of people to embrace the idea of virtualization.
Viewers needed new ways to experience performances and shows. Then, new virtual reality (VR) headsets entered the market, making people amazed as they did the best of what an average standalone headset could do. VR videos give real-like visual effects that will amaze and make you feel in the same surrounding as in the video background. And with the arrival of futuristic VR video Youtubers, creative videos are coming all around. Through this article, let’s look over the best YouTube VR Videos and understand how YouTube VR 360 videos differ from each other.
In this article
01 What is a VR video on YouTube?
02 10 Best VR Videos on YouTube for 2021
03 Where to Watch VR Videos besides YouTube?
04 Choose High-Quality VR Headsets
Part 1: What is a VR video on YouTube?
Firstly, it is essential to understand a VR Video on YouTube and how it differs from 360 videos?
VR Videos YouTube – For VR Videos with the YouTube mobile app, you can watch VR videos alongside cardboard. You will have an immersive feeling while watching this as you feel present in the scene actions while having your field of vision covered with a viewing device.
Though both YouTube VR and 360 give an immersive viewing experience with 360-degree coverage, still YouTube 360 videos reflect live actions with modified cameras accessible through 360-degree video-compatible devices. YouTube 360 videos are also viewable on devices such as smartphones, computers, etc., that are compatible. However, here, video progression is not under viewers’ control.
On the other hand, VR videos with VR headsets give options to control the viewing experience, such as interacting, running, walk with the video from the viewer’s end.
Part 2: 10 Best VR Videos on YouTube for 2021
You must be eager to start your voyage to VR YouTube videos. So let’s move ahead with the below-mentioned options that cover the ten best YouTuber VR Videos.
1. 360° VR GALACTUS EVENT | The End of season Fortnite Event
The production of VR videos from the 360 worlds games is becoming a live event model, making video creators keep these incredible experiences with this end-of-season Fortnite event.
2. Around the Planet in 2 Minutes
This video offers viewers a glimpse of other travel videos on the channel while leading them to various locations worldwide.
3. Ascension by David Blaine (YouTube 360 Video)
This version of the YouTube 360 video gives viewers a view of it from the first-person point of view. This video broke YouTube records with its 22+million views within a short while.
4. Beautifully Broken by Warren Haynes and Danny Louis
In this video, Warren Haynes and Danny Louis mirrored the constraints of the moment implicitly, taking their craft outdoors.
5. China, One week before Coronavirus Lockdown
This experience gives one the view of different structures like plants, people, and nature at large.
6. The Dawn of Art; AVirtual Journey inside Chauvet Cave
This animated tour is being narrated into a cave by Daisy Ridley. The video is known for holding the best figurative cave painting in the world kept for 36,000 years.
7. Guardians of the Kingdom
This video exposes the relationship between whales and humans by the incidences between two mothers; a human and a whale.
8. HowVolcanoes Affect Earth’s Climate over Millions of Years
Here, viewers get to see how volcanoes spew carbon dioxide and other gases into the air, changing the earth’s climate through that.
9. Inside NYC’s Skinniest Supertall Skyscraper
In this video, the viewers see the views of the central park and the iconic US metropolis.
10. Lockdown Around the World | National Geographic
This video is from National Geographic. It exposes a view of crowded cities in an unprecedented period like the lockdown.
Part 3: Where to Watch VR Videos besides YouTube?
You may wonder whether there are other platforms where you can watch VR videos.
The good news is: Yes! Besides YouTube, we have platforms where viewers can watch VR videos and have an immersive experience. Read on to know them.
1. Vimeo 360
This platform allows users to upload, play, and even share their VR videos with their friends on apps like Facebook and YouTube.
2. Oculus Gear VR store
Users can watch their YouTube VR Oculus videos on this platform with apps like Samsung XR, Skybox VR video player, etc. They are also allowed to download games apps.
3. Steam Powered
Steam Powered is known for VR titles and gets support from good VR headsets.
Part 4: Choose High-Quality VR Headsets
There are quite a good number of VR Headsets, but we have the option of choosing a high-quality VR headset that should be able to deliver a wonderful experience. This is what every user wants. Let’s take a good look at a few of them.
1. Oculus Quest 2
This VR headset is top-notch. Its impressive flexibility, backed by its shocking price, will make one not want to look elsewhere.
No need to worry about screen-door effects as the headset possesses a high per-eye resolution—smooth 90Hz refreshing rate just like the Rift CV1 Oculus. Based on the Qualcomm Snapdragon chipset, XR2 resulted in excellent standalone performance. It’s also capable of linking up with gaming PC for desktop experiences.
2. PlayStation VR
A lot of VR games have come out on PlayStation VR. The PlayStation VR gives PS4 users an excellent and quality experience. However, it doesn’t have the highest resolution displays and cannot go for wild, room-scale tracking.
It has a 960 x 1,080 per-eye resolution and offers a 120Hz refresh rate for quality experiences. Its 100-degree field of view, motion controllers, and separate camera are suitable for unlocking immersive gameplay. A fantastic thing about it is that although it was for the PS4 and PS4 Pro, Sony ensured it’ll also run on the PS5.
3. HTC Vive Cosmos
The HTC Vive Cosmos is the latest HTC headset in town. Overall combined 2,880 x 1,700 resolution provides optimally sharp resolution for the eyes that is 1,440 x 1,700.
This headset has an easy-to-wear halo-style headband and attached headphones for spatial audio. It’s a highly versatile headset that allows users to switch which version of the Cosmos they’re using by simply swapping out the faceplate, controllers, and any tracking base station.
Part 5: FAQs about VR Videos
Let’s take a look at some questions by VR viewers.
Who is the Most Popular VR YouTuber?
‘Nathie’ is the most popular VR YouTuber today. He is a Netherland-based content creator whose niche is VR technology. His channel has stupendous 600k subscribers.
Is VR Bad for Your Eyes?
According to research, there is evidence that wearing VR Headsets can cause the eyesight to deteriorate, causing eye strain, discomfort, and making the vision blur.
What is the Future of VR?
VR is known for giving immersive experiences in various aspects of life and career. Education, Sports events, technology, and lots more are fields where VR is in use with artificial intelligence.
Over time, it has been a lifesaver, being helpful to many in various locations worldwide and has been even more accessible than it used to be. The future of VR holds more opportunities for us as it evolves daily.
So, the end is not coming to it anytime soon.
Conclusion
In the world today, everyone has the opportunity to experience technology at its best through VR, and the good thing is that its rapid evolvement is an assurance that it’s not ending soon. Every man and business needs VR to grow as its opportunities are massive. Whether with YouTube VR Oculus or any other platform, getting the real essence of visualization creates a big difference.
The future holds more great ways and opportunities to make things easy for us with VR. Thus, through the article, you will get to know many YouTube 360 videos and VR Videos YouTube platforms so that entertainment does not end with simple videos but goes beyond expectations.
- Title: "2024 Approved Top Techniques Uploading YouTube Videos on iPhone/iPad"
- Author: Thomas
- Created at : 2024-05-31 12:39:53
- Updated at : 2024-06-01 12:39:53
- Link: https://youtube-help.techidaily.com/2024-approved-top-techniques-uploading-youtube-videos-on-iphoneipad/
- License: This work is licensed under CC BY-NC-SA 4.0.
