
:max_bytes(150000):strip_icc()/GettyImages-1271990303-32f5706e9f8f4bdf940b6eedc13f5e67.jpg)
"Exploring Vlogging Selecting the Best Cameras & Lenses for 2024"
Exploring Vlogging: Selecting the Best Cameras & Lenses
A Vlogger’s Guide To Camera Lenses

Richard Bennett
Nov 01, 2022• Proven solutions
The staple of any vlog is the talking headshot, a shot of the speaker talking directly to the audience. You can compose this shot with different kinds of lenses for your interchangeable lens camera.
But which kind of lens is the right lens for you as a vlogger?
In this article, I’m going to help you figure that out.
- Part 1: Three Focal Length Groups: Wide, Standard, Telephoto
- Part 2: Vlogging With Each Focal Length Group
- Part 3: Crop Factor
- Part 4: Focal Length Equivalency Table
- Part 5: Aperture
- Part 6: Vlogging With a Fast Lens
- Part 7: Optical Image Stabilization
Three Focal Length Groups: Wide, Standard, Telephoto
There are three main ranges in focal lengths that camera lenses can be categorized into wide, standard, and telephoto.
Wide-Angle Lens
Wide-angle lenses can “see more.” They allow more of your scene to fit inside your frame. Objects that are closer to the lens appear much bigger while objects that are further away appear even smaller. Perspectives are also enhanced, making close objects and people that just make it into the sides of the frame appear more stretched out. Out of all the other ranges in focal lengths, wide-angle lenses will appear the least zoomed in.
Standard Lens
With standard lenses or normal lenses, you won’t get the stretched out objects or enhanced perspectives that you get from wide-angle lenses. Instead, standard lenses are meant to see scenes as the natural human eye is meant to see them. If you shoot a scene with both a wide-angle lens and a standard lens from the same position, you’ll notice that less of the scene fits into your frame. Standard lenses will appear more zoomed-in than wide-angle lenses, but less zoomed-in than telephoto lenses.
Telephoto Lens
Out of all the other ranges in focal lengths, telephoto lenses will appear the most zoomed in. This can be beneficial for the shooter who wants to get a closer shot of a scene without having to physically be in close proximity to the scene. Objects that are further away in the background also appear larger and closer than they would appear on wide-angle or standard lenses.
Vlogging With Each Focal Length Group
You can get your talking head footage using lenses from any of the three focal length groups. Depending on how you plan to vlog most of the time, though, one of the three focal lengths might be more suitable for you.
When to vlog with a wide-angle lens
Wide-angle lenses are the most commonly used lenses for vlogging. Wide-angle lenses are great when you need to be close to your camera. This might be the case for you if your recording space is small or if you want to film yourself as you hold your camera up with your own hand.
Being close to your camera not only gives you the option to use your camera’s built-in microphone, but it also gives you the option to make use of camera-mounted shotgun microphones.
When to vlog with a standard lens
Standard lenses are great when you have more space to be further away from your camera. The perspectives in your shot will look more natural through a standard lens, making your talking head footage feel more corporate or professional. You’ll also be able to get blurrier backgrounds using a standard lens versus a wide-angle lens.
Being further away from your camera, however, means that you’ll have to use a separate microphone positioned closer to you.
When to vlog with a telephoto lens
As telephoto lenses are even more zoomed in, you’ll need to be even further away from your camera to fit yourself inside your camera frame. Why would any vlogger ever need to be that far away from their camera? One word… teleprompter. If you want or need to stick to a script, you’ll have to be far away enough from your camera that it doesn’t appear like your eyes are scanning left to right. You then close in the distance with a telephoto lens.
In the above video, Marcos Rocha compares different focal lengths for talking head videos. Which focal length range do you like the look of?
Crop Factor
Focal lengths in camera lenses are measured in millimeters. You can vlog yourself handheld with a 24mm lens on a camera with a full-frame sensor (the sensor is the piece of hardware inside your camera that turns the light it receives into a digital image). But if you use a 24mm lens on a camera with a smaller sensor, like an APS-C sensor or even smaller Micro 4/3 sensor, more of you will get cropped out (see below).

In order to make up for the cropping that occurs, you will need to use a wider lens on cameras with smaller sensors to get the same shot you’d get with a full-frame camera.
Focal Length Equivalency Table
This table shows you the focal lengths needed to achieve the same shot between cameras with different sensor sizes. In order to take a shot as wide as the shot I took of myself with the 24mm lens on my full-frame camera, I would need a 15mm lens on an APS-C sensor camera or a 12mm lens on a micro 4/3 camera.
| Focal Length / Sensor | Full Frame | APS-C | Micro 4/3 |
|---|---|---|---|
| Wide (Handheld Selfie-Safe) | 16mm | 10mm | 8mm |
| Wide (Handheld Selfie-Safe) | 18mm | 11mm | 9mm |
| Wide (Handheld Selfie-Safe) | 24mm | 15mm | 12mm |
| Wide | 35mm | 22mm | 18mm |
| Standard | 50mm | 31mm | 25mm |
| Telephoto | 70mm | 44mm | 35mm |
| Telephoto | 100mm | 63mm | 50mm |
| Telephoto | 200mm | 125mm | 100mm |
Aperture

The next thing to consider when you’re looking for a lens is the aperture, the hole (often adjustable) within the lens that lets light in. Aperture for camera lenses is measured in f-stops (f/1.4, f/1.8, f/2.0) - the smaller the f-stop number, the larger the aperture (bigger hole letting even more light in).

Because larger aperture lenses let more light in, they need a shorter time for cameras to compose an image. This is why larger aperture lenses are also called “fast” lenses.
Fast lenses are more expensive because they cost more to produce. There’s a lot more that goes into them, including larger and higher quality glass elements.
But do you even need a fast lens?
Vlogging With a Fast Lens
Pros of Vlogging With a Fast Lens
- Better low-light performance
- Better autofocus performance
- Better “bokeh” (out-of-focus areas, like your background, having that nice blurry look that you see in a lot of movies)
Cons of Vlogging With a Fast Lens
- More expensive
- Moving subjects more likely to get out of focus when shooting with a large aperture
- Better continuous autofocus performance needed when shooting moving subjects with a large aperture
Optical Image Stabilization
Finally, you’ll have to decide whether or not you want your lens to have built-in optical image stabilization (OIS).
OIS is very beneficial to have on a lens if you’re a vlogger who films mostly handheld footage. Although this technology adds to the price of your lens as well, it can greatly help you to capture smoother footage that may otherwise be shaky. Nikon calls this technology “Vibration Reduction” (VR) for their lenses.
In the above video, you can see how much OIS can help to stabilize your footage. MicBergsma simultaneously compares the footage between two GoPro Hero5 Blacks, one with OIS on and one with OIS off.
If, however, you are shooting most of your vlogs on a tripod, you won’t need a lens with OIS.
Looking for ways to set up your talking-head shot for YouTube with any of these lenses? Check out our post on 4 Ways To Set Up Your Talking-Head Shots For YouTube .
Richard Bennett
Richard Bennett is a writer and a lover of all things video.
Follow @Richard Bennett
Richard Bennett
Nov 01, 2022• Proven solutions
The staple of any vlog is the talking headshot, a shot of the speaker talking directly to the audience. You can compose this shot with different kinds of lenses for your interchangeable lens camera.
But which kind of lens is the right lens for you as a vlogger?
In this article, I’m going to help you figure that out.
- Part 1: Three Focal Length Groups: Wide, Standard, Telephoto
- Part 2: Vlogging With Each Focal Length Group
- Part 3: Crop Factor
- Part 4: Focal Length Equivalency Table
- Part 5: Aperture
- Part 6: Vlogging With a Fast Lens
- Part 7: Optical Image Stabilization
Three Focal Length Groups: Wide, Standard, Telephoto
There are three main ranges in focal lengths that camera lenses can be categorized into wide, standard, and telephoto.
Wide-Angle Lens
Wide-angle lenses can “see more.” They allow more of your scene to fit inside your frame. Objects that are closer to the lens appear much bigger while objects that are further away appear even smaller. Perspectives are also enhanced, making close objects and people that just make it into the sides of the frame appear more stretched out. Out of all the other ranges in focal lengths, wide-angle lenses will appear the least zoomed in.
Standard Lens
With standard lenses or normal lenses, you won’t get the stretched out objects or enhanced perspectives that you get from wide-angle lenses. Instead, standard lenses are meant to see scenes as the natural human eye is meant to see them. If you shoot a scene with both a wide-angle lens and a standard lens from the same position, you’ll notice that less of the scene fits into your frame. Standard lenses will appear more zoomed-in than wide-angle lenses, but less zoomed-in than telephoto lenses.
Telephoto Lens
Out of all the other ranges in focal lengths, telephoto lenses will appear the most zoomed in. This can be beneficial for the shooter who wants to get a closer shot of a scene without having to physically be in close proximity to the scene. Objects that are further away in the background also appear larger and closer than they would appear on wide-angle or standard lenses.
Vlogging With Each Focal Length Group
You can get your talking head footage using lenses from any of the three focal length groups. Depending on how you plan to vlog most of the time, though, one of the three focal lengths might be more suitable for you.
When to vlog with a wide-angle lens
Wide-angle lenses are the most commonly used lenses for vlogging. Wide-angle lenses are great when you need to be close to your camera. This might be the case for you if your recording space is small or if you want to film yourself as you hold your camera up with your own hand.
Being close to your camera not only gives you the option to use your camera’s built-in microphone, but it also gives you the option to make use of camera-mounted shotgun microphones.
When to vlog with a standard lens
Standard lenses are great when you have more space to be further away from your camera. The perspectives in your shot will look more natural through a standard lens, making your talking head footage feel more corporate or professional. You’ll also be able to get blurrier backgrounds using a standard lens versus a wide-angle lens.
Being further away from your camera, however, means that you’ll have to use a separate microphone positioned closer to you.
When to vlog with a telephoto lens
As telephoto lenses are even more zoomed in, you’ll need to be even further away from your camera to fit yourself inside your camera frame. Why would any vlogger ever need to be that far away from their camera? One word… teleprompter. If you want or need to stick to a script, you’ll have to be far away enough from your camera that it doesn’t appear like your eyes are scanning left to right. You then close in the distance with a telephoto lens.
In the above video, Marcos Rocha compares different focal lengths for talking head videos. Which focal length range do you like the look of?
Crop Factor
Focal lengths in camera lenses are measured in millimeters. You can vlog yourself handheld with a 24mm lens on a camera with a full-frame sensor (the sensor is the piece of hardware inside your camera that turns the light it receives into a digital image). But if you use a 24mm lens on a camera with a smaller sensor, like an APS-C sensor or even smaller Micro 4/3 sensor, more of you will get cropped out (see below).
In order to make up for the cropping that occurs, you will need to use a wider lens on cameras with smaller sensors to get the same shot you’d get with a full-frame camera.
Focal Length Equivalency Table
This table shows you the focal lengths needed to achieve the same shot between cameras with different sensor sizes. In order to take a shot as wide as the shot I took of myself with the 24mm lens on my full-frame camera, I would need a 15mm lens on an APS-C sensor camera or a 12mm lens on a micro 4/3 camera.
| Focal Length / Sensor | Full Frame | APS-C | Micro 4/3 |
|---|---|---|---|
| Wide (Handheld Selfie-Safe) | 16mm | 10mm | 8mm |
| Wide (Handheld Selfie-Safe) | 18mm | 11mm | 9mm |
| Wide (Handheld Selfie-Safe) | 24mm | 15mm | 12mm |
| Wide | 35mm | 22mm | 18mm |
| Standard | 50mm | 31mm | 25mm |
| Telephoto | 70mm | 44mm | 35mm |
| Telephoto | 100mm | 63mm | 50mm |
| Telephoto | 200mm | 125mm | 100mm |
Aperture
The next thing to consider when you’re looking for a lens is the aperture, the hole (often adjustable) within the lens that lets light in. Aperture for camera lenses is measured in f-stops (f/1.4, f/1.8, f/2.0) - the smaller the f-stop number, the larger the aperture (bigger hole letting even more light in).
Because larger aperture lenses let more light in, they need a shorter time for cameras to compose an image. This is why larger aperture lenses are also called “fast” lenses.
Fast lenses are more expensive because they cost more to produce. There’s a lot more that goes into them, including larger and higher quality glass elements.
But do you even need a fast lens?
Vlogging With a Fast Lens
Pros of Vlogging With a Fast Lens
- Better low-light performance
- Better autofocus performance
- Better “bokeh” (out-of-focus areas, like your background, having that nice blurry look that you see in a lot of movies)
Cons of Vlogging With a Fast Lens
- More expensive
- Moving subjects more likely to get out of focus when shooting with a large aperture
- Better continuous autofocus performance needed when shooting moving subjects with a large aperture
Optical Image Stabilization
Finally, you’ll have to decide whether or not you want your lens to have built-in optical image stabilization (OIS).
OIS is very beneficial to have on a lens if you’re a vlogger who films mostly handheld footage. Although this technology adds to the price of your lens as well, it can greatly help you to capture smoother footage that may otherwise be shaky. Nikon calls this technology “Vibration Reduction” (VR) for their lenses.
In the above video, you can see how much OIS can help to stabilize your footage. MicBergsma simultaneously compares the footage between two GoPro Hero5 Blacks, one with OIS on and one with OIS off.
If, however, you are shooting most of your vlogs on a tripod, you won’t need a lens with OIS.
Looking for ways to set up your talking-head shot for YouTube with any of these lenses? Check out our post on 4 Ways To Set Up Your Talking-Head Shots For YouTube .
Richard Bennett
Richard Bennett is a writer and a lover of all things video.
Follow @Richard Bennett
Discovering YouTube Studio: Where Ideas Become Engaging Content
Where Is Youtube Video Manager? [All You Need to Know]
Richard Bennett
Mar 27, 2024• Proven solutions
If you are a YouTuber and uploads video to your channel then you must need to see the statistics and analytics of your uploads. Sometimes you might want to alter some of the settings in the video that you already have uploaded.
So if you are looking for ways how to manage your videos and your YouTube overall then look no further. The solution lies in the YouTube studio. This is where all your video and their settings can be managed whether using a desktop PC or any smartphone.
So if you are wondering the sole purpose of YouTube studio and how to manage your productions using video manager then stay with us!
You will Learn :
- How YouTube Studio Can Manage Your Uploads?
- What Does A Video Manager Do?
- How to Find Video Manager on YouTube?
- How To Access Video Manager On YouTube Using A Desktop PC?
- How To Access YouTube Manager In YouTube Using Mobile Phones?
- How to Access YouTube Manager on YouTube Using An iPad?
Best Video Editing Software for YouTubers
Making a video with Filmora is simple, as this movie maker enables its users to import virtually any type of footage in just a couple of clicks.
There are one hundred tracks available so you can combine audio and video files effortlessly or add visual effects to them.
Filmora also offers full support for 4K videos,fgxcsd which means that you can use it to edit footage captured with GoPro and other action cameras.
In addition to huge effects and transitions libraries, the Filmora also features a rich selection of royalty-free music and audio effects that you can use to create soundtracks for all of your videos.
Filmora is free to download now. And due to its small Installation package, it’s easy and quick to install.


How YouTube Studio Can Manage Your Uploads?
The primary purpose of the YouTube studio is to manage your YouTube channel overall.
Accessing YouTube studio will let you see the statistics regarding how many people have viewed your videos, replies of any of the comment you made on your videos, and much more. This is where you can access one of the most significant options of Video Manger where you can completely customize the video setting accordingly any time after the uploading of your YouTube video.
What Does A Video Manager Do?
In the YouTube studio option, you will find another great tab of a video manager which will let you edit your productions, add, edit or delete annotation or even caption and perform zillions of similar related options to personalize and manage your video accordingly even after your video has been uploaded.
This gives one a huge margin to change the initial settings of the uploaded video if they came across any error or lacking in the video.
But you may wonder how to actually access the video manager in your YouTube channel to avail such a vast variety of options to customize your video setting and making it into a masterpiece to gain views to a greater extent by viewing, analyzing and improvising the analytics of your productions.
How to Find Video Manager on YouTube?
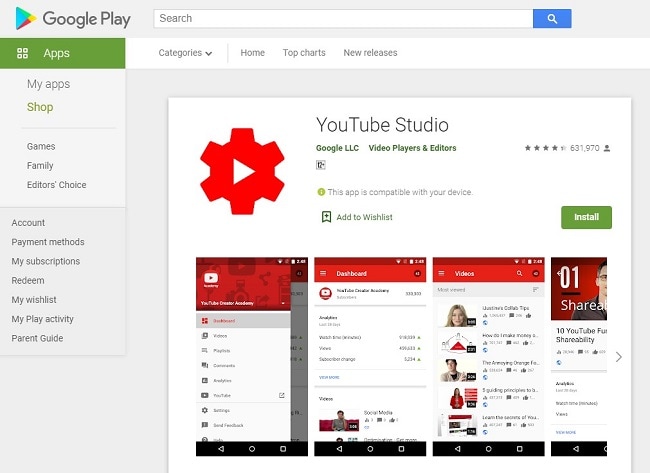
You can go access video manager on your desktop application of YouTube. Although you might need to download YouTube studio if you are looking for a video manager YouTube app. YouTube studio has abundant options in it, including a video manager. So once you download this application in your smartphone, be it iPhone or Android, you can have complete access to all the management features under the video manager option.
Read More to Get : How to Reverse Search a Video >>
How To Access Video Manager On YouTube Using A Desktop PC?
If you need to modify and organize your productions from a single place or just need customization in a particular video to adjust its setting then you can do it with a single click.
Video manager gives you full liberty to tweak the settings of your uploads, making use of tools for video optimization or making bulk update alterations.
So, without further ado, let’s dig into the step by step guide to how to get to YouTube video manager using desktop PC.
Step 1: Sign in to your YouTube account by entering your correct credentials.
Step 2: You will be redirected to the homepage of your YouTube channel.
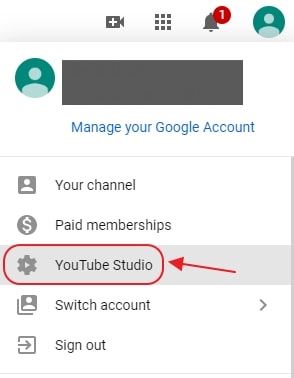
Step 3: At the top right corner of your YouTube main page, there will be your channel profile icon having a circular shape.

Step 4: Click on that icon.
Step 5: You will be served with abundant options in the dropdown, but you need to click on the YouTube studio (beta) option.
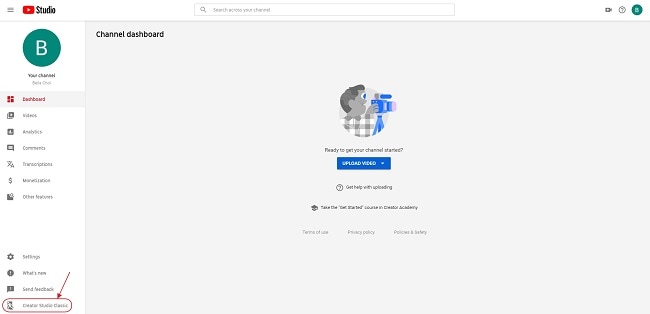
Step 6: This will redirect you to your channel’s dashboard where you will be facilitated with multiple options related to your video uploads, a complete and wholesome package to organize, monitor, improvise and manage your videos in general.
Step 7: At the left pane of the dashboard, you will see Creator Studio Classic at the bottom.
Step 8: Click on Creator Studio Classic.
Step 9: This will redirect you to creator studio. At the left on the window will be a bar full of multiple options where you will see the video manager option right there.
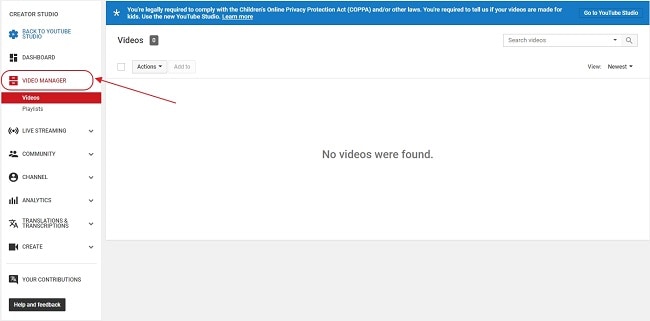
Step 10: Click on the video manager to manage.
Step 11: This will open a drop-down which gives you two options. One of managing your videos and others to organize your playlist or make any modifications as per your likeliness.
Voila! You are here in video manager, having full liberty to make any alteration to the metadata of your YouTube uploads. You are now a single click away to change the video title, its stale or non-captivating caption, adjust comment setting and literally everything right according to your choice.
How To Access YouTube Manager In YouTube Using Mobile Phones?
If you are used to operating your YouTube channel through smartphones like iPhone or any android phone or manage your account activities using a tablet then the process to manage your account remains quite the same.
You don’t need to stress out is you are using a mobile application of YouTube. You can still have complete authority to manage your videos using YouTube video manager mobile, YouTube studio applications.
YouTube studio application is an official tool dedicated to content creator introduced by Google for YouTube. This gives immense ease for the mobile users, either android or iPhone, to manage their videos and update the metadata of their upload by merely using this one application.
All thanks to Google to launch such an amazing and wholesome product, considering the ample number of content creators who use mobile phones to create and manage their productions.
YouTube Studio Application Link for iOS
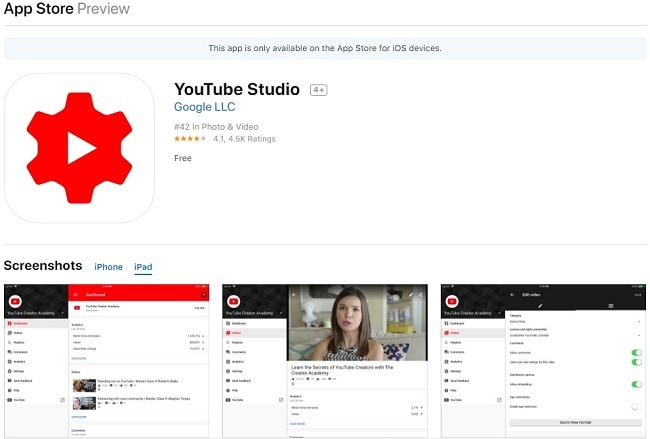
You can download this video manager YouTube application, named as YouTube studio, on your iPhone by clicking the link given here . You can download this YouTube video manager iPhone application on apple store which is absolutely free of cost.
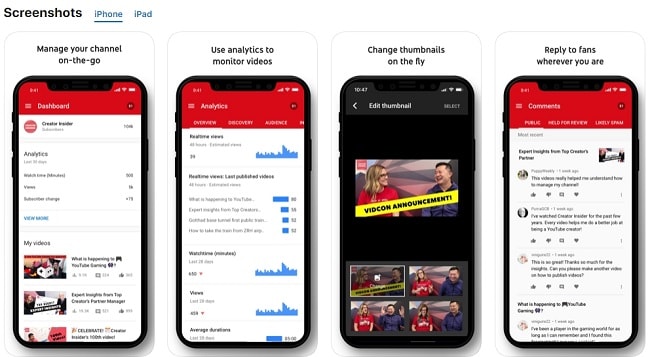
Downloading this tool will make the managing process of your YouTube channel quite easier and faster. Numerous list of options ranging from monitoring latest stats, create or update your productions’ thumbnail images to changing profile picture, reply to your comments, get notifications or organize your playlist on the go and stay connected from literally anywhere.
Features:
- Organize playlist
- Respond to the comments and also moderate them
- Get notified about important events and activities on your channel
- Update video settings like personalizing thumbnail pictures, adding a description, updating titles and monetization.
- Create and modify your profile images.
- Seek for help content using voice
How To Access YouTube Manager In YouTube Using Android?
Similar to the approach we used in for iPhone users, you can download YouTube studio application on google store by clicking on the link given here .
This application is available free on the internet.
If you are an android user and looking for an application that can manage your YouTube channel with an abundance of options, then The official application developed by Google, YouTube Studio is the answer to your question “how to get to YouTube video manager”. It is a powerful tool to give you all the controls to manage and efficiently organize your YouTube channel with great ease and speed.
Features:
- Filter and get an update with the response on the comments
- Monitor video performance and channel activity using user-friendly analytics
- Manage and organize playlist
- Update video settings like schedule dates, personalizing thumbnail pictures, adding description, updating titles and monetization settings.
How to Access YouTube Manager on YouTube Using An iPad?
You can enjoy all the same features as facilitated in the YouTube Studio app for iOS and Android users. All you need is to download this application by clicking on the link given here .
You may find this tool a little overwhelming at the fresh start. There are multiple options given to the users and given full control and independence to manage the video settings as per your requirement for improvisation purposes.
This may take some time to get yourself familiar with this tool. The more you explore deep into it, the more quickly you will get hold onto it.
Worry not! These experiments won’t do any harm to productions, but only make you expertise in a while.
To learn the fundamentals of YouTube Studio application and video manager, you can refer to this site .
Conclusion
The use of YouTube had outgrown to an extent that it has now become a professional career for many which once used to a merely an entertainment platform and get nothing in return for creating content.
But now with the shift of trend, YouTube is taken seriously as a professional domain to earn through the productions or spread awareness and joy to others through one’s creative content. For your content to make an impact, your channel needs thorough management and organization to view your content’s quality by seeing the stats and manage accordingly.
This is now possible to achieve all this within the snap of fingers with great ease offered by this great tool, Video Manager. With this, you can edit and customize your video’s metadata and improvise your video settings to elevate your channel to the next level.
Richard Bennett
Richard Bennett is a writer and a lover of all things video.
Follow @Richard Bennett
Richard Bennett
Mar 27, 2024• Proven solutions
If you are a YouTuber and uploads video to your channel then you must need to see the statistics and analytics of your uploads. Sometimes you might want to alter some of the settings in the video that you already have uploaded.
So if you are looking for ways how to manage your videos and your YouTube overall then look no further. The solution lies in the YouTube studio. This is where all your video and their settings can be managed whether using a desktop PC or any smartphone.
So if you are wondering the sole purpose of YouTube studio and how to manage your productions using video manager then stay with us!
You will Learn :
- How YouTube Studio Can Manage Your Uploads?
- What Does A Video Manager Do?
- How to Find Video Manager on YouTube?
- How To Access Video Manager On YouTube Using A Desktop PC?
- How To Access YouTube Manager In YouTube Using Mobile Phones?
- How to Access YouTube Manager on YouTube Using An iPad?
Best Video Editing Software for YouTubers
Making a video with Filmora is simple, as this movie maker enables its users to import virtually any type of footage in just a couple of clicks.
There are one hundred tracks available so you can combine audio and video files effortlessly or add visual effects to them.
Filmora also offers full support for 4K videos,fgxcsd which means that you can use it to edit footage captured with GoPro and other action cameras.
In addition to huge effects and transitions libraries, the Filmora also features a rich selection of royalty-free music and audio effects that you can use to create soundtracks for all of your videos.
Filmora is free to download now. And due to its small Installation package, it’s easy and quick to install.
How YouTube Studio Can Manage Your Uploads?
The primary purpose of the YouTube studio is to manage your YouTube channel overall.
Accessing YouTube studio will let you see the statistics regarding how many people have viewed your videos, replies of any of the comment you made on your videos, and much more. This is where you can access one of the most significant options of Video Manger where you can completely customize the video setting accordingly any time after the uploading of your YouTube video.
What Does A Video Manager Do?
In the YouTube studio option, you will find another great tab of a video manager which will let you edit your productions, add, edit or delete annotation or even caption and perform zillions of similar related options to personalize and manage your video accordingly even after your video has been uploaded.
This gives one a huge margin to change the initial settings of the uploaded video if they came across any error or lacking in the video.
But you may wonder how to actually access the video manager in your YouTube channel to avail such a vast variety of options to customize your video setting and making it into a masterpiece to gain views to a greater extent by viewing, analyzing and improvising the analytics of your productions.
How to Find Video Manager on YouTube?
You can go access video manager on your desktop application of YouTube. Although you might need to download YouTube studio if you are looking for a video manager YouTube app. YouTube studio has abundant options in it, including a video manager. So once you download this application in your smartphone, be it iPhone or Android, you can have complete access to all the management features under the video manager option.
Read More to Get : How to Reverse Search a Video >>
How To Access Video Manager On YouTube Using A Desktop PC?
If you need to modify and organize your productions from a single place or just need customization in a particular video to adjust its setting then you can do it with a single click.
Video manager gives you full liberty to tweak the settings of your uploads, making use of tools for video optimization or making bulk update alterations.
So, without further ado, let’s dig into the step by step guide to how to get to YouTube video manager using desktop PC.
Step 1: Sign in to your YouTube account by entering your correct credentials.
Step 2: You will be redirected to the homepage of your YouTube channel.
Step 3: At the top right corner of your YouTube main page, there will be your channel profile icon having a circular shape.
Step 4: Click on that icon.
Step 5: You will be served with abundant options in the dropdown, but you need to click on the YouTube studio (beta) option.
Step 6: This will redirect you to your channel’s dashboard where you will be facilitated with multiple options related to your video uploads, a complete and wholesome package to organize, monitor, improvise and manage your videos in general.
Step 7: At the left pane of the dashboard, you will see Creator Studio Classic at the bottom.
Step 8: Click on Creator Studio Classic.
Step 9: This will redirect you to creator studio. At the left on the window will be a bar full of multiple options where you will see the video manager option right there.
Step 10: Click on the video manager to manage.
Step 11: This will open a drop-down which gives you two options. One of managing your videos and others to organize your playlist or make any modifications as per your likeliness.
Voila! You are here in video manager, having full liberty to make any alteration to the metadata of your YouTube uploads. You are now a single click away to change the video title, its stale or non-captivating caption, adjust comment setting and literally everything right according to your choice.
How To Access YouTube Manager In YouTube Using Mobile Phones?
If you are used to operating your YouTube channel through smartphones like iPhone or any android phone or manage your account activities using a tablet then the process to manage your account remains quite the same.
You don’t need to stress out is you are using a mobile application of YouTube. You can still have complete authority to manage your videos using YouTube video manager mobile, YouTube studio applications.
YouTube studio application is an official tool dedicated to content creator introduced by Google for YouTube. This gives immense ease for the mobile users, either android or iPhone, to manage their videos and update the metadata of their upload by merely using this one application.
All thanks to Google to launch such an amazing and wholesome product, considering the ample number of content creators who use mobile phones to create and manage their productions.
YouTube Studio Application Link for iOS
You can download this video manager YouTube application, named as YouTube studio, on your iPhone by clicking the link given here . You can download this YouTube video manager iPhone application on apple store which is absolutely free of cost.
Downloading this tool will make the managing process of your YouTube channel quite easier and faster. Numerous list of options ranging from monitoring latest stats, create or update your productions’ thumbnail images to changing profile picture, reply to your comments, get notifications or organize your playlist on the go and stay connected from literally anywhere.
Features:
- Organize playlist
- Respond to the comments and also moderate them
- Get notified about important events and activities on your channel
- Update video settings like personalizing thumbnail pictures, adding a description, updating titles and monetization.
- Create and modify your profile images.
- Seek for help content using voice
How To Access YouTube Manager In YouTube Using Android?
Similar to the approach we used in for iPhone users, you can download YouTube studio application on google store by clicking on the link given here .
This application is available free on the internet.
If you are an android user and looking for an application that can manage your YouTube channel with an abundance of options, then The official application developed by Google, YouTube Studio is the answer to your question “how to get to YouTube video manager”. It is a powerful tool to give you all the controls to manage and efficiently organize your YouTube channel with great ease and speed.
Features:
- Filter and get an update with the response on the comments
- Monitor video performance and channel activity using user-friendly analytics
- Manage and organize playlist
- Update video settings like schedule dates, personalizing thumbnail pictures, adding description, updating titles and monetization settings.
How to Access YouTube Manager on YouTube Using An iPad?
You can enjoy all the same features as facilitated in the YouTube Studio app for iOS and Android users. All you need is to download this application by clicking on the link given here .
You may find this tool a little overwhelming at the fresh start. There are multiple options given to the users and given full control and independence to manage the video settings as per your requirement for improvisation purposes.
This may take some time to get yourself familiar with this tool. The more you explore deep into it, the more quickly you will get hold onto it.
Worry not! These experiments won’t do any harm to productions, but only make you expertise in a while.
To learn the fundamentals of YouTube Studio application and video manager, you can refer to this site .
Conclusion
The use of YouTube had outgrown to an extent that it has now become a professional career for many which once used to a merely an entertainment platform and get nothing in return for creating content.
But now with the shift of trend, YouTube is taken seriously as a professional domain to earn through the productions or spread awareness and joy to others through one’s creative content. For your content to make an impact, your channel needs thorough management and organization to view your content’s quality by seeing the stats and manage accordingly.
This is now possible to achieve all this within the snap of fingers with great ease offered by this great tool, Video Manager. With this, you can edit and customize your video’s metadata and improvise your video settings to elevate your channel to the next level.
Richard Bennett
Richard Bennett is a writer and a lover of all things video.
Follow @Richard Bennett
- Title: "Exploring Vlogging Selecting the Best Cameras & Lenses for 2024"
- Author: Thomas
- Created at : 2024-05-31 12:41:06
- Updated at : 2024-06-01 12:41:06
- Link: https://youtube-help.techidaily.com/exploring-vlogging-selecting-the-best-cameras-and-lenses-for-2024/
- License: This work is licensed under CC BY-NC-SA 4.0.
