"From Blank Canvas to Biggest Hit Mastering YouTube Thumbnail Sizes for 2024"

From Blank Canvas to Biggest Hit: Mastering YouTube Thumbnail Sizes
Best YouTube Thumbnail Size You Should Know[The Ultimate Guide]

Richard Bennett
Mar 27, 2024• Proven solutions
Around 300 hours of video is uploaded to Youtube in every single minute. Then content creators need to be more innovative and creative than others in the market. A thumbnail is worth a thousand words that show its real meaning in the case where every month YouTube records a whopping 2 billion active users. To create an impressive and tempting thumbnail, you should set a perfect youtube thumbnail size first.
So you may be wondering what the best youtube thumbnail size is, and how to create a attractive thumbnail for your YouTube videos? Don’t worry I’ll explain everything here. You will learn:
- Part 1: The Ultimate Guide of YouTube Thumbnail Size
- Part 2: Upload and Change a Custom YouTube Thumbnail to Your Video
- Part 3: Q&A– About Creating YouTube Thumbnails
Part 1: The Ultimate Guide of Youtube Thumbnail Size
Every content creator needs to select the right youtube thumbnail size for any given video.
1. What’s the Best YouTube Thumbnail Size(Dimensions)?
According to the YouTube guidelines , the best-suited youtube thumbnail size is 1280x720 pixels with a minimum pixel width of 640 pixels. Also, the custom thumbnail image must be as large as possible as it will be utilized as a preview image in the embedded player.
2. What Are the Compatible Formats for YouTube Thumbnail Image?
The recommended thumbnail image formats are .JPG, .PNG, .GIF, .BMP
3. What’s the Maximum YouTube Thumbnail Size?
The maximum YouTube thumbnail size must be below 2MB. Keeping the limit in mind design your thumbnail image as high-resolution as possible. This will ensure your custom thumbnail doesn’t get rejected by YouTube.
4. What’s the Recommended Aspect Ratio of YouTube Thumbnail?
Usually, the 16:9 ratio is deemed an ideal choice for any YouTube video aiming high view volume. As it is most widely used in YouTube players and previews.
Part 2: Upload and Change a Custom YouTube Thumbnail
With a verified account, you can upload custom thumbnail on new videos as well as change the thumbnail of uploaded videos.
1. For New Video
YouTube makes it very simple and easy for any content creator to publish custom YouTube thumbnail on their video while uploading the video onto the platform. Here’s the method to do so:
- Upload your desired video to YouTube in the Upload section.
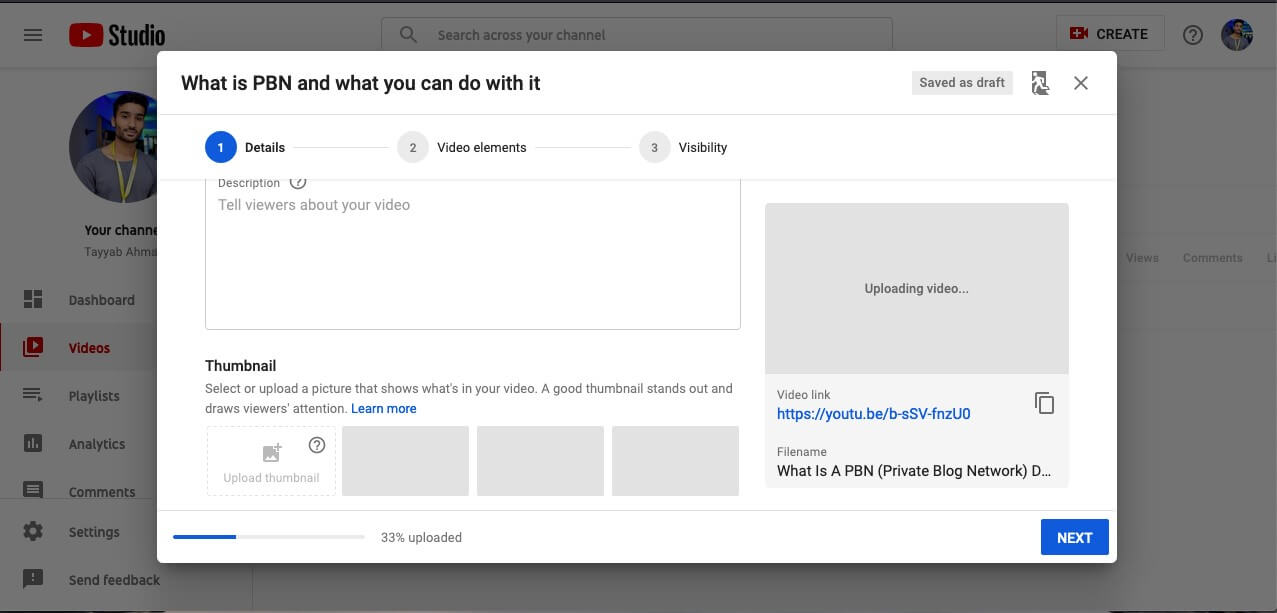
- When your upload to the YouTube is completed a section will appear at the down portion of the browser screen showing Video Thumbnails. Here YouTube automatically creates some thumbnail images from your uploaded video and shows them here. These are the screenshots from your video, and you can select any one of them to be your thumbnail.
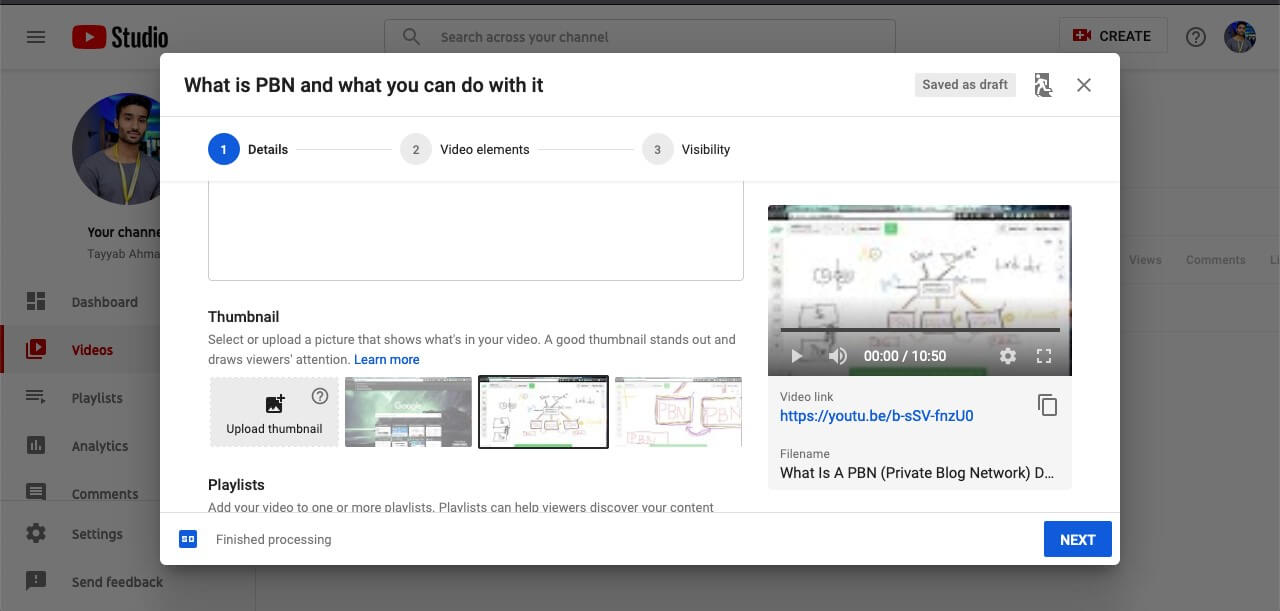
- You will be able to see a button right next to the image – Custom thumbnail. Click on the button and you can upload a set of images of your choice as the thumbnail of your video.
- Once done you can see the custom image just uploaded as the thumbnail of your video.

- If you want to update the image or change it with another one you can just click on the same image in the video thumbnail section and swap it with any other image.
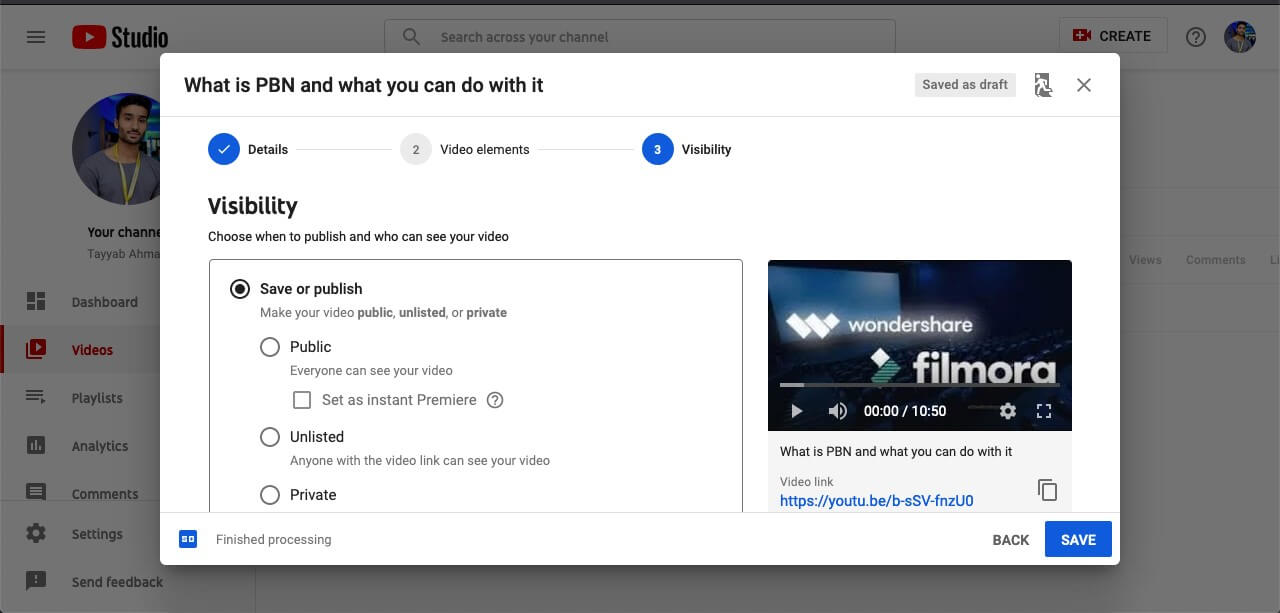
2. For Already Uploaded Video
To change the thumbnail on an already uploaded video you need to follow these steps:
- Sign in to YouTube Studio associated with your YouTube channel.
- From the menu go to Videos and then select the video you want to upload a custom thumbnail to via its title or thumbnail
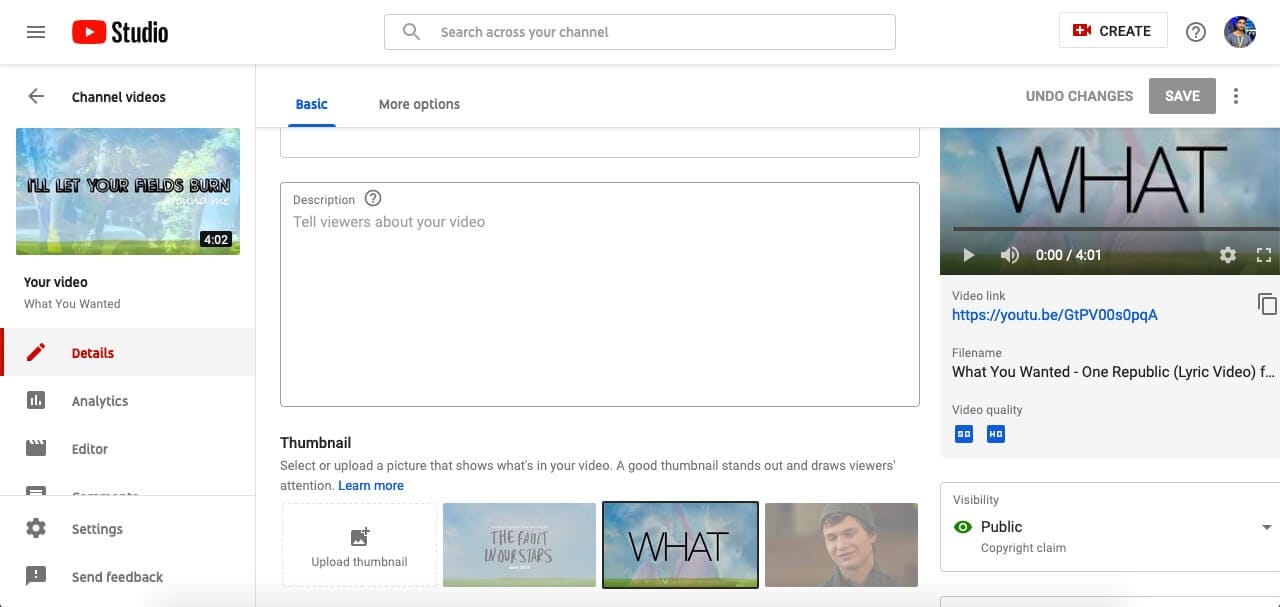
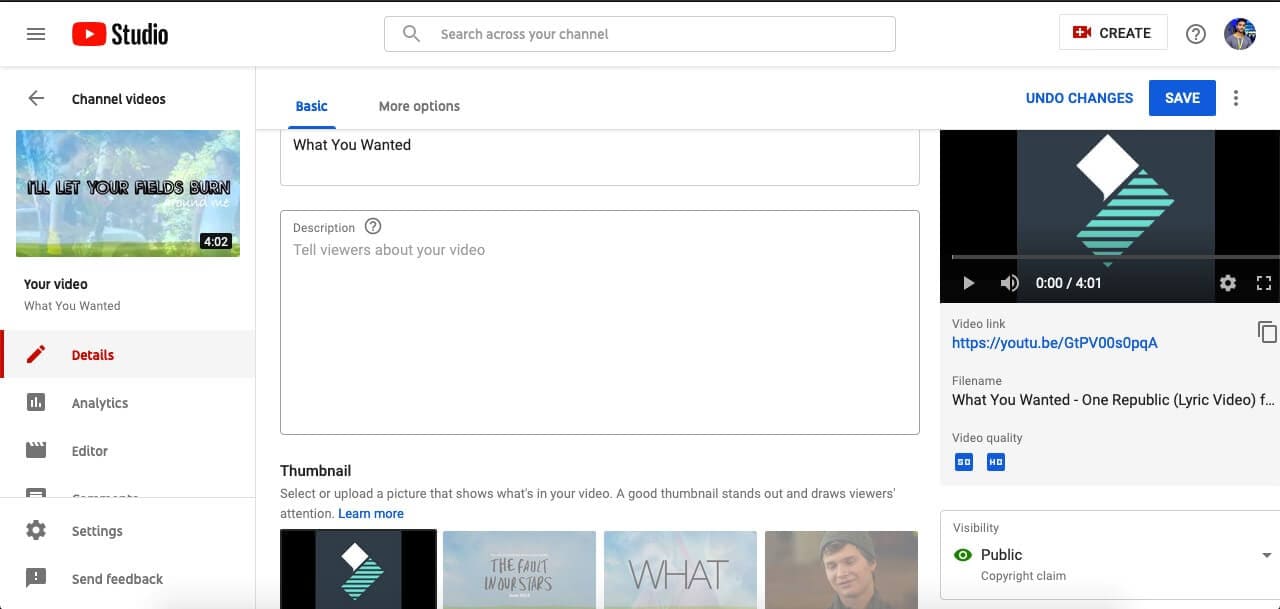
- Now in the thumbnail section if you already haven’t uploaded a custom thumbnail, click Custom thumbnail.
- Select your intended thumbnail file and click Save.
Part 3: Q&A– About YouTube Thumbnail Images
You may want to know:
- Question 1: How do I make my youtube thumbnail less than 2mb?
- Question 2: How can I create an attractive youtube thumbnail?
1. How do I make my youtube thumbnail less than 2mb?
YouTube will not allow you to upload a custom thumbnail image if it is bigger than the 2MB limit. So, you need to make sure the file size is below the limit to be able to successfully upload a custom thumbnail. To reduce the image size you can follow the steps below:
- 1. Open Microsoft Paint and open the thumbnail image that is above 2MB size
- 2. Now go to the File menu and click Save as then select JPEG picture
- 3. Select the location you want the file to be saved to
- 4. The thumbnail picture will be reduced to Kilobytes only while maintaining the image quality
2. How can I create an attractive youtube thumbnail?
Utilizing online platforms and software tools to make your thumbnail image informative and attractive can potentially increase your views and traffic. You can use any advanced tools like Wondershare Filmora, Wondershare PixStudio, or Canva to create an aspiring and luring image that will get more views on YouTube just because of the thumbnail image. Here we will show you how to do it with Wondershare Filmora, Wondershare PixStudio and Canva:
1. Try Wondershare Filmora>>
Wondershare Filmora is an outstanding tool if you want to make a perfect thumbnail image. Consider and optimize your thumbnail for mobile devices to offer the best experience to your users on every possible device. Make it stand out as the thumbnail can be the very first thing that might attract a viewer.
Let’s see how you can create your thumbnail using Wondershare Filmora:
2. Try Wondershare PixStudio>>
Wondershare PixStudio provides you massive pre-designed templates which help you to create attractive YouTube Thumbnail. Let’s see the video below and see how you can design your YouTube Thumbnail easily.
3. Try Canva>>
With Canva you can make a distinct and stand-out YouTube thumbnail image. Canva hosts a number of readymade designs that you can use to design and customize it for your use.
Note:
To download the image without the watermark you’ll need to sign-up for a premium account on the Canva.
To sum up
YouTube thumbnail plays an important part for the audience’s first impression on your video. And it is of essential essence as it can attract more viewers to your content. So you should get the right youtube thumbnail size before you start customing your thumbnail. We’ve gone through all the detailed requirements of youtube thumbnail size and how to make the best thumbnail by using the best software solutions. Please leave your comments below if any suggestions. We’d love to hear them!

Richard Bennett
Richard Bennett is a writer and a lover of all things video.
Follow @Richard Bennett
Richard Bennett
Mar 27, 2024• Proven solutions
Around 300 hours of video is uploaded to Youtube in every single minute. Then content creators need to be more innovative and creative than others in the market. A thumbnail is worth a thousand words that show its real meaning in the case where every month YouTube records a whopping 2 billion active users. To create an impressive and tempting thumbnail, you should set a perfect youtube thumbnail size first.
So you may be wondering what the best youtube thumbnail size is, and how to create a attractive thumbnail for your YouTube videos? Don’t worry I’ll explain everything here. You will learn:
- Part 1: The Ultimate Guide of YouTube Thumbnail Size
- Part 2: Upload and Change a Custom YouTube Thumbnail to Your Video
- Part 3: Q&A– About Creating YouTube Thumbnails
Part 1: The Ultimate Guide of Youtube Thumbnail Size
Every content creator needs to select the right youtube thumbnail size for any given video.
1. What’s the Best YouTube Thumbnail Size(Dimensions)?
According to the YouTube guidelines , the best-suited youtube thumbnail size is 1280x720 pixels with a minimum pixel width of 640 pixels. Also, the custom thumbnail image must be as large as possible as it will be utilized as a preview image in the embedded player.
2. What Are the Compatible Formats for YouTube Thumbnail Image?
The recommended thumbnail image formats are .JPG, .PNG, .GIF, .BMP
3. What’s the Maximum YouTube Thumbnail Size?
The maximum YouTube thumbnail size must be below 2MB. Keeping the limit in mind design your thumbnail image as high-resolution as possible. This will ensure your custom thumbnail doesn’t get rejected by YouTube.
4. What’s the Recommended Aspect Ratio of YouTube Thumbnail?
Usually, the 16:9 ratio is deemed an ideal choice for any YouTube video aiming high view volume. As it is most widely used in YouTube players and previews.
Part 2: Upload and Change a Custom YouTube Thumbnail
With a verified account, you can upload custom thumbnail on new videos as well as change the thumbnail of uploaded videos.
1. For New Video
YouTube makes it very simple and easy for any content creator to publish custom YouTube thumbnail on their video while uploading the video onto the platform. Here’s the method to do so:
- Upload your desired video to YouTube in the Upload section.

- When your upload to the YouTube is completed a section will appear at the down portion of the browser screen showing Video Thumbnails. Here YouTube automatically creates some thumbnail images from your uploaded video and shows them here. These are the screenshots from your video, and you can select any one of them to be your thumbnail.

- You will be able to see a button right next to the image – Custom thumbnail. Click on the button and you can upload a set of images of your choice as the thumbnail of your video.
- Once done you can see the custom image just uploaded as the thumbnail of your video.

- If you want to update the image or change it with another one you can just click on the same image in the video thumbnail section and swap it with any other image.

2. For Already Uploaded Video
To change the thumbnail on an already uploaded video you need to follow these steps:
- Sign in to YouTube Studio associated with your YouTube channel.
- From the menu go to Videos and then select the video you want to upload a custom thumbnail to via its title or thumbnail

- Now in the thumbnail section if you already haven’t uploaded a custom thumbnail, click Custom thumbnail.
- Select your intended thumbnail file and click Save.

Part 3: Q&A– About YouTube Thumbnail Images
You may want to know:
- Question 1: How do I make my youtube thumbnail less than 2mb?
- Question 2: How can I create an attractive youtube thumbnail?
1. How do I make my youtube thumbnail less than 2mb?
YouTube will not allow you to upload a custom thumbnail image if it is bigger than the 2MB limit. So, you need to make sure the file size is below the limit to be able to successfully upload a custom thumbnail. To reduce the image size you can follow the steps below:
- 1. Open Microsoft Paint and open the thumbnail image that is above 2MB size
- 2. Now go to the File menu and click Save as then select JPEG picture
- 3. Select the location you want the file to be saved to
- 4. The thumbnail picture will be reduced to Kilobytes only while maintaining the image quality
2. How can I create an attractive youtube thumbnail?
Utilizing online platforms and software tools to make your thumbnail image informative and attractive can potentially increase your views and traffic. You can use any advanced tools like Wondershare Filmora, Wondershare PixStudio, or Canva to create an aspiring and luring image that will get more views on YouTube just because of the thumbnail image. Here we will show you how to do it with Wondershare Filmora, Wondershare PixStudio and Canva:
1. Try Wondershare Filmora>>
Wondershare Filmora is an outstanding tool if you want to make a perfect thumbnail image. Consider and optimize your thumbnail for mobile devices to offer the best experience to your users on every possible device. Make it stand out as the thumbnail can be the very first thing that might attract a viewer.
Let’s see how you can create your thumbnail using Wondershare Filmora:
2. Try Wondershare PixStudio>>
Wondershare PixStudio provides you massive pre-designed templates which help you to create attractive YouTube Thumbnail. Let’s see the video below and see how you can design your YouTube Thumbnail easily.
3. Try Canva>>
With Canva you can make a distinct and stand-out YouTube thumbnail image. Canva hosts a number of readymade designs that you can use to design and customize it for your use.
Note:
To download the image without the watermark you’ll need to sign-up for a premium account on the Canva.
To sum up
YouTube thumbnail plays an important part for the audience’s first impression on your video. And it is of essential essence as it can attract more viewers to your content. So you should get the right youtube thumbnail size before you start customing your thumbnail. We’ve gone through all the detailed requirements of youtube thumbnail size and how to make the best thumbnail by using the best software solutions. Please leave your comments below if any suggestions. We’d love to hear them!

Richard Bennett
Richard Bennett is a writer and a lover of all things video.
Follow @Richard Bennett
Richard Bennett
Mar 27, 2024• Proven solutions
Around 300 hours of video is uploaded to Youtube in every single minute. Then content creators need to be more innovative and creative than others in the market. A thumbnail is worth a thousand words that show its real meaning in the case where every month YouTube records a whopping 2 billion active users. To create an impressive and tempting thumbnail, you should set a perfect youtube thumbnail size first.
So you may be wondering what the best youtube thumbnail size is, and how to create a attractive thumbnail for your YouTube videos? Don’t worry I’ll explain everything here. You will learn:
- Part 1: The Ultimate Guide of YouTube Thumbnail Size
- Part 2: Upload and Change a Custom YouTube Thumbnail to Your Video
- Part 3: Q&A– About Creating YouTube Thumbnails
Part 1: The Ultimate Guide of Youtube Thumbnail Size
Every content creator needs to select the right youtube thumbnail size for any given video.
1. What’s the Best YouTube Thumbnail Size(Dimensions)?
According to the YouTube guidelines , the best-suited youtube thumbnail size is 1280x720 pixels with a minimum pixel width of 640 pixels. Also, the custom thumbnail image must be as large as possible as it will be utilized as a preview image in the embedded player.
2. What Are the Compatible Formats for YouTube Thumbnail Image?
The recommended thumbnail image formats are .JPG, .PNG, .GIF, .BMP
3. What’s the Maximum YouTube Thumbnail Size?
The maximum YouTube thumbnail size must be below 2MB. Keeping the limit in mind design your thumbnail image as high-resolution as possible. This will ensure your custom thumbnail doesn’t get rejected by YouTube.
4. What’s the Recommended Aspect Ratio of YouTube Thumbnail?
Usually, the 16:9 ratio is deemed an ideal choice for any YouTube video aiming high view volume. As it is most widely used in YouTube players and previews.
Part 2: Upload and Change a Custom YouTube Thumbnail
With a verified account, you can upload custom thumbnail on new videos as well as change the thumbnail of uploaded videos.
1. For New Video
YouTube makes it very simple and easy for any content creator to publish custom YouTube thumbnail on their video while uploading the video onto the platform. Here’s the method to do so:
- Upload your desired video to YouTube in the Upload section.

- When your upload to the YouTube is completed a section will appear at the down portion of the browser screen showing Video Thumbnails. Here YouTube automatically creates some thumbnail images from your uploaded video and shows them here. These are the screenshots from your video, and you can select any one of them to be your thumbnail.

- You will be able to see a button right next to the image – Custom thumbnail. Click on the button and you can upload a set of images of your choice as the thumbnail of your video.
- Once done you can see the custom image just uploaded as the thumbnail of your video.

- If you want to update the image or change it with another one you can just click on the same image in the video thumbnail section and swap it with any other image.

2. For Already Uploaded Video
To change the thumbnail on an already uploaded video you need to follow these steps:
- Sign in to YouTube Studio associated with your YouTube channel.
- From the menu go to Videos and then select the video you want to upload a custom thumbnail to via its title or thumbnail

- Now in the thumbnail section if you already haven’t uploaded a custom thumbnail, click Custom thumbnail.
- Select your intended thumbnail file and click Save.

Part 3: Q&A– About YouTube Thumbnail Images
You may want to know:
- Question 1: How do I make my youtube thumbnail less than 2mb?
- Question 2: How can I create an attractive youtube thumbnail?
1. How do I make my youtube thumbnail less than 2mb?
YouTube will not allow you to upload a custom thumbnail image if it is bigger than the 2MB limit. So, you need to make sure the file size is below the limit to be able to successfully upload a custom thumbnail. To reduce the image size you can follow the steps below:
- 1. Open Microsoft Paint and open the thumbnail image that is above 2MB size
- 2. Now go to the File menu and click Save as then select JPEG picture
- 3. Select the location you want the file to be saved to
- 4. The thumbnail picture will be reduced to Kilobytes only while maintaining the image quality
2. How can I create an attractive youtube thumbnail?
Utilizing online platforms and software tools to make your thumbnail image informative and attractive can potentially increase your views and traffic. You can use any advanced tools like Wondershare Filmora, Wondershare PixStudio, or Canva to create an aspiring and luring image that will get more views on YouTube just because of the thumbnail image. Here we will show you how to do it with Wondershare Filmora, Wondershare PixStudio and Canva:
1. Try Wondershare Filmora>>
Wondershare Filmora is an outstanding tool if you want to make a perfect thumbnail image. Consider and optimize your thumbnail for mobile devices to offer the best experience to your users on every possible device. Make it stand out as the thumbnail can be the very first thing that might attract a viewer.
Let’s see how you can create your thumbnail using Wondershare Filmora:
2. Try Wondershare PixStudio>>
Wondershare PixStudio provides you massive pre-designed templates which help you to create attractive YouTube Thumbnail. Let’s see the video below and see how you can design your YouTube Thumbnail easily.
3. Try Canva>>
With Canva you can make a distinct and stand-out YouTube thumbnail image. Canva hosts a number of readymade designs that you can use to design and customize it for your use.
Note:
To download the image without the watermark you’ll need to sign-up for a premium account on the Canva.
To sum up
YouTube thumbnail plays an important part for the audience’s first impression on your video. And it is of essential essence as it can attract more viewers to your content. So you should get the right youtube thumbnail size before you start customing your thumbnail. We’ve gone through all the detailed requirements of youtube thumbnail size and how to make the best thumbnail by using the best software solutions. Please leave your comments below if any suggestions. We’d love to hear them!

Richard Bennett
Richard Bennett is a writer and a lover of all things video.
Follow @Richard Bennett
Richard Bennett
Mar 27, 2024• Proven solutions
Around 300 hours of video is uploaded to Youtube in every single minute. Then content creators need to be more innovative and creative than others in the market. A thumbnail is worth a thousand words that show its real meaning in the case where every month YouTube records a whopping 2 billion active users. To create an impressive and tempting thumbnail, you should set a perfect youtube thumbnail size first.
So you may be wondering what the best youtube thumbnail size is, and how to create a attractive thumbnail for your YouTube videos? Don’t worry I’ll explain everything here. You will learn:
- Part 1: The Ultimate Guide of YouTube Thumbnail Size
- Part 2: Upload and Change a Custom YouTube Thumbnail to Your Video
- Part 3: Q&A– About Creating YouTube Thumbnails
Part 1: The Ultimate Guide of Youtube Thumbnail Size
Every content creator needs to select the right youtube thumbnail size for any given video.
1. What’s the Best YouTube Thumbnail Size(Dimensions)?
According to the YouTube guidelines , the best-suited youtube thumbnail size is 1280x720 pixels with a minimum pixel width of 640 pixels. Also, the custom thumbnail image must be as large as possible as it will be utilized as a preview image in the embedded player.
2. What Are the Compatible Formats for YouTube Thumbnail Image?
The recommended thumbnail image formats are .JPG, .PNG, .GIF, .BMP
3. What’s the Maximum YouTube Thumbnail Size?
The maximum YouTube thumbnail size must be below 2MB. Keeping the limit in mind design your thumbnail image as high-resolution as possible. This will ensure your custom thumbnail doesn’t get rejected by YouTube.
4. What’s the Recommended Aspect Ratio of YouTube Thumbnail?
Usually, the 16:9 ratio is deemed an ideal choice for any YouTube video aiming high view volume. As it is most widely used in YouTube players and previews.
Part 2: Upload and Change a Custom YouTube Thumbnail
With a verified account, you can upload custom thumbnail on new videos as well as change the thumbnail of uploaded videos.
1. For New Video
YouTube makes it very simple and easy for any content creator to publish custom YouTube thumbnail on their video while uploading the video onto the platform. Here’s the method to do so:
- Upload your desired video to YouTube in the Upload section.

- When your upload to the YouTube is completed a section will appear at the down portion of the browser screen showing Video Thumbnails. Here YouTube automatically creates some thumbnail images from your uploaded video and shows them here. These are the screenshots from your video, and you can select any one of them to be your thumbnail.

- You will be able to see a button right next to the image – Custom thumbnail. Click on the button and you can upload a set of images of your choice as the thumbnail of your video.
- Once done you can see the custom image just uploaded as the thumbnail of your video.

- If you want to update the image or change it with another one you can just click on the same image in the video thumbnail section and swap it with any other image.

2. For Already Uploaded Video
To change the thumbnail on an already uploaded video you need to follow these steps:
- Sign in to YouTube Studio associated with your YouTube channel.
- From the menu go to Videos and then select the video you want to upload a custom thumbnail to via its title or thumbnail

- Now in the thumbnail section if you already haven’t uploaded a custom thumbnail, click Custom thumbnail.
- Select your intended thumbnail file and click Save.

Part 3: Q&A– About YouTube Thumbnail Images
You may want to know:
- Question 1: How do I make my youtube thumbnail less than 2mb?
- Question 2: How can I create an attractive youtube thumbnail?
1. How do I make my youtube thumbnail less than 2mb?
YouTube will not allow you to upload a custom thumbnail image if it is bigger than the 2MB limit. So, you need to make sure the file size is below the limit to be able to successfully upload a custom thumbnail. To reduce the image size you can follow the steps below:
- 1. Open Microsoft Paint and open the thumbnail image that is above 2MB size
- 2. Now go to the File menu and click Save as then select JPEG picture
- 3. Select the location you want the file to be saved to
- 4. The thumbnail picture will be reduced to Kilobytes only while maintaining the image quality
2. How can I create an attractive youtube thumbnail?
Utilizing online platforms and software tools to make your thumbnail image informative and attractive can potentially increase your views and traffic. You can use any advanced tools like Wondershare Filmora, Wondershare PixStudio, or Canva to create an aspiring and luring image that will get more views on YouTube just because of the thumbnail image. Here we will show you how to do it with Wondershare Filmora, Wondershare PixStudio and Canva:
1. Try Wondershare Filmora>>
Wondershare Filmora is an outstanding tool if you want to make a perfect thumbnail image. Consider and optimize your thumbnail for mobile devices to offer the best experience to your users on every possible device. Make it stand out as the thumbnail can be the very first thing that might attract a viewer.
Let’s see how you can create your thumbnail using Wondershare Filmora:
2. Try Wondershare PixStudio>>
Wondershare PixStudio provides you massive pre-designed templates which help you to create attractive YouTube Thumbnail. Let’s see the video below and see how you can design your YouTube Thumbnail easily.
3. Try Canva>>
With Canva you can make a distinct and stand-out YouTube thumbnail image. Canva hosts a number of readymade designs that you can use to design and customize it for your use.
Note:
To download the image without the watermark you’ll need to sign-up for a premium account on the Canva.
To sum up
YouTube thumbnail plays an important part for the audience’s first impression on your video. And it is of essential essence as it can attract more viewers to your content. So you should get the right youtube thumbnail size before you start customing your thumbnail. We’ve gone through all the detailed requirements of youtube thumbnail size and how to make the best thumbnail by using the best software solutions. Please leave your comments below if any suggestions. We’d love to hear them!

Richard Bennett
Richard Bennett is a writer and a lover of all things video.
Follow @Richard Bennett
Streamline Your YouTube Presence Using Premiere Pro
How to Edit YouTube Videos in Adobe Premiere

Richard Bennett
Mar 27, 2024• Proven solutions
You just made a few videos, and you want to edit them first before uploading to YouTube. The truth is that you may find the editing part a bit more challenging compared to uploading. However, there are now tools like Adobe Premiere that can help make the editing process easier. Read on and learn how to edit YouTube videos with Adobe Premier so that you can create amazing videos.
Related article:Adobe Premiere User Guide
Adobe Premiere is largely targeted towards professional users, and the best alternative you can use today, whether you are a professional user or just a casual YouTube user, is Wondershare Filmora . This is not only a highly effective video editing program, but it is also user-friendly and very easy to use.
 Download Mac Version ](https://tools.techidaily.com/wondershare/filmora/download/ )
Adobe is well known for having some of the leading video production tools in the industry. In fact, most of their tools ranging from the Premier Pro and Photoshop to Audition and many others have been used in many video and movie productions, including some of the popular theatrical releases of our times. Their latest professional video editor, Adobe Premier can be summarized as one of the best editors with versatility, depth, and power for high-quality video editing.
How to edit YouTube Videos with Adobe Premier
Step 1: Import the Video Clips
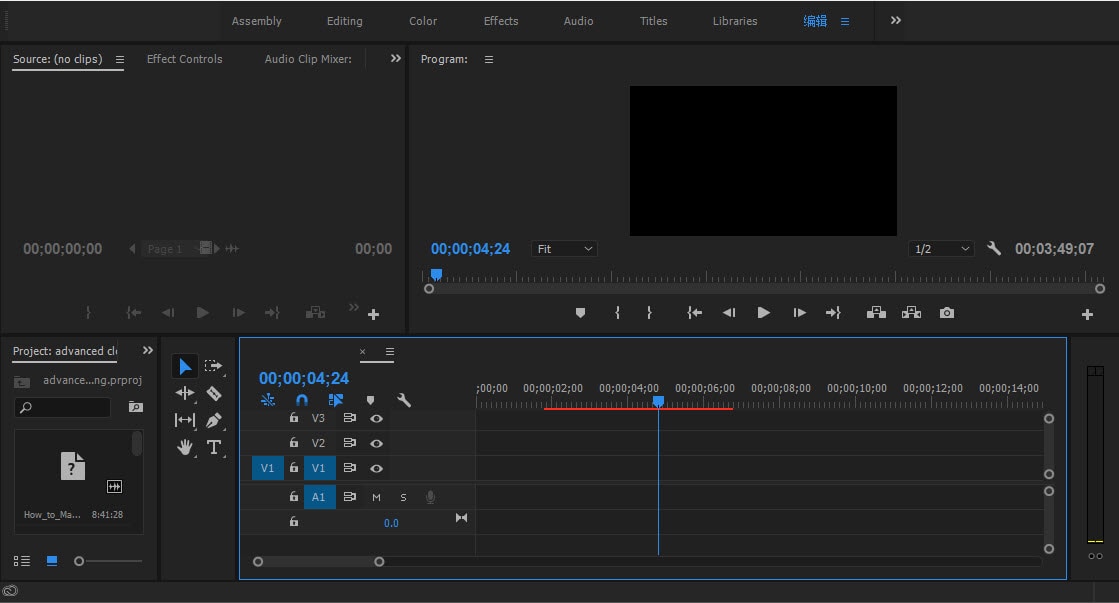
The first step in how to edit YouTube videos with Adobe Premier is to basically import the video clips you want to edit. This is achieved using a simple process of clicking “import” from the “file” drop-down menu. Once you have finished importing your photos or video files, you can then drag them from the sidebar and into the editing area.
Note
- If the videos you want to import are already published online, you can start the process by first downloading them directly from YouTube first, making sure to save them as MP4 files.
- The best way of importing videos from YouTube is by using an innovative video converter like Wondershare Video Converter Ultimate. This program will help in downloading and converting files to a format that is supported by Adobe Premier.
Step 2: Editing
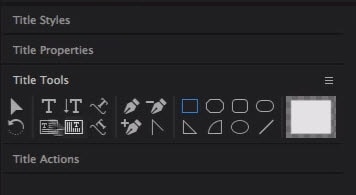
The next step in how edit YouTube videos with Adobe Premiere is to start modifying the video files or photos the way you want. To achieve this, click on “Effects Control” and apply the desired effects. If you want to insert some text or words into your video, select “title” and then click “new title.” Now choose how you would like the words to behave, for instance, “Default Roll” makes the text roll upwards in the page.
Now drag the text that you have created into the editor area. If you want to edit the text, simply double-click to select it, and it will bring up a separate page where you can make further edits. You can then modify the text, font, and the positioning as well. This page also allows you to set whether the text will crawl or roll.
The final part of the process is to import your chosen audio file. This could be the chosen soundtrack for your presentation. Simply drag the audio file onto your editor. You can then modify how the length of your videos or photos by selecting and dragging the specific photo or video. Finally, press enter and your video will start rendering.
Step 3: Save the Edited File and Upload to YouTube
It is important to note that even as you edit YouTube videos with Adobe Premier, the software does not allow direct uploads to YouTube. This means you will need to save the edited file first on your computer and ensure you use a YouTube supported format. The most effective option is to use the codec, which will then save your file in the MPEG-4 format. This is the preferred format for YouTube and Video uploads.

Richard Bennett
Richard Bennett is a writer and a lover of all things video.
Follow @Richard Bennett
Richard Bennett
Mar 27, 2024• Proven solutions
You just made a few videos, and you want to edit them first before uploading to YouTube. The truth is that you may find the editing part a bit more challenging compared to uploading. However, there are now tools like Adobe Premiere that can help make the editing process easier. Read on and learn how to edit YouTube videos with Adobe Premier so that you can create amazing videos.
Related article:Adobe Premiere User Guide
Adobe Premiere is largely targeted towards professional users, and the best alternative you can use today, whether you are a professional user or just a casual YouTube user, is Wondershare Filmora . This is not only a highly effective video editing program, but it is also user-friendly and very easy to use.
 Download Mac Version ](https://tools.techidaily.com/wondershare/filmora/download/ )
Adobe is well known for having some of the leading video production tools in the industry. In fact, most of their tools ranging from the Premier Pro and Photoshop to Audition and many others have been used in many video and movie productions, including some of the popular theatrical releases of our times. Their latest professional video editor, Adobe Premier can be summarized as one of the best editors with versatility, depth, and power for high-quality video editing.
How to edit YouTube Videos with Adobe Premier
Step 1: Import the Video Clips
The first step in how to edit YouTube videos with Adobe Premier is to basically import the video clips you want to edit. This is achieved using a simple process of clicking “import” from the “file” drop-down menu. Once you have finished importing your photos or video files, you can then drag them from the sidebar and into the editing area.

Note
- If the videos you want to import are already published online, you can start the process by first downloading them directly from YouTube first, making sure to save them as MP4 files.
- The best way of importing videos from YouTube is by using an innovative video converter like Wondershare Video Converter Ultimate. This program will help in downloading and converting files to a format that is supported by Adobe Premier.
Step 2: Editing
The next step in how edit YouTube videos with Adobe Premiere is to start modifying the video files or photos the way you want. To achieve this, click on “Effects Control” and apply the desired effects. If you want to insert some text or words into your video, select “title” and then click “new title.” Now choose how you would like the words to behave, for instance, “Default Roll” makes the text roll upwards in the page.
Now drag the text that you have created into the editor area. If you want to edit the text, simply double-click to select it, and it will bring up a separate page where you can make further edits. You can then modify the text, font, and the positioning as well. This page also allows you to set whether the text will crawl or roll.

The final part of the process is to import your chosen audio file. This could be the chosen soundtrack for your presentation. Simply drag the audio file onto your editor. You can then modify how the length of your videos or photos by selecting and dragging the specific photo or video. Finally, press enter and your video will start rendering.
Step 3: Save the Edited File and Upload to YouTube
It is important to note that even as you edit YouTube videos with Adobe Premier, the software does not allow direct uploads to YouTube. This means you will need to save the edited file first on your computer and ensure you use a YouTube supported format. The most effective option is to use the codec, which will then save your file in the MPEG-4 format. This is the preferred format for YouTube and Video uploads.

Richard Bennett
Richard Bennett is a writer and a lover of all things video.
Follow @Richard Bennett
Richard Bennett
Mar 27, 2024• Proven solutions
You just made a few videos, and you want to edit them first before uploading to YouTube. The truth is that you may find the editing part a bit more challenging compared to uploading. However, there are now tools like Adobe Premiere that can help make the editing process easier. Read on and learn how to edit YouTube videos with Adobe Premier so that you can create amazing videos.
Related article:Adobe Premiere User Guide
Adobe Premiere is largely targeted towards professional users, and the best alternative you can use today, whether you are a professional user or just a casual YouTube user, is Wondershare Filmora . This is not only a highly effective video editing program, but it is also user-friendly and very easy to use.
 Download Mac Version ](https://tools.techidaily.com/wondershare/filmora/download/ )
Adobe is well known for having some of the leading video production tools in the industry. In fact, most of their tools ranging from the Premier Pro and Photoshop to Audition and many others have been used in many video and movie productions, including some of the popular theatrical releases of our times. Their latest professional video editor, Adobe Premier can be summarized as one of the best editors with versatility, depth, and power for high-quality video editing.
How to edit YouTube Videos with Adobe Premier
Step 1: Import the Video Clips
The first step in how to edit YouTube videos with Adobe Premier is to basically import the video clips you want to edit. This is achieved using a simple process of clicking “import” from the “file” drop-down menu. Once you have finished importing your photos or video files, you can then drag them from the sidebar and into the editing area.

Note
- If the videos you want to import are already published online, you can start the process by first downloading them directly from YouTube first, making sure to save them as MP4 files.
- The best way of importing videos from YouTube is by using an innovative video converter like Wondershare Video Converter Ultimate. This program will help in downloading and converting files to a format that is supported by Adobe Premier.
Step 2: Editing
The next step in how edit YouTube videos with Adobe Premiere is to start modifying the video files or photos the way you want. To achieve this, click on “Effects Control” and apply the desired effects. If you want to insert some text or words into your video, select “title” and then click “new title.” Now choose how you would like the words to behave, for instance, “Default Roll” makes the text roll upwards in the page.
Now drag the text that you have created into the editor area. If you want to edit the text, simply double-click to select it, and it will bring up a separate page where you can make further edits. You can then modify the text, font, and the positioning as well. This page also allows you to set whether the text will crawl or roll.

The final part of the process is to import your chosen audio file. This could be the chosen soundtrack for your presentation. Simply drag the audio file onto your editor. You can then modify how the length of your videos or photos by selecting and dragging the specific photo or video. Finally, press enter and your video will start rendering.
Step 3: Save the Edited File and Upload to YouTube
It is important to note that even as you edit YouTube videos with Adobe Premier, the software does not allow direct uploads to YouTube. This means you will need to save the edited file first on your computer and ensure you use a YouTube supported format. The most effective option is to use the codec, which will then save your file in the MPEG-4 format. This is the preferred format for YouTube and Video uploads.

Richard Bennett
Richard Bennett is a writer and a lover of all things video.
Follow @Richard Bennett
Richard Bennett
Mar 27, 2024• Proven solutions
You just made a few videos, and you want to edit them first before uploading to YouTube. The truth is that you may find the editing part a bit more challenging compared to uploading. However, there are now tools like Adobe Premiere that can help make the editing process easier. Read on and learn how to edit YouTube videos with Adobe Premier so that you can create amazing videos.
Related article:Adobe Premiere User Guide
Adobe Premiere is largely targeted towards professional users, and the best alternative you can use today, whether you are a professional user or just a casual YouTube user, is Wondershare Filmora . This is not only a highly effective video editing program, but it is also user-friendly and very easy to use.
 Download Mac Version ](https://tools.techidaily.com/wondershare/filmora/download/ )
Adobe is well known for having some of the leading video production tools in the industry. In fact, most of their tools ranging from the Premier Pro and Photoshop to Audition and many others have been used in many video and movie productions, including some of the popular theatrical releases of our times. Their latest professional video editor, Adobe Premier can be summarized as one of the best editors with versatility, depth, and power for high-quality video editing.
How to edit YouTube Videos with Adobe Premier
Step 1: Import the Video Clips
The first step in how to edit YouTube videos with Adobe Premier is to basically import the video clips you want to edit. This is achieved using a simple process of clicking “import” from the “file” drop-down menu. Once you have finished importing your photos or video files, you can then drag them from the sidebar and into the editing area.

Note
- If the videos you want to import are already published online, you can start the process by first downloading them directly from YouTube first, making sure to save them as MP4 files.
- The best way of importing videos from YouTube is by using an innovative video converter like Wondershare Video Converter Ultimate. This program will help in downloading and converting files to a format that is supported by Adobe Premier.
Step 2: Editing
The next step in how edit YouTube videos with Adobe Premiere is to start modifying the video files or photos the way you want. To achieve this, click on “Effects Control” and apply the desired effects. If you want to insert some text or words into your video, select “title” and then click “new title.” Now choose how you would like the words to behave, for instance, “Default Roll” makes the text roll upwards in the page.
Now drag the text that you have created into the editor area. If you want to edit the text, simply double-click to select it, and it will bring up a separate page where you can make further edits. You can then modify the text, font, and the positioning as well. This page also allows you to set whether the text will crawl or roll.

The final part of the process is to import your chosen audio file. This could be the chosen soundtrack for your presentation. Simply drag the audio file onto your editor. You can then modify how the length of your videos or photos by selecting and dragging the specific photo or video. Finally, press enter and your video will start rendering.
Step 3: Save the Edited File and Upload to YouTube
It is important to note that even as you edit YouTube videos with Adobe Premier, the software does not allow direct uploads to YouTube. This means you will need to save the edited file first on your computer and ensure you use a YouTube supported format. The most effective option is to use the codec, which will then save your file in the MPEG-4 format. This is the preferred format for YouTube and Video uploads.

Richard Bennett
Richard Bennett is a writer and a lover of all things video.
Follow @Richard Bennett
Also read:
- [New] Harnessing Hashtags Elevating Your YouTube Gaming Series for 2024
- [New] In 2024, Revolutionize Your Memes with These 7 Top GIF Creation Techniques
- [New] Streamline Your Video's Acoustic Appeal on YouTube
- [Updated] 2024 Approved Elite Action Cameras for Thrill Seekers
- [Updated] In 2024, The Impact of Music on a Trailer's Emotional Pull
- 2024 Approved Premier's 8 Most Booming Online Influencers
- 2024 Approved Quick Tips Adding Captions in YouTube Videos
- 無料のVOB & MKVコンバーター:Movaviによる簡単なオンライン変換手順
- A Complete Overview: Navigating Through The Features of Netflix's Digital Library
- How to Reset Gmail Password on Motorola Moto G 5G (2023) Devices
- In 2024, From Basic to Breakthrough A YouTube Live Thumbnail Journey
- In 2024, Study with Stars The Finest Historical Channels for Students & Enthusiasts
- 이미지 및 동영상에 대한 MP4 확장을 사용하여 원하시는 MP3 파일을 MPG로 자유롭게 변환하기 위해 MoveAVI를 사용합니다.
- Title: From Blank Canvas to Biggest Hit Mastering YouTube Thumbnail Sizes for 2024
- Author: Thomas
- Created at : 2024-12-15 16:43:20
- Updated at : 2024-12-16 18:31:46
- Link: https://youtube-help.techidaily.com/from-blank-canvas-to-biggest-hit-mastering-youtube-thumbnail-sizes-for-2024/
- License: This work is licensed under CC BY-NC-SA 4.0.
