
:max_bytes(150000):strip_icc()/142020133-56a1048d5f9b58eba4b6aebe.jpg)
How to Shave Seconds Off Your YouTube Video Submission for 2024
How to Shave Seconds Off Your YouTube Video Submission
How to Render and Upload YouTube Videos Faster?

Richard Bennett
Oct 26, 2023• Proven solutions
You’ve shot a video you’re proud of and you can’t wait to post it! But, slow down, you have to edit all your clips together first. And then you have to export your video from the editing program, which can take a while. Then you have to wait for it to upload to YouTube, and once it’s up you have to write your description, add cards, and do a handful of other things.
The period between finishing a video and actually posting it for your subscribers to see can be long and tiresome. A lot of videos have probably died in these stages because their creators ran out of energy and patience.
Don’t let this happen to your videos! Here are 4 ways you can save time and avoid headaches during post-production:
3. Use default descriptions and tags
4. TubeBuddy’s bulk features and tagging tools
1. Create mini-projects
When you have alarge editing project with lots of different titles, animations, clip sequences, and PIP tracks it can get hard to keep track of everything. That’s especially true if you need to go back and make changes. A change to one part of your video could affect other parts of it.
Also, the more complex your video is the longer it will take to render/export.
There is a way you can keep your project more organized, save time making minor adjustments, and speed up rendering: create sub-projects of different segments of your video and import them into your main project as their own clips.
This helps you in 3 ways:
1. If there are a lot of effects it’ll be faster to render a shorter video.
2. If you import your sequence as its own clip you won’t have to worry about adjusting little parts of it whenever you change earlier sections of your video.
3. If you do want to make adjustments to your sequence you can open up your mini-project and change it without affecting anything in your main project.
2. Optimize your upload speed
At home, your videos will upload fastest if all of your internet resources are devoted to the upload. That means you should not have any other windows open on your computer while you are uploading. You should also make sure there aren’t other devices competing for wifi like smart tvs, cell phones, or really fancy coffee makers.
If you have neighbors on the same wifi signal as you and they are online at the same time, this will slow you down too.
Because there is so much that can interfere with wifi, you might want to consider a wired Ethernet cable. Ethernet connections are faster in general, and you won’t have any problems with other devices competing for resources like you get with wifi.
If you’re doing everything you can to optimize your upload speed at home and still find that it takes an unreasonable amount of time to upload videos to YouTube, go somewhere with a better connection. Save your video to a USB drive and take it to a library or college to upload. Connections in these kinds of places tend to be very strong.
3. Use default descriptions and tags
In your Creator Studio, go to Channel > Upload defaults. Here you can write in titles, descriptions, and tags which will automatically be applied to every video you upload.

Note: in the latest YouTube Studio, the upload interface is changed but the main process is similar.

You probably have tags you use for almost every video you post. For example, if your channel is about vegan cooking then every one of your videos is probably tagged ‘vegan’, ‘food’, and ‘cooking’. If you type those tags in here then you don’t have to keep adding them to every new video, and you can still add or remove tags from individual uploads so you aren’t stuck using the exact same set of tags every time.
Similarly, you probably have some default text that goes in the description of every one of your videos (i.e. a link to your personal website or a brief introduction of yourself). If you type in a default description then that text will appear automatically in every new video description and you can just add to it when you need to for individual videos.
Using defaults might only save you a couple of minutes per video, but those minutes add up.
4. TubeBuddy’s bulk features and tagging tools
TubeBuddy is a channel management tool for YouTube. Most of its features are more geared towards very large channels or companies with a YouTube presence, but there are also features that can help small or mid-sized YouTubers save time and stay organized.
Some of these tools include templates for things like cards and end screens and bulk processing tools for when you want to change a lot of things at once. For example, if you wanted to update the links in every card in every one of your videos at once then TubeBuddy could help with that.
Some of TubeBuddy’s best features for growing channels are the tagging features. TubeBuddy will help you discover tags, suggest new tags, and even copy whole lists of tags from rival videos.
There are different levels of pricing for TubeBuddy (including a free version, although it’s very limited) and you get a discount on the Pro version if you have less than 50,000 lifetime views on your channel. It ends up being $4.50USD a month (or $3.60 USD a month if you pay for a year in advance). It’s a good investment for someone who’s starting to see some growth on YouTube, but probably not if you’re still trying to reach milestones like 500 subs or 10,000 views.
You have to work hard to get anywhere on YouTube, but that doesn’t mean you should be toiling away at tedious stuff like typing in the same tags over and over. If you have any time-saving tips then make sure to share them with everyone in the comments!
Remember that your time is valuable =)

If you are using Filmora to edit YouTube videos, you can upload the video to YouTube directly from Filmora without download it again first, which can save you time. Besides, if you don’t want the video to be public, you can change Privacy to unlisted or private in Filmora.


Richard Bennett
Richard Bennett is a writer and a lover of all things video.
Follow @Richard Bennett
Richard Bennett
Oct 26, 2023• Proven solutions
You’ve shot a video you’re proud of and you can’t wait to post it! But, slow down, you have to edit all your clips together first. And then you have to export your video from the editing program, which can take a while. Then you have to wait for it to upload to YouTube, and once it’s up you have to write your description, add cards, and do a handful of other things.
The period between finishing a video and actually posting it for your subscribers to see can be long and tiresome. A lot of videos have probably died in these stages because their creators ran out of energy and patience.
Don’t let this happen to your videos! Here are 4 ways you can save time and avoid headaches during post-production:
3. Use default descriptions and tags
4. TubeBuddy’s bulk features and tagging tools
1. Create mini-projects
When you have alarge editing project with lots of different titles, animations, clip sequences, and PIP tracks it can get hard to keep track of everything. That’s especially true if you need to go back and make changes. A change to one part of your video could affect other parts of it.
Also, the more complex your video is the longer it will take to render/export.
There is a way you can keep your project more organized, save time making minor adjustments, and speed up rendering: create sub-projects of different segments of your video and import them into your main project as their own clips.
This helps you in 3 ways:
1. If there are a lot of effects it’ll be faster to render a shorter video.
2. If you import your sequence as its own clip you won’t have to worry about adjusting little parts of it whenever you change earlier sections of your video.
3. If you do want to make adjustments to your sequence you can open up your mini-project and change it without affecting anything in your main project.
2. Optimize your upload speed
At home, your videos will upload fastest if all of your internet resources are devoted to the upload. That means you should not have any other windows open on your computer while you are uploading. You should also make sure there aren’t other devices competing for wifi like smart tvs, cell phones, or really fancy coffee makers.
If you have neighbors on the same wifi signal as you and they are online at the same time, this will slow you down too.
Because there is so much that can interfere with wifi, you might want to consider a wired Ethernet cable. Ethernet connections are faster in general, and you won’t have any problems with other devices competing for resources like you get with wifi.
If you’re doing everything you can to optimize your upload speed at home and still find that it takes an unreasonable amount of time to upload videos to YouTube, go somewhere with a better connection. Save your video to a USB drive and take it to a library or college to upload. Connections in these kinds of places tend to be very strong.
3. Use default descriptions and tags
In your Creator Studio, go to Channel > Upload defaults. Here you can write in titles, descriptions, and tags which will automatically be applied to every video you upload.
Note: in the latest YouTube Studio, the upload interface is changed but the main process is similar.
You probably have tags you use for almost every video you post. For example, if your channel is about vegan cooking then every one of your videos is probably tagged ‘vegan’, ‘food’, and ‘cooking’. If you type those tags in here then you don’t have to keep adding them to every new video, and you can still add or remove tags from individual uploads so you aren’t stuck using the exact same set of tags every time.
Similarly, you probably have some default text that goes in the description of every one of your videos (i.e. a link to your personal website or a brief introduction of yourself). If you type in a default description then that text will appear automatically in every new video description and you can just add to it when you need to for individual videos.
Using defaults might only save you a couple of minutes per video, but those minutes add up.
4. TubeBuddy’s bulk features and tagging tools
TubeBuddy is a channel management tool for YouTube. Most of its features are more geared towards very large channels or companies with a YouTube presence, but there are also features that can help small or mid-sized YouTubers save time and stay organized.
Some of these tools include templates for things like cards and end screens and bulk processing tools for when you want to change a lot of things at once. For example, if you wanted to update the links in every card in every one of your videos at once then TubeBuddy could help with that.
Some of TubeBuddy’s best features for growing channels are the tagging features. TubeBuddy will help you discover tags, suggest new tags, and even copy whole lists of tags from rival videos.
There are different levels of pricing for TubeBuddy (including a free version, although it’s very limited) and you get a discount on the Pro version if you have less than 50,000 lifetime views on your channel. It ends up being $4.50USD a month (or $3.60 USD a month if you pay for a year in advance). It’s a good investment for someone who’s starting to see some growth on YouTube, but probably not if you’re still trying to reach milestones like 500 subs or 10,000 views.
You have to work hard to get anywhere on YouTube, but that doesn’t mean you should be toiling away at tedious stuff like typing in the same tags over and over. If you have any time-saving tips then make sure to share them with everyone in the comments!
Remember that your time is valuable =)
If you are using Filmora to edit YouTube videos, you can upload the video to YouTube directly from Filmora without download it again first, which can save you time. Besides, if you don’t want the video to be public, you can change Privacy to unlisted or private in Filmora.
Richard Bennett
Richard Bennett is a writer and a lover of all things video.
Follow @Richard Bennett
Optimal Media Transfer: Top Free YouTube-MP3 Apps Revealed
Best Free YouTube to MP3 Converters You Should Know [Online/Win/Mac]

Benjamin Arango
Mar 27, 2024• Proven solutions
Hey, when you find a wonderful or dramatic song or music in a YouTube video, what would you like to do? For me, I want to download it and listen to it when I’m offline. How about you? Instead of tapping the frequently used links on the YouTube platform, you can convert YouTube to mp3 by using a YouTube to mp3 converter. Then you can always listen to music or audio whenever you want. Therefore, this article will show 10 best free YouTube to mp3 converters for you to convert a YouTube video to mp3, on both Windows and Mac. You will learn:
- Part 1: Best Free Online YouTube to MP3 Converters
- Part 2: YouTube to MP3 Converters for Windows and Mac [Free Download]
- Part 3: Bonus Tip—Edit and Cut MP3 with Wondershare Filmora
Warning and Notice: It is illegal when you misuse the content uploaded by other users on YouTube. If it is your content, then go ahead to download the YouTube video and convert it to mp3. You should follow the terms and conditions displayed on the YouTube website.
Part 1: 5 Free Online YouTube to MP3 Converters for Windows and Mac
Whether you’re using a Windows or a Mac computer, you can find a YouTube to MP3 converter that fits your need perfectly from the below list. In the following part, I will share with you some incredible online YouTube videos to MP3 converters. Enlighten and sharpen your skills on video conversion by exploring the discussed steps below:
- **1. YtMp3 Video Converter
- **2. Flvto Converter Tool
- **3. y2mate YouTube to MP3 Converter
- **4. YOUTUBETOMP3 Online
- **5. youtubetomp3music.com
1. YtMp3 Video Converter
This is a free online YouTube to MP3/MP4 converting tool. It will assist you to accomplish reliable YouTube video conversions at free of cost. There is no need to fill in any details for registration to make use of this online service. This platform offers you an immediate solution to convert YouTube to mp3.
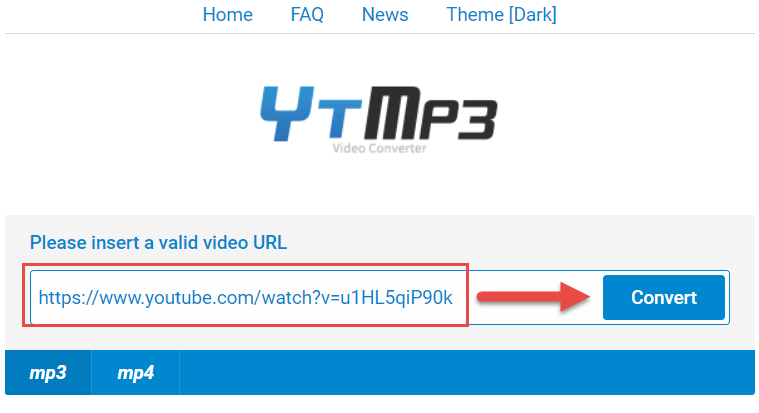
- Visit https://ytmp3.cc/youtube-to-mp3/ to open the YtMp3 converter tool with your browser
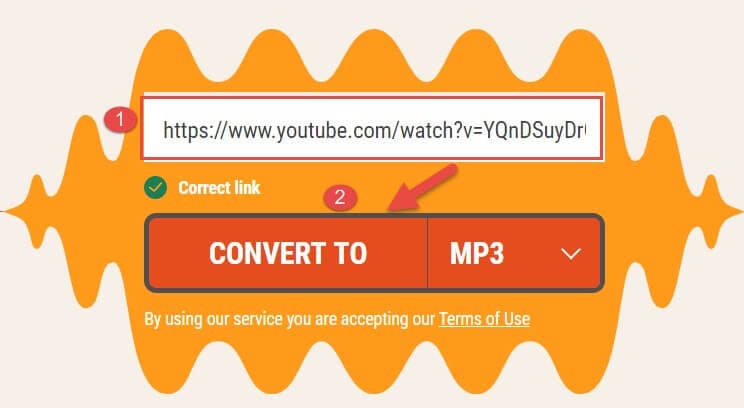
- Copy your favorite video’s URL from YouTube
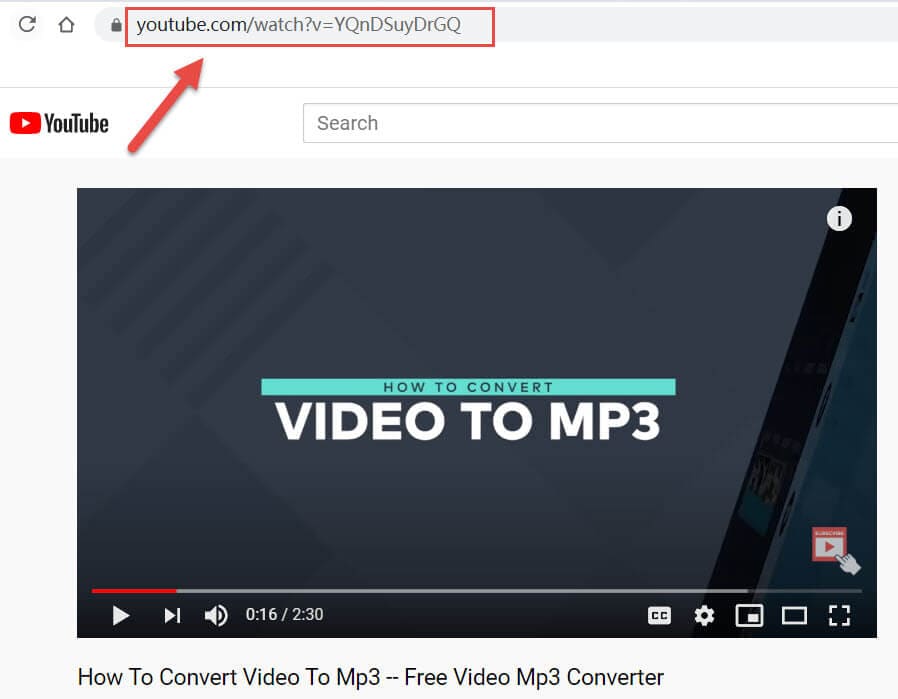
- Paste the URL on the text field. Then, choose MP3 below the text box and finally hit the Convert button to start the conversion
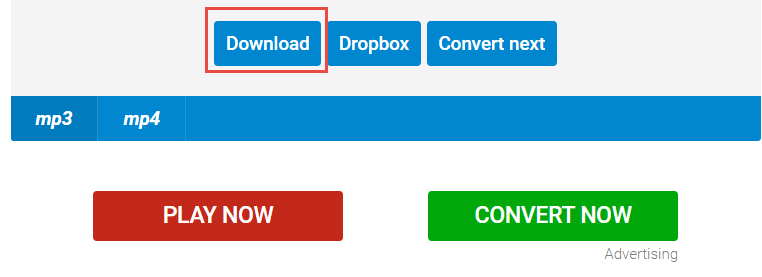
- Once the conversion finishes, click Download to save the mp4 file at your desired location in your device.
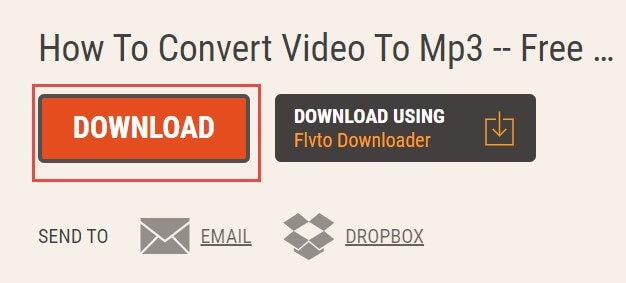
2. Flvto Converter Tool
If you are looking for a reliable online platform to convert YouTube to MP3, MP4, or AVI**,** this online tool is also the right choice. The steps are quite simple and you can perform the conversion process anytime without any issues. Save the converted file in your desired location and access it whenever you need it. Ease the YouTube conversion process using this online software by following the below instructions:
- Visit https://www.flvto.biz/en91/ to open Flvto converter tool online with your browser
- Copy your favorite video’s URL from YouTube, as mentioned before
- Enter the link to the box, then select the file format as mp3, then click CONVERT TO button to trigger the conversion process
- Once finished, press the Download icon to download and save a converted mp3 file to your computer or local device. You can also send the mp3 to an email or upload it to dropbox directly.
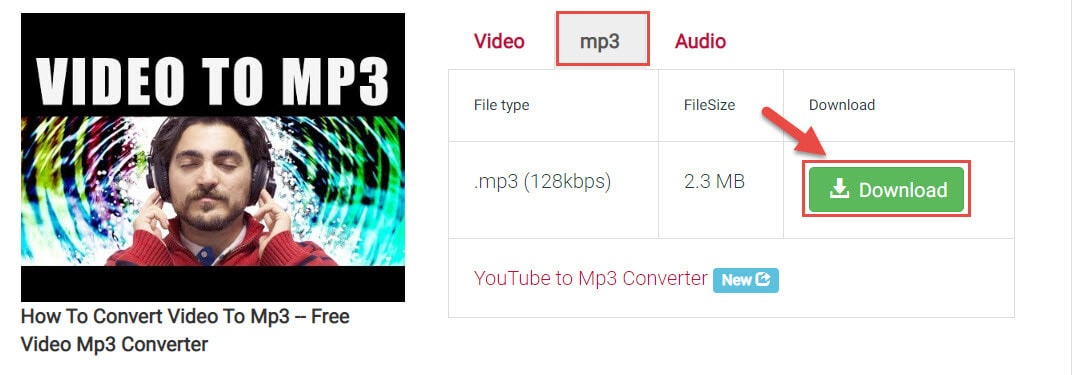
3. y2mate YouTube to MP3 Converter
Y2mate is an online YouTube video downloader and converter. This online tool is compatible with all kinds of browsers optimally. You can use this program to convert YouTube to MP3 on both Windows and Mac. This platform allows you to make unlimited file conversions without spending even a penny from your pocket. You can avail for this service anytime and anywhere without any interruptions.
- Visit https://www.y2mate.com/en68 to open y2mate YouTube to MP3 Converter with your browser
- Go to YouTube and copy your desired URL link into the clipboard
- Copy and paste the YouTube URL to the box, and click Start
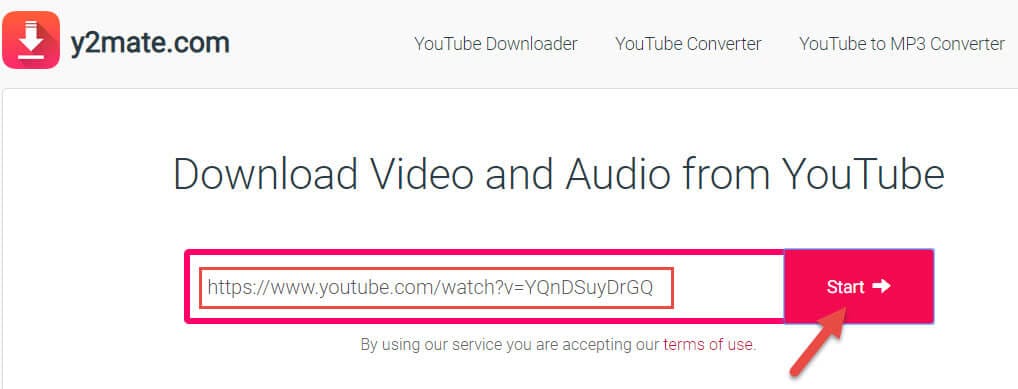
- Just a second, the YouTube video will be converted successfully. Please select the format as MP3 and then hit Download to save it at your favorite storage place in your device for easy retrieval when required.
4. YOUTUBETOMP3 Online
This extraordinary online platform wins your expectations by offering you with free service without any registration. There is no need to download any software to convert YouTube to mp3 instead of stepping into this online platform and carry on with unlimited quality conversion without any issues. Follow the below guidelines for the successful file conversion process:
- Visit https://youtubetomp3.sc/ to open this YOUTUBETOMP3 Online tool with your browser
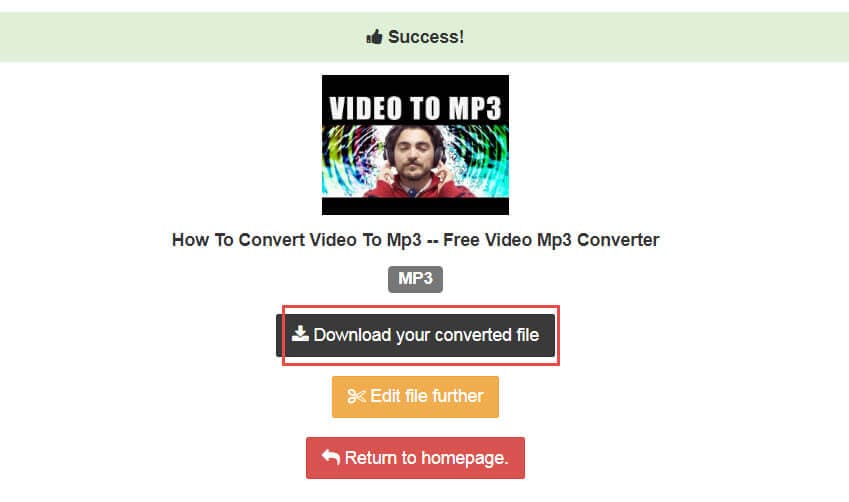
- Take a quick copy of your favorite YouTube link
- Still paste the URL and select MP3 as the desired format in the list. Next press the Convert button.
- Then it will show Success, which means the YouTube video has been converted successfully. Then you can click Download your converted file to save the mp3 as you need.
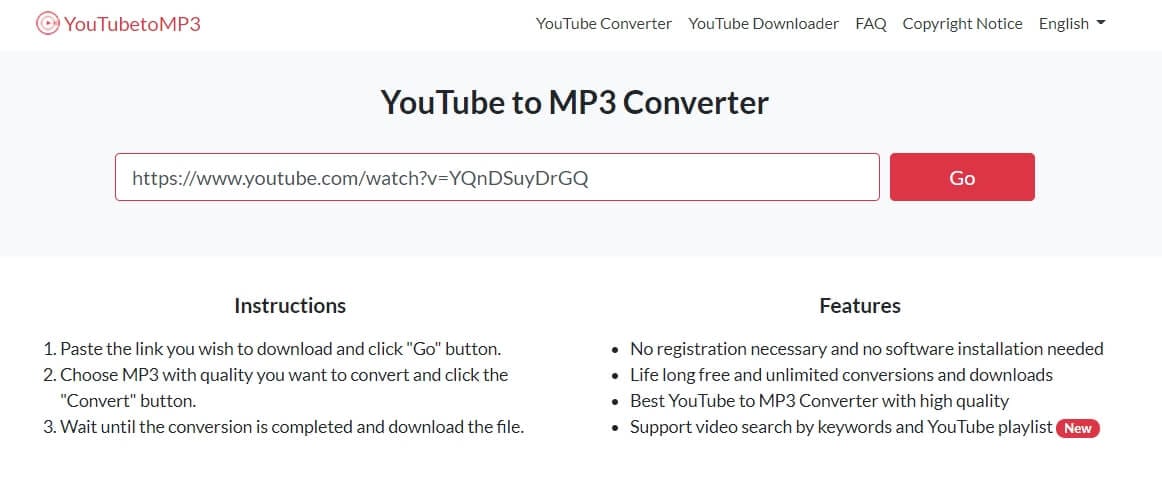
5. youtubetomp3music.com
This online YouTube to MP3 converter allows you to convert YouTube video to MP3 with high quality.
It supports both desktop and mobile devices, so you can use it on Windows, Mac, iPhone, or Android. Besides YouTube, it also supports Facebook, Vimeo and Dailymotion, which is great. Below are the brief steps of converting YouTube to MP3.
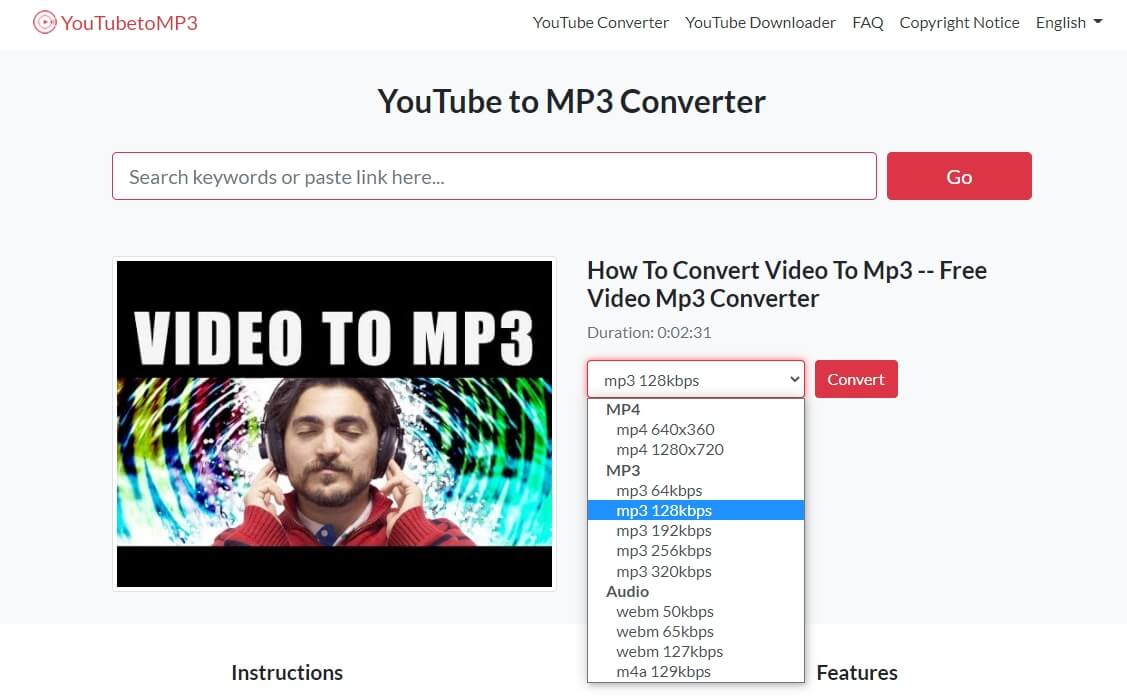
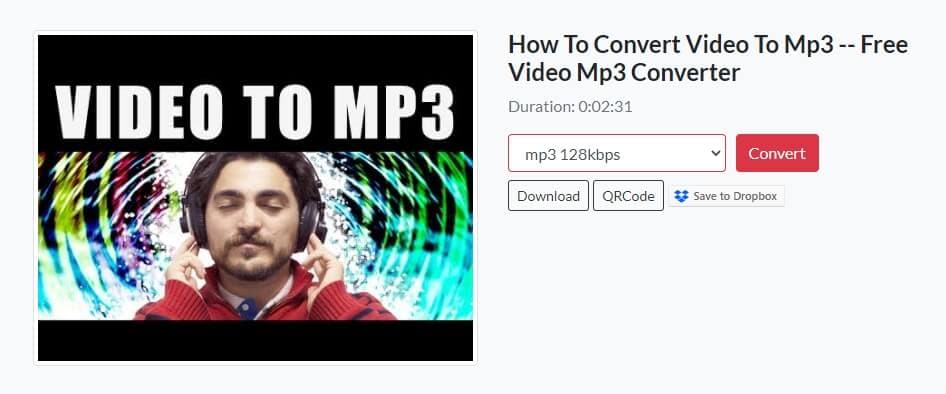
- Visit https://youtubetomp3music.com/en16/ , paste the YouTube video link, and click the Go button.
- Now, you can choose the MP3 quality from 64kbps to 320kbps, the higher the kbps, the clear the audio.
- Click Convert to start the conversion, and then you can choose Download to save the converted YouTube video to local, or choose to Save to Dropbox.
Part 2: YouTube to MP3 Converters for Windows and Mac [Free Download]
For people who will convert YouTube to MP3 audio files often, I recommend you to try the offline YouTube to MP3 downloader. If you have tried the converters above, you may find that some of them are filled with ads. Here are some YouTube to MP3 converters for Windows and Mac that you can download for free.
- **1. Wondershare UniConverter
- **2. 4K Video Downloader
- **3. DVDVideoSoft YouTube to MP3 Converter
- **4. Mediahuman’s YouTube to MP3 Converter
- **5. Clipgrab
1. Wondershare UniConverter
UniCovnerter is the professional desktop video converter application from Wondershare. This one-stop video converter provides high-quality video and audio conversion, which is compatible with both Windows and Mac OS. Converting YouTube video to MP3 audio is easy with UniConverter, check the steps below:
- Download and install UniConverter on your computer (Windows 7 64-bit or later & macOS 10.10 or later). Launch it and then go to the Downloader menu and then click the Plus File icon.
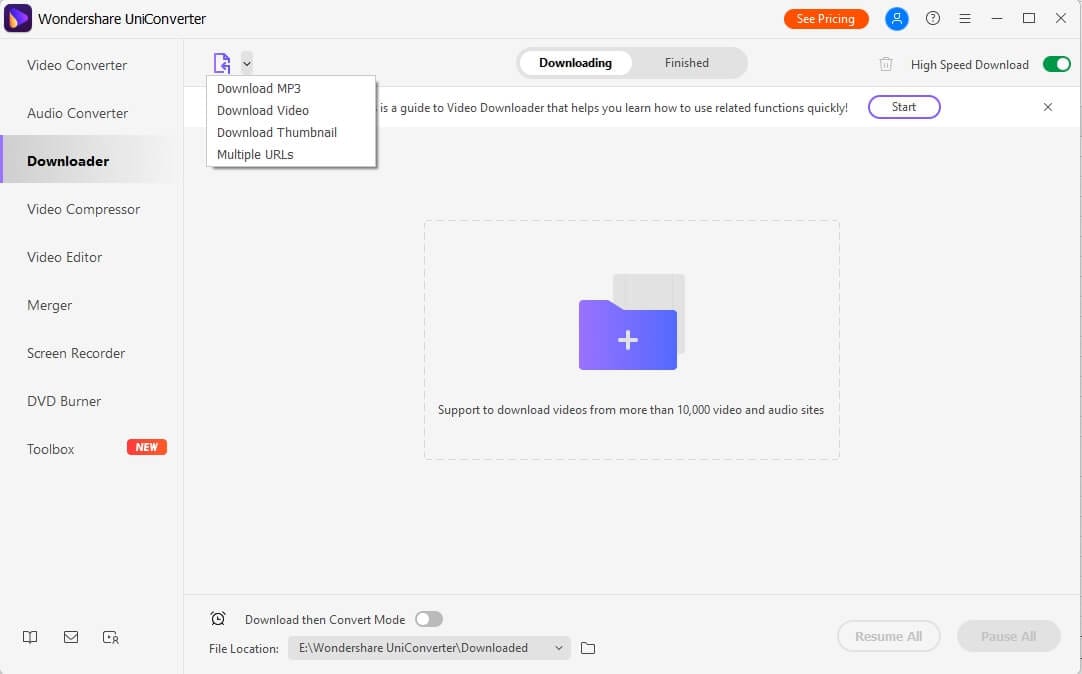
- In the pop-up window, paste the YouTube video link. If you want to download multiple MP3 files, you can paste one URL per line to continue, and then click the Download button.
- In the Download Audio tab, you can choose the downloaded audio quality. In UniConverter, you can download MP3 in 128Kbps, 256Kbps, or 320Kbps high quality. Click Download to start downloading.
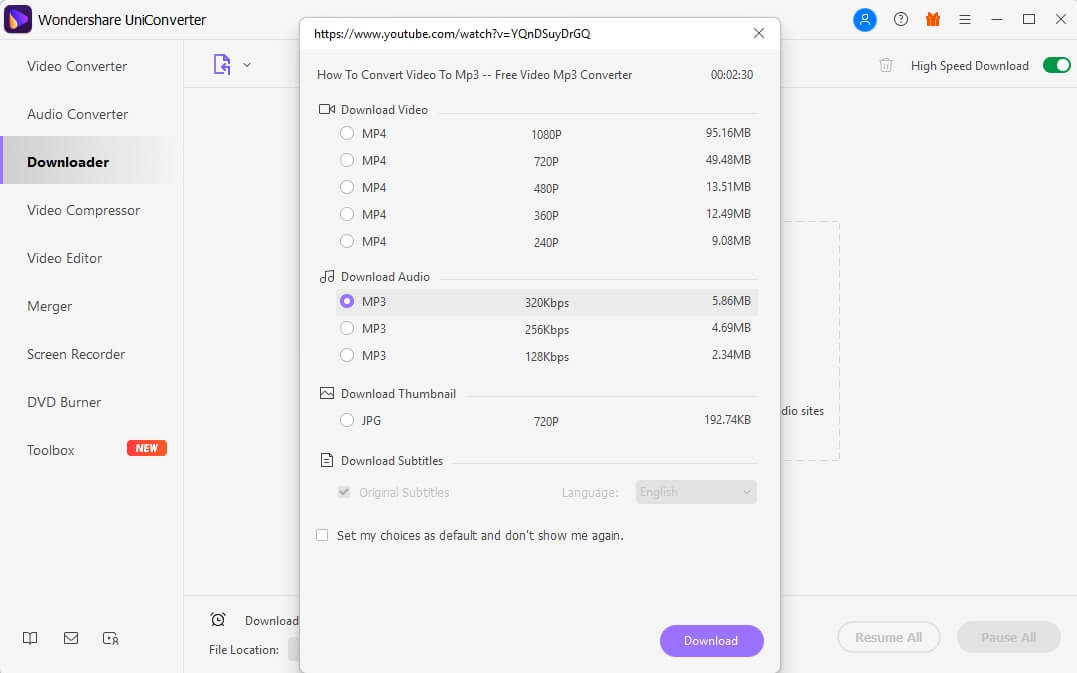
Besides MP3 audio file, you can also download the YouTube video in mp4 format, or download the thumbnail, or the subtitles if needed with UniConverter.
2. 4K Video Downloader
This tool is an offline converter where you have to download the app from its official website to discover it’s built-in features. It is a quality converter, which allows you to download full playlist and channels in your local drive for future reference. This program is compatible with all platforms like Mac, Windows, and Linux, etc. It supports more than 50 languages and it is trusted by million of users across boundaries.
Note
This 4K Video Downloader application enables you to download and convert up to 24 YouTube videos to mp3 files. You need to purchase a license for it if you want to convert more YouTube videos to mp3.
- Download the 4K Video Downloader application to your computer. It is compatible with both Windows and Mac OS
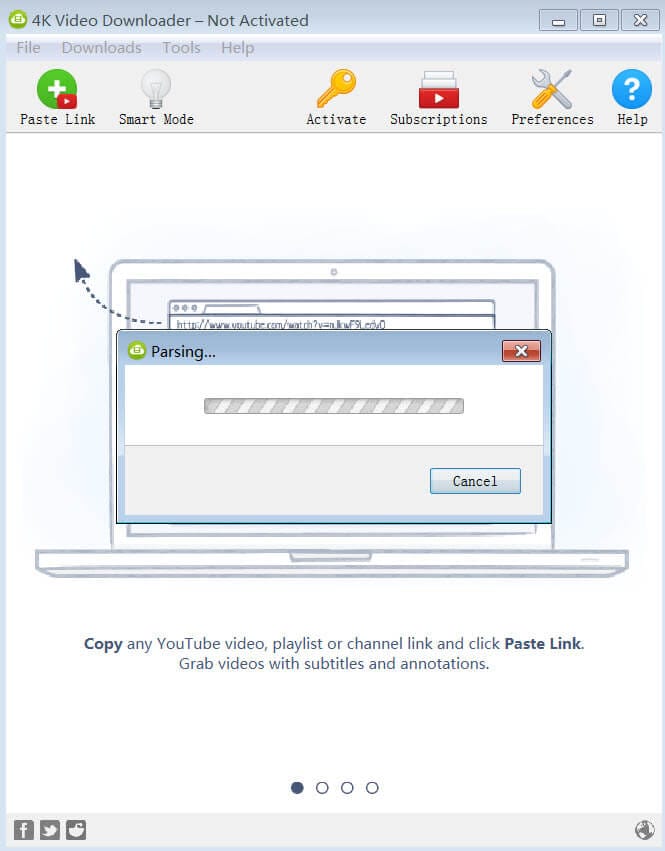
- After installation, please open this application on your computer, and copy the video URL from YouTube to your clipboard
- Tap the Paste Link option, and then this application will detect the URL automatically. You will see it’s parsing the video
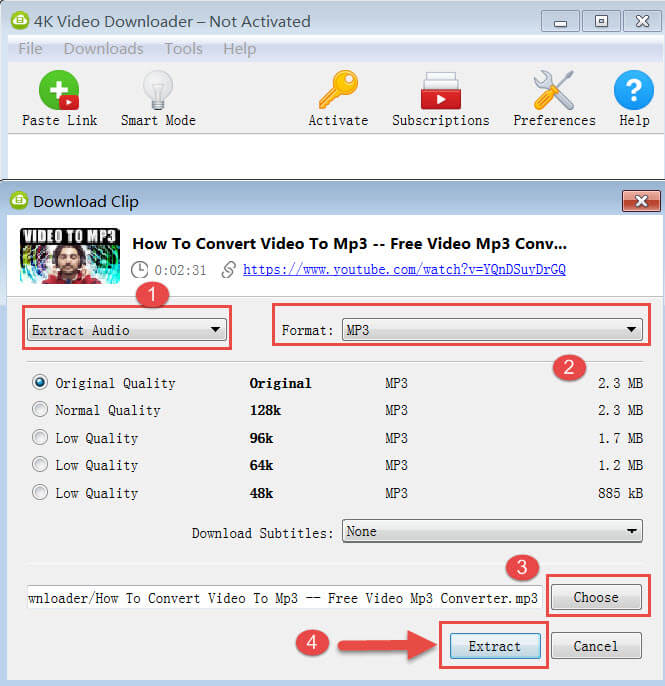
- Once done, drop down the list and select Extract Audio and MP3 as the format. You can hit Choose to change the output directory on your computer to save the converted mp3 file. Finally, press Extract to start the conversion
- After conversion, you can go to the output directory you set and find the converted mp3.

3. DVDVideoSoft YouTube to MP3 Converter
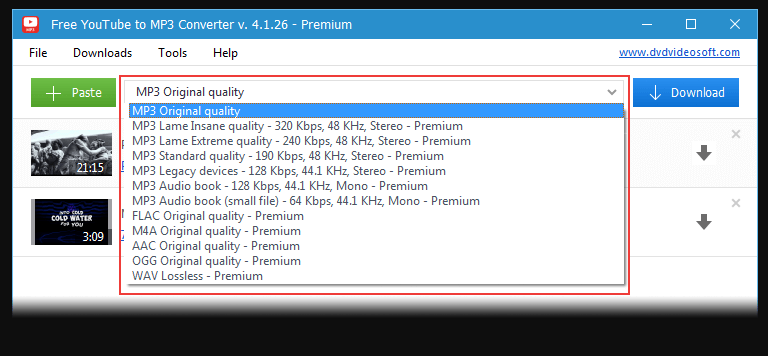
It is an excellent YouTube to MP3 converter available for free download. This application has ample features like lossless conversion, retains the quality during the conversion process, and lastly it is safe and secure to carry on with the conversion procedure. Apart from the MP3 format, you can also choose other file types like M4A, WAV, FLAC and OGG.
- Download and install this app to your PC as per the OS type
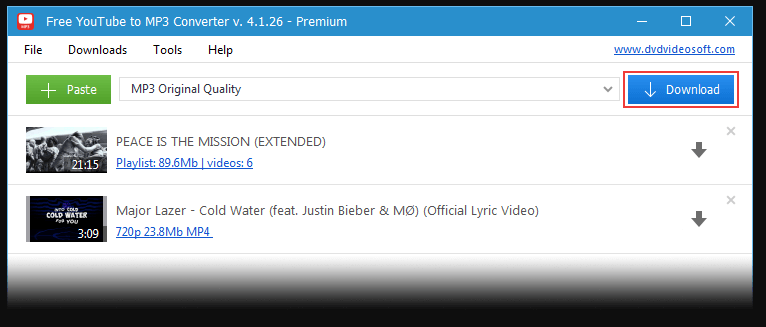
- Open this mp3 converter after installation. Copy the URL from YouTube and paste in the blank field by pressing the Paste button.
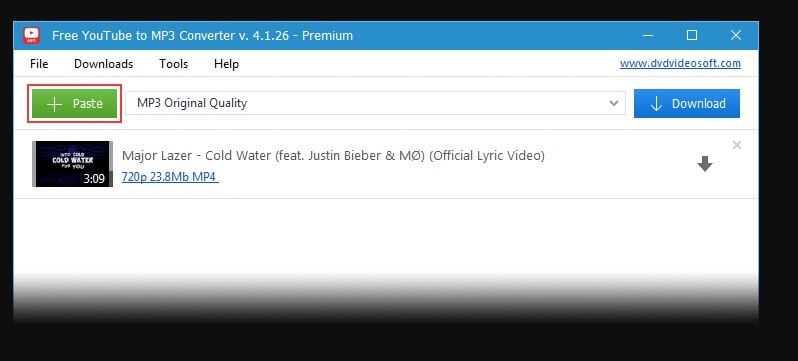
- Choose MP3 original quality from the drop-down list
- Finally hit the Download button. You can now save the file at any location of your choice without issues.
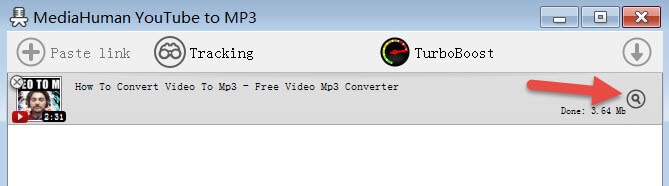
4. Mediahuman’s YouTube to MP3 Converter
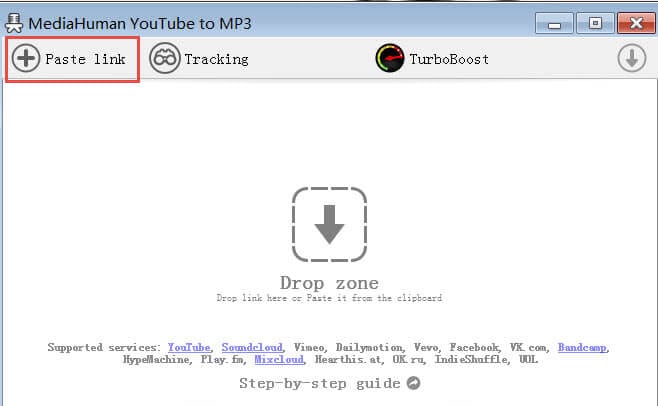
This application can work on both Windows and Mac. It also supports downloading playlists and channels from YouTube. The download tracks can be merged with the iTunes platform easily. You can make a copy of HD tracks of YouTube videos at your local disk and listen to it whenever you feel like. This tool saves a lot of time and the required process completes in a few minutes. Let’s see how you can convert YouTube to mp3 using this application:
- Download this video converter tool and install it to your computer
- Launch this application. Then go to YouTube and copy the video URL to the clipboard
- Click Paste link option(you should copy the YouTube URL first, otherwise this option will gray out), and it will load the YouTube video
- Then hit the download icon to trigger the conversion process
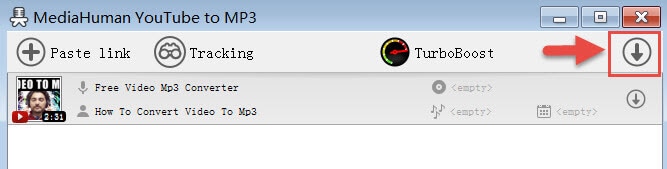
- Once done, you can click the Search icon to locate the converted mp3 file on your computer.
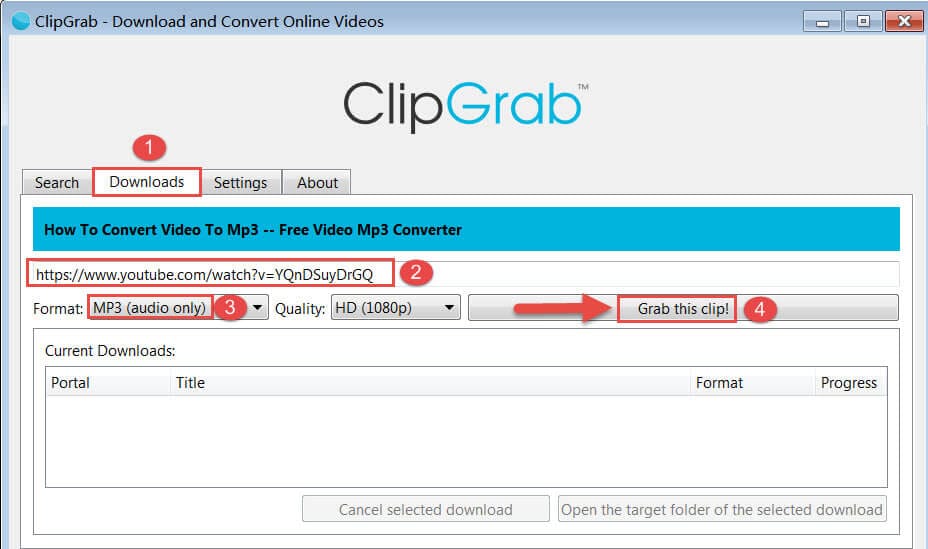
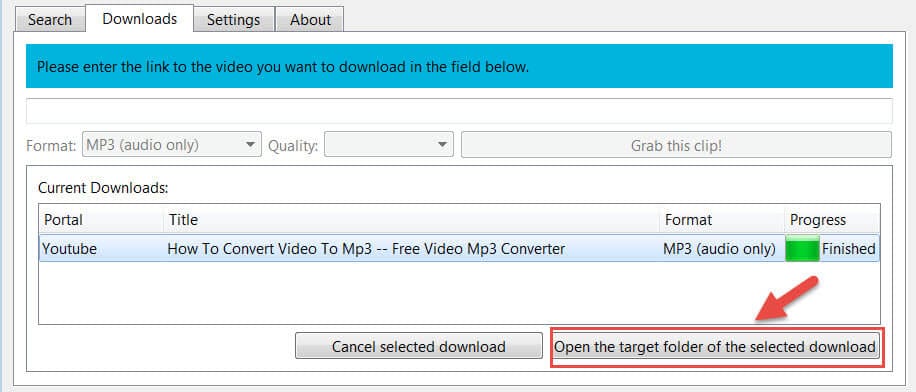
5. Clipgrab
This open-source video converter assists you to convert YouTube to mp3 optimally. It is enough if you tap the download link from its official website without any fee. This free software updates with the latest controls now and then to serve their customers efficiently. Take a glance at the steps regarding the conversion procedure
- Download and install this free application to your computer
- Open this application after installation, and go to the Downloads tab at the top
- Copy and paste and your favorite YouTube video link to the box, and choose MP3 format followed by adjusting HD quality. At last, press Grab this clip! button to trigger the conversion
- Once finished, you can click Open the target folder of the selected download to find the converted mp3 file.
Part3: Bonus Tip—Edit &Cut MP3 with Wondershare Filmora
In case if you want to edit and customize the downloaded MP3 file from YouTube, what can you do? Get started with Wondershare Filmora! It is a prestigious product from Wondershare to carry out the editing process after you convert YouTube to mp3 from your favorite tracks.
Excited to explore dazzling features then scroll down:
- Flexible audio control to do more audio adjustment
- Cut and trim your desired tracks in audio and video files
- Get rid of noise and unwanted background disturbances in the audio files
- This tool guarantees crisp and quality video and audio files
Just surf through the below guidelines to cut or edit your mp3 file:
- Download and install the program below. Then open Filmora on your computer
Download Mac Version ](https://tools.techidaily.com/wondershare/filmora/download/ )
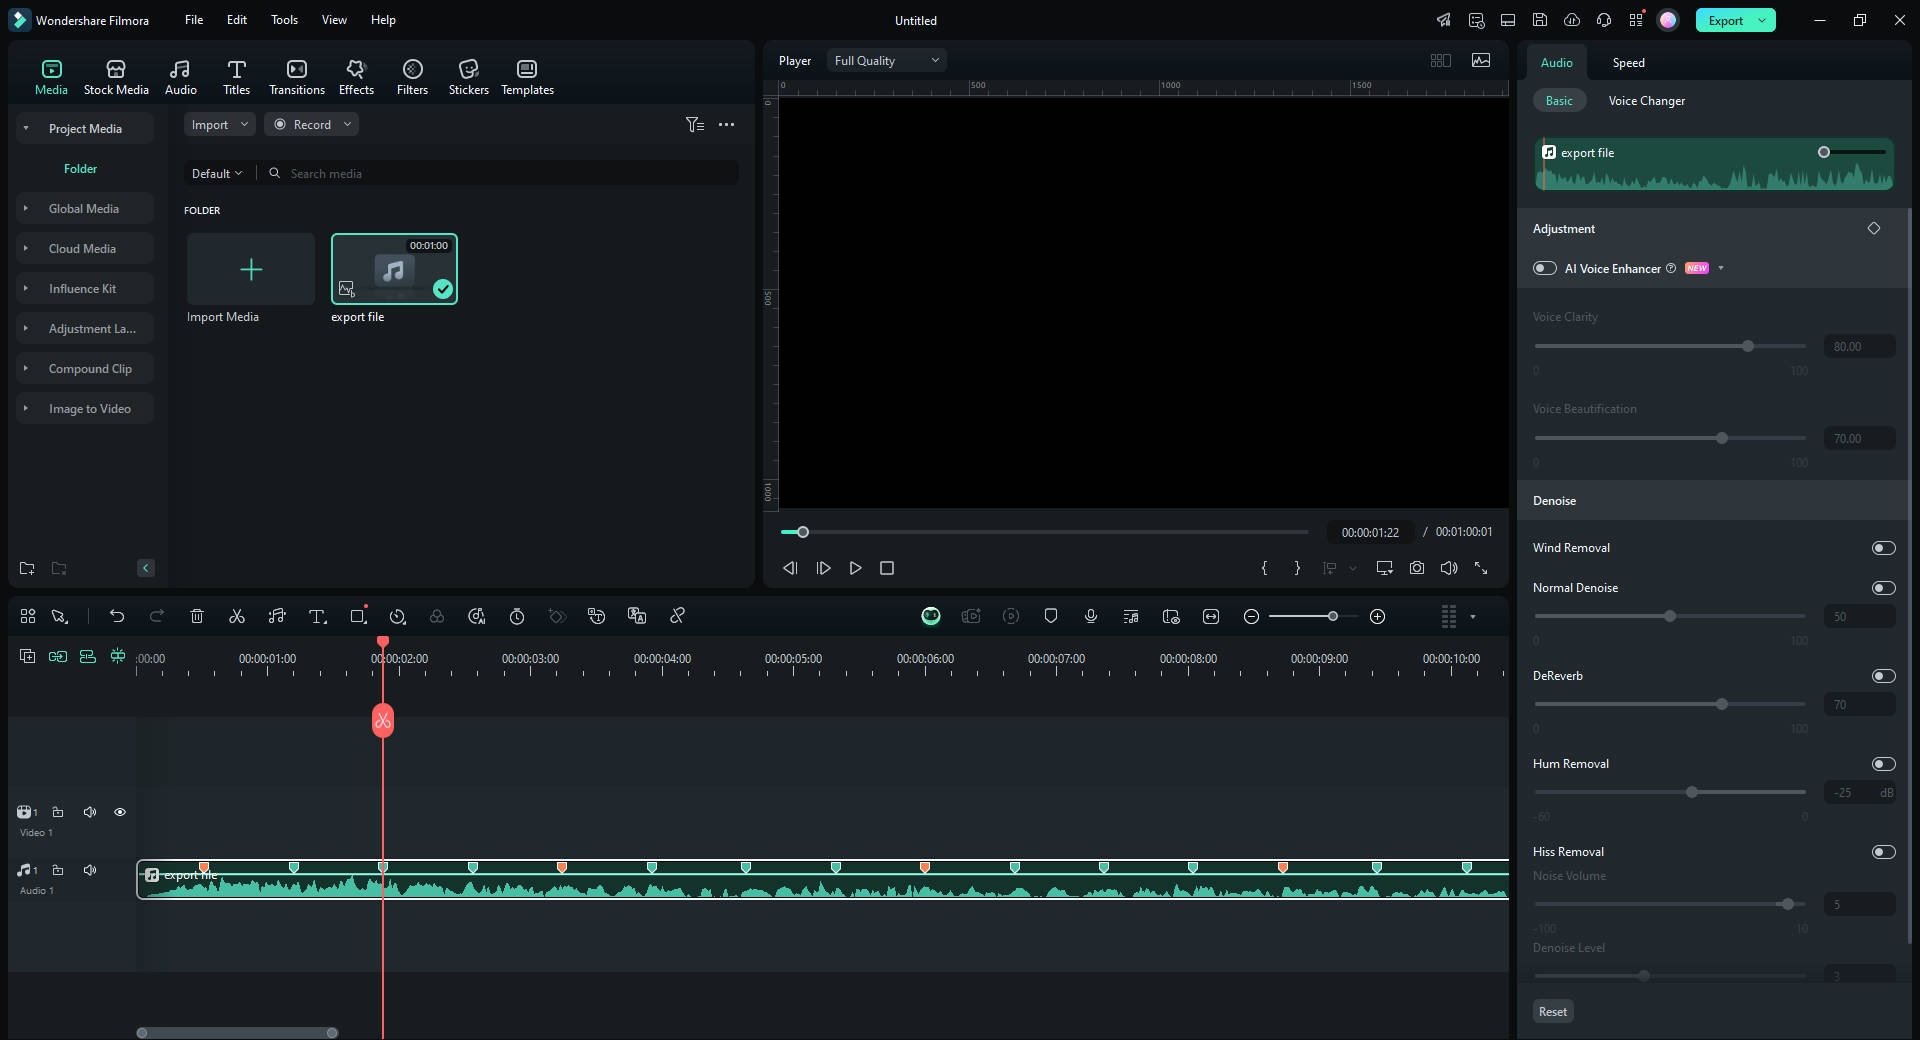
- Hit the File-Import Media option to load the converted mp3 file to the Media Library
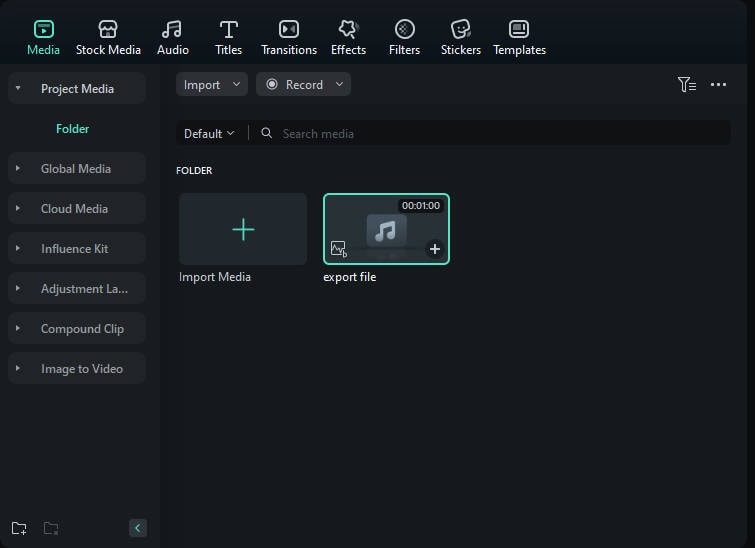
- Add the mp3 to the timeline, move the indicator to the place you want to cut, then click the red scissor icon to cut the mp3.

- And you can right-click the mp3 on the timeline, select Adjust Audio to get more audio control. The users can fade in/out the audio, adjust the volume/pitch, remove background noise, etc.
To sum up
Finally, it is time to conclude the discussion on a wide range of free YouTube to mp3 converters. You had a better idea of different video converters both on the online and offline platforms. Choose Filmora to obtain better quality edited audio and video tracks. You can now convert, edit, and store it at your desired location of video and audio files effortlessly. You can give your comments and write down your suggestions regarding this article. Get connected with us to explore and discover more facts on video editors and converters.
Benjamin Arango
Benjamin Arango is a writer and a lover of all things video.
Follow @Benjamin Arango
Benjamin Arango
Mar 27, 2024• Proven solutions
Hey, when you find a wonderful or dramatic song or music in a YouTube video, what would you like to do? For me, I want to download it and listen to it when I’m offline. How about you? Instead of tapping the frequently used links on the YouTube platform, you can convert YouTube to mp3 by using a YouTube to mp3 converter. Then you can always listen to music or audio whenever you want. Therefore, this article will show 10 best free YouTube to mp3 converters for you to convert a YouTube video to mp3, on both Windows and Mac. You will learn:
- Part 1: Best Free Online YouTube to MP3 Converters
- Part 2: YouTube to MP3 Converters for Windows and Mac [Free Download]
- Part 3: Bonus Tip—Edit and Cut MP3 with Wondershare Filmora
Warning and Notice: It is illegal when you misuse the content uploaded by other users on YouTube. If it is your content, then go ahead to download the YouTube video and convert it to mp3. You should follow the terms and conditions displayed on the YouTube website.
Part 1: 5 Free Online YouTube to MP3 Converters for Windows and Mac
Whether you’re using a Windows or a Mac computer, you can find a YouTube to MP3 converter that fits your need perfectly from the below list. In the following part, I will share with you some incredible online YouTube videos to MP3 converters. Enlighten and sharpen your skills on video conversion by exploring the discussed steps below:
- **1. YtMp3 Video Converter
- **2. Flvto Converter Tool
- **3. y2mate YouTube to MP3 Converter
- **4. YOUTUBETOMP3 Online
- **5. youtubetomp3music.com
1. YtMp3 Video Converter
This is a free online YouTube to MP3/MP4 converting tool. It will assist you to accomplish reliable YouTube video conversions at free of cost. There is no need to fill in any details for registration to make use of this online service. This platform offers you an immediate solution to convert YouTube to mp3.
- Visit https://ytmp3.cc/youtube-to-mp3/ to open the YtMp3 converter tool with your browser
- Copy your favorite video’s URL from YouTube
- Paste the URL on the text field. Then, choose MP3 below the text box and finally hit the Convert button to start the conversion
- Once the conversion finishes, click Download to save the mp4 file at your desired location in your device.
2. Flvto Converter Tool
If you are looking for a reliable online platform to convert YouTube to MP3, MP4, or AVI**,** this online tool is also the right choice. The steps are quite simple and you can perform the conversion process anytime without any issues. Save the converted file in your desired location and access it whenever you need it. Ease the YouTube conversion process using this online software by following the below instructions:
- Visit https://www.flvto.biz/en91/ to open Flvto converter tool online with your browser
- Copy your favorite video’s URL from YouTube, as mentioned before
- Enter the link to the box, then select the file format as mp3, then click CONVERT TO button to trigger the conversion process
- Once finished, press the Download icon to download and save a converted mp3 file to your computer or local device. You can also send the mp3 to an email or upload it to dropbox directly.
3. y2mate YouTube to MP3 Converter
Y2mate is an online YouTube video downloader and converter. This online tool is compatible with all kinds of browsers optimally. You can use this program to convert YouTube to MP3 on both Windows and Mac. This platform allows you to make unlimited file conversions without spending even a penny from your pocket. You can avail for this service anytime and anywhere without any interruptions.
- Visit https://www.y2mate.com/en68 to open y2mate YouTube to MP3 Converter with your browser
- Go to YouTube and copy your desired URL link into the clipboard
- Copy and paste the YouTube URL to the box, and click Start
- Just a second, the YouTube video will be converted successfully. Please select the format as MP3 and then hit Download to save it at your favorite storage place in your device for easy retrieval when required.
4. YOUTUBETOMP3 Online
This extraordinary online platform wins your expectations by offering you with free service without any registration. There is no need to download any software to convert YouTube to mp3 instead of stepping into this online platform and carry on with unlimited quality conversion without any issues. Follow the below guidelines for the successful file conversion process:
- Visit https://youtubetomp3.sc/ to open this YOUTUBETOMP3 Online tool with your browser
- Take a quick copy of your favorite YouTube link
- Still paste the URL and select MP3 as the desired format in the list. Next press the Convert button.
- Then it will show Success, which means the YouTube video has been converted successfully. Then you can click Download your converted file to save the mp3 as you need.
5. youtubetomp3music.com
This online YouTube to MP3 converter allows you to convert YouTube video to MP3 with high quality.
It supports both desktop and mobile devices, so you can use it on Windows, Mac, iPhone, or Android. Besides YouTube, it also supports Facebook, Vimeo and Dailymotion, which is great. Below are the brief steps of converting YouTube to MP3.
- Visit https://youtubetomp3music.com/en16/ , paste the YouTube video link, and click the Go button.
- Now, you can choose the MP3 quality from 64kbps to 320kbps, the higher the kbps, the clear the audio.
- Click Convert to start the conversion, and then you can choose Download to save the converted YouTube video to local, or choose to Save to Dropbox.
Part 2: YouTube to MP3 Converters for Windows and Mac [Free Download]
For people who will convert YouTube to MP3 audio files often, I recommend you to try the offline YouTube to MP3 downloader. If you have tried the converters above, you may find that some of them are filled with ads. Here are some YouTube to MP3 converters for Windows and Mac that you can download for free.
- **1. Wondershare UniConverter
- **2. 4K Video Downloader
- **3. DVDVideoSoft YouTube to MP3 Converter
- **4. Mediahuman’s YouTube to MP3 Converter
- **5. Clipgrab
1. Wondershare UniConverter
UniCovnerter is the professional desktop video converter application from Wondershare. This one-stop video converter provides high-quality video and audio conversion, which is compatible with both Windows and Mac OS. Converting YouTube video to MP3 audio is easy with UniConverter, check the steps below:
- Download and install UniConverter on your computer (Windows 7 64-bit or later & macOS 10.10 or later). Launch it and then go to the Downloader menu and then click the Plus File icon.
- In the pop-up window, paste the YouTube video link. If you want to download multiple MP3 files, you can paste one URL per line to continue, and then click the Download button.
- In the Download Audio tab, you can choose the downloaded audio quality. In UniConverter, you can download MP3 in 128Kbps, 256Kbps, or 320Kbps high quality. Click Download to start downloading.
Besides MP3 audio file, you can also download the YouTube video in mp4 format, or download the thumbnail, or the subtitles if needed with UniConverter.
2. 4K Video Downloader
This tool is an offline converter where you have to download the app from its official website to discover it’s built-in features. It is a quality converter, which allows you to download full playlist and channels in your local drive for future reference. This program is compatible with all platforms like Mac, Windows, and Linux, etc. It supports more than 50 languages and it is trusted by million of users across boundaries.
Note
This 4K Video Downloader application enables you to download and convert up to 24 YouTube videos to mp3 files. You need to purchase a license for it if you want to convert more YouTube videos to mp3.
- Download the 4K Video Downloader application to your computer. It is compatible with both Windows and Mac OS
- After installation, please open this application on your computer, and copy the video URL from YouTube to your clipboard
- Tap the Paste Link option, and then this application will detect the URL automatically. You will see it’s parsing the video
- Once done, drop down the list and select Extract Audio and MP3 as the format. You can hit Choose to change the output directory on your computer to save the converted mp3 file. Finally, press Extract to start the conversion
- After conversion, you can go to the output directory you set and find the converted mp3.
3. DVDVideoSoft YouTube to MP3 Converter
It is an excellent YouTube to MP3 converter available for free download. This application has ample features like lossless conversion, retains the quality during the conversion process, and lastly it is safe and secure to carry on with the conversion procedure. Apart from the MP3 format, you can also choose other file types like M4A, WAV, FLAC and OGG.
- Download and install this app to your PC as per the OS type
- Open this mp3 converter after installation. Copy the URL from YouTube and paste in the blank field by pressing the Paste button.
- Choose MP3 original quality from the drop-down list
- Finally hit the Download button. You can now save the file at any location of your choice without issues.
4. Mediahuman’s YouTube to MP3 Converter
This application can work on both Windows and Mac. It also supports downloading playlists and channels from YouTube. The download tracks can be merged with the iTunes platform easily. You can make a copy of HD tracks of YouTube videos at your local disk and listen to it whenever you feel like. This tool saves a lot of time and the required process completes in a few minutes. Let’s see how you can convert YouTube to mp3 using this application:
- Download this video converter tool and install it to your computer
- Launch this application. Then go to YouTube and copy the video URL to the clipboard
- Click Paste link option(you should copy the YouTube URL first, otherwise this option will gray out), and it will load the YouTube video
- Then hit the download icon to trigger the conversion process
- Once done, you can click the Search icon to locate the converted mp3 file on your computer.
5. Clipgrab
This open-source video converter assists you to convert YouTube to mp3 optimally. It is enough if you tap the download link from its official website without any fee. This free software updates with the latest controls now and then to serve their customers efficiently. Take a glance at the steps regarding the conversion procedure
- Download and install this free application to your computer
- Open this application after installation, and go to the Downloads tab at the top
- Copy and paste and your favorite YouTube video link to the box, and choose MP3 format followed by adjusting HD quality. At last, press Grab this clip! button to trigger the conversion
- Once finished, you can click Open the target folder of the selected download to find the converted mp3 file.
Part3: Bonus Tip—Edit &Cut MP3 with Wondershare Filmora
In case if you want to edit and customize the downloaded MP3 file from YouTube, what can you do? Get started with Wondershare Filmora! It is a prestigious product from Wondershare to carry out the editing process after you convert YouTube to mp3 from your favorite tracks.
Excited to explore dazzling features then scroll down:
- Flexible audio control to do more audio adjustment
- Cut and trim your desired tracks in audio and video files
- Get rid of noise and unwanted background disturbances in the audio files
- This tool guarantees crisp and quality video and audio files
Just surf through the below guidelines to cut or edit your mp3 file:
- Download and install the program below. Then open Filmora on your computer
Download Mac Version ](https://tools.techidaily.com/wondershare/filmora/download/ )
- Hit the File-Import Media option to load the converted mp3 file to the Media Library
- Add the mp3 to the timeline, move the indicator to the place you want to cut, then click the red scissor icon to cut the mp3.
- And you can right-click the mp3 on the timeline, select Adjust Audio to get more audio control. The users can fade in/out the audio, adjust the volume/pitch, remove background noise, etc.
To sum up
Finally, it is time to conclude the discussion on a wide range of free YouTube to mp3 converters. You had a better idea of different video converters both on the online and offline platforms. Choose Filmora to obtain better quality edited audio and video tracks. You can now convert, edit, and store it at your desired location of video and audio files effortlessly. You can give your comments and write down your suggestions regarding this article. Get connected with us to explore and discover more facts on video editors and converters.
Benjamin Arango
Benjamin Arango is a writer and a lover of all things video.
Follow @Benjamin Arango
- Title: How to Shave Seconds Off Your YouTube Video Submission for 2024
- Author: Thomas
- Created at : 2024-05-31 12:40:27
- Updated at : 2024-06-01 12:40:27
- Link: https://youtube-help.techidaily.com/how-to-shave-seconds-off-your-youtube-video-submission-for-2024/
- License: This work is licensed under CC BY-NC-SA 4.0.
