
How YouTube Snippets Can Boost Your Financial Goals for 2024
How YouTube Snippets Can Boost Your Financial Goals
YouTube Shorts have become a craze in the recent past as creators try to get the best out of them. These are short, vertical videos that are 60 seconds long. Originally a way of YouTube attempting to compete with TikTok, Shorts have become a household name. However, are YouTube shorts monetized? Can you get paid for YouTube shorts? The increasing interest in monetizing Shorts has inspired many creators working on their video creation. This article answers the question of can YouTube Shorts be monetized and explains how the revenue-sharing model works.
YouTube Shorts Editor A cross-platform helps creators edit the vertical videos quickly and easily!
Free Download Free Download Learn More

Part 1. Unveiling the Mystery of YouTube Shorts Revenue Sharing
YouTube launched the Shorts platform in 2021, which gained popularity within a short period. By the end of the first year, some videos had racked up more than half a billion views and counties. This begged the question: can you get paid from YouTube shorts?
Yes, YouTube updated its Partner Program, allowing the revenue-sharing model to benefit Shorts creators. The platform pools all the money it gets from advertisers every month from the Shorts feeds. It then shares that money with creators based on the number of views. Since the launch of this program in February 2023, the previous YouTube Shorts Fund became defunct.
The ad revenue-sharing model on YouTube Shorts may seem complex, but let’s break it down
- Every month YouTube pools all the revenue it generates from ads that appear in the Shorts feed.
- YouTube calculates that is going to the Creators Pool. A chuck of this money goes towards paying for songs used in YouTube Shorts. For instance, only a third of the ad revenue generated from a Shorts goes to the Creator Pool if it used two songs while the rest goes to paying for the music.
- YouTube divides the Creator pool depending on the number of views they contributed. If a creator generated 5% of the Shorts views during a period, they are assigned 5% of the Creator Pool.
- From that amount, YouTube keeps 55% of its share while you get paid the remaining 45%. If a creator’s 5% amounted to $800, then they will receive $360.
So, is YouTube shorts monetized? Yes, the ads-sharing model defines the amount of money a creator can earn from Shorts every month. Depending on the number of views generated, high-performing Shorts can bring in a huge amount of money.
Part 2. YouTube Shorts Monetization: Eligibility Criteria and Earnings Potential
YouTube Shorts provides creators with an exceptional way of making extra income. Let’s have a look at what it takes and what the numbers say:
Eligibility Criteria
If you are wondering, can I monetize YouTube shorts? To start earning ad revenue from Shorts, you need to be part of the YouTube Partner Program (YPP) This is the gateway to YouTube monetization opportunities. With the latest YouTube shorts monetization 2023 policy, the platform lowered the eligibility criteria.
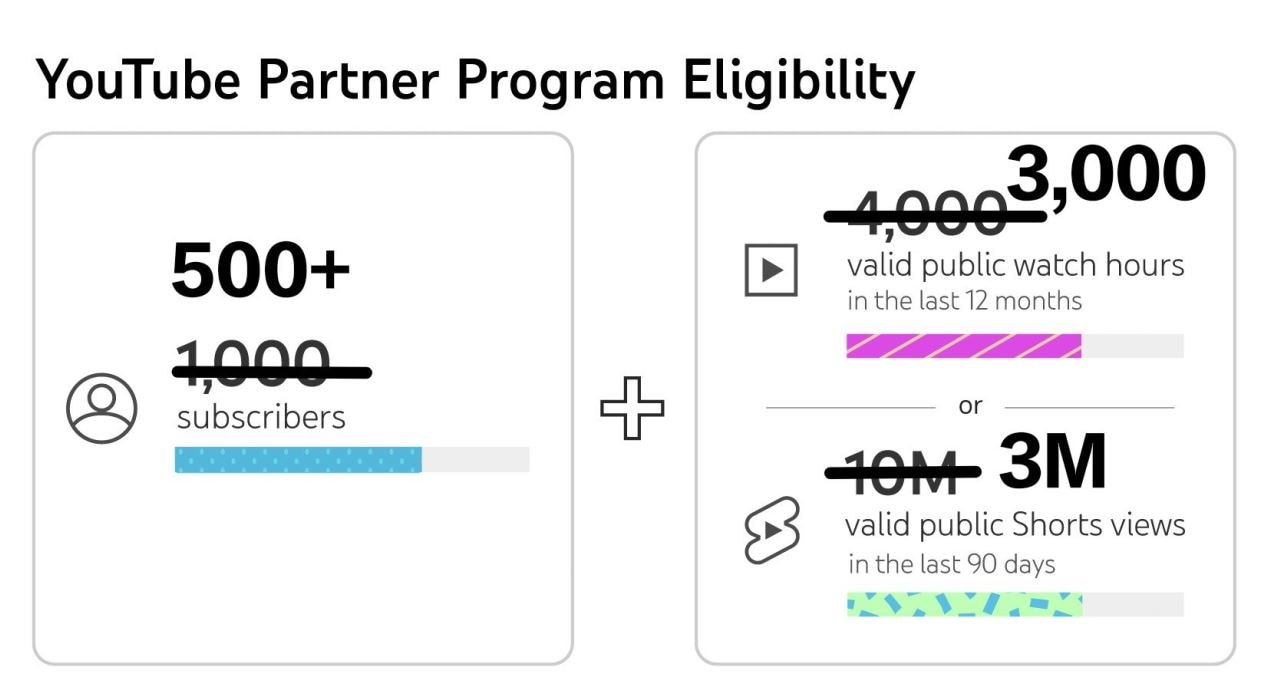
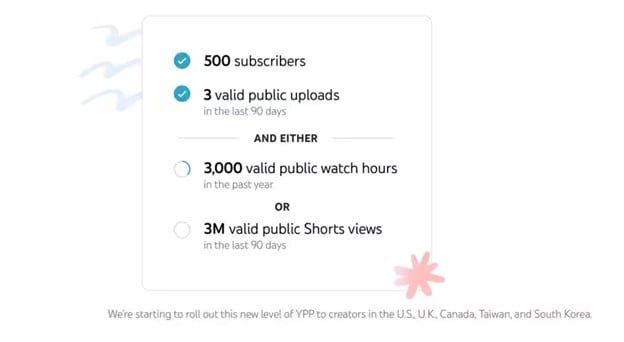
To be eligible to the YPP, you will need:
- At least 500 Subscribers
- At least 3,000 valid public hours in the last 12 months, or
- At least 3M valid public Shorts views in the last 90 days
This means that your YouTube channel must have gained some traction before monetizing your shorts. The following YouTube short monetization 2023 requirements are also needed:
- Live in a region where the YPP is available
- Comply with YouTube’s channel monetization policies
- Have no Community Guidelines strikes on your channel
- Have an active AdSense account
- Have 2-step verification turned on for your Google account
How Much Can You Earn With Shorts
YouTube Shorts have the potential to make a huge amount of money for creators. In fact, YouTube monetize Shorts in a quite generous way. Here are a few examples to give you an idea of the numbers:
- James Seo (573,000 subscribers) - Earned $445.09 from 10.3 million Shorts views
- Riley Lemon (84,000 subscribers) - Earned $76.23 from 1.9 million Shorts views
- Matthew King (212,000 subscribers) – Earned $163.73 from 4.2 million Shorts views
- Hassan Khadair (2.1 million subscribers) – Earned $872.14 from 22 million Shorts views
Part 3. How to Start Earning from YouTube Shorts
Eligible creators start earning from YouTube Shorts when they opt-in to the program. You need to make sure you are eligible and agree to start receiving revenue from your creations.
Are You Eligible for YouTube Shorts Earnings?
Shorts creators growing their channel and are yet to meet the minimum requirements can track their eligibility status by selecting “Notify me when I’m eligible” in YouTube Studio’s Earn section.
When you become eligible, follow these steps to apply for the YPP program:
- Sign in to YouTube on a computer or the YouTube Studio app on a mobile
- Click on your profile picture, and choose YouTube Studio
- Click Earn on the left menu, then select Apply
- Click Start to review your eligibility and accept the base terms
- Click Start to set up an AdSense account. You may also choose to link an existing active one.
- Your application will be in Progress in the Get Reviewed step.
Once you have completed these steps, your YouTube Channel will be reviewed. You can expect to hear a decision within a month of enrolling you in the program.
How to opt in for YouTube Shorts Monetization
After being approved and enrolled in the YPP program, you need to opt in to monetize your channel. Remember that you will not be automatically signed up for the ad revenue-sharing model. Here are a few more steps you need to take:
- Sign in to YouTube Studio
- Select Earn in the left menu
- Click Get Started for every module to review and accept their terms
- Accept the Base Terms and the Shorts Monetization Module to monetize Shorts
Once your Shorts are monetized, track the progress and amount of money earned through YouTube Analytics.
Other Ways to Monetize YouTube Shorts
The YPP program is the only ad-based monetization option for YouTube Shorts. However, there are other ways of earning:
- Selling Subscription Memberships: Turn your YouTube to membership and charge monthly payments in exchange for perks like badges and exclusive content.
- Monetize Livestreams: Features such as super stickers and super chat allow creators to make money when fans pay to send highlighted messages.
- Selling Merchandise and Products: Make additional income by selling branded merchandise like apparel or product lines in your content niche.
- Secure Paid Brand Partnerships: Interacting directly with brands and negotiating sponsorship deals.
- Join an Affiliate Program: An affiliate program will pay you revenue associated with clicks to links hosted on your channel.
Part 4. Edit Your YouTube Videos to Shorts with Wondershare Filmora
To earn more from your YouTube Shorts, you need quality content that keeps your viewers entertained. With Shorts having a limit of 60 seconds, you want to make sure that you cover the most essential footage. Wondershare Filmora is a versatile video editing software that helps creators edit their vertical videos quickly and easily. The mobile app is specifically great for editing shorts on the go:
Free Download For Win 7 or later(64-bit)
Free Download For macOS 10.14 or later
Editing your videos with Filmora is quite straightforward. One of the features that work well for YouTube shorts is the Auto Reframe.
Auto Reframe
The Auto Reframe feature allows creators to resize videos automatically with no editing skills needed. This is a great tool for converting your horizontal YouTube videos to Shorts format. It also boosts your potential audience while saving you precious time and effort you would have used editing. To use this feature, choose any of the following options:
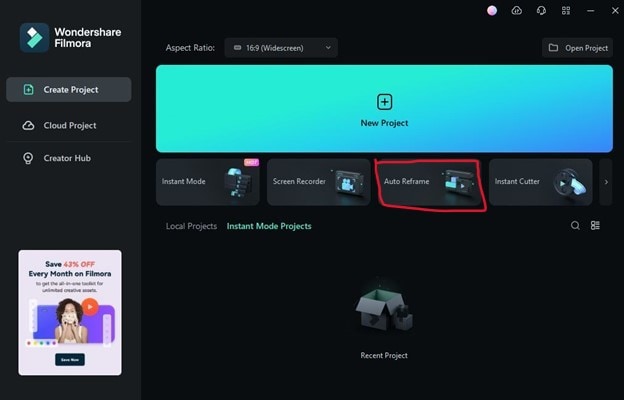
1. Open Filmora and Select Auto Reframe
After opening Filmora, head over to the main interface. You will find the Auto Reframe option on the right side. Click on it to open the reframing feature.
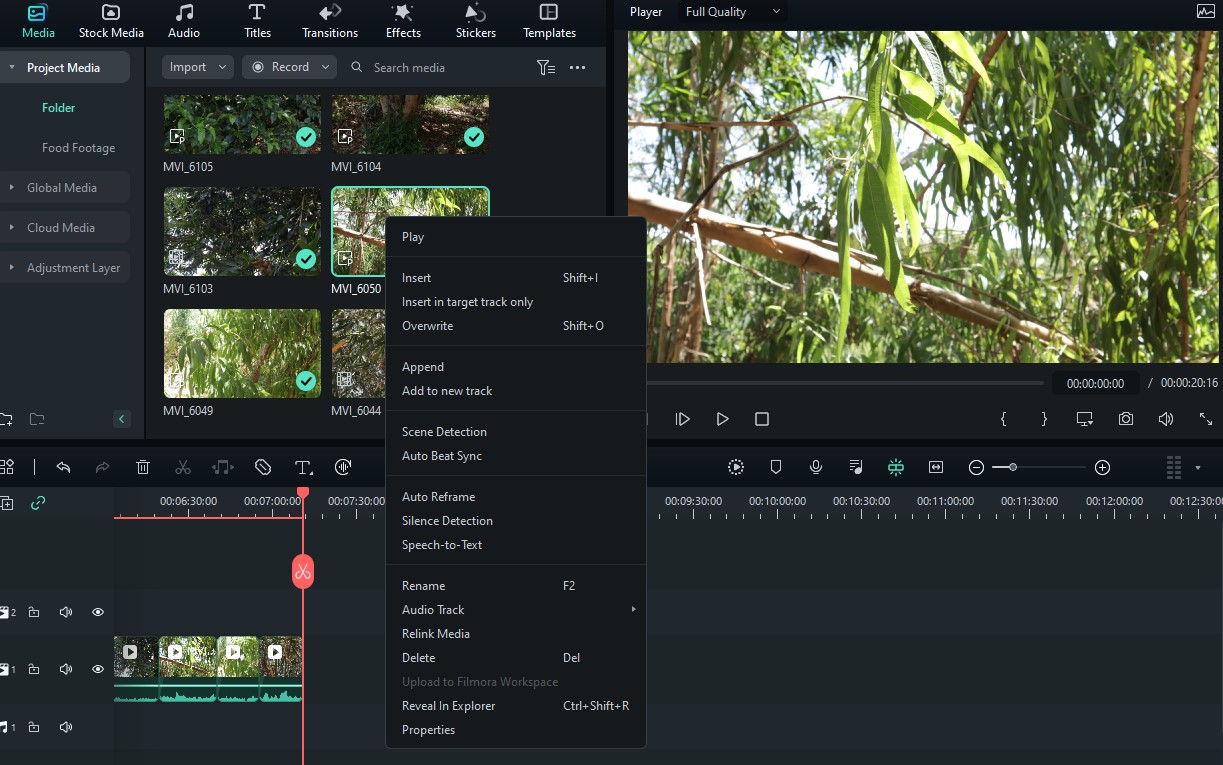
2. Launch Directly from the Video
Click File, followed by Import Media. Select the file that you gave imported in the timeline and right-click on it. Then select Auto Reframe.
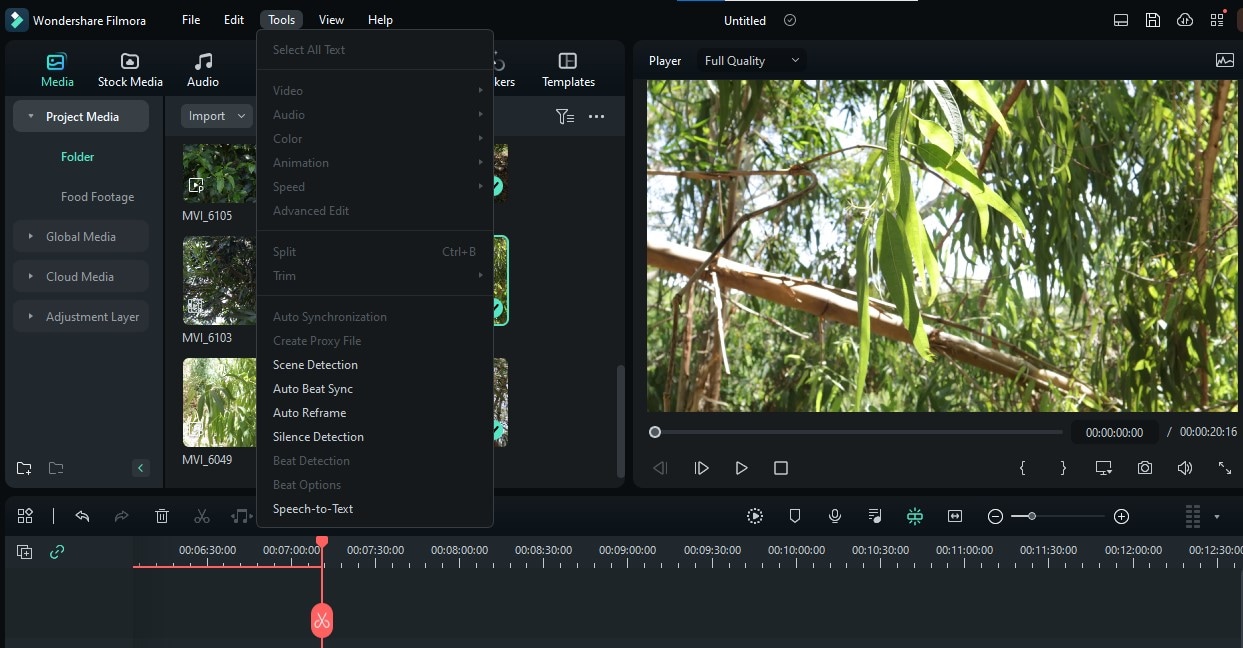
3. Use the Tools Option
You may also use the Auto Reframe feature by clicking on the Tools feature on the top menu bar. Then click on Auto Reframe.
Other Filmora Features for Editing Shorts
- Split Screen Video Editor – A choice of pre-made templates to create split-screen videos instantly.
- Add Text to Video – Directly add texts to your videos, including subtitles and captions.
- Text To Speech – Instantly convert your text files to voice and introduce more elements that will enrich your Shorts video.
Conclusion
YouTube Short’s revenue-sharing programs offer a great opportunity for creators specializing in short-form content to earn money on the platform. Once eligible for the YPP program, you can start earning a nice cash bonus monthly. However, you will need to create quality content that keeps your audience entertained and engaged. We recommend using Wondershare Filmora to edit your Shorts and make them more relatable to the audience,
Free Download Free Download Learn More
Part 1. Unveiling the Mystery of YouTube Shorts Revenue Sharing
YouTube launched the Shorts platform in 2021, which gained popularity within a short period. By the end of the first year, some videos had racked up more than half a billion views and counties. This begged the question: can you get paid from YouTube shorts?
Yes, YouTube updated its Partner Program, allowing the revenue-sharing model to benefit Shorts creators. The platform pools all the money it gets from advertisers every month from the Shorts feeds. It then shares that money with creators based on the number of views. Since the launch of this program in February 2023, the previous YouTube Shorts Fund became defunct.
The ad revenue-sharing model on YouTube Shorts may seem complex, but let’s break it down
- Every month YouTube pools all the revenue it generates from ads that appear in the Shorts feed.
- YouTube calculates that is going to the Creators Pool. A chuck of this money goes towards paying for songs used in YouTube Shorts. For instance, only a third of the ad revenue generated from a Shorts goes to the Creator Pool if it used two songs while the rest goes to paying for the music.
- YouTube divides the Creator pool depending on the number of views they contributed. If a creator generated 5% of the Shorts views during a period, they are assigned 5% of the Creator Pool.
- From that amount, YouTube keeps 55% of its share while you get paid the remaining 45%. If a creator’s 5% amounted to $800, then they will receive $360.
So, is YouTube shorts monetized? Yes, the ads-sharing model defines the amount of money a creator can earn from Shorts every month. Depending on the number of views generated, high-performing Shorts can bring in a huge amount of money.
Part 2. YouTube Shorts Monetization: Eligibility Criteria and Earnings Potential
YouTube Shorts provides creators with an exceptional way of making extra income. Let’s have a look at what it takes and what the numbers say:
Eligibility Criteria
If you are wondering, can I monetize YouTube shorts? To start earning ad revenue from Shorts, you need to be part of the YouTube Partner Program (YPP) This is the gateway to YouTube monetization opportunities. With the latest YouTube shorts monetization 2023 policy, the platform lowered the eligibility criteria.
To be eligible to the YPP, you will need:
- At least 500 Subscribers
- At least 3,000 valid public hours in the last 12 months, or
- At least 3M valid public Shorts views in the last 90 days
This means that your YouTube channel must have gained some traction before monetizing your shorts. The following YouTube short monetization 2023 requirements are also needed:
- Live in a region where the YPP is available
- Comply with YouTube’s channel monetization policies
- Have no Community Guidelines strikes on your channel
- Have an active AdSense account
- Have 2-step verification turned on for your Google account
How Much Can You Earn With Shorts
YouTube Shorts have the potential to make a huge amount of money for creators. In fact, YouTube monetize Shorts in a quite generous way. Here are a few examples to give you an idea of the numbers:
- James Seo (573,000 subscribers) - Earned $445.09 from 10.3 million Shorts views
- Riley Lemon (84,000 subscribers) - Earned $76.23 from 1.9 million Shorts views
- Matthew King (212,000 subscribers) – Earned $163.73 from 4.2 million Shorts views
- Hassan Khadair (2.1 million subscribers) – Earned $872.14 from 22 million Shorts views
Part 3. How to Start Earning from YouTube Shorts
Eligible creators start earning from YouTube Shorts when they opt-in to the program. You need to make sure you are eligible and agree to start receiving revenue from your creations.
Are You Eligible for YouTube Shorts Earnings?
Shorts creators growing their channel and are yet to meet the minimum requirements can track their eligibility status by selecting “Notify me when I’m eligible” in YouTube Studio’s Earn section.
When you become eligible, follow these steps to apply for the YPP program:
- Sign in to YouTube on a computer or the YouTube Studio app on a mobile
- Click on your profile picture, and choose YouTube Studio
- Click Earn on the left menu, then select Apply
- Click Start to review your eligibility and accept the base terms
- Click Start to set up an AdSense account. You may also choose to link an existing active one.
- Your application will be in Progress in the Get Reviewed step.
Once you have completed these steps, your YouTube Channel will be reviewed. You can expect to hear a decision within a month of enrolling you in the program.
How to opt in for YouTube Shorts Monetization
After being approved and enrolled in the YPP program, you need to opt in to monetize your channel. Remember that you will not be automatically signed up for the ad revenue-sharing model. Here are a few more steps you need to take:
- Sign in to YouTube Studio
- Select Earn in the left menu
- Click Get Started for every module to review and accept their terms
- Accept the Base Terms and the Shorts Monetization Module to monetize Shorts
Once your Shorts are monetized, track the progress and amount of money earned through YouTube Analytics.
Other Ways to Monetize YouTube Shorts
The YPP program is the only ad-based monetization option for YouTube Shorts. However, there are other ways of earning:
- Selling Subscription Memberships: Turn your YouTube to membership and charge monthly payments in exchange for perks like badges and exclusive content.
- Monetize Livestreams: Features such as super stickers and super chat allow creators to make money when fans pay to send highlighted messages.
- Selling Merchandise and Products: Make additional income by selling branded merchandise like apparel or product lines in your content niche.
- Secure Paid Brand Partnerships: Interacting directly with brands and negotiating sponsorship deals.
- Join an Affiliate Program: An affiliate program will pay you revenue associated with clicks to links hosted on your channel.
Part 4. Edit Your YouTube Videos to Shorts with Wondershare Filmora
To earn more from your YouTube Shorts, you need quality content that keeps your viewers entertained. With Shorts having a limit of 60 seconds, you want to make sure that you cover the most essential footage. Wondershare Filmora is a versatile video editing software that helps creators edit their vertical videos quickly and easily. The mobile app is specifically great for editing shorts on the go:
Free Download For Win 7 or later(64-bit)
Free Download For macOS 10.14 or later
Editing your videos with Filmora is quite straightforward. One of the features that work well for YouTube shorts is the Auto Reframe.
Auto Reframe
The Auto Reframe feature allows creators to resize videos automatically with no editing skills needed. This is a great tool for converting your horizontal YouTube videos to Shorts format. It also boosts your potential audience while saving you precious time and effort you would have used editing. To use this feature, choose any of the following options:
1. Open Filmora and Select Auto Reframe
After opening Filmora, head over to the main interface. You will find the Auto Reframe option on the right side. Click on it to open the reframing feature.
2. Launch Directly from the Video
Click File, followed by Import Media. Select the file that you gave imported in the timeline and right-click on it. Then select Auto Reframe.
3. Use the Tools Option
You may also use the Auto Reframe feature by clicking on the Tools feature on the top menu bar. Then click on Auto Reframe.
Other Filmora Features for Editing Shorts
- Split Screen Video Editor – A choice of pre-made templates to create split-screen videos instantly.
- Add Text to Video – Directly add texts to your videos, including subtitles and captions.
- Text To Speech – Instantly convert your text files to voice and introduce more elements that will enrich your Shorts video.
Conclusion
YouTube Short’s revenue-sharing programs offer a great opportunity for creators specializing in short-form content to earn money on the platform. Once eligible for the YPP program, you can start earning a nice cash bonus monthly. However, you will need to create quality content that keeps your audience entertained and engaged. We recommend using Wondershare Filmora to edit your Shorts and make them more relatable to the audience,
Elevate Your Video Guide with Annotations on YouTube
How to Add YouTube Annotations and Cards?

Richard Bennett
Mar 27, 2024• Proven solutions
Update: YouTube has replaced annotation with end screen. You can find the latest informaiton about YouTube screen and YouTube cards here.
YouTube Cards and Annotations are very useful if you want to encourage your viewrs to take an action, like Subscribe, go to another video or associated website, etc. Today, we’re going to show you the differences between cards and annotations, and how to add them in YouTube videos.
Do you want to make your YouTube video more attractive? Wondershare Filmora is a such video editing software designed for YouTube creator. It not only allows you cut, trim, crop, zoom, reverse, rotate the video clips, but also makes the advanced features like green screen, PIP, tilt-shift and mosaic easy like a piece of cake. With Wondershare Filmora, you can ignite your YouTube videos with over 300 effects like Fashion, Beauty, Block Buster, Travel, etc.
 Download Mac Version ](https://tools.techidaily.com/wondershare/filmora/download/ )
The main difference between annotation and cards is their outlook. Cards are more graphical whereas annotations are text based. The cards slide in once you click the small “i” button on the video where as the annotation is there based on the timings set by the user. Moreover the main differences between the two are:
1. YouTube Cards are small and unobtrusive, unless a viewer chooses to click on them, which is why they are the better option when you are trying to get views on other videos. Irritating a few people with a big annotation might be worth it if you also draw other people’s attention to your cause or website, but it is not a good way to endear yourself to people you are trying to get views and subscriptions from. When a card is clicked a thumbnail will appear with a link to your additional content. YouTube Cards are often better than annotations for adding links to your videos because they look much tidier. Also, unlike annotations, cards will be visible to people watching your videos on their mobile devices.
2. You cannot use Cards just to insert notes into your videos, though, and you cannot adjust their size like you can with annotations. So, if you do need a link to be large and extremely noticeable, annotations might still be your best option. Cards and annotations can even be used in combination sometimes.
How to add YouTube Cards
YouTube Cards are similar to annotations but more interactive. They allow the owner of the video to add images and other links. A small box appears, clicking on which will activate the cards.
- Click on the “Video Manager” tab

- Click “Edit” tab under the video screen shot you want to add the card on
- Click on the “Cards” tab

- On the right panel click on “Add Card” drop down menu and select the type of card you want to add
- Click on the create button which will open the corresponding video
- Once you finish the subsequent information required click create card
- Select the timeline for the playhead to appear which leads to the card slide

- Apply changes and exit
How to add YouTube annotations
YouTube Annotation is addition of a text layer, link or hotspots over your video. They add interactive boxes which link to other websites or videos (any link you want).
- Click on the video manager tab
- Click edit tab under the video screen shot you want to add the annotation on
- Click on the “End screen & Annotation” tab

- On the right panel click on “+ Add Element” and select the kind of annotation you want to add
- Adjust the position of Annotation, you can drag the rectangle to locate it at any position of the video, move the slide to set the start and end time of the annotation

- Apply changes
The types of YouTube annotations:
1. Speech Bubbles
Speech Bubbles: look like the dialogue box in a comic strip. There is a tail which you can adjust so it looks like one of the people in your video is saying what is written in the annotation. Speech bubbles are great for adding in funny comments.
2. Notes
Notes: come in a limited selection of colors and can be adjusted to take up a maximum of 30% of your player screen. Sometimes you need a huge annotation to get an important point across, but using huge note annotations too often – especially near the beginnings of your videos – will annoy viewers. If you need a large note annotation make sure to place it later in your video, when a viewer will already be invested in what they are watching and less likely to click away.
3. Titles
Titles: are large pieces of text that go either at the beginning of your video or in-between different topics within your video. YouTube’s titles are not very nice to look at, but they are a decent option if you do not have access to video editing software.
4. Spotlights
Spotlights: have a subtle border and are completely clear inside. Your text only appears when a user hovers over the spotlight. Spotlights are great for turning elements within your video into links.
5. Labels
Labels: are completely transparent, like spotlights, but the user does not have to hover over them for your text to be visible.
6. Pauses
Pauses: are no longer available to add to your videos, although Pause Annotations added before they were removed still work. Pause Annotations used to stop your video for a set period of time when your annotation appeared.
If somebody watches your video and gets to the end then that means they enjoyed it and will probably be open to checking out more of your content. Rather than hoping that your other videos show up in the ‘Suggested Videos’ YouTube will show after yours has finished playing you should always include an outro, or ending card, after your video to recommend your own work. Annotations are used in a lot of successful YouTuber’s ending cards.
One form this takes is small Note annotations in the bottom corners of the screen, one linking to your previous video and one to the next. Sometimes your viewers might not necessarily get the most enjoyment out of your videos by watching them in order, though. Sometimes you want to link viewers to the videos that are most related to the one they just watched.
The best outros also include a subscribe button, which can be created using annotations. These annotations work best when combined with a verbal call to action. Make sure your outro lasts long enough for people to make the decision to subscribe or click another video.
No matter what kind of annotations you are using, you should never use more than two of them at a time anywhere except for your outro. You should also never place annotations at the very top of your screen, or in the middle at the bottom. If your video is embedding on a separate website then the player will cover annotations at the top of the screen, and ads might cover annotations placed in the bottom-middle of the screen. Keep in mind when using annotations that they will not be visible to users watching your videos on mobile devices. If mobile traffic is very important to you then consider using YouTube Cards.
Richard Bennett
Richard Bennett is a writer and a lover of all things video.
Follow @Richard Bennett
Richard Bennett
Mar 27, 2024• Proven solutions
Update: YouTube has replaced annotation with end screen. You can find the latest informaiton about YouTube screen and YouTube cards here.
YouTube Cards and Annotations are very useful if you want to encourage your viewrs to take an action, like Subscribe, go to another video or associated website, etc. Today, we’re going to show you the differences between cards and annotations, and how to add them in YouTube videos.
Do you want to make your YouTube video more attractive? Wondershare Filmora is a such video editing software designed for YouTube creator. It not only allows you cut, trim, crop, zoom, reverse, rotate the video clips, but also makes the advanced features like green screen, PIP, tilt-shift and mosaic easy like a piece of cake. With Wondershare Filmora, you can ignite your YouTube videos with over 300 effects like Fashion, Beauty, Block Buster, Travel, etc.
Download Mac Version ](https://tools.techidaily.com/wondershare/filmora/download/ )
The main difference between annotation and cards is their outlook. Cards are more graphical whereas annotations are text based. The cards slide in once you click the small “i” button on the video where as the annotation is there based on the timings set by the user. Moreover the main differences between the two are:
1. YouTube Cards are small and unobtrusive, unless a viewer chooses to click on them, which is why they are the better option when you are trying to get views on other videos. Irritating a few people with a big annotation might be worth it if you also draw other people’s attention to your cause or website, but it is not a good way to endear yourself to people you are trying to get views and subscriptions from. When a card is clicked a thumbnail will appear with a link to your additional content. YouTube Cards are often better than annotations for adding links to your videos because they look much tidier. Also, unlike annotations, cards will be visible to people watching your videos on their mobile devices.
2. You cannot use Cards just to insert notes into your videos, though, and you cannot adjust their size like you can with annotations. So, if you do need a link to be large and extremely noticeable, annotations might still be your best option. Cards and annotations can even be used in combination sometimes.
How to add YouTube Cards
YouTube Cards are similar to annotations but more interactive. They allow the owner of the video to add images and other links. A small box appears, clicking on which will activate the cards.
- Click on the “Video Manager” tab
- Click “Edit” tab under the video screen shot you want to add the card on
- Click on the “Cards” tab
- On the right panel click on “Add Card” drop down menu and select the type of card you want to add
- Click on the create button which will open the corresponding video
- Once you finish the subsequent information required click create card
- Select the timeline for the playhead to appear which leads to the card slide
- Apply changes and exit
How to add YouTube annotations
YouTube Annotation is addition of a text layer, link or hotspots over your video. They add interactive boxes which link to other websites or videos (any link you want).
- Click on the video manager tab
- Click edit tab under the video screen shot you want to add the annotation on
- Click on the “End screen & Annotation” tab
- On the right panel click on “+ Add Element” and select the kind of annotation you want to add
- Adjust the position of Annotation, you can drag the rectangle to locate it at any position of the video, move the slide to set the start and end time of the annotation
- Apply changes
The types of YouTube annotations:
1. Speech Bubbles
Speech Bubbles: look like the dialogue box in a comic strip. There is a tail which you can adjust so it looks like one of the people in your video is saying what is written in the annotation. Speech bubbles are great for adding in funny comments.
2. Notes
Notes: come in a limited selection of colors and can be adjusted to take up a maximum of 30% of your player screen. Sometimes you need a huge annotation to get an important point across, but using huge note annotations too often – especially near the beginnings of your videos – will annoy viewers. If you need a large note annotation make sure to place it later in your video, when a viewer will already be invested in what they are watching and less likely to click away.
3. Titles
Titles: are large pieces of text that go either at the beginning of your video or in-between different topics within your video. YouTube’s titles are not very nice to look at, but they are a decent option if you do not have access to video editing software.
4. Spotlights
Spotlights: have a subtle border and are completely clear inside. Your text only appears when a user hovers over the spotlight. Spotlights are great for turning elements within your video into links.
5. Labels
Labels: are completely transparent, like spotlights, but the user does not have to hover over them for your text to be visible.
6. Pauses
Pauses: are no longer available to add to your videos, although Pause Annotations added before they were removed still work. Pause Annotations used to stop your video for a set period of time when your annotation appeared.
If somebody watches your video and gets to the end then that means they enjoyed it and will probably be open to checking out more of your content. Rather than hoping that your other videos show up in the ‘Suggested Videos’ YouTube will show after yours has finished playing you should always include an outro, or ending card, after your video to recommend your own work. Annotations are used in a lot of successful YouTuber’s ending cards.
One form this takes is small Note annotations in the bottom corners of the screen, one linking to your previous video and one to the next. Sometimes your viewers might not necessarily get the most enjoyment out of your videos by watching them in order, though. Sometimes you want to link viewers to the videos that are most related to the one they just watched.
The best outros also include a subscribe button, which can be created using annotations. These annotations work best when combined with a verbal call to action. Make sure your outro lasts long enough for people to make the decision to subscribe or click another video.
No matter what kind of annotations you are using, you should never use more than two of them at a time anywhere except for your outro. You should also never place annotations at the very top of your screen, or in the middle at the bottom. If your video is embedding on a separate website then the player will cover annotations at the top of the screen, and ads might cover annotations placed in the bottom-middle of the screen. Keep in mind when using annotations that they will not be visible to users watching your videos on mobile devices. If mobile traffic is very important to you then consider using YouTube Cards.
Richard Bennett
Richard Bennett is a writer and a lover of all things video.
Follow @Richard Bennett
Also read:
- [New] 2024 Approved Advanced Recording Strategies for Effective PPT Dissemination
- [New] Expert's Choice Top 10 High-Definition Screen Recorders
- [New] Stepwise Approach Effortlessly Incorporate Subtitles/CC Into Your YouTube Content
- 2024 Approved Maximize Engagement with These 9 YouTube Thumbnail Creators
- Building Your Sales Funnel with MassMail: A Five-Stage Process for Generating a Prospect List
- Embark on a Cinematic Journey Step-by-Step Tutorial for Creating Slow-Motion Video From Stills Online
- Expert Analysis: IPad Pro with M1 Chip Delivers Unmatched Laptop-Level Power
- How to Maximize Your View with LG 27UD88-W Monitor for 2024
- How to Restore iPhone to Original State and Erase All Data
- In 2024, Startups' Guide to Earnings on YouTube Platform
- In 2024, Streamlined Strategy to Create Your Custom YouTube Queue
- In 2024, Understanding YouTube's Legal Framework Vs. CC
- Navigate and Dominate with YouTube Studio's Advanced Editing Features for 2024
- Privacy Pitfalls: Risks of Relying on ChatGPT for Confidential Communication
- Title: How YouTube Snippets Can Boost Your Financial Goals for 2024
- Author: Thomas
- Created at : 2025-02-04 00:52:25
- Updated at : 2025-02-09 23:46:12
- Link: https://youtube-help.techidaily.com/how-youtube-snippets-can-boost-your-financial-goals-for-2024/
- License: This work is licensed under CC BY-NC-SA 4.0.