
:max_bytes(150000):strip_icc()/Holding-iPhone-Emergency-SOS-Power-Off-Screen-8630001-1896d5a5d1e84350b096a0098f4e45c4.jpg)
"Ideal Screen Re-Recorders for YouTube Performances for 2024"
Ideal Screen Re-Recorders for YouTube Performances
Best YouTube Livestreaming Screen Recorders

Richard Bennett
Oct 26, 2023• Proven solutions
The global pandemic has changed the way we live for the time being, and right now, we cannot attend events in the same way we did at the beginning of the year.
A growing number of cultural organizations, businesses, and influential YouTubers are turning towards YouTube’s Live feature because it provides a simple way of broadcasting different types of content in real-time. YouTube Live is by no means a new option, since the platform first introduced live streaming features in 2008, and some twelve years later, the feature has never been more popular.
However, the live streams you broadcast on YouTube are stored for just a brief period of time, which means you have to search for alternative methods of saving them. That’s why in this article we are going to take you through the best YouTube Live screen recorders you can use to capture the video content you are sharing with your followers.
Note: We resolutely oppose all forms of copyright-infringing downloads. This tutorial is only for downloading YouTube videos/audio materials from your own channel.
Top 10+ YouTube Live Screen Recorders
The maximum resolution in which you can record computer screen , audio recording options, or customization of the recording area are some of the most important features you need to consider while choosing a YouTube Live screen recorder.
We have selected some of the best YouTube Live screen recorders that enable you to do much more than just record live streams. So, let’s take a look at what they have to offer.
1. OBS Studio
Price: Free
Compatibility: Windows, Linux, macOS
The vast majority of live streams you can find on Twitch and YouTube are made with OBS Studio, but besides broadcasting videos, the software also gives you access to screencasting tools. This means that you can specify the area of the screen you want to record, choose the recording’s resolution and frame rate, or adjust the audio recording options.
OBS Studio is the best free, open-source screen recording program you can download. You shouldn’t use a software just because it’s free, but OBS Studio is also an extremely versatile tool. You can both record and stream in high definition and it comes with the ability to record either through your webcam or through your screen. It records directly through the graphics card , which means it can capture games even when in full-screen mode whereas a lot of other screen-recording software forces you to play games in windowed mode. The high quality can be seen easily in whatever you choose to broadcast.
OBS Studio allows you to record videos from a variety of sources, which makes it a perfect option for capturing the content you share through YouTube Live since you can select a browser window you want to capture in just a few clicks. What’s more, this open-source software is equipped with basic video editing tools, which enables you to preview the video you recorded before publishing it, apply transitions between cuts, or perform basic color correction.
Check the detailed guide to How to Record with OBS .
2. XSplit
Price: $24.95 for a three-month license
Compatibility: Windows
This is yet another broadcasting software that is equipped with powerful screen recording tools. Setting up a new screencasting session with XSplit is a simple and intuitive process that is not going to take much more than a few moments of your time.
All you need to do is define a workspace, then pick the preferred resolution and frame rate. The software allows you to capture screens in 4K resolution and at 60 fps, but it also offers a variety of resolution and frame rate options so that you can choose the one that best fits your needs. Furthermore, you can record the computer audio, which enables you to capture the live stream’s audio in excellent quality. Besides YouTube Live, XSplit can be used with Zoom , Skype, Google Hangouts, and numerous other live streaming and video calling apps.
3. Filmora
Price: Free, pricing plans start at $49.99/year
Compatibility: macOS, Windows


If you are looking for a screen recorder that is stacked with powerful video editing features, then Filmora is a great option for you. Customizing a YouTube Live or any other screencasting session with this video editing software is easy, and you can choose the resolution, frame rate, or even if you want to show mouse clicks in the recording.
Capturing the webcam feed and the computer’s screen simultaneously is also an option, while you can also decide whether or not you want to record audio from a microphone, computer audio, or both at the same time.
What’s more Filmora lets you set up the maximum duration of a screen recording and you start, pause, resume or stop a screen recording session by using hotkeys. Once you are done recording the live stream you shared on YouTube, you can edit the footage you created before uploading it to your YouTube channel.
4. Wondershare DemoCreator
Compatibility: Windows
Price: Start from $9.99
DemoCreator is a recorder that focuses its overall user experience. It is able to easily record high-quality videos at up to 120 FPS (60 FPS for Mac) and allows you to simultaneously record both your screen and webcam. This software is incredibly user friendly and makes for an easy experience for new streamers. The dual recording makes it great for gamers who are also looking to film their reactions.
5. CloudApp
Price: Free, $10 per month for an individual user
Compatibility: Windows, macOS, Linux, Chrome
Starting a new screen capturing session with the CloudApp requires you to just specify the portion of the screen you want to capture and hit the record button. Moreover, you can choose if you want to record with or without a webcam and you have the option to enable or disable the audio recording option.
However, you can only create 90-second screen recordings with the free version of the CloudApp and you cannot set resolution or frame rate of the recording. That’s why you need to upgrade to the Pro version if you want to use it to record live streams on YouTube. The Pro subscription model also grants you access to basic video editing tools and a variety of file sharing options. In addition, CloudApp lets you create and annotate still images and GIFs, which makes it a great option for digital marketers.
6. Techsmith Camtasia
Price: Free trial, $269.05 one-time fee
Compatibility: Windows, macOS
You don’t need years of video editing experience to start a new screen recording session in Camtasia. In fact, you just have to click on the Record button that is located in the software’s tool panel and then customize the settings.
Camtasia lets you choose if you want to record the full screen or just a selected portion of the screen or decide if you want to switch the webcam or the microphone off. You should make sure that the System Audio feature is enabled in order to record the sound of the live stream you’re sharing on YouTube. Pausing or stopping a screencasting session requires you to either click on the appropriate buttons or use the keyboard-based hotkeys. After you are done recording a live stream you can edit the footage using Camtasia’s video editing tools.
7. ScreenRec
Price: Free
Compatibility: Windows, macOS, Linux
Recording any live stream or TV show you play on your computer with ScreenRec is a straightforward process that can be completed in just a few clicks. Simply drag the mouse cursor over the area you want to record, then hit the Record button when you are ready and ScreenRec will start capturing the computer screen.
Once the screencasting session is completed you will get a sharable link that can be embedded to a website or used to save an MP4 file on your hard drive. Furthermore, ScreenRec is equipped with analytics tools that show you how many views your videos attracted or for how long each visitor watched them. All of these features make ScreenRec an excellent option for anyone who wants to record a live stream on YouTube or any other on-screen activity.
8. Flashback Express
Price: Free
Compatibility: Windows
Flashback Express is a simple screen recorder that lets you create high-res videos effortlessly. Setting up a new screencasting session requires you to just specify the area of the screen you want to record, choose whether or not you want to record the webcam feed and hit the Record button.
There are no restrictions in terms of the duration of screen recordings you can make with Flashback Express and the software doesn’t watermark the video you create.
However, you can only save the files in MP4, AVI, or WMW formats and you cannot adjust the video’s frame rate or resolution. What’s more, editing videos or applying effects with Flashback Express isn’t possible and you must upgrade to FlashBack Pro if you want to edit the live streams you broadcast on YouTube.
This piece of software is user friendly, but it doesn’t have as many features as other products on the market. Having said that, it is still an excellent tool that will help you live stream gameplay easily. Although it doesn’t come with built-in video editing software, it is possible to download another program to do this for you (i.e. Filmora). Flashback Express has the ability to record through your headset or microphone as well.
9. VLC
Price: Free
Compatibility: macOS, Linux, Windows
This is an iconic media player that became famous for its versatility and support for nearly all video file formats. Besides being one of the best media players ever created, VLC is also equipped with screen recording and video editing tools.
In order to start a new screencasting session, you will have to go to the Media menu and then select the Open Capture Device option. Once the new window pops up on the screen you should change the Capture Mode to Desktop and then adjust the frame rate in accordance with your needs.
Click on the Play button, and then hit the Record button after the screen recording window appears on the screen. You can only record the entire screen with VLC, since customizing the recording area isn’t an option, and all your files will be captured in the RAW format which means that you may have to resize them before you upload them to YouTube.
10. Screencast-o-matic
Price: Free, pricing options start at $1.65 per month
Compatibility: macOS, Windows
As its name suggests, this software product makes the screen recording process almost automatic. You can choose if you want to record an entire screen or just a window you selected. In addition, Screencast-o-matic lets you record the desktop and webcam footage at the same time, and you can even zoom in while the screencasting session is still in progress.
The free version of the software offers only a basic set of features that doesn’t include the option to record system audio. This means that you have to opt for one of the available subscription models if you want to record your live streams on YouTube with Screencast-o-matic. What’s more, you will be to create videos that are longer than 15 minutes, create recordings without watermarks or add music to your recordings if you opt for Deluxe or Premiere pricing options.
11. QuickTime Player
Price: Free
Compatibility: macOS, Windows
Mac users who want to record content that is broadcasted via YouTube Live can do so without having to install a third-party app. Apple ceased the support for the Windows-based version of QuickTime Player in 2016 and PC users can only capture their screens with this software if they have some of its earlier versions.
In order to start a new screen recording session in QuickTime Player, you just have to go to the File menu and select the New Screen Recording option. The Screen Recording window where you can choose if you want to record audio or show mouse click in the recording will pop up on the screen. QuickTime Player lets you choose if you want to capture the entire screen or just a portion of it, and you can click on the Record button to start a new screencasting session. In order to save a video file you created, you just have to go to the File menu and pick the Save option.
How to Record a YouTube Live Stream with Filmora
Recording a YouTube Live stream with Filmora is easy even if you never went through this process before. You can set up a new screencasting session in just a few easy steps that won’t take more than a few moments to complete. Here’s what you need to do:
Step 1: Launch Filmora and create a new project. Go to the Media tab once the video editor’s main window loads and click on the Record drop-down menu that is located next to the Import drop-down menu.
Choose the Record PC Screen option and then proceed to customize the settings for your screencasting session.

Step 2: Click on the Rectangular icon in the upper left corner of the Wondershare Filmora Scrn window and choose either Full Screen, Custom, or Target Window option, depending on how you want to record a YouTube Live stream to define the area of the screen that is going to be recorded.
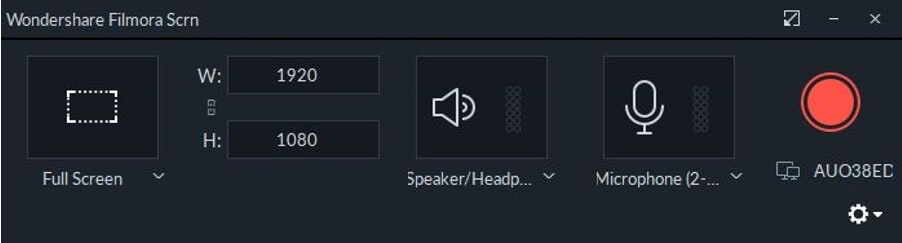
You can then proceed to insert the resolution your screen recording is going to have, and choose if you want to record system audio and sound from an external microphone.
Step 3: Click on the Gear icon below the Record button to gain access to additional settings, and then proceed to set the frame rate, adjust the video’s quality or activate the Show Mouse Clicks in Recording option.
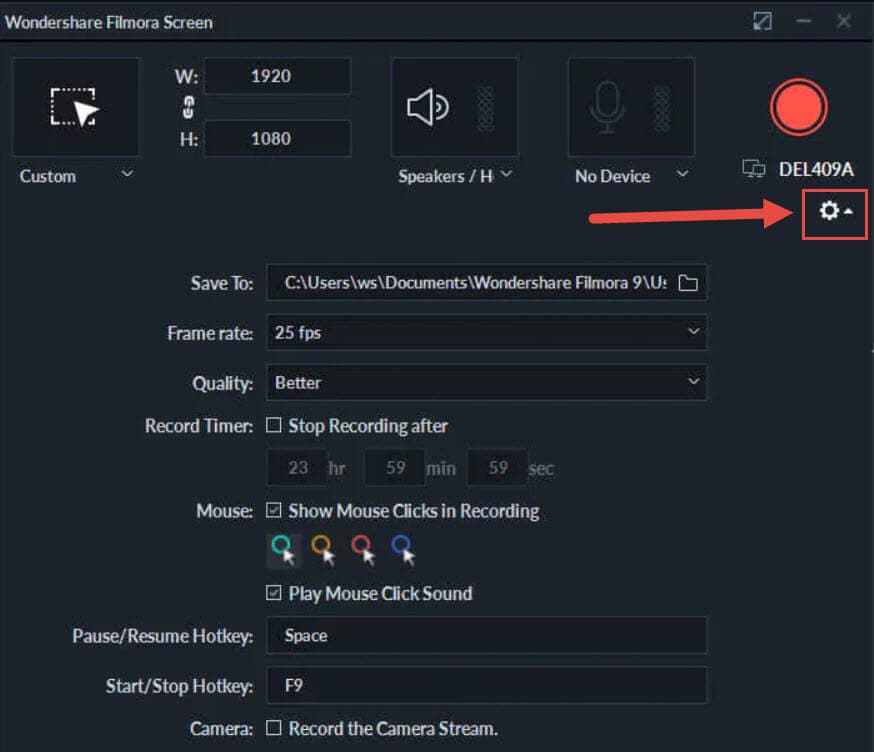
Make sure that the checkbox next to the Record the Camera Stream is marked if you want to record webcam feed and computer desktop at the same time.
Step 4: Press the red Record button in the upper right corner of the window and jump to the live stream. Once the broadcast is completed, you should click on the Stop button and use Filmora’s editing tools to remove all imperfections from the recording.
Filmora allows you to export all of your projects directly to your YouTube channel immediately after the rendering process is completed.
Frequently Asked Questions about YouTube Live Screen Recorders
1. Does YouTube Save Live Videos?
Stream Now, Mobile, Webcam, and Events streams can be stored automatically for 12 hours after they end. You can access all of your live streams by clicking on the Videos menu in the YouTube Studio and selecting the Live option and then change the Privacy setting in the Visibility menu.
2. How to use YouTube to Archive a Live Stream?
Once the live stream ends, you should go to the Dashboard and click on the Live feature, and then choose the Stream option. Check the Make Archive Unlisted When Complete checkbox and the live stream video will be saved accordingly.
Richard Bennett
Richard Bennett is a writer and a lover of all things video.
Follow @Richard Bennett
Richard Bennett
Oct 26, 2023• Proven solutions
The global pandemic has changed the way we live for the time being, and right now, we cannot attend events in the same way we did at the beginning of the year.
A growing number of cultural organizations, businesses, and influential YouTubers are turning towards YouTube’s Live feature because it provides a simple way of broadcasting different types of content in real-time. YouTube Live is by no means a new option, since the platform first introduced live streaming features in 2008, and some twelve years later, the feature has never been more popular.
However, the live streams you broadcast on YouTube are stored for just a brief period of time, which means you have to search for alternative methods of saving them. That’s why in this article we are going to take you through the best YouTube Live screen recorders you can use to capture the video content you are sharing with your followers.
Note: We resolutely oppose all forms of copyright-infringing downloads. This tutorial is only for downloading YouTube videos/audio materials from your own channel.
Top 10+ YouTube Live Screen Recorders
The maximum resolution in which you can record computer screen , audio recording options, or customization of the recording area are some of the most important features you need to consider while choosing a YouTube Live screen recorder.
We have selected some of the best YouTube Live screen recorders that enable you to do much more than just record live streams. So, let’s take a look at what they have to offer.
1. OBS Studio
Price: Free
Compatibility: Windows, Linux, macOS
The vast majority of live streams you can find on Twitch and YouTube are made with OBS Studio, but besides broadcasting videos, the software also gives you access to screencasting tools. This means that you can specify the area of the screen you want to record, choose the recording’s resolution and frame rate, or adjust the audio recording options.
OBS Studio is the best free, open-source screen recording program you can download. You shouldn’t use a software just because it’s free, but OBS Studio is also an extremely versatile tool. You can both record and stream in high definition and it comes with the ability to record either through your webcam or through your screen. It records directly through the graphics card , which means it can capture games even when in full-screen mode whereas a lot of other screen-recording software forces you to play games in windowed mode. The high quality can be seen easily in whatever you choose to broadcast.
OBS Studio allows you to record videos from a variety of sources, which makes it a perfect option for capturing the content you share through YouTube Live since you can select a browser window you want to capture in just a few clicks. What’s more, this open-source software is equipped with basic video editing tools, which enables you to preview the video you recorded before publishing it, apply transitions between cuts, or perform basic color correction.
Check the detailed guide to How to Record with OBS .
2. XSplit
Price: $24.95 for a three-month license
Compatibility: Windows
This is yet another broadcasting software that is equipped with powerful screen recording tools. Setting up a new screencasting session with XSplit is a simple and intuitive process that is not going to take much more than a few moments of your time.
All you need to do is define a workspace, then pick the preferred resolution and frame rate. The software allows you to capture screens in 4K resolution and at 60 fps, but it also offers a variety of resolution and frame rate options so that you can choose the one that best fits your needs. Furthermore, you can record the computer audio, which enables you to capture the live stream’s audio in excellent quality. Besides YouTube Live, XSplit can be used with Zoom , Skype, Google Hangouts, and numerous other live streaming and video calling apps.
3. Filmora
Price: Free, pricing plans start at $49.99/year
Compatibility: macOS, Windows
If you are looking for a screen recorder that is stacked with powerful video editing features, then Filmora is a great option for you. Customizing a YouTube Live or any other screencasting session with this video editing software is easy, and you can choose the resolution, frame rate, or even if you want to show mouse clicks in the recording.
Capturing the webcam feed and the computer’s screen simultaneously is also an option, while you can also decide whether or not you want to record audio from a microphone, computer audio, or both at the same time.
What’s more Filmora lets you set up the maximum duration of a screen recording and you start, pause, resume or stop a screen recording session by using hotkeys. Once you are done recording the live stream you shared on YouTube, you can edit the footage you created before uploading it to your YouTube channel.
4. Wondershare DemoCreator
Compatibility: Windows
Price: Start from $9.99
DemoCreator is a recorder that focuses its overall user experience. It is able to easily record high-quality videos at up to 120 FPS (60 FPS for Mac) and allows you to simultaneously record both your screen and webcam. This software is incredibly user friendly and makes for an easy experience for new streamers. The dual recording makes it great for gamers who are also looking to film their reactions.
5. CloudApp
Price: Free, $10 per month for an individual user
Compatibility: Windows, macOS, Linux, Chrome
Starting a new screen capturing session with the CloudApp requires you to just specify the portion of the screen you want to capture and hit the record button. Moreover, you can choose if you want to record with or without a webcam and you have the option to enable or disable the audio recording option.
However, you can only create 90-second screen recordings with the free version of the CloudApp and you cannot set resolution or frame rate of the recording. That’s why you need to upgrade to the Pro version if you want to use it to record live streams on YouTube. The Pro subscription model also grants you access to basic video editing tools and a variety of file sharing options. In addition, CloudApp lets you create and annotate still images and GIFs, which makes it a great option for digital marketers.
6. Techsmith Camtasia
Price: Free trial, $269.05 one-time fee
Compatibility: Windows, macOS
You don’t need years of video editing experience to start a new screen recording session in Camtasia. In fact, you just have to click on the Record button that is located in the software’s tool panel and then customize the settings.
Camtasia lets you choose if you want to record the full screen or just a selected portion of the screen or decide if you want to switch the webcam or the microphone off. You should make sure that the System Audio feature is enabled in order to record the sound of the live stream you’re sharing on YouTube. Pausing or stopping a screencasting session requires you to either click on the appropriate buttons or use the keyboard-based hotkeys. After you are done recording a live stream you can edit the footage using Camtasia’s video editing tools.
7. ScreenRec
Price: Free
Compatibility: Windows, macOS, Linux
Recording any live stream or TV show you play on your computer with ScreenRec is a straightforward process that can be completed in just a few clicks. Simply drag the mouse cursor over the area you want to record, then hit the Record button when you are ready and ScreenRec will start capturing the computer screen.
Once the screencasting session is completed you will get a sharable link that can be embedded to a website or used to save an MP4 file on your hard drive. Furthermore, ScreenRec is equipped with analytics tools that show you how many views your videos attracted or for how long each visitor watched them. All of these features make ScreenRec an excellent option for anyone who wants to record a live stream on YouTube or any other on-screen activity.
8. Flashback Express
Price: Free
Compatibility: Windows
Flashback Express is a simple screen recorder that lets you create high-res videos effortlessly. Setting up a new screencasting session requires you to just specify the area of the screen you want to record, choose whether or not you want to record the webcam feed and hit the Record button.
There are no restrictions in terms of the duration of screen recordings you can make with Flashback Express and the software doesn’t watermark the video you create.
However, you can only save the files in MP4, AVI, or WMW formats and you cannot adjust the video’s frame rate or resolution. What’s more, editing videos or applying effects with Flashback Express isn’t possible and you must upgrade to FlashBack Pro if you want to edit the live streams you broadcast on YouTube.
This piece of software is user friendly, but it doesn’t have as many features as other products on the market. Having said that, it is still an excellent tool that will help you live stream gameplay easily. Although it doesn’t come with built-in video editing software, it is possible to download another program to do this for you (i.e. Filmora). Flashback Express has the ability to record through your headset or microphone as well.
9. VLC
Price: Free
Compatibility: macOS, Linux, Windows
This is an iconic media player that became famous for its versatility and support for nearly all video file formats. Besides being one of the best media players ever created, VLC is also equipped with screen recording and video editing tools.
In order to start a new screencasting session, you will have to go to the Media menu and then select the Open Capture Device option. Once the new window pops up on the screen you should change the Capture Mode to Desktop and then adjust the frame rate in accordance with your needs.
Click on the Play button, and then hit the Record button after the screen recording window appears on the screen. You can only record the entire screen with VLC, since customizing the recording area isn’t an option, and all your files will be captured in the RAW format which means that you may have to resize them before you upload them to YouTube.
10. Screencast-o-matic
Price: Free, pricing options start at $1.65 per month
Compatibility: macOS, Windows
As its name suggests, this software product makes the screen recording process almost automatic. You can choose if you want to record an entire screen or just a window you selected. In addition, Screencast-o-matic lets you record the desktop and webcam footage at the same time, and you can even zoom in while the screencasting session is still in progress.
The free version of the software offers only a basic set of features that doesn’t include the option to record system audio. This means that you have to opt for one of the available subscription models if you want to record your live streams on YouTube with Screencast-o-matic. What’s more, you will be to create videos that are longer than 15 minutes, create recordings without watermarks or add music to your recordings if you opt for Deluxe or Premiere pricing options.
11. QuickTime Player
Price: Free
Compatibility: macOS, Windows
Mac users who want to record content that is broadcasted via YouTube Live can do so without having to install a third-party app. Apple ceased the support for the Windows-based version of QuickTime Player in 2016 and PC users can only capture their screens with this software if they have some of its earlier versions.
In order to start a new screen recording session in QuickTime Player, you just have to go to the File menu and select the New Screen Recording option. The Screen Recording window where you can choose if you want to record audio or show mouse click in the recording will pop up on the screen. QuickTime Player lets you choose if you want to capture the entire screen or just a portion of it, and you can click on the Record button to start a new screencasting session. In order to save a video file you created, you just have to go to the File menu and pick the Save option.
How to Record a YouTube Live Stream with Filmora
Recording a YouTube Live stream with Filmora is easy even if you never went through this process before. You can set up a new screencasting session in just a few easy steps that won’t take more than a few moments to complete. Here’s what you need to do:
Step 1: Launch Filmora and create a new project. Go to the Media tab once the video editor’s main window loads and click on the Record drop-down menu that is located next to the Import drop-down menu.
Choose the Record PC Screen option and then proceed to customize the settings for your screencasting session.
Step 2: Click on the Rectangular icon in the upper left corner of the Wondershare Filmora Scrn window and choose either Full Screen, Custom, or Target Window option, depending on how you want to record a YouTube Live stream to define the area of the screen that is going to be recorded.
You can then proceed to insert the resolution your screen recording is going to have, and choose if you want to record system audio and sound from an external microphone.
Step 3: Click on the Gear icon below the Record button to gain access to additional settings, and then proceed to set the frame rate, adjust the video’s quality or activate the Show Mouse Clicks in Recording option.
Make sure that the checkbox next to the Record the Camera Stream is marked if you want to record webcam feed and computer desktop at the same time.
Step 4: Press the red Record button in the upper right corner of the window and jump to the live stream. Once the broadcast is completed, you should click on the Stop button and use Filmora’s editing tools to remove all imperfections from the recording.
Filmora allows you to export all of your projects directly to your YouTube channel immediately after the rendering process is completed.
Frequently Asked Questions about YouTube Live Screen Recorders
1. Does YouTube Save Live Videos?
Stream Now, Mobile, Webcam, and Events streams can be stored automatically for 12 hours after they end. You can access all of your live streams by clicking on the Videos menu in the YouTube Studio and selecting the Live option and then change the Privacy setting in the Visibility menu.
2. How to use YouTube to Archive a Live Stream?
Once the live stream ends, you should go to the Dashboard and click on the Live feature, and then choose the Stream option. Check the Make Archive Unlisted When Complete checkbox and the live stream video will be saved accordingly.
Richard Bennett
Richard Bennett is a writer and a lover of all things video.
Follow @Richard Bennett
Top Online Essentials: Video to Text Conversion Hacks
Have you ever wondered why there is a need to transcribe YouTube videos? Well, let us enlighten you! Turning content from YouTube to text is essential for numerous content creators as it allows them to gain more views. Recent studies have shown that around 33% of the audience watching YouTube videos do not necessarily watch them in English. So, by converting them to text, translation becomes a whole lot easier and subtitles can be generated more efficiently.
In this article, we will explore the procedure through how one can convert a YouTube video to text, and learn about numerous effective online YouTube video to text software.
In this article
01 How to Convert YouTube Video to Texts by Copy/Paste YouTube Transcript
02 Best YouTube Video to Text Converters Online
Part 1: How to Convert YouTube Video to Texts by Copy/Paste YouTube Transcript
When people think “Get the transcript from YouTube” they believe it is going to be a daunting and lengthy procedure. Well, let us tell you that it is certainly not! All you have to do is follow the steps outlined below to transcribe YouTube video to text - that too through the YouTube player itself.
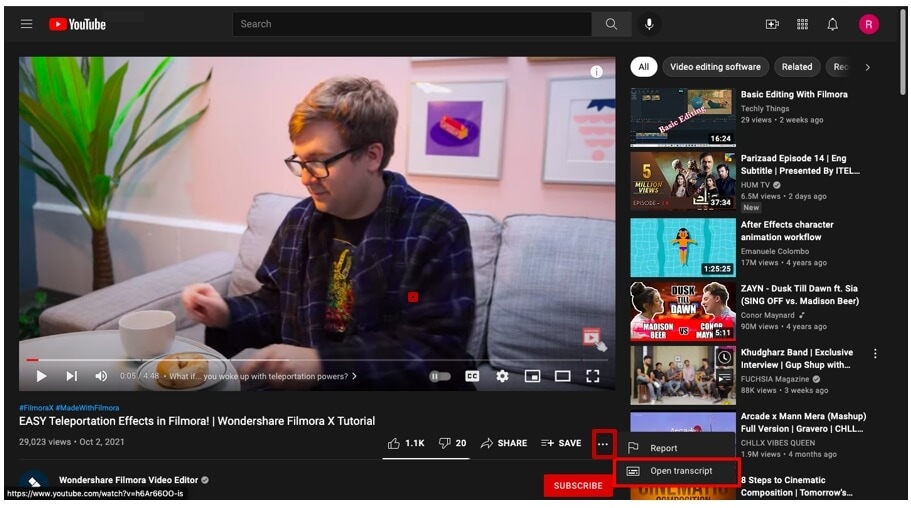
First what you have to do is open YouTube and select any video for which you require the transcript. Once you have selected the video, wait for it to load and then click the three dots located beneath the video, as shown in the image below.
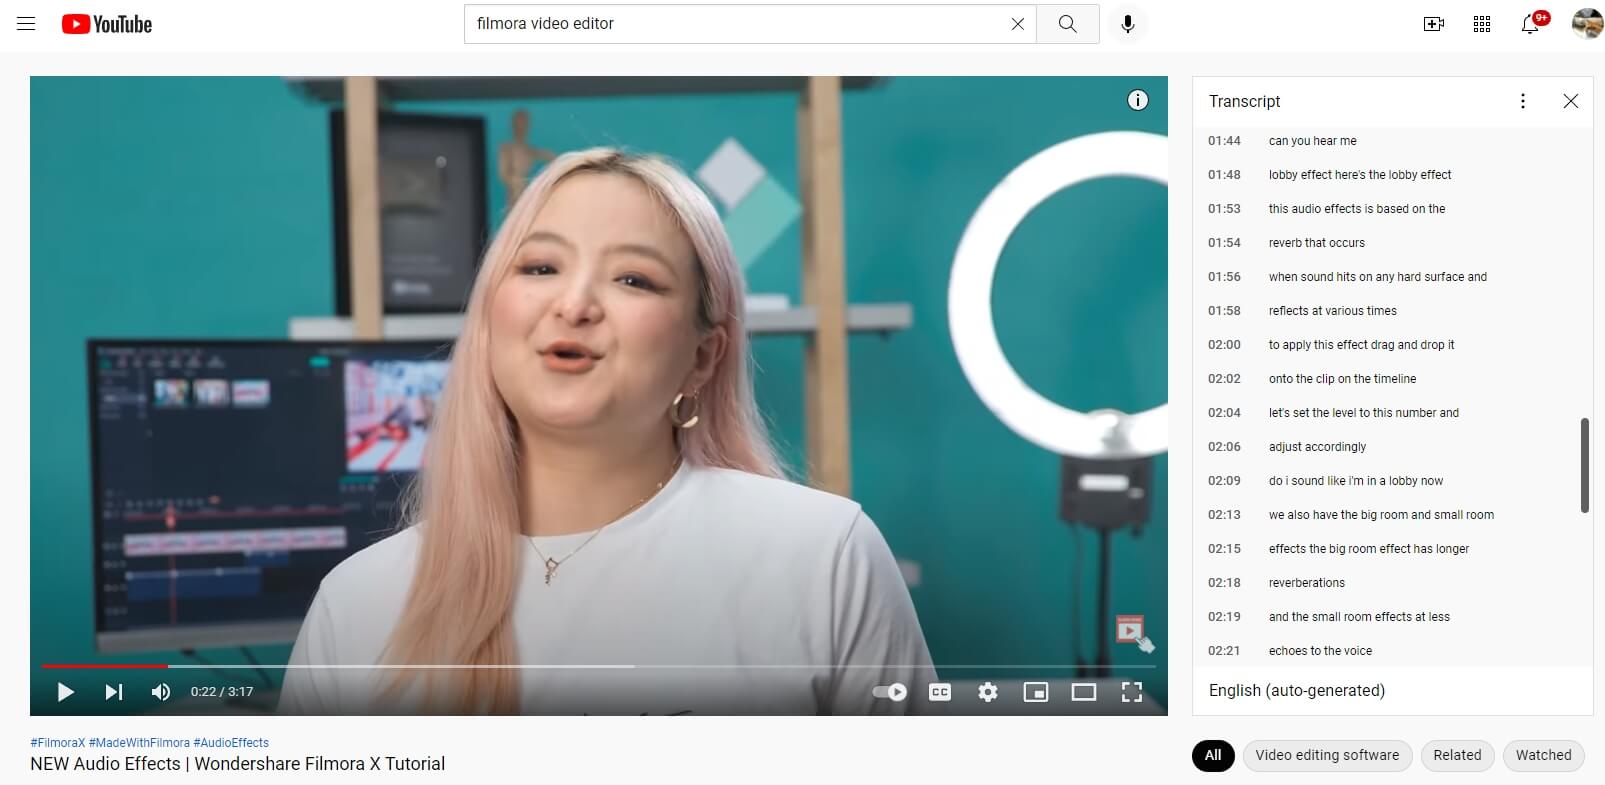
Following that, a menu will appear, just select the “Open Transcript” option and the transcription will open on the top right side of your screen.
Simply select the entire transcript using your mouse, then copy and paste it into a new Word Document or Google Document. If you don’t need the timestamps, you can click the three-dot icon to toggle timestamps off.

By following the steps outlined above, you can convert a YouTube video to text in less than five seconds!
Part 2: Best YouTube Video to Text Converters Online
Aside from the basic method of getting the transcription from YouTube itself, many individuals make use of effective YouTube video to text converter online free. This allows them to get the complete video into text, small parts of the video to text, as well as options to convert the text into multiple languages. Below are some of the best software to convert YouTube video to text online.
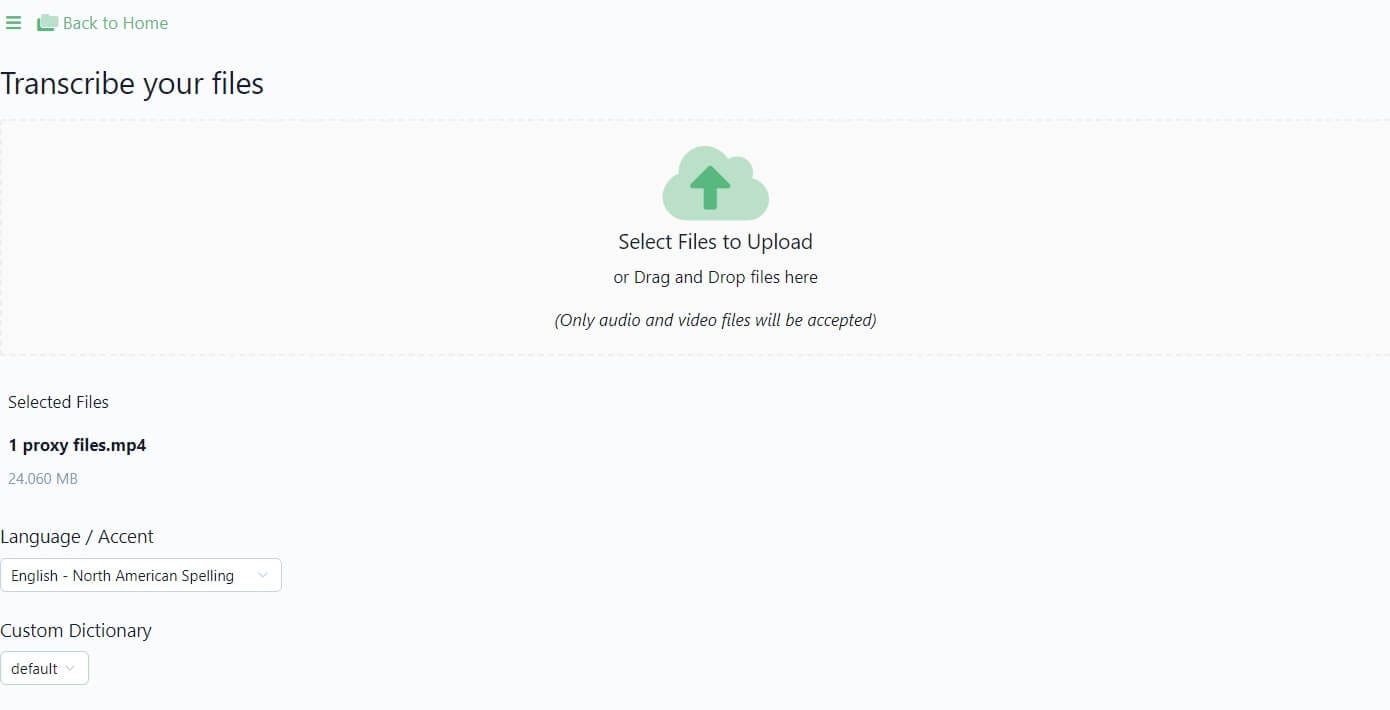
1. Inqscribe
This high-quality cross-platform tool allows users to transcribe audio and video files into text . Whether it is a meeting recording or a YouTube video - you can convert them all to text. Making use of this free online software is extremely easy, all one has to do is just upload their file and click the process. Then the system will automatically transcribe the video into a text document for you. The software is uni code so all file formats are supported such as txt, XML, HTML, WebVTT, and more. The only drawback of this online software is that video files that are larger than a certain limit cannot be accepted.
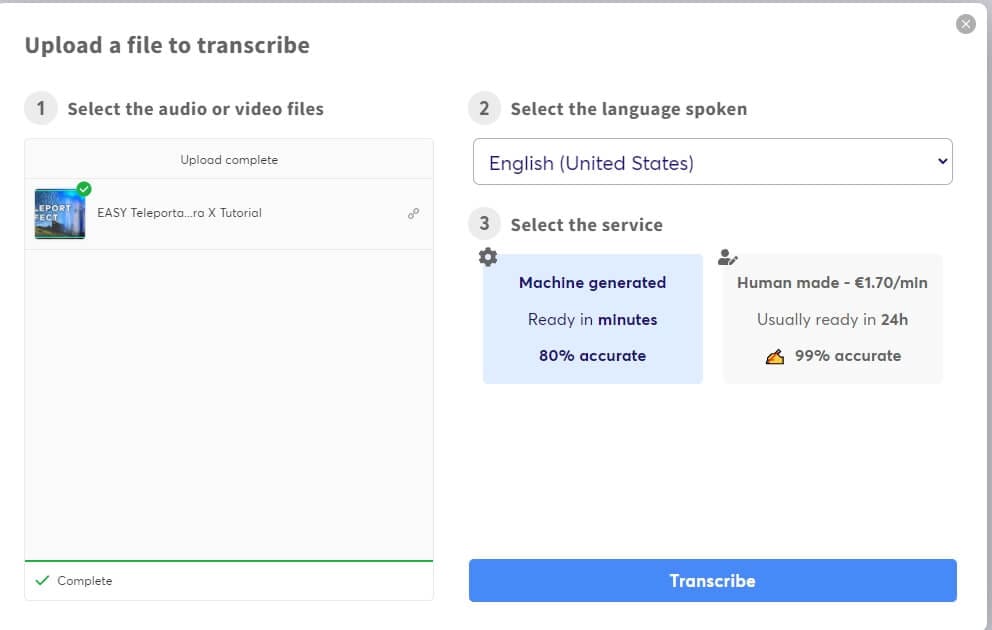
2. Sonix
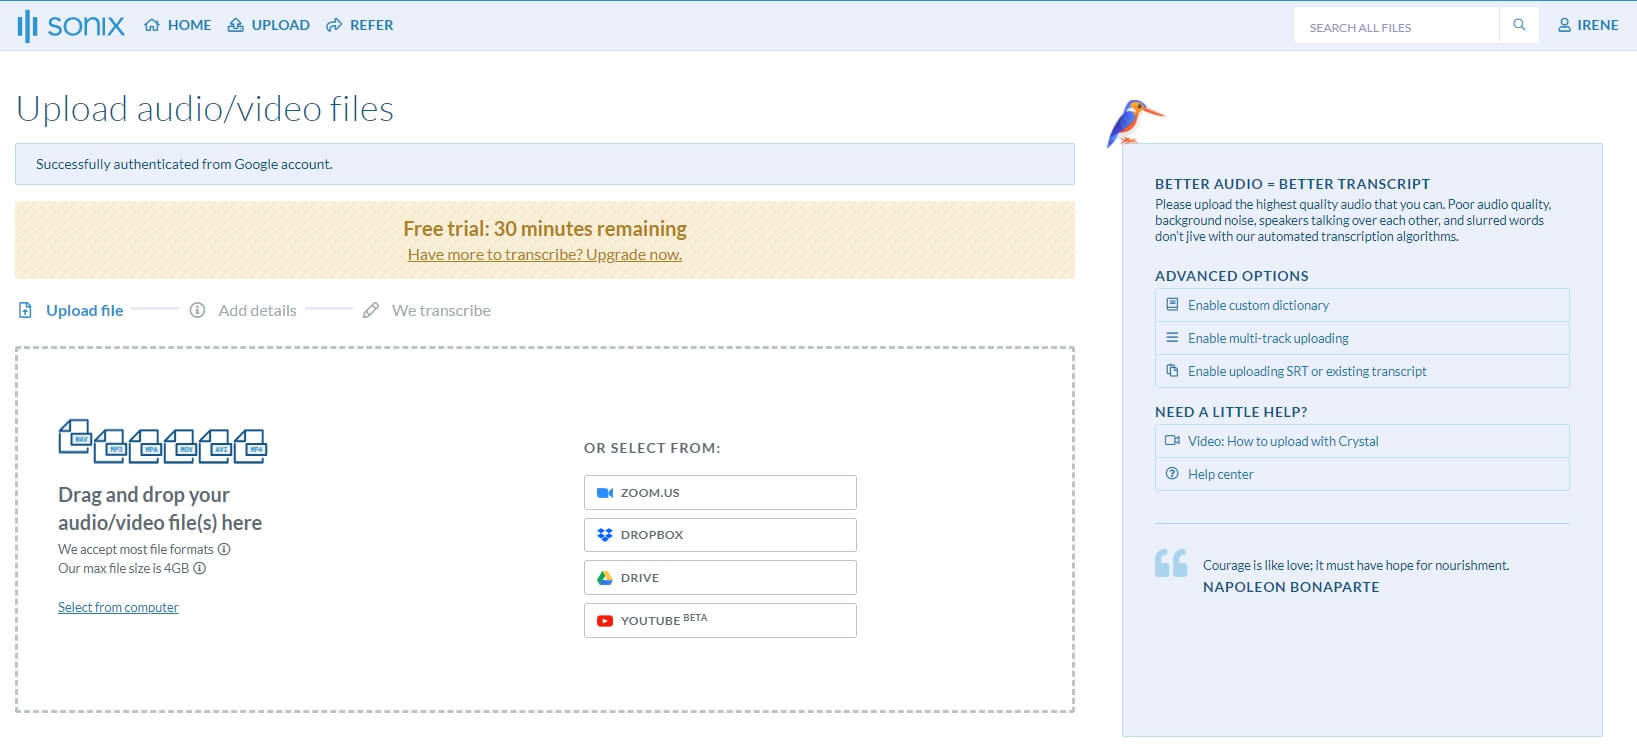
For individuals who have premium quality audio transcription, a tool by the name of Sonix is the right choice for you. This tool enables users to turn all types of YouTube videos into text. All they have to do is simply download the YouTube video they need to transcribe and then upload it to the online interface. From there, this software uses its comprehensive text reader to convert the video to text. This platform supports more than 40 different language choice inputs and outputs. Users are allowed to transcribe up to five videos for free, then they must pay a subscription fee.
3. Otter
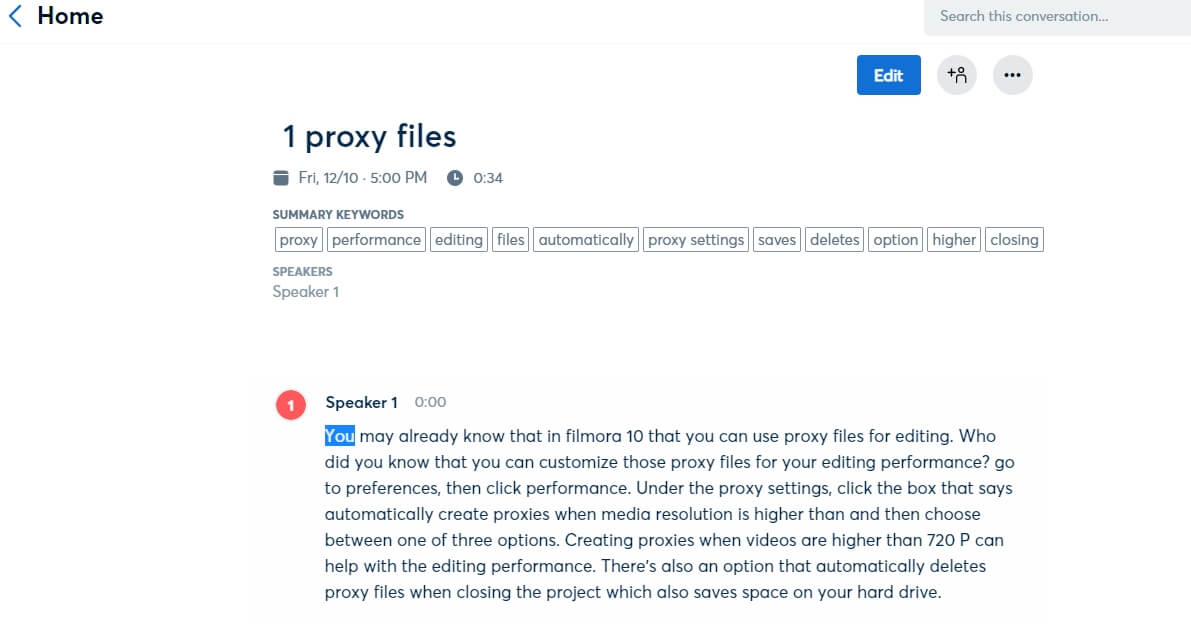
This video-to-text converter works best in real-time. Simply play the audio of a YouTube video and let Otter do its magic. In real-time it will convert audio into text. Moreover, if you would like to only convert some parts of the audio to text, that is possible with this tool as well.
All you need to do is play the audio accordingly and the text will automatically generate itself. The AVI (Ambient Voice Intelligence) of this tool allows it to accurately understand what the audio is saying to transcribe the video. While many do find this tool handy, learning how to use it can be a tiny bit tedious and confusing.
Note: Currently, Otter doesn’t support uploading YouTube video link, you may need to download the YouTube video first and then upload it from desktop.
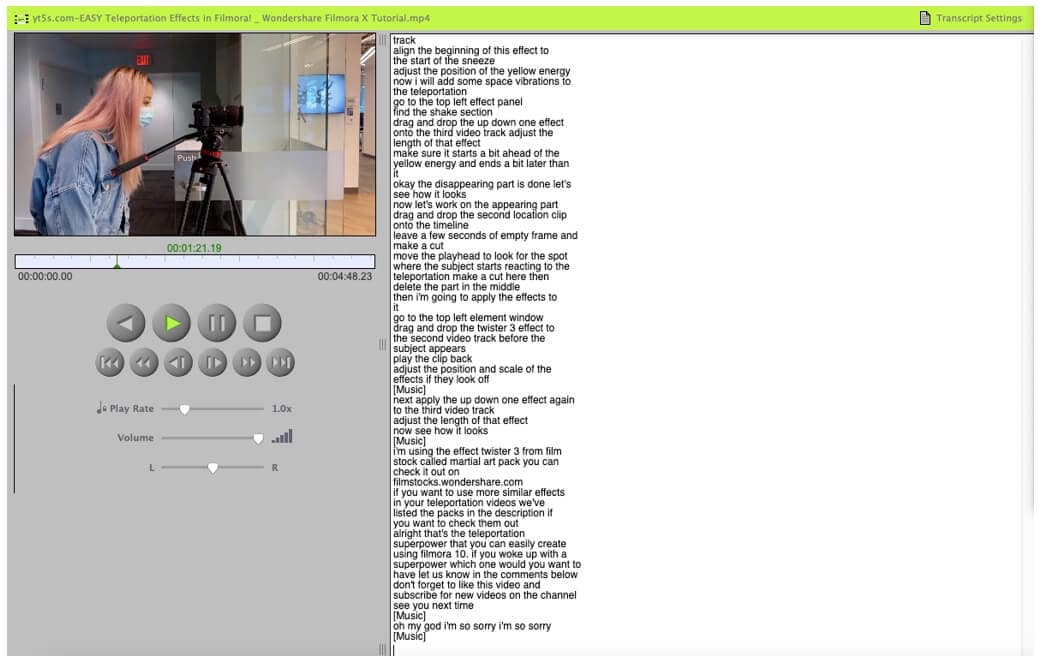
4. oTranscribe
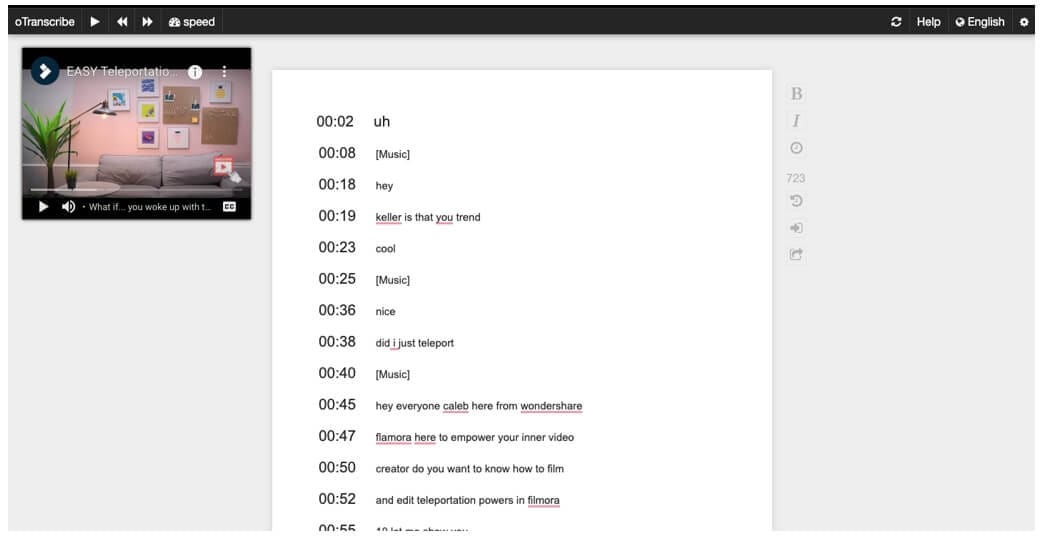
This online transcription tool is extremely easy and convenient to use - and it is entirely free! All you need to do is head on over to its homepage and drop a link to the YouTube video that you would like to transcribe. Then from there, you can access the video and text all at the same time, without having to switch between videos.
The best part is that you can record and translate text according to your need, cut and miss parts that you do not require. This tool supports all file formats which just adds to convince. The only challenge is that it will only accept videos and translate them into English.
5. Go Transcribe
If you are looking to convert any sort of video format to text, then Go Transcribe might just be the tool that you require. This tool makes use of the latest voice technology to convert videos to text - and gives you the output in the form of an SRT, PDF, or DOC, which are all editable. All you need to do is upload the video in one of the formats below,
- 3PG
- FLV
- AVI
- MOV
- MPG
- MPEG
Then simply click the processing options and your video will be generated into a text file within minutes. However, this software may require a subscription fee.
files. Moreover, the output format is PDF which individuals cannot edit unless they convert the PDF to a TXT file online using different software.
6. Trint
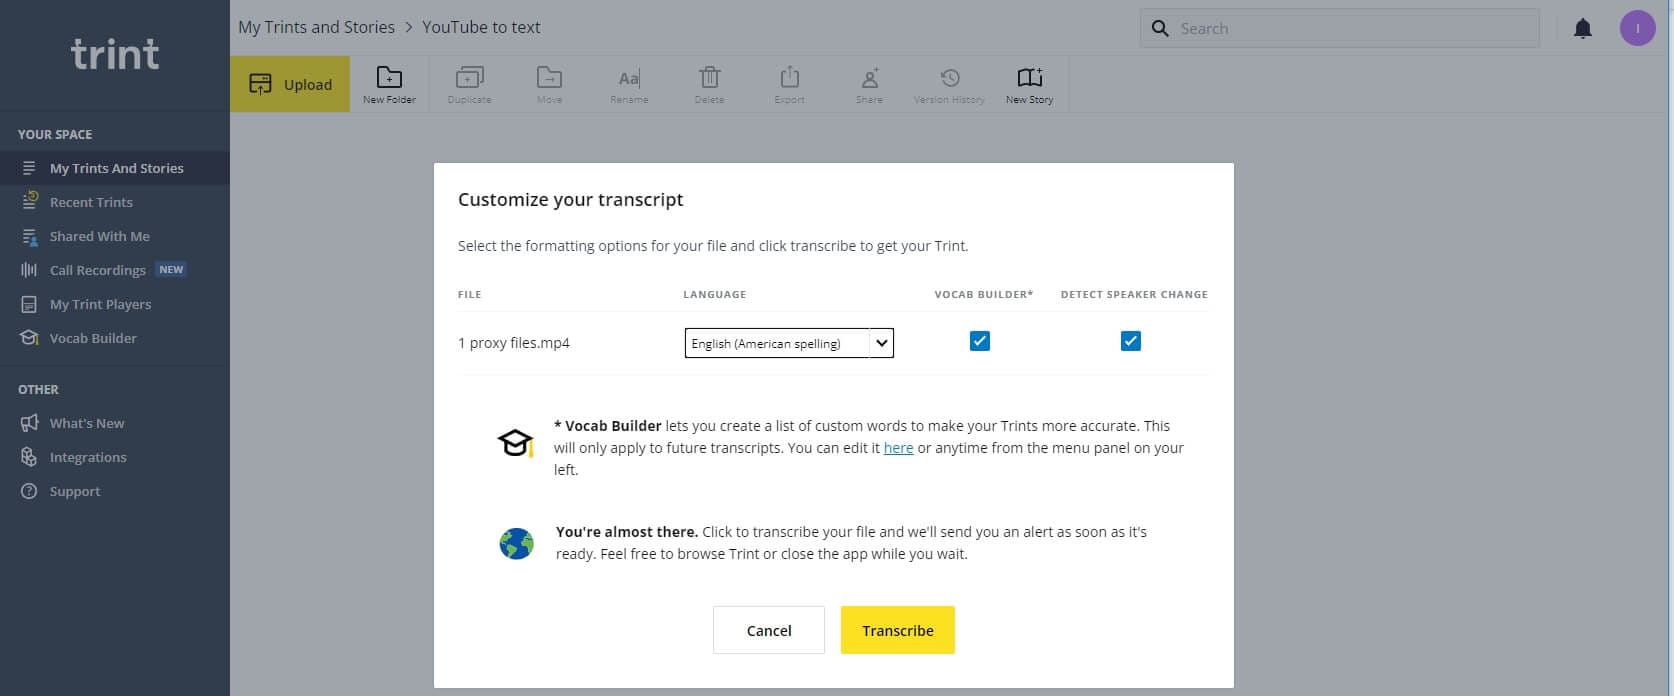
Turn your speech to text through magic - or in other words, through state-of-the-art technology. Trint is an online transcription tool that allows individuals to turn video files into text. People can download and upload numerous video files at once and turn them into text documents.
This is an extremely handy tool to have considering it comes with numerous options such as editing the text, only inducing certain parts of the video in the text, and so much more. This tool only has one shortcoming, it only accepts English language videos.
7. Happy Scribe
If you are wondering how, you will convert YouTube video to text, then we have just the answer for you. Make use of Happy Scribe to automatically transcribe all sorts of audio and video into comprehensive and readable text. You can get numerous features and options in this tool such as advanced grammatical functions as well as timestamps.
If your videos are in different languages, do not worry because Happy Scribe has more than 60 language formats. However, to make use of added features, individuals will need to pay for the tool and upgrade to the pro version.
8. 360Converter
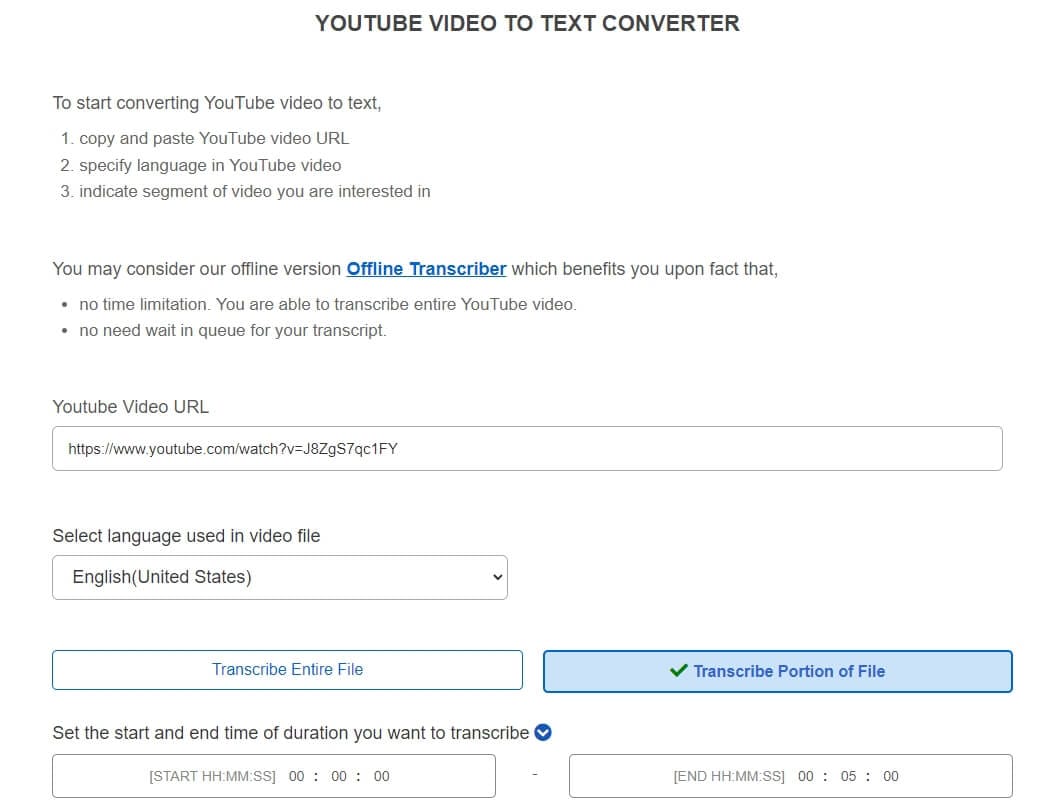
360Converter, as its name suggests is a video to text converter which individuals can use online and offline. All you need to do is download and then upload the YouTube video that you would like to transcribe and the tool will automatically generate the text for you. The supported video formats include 3GP, MP4, MOV, AVI, and many more. This tool uses advanced technology to get accurate language and grammatical transcriptions, so everything is word to word - the exact same as the video. While this tool is extremely user-friendly, many state that it takes a while to process videos to text.
Key Takeaways!
Technology has come a long way which is why we now have numerous options available online to help us convert YouTube videos to text in less than 5-10 minutes. All you have to do is upload the file and let the tool do its magic! You can transcribe in different languages, segments, and so much more now!
Transform Long Videos into Short Ones Instantly
Turn long videos into viral clips. Effortlessly transform lengthy videos into engaging, shareable clips.

02 Best YouTube Video to Text Converters Online
Part 1: How to Convert YouTube Video to Texts by Copy/Paste YouTube Transcript
When people think “Get the transcript from YouTube” they believe it is going to be a daunting and lengthy procedure. Well, let us tell you that it is certainly not! All you have to do is follow the steps outlined below to transcribe YouTube video to text - that too through the YouTube player itself.
First what you have to do is open YouTube and select any video for which you require the transcript. Once you have selected the video, wait for it to load and then click the three dots located beneath the video, as shown in the image below.
Following that, a menu will appear, just select the “Open Transcript” option and the transcription will open on the top right side of your screen.
Simply select the entire transcript using your mouse, then copy and paste it into a new Word Document or Google Document. If you don’t need the timestamps, you can click the three-dot icon to toggle timestamps off.
By following the steps outlined above, you can convert a YouTube video to text in less than five seconds!
Part 2: Best YouTube Video to Text Converters Online
Aside from the basic method of getting the transcription from YouTube itself, many individuals make use of effective YouTube video to text converter online free. This allows them to get the complete video into text, small parts of the video to text, as well as options to convert the text into multiple languages. Below are some of the best software to convert YouTube video to text online.
1. Inqscribe
This high-quality cross-platform tool allows users to transcribe audio and video files into text . Whether it is a meeting recording or a YouTube video - you can convert them all to text. Making use of this free online software is extremely easy, all one has to do is just upload their file and click the process. Then the system will automatically transcribe the video into a text document for you. The software is uni code so all file formats are supported such as txt, XML, HTML, WebVTT, and more. The only drawback of this online software is that video files that are larger than a certain limit cannot be accepted.
2. Sonix
For individuals who have premium quality audio transcription, a tool by the name of Sonix is the right choice for you. This tool enables users to turn all types of YouTube videos into text. All they have to do is simply download the YouTube video they need to transcribe and then upload it to the online interface. From there, this software uses its comprehensive text reader to convert the video to text. This platform supports more than 40 different language choice inputs and outputs. Users are allowed to transcribe up to five videos for free, then they must pay a subscription fee.
3. Otter
This video-to-text converter works best in real-time. Simply play the audio of a YouTube video and let Otter do its magic. In real-time it will convert audio into text. Moreover, if you would like to only convert some parts of the audio to text, that is possible with this tool as well.
All you need to do is play the audio accordingly and the text will automatically generate itself. The AVI (Ambient Voice Intelligence) of this tool allows it to accurately understand what the audio is saying to transcribe the video. While many do find this tool handy, learning how to use it can be a tiny bit tedious and confusing.
Note: Currently, Otter doesn’t support uploading YouTube video link, you may need to download the YouTube video first and then upload it from desktop.
4. oTranscribe
This online transcription tool is extremely easy and convenient to use - and it is entirely free! All you need to do is head on over to its homepage and drop a link to the YouTube video that you would like to transcribe. Then from there, you can access the video and text all at the same time, without having to switch between videos.
The best part is that you can record and translate text according to your need, cut and miss parts that you do not require. This tool supports all file formats which just adds to convince. The only challenge is that it will only accept videos and translate them into English.
5. Go Transcribe
If you are looking to convert any sort of video format to text, then Go Transcribe might just be the tool that you require. This tool makes use of the latest voice technology to convert videos to text - and gives you the output in the form of an SRT, PDF, or DOC, which are all editable. All you need to do is upload the video in one of the formats below,
- 3PG
- FLV
- AVI
- MOV
- MPG
- MPEG
Then simply click the processing options and your video will be generated into a text file within minutes. However, this software may require a subscription fee.
files. Moreover, the output format is PDF which individuals cannot edit unless they convert the PDF to a TXT file online using different software.
6. Trint
Turn your speech to text through magic - or in other words, through state-of-the-art technology. Trint is an online transcription tool that allows individuals to turn video files into text. People can download and upload numerous video files at once and turn them into text documents.
This is an extremely handy tool to have considering it comes with numerous options such as editing the text, only inducing certain parts of the video in the text, and so much more. This tool only has one shortcoming, it only accepts English language videos.
7. Happy Scribe
If you are wondering how, you will convert YouTube video to text, then we have just the answer for you. Make use of Happy Scribe to automatically transcribe all sorts of audio and video into comprehensive and readable text. You can get numerous features and options in this tool such as advanced grammatical functions as well as timestamps.
If your videos are in different languages, do not worry because Happy Scribe has more than 60 language formats. However, to make use of added features, individuals will need to pay for the tool and upgrade to the pro version.
8. 360Converter
360Converter, as its name suggests is a video to text converter which individuals can use online and offline. All you need to do is download and then upload the YouTube video that you would like to transcribe and the tool will automatically generate the text for you. The supported video formats include 3GP, MP4, MOV, AVI, and many more. This tool uses advanced technology to get accurate language and grammatical transcriptions, so everything is word to word - the exact same as the video. While this tool is extremely user-friendly, many state that it takes a while to process videos to text.
Key Takeaways!
Technology has come a long way which is why we now have numerous options available online to help us convert YouTube videos to text in less than 5-10 minutes. All you have to do is upload the file and let the tool do its magic! You can transcribe in different languages, segments, and so much more now!
Transform Long Videos into Short Ones Instantly
Turn long videos into viral clips. Effortlessly transform lengthy videos into engaging, shareable clips.
- Title: "Ideal Screen Re-Recorders for YouTube Performances for 2024"
- Author: Thomas
- Created at : 2024-05-31 12:48:49
- Updated at : 2024-06-01 12:48:49
- Link: https://youtube-help.techidaily.com/ideal-screen-re-recorders-for-youtube-performances-for-2024/
- License: This work is licensed under CC BY-NC-SA 4.0.
