
:max_bytes(150000):strip_icc():format(webp)/Instagram_Login-5c004ff2c9e77c000104174d.png)
"Illuminating Ideas The Basics of Video Setup for 2024"
Illuminating Ideas: The Basics of Video Setup
Lighting Tips for Vlogging: How to Light

Richard Bennett
Mar 27, 2024• Proven solutions
One of the best things you can do for your video quality is to ensure you have great lighting. Viewers find poor lighting distracting and it’s hard for them to see how great your content is if they are busy thinking about why your video is so dark. By creating a great lighting set up you can ensure that the people watching your videos are only thinking about how much they’re enjoying them.
Going outside and using natural light is the cheapest way to get a lot of light for your videos. If your vlog is not suited to the great outdoors then you need to get more strategic. You can turn on all the lights in your living room and still end up with a dark, grainy, video.
Video Lighting Basics: Three Point Lighting

The most common technique of lighting a scene is called three-point lighting. It involves three different sources of light in the shot and is used by portrait photographers, which is also a great method for lighting your vlog.
The brightest source of light is also known as the key light which need to be high quality. A window will work, but if you do not have access to one where you are filming then consider an LED panel light or a softbox light like the ones used in portrait photography.
This first light will create a dramatic shadow across half of your face. You want to reduce this shadow, but not get rid of it completely.
Rather than setting up another light source on the opposite side of the camera, put up a reflector to bounce some light back onto your face. This reflector is called your ‘Fill Light’.
The fill light is less bright than the primary source of light and it is placed on the side opposite to the key light. Its purpose is to reduce shadows produced by the key light and the reflector will need to be mounted on a stand.
The final step to creating three point lighting is to set up another light behind you. This is your ‘Backlight’, and it will help you stand out from your background. Backlight or Hair light is always placed behind and above the subject to create separation between the subject in the shot and the background. This basic lighting technique can be applied in almost every scene you shoot, which is why it is important to keep an open mind and to continue experimenting with possible light setups.
Watch Video! Top Lighting Tips for Vlogging
Lightning Tips for Aspiring YouTube Videographers
Becoming the master of light will take some time and practice, so it is crucial to remain curious and anxious to learn new tricks throughout that process if you want to continually become better. These tips will help you make the first steps on that journey.
1. Focus Your Key Light
Try to focus your Key Light so that it lights only you and not your background. Do this by mounting anything that can cast a shadow onto your Key Light to control the area where the light hits. If you are using a window for your Key Light then you can use a curtain. If you use a softbox light then your light will already be somewhat focused.
2. Use Natural Lighting
The light provided by the Sun is still the best light source, you can have in your video. The trouble is that natural light changes quickly, which makes it highly unpredictable. The best way to deal with this challenge is to come prepared to the set and to get the shot you want as quickly as you can.
3. Try DIY Lightning
Literally, anything from candles to LED light bulbs can serve as a source of light in a shot. You just need to pay attention to the light temperature, because warmer light sources may highlight reds and yellows that can make your footage look less realistic.
4. Use Lightning Kits
This is by far the best option if you want to be in complete control of the light on your set. You can adjust the intensity of the lights, use filters, diffusers and all sorts of other accessories to create the light that flatters the subjects of your videos. The only downside is that you’ll have to spend a considerable amount of money if you want to have a professional lighting kit.
5. Set up reflectors
Sets of reflectors are often under $50, so they are fairly affordable. However, some vloggers choose to forgo purchasing reflectors and make their own out of tinfoil.

If your strong main light is too hard on your eyes then you can use a translucent ‘reflector’ to soften it. Set your translucent reflector, or other screen, up in front of your main light to diffuse it.
If you are hosting a beauty vlog then you might consider a slightly different set up. Instead of having your main light off to one side set it up directly in front of you so your entire face is lit evenly. It is still a good idea to use fill lights in this set up to give you some dimension, and a backlight is even more essential for helping you stand out from the background. The even light hitting your face will also make you look flat if you do not use a backlight.

If you are using all of the lighting options available to you and your video still looks too dark then you can try brightening it by opening up the aperture of your camera lens/setting a lower f-stop. Letting more light into your camera can help your footage look brighter, although you also run the risk of making things look overexposed/ washed out if you are not careful.
If you are stuck shooting in low light conditions it is best to use a lens with a wider aperture/lower f-stop. This will make the best of the light you do have.
Richard Bennett
Richard Bennett is a writer and a lover of all things video.
Follow @Richard Bennett
Richard Bennett
Mar 27, 2024• Proven solutions
One of the best things you can do for your video quality is to ensure you have great lighting. Viewers find poor lighting distracting and it’s hard for them to see how great your content is if they are busy thinking about why your video is so dark. By creating a great lighting set up you can ensure that the people watching your videos are only thinking about how much they’re enjoying them.
Going outside and using natural light is the cheapest way to get a lot of light for your videos. If your vlog is not suited to the great outdoors then you need to get more strategic. You can turn on all the lights in your living room and still end up with a dark, grainy, video.
Video Lighting Basics: Three Point Lighting
The most common technique of lighting a scene is called three-point lighting. It involves three different sources of light in the shot and is used by portrait photographers, which is also a great method for lighting your vlog.
The brightest source of light is also known as the key light which need to be high quality. A window will work, but if you do not have access to one where you are filming then consider an LED panel light or a softbox light like the ones used in portrait photography.
This first light will create a dramatic shadow across half of your face. You want to reduce this shadow, but not get rid of it completely.
Rather than setting up another light source on the opposite side of the camera, put up a reflector to bounce some light back onto your face. This reflector is called your ‘Fill Light’.
The fill light is less bright than the primary source of light and it is placed on the side opposite to the key light. Its purpose is to reduce shadows produced by the key light and the reflector will need to be mounted on a stand.
The final step to creating three point lighting is to set up another light behind you. This is your ‘Backlight’, and it will help you stand out from your background. Backlight or Hair light is always placed behind and above the subject to create separation between the subject in the shot and the background. This basic lighting technique can be applied in almost every scene you shoot, which is why it is important to keep an open mind and to continue experimenting with possible light setups.
Watch Video! Top Lighting Tips for Vlogging
Lightning Tips for Aspiring YouTube Videographers
Becoming the master of light will take some time and practice, so it is crucial to remain curious and anxious to learn new tricks throughout that process if you want to continually become better. These tips will help you make the first steps on that journey.
1. Focus Your Key Light
Try to focus your Key Light so that it lights only you and not your background. Do this by mounting anything that can cast a shadow onto your Key Light to control the area where the light hits. If you are using a window for your Key Light then you can use a curtain. If you use a softbox light then your light will already be somewhat focused.
2. Use Natural Lighting
The light provided by the Sun is still the best light source, you can have in your video. The trouble is that natural light changes quickly, which makes it highly unpredictable. The best way to deal with this challenge is to come prepared to the set and to get the shot you want as quickly as you can.
3. Try DIY Lightning
Literally, anything from candles to LED light bulbs can serve as a source of light in a shot. You just need to pay attention to the light temperature, because warmer light sources may highlight reds and yellows that can make your footage look less realistic.
4. Use Lightning Kits
This is by far the best option if you want to be in complete control of the light on your set. You can adjust the intensity of the lights, use filters, diffusers and all sorts of other accessories to create the light that flatters the subjects of your videos. The only downside is that you’ll have to spend a considerable amount of money if you want to have a professional lighting kit.
5. Set up reflectors
Sets of reflectors are often under $50, so they are fairly affordable. However, some vloggers choose to forgo purchasing reflectors and make their own out of tinfoil.
If your strong main light is too hard on your eyes then you can use a translucent ‘reflector’ to soften it. Set your translucent reflector, or other screen, up in front of your main light to diffuse it.
If you are hosting a beauty vlog then you might consider a slightly different set up. Instead of having your main light off to one side set it up directly in front of you so your entire face is lit evenly. It is still a good idea to use fill lights in this set up to give you some dimension, and a backlight is even more essential for helping you stand out from the background. The even light hitting your face will also make you look flat if you do not use a backlight.
If you are using all of the lighting options available to you and your video still looks too dark then you can try brightening it by opening up the aperture of your camera lens/setting a lower f-stop. Letting more light into your camera can help your footage look brighter, although you also run the risk of making things look overexposed/ washed out if you are not careful.
If you are stuck shooting in low light conditions it is best to use a lens with a wider aperture/lower f-stop. This will make the best of the light you do have.
Richard Bennett
Richard Bennett is a writer and a lover of all things video.
Follow @Richard Bennett
The Fast Track to Clearing YouTube Post-Comments
Deleting YouTube Comments
Richard Bennett
Mar 27, 2024• Proven solutions
YouTube is a video platform where people share informative and entertaining content. It works in the form of channels belonging to individuals or companies. People can subscribe to these channels to show support, and YouTubers create a strong sense of community with these subscribers.
But some people comment inappropriate comments that can cause the community harm and spread hatred. Many YouTubers may want to delete such remarks. There are also times when you accidentally comment on a channel’s comment section and may wish to delete it.
So how do you delete all YouTube comments? In this how-to blog, we will show you.
- Part 1: Deleting YouTube Comments from Desktop
- Part 2: Deleting All YouTube Comments from Mobile
- Part 3: How to Delete Your Comments from YouTube?
- part 4: Delete Other People’s Comments on Others’ Channels
- Part 5: Delete All Your Posted YouTube Comments
How to Delete YouTube Comments from Desktop?
In this section, we will tell you how you can do it from your desktop.
- Go tohttps://www.youtube.com/ from your desktop browser and log in.
- Once you log in, you need to go to your channel. For this, you can select the My Channel option from the upper-left side of your YouTube home page.
- From the list of your videos, select the one you need and scroll down to reach the comment you want to delete.
- When you locate the comment, click on the three vertical dots on the right-hand side of the comment. From the drop-down list, click on Remove. The process is complete, and YouTube will remove your comment.
You also have the option to report the comment or hide the user from your channel .
How to Delete All YouTube Comments from Mobile?
The steps to deleting someone else’s YouTube comments from your mobile are similar to those from your desktop.
- Log in to your account from the YouTube app on your phone.
- On the right-hand side of your YouTube homepage, there will be a profile icon. Tap on that, and from the list, select My Channel. This will direct you to all videos on your channel.
- Select the video from where you want to delete a comment. Scroll down to reach the desired comment.
- Once you reach the target comment, click on the three vertical dots at the bottom corner. There should be an option called Remove. Tap on it.
- This will create another dialog box on the mobile app where you have to click on Remove again to delete the comment.
How Do You Delete Your Comments from YouTube?
Have you accidentally posted something on a YouTuber’s channel? Are you anxious because you cannot find the comment and delete it?
Fear not. Read on to know how to delete all comments you posted on someone else’s YouTube channel from your desktop.
- Visithttps://www.youtube.com/ from your desktop and then sign in YouTube channel.
- If your YouTube account is not open, tap on Sign in and enter your email and password to log in to your account.
- Once there, you need to access your Comment History page. To do this, you can click on the three horizontal lines at the top left corner of your YouTube homepage. Click on History. On the page that opens, click Comments from the panel on the right. It will direct you to your Comment History page. You can also access the YouTube comment history fromhere .
- When you reach the Comment History page, you will be able to find all comments you have ever posted. Scroll down to the comment you want to delete.
- Click on the three vertical dots that you see beside the target comment. You will find a Delete option. Tap on it, and confirm that you want to delete the comment. That completes the process. No more embarrassing comments!
How Do You Delete Your Comments from Your Phone?
Don’t have a desktop handy? This section will tell you how you can delete your comments you posted on your or someone else’s YouTube video from your mobile.
- Go to the YouTube app on your phone. You will need to log in to your account to delete any comment you posted.
- When the login process is complete, you need to find the video where your target comment is.
If it is someone else’s video, you can search for it by clicking on the magnifying glass at the top of the homepage or check your YouTube History to find it. To access your History, you need to click on an option called Library at the bottom of the homepage. From there, you can find the History option.
If it is your video where the comment to be removed is, you can go to My Channel from the profile icon on the right-hand side of the YouTube app’s homepage.
- Once you locate the video, you need to find the comment you want to delete. On the YouTube app, you may need to scroll down for a while to do this.
- When you reach it, click on the three vertical dots at the bottom corner of your comment. You should see an option called Delete. Click on that. You need to confirm once more that you want to delete it, and the process will be complete.
Delete Other People’s Comments on Others’ Channels
Did you see a hate comment on your favorite creator’s video? Sadly, you cannot delete the comment. But, you can report it, and YouTube will hide or take it down.
You can do this both from your desktop or your phone with some easy steps.
How to report people’s comments on YouTube?
Go to https://www.youtube.com/ from your desktop or open the YouTube app from your phone. Log in to your account if it is not open.
- The next step is to find the video where the comment is. You can search for it by tapping on the search button at the top of the YouTube homepage. Or you can locate it from your YouTube History.
To find your History from your desktop, you need to click on the three horizontal lines at the top left corner of the homepage. You will find the History option from the list. To access it from your phone, click on the Library option at the bottom of your homepage, and it will open a list where you will find the History option.
- Open the video, and scroll down to locate the comment you want to report.
- Once you find your target comment, click on the three vertical dots that appear on its right side. You will find the Report option from the pop-up menu. Click on that.
- When you tap Report, another dialogue box will appear. From the list of options, choose the most appropriate option, tap on Report at the lower right corner of the pop-up, and complete the process. YouTube will do the rest.

How to Delete All Your Posted YouTube Comments?
You can also delete all comments you ever posted on any YouTube video by hiding your channel. When you do this, you can hide your video content temporarily. But it will irreversibly erase all your comments throughout YouTube. If you are curious, read on to know how you can do it.
- You need to go to YouTube from your desktop and sign in to your account.
- Next, you can either click on the profile icon at the top right corner or the three horizontal lines beside the YouTube logo on your homepage. From the list of options, click Settings.
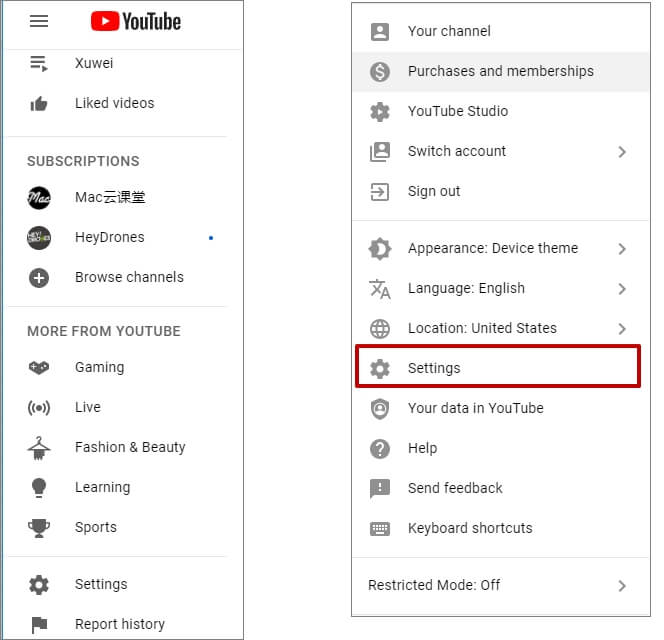
- YouTube will direct you to the Settings page of your account. Choose Advanced Settings from the list on your left. You can also access it fromhere .

- Scroll down and select Delete Channel. Clicking it will not delete your account. When you click on Delete Channel, you will get two choices – ‘I want to hide my channel’ and ‘I want to permanently delete my content’. Select the first.

- YouTube will now show you what will happen when you hide your channel. Check all the boxes to confirm that you understand, and then tap on Hide My Channel. YouTube will now delete all comments made by your account.
Final Thoughts
YouTube can be an unsafe place with unwanted comments everywhere. In this blog, we tried to show how you can get rid of comments on your and on others’ YouTube accounts. The next time you see an offensive comment or post something mistakenly, don’t forget to try our tips and make YouTube a safe platform again.
Richard Bennett
Richard Bennett is a writer and a lover of all things video.
Follow @Richard Bennett
Richard Bennett
Mar 27, 2024• Proven solutions
YouTube is a video platform where people share informative and entertaining content. It works in the form of channels belonging to individuals or companies. People can subscribe to these channels to show support, and YouTubers create a strong sense of community with these subscribers.
But some people comment inappropriate comments that can cause the community harm and spread hatred. Many YouTubers may want to delete such remarks. There are also times when you accidentally comment on a channel’s comment section and may wish to delete it.
So how do you delete all YouTube comments? In this how-to blog, we will show you.
- Part 1: Deleting YouTube Comments from Desktop
- Part 2: Deleting All YouTube Comments from Mobile
- Part 3: How to Delete Your Comments from YouTube?
- part 4: Delete Other People’s Comments on Others’ Channels
- Part 5: Delete All Your Posted YouTube Comments
How to Delete YouTube Comments from Desktop?
In this section, we will tell you how you can do it from your desktop.
- Go tohttps://www.youtube.com/ from your desktop browser and log in.
- Once you log in, you need to go to your channel. For this, you can select the My Channel option from the upper-left side of your YouTube home page.
- From the list of your videos, select the one you need and scroll down to reach the comment you want to delete.
- When you locate the comment, click on the three vertical dots on the right-hand side of the comment. From the drop-down list, click on Remove. The process is complete, and YouTube will remove your comment.
You also have the option to report the comment or hide the user from your channel .
How to Delete All YouTube Comments from Mobile?
The steps to deleting someone else’s YouTube comments from your mobile are similar to those from your desktop.
- Log in to your account from the YouTube app on your phone.
- On the right-hand side of your YouTube homepage, there will be a profile icon. Tap on that, and from the list, select My Channel. This will direct you to all videos on your channel.
- Select the video from where you want to delete a comment. Scroll down to reach the desired comment.
- Once you reach the target comment, click on the three vertical dots at the bottom corner. There should be an option called Remove. Tap on it.
- This will create another dialog box on the mobile app where you have to click on Remove again to delete the comment.
How Do You Delete Your Comments from YouTube?
Have you accidentally posted something on a YouTuber’s channel? Are you anxious because you cannot find the comment and delete it?
Fear not. Read on to know how to delete all comments you posted on someone else’s YouTube channel from your desktop.
- Visithttps://www.youtube.com/ from your desktop and then sign in YouTube channel.
- If your YouTube account is not open, tap on Sign in and enter your email and password to log in to your account.
- Once there, you need to access your Comment History page. To do this, you can click on the three horizontal lines at the top left corner of your YouTube homepage. Click on History. On the page that opens, click Comments from the panel on the right. It will direct you to your Comment History page. You can also access the YouTube comment history fromhere .
- When you reach the Comment History page, you will be able to find all comments you have ever posted. Scroll down to the comment you want to delete.
- Click on the three vertical dots that you see beside the target comment. You will find a Delete option. Tap on it, and confirm that you want to delete the comment. That completes the process. No more embarrassing comments!
How Do You Delete Your Comments from Your Phone?
Don’t have a desktop handy? This section will tell you how you can delete your comments you posted on your or someone else’s YouTube video from your mobile.
- Go to the YouTube app on your phone. You will need to log in to your account to delete any comment you posted.
- When the login process is complete, you need to find the video where your target comment is.
If it is someone else’s video, you can search for it by clicking on the magnifying glass at the top of the homepage or check your YouTube History to find it. To access your History, you need to click on an option called Library at the bottom of the homepage. From there, you can find the History option.
If it is your video where the comment to be removed is, you can go to My Channel from the profile icon on the right-hand side of the YouTube app’s homepage.
- Once you locate the video, you need to find the comment you want to delete. On the YouTube app, you may need to scroll down for a while to do this.
- When you reach it, click on the three vertical dots at the bottom corner of your comment. You should see an option called Delete. Click on that. You need to confirm once more that you want to delete it, and the process will be complete.
Delete Other People’s Comments on Others’ Channels
Did you see a hate comment on your favorite creator’s video? Sadly, you cannot delete the comment. But, you can report it, and YouTube will hide or take it down.
You can do this both from your desktop or your phone with some easy steps.
How to report people’s comments on YouTube?
Go to https://www.youtube.com/ from your desktop or open the YouTube app from your phone. Log in to your account if it is not open.
- The next step is to find the video where the comment is. You can search for it by tapping on the search button at the top of the YouTube homepage. Or you can locate it from your YouTube History.
To find your History from your desktop, you need to click on the three horizontal lines at the top left corner of the homepage. You will find the History option from the list. To access it from your phone, click on the Library option at the bottom of your homepage, and it will open a list where you will find the History option.
- Open the video, and scroll down to locate the comment you want to report.
- Once you find your target comment, click on the three vertical dots that appear on its right side. You will find the Report option from the pop-up menu. Click on that.
- When you tap Report, another dialogue box will appear. From the list of options, choose the most appropriate option, tap on Report at the lower right corner of the pop-up, and complete the process. YouTube will do the rest.
How to Delete All Your Posted YouTube Comments?
You can also delete all comments you ever posted on any YouTube video by hiding your channel. When you do this, you can hide your video content temporarily. But it will irreversibly erase all your comments throughout YouTube. If you are curious, read on to know how you can do it.
- You need to go to YouTube from your desktop and sign in to your account.
- Next, you can either click on the profile icon at the top right corner or the three horizontal lines beside the YouTube logo on your homepage. From the list of options, click Settings.
- YouTube will direct you to the Settings page of your account. Choose Advanced Settings from the list on your left. You can also access it fromhere .
- Scroll down and select Delete Channel. Clicking it will not delete your account. When you click on Delete Channel, you will get two choices – ‘I want to hide my channel’ and ‘I want to permanently delete my content’. Select the first.
- YouTube will now show you what will happen when you hide your channel. Check all the boxes to confirm that you understand, and then tap on Hide My Channel. YouTube will now delete all comments made by your account.
Final Thoughts
YouTube can be an unsafe place with unwanted comments everywhere. In this blog, we tried to show how you can get rid of comments on your and on others’ YouTube accounts. The next time you see an offensive comment or post something mistakenly, don’t forget to try our tips and make YouTube a safe platform again.
Richard Bennett
Richard Bennett is a writer and a lover of all things video.
Follow @Richard Bennett
- Title: "Illuminating Ideas The Basics of Video Setup for 2024"
- Author: Thomas
- Created at : 2024-05-31 12:42:11
- Updated at : 2024-06-01 12:42:11
- Link: https://youtube-help.techidaily.com/illuminating-ideas-the-basics-of-video-setup-for-2024/
- License: This work is licensed under CC BY-NC-SA 4.0.
