
"In 2024, Guide Deleting Items From Your YouTube'umbers List"
Guide: Deleting Items From Your YouTube’umbers List
The YouTube Watch Later playlist is a great way to save videos and view them later. But if you don’t keep on top of it, your Watch Later list can quickly become unmanageable and cluttered with content that you no longer want to watch afterward.
If you are wondering how, you can declutter the playlist, we’ve got you covered. To help you with the task, we’ve compiled a comprehensive step-by-step guide. In this article, we will show you how to clear Watch Later on YouTube with just a few clicks.
So, without beating around the bush, let’s get started with our tutorial!
How To Delete YouTube Watch Later Playlist
If your YouTube Watch Later playlist is filled with videos you’ll never watch again, or you are not interested in that specific content type, you can quickly delete these videos at any time.
Here’s the step-by-step process on how to clear Watch Later on YouTube Web and App:
How To Delete YouTube Watch Later Playlist On Web?
You can delete the YouTube Watch Later Playlist on your desktop in the following ways:
From YouTube Homepage
To clear the YouTube Watch Later Playlist from the YouTube Homepage, do the following steps:
Step1 First, open a browser on your PC and visit the YouTube homepage. Sign into your account if needed and click the “Library” option located at the left-hand side menu panel.

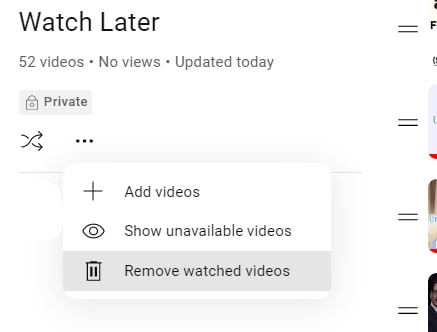
Step2 Croll down and click the “See All” option under the Watch Later header. Click the Three Dots below the Watch Later playlist details on the next page.
Step3 From the drop-down menu, click “Remove Watch Videos.” This will instantly remove all the videos you’ve watched but are still in the playlist.

Step4 Finally, to remove the unwatched videos, hover over a video and click the Three Dots. Select the “Remove from Watch Later” option to delete the video. You can repeat this process to remove all the content from the playlist until it is decluttered at the point of your satisfaction.

Using A Script
Since the above process can be tiring, you can use a script to remove all the videos at once from the Watch Later playlist in the following way:
Step1 In the first step, launch the Google Chrome browser on your system and head to the YouTube website**.** Next, select the “Library” option in the left pane and click “Watch Later” from the menu.
Step2 Now, hit the “Ctrl + Shift + J” keys on Windows or the “Command + Option+ J” buttons on Mac to launch the developer mode and open the console window.

Step3 Copy and paste the following lines of the script at the end of the line under the Console tab where the cursor is blinking.
setInterval(function () { document.querySelector(‘#primary button[aria-label=”Action menu”]‘).click(); var things = document.evaluate( ‘//span[contains(text(),”Remove from”)]‘, document, null, XPathResult.ORDERED_NODE_SNAPSHOT_TYPE, null ); for (var i = 0; i < things.snapshotLength; i++) { things.snapshotItem(i).click(); } }, 1000);
Step4 In the last step, hit the “Enter” key to clear the Watch Later Playlist on YouTube. However, the process may take some time, depending on the number of videos in your playlist.
Although a bit tech-savvy, the script execution method is the most effective way to delete all Watch Later videos at once.
You can also replace the number at the end of the script with a lower entry to delete videos according to your preference. Also, choosing a lesser number can speed up the video deletion process from YouTube Watch Later list by a great deal.
![]()
Note: It is important to note that experimenting with scripts is only for some. The script above has been confirmed to work, but others still need to be thoroughly checked and could potentially damage your computer. To prevent this from happening, only look for scripts from reliable sources instead of those posted by random people in various forums.
How To Delete YouTube Watch Later Playlist On YouTube App?
If you are using YouTube on an Android or iOS device, it is possible to clear the Watch Later Playlist by doing the steps below:
Step1 In the first step, swipe up on the Homescreen of your Android device or swipe right on your iOS device to launch App Drawer, and tap “YouTube” to launch the app.
Step2 Now, tap the “Library” option in the bottom-right corner of the screen and tap “Watch Later.”
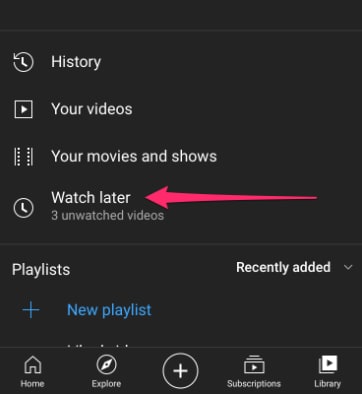
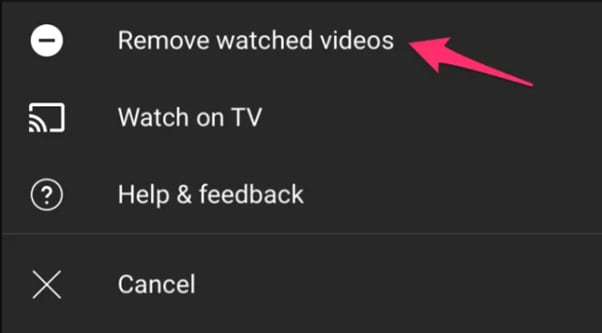
Step3 Next, tap the three dots (vertical ellipses) icon on the top-right side of the screen and choose the “Remove Watched Videos” option to delete them from the playlist.
Step4 If there are still unwatched videos in the playlist, select a video and tap the three dots next to it. Now, tap the “Remove from Watch Later” option. Repeat the process to remove all the unwatched videos to clear the playlist.
Is there an Alternative Way to Download YouTube Videos without Using Software?
Now that you’ve learned how you can clear the Watch Later playlist on YouTube, you might be looking for a way to download your favorite videos on your PC for later watch without using any software. If so,click here to find out 13 proven ways to get this done.
Free Download For Win 7 or later(64-bit)
Free Download For macOS 10.14 or later
Bonus Video Tutorial: From a User to a Creator, How To Edit YouTube Videos Like a Pro
Hopefully, you have found the most appropriate solution to clear your YouTube Watcher Later playlist. However, while you are a YouTube user, how can you transfer your character from a user to a creator? In this video era, why not participate in the creation party and be one of them?
If you have any interests, you can watch the video we specially prepared for you. This video will show you how to use a user-friendly video editor, Filmora , to create your own YouTube videos!
Conclusion
In this article, we’ve discussed how to clear your YouTube watch later playlist from both the YouTube web from the homepage and using the script in the browser’s developer mode. We’ve also provided a step-by-step process for deleting the Watch Later playlist on the YouTube mobile app.
This guide was informative enough to answer most of your queries, and after reading it, you can now unclutter your YouTube Watch Later without any issues.
How To Delete YouTube Watch Later Playlist On YouTube App?
If you are using YouTube on an Android or iOS device, it is possible to clear the Watch Later Playlist by doing the steps below:
Step1 In the first step, swipe up on the Homescreen of your Android device or swipe right on your iOS device to launch App Drawer, and tap “YouTube” to launch the app.
Step2 Now, tap the “Library” option in the bottom-right corner of the screen and tap “Watch Later.”
Step3 Next, tap the three dots (vertical ellipses) icon on the top-right side of the screen and choose the “Remove Watched Videos” option to delete them from the playlist.
Step4 If there are still unwatched videos in the playlist, select a video and tap the three dots next to it. Now, tap the “Remove from Watch Later” option. Repeat the process to remove all the unwatched videos to clear the playlist.
Is there an Alternative Way to Download YouTube Videos without Using Software?
Now that you’ve learned how you can clear the Watch Later playlist on YouTube, you might be looking for a way to download your favorite videos on your PC for later watch without using any software. If so,click here to find out 13 proven ways to get this done.
Free Download For Win 7 or later(64-bit)
Free Download For macOS 10.14 or later
Bonus Video Tutorial: From a User to a Creator, How To Edit YouTube Videos Like a Pro
Hopefully, you have found the most appropriate solution to clear your YouTube Watcher Later playlist. However, while you are a YouTube user, how can you transfer your character from a user to a creator? In this video era, why not participate in the creation party and be one of them?
If you have any interests, you can watch the video we specially prepared for you. This video will show you how to use a user-friendly video editor, Filmora , to create your own YouTube videos!
Conclusion
In this article, we’ve discussed how to clear your YouTube watch later playlist from both the YouTube web from the homepage and using the script in the browser’s developer mode. We’ve also provided a step-by-step process for deleting the Watch Later playlist on the YouTube mobile app.
This guide was informative enough to answer most of your queries, and after reading it, you can now unclutter your YouTube Watch Later without any issues.
A Filmmaker’s Companion: The Journey From Capturing to Post-Production of 360 Videos
360 Video Editors: How to Upload 360 Video to YouTube

Richard Bennett
Mar 27, 2024• Proven solutions
360 degree videos have become incredibly popular on the Internet. Not only do they give people a complete look at a scene, but they also allow for a lot of artistic freedom. Those who are using VR-capable devices can get an even more immersive experience. It is why many content creators want to learn about the best 360 video editor they can use on their computers.
Here is a look at the 5 best 360 video converter and editor programs that you can use on your Windows or Mac computer.
Part 1: 5 Best 360 Video Editor for You
1. Movavi
Movavi is an affordable 360 degree video editor that makes it easy for you to create, edit and share these videos online. You can even add filters, titles and transitions to your videos, while soundtrack addition is also possible.
You can use the preview window in the program to see how your video will look if it is published as is. Plus you can use the software with both Windows and Mac, depending on the version that you download.
Pros:
- Works with all mainstream video formats
- Features support for 4K videos
- Includes color adjustment and picture in picture, even in 360 videos
- Speed adjustment capabilities

2. Premiere Pro
Adobe Premiere Pro CC is seen by many as the leading product that you can get if you want to edit high quality videos, including 360 degree content.
Any type of video format will be compatible. You should have no issues editing different segments of the content that you are creating, as Premiere Pro CC is known for having very efficient workflow screens.
Pros:
- Tools to adjust color, audio and graphics
- Works seamlessly with other Adobe apps
- Possible to create and edit content on the go using smartphones

3. After Effects
If you are attempting to add many unique graphics and transitions to your videos, then you will want to use Adobe After Effects. Most would recommend that be combined with Premiere Pro to get the best experience.
After Effects is ideal for adding introductions, end credits, transitions and other effects to the content that you have produced. You can use it to take the videos that you have created to the next level.
Pros:
- Support for movie titles, introductions, transitions and end credits
- Possible to animate logos and characters
- Works with Adobe Premiere Pro

4. Final Cut Pro X
Mac users who want to use their laptop or desktop to edit 360 videos will be happy to know that it is supported in Final Cut Pro X. It is one of the fastest and most powerful programs to use on a Mac, as it is completely optimized for the operating system and hardware.
It is possible to edit and playback 360 videos using a VR headset. It allows creators to not only put in great videos and edit them, but also see how they look after various adjustments.
Pros:
- Advanced color grading options
- Full HDR and 4K support
- View files with VR headset
- Optimized for Macs
- Includes free trial
Cons:
- Little bit expensive

5. Molanis VR
Molanis VR is ideal for anyone who wants to create 360 video that will look incredible when viewed through VR glasses. It is one of the most flexible software options, as it is inexpensive and includes many great features.
IT is possible to trim, cut and fade, include text and images, add effects and make other changes to videos on the fly. The software is intuitive to use, which is great for beginners who have not edited much in the past.
Pros:
- Support for 4K videos
- Options to add text, images and effects to videos
- Can manage color, correct horizon and stabilize 360 videos
- Includes a tree trial
Cons:
- Not as many tutorials on how to use the software compared to bigger brands

Part 2: How to Upload 360 Degree Videos to YouTube
It is possible to add 360 degree videos onto YouTube . Using YouTube to promote such content is sensible, as it is one of the largest streaming video platforms in the world. These videos can be seen on any of the major browsers and on certain mobile devices. But they must be uploaded from a desktop.
YouTube 360 Video Specification
The first step of the process is to create a video that YouTube will approve as a 360 submission. Such a video should be either 24, 25, 30, 48, 50, or 60 frames per second. Do not go any higher or it will not be approved.
It is also a good idea to have videos that are between 7168x3584 and 8192x4096 in resolution. Any lower and the quality of the video will not be good enough to provide a pleasant viewing experience to the audience.
How to Upload to YouTube
Now that you have your video edited, you are a step closer to uploading it onto YouTube. But there are some steps that you must follow . These include downloading the 360 Video Metadata app on your Mac or Windows device.
Then you will choose the file, check the Spherical box and save it. Make sure that 3D top-bottom is not checked when you save the file. The file should be created in the folder where the original was located. Now you can upload that file to YouTube.
Read More to Get : YouTube Video Dimensions/Size: Guide for Upload Settings
Conclusion
If you want to upload 360 video to YouTube or some other platform, using a 360 video editor is the way to go. The best 360 video converter and editor program will let you take the raw footage that you have shot and turn it into a stunning video that anyone can enjoy.
Richard Bennett
Richard Bennett is a writer and a lover of all things video.
Follow @Richard Bennett
Richard Bennett
Mar 27, 2024• Proven solutions
360 degree videos have become incredibly popular on the Internet. Not only do they give people a complete look at a scene, but they also allow for a lot of artistic freedom. Those who are using VR-capable devices can get an even more immersive experience. It is why many content creators want to learn about the best 360 video editor they can use on their computers.
Here is a look at the 5 best 360 video converter and editor programs that you can use on your Windows or Mac computer.
Part 1: 5 Best 360 Video Editor for You
1. Movavi
Movavi is an affordable 360 degree video editor that makes it easy for you to create, edit and share these videos online. You can even add filters, titles and transitions to your videos, while soundtrack addition is also possible.
You can use the preview window in the program to see how your video will look if it is published as is. Plus you can use the software with both Windows and Mac, depending on the version that you download.
Pros:
- Works with all mainstream video formats
- Features support for 4K videos
- Includes color adjustment and picture in picture, even in 360 videos
- Speed adjustment capabilities
2. Premiere Pro
Adobe Premiere Pro CC is seen by many as the leading product that you can get if you want to edit high quality videos, including 360 degree content.
Any type of video format will be compatible. You should have no issues editing different segments of the content that you are creating, as Premiere Pro CC is known for having very efficient workflow screens.
Pros:
- Tools to adjust color, audio and graphics
- Works seamlessly with other Adobe apps
- Possible to create and edit content on the go using smartphones
3. After Effects
If you are attempting to add many unique graphics and transitions to your videos, then you will want to use Adobe After Effects. Most would recommend that be combined with Premiere Pro to get the best experience.
After Effects is ideal for adding introductions, end credits, transitions and other effects to the content that you have produced. You can use it to take the videos that you have created to the next level.
Pros:
- Support for movie titles, introductions, transitions and end credits
- Possible to animate logos and characters
- Works with Adobe Premiere Pro
4. Final Cut Pro X
Mac users who want to use their laptop or desktop to edit 360 videos will be happy to know that it is supported in Final Cut Pro X. It is one of the fastest and most powerful programs to use on a Mac, as it is completely optimized for the operating system and hardware.
It is possible to edit and playback 360 videos using a VR headset. It allows creators to not only put in great videos and edit them, but also see how they look after various adjustments.
Pros:
- Advanced color grading options
- Full HDR and 4K support
- View files with VR headset
- Optimized for Macs
- Includes free trial
Cons:
- Little bit expensive
5. Molanis VR
Molanis VR is ideal for anyone who wants to create 360 video that will look incredible when viewed through VR glasses. It is one of the most flexible software options, as it is inexpensive and includes many great features.
IT is possible to trim, cut and fade, include text and images, add effects and make other changes to videos on the fly. The software is intuitive to use, which is great for beginners who have not edited much in the past.
Pros:
- Support for 4K videos
- Options to add text, images and effects to videos
- Can manage color, correct horizon and stabilize 360 videos
- Includes a tree trial
Cons:
- Not as many tutorials on how to use the software compared to bigger brands
Part 2: How to Upload 360 Degree Videos to YouTube
It is possible to add 360 degree videos onto YouTube . Using YouTube to promote such content is sensible, as it is one of the largest streaming video platforms in the world. These videos can be seen on any of the major browsers and on certain mobile devices. But they must be uploaded from a desktop.
YouTube 360 Video Specification
The first step of the process is to create a video that YouTube will approve as a 360 submission. Such a video should be either 24, 25, 30, 48, 50, or 60 frames per second. Do not go any higher or it will not be approved.
It is also a good idea to have videos that are between 7168x3584 and 8192x4096 in resolution. Any lower and the quality of the video will not be good enough to provide a pleasant viewing experience to the audience.
How to Upload to YouTube
Now that you have your video edited, you are a step closer to uploading it onto YouTube. But there are some steps that you must follow . These include downloading the 360 Video Metadata app on your Mac or Windows device.
Then you will choose the file, check the Spherical box and save it. Make sure that 3D top-bottom is not checked when you save the file. The file should be created in the folder where the original was located. Now you can upload that file to YouTube.
Read More to Get : YouTube Video Dimensions/Size: Guide for Upload Settings
Conclusion
If you want to upload 360 video to YouTube or some other platform, using a 360 video editor is the way to go. The best 360 video converter and editor program will let you take the raw footage that you have shot and turn it into a stunning video that anyone can enjoy.
Richard Bennett
Richard Bennett is a writer and a lover of all things video.
Follow @Richard Bennett
Also read:
- [New] The Ultimate Recorder's Companion for Clear Notes
- [Updated] 2024 Approved Precision in Photos Mastering Insta Story Zoom Levels
- [Updated] 2024 Approved Rapid Capture Sounds Alongside Images
- 2024 Approved Harmonic Hits Top-Rated DJ Template Downloads
- 2024 Approved The Ultimate Guide How To Record and Save YouTube Videos without Spending a Penny
- Complete Facetune Overhaul Analysis A 2024 Insight
- Discover the Leading Electric Smokers of 2023: In-Depth Analysis and Ratings - PCMag
- In 2024, ImageMorph Magic
- In 2024, Mac Users Mastering MP3 Conversion From YouTube
- In 2024, Overcoming Shadows in Indoor Vlogging Environments
- In 2024, Positive Interaction, Not Pressure A Subscription Success Story
- Navigating YouTube Membership Options Wisely for 2024
- Resolve Email Characters Glitch: Fixing a Broken '@' Key
- Solved Warning Camera Failed on Poco M6 Pro 4G | Dr.fone
- Troubleshooting Tips for Solving Logitech G533 Headset Mic Issues - All Cases Covered!
- Title: In 2024, Guide Deleting Items From Your YouTube'umbers List
- Author: Thomas
- Created at : 2024-11-03 01:40:41
- Updated at : 2024-11-05 02:46:22
- Link: https://youtube-help.techidaily.com/in-2024-guide-deleting-items-from-your-youtubeumbers-list/
- License: This work is licensed under CC BY-NC-SA 4.0.