
:max_bytes(150000):strip_icc()/Streaming_GettyImages-1317927924_grinvalds_CROPPED-71ab52546b8b477ca2c0788bc26d150f.jpg)
"In 2024, Identifying the Most Versatile Cam Top 12 Screen Swivel Gadgets"
Identifying the Most Versatile Cam: Top 12 Screen Swivel Gadgets
12 Best Vlogging Cameras with a Flip Screen

Richard Bennett
Nov 01, 2022• Proven solutions
A flip screen is a very important feature on a camera for vloggers. With a flip screen, you can preview whether or not your shot is composed the way you want it to be, all in real-time. Below is our top list and review of the twelve best vlogging cameras with a flip screen.
WHAT TO LOOK FOR IN A VLOGGING CAMERA
1. Fully articulated screen (flip screen)
2. Good continual autofocus while recording video
3. Good focus priority through face recognition
4. Touch to focus
5. Good low-light performance
6. external mic jack, hot/cold shoe bracket
7. optical image stabilization
8. good battery life
Check out my full list of 10 Things To Look For In A Vlogging Camera to understand the importance of these camera features.
THE 12 BEST VLOGGING CAMERAS WITH A FLIP SCREEN (2018)
| Camera | Release Date | Camera Type | Flip Screen Type | Mic Port | Price | |
|---|---|---|---|---|---|---|
| CanonEOSM50 | 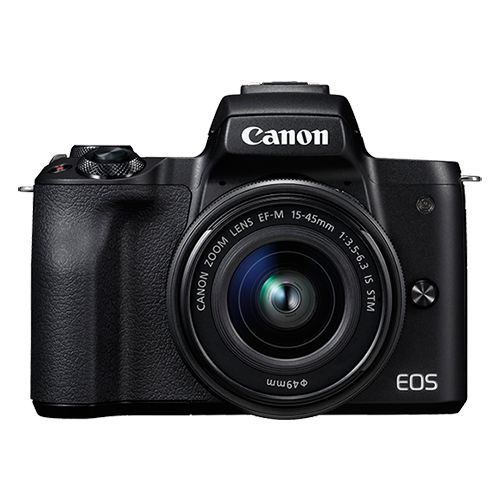 |
February2018 | Mirrorless | Fully Articulated | Yes | $- |
| PanasonicLumixDC-GH5S | 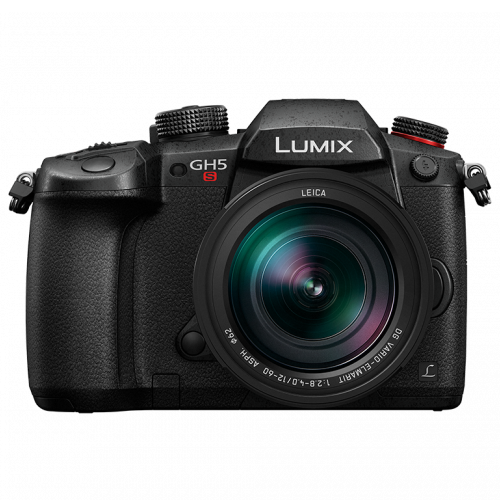 |
January2018 | Mirrorless | Fully Articulated | Yes | $$$ |
| CanonEOSM100 | 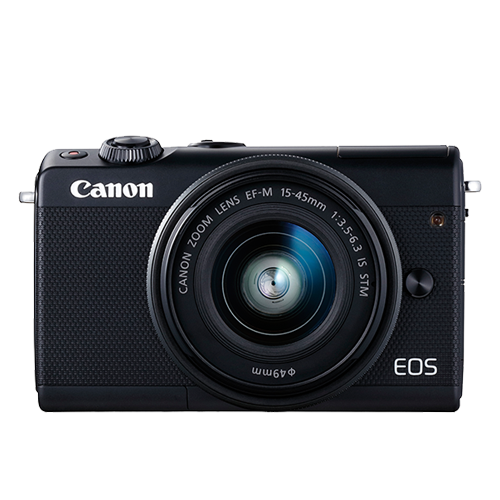 |
August2017 | Mirrorless | Flip Up | No | $ |
| CanonEOS6D Mark II | 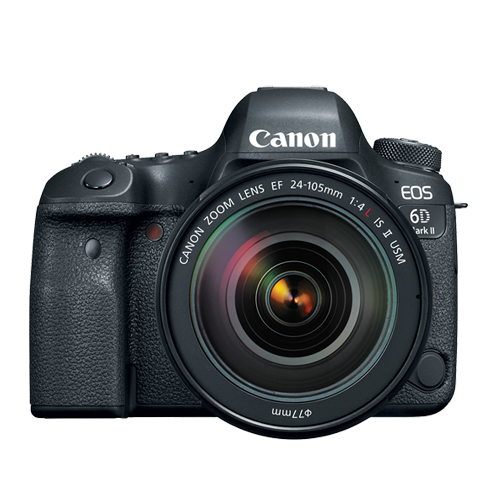 |
June2017 | Mid-size SLR | Fully Articulated | Yes | $$ |
| CanonEOS RebelSL2 |  |
June2017 | Compact SLR | Fully Articulated | Yes | $ |
| CanonEOS RebelT7i | 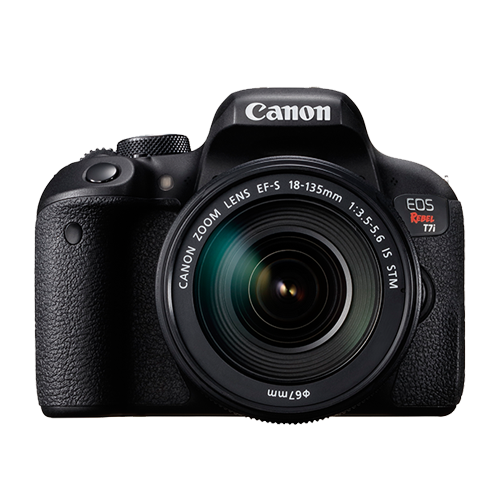 |
February2017 | Mid-size SLR | Fully Articulated | Yes | $- |
| CanonEOSM6 | 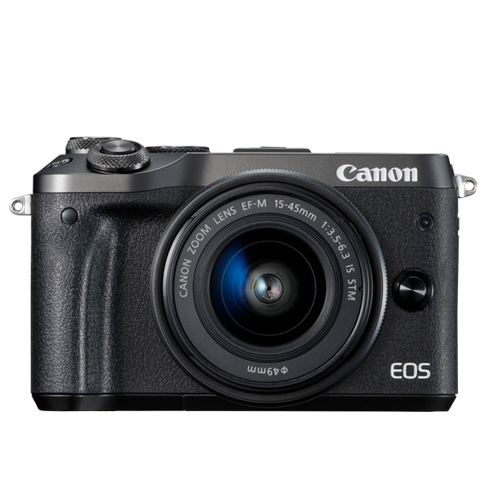 |
February2017 | Mirrorless | Flip Up | Yes | $ |
| NikonD5600 | 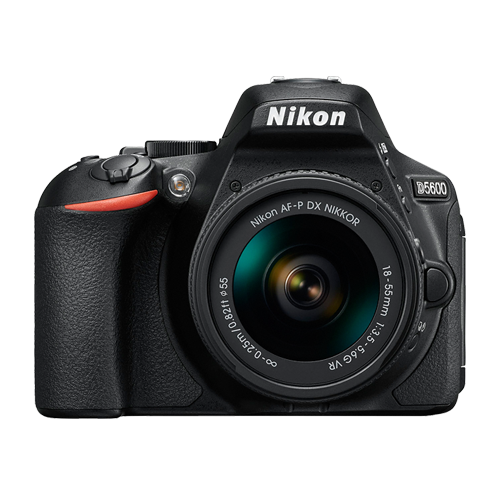 |
November2016 | Compact SLR | Fully Articulated | Yes | $- |
| SonyCyber-Shot DSCRX 100 V | 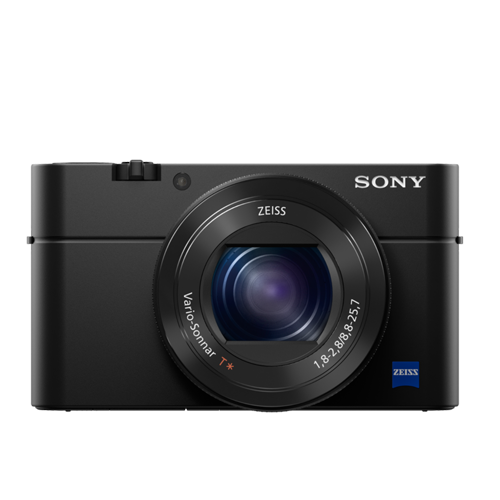 |
October2016 | Compact | Flip Up | No | $- |
| PanasonicLumixDMC-G85 | 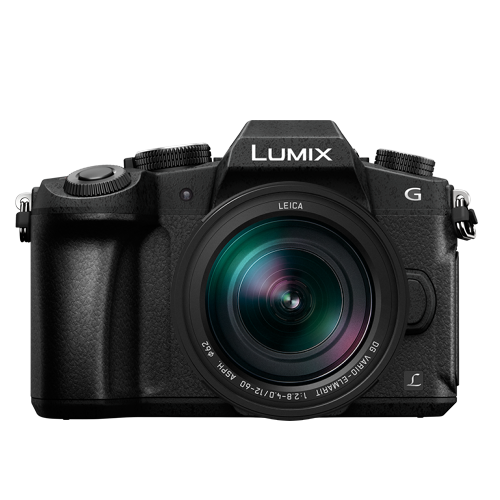 |
September2016 | Mirrorless | Flip Up | Yes | $- |
| CanonEOS80D | 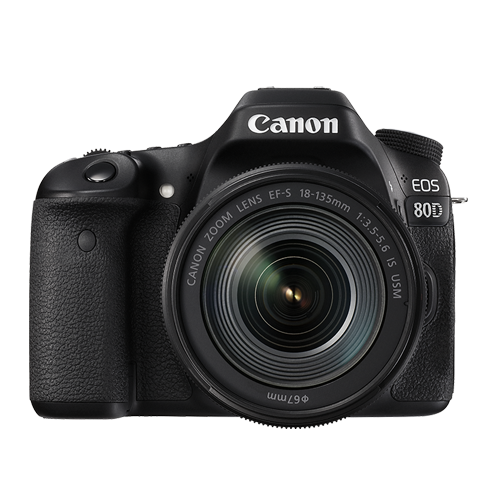 |
February2016 | Mid-size SLR | Fully Articulated | Yes | $$ |
| CanonPowerShotG7 X Mark II |  |
February2016 | Compact | Flip Up | No | $ |
|
Best daily vlogging camera with a flip screen: Sony Cyber-Shot DSC-RX 100 V If you want to use a compact camera with a flip screen, Sony’s Cyber-shot DSC-RX 100 V is an exceptional daily vlogging camera. This camera’s 20.1 MP Exmor RS BSI CMOS sensor with a maximum of 12800 in ISO sensitivity, can record footage in UHD 4K at 30 or 24 fps. The lens on this camera, a non-interchangeable Carl Zeiss Vario Sonnar T lens, performs well even under low-light conditions. With its fast hybrid AF system with 315 phase-detection points and an anti-motion blur mode, you can expect your shots to be accurately focused. The Sony RX 100 V packs so much power into such a small, portable camera, making it a great daily vlogging device. PROS - Light and easy to carry around - Produces high-res videos CONS - Short battery life - Lacking a touchscreen |
|---|---|
|
Best cheap vlogging camera with a flip screen: Canon EOS M100 The Canon EOS M100 is another great small vlogging camera with a flip screen. This mirrorless camera shoots up to full HD 1080p videos at 60 fps. Its 24.2 MP APS-C CMOS sensor and DIGIC 7 image processor will accurately lock the right focus and produce videos with rich detail. The camera’s ISO sensitivity goes as high as ISO 25600. Even in difficult light conditions, this camera will be able to capture a scene. You can control and navigate through the difficult functions of this camera using its 3-inch touchscreen LCD. This camera has a flip screen that flips upward so that you can see yourself while you vlog. With built-in Wi-Fi and NFC, you can also transfer your videos seamlessly to a computer without any cables. If you don’t want to spend a fortune but still want to produce videos with great picture quality, the Canon EOS M100 is the best entry-level camera for daily vlogging that’s currently on the market. PROS - Affordable - Great connectivity options CONS - Lacks advanced video recording features - No viewfinder |
|
Best entry-level mirrorless camera with a flip screen for vlogging: Canon EOS M100 The Canon EOS M100 is the best entry-level mirrorless camera with a flip screen for vlogging. In case you missed it, check out my review on the Canon EOS M100. |
|
Best mid-range mirrorless camera with a flip screen for vlogging: Canon EOS M50 The Canon EOS M50 is already regarded as one of the best mirrorless cameras for vlogging though it has only been on the market for just a few months. This mirrorless camera comes with the newer DIGIC 8 Image Processor that find a focus for your footage even better than the last generation’s image processor. You can crank up the ISO sensitivity to ISO 51200 with the Canon EOS M50. The Canon EOS M50 can shoot UHD 4K videos at 23.98 fps. You can also capture 720p slow-motion videos at 120 fps. PROS - Has an external microphone port - Has a 2.36m-dot OLED electronic viewfinder CONS - No image stabilization - Battery life could be longer |
|
Best professional mirrorless camera with a flip screen for vlogging: Panasonic Lumix DC-GH5S When Panasonic made its Lumix DC-GH5, it was a hybrid camera that performed equally well in both photo and video. In response to customers’ interest in a video-focused camera, Panasonic released the GH5S. This camera is equipped with a micro four-thirds sensor and can shoot UHD 4K and DCI videos at 60 fps, up to 150 Mbps. If you want to capture slow-motion footage, you can shoot full HD 1080p videos at 240 fps as well. With its 10.28MP multi-aspect ratio MOS sensor, you’ll be able to produce high-quality videos even under very challenging lighting conditions. In a fraction of a second, this camera can also automatically grab focus during your video with its advanced depth-from-focus technology. It is also equipped with a microphone jack so that you can record better audio while shooting with this camera. The GH5S has a fully articulated touchscreen so that you can compose your shot from any angle. PROS - ISO sensitivity goes up to 204800 - High video bit rates CONS - Expensive - The camera body weighs about 1.5 lbs |
|
Best entry-level DSLR camera with a flip screen for vlogging: Canon EOS SL2 If you’re looking for a low priced entry-level vlogging camera with a flip screen, the Canon EOS Rebel SL2 is the best option. You can precisely and quickly grab focus during video recording with its 9-point AF system and dual pixel CMOS AF technology. The camera powers these functions with its DIGIC 7 image processor. You can shoot up to full HD 1080p videos at 60 fps with its 24.2 MP APS-C CMOS sensor and crank the ISO up to ISO 51200 in case you need to shoot under low light conditions. If you want better audio for your vlogs, you can connect an external microphone to the SL2’s microphone jack. PROS - Microphone jack - Wi-Fi connectivity CONS - No 4K video support - Optical image stabilizer could be better |
|
Best mid-range DSLR camera with a flip screen for vlogging: Canon EOS 80D The 80D is the best camera to go with if you’re looking for a mid-range DLSR vlogging camera with a flip screen. It is equipped with a 24.2 MP APS-C CMOS sensor, comes with the DIGIC 6 image processor, and shoots up to full HD 1080p videos at 60 fps. For low lighting conditions, you can set the camera’s ISO to as high as ISO 25600. The 80D is great for autofocusing during video recording as it comes with a 45-point all cross phase detection autofocus system and a dual pixel CMOS AF system. PROS - Feature-rich - Continuous AF feature performs beautifully while recording high-res videos CONS - Just one SD card slot - PC sync connection features could be better |
|
Best professional DSLR camera with a flip screen for vlogging: Canon 6D Mark II The 6D Mark II is currently (at the time of writing this review) the only full-frame DSLR camera that comes with both a fully-articulated screen and a microphone jack. It is equipped with a 26.2 MP full-frame CMOS sensor, comes with the DIGIC 7 image processor, and shoots up to full HD 1080p videos at 60 fps. The 6D is also equipped with the same 45-point all cross-phase detection and dual pixel CMOS autofocusing system as the 80D. If you’re wanting to vlog with a full-frame camera, the 6D Mark II is the best option. PROS - ISO sensitivity goes up to 102400 - Amazing touchscreen controls CONS - No 4K video recording option - No USB 3.0 |
Want to compare even more cameras? Check out…
12 Best Vlogging Cameras (2018)
Top 11 Cheap Vlogging Cameras (2018)
7 Best DSLR Cameras For Vlogging (2018)
8 Best Mirrorless Cameras For Vlogging (2018)
Richard Bennett
Richard Bennett is a writer and a lover of all things video.
Follow @Richard Bennett
Richard Bennett
Nov 01, 2022• Proven solutions
A flip screen is a very important feature on a camera for vloggers. With a flip screen, you can preview whether or not your shot is composed the way you want it to be, all in real-time. Below is our top list and review of the twelve best vlogging cameras with a flip screen.
WHAT TO LOOK FOR IN A VLOGGING CAMERA
1. Fully articulated screen (flip screen)
2. Good continual autofocus while recording video
3. Good focus priority through face recognition
4. Touch to focus
5. Good low-light performance
6. external mic jack, hot/cold shoe bracket
7. optical image stabilization
8. good battery life
Check out my full list of 10 Things To Look For In A Vlogging Camera to understand the importance of these camera features.
THE 12 BEST VLOGGING CAMERAS WITH A FLIP SCREEN (2018)
| Camera | Release Date | Camera Type | Flip Screen Type | Mic Port | Price | |
|---|---|---|---|---|---|---|
| CanonEOSM50 | |
February2018 | Mirrorless | Fully Articulated | Yes | $- |
| PanasonicLumixDC-GH5S | |
January2018 | Mirrorless | Fully Articulated | Yes | $$$ |
| CanonEOSM100 | |
August2017 | Mirrorless | Flip Up | No | $ |
| CanonEOS6D Mark II | |
June2017 | Mid-size SLR | Fully Articulated | Yes | $$ |
| CanonEOS RebelSL2 | |
June2017 | Compact SLR | Fully Articulated | Yes | $ |
| CanonEOS RebelT7i | |
February2017 | Mid-size SLR | Fully Articulated | Yes | $- |
| CanonEOSM6 | |
February2017 | Mirrorless | Flip Up | Yes | $ |
| NikonD5600 | |
November2016 | Compact SLR | Fully Articulated | Yes | $- |
| SonyCyber-Shot DSCRX 100 V | |
October2016 | Compact | Flip Up | No | $- |
| PanasonicLumixDMC-G85 | |
September2016 | Mirrorless | Flip Up | Yes | $- |
| CanonEOS80D | |
February2016 | Mid-size SLR | Fully Articulated | Yes | $$ |
| CanonPowerShotG7 X Mark II | |
February2016 | Compact | Flip Up | No | $ |
|
Best daily vlogging camera with a flip screen: Sony Cyber-Shot DSC-RX 100 V If you want to use a compact camera with a flip screen, Sony’s Cyber-shot DSC-RX 100 V is an exceptional daily vlogging camera. This camera’s 20.1 MP Exmor RS BSI CMOS sensor with a maximum of 12800 in ISO sensitivity, can record footage in UHD 4K at 30 or 24 fps. The lens on this camera, a non-interchangeable Carl Zeiss Vario Sonnar T lens, performs well even under low-light conditions. With its fast hybrid AF system with 315 phase-detection points and an anti-motion blur mode, you can expect your shots to be accurately focused. The Sony RX 100 V packs so much power into such a small, portable camera, making it a great daily vlogging device. PROS - Light and easy to carry around - Produces high-res videos CONS - Short battery life - Lacking a touchscreen |
|---|---|
|
Best cheap vlogging camera with a flip screen: Canon EOS M100 The Canon EOS M100 is another great small vlogging camera with a flip screen. This mirrorless camera shoots up to full HD 1080p videos at 60 fps. Its 24.2 MP APS-C CMOS sensor and DIGIC 7 image processor will accurately lock the right focus and produce videos with rich detail. The camera’s ISO sensitivity goes as high as ISO 25600. Even in difficult light conditions, this camera will be able to capture a scene. You can control and navigate through the difficult functions of this camera using its 3-inch touchscreen LCD. This camera has a flip screen that flips upward so that you can see yourself while you vlog. With built-in Wi-Fi and NFC, you can also transfer your videos seamlessly to a computer without any cables. If you don’t want to spend a fortune but still want to produce videos with great picture quality, the Canon EOS M100 is the best entry-level camera for daily vlogging that’s currently on the market. PROS - Affordable - Great connectivity options CONS - Lacks advanced video recording features - No viewfinder |
|
Best entry-level mirrorless camera with a flip screen for vlogging: Canon EOS M100 The Canon EOS M100 is the best entry-level mirrorless camera with a flip screen for vlogging. In case you missed it, check out my review on the Canon EOS M100. |
|
Best mid-range mirrorless camera with a flip screen for vlogging: Canon EOS M50 The Canon EOS M50 is already regarded as one of the best mirrorless cameras for vlogging though it has only been on the market for just a few months. This mirrorless camera comes with the newer DIGIC 8 Image Processor that find a focus for your footage even better than the last generation’s image processor. You can crank up the ISO sensitivity to ISO 51200 with the Canon EOS M50. The Canon EOS M50 can shoot UHD 4K videos at 23.98 fps. You can also capture 720p slow-motion videos at 120 fps. PROS - Has an external microphone port - Has a 2.36m-dot OLED electronic viewfinder CONS - No image stabilization - Battery life could be longer |
|
Best professional mirrorless camera with a flip screen for vlogging: Panasonic Lumix DC-GH5S When Panasonic made its Lumix DC-GH5, it was a hybrid camera that performed equally well in both photo and video. In response to customers’ interest in a video-focused camera, Panasonic released the GH5S. This camera is equipped with a micro four-thirds sensor and can shoot UHD 4K and DCI videos at 60 fps, up to 150 Mbps. If you want to capture slow-motion footage, you can shoot full HD 1080p videos at 240 fps as well. With its 10.28MP multi-aspect ratio MOS sensor, you’ll be able to produce high-quality videos even under very challenging lighting conditions. In a fraction of a second, this camera can also automatically grab focus during your video with its advanced depth-from-focus technology. It is also equipped with a microphone jack so that you can record better audio while shooting with this camera. The GH5S has a fully articulated touchscreen so that you can compose your shot from any angle. PROS - ISO sensitivity goes up to 204800 - High video bit rates CONS - Expensive - The camera body weighs about 1.5 lbs |
|
Best entry-level DSLR camera with a flip screen for vlogging: Canon EOS SL2 If you’re looking for a low priced entry-level vlogging camera with a flip screen, the Canon EOS Rebel SL2 is the best option. You can precisely and quickly grab focus during video recording with its 9-point AF system and dual pixel CMOS AF technology. The camera powers these functions with its DIGIC 7 image processor. You can shoot up to full HD 1080p videos at 60 fps with its 24.2 MP APS-C CMOS sensor and crank the ISO up to ISO 51200 in case you need to shoot under low light conditions. If you want better audio for your vlogs, you can connect an external microphone to the SL2’s microphone jack. PROS - Microphone jack - Wi-Fi connectivity CONS - No 4K video support - Optical image stabilizer could be better |
|
Best mid-range DSLR camera with a flip screen for vlogging: Canon EOS 80D The 80D is the best camera to go with if you’re looking for a mid-range DLSR vlogging camera with a flip screen. It is equipped with a 24.2 MP APS-C CMOS sensor, comes with the DIGIC 6 image processor, and shoots up to full HD 1080p videos at 60 fps. For low lighting conditions, you can set the camera’s ISO to as high as ISO 25600. The 80D is great for autofocusing during video recording as it comes with a 45-point all cross phase detection autofocus system and a dual pixel CMOS AF system. PROS - Feature-rich - Continuous AF feature performs beautifully while recording high-res videos CONS - Just one SD card slot - PC sync connection features could be better |
|
Best professional DSLR camera with a flip screen for vlogging: Canon 6D Mark II The 6D Mark II is currently (at the time of writing this review) the only full-frame DSLR camera that comes with both a fully-articulated screen and a microphone jack. It is equipped with a 26.2 MP full-frame CMOS sensor, comes with the DIGIC 7 image processor, and shoots up to full HD 1080p videos at 60 fps. The 6D is also equipped with the same 45-point all cross-phase detection and dual pixel CMOS autofocusing system as the 80D. If you’re wanting to vlog with a full-frame camera, the 6D Mark II is the best option. PROS - ISO sensitivity goes up to 102400 - Amazing touchscreen controls CONS - No 4K video recording option - No USB 3.0 |
Want to compare even more cameras? Check out…
12 Best Vlogging Cameras (2018)
Top 11 Cheap Vlogging Cameras (2018)
7 Best DSLR Cameras For Vlogging (2018)
8 Best Mirrorless Cameras For Vlogging (2018)
Richard Bennett
Richard Bennett is a writer and a lover of all things video.
Follow @Richard Bennett
Converting Live Streamed YouTubes Into Animated GIF Formats
How to Convert YouTube Videos to GIFs

Shanoon Cox
Mar 27, 2024• Proven solutions
A GIF adds an extra element to any conversation and makes the reader feel connected to the post. Using GIF can turn useful if done rightly. It narrates a story in a single animated image for social media conversation. In this article, we will brief you about how to convert YouTube to gif, various GIF converters, their uses, and the pros and cons of each converter.
Let’s get started!
How to Convert a YouTube Video into GIFs?
1. YouTube to GIF Directly
Here is a quick way to convert the YouTube video to GIFs without typing a YouTube to GIF website.
Gif.com is a free and easy-to-use video editor available with multiple effects. This converter was created keeping in mind how people spend hours and money on paid platforms.
Follow the below steps to convert a YouTube video into gifs.
- In the YouTube video page, add gif before youtube.com. For example, I want to convert the YouTube video https://www.youtube.com/watch?v=40fuGLmwHwk to GIFs, here is how it looks like after adding gif at the beginning: https://www.gifyoutube.com/watch?v=40fuGLmwHwk . Press the enter button on your keyboard and you will enter the gifs.com directly.

- In gifs.com, you can play and pause the YouTube video and drag the bar to select a desired moment for gif. Press the “Create Gif” button on the top right side to convert the specific part of the YouTube video to gif.
- You will then be directed to the result page to see your GIF created using the YouTube video, and you can change the GIF title and the tag.
- Lastly, you need to copy the link and share it!
Pros of converting YouTube to GIFs with Gifs.com:
- The interface is easy to use and it provides lots of tools to adjust.
- Simple functionality.
Cons:
- The watermark on your created GIF can be removed only after purchasing the premium version.
- GIFs can be downloaded only by registered users.
2. FreeGifMaker.me
FreeGifMaker is one simple online tool that allows the creation of animated Gifs for free. A minimum of two pictures has to be uploaded out of ten. It takes few seconds and is super easy to make a GIF from a YouTube video. You can use FreeGifMaker.me in some easy steps.
- Open the website http://freegifmaker.me/youtube-to-gif/ on your desktop.
- Go to YouTube and copy the video URL you want to create a GIF of and paste it on the website mentioned above.
- Then click “Load YouTube Video” below the URL and wait for a few seconds while the tool checks the video source.
- Once the YouTube video is loaded, enter the gif duration, start time, and click on the “Make a GIF button.” It will redirect you to the result page.
- Pros:
- Conversion size is unlimited**.**
- There is no usage of ads.
- Easy to make Gifs.
- Cons:
- The upload speed is slow.
- The converter gives limited options for editing.
3. Wondershare Online UniConverter
Online UniConverter converts video into a high-quality animated GIF and allows editing. It is a simple converter with unique features.
If you want to convert your YouTube video into a GIF, follow the steps.
- You need to upload your video through the “Choose Files” option. You can also copy the link from YouTube.
- Wait for some time once you upload the file; you can then set your start time, end time, frame rate according to your needs.
- Lastly, click on “Create GIF” and download your GIF. You can also save it through the dropdown option available besides “Download.”
- Pros:
- Easy to handle.
- A wide range of customization tools is available.
- Zero ads.
- Cons:
- Upload speed is slow.
- Conversion size is limited.
4. GifRun
It is a video maker that started in 2013, and GifRun converts videos from YouTube, Facebook, and other sources to high-quality GIFs. You can create Gifs free of cost from GifRun.
Here is how you can use Gifrun.
- Open the website and paste the URL you want to convert into Gif. Later, press “Get Video” option below the URL box.
- In this step, you can adjust the duration, start time, add text, and also pause and preview the video. Once you’re done altering the video, click “Create GIF.”
- Lastly, click on the “Download” button beside the add text button, or share the link directly.
- Pros:
- Fast conversion and download.
- There is no upload limit.
- The video preview feature is available.
- Cons:
- UI is ad-infested.
- Supports YouTube videos only.
5. Makeagif
This GIF converter creates high-quality GIFs in no time. You need to paste the URL in Makeagif and nothing much. It can make GIFs from Instagram, Facebook, Twitter, and other platforms easily.
The only issue is that it supports one type of conversion with a maximum limit of 25MB.
Here is how you can make your favorite GIF in few steps.
- Open makeagif.com and paste the YouTube URL in the box available.
- Once you paste the URL, the website will automatically take you to the edit page to edit GIF length, start time, speed, and add caption and stickers. The next step is to select the category to which the video belongs available on the left side of the screen.
- After editing, click on “Continue to publishing” then “Create GIF” at the lower right corner of the screen. Voila! Your GIF is ready to use.
- Pros:
- The UI is user-friendly.
- Ads are minimal
- Various GIF conversions are supported.
- Cons:
- The conversion size is small.
- Batch conversions are not available.
6. ImgFlip
It is a creative GIF website supporting various videos from other websites such as Vimeo and YouTube. ImgFlip has innovative customization tools for cropping, reshaping, adding text and, a lot more, but you just need to be aware of the ads.
Want to know how to create GIF? Go through these simple steps.
- You can make GIFs both from Video and Images. To make GIF from a video, paste the YouTube URL in the box at the top, upload the tape from your device’s file.
- After pasting the URL, you will be given lots of customization options. Choose the effect of your choice for your GIF.
- Lastly, click on “Generate GIF” available on the right side of the screen. You can now share the GIF via your device or download it.
- Pros:
- Plenty of customization options.
- Fast conversion.
- Easy to upload and use.
- Cons:
- Ads pop up frequently.
- Offline conversion is unavailable.
7. GIPHY
It is a free GIF converter that helps you download free YouTube GIFs. You can also make GIFs from your photos, videos available on your device along with video URLs and images. The only problem is, to use Giphy you first have to log in to the app.
Follow the below steps to create a GIF from YouTube videos with Giphy:
- Open Giphy on your device and click on “Create” on the top right-side of your screen.
- Paste the URL in the space given below. A pop-up will tell you to log in. Log in to the website to continue.
- The video you choose should be less than 15 seconds and under 100MB. You will be given editing options from which you can select the start time and duration of your GIF along with Captions and Tags.
- In the end, press the “Create GIF” button to make the GIF. When it’s done, you will be redirected to the GIF page. You can then share your GIF on any social media site.
- Pros:
- Ads are absent
- Uploading is fast
- Wide range of free GIFs available
- Cons:
- Not perfect for green hands
8. Imgur
It is one of the best apps that offers tons of images, memes, and GIFs. You can make GIFs of less than 60 seconds with high quality, which you can share anywhere.
Here are three easy steps to make GIFs
- Visit the page “imgur.com/vidgif” and paste your YouTube URL there.
- Set a start time by clicking or dragging on the timeline. The total runtime is also adjustable, with 60 seconds as the maximum time for GIFs.
- Lastly, press on “Create GIF” to see the magic. The GIF is converted from the YouTube video.
- Pros:
- The users can share the post of their choice
- Users can save posts.
- Great collection of short GIFs and videos.
- Cons:
- During loading, the screen flashes.
9 VEED.IO
Veed is a simple YouTube video converter that makes your work super easy. It converts YouTube videos into GIFs with various editing options like crop, trim, text ads, and many more.
Check out how to use VEED in 3 steps.
- Start by pasting the URL of your YouTube video into VEED, Your video will be ready to convert into GIF.
- Now you are all set to edit your video. You have the option to crop and trim the video. You can also include different font styles, colors, and sizes of your choice.
- Lastly, download the GIF you made in VEED.
- Pros:
- Downloading the software is not mandatory.
- UI is simple and easy to navigate.
- The subtitle option is present.
- Cons:
- It takes a lot of time to upload video.
- Many basic tools.
10. Kapwing
Kapwing is a helpful video converter that can easily turn any video into GIFs with a click. It can also convert different files such as 3GP, GIF, WEBM.
To create beautiful GIFs with this video editor, follow these easy steps.
- Open Kapwing video editor and upload your video from YouTube.
- Choose the “Export dropdown” option and choose the format you wish to convert.
You can also preview the GIF and customize it as per your choice.
- In the final step, export the video by clicking the “Export Video” button. Save and download the newly created GIF and share it anywhere with your friends.
- Pros:
- Great editing tools.
- Easy to use.
- Cons:
- Available only on the website.
- Too many tools for the same purpose.
Final Thoughts
With the increased use of GIFs on social media, you can now easily convert your favorite YouTube videos into GIFs on your own. All you have to do is simply choose the tools mentioned above and share it with your friends.
Shanoon Cox
Shanoon Cox is a writer and a lover of all things video.
Follow @Shanoon Cox
Shanoon Cox
Mar 27, 2024• Proven solutions
A GIF adds an extra element to any conversation and makes the reader feel connected to the post. Using GIF can turn useful if done rightly. It narrates a story in a single animated image for social media conversation. In this article, we will brief you about how to convert YouTube to gif, various GIF converters, their uses, and the pros and cons of each converter.
Let’s get started!
How to Convert a YouTube Video into GIFs?
1. YouTube to GIF Directly
Here is a quick way to convert the YouTube video to GIFs without typing a YouTube to GIF website.
Gif.com is a free and easy-to-use video editor available with multiple effects. This converter was created keeping in mind how people spend hours and money on paid platforms.
Follow the below steps to convert a YouTube video into gifs.
- In the YouTube video page, add gif before youtube.com. For example, I want to convert the YouTube video https://www.youtube.com/watch?v=40fuGLmwHwk to GIFs, here is how it looks like after adding gif at the beginning: https://www.gifyoutube.com/watch?v=40fuGLmwHwk . Press the enter button on your keyboard and you will enter the gifs.com directly.
- In gifs.com, you can play and pause the YouTube video and drag the bar to select a desired moment for gif. Press the “Create Gif” button on the top right side to convert the specific part of the YouTube video to gif.
- You will then be directed to the result page to see your GIF created using the YouTube video, and you can change the GIF title and the tag.
- Lastly, you need to copy the link and share it!
Pros of converting YouTube to GIFs with Gifs.com:
- The interface is easy to use and it provides lots of tools to adjust.
- Simple functionality.
Cons:
- The watermark on your created GIF can be removed only after purchasing the premium version.
- GIFs can be downloaded only by registered users.
2. FreeGifMaker.me
FreeGifMaker is one simple online tool that allows the creation of animated Gifs for free. A minimum of two pictures has to be uploaded out of ten. It takes few seconds and is super easy to make a GIF from a YouTube video. You can use FreeGifMaker.me in some easy steps.
- Open the website http://freegifmaker.me/youtube-to-gif/ on your desktop.
- Go to YouTube and copy the video URL you want to create a GIF of and paste it on the website mentioned above.
- Then click “Load YouTube Video” below the URL and wait for a few seconds while the tool checks the video source.
- Once the YouTube video is loaded, enter the gif duration, start time, and click on the “Make a GIF button.” It will redirect you to the result page.
- Pros:
- Conversion size is unlimited**.**
- There is no usage of ads.
- Easy to make Gifs.
- Cons:
- The upload speed is slow.
- The converter gives limited options for editing.
3. Wondershare Online UniConverter
Online UniConverter converts video into a high-quality animated GIF and allows editing. It is a simple converter with unique features.
If you want to convert your YouTube video into a GIF, follow the steps.
- You need to upload your video through the “Choose Files” option. You can also copy the link from YouTube.
- Wait for some time once you upload the file; you can then set your start time, end time, frame rate according to your needs.
- Lastly, click on “Create GIF” and download your GIF. You can also save it through the dropdown option available besides “Download.”
- Pros:
- Easy to handle.
- A wide range of customization tools is available.
- Zero ads.
- Cons:
- Upload speed is slow.
- Conversion size is limited.
4. GifRun
It is a video maker that started in 2013, and GifRun converts videos from YouTube, Facebook, and other sources to high-quality GIFs. You can create Gifs free of cost from GifRun.
Here is how you can use Gifrun.
- Open the website and paste the URL you want to convert into Gif. Later, press “Get Video” option below the URL box.
- In this step, you can adjust the duration, start time, add text, and also pause and preview the video. Once you’re done altering the video, click “Create GIF.”
- Lastly, click on the “Download” button beside the add text button, or share the link directly.
- Pros:
- Fast conversion and download.
- There is no upload limit.
- The video preview feature is available.
- Cons:
- UI is ad-infested.
- Supports YouTube videos only.
5. Makeagif
This GIF converter creates high-quality GIFs in no time. You need to paste the URL in Makeagif and nothing much. It can make GIFs from Instagram, Facebook, Twitter, and other platforms easily.
The only issue is that it supports one type of conversion with a maximum limit of 25MB.
Here is how you can make your favorite GIF in few steps.
- Open makeagif.com and paste the YouTube URL in the box available.
- Once you paste the URL, the website will automatically take you to the edit page to edit GIF length, start time, speed, and add caption and stickers. The next step is to select the category to which the video belongs available on the left side of the screen.
- After editing, click on “Continue to publishing” then “Create GIF” at the lower right corner of the screen. Voila! Your GIF is ready to use.
- Pros:
- The UI is user-friendly.
- Ads are minimal
- Various GIF conversions are supported.
- Cons:
- The conversion size is small.
- Batch conversions are not available.
6. ImgFlip
It is a creative GIF website supporting various videos from other websites such as Vimeo and YouTube. ImgFlip has innovative customization tools for cropping, reshaping, adding text and, a lot more, but you just need to be aware of the ads.
Want to know how to create GIF? Go through these simple steps.
- You can make GIFs both from Video and Images. To make GIF from a video, paste the YouTube URL in the box at the top, upload the tape from your device’s file.
- After pasting the URL, you will be given lots of customization options. Choose the effect of your choice for your GIF.
- Lastly, click on “Generate GIF” available on the right side of the screen. You can now share the GIF via your device or download it.
- Pros:
- Plenty of customization options.
- Fast conversion.
- Easy to upload and use.
- Cons:
- Ads pop up frequently.
- Offline conversion is unavailable.
7. GIPHY
It is a free GIF converter that helps you download free YouTube GIFs. You can also make GIFs from your photos, videos available on your device along with video URLs and images. The only problem is, to use Giphy you first have to log in to the app.
Follow the below steps to create a GIF from YouTube videos with Giphy:
- Open Giphy on your device and click on “Create” on the top right-side of your screen.
- Paste the URL in the space given below. A pop-up will tell you to log in. Log in to the website to continue.
- The video you choose should be less than 15 seconds and under 100MB. You will be given editing options from which you can select the start time and duration of your GIF along with Captions and Tags.
- In the end, press the “Create GIF” button to make the GIF. When it’s done, you will be redirected to the GIF page. You can then share your GIF on any social media site.
- Pros:
- Ads are absent
- Uploading is fast
- Wide range of free GIFs available
- Cons:
- Not perfect for green hands
8. Imgur
It is one of the best apps that offers tons of images, memes, and GIFs. You can make GIFs of less than 60 seconds with high quality, which you can share anywhere.
Here are three easy steps to make GIFs
- Visit the page “imgur.com/vidgif” and paste your YouTube URL there.
- Set a start time by clicking or dragging on the timeline. The total runtime is also adjustable, with 60 seconds as the maximum time for GIFs.
- Lastly, press on “Create GIF” to see the magic. The GIF is converted from the YouTube video.
- Pros:
- The users can share the post of their choice
- Users can save posts.
- Great collection of short GIFs and videos.
- Cons:
- During loading, the screen flashes.
9 VEED.IO
Veed is a simple YouTube video converter that makes your work super easy. It converts YouTube videos into GIFs with various editing options like crop, trim, text ads, and many more.
Check out how to use VEED in 3 steps.
- Start by pasting the URL of your YouTube video into VEED, Your video will be ready to convert into GIF.
- Now you are all set to edit your video. You have the option to crop and trim the video. You can also include different font styles, colors, and sizes of your choice.
- Lastly, download the GIF you made in VEED.
- Pros:
- Downloading the software is not mandatory.
- UI is simple and easy to navigate.
- The subtitle option is present.
- Cons:
- It takes a lot of time to upload video.
- Many basic tools.
10. Kapwing
Kapwing is a helpful video converter that can easily turn any video into GIFs with a click. It can also convert different files such as 3GP, GIF, WEBM.
To create beautiful GIFs with this video editor, follow these easy steps.
- Open Kapwing video editor and upload your video from YouTube.
- Choose the “Export dropdown” option and choose the format you wish to convert.
You can also preview the GIF and customize it as per your choice.
- In the final step, export the video by clicking the “Export Video” button. Save and download the newly created GIF and share it anywhere with your friends.
- Pros:
- Great editing tools.
- Easy to use.
- Cons:
- Available only on the website.
- Too many tools for the same purpose.
Final Thoughts
With the increased use of GIFs on social media, you can now easily convert your favorite YouTube videos into GIFs on your own. All you have to do is simply choose the tools mentioned above and share it with your friends.
Shanoon Cox
Shanoon Cox is a writer and a lover of all things video.
Follow @Shanoon Cox
- Title: "In 2024, Identifying the Most Versatile Cam Top 12 Screen Swivel Gadgets"
- Author: Thomas
- Created at : 2024-05-31 12:41:08
- Updated at : 2024-06-01 12:41:08
- Link: https://youtube-help.techidaily.com/in-2024-identifying-the-most-versatile-cam-top-12-screen-swivel-gadgets/
- License: This work is licensed under CC BY-NC-SA 4.0.
