In 2024, Integrating Annotations for Enhanced Engagement
Integrating Annotations for Enhanced Engagement
How to Use YouTube Cards and Annotations?

Richard Bennett
Oct 26, 2023• Proven solutions
YouTube Annotations and Cards are both tools for linking viewers to your other videos or to off-YouTube webpages. Two of the major differences between them are:
Annotations are not clickable on mobile devices.
You cannot choose the size or positioning of Cards.
This article will teach you about both Cards and Annotations and discuss the best uses for each of them.
Part 1: Annotations
Annotations are messages that float overtop of your videos in the YouTube player. Usually, annotations are clickable and take users to other content created by you.
Section 1: Types of Annotations
There are five types of YouTube annotations:
Notes are colored boxes placed over the top of your videos.
Speech Bubbles look like dialogue boxes in a comic strip. They have tails that you can adjust so it looks like one of the people in your video is saying what is written in the annotation.
Spotlights have a subtle border and are completely clear inside. Your text only appears when a viewer’s cursor hovers over top of these annotations.
Labels are like spotlights except that viewers do not have to hover over them for your text to be visible.
Any of these annotations can be used to link viewers to other videos, or as subscribe links. You can also add a simple Title to your video through the Annotations menu.
Section 2: How to Use Annotations
*Note: the above video mentions Pause annotations, which are no longer available.
Here are two of the best uses for annotations:
Clickable End Cards / Outros
One of the best ways you can use spotlight annotations is to create clickable end cards for your videos.
When your video finishes playing the YouTube player will display a selection of suggested videos that might direct viewers away from your channel. You can keep more of these viewers watching your content by creating your own ‘suggested videos’ card and putting it at the end of your videos.
Put thumbnails of two or three of your other videos on your end card, or use ‘picture-in-picture’ to actually imbed footage from them. Then, after you upload your video, go in and place clickable spotlight annotations over top of your video thumbnails.
This is one use for annotations that cannot be duplicated with cards.
Promoting Your Videos
You should not wait until the end of your video to start linking viewers to other content. Many viewers will click away before they see your end card because your video is not exactly what they were looking for. By placing note or speech bubble annotations occasionally throughout your videos you can catch some of these people before they click off of your channel.
This works especially well if you link to videos on similar subjects to the one you are annotating.
Instead of just linking to another video of yours, try to link to that video on a playlist. Once a viewer is on a playlist your videos will auto-play after each other, which is good for both your view count and watch time.
You can also use the newer YouTube Cards for this, but Annotations might still be a better choice because viewers only need to click once vs. twice for Cards.
Try both and see which performs best for your channel. It might be in your best interest to keep on using both as they target different audiences – Cards are clickable on mobile devices, for example, but Annotations are not.
Part 2: YouTube Cards
YouTube Cards are newer than annotations and a lot of people believe they will one day replace Annotations. While there are benefits to Cards – like embedding images to represent your links – you cannot choose the shape, size, or placement of them. This means they have limited uses.
When viewers click on a Card they are shown additional information and a thumbnail representing the page they will be taken to if they choose to click again. This extra step could be either help viewers decide to click your links or give them a second chance to decide they would rather not.
Section 1: When to Use Cards
A linked Annotation is simply a call to action viewers can click on. A Card is a call to action as well, but instead of taking the viewer directly to where its link leads when it is clicked a Card opens up into a larger version of itself with a thumbnail image.
Crowdfunding pages (Patreon is a great choice for video creators), charity fundraising pages, and merchandise stores are all examples of links that benefit from the format of YouTube Cards.
When you link a viewer to a non-YouTube page you break up their session time, which negatively impacts your watch time and SEO ranking. You want to make sure that the viewers you are directing away from YouTube are the ones most likely to convert after they leave. By ‘convert’ we mean to contribute to your Patreon campaign, donate to the charity you are promoting, or buy some of your merchandise.
Giving viewers more information and a thumbnail through a Card can help ensure the most interested viewers are the ones clicking your links.
If you want to find a video editing solution that empowers your imagination and creativity yet takes less effort, please try this robust and user-friendly video editing software Filmora, which is equipped with its own footage stock _ Wondershare Filmstock _ and will definitely enhance your productivity and helps you to make money by making videos much easier.


Richard Bennett
Richard Bennett is a writer and a lover of all things video.
Follow @Richard Bennett
Richard Bennett
Oct 26, 2023• Proven solutions
YouTube Annotations and Cards are both tools for linking viewers to your other videos or to off-YouTube webpages. Two of the major differences between them are:
Annotations are not clickable on mobile devices.
You cannot choose the size or positioning of Cards.
This article will teach you about both Cards and Annotations and discuss the best uses for each of them.
Part 1: Annotations
Annotations are messages that float overtop of your videos in the YouTube player. Usually, annotations are clickable and take users to other content created by you.
Section 1: Types of Annotations
There are five types of YouTube annotations:
Notes are colored boxes placed over the top of your videos.
Speech Bubbles look like dialogue boxes in a comic strip. They have tails that you can adjust so it looks like one of the people in your video is saying what is written in the annotation.
Spotlights have a subtle border and are completely clear inside. Your text only appears when a viewer’s cursor hovers over top of these annotations.
Labels are like spotlights except that viewers do not have to hover over them for your text to be visible.
Any of these annotations can be used to link viewers to other videos, or as subscribe links. You can also add a simple Title to your video through the Annotations menu.
Section 2: How to Use Annotations
*Note: the above video mentions Pause annotations, which are no longer available.
Here are two of the best uses for annotations:
Clickable End Cards / Outros
One of the best ways you can use spotlight annotations is to create clickable end cards for your videos.
When your video finishes playing the YouTube player will display a selection of suggested videos that might direct viewers away from your channel. You can keep more of these viewers watching your content by creating your own ‘suggested videos’ card and putting it at the end of your videos.
Put thumbnails of two or three of your other videos on your end card, or use ‘picture-in-picture’ to actually imbed footage from them. Then, after you upload your video, go in and place clickable spotlight annotations over top of your video thumbnails.
This is one use for annotations that cannot be duplicated with cards.
Promoting Your Videos
You should not wait until the end of your video to start linking viewers to other content. Many viewers will click away before they see your end card because your video is not exactly what they were looking for. By placing note or speech bubble annotations occasionally throughout your videos you can catch some of these people before they click off of your channel.
This works especially well if you link to videos on similar subjects to the one you are annotating.
Instead of just linking to another video of yours, try to link to that video on a playlist. Once a viewer is on a playlist your videos will auto-play after each other, which is good for both your view count and watch time.
You can also use the newer YouTube Cards for this, but Annotations might still be a better choice because viewers only need to click once vs. twice for Cards.
Try both and see which performs best for your channel. It might be in your best interest to keep on using both as they target different audiences – Cards are clickable on mobile devices, for example, but Annotations are not.
Part 2: YouTube Cards
YouTube Cards are newer than annotations and a lot of people believe they will one day replace Annotations. While there are benefits to Cards – like embedding images to represent your links – you cannot choose the shape, size, or placement of them. This means they have limited uses.
When viewers click on a Card they are shown additional information and a thumbnail representing the page they will be taken to if they choose to click again. This extra step could be either help viewers decide to click your links or give them a second chance to decide they would rather not.
Section 1: When to Use Cards
A linked Annotation is simply a call to action viewers can click on. A Card is a call to action as well, but instead of taking the viewer directly to where its link leads when it is clicked a Card opens up into a larger version of itself with a thumbnail image.
Crowdfunding pages (Patreon is a great choice for video creators), charity fundraising pages, and merchandise stores are all examples of links that benefit from the format of YouTube Cards.
When you link a viewer to a non-YouTube page you break up their session time, which negatively impacts your watch time and SEO ranking. You want to make sure that the viewers you are directing away from YouTube are the ones most likely to convert after they leave. By ‘convert’ we mean to contribute to your Patreon campaign, donate to the charity you are promoting, or buy some of your merchandise.
Giving viewers more information and a thumbnail through a Card can help ensure the most interested viewers are the ones clicking your links.
If you want to find a video editing solution that empowers your imagination and creativity yet takes less effort, please try this robust and user-friendly video editing software Filmora, which is equipped with its own footage stock _ Wondershare Filmstock _ and will definitely enhance your productivity and helps you to make money by making videos much easier.
Richard Bennett
Richard Bennett is a writer and a lover of all things video.
Follow @Richard Bennett
Reel In Viewers: Mastery of Live 360 Video Broadcasts on Youtube
How to live streaming 360 video to youtube
Richard Bennett
Mar 27, 2024• Proven solutions
- Part1.Stream 360 to Youtube via Ricoh Theta S and OBS on PC
- Part2.Live Stream from Allie 360 Camera to YouTube on Mobile
1. Stream 360 to Youtube via Ricoh Theta S and OBS on PC
Step 1: First of all you need to get ready with your Ricoh Theta S 360 camera unit.
Step 2: Now visit the official website of Theta 360 in order to download your dedicated live streaming application.
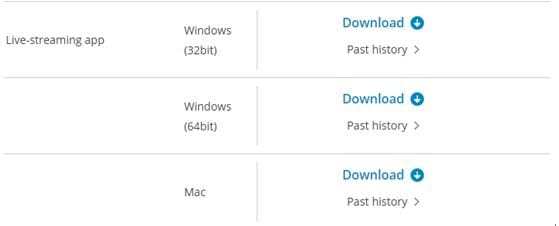
Step 3: Get your application and install it on your Mac or PC as per need.
Step 4: It is time to plug in to your Ricoh Theta S 360 camera using your PC.
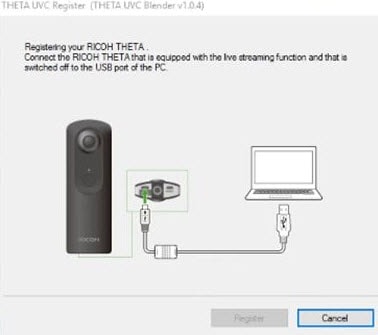
Step 5: Now select your device ‘Ricoh Theta S’ and then hit Okay.
Step 6: You will find option to register to application with your respective device. Select and hit register.
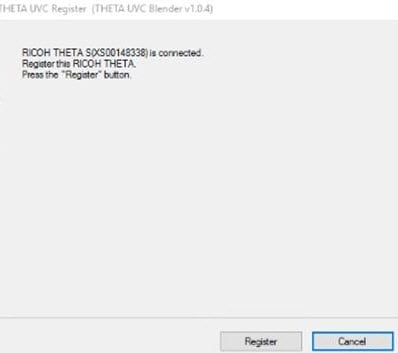
Step 7: As soon as your registration process is complete then un-plug your USB cable.
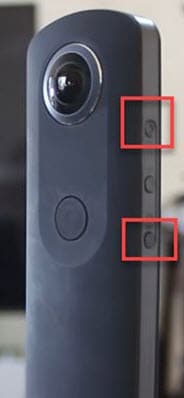
Step 8: It is time to turn the Ricoh Theta device to Live Mode; you simple need to press the top power and lower video button simultaneously to directly switch to the live mode.
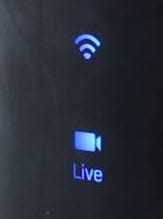
Step 9: Once your device enters into Live Stream mode then a Led will start blinking on your device that represents your device is live at this moment.
Step 10: Now you need to plug in the USB cable again with your computer.
Step 11: Visit the official site of OBS and download your software; install it on your system.
Step 12: Go to create scene option and then switch to create sources.
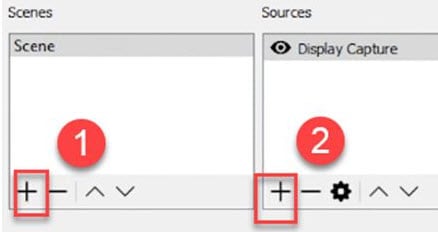
Step 13: Select video capture device as your source from drop down menu.
Step 14: Now from available list select Theta UVC as your active video capture source.
Step 15: You need to adjust screen as per your requirements.
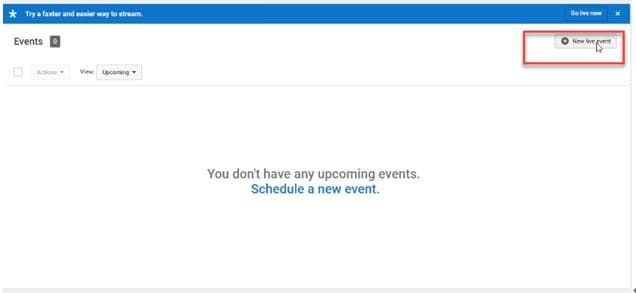
Step 16: Now move to YouTube and then hit New Live Events option.
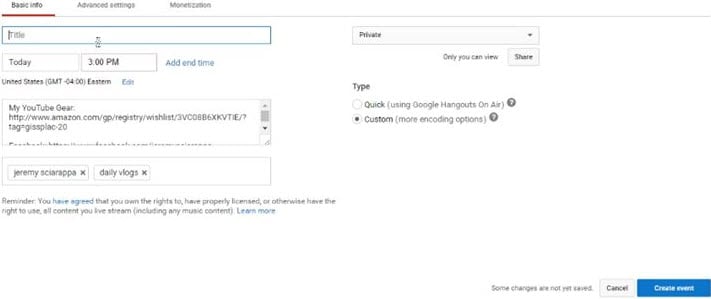
Step 17: Complete the basic information.
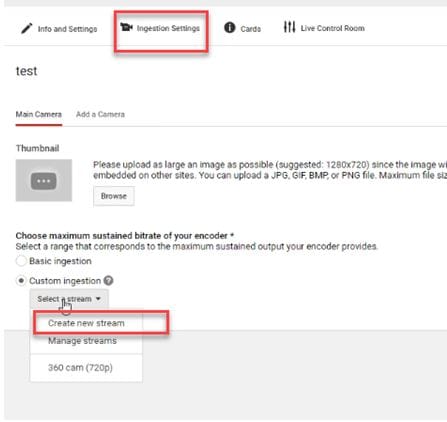
Step 18: You need to move to advanced settings now; select 360 live stream option and then create event.
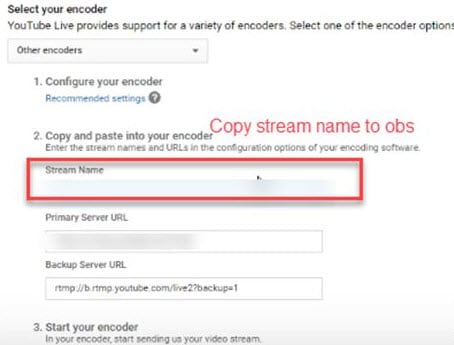
Step 19: Now complete the ingesting settings and finally select create new stream option.

Step 20: As soon as your event is created then you will be able to find your stream name on screen, copy it and simply paste it on OBS window.
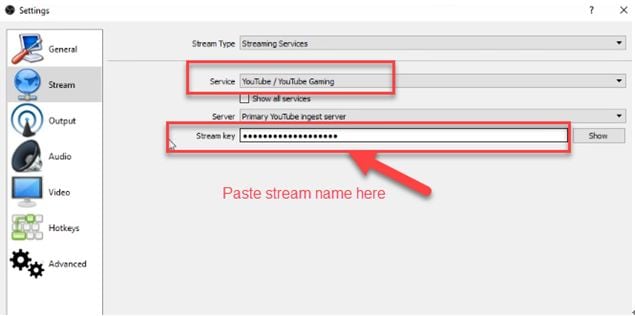
Step 21: It is time to return to OBS settings and then you need to paste that copied name on stream key option.
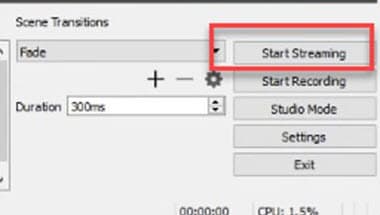
Step 22: Once all above settings are complete then click start stream option from your OBS window and you will soon be able to find your 360 live on YouTube.
2.Live Stream from Allie 360 Camera to YouTube on Mobile
Step 1: Get ready with your Allie 360 camera unit.
Step 2: Visit YouTube and then hit the option to create your live event.
Step 3: It is time to download your Allie Application and then get it installed on your device.
- Prefer to use this link if you are working on iOS: https://itunes.apple.com/app/allie-home/id1063986074
- Android users need to visit: https://play.google.com/store/apps/details?id=com.icrealtime.allie
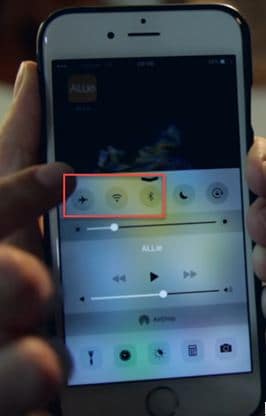
Step 4: As soon as you have downloaded your app then simply turn on the Bluetooth, Wi-Fi and air plane mode on your device.
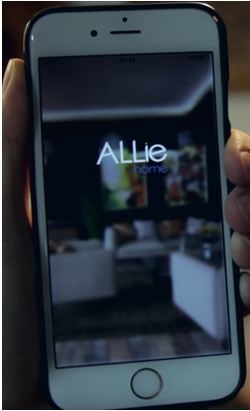
Step 5: Simply open your Allie application and then connect your camera.
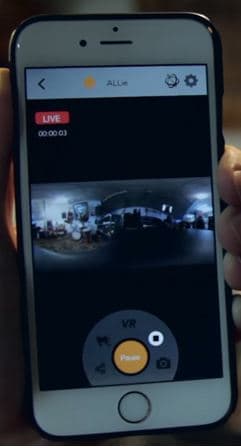
Step 6: Now users need to hit stream icon on screen.
![]()
Step 7: You will be asked to fill the necessary information about your video. It is also possible to make adjustments regarding video quality. Once you are done with all required settings then hit Submit option.

Step 8: Soon your video will become live; note that you can also share your live video via SNS platform with other viewers.
Richard Bennett
Richard Bennett is a writer and a lover of all things video.
Follow @Richard Bennett
Richard Bennett
Mar 27, 2024• Proven solutions
- Part1.Stream 360 to Youtube via Ricoh Theta S and OBS on PC
- Part2.Live Stream from Allie 360 Camera to YouTube on Mobile
1. Stream 360 to Youtube via Ricoh Theta S and OBS on PC
Step 1: First of all you need to get ready with your Ricoh Theta S 360 camera unit.
Step 2: Now visit the official website of Theta 360 in order to download your dedicated live streaming application.
Step 3: Get your application and install it on your Mac or PC as per need.
Step 4: It is time to plug in to your Ricoh Theta S 360 camera using your PC.
Step 5: Now select your device ‘Ricoh Theta S’ and then hit Okay.
Step 6: You will find option to register to application with your respective device. Select and hit register.
Step 7: As soon as your registration process is complete then un-plug your USB cable.
Step 8: It is time to turn the Ricoh Theta device to Live Mode; you simple need to press the top power and lower video button simultaneously to directly switch to the live mode.
Step 9: Once your device enters into Live Stream mode then a Led will start blinking on your device that represents your device is live at this moment.
Step 10: Now you need to plug in the USB cable again with your computer.
Step 11: Visit the official site of OBS and download your software; install it on your system.
Step 12: Go to create scene option and then switch to create sources.
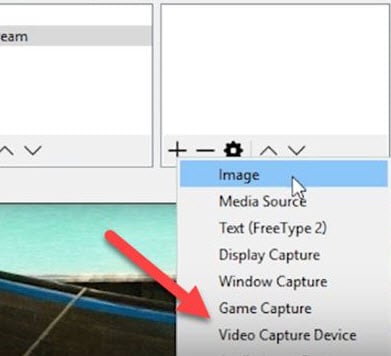
Step 13: Select video capture device as your source from drop down menu.
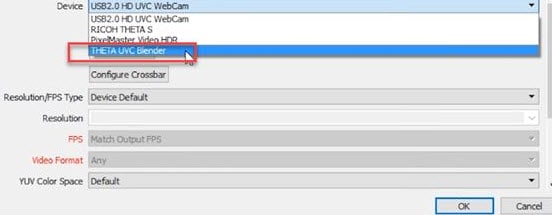
Step 14: Now from available list select Theta UVC as your active video capture source.
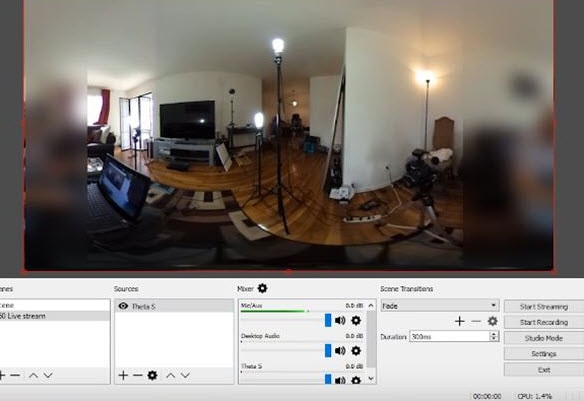
Step 15: You need to adjust screen as per your requirements.
Step 16: Now move to YouTube and then hit New Live Events option.
Step 17: Complete the basic information.
Step 18: You need to move to advanced settings now; select 360 live stream option and then create event.
Step 19: Now complete the ingesting settings and finally select create new stream option.
Step 20: As soon as your event is created then you will be able to find your stream name on screen, copy it and simply paste it on OBS window.
Step 21: It is time to return to OBS settings and then you need to paste that copied name on stream key option.
Step 22: Once all above settings are complete then click start stream option from your OBS window and you will soon be able to find your 360 live on YouTube.
2.Live Stream from Allie 360 Camera to YouTube on Mobile
Step 1: Get ready with your Allie 360 camera unit.
Step 2: Visit YouTube and then hit the option to create your live event.
Step 3: It is time to download your Allie Application and then get it installed on your device.
- Prefer to use this link if you are working on iOS: https://itunes.apple.com/app/allie-home/id1063986074
- Android users need to visit: https://play.google.com/store/apps/details?id=com.icrealtime.allie
Step 4: As soon as you have downloaded your app then simply turn on the Bluetooth, Wi-Fi and air plane mode on your device.
Step 5: Simply open your Allie application and then connect your camera.
Step 6: Now users need to hit stream icon on screen.
![]()
Step 7: You will be asked to fill the necessary information about your video. It is also possible to make adjustments regarding video quality. Once you are done with all required settings then hit Submit option.
Step 8: Soon your video will become live; note that you can also share your live video via SNS platform with other viewers.
Richard Bennett
Richard Bennett is a writer and a lover of all things video.
Follow @Richard Bennett
Richard Bennett
Mar 27, 2024• Proven solutions
- Part1.Stream 360 to Youtube via Ricoh Theta S and OBS on PC
- Part2.Live Stream from Allie 360 Camera to YouTube on Mobile
1. Stream 360 to Youtube via Ricoh Theta S and OBS on PC
Step 1: First of all you need to get ready with your Ricoh Theta S 360 camera unit.
Step 2: Now visit the official website of Theta 360 in order to download your dedicated live streaming application.
Step 3: Get your application and install it on your Mac or PC as per need.
Step 4: It is time to plug in to your Ricoh Theta S 360 camera using your PC.
Step 5: Now select your device ‘Ricoh Theta S’ and then hit Okay.
Step 6: You will find option to register to application with your respective device. Select and hit register.
Step 7: As soon as your registration process is complete then un-plug your USB cable.
Step 8: It is time to turn the Ricoh Theta device to Live Mode; you simple need to press the top power and lower video button simultaneously to directly switch to the live mode.
Step 9: Once your device enters into Live Stream mode then a Led will start blinking on your device that represents your device is live at this moment.
Step 10: Now you need to plug in the USB cable again with your computer.
Step 11: Visit the official site of OBS and download your software; install it on your system.
Step 12: Go to create scene option and then switch to create sources.
Step 13: Select video capture device as your source from drop down menu.
Step 14: Now from available list select Theta UVC as your active video capture source.
Step 15: You need to adjust screen as per your requirements.
Step 16: Now move to YouTube and then hit New Live Events option.
Step 17: Complete the basic information.
Step 18: You need to move to advanced settings now; select 360 live stream option and then create event.
Step 19: Now complete the ingesting settings and finally select create new stream option.
Step 20: As soon as your event is created then you will be able to find your stream name on screen, copy it and simply paste it on OBS window.
Step 21: It is time to return to OBS settings and then you need to paste that copied name on stream key option.
Step 22: Once all above settings are complete then click start stream option from your OBS window and you will soon be able to find your 360 live on YouTube.
2.Live Stream from Allie 360 Camera to YouTube on Mobile
Step 1: Get ready with your Allie 360 camera unit.
Step 2: Visit YouTube and then hit the option to create your live event.
Step 3: It is time to download your Allie Application and then get it installed on your device.
- Prefer to use this link if you are working on iOS: https://itunes.apple.com/app/allie-home/id1063986074
- Android users need to visit: https://play.google.com/store/apps/details?id=com.icrealtime.allie
Step 4: As soon as you have downloaded your app then simply turn on the Bluetooth, Wi-Fi and air plane mode on your device.
Step 5: Simply open your Allie application and then connect your camera.
Step 6: Now users need to hit stream icon on screen.
![]()
Step 7: You will be asked to fill the necessary information about your video. It is also possible to make adjustments regarding video quality. Once you are done with all required settings then hit Submit option.
Step 8: Soon your video will become live; note that you can also share your live video via SNS platform with other viewers.
Richard Bennett
Richard Bennett is a writer and a lover of all things video.
Follow @Richard Bennett
Also read:
- [New] 2024 Approved Digital Content Showdown Audio's Answer to Visual Media?
- [New] In 2024, FIFA Highlights & Trends Charting on YouTube
- [New] Minecraft Logo Designs for YouTube Channels
- [Updated] Best of the Best Unlimited Recorders, #Top12
- 2024 Approved Learn the Safest Ways to Extract and Convert YouTube Tracks to MP3
- 2024 Approved Swiftness at a Click Managing YouTube's Video Speed Settings
- 2024 Approved The Ultimate Guide to Charging Up Your Video Empire
- 2024 Approved Unboxing Premium Game Devices YouTube Edition
- Assessment of VLC Screen Recording
- ChatGPT and Claude Head-to-Head: Determining the Leading AI Chatbot
- Harmonic Harvest Best Sites for Classical Tones Downloads for 2024
- In 2024, Forgot Locked Apple iPhone 13 mini Password? Learn the Best Methods To Unlock
- Navigating to Platforms for YouTube Influencer Partnerships for 2024
- Ultimate List of Web Toolkits to Elevate Your Skills in Prompt Engineering
- Title: In 2024, Integrating Annotations for Enhanced Engagement
- Author: Thomas
- Created at : 2025-02-14 21:08:45
- Updated at : 2025-02-20 10:35:22
- Link: https://youtube-help.techidaily.com/in-2024-integrating-annotations-for-enhanced-engagement/
- License: This work is licensed under CC BY-NC-SA 4.0.