"In 2024, Integrating Moving Images Into Non-Paid Content"
Integrating Moving Images Into Non-Paid Content
How to Add Video to Text

Liza Brown
Mar 27, 2024• Proven solutions
It may be challenging to capture the attention of your audience if the video openings or PowerPoint presentations contain too much text. Striking a perfect balance between the visual and textual elements isn’t always easy, especially if the text is the only way to convey essential information to the audience.
Luckily, video editing and presentation software products offer the tools you will need to combine video and text. In this article, we are going to show you how to add a video to text in PowerPoint and Filmora.
Part 1: How to Add Video to Text for Free with PowerPoint?
An effective PowerPoint presentation should contain proportionate amounts of textual and visual elements. Using too many images, videos or animations can make following a presentation difficult, just as too much text can render a presentation too static.
Adding videos to titles or subtitles you include in a slideshow you’re creating in PowerPoint can help you create a presentation that is both informative and visually entertaining. The process of combining videos with text in PowerPoint isn’t overly complicated, but you will still need to go through it several times in order to become familiar with it.
You should start by creating a new slide and adding a textbox to it. Proceed to type the word or phrase into the textbox and go on to format the text. Pick the font that matches the style of your presentation and make sure that the text size is large enough for the video to be visible.
Head over to the Insert tab, select Rectangle from the Shapes menu, and create a rectangular shape over the entire slide. Right-click on the slide and choose the Send to Back option from the menu. In this manner, you will position the rectangle you created behind the textbox.

The next step you will have to take is to create the cut-out of the text within the rectangle. Select both the text and shape you placed in the background before clicking on the Format tab that is located near the end of PowerPoint’s ribbon.
Find the Insert Shape option and choose Subtract from the Merge Shapes drop-down menu. The shape of the text in the textbox will be applied to the object in the background, which enables you to add a video to that text.

Click on the Insert tab, and then choose the Video option from the Media menu. You can insert a video that is stored on a local hard drive or the Internet to PowerPoint. The video will cover the entire slide, so you must right-click on it and select the Send to Back option.
You can then fine-tune the video playback settings from the Playback tab. Preview the results before you move on to the next slide in your presentation, and make necessary adjustments if you don’t like how the video merged with the text.
Part 2: Adding Video to Text in Filmora
Besides presentation software, you can also use video editing software products to add a video to text. Filmora lets you add a video to text in just a few simple steps. You can first make a text video with animation first, and then use the picture in picture feature to add the video to text. Here are the detailed information about how to add a video to text in Filmora.


You should start by creating a new project in Filmora and importing the video you want to add to the text into the project. Click on the Titles tab, and choose the title that matches the visual style of your project.

Set the preferred duration of the title by dragging one of its ends to the left or right after you place it on the timeline, and then double-click on it to customize it. Click on the Advanced button once the Text tab opens and insert the text into the Input Text box.

Proceed to select a font and adjust the text size before deciding if you want to animate the text . When done, you should export the title as a video file, and then import it back into your project.
Now it’s time to add the text video and the background video to the project media library, and then place the two videos one above the other. Since we’re adding video to text, the text video should be placed above the background video.


Click on the video that contains text to gain access to the Video tab of the Editor panel and then expand the Compositing menu. Change the Blending Mode to Multiply, and the text in the overlaying video should be filled with the parts of the footage from the video below it.
Optionally you can enhance the colors in the background video or adjust the size of the text before exporting your project from Filmora.
Conclusion
There are so many different ways to create visually striking content, and adding videos to text is just one among numerous techniques that enable you to make a PowerPoint presentation or an opening of a video more interesting to watch.
Merging text with video is equally easy in PowerPoint and Filmora, so you just have to choose which software better suits your needs and select the materials that fit the style of your project. Learning how to add a video to text won’t take too much of your time, as this process can be completed in just a few quick steps. Which software are you using to add a video to text? Leave a comment below and let us know.
Liza Brown
Liza Brown is a writer and a lover of all things video.
Follow @Liza Brown
Liza Brown
Mar 27, 2024• Proven solutions
It may be challenging to capture the attention of your audience if the video openings or PowerPoint presentations contain too much text. Striking a perfect balance between the visual and textual elements isn’t always easy, especially if the text is the only way to convey essential information to the audience.
Luckily, video editing and presentation software products offer the tools you will need to combine video and text. In this article, we are going to show you how to add a video to text in PowerPoint and Filmora.
Part 1: How to Add Video to Text for Free with PowerPoint?
An effective PowerPoint presentation should contain proportionate amounts of textual and visual elements. Using too many images, videos or animations can make following a presentation difficult, just as too much text can render a presentation too static.
Adding videos to titles or subtitles you include in a slideshow you’re creating in PowerPoint can help you create a presentation that is both informative and visually entertaining. The process of combining videos with text in PowerPoint isn’t overly complicated, but you will still need to go through it several times in order to become familiar with it.
You should start by creating a new slide and adding a textbox to it. Proceed to type the word or phrase into the textbox and go on to format the text. Pick the font that matches the style of your presentation and make sure that the text size is large enough for the video to be visible.
Head over to the Insert tab, select Rectangle from the Shapes menu, and create a rectangular shape over the entire slide. Right-click on the slide and choose the Send to Back option from the menu. In this manner, you will position the rectangle you created behind the textbox.
The next step you will have to take is to create the cut-out of the text within the rectangle. Select both the text and shape you placed in the background before clicking on the Format tab that is located near the end of PowerPoint’s ribbon.
Find the Insert Shape option and choose Subtract from the Merge Shapes drop-down menu. The shape of the text in the textbox will be applied to the object in the background, which enables you to add a video to that text.
Click on the Insert tab, and then choose the Video option from the Media menu. You can insert a video that is stored on a local hard drive or the Internet to PowerPoint. The video will cover the entire slide, so you must right-click on it and select the Send to Back option.
You can then fine-tune the video playback settings from the Playback tab. Preview the results before you move on to the next slide in your presentation, and make necessary adjustments if you don’t like how the video merged with the text.
Part 2: Adding Video to Text in Filmora
Besides presentation software, you can also use video editing software products to add a video to text. Filmora lets you add a video to text in just a few simple steps. You can first make a text video with animation first, and then use the picture in picture feature to add the video to text. Here are the detailed information about how to add a video to text in Filmora.
You should start by creating a new project in Filmora and importing the video you want to add to the text into the project. Click on the Titles tab, and choose the title that matches the visual style of your project.
Set the preferred duration of the title by dragging one of its ends to the left or right after you place it on the timeline, and then double-click on it to customize it. Click on the Advanced button once the Text tab opens and insert the text into the Input Text box.
Proceed to select a font and adjust the text size before deciding if you want to animate the text . When done, you should export the title as a video file, and then import it back into your project.
Now it’s time to add the text video and the background video to the project media library, and then place the two videos one above the other. Since we’re adding video to text, the text video should be placed above the background video.
Click on the video that contains text to gain access to the Video tab of the Editor panel and then expand the Compositing menu. Change the Blending Mode to Multiply, and the text in the overlaying video should be filled with the parts of the footage from the video below it.
Optionally you can enhance the colors in the background video or adjust the size of the text before exporting your project from Filmora.
Conclusion
There are so many different ways to create visually striking content, and adding videos to text is just one among numerous techniques that enable you to make a PowerPoint presentation or an opening of a video more interesting to watch.
Merging text with video is equally easy in PowerPoint and Filmora, so you just have to choose which software better suits your needs and select the materials that fit the style of your project. Learning how to add a video to text won’t take too much of your time, as this process can be completed in just a few quick steps. Which software are you using to add a video to text? Leave a comment below and let us know.
Liza Brown
Liza Brown is a writer and a lover of all things video.
Follow @Liza Brown
Youtube to Gif Magic: Your Ultimate Guide to Animated Images
GIF editor: How to Make Animated GIF Images online from YouTube Video

Richard Bennett
Mar 27, 2024• Proven solutions
YouTube videos are fun and easy to access, they deliver a very good value and you will always have fun using them. But there are situations where these videos can integrate some interesting, funny moments and this is why creating a GIF out of them can be a good idea. You can make GIF from video if you want and all you need is a good GIF editor, which is very impressive to say the least.
You May Also Like:
Royalty free music for YouTube Videos >>
Best Screen Recorders for YouTube >>
It’s not a problem to use the GIF files as a way to express yourself so using a GIF editor to create the GIF you want is not only interesting, it can also bring in front a very good value and interesting options for sure. You should totally give it a shot if you can.
Tools that can help you make gif images from YouTube video
Lots of apps can help you do this and most of them are online based. This basically means that you can create a GIF from video without that much of a hassle. All you have to do is to find the right video and the best moments, edit it and then use this video to create the GIF you want. The process is easy and fun and it will provide you with a great value for sure.
1. imgur.com

This tool requires you to add in the YouTube link and then you press Enter. Once you do that the app will do its job on its own. It’s certainly a very interesting option and one that will deliver a lot of value for all kinds of users. It’s an exciting experience for sure just because you get so much value and incredible results without that much of a hassle. You can add captions to the app which is great.
2. likeyoyo.com

Using this app is simple, you paste the URL, press Enter and then the GIF is created automatically. They integrate some share buttons and a set of tools to help you move this, but it’s not that hard to use and it’s very user friendly to be honest.
3. makeagif.com
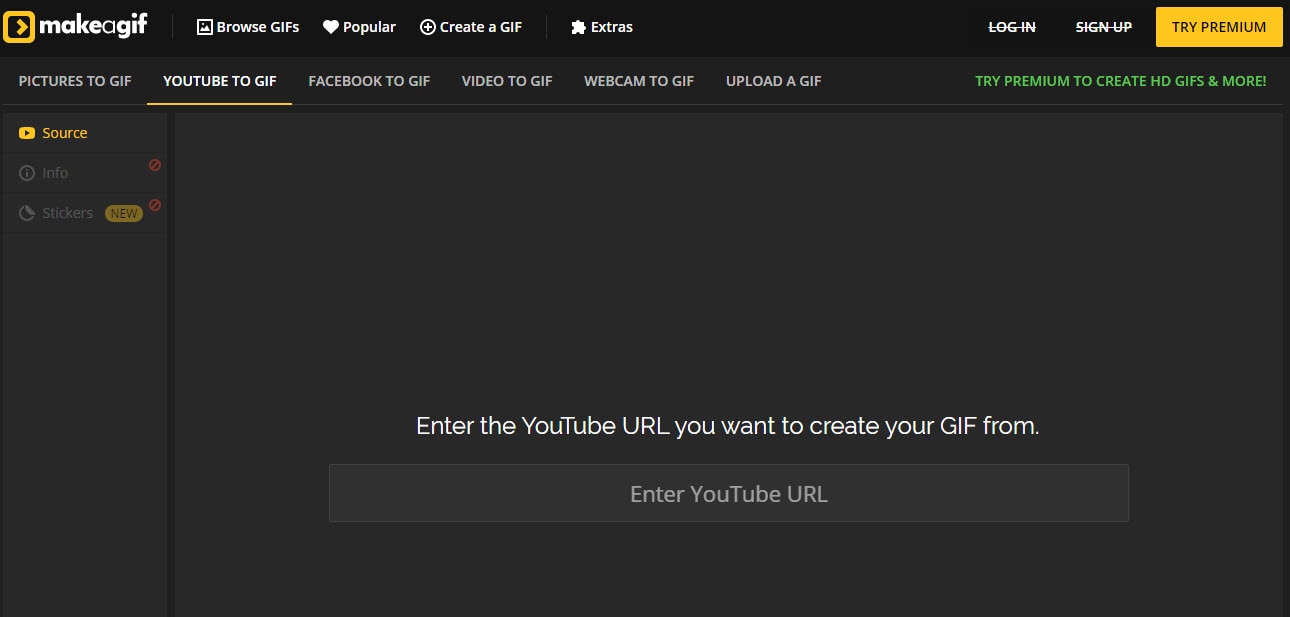
This is a great, easy to use online tool that just requires you to add in the video URL you want and then wait until it’s done. It’s certainly a great tool to use and one that will deliver a lot of value.
Add more fun on your GIF with Wondershare Filmora
Wondershare Filmora is a refined application that allows you to make GIF from video fast and with great results. It features an interesting set of tools, it’s very easy to modify and it does bring in front interesting options for sure. It’s designed with ease of use in mind and it does enable you to add in many animated effects which is always a major plus for this kind of tool.
However, if you want to make a GIF online, Filmora meme maker is your ultimate solution. It helps you make image, GIF and video memes directly without watermark. It is totally FREE to use and no sign up. You can change text size, color and position to create caption when you are editing. You can also put text inside or outside in GIF. Just with a few clicks, your GIF is done. Try it now!
Download Mac Version ](https://tools.techidaily.com/wondershare/filmora/download/ )
How to use?
Using Wondershare Filmora is actually very easy and the process is designed in order to deliver lots of value to the user without making the experience complex or boring. In fact, you just have to use the following steps in order to get the best results:
- At first you will have to import your GIF file and it allows you to bring in front immense possibilities since you can edit GIF on the fly.
- Once you have the file imported, you will need to drag that file you want to edit to the timeline.
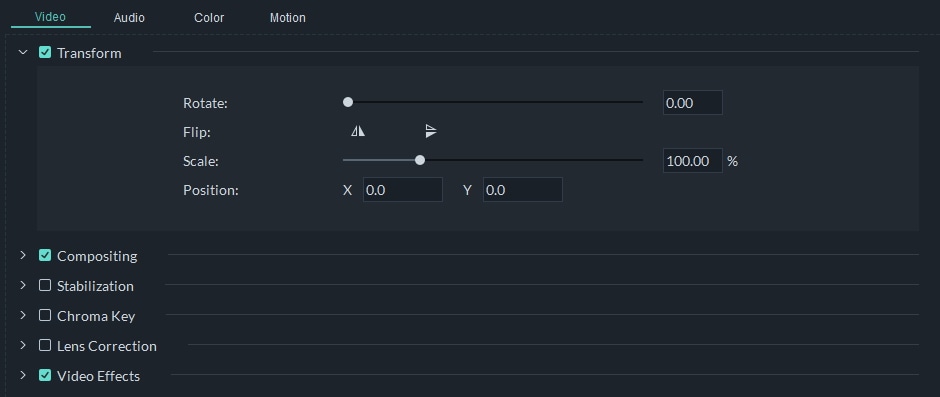
- Double clik on the clip in the timeline. You will be able to edit GIF, you can rotate, scale or flip which is very helpful.
- Although it’s not mandatory, you can try to add filter to the GIF in order to make the experience more interesting.

- Lastly, when you are done with the process you can export to format GIF. This is a very good value and it will provide you with a stellar experience.

Conclusion
Using Wondershare Filmora in order to edit GIF and create GIF from video is a very good idea. The app is designed to offer some amazing features and it’s also very easy to use. If you want to take on such a task, then Wondershare Filmora is certainly the tool for you so just give it a shot and you are bound to love it!
Richard Bennett
Richard Bennett is a writer and a lover of all things video.
Follow @Richard Bennett
Richard Bennett
Mar 27, 2024• Proven solutions
YouTube videos are fun and easy to access, they deliver a very good value and you will always have fun using them. But there are situations where these videos can integrate some interesting, funny moments and this is why creating a GIF out of them can be a good idea. You can make GIF from video if you want and all you need is a good GIF editor, which is very impressive to say the least.
You May Also Like:
Royalty free music for YouTube Videos >>
Best Screen Recorders for YouTube >>
It’s not a problem to use the GIF files as a way to express yourself so using a GIF editor to create the GIF you want is not only interesting, it can also bring in front a very good value and interesting options for sure. You should totally give it a shot if you can.
Tools that can help you make gif images from YouTube video
Lots of apps can help you do this and most of them are online based. This basically means that you can create a GIF from video without that much of a hassle. All you have to do is to find the right video and the best moments, edit it and then use this video to create the GIF you want. The process is easy and fun and it will provide you with a great value for sure.
1. imgur.com
This tool requires you to add in the YouTube link and then you press Enter. Once you do that the app will do its job on its own. It’s certainly a very interesting option and one that will deliver a lot of value for all kinds of users. It’s an exciting experience for sure just because you get so much value and incredible results without that much of a hassle. You can add captions to the app which is great.
2. likeyoyo.com
Using this app is simple, you paste the URL, press Enter and then the GIF is created automatically. They integrate some share buttons and a set of tools to help you move this, but it’s not that hard to use and it’s very user friendly to be honest.
3. makeagif.com
This is a great, easy to use online tool that just requires you to add in the video URL you want and then wait until it’s done. It’s certainly a great tool to use and one that will deliver a lot of value.
Add more fun on your GIF with Wondershare Filmora
Wondershare Filmora is a refined application that allows you to make GIF from video fast and with great results. It features an interesting set of tools, it’s very easy to modify and it does bring in front interesting options for sure. It’s designed with ease of use in mind and it does enable you to add in many animated effects which is always a major plus for this kind of tool.
However, if you want to make a GIF online, Filmora meme maker is your ultimate solution. It helps you make image, GIF and video memes directly without watermark. It is totally FREE to use and no sign up. You can change text size, color and position to create caption when you are editing. You can also put text inside or outside in GIF. Just with a few clicks, your GIF is done. Try it now!
Download Mac Version ](https://tools.techidaily.com/wondershare/filmora/download/ )
How to use?
Using Wondershare Filmora is actually very easy and the process is designed in order to deliver lots of value to the user without making the experience complex or boring. In fact, you just have to use the following steps in order to get the best results:
- At first you will have to import your GIF file and it allows you to bring in front immense possibilities since you can edit GIF on the fly.
- Once you have the file imported, you will need to drag that file you want to edit to the timeline.
- Double clik on the clip in the timeline. You will be able to edit GIF, you can rotate, scale or flip which is very helpful.
- Although it’s not mandatory, you can try to add filter to the GIF in order to make the experience more interesting.
- Lastly, when you are done with the process you can export to format GIF. This is a very good value and it will provide you with a stellar experience.
Conclusion
Using Wondershare Filmora in order to edit GIF and create GIF from video is a very good idea. The app is designed to offer some amazing features and it’s also very easy to use. If you want to take on such a task, then Wondershare Filmora is certainly the tool for you so just give it a shot and you are bound to love it!
Richard Bennett
Richard Bennett is a writer and a lover of all things video.
Follow @Richard Bennett
Also read:
- [New] 2024 Approved Accessible Visual Aids for YouTube Videos
- [New] Examining Social Media Comment Standouts
- [New] Pre-Sub4sub Wisdom to Enhance Your Online Experience Quickly
- [New] Relish in 9 Festive, Full-Length Films Exclusive YouTube Offering
- [Updated] 2024 Approved Unrestricted Display Save Tool
- [Updated] How to See Your Subscribers on YouTube?
- [Updated] In 2024, YouTube's Revenue Boost New 500 Subs Milestone
- 2024 Approved Loop & Relish YouTube Videos, Double the Delight on Tv
- 2024 Approved The Ultimate Guide to Polishing Videos for YouTube via Windows PC
- Eliminating Red Flags: How to Disable Pages on Facebook
- Excellent 10-Drone Set Professional Filming & Photography for 2024
- Extracting Image Files From Youtube Browser-Based, OS Techniques for 2024
- How to Change Xiaomi Redmi Note 13 Pro+ 5G Location on Skout | Dr.fone
- How to Play AV1 Videos on Your Plex Media Server
- Illuminated Insights! Visualizing YouTube's '17 Data Story for 2024
- In 2024, How to Bypass Google FRP Lock on Xiaomi Redmi K70 Devices
- どうやったら最適なDVD MP4変換ソフトを見つけ出せるか?専門家が解き明かす!
- Title: In 2024, Integrating Moving Images Into Non-Paid Content
- Author: Thomas
- Created at : 2024-10-05 01:03:20
- Updated at : 2024-10-07 00:41:35
- Link: https://youtube-help.techidaily.com/in-2024-integrating-moving-images-into-non-paid-content/
- License: This work is licensed under CC BY-NC-SA 4.0.