
"In 2024, Mastery of Removal Eliminating Downloaded YouTube Clips"
Mastery of Removal: Eliminating Downloaded YouTube Clips
How to Remove YouTube Videos

Richard Bennett
Mar 27, 2024• Proven solutions
There are quite a few different reasons for which you might want to consider removing your YouTube video. From outdated content to mistakes in editing – the reasons are quite extensive. In the part 1, we will teach you how to remove your own videos on YouTube and things you should note when removing. The part 2 will tell you how to remove the videos from other YouTube channel.
If you need more advanced features like PIP, Green Screen, or audio mixing, check this easy to use and powerful video editor-Wondershare Filmora , and ignite your video by clicks.
 Download Mac Version ](https://tools.techidaily.com/wondershare/filmora/download/ )
You may also like:What is YouTube Creative Commons and How to Use it >>
Part 1: How to Remove YouTube Videos that You’ve Uploaded
You may also like:How to Edit Uploaded YouTube Videos >>
The first thing that we are going to show you is how to remove your own videos. This might be needed if you have uploaded content quite some time ago and it is already outdated. Or, if you have too many videos on your channel and you need to clear up those who aren’t that interesting.
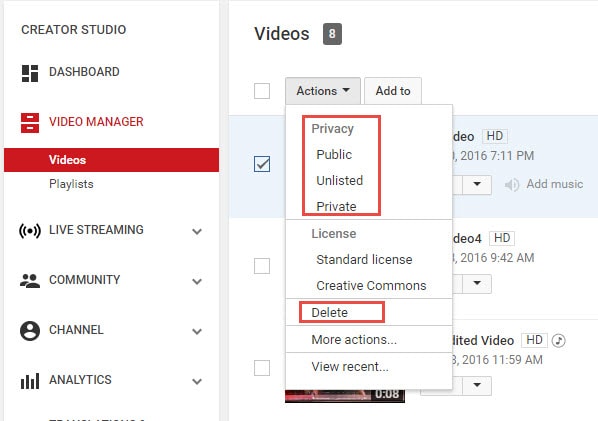
The fact of the matter is that it’s quite easy to remove YouTube videos. The first thing that you would need to do is going ahead and hop on the website and log into your account. Afterwards, you need to go to the “My Channel” option and click on the “Video Manager”.
Upon doing this, a new page is going to pop up, and you are going to see a list of all the videos that you’ve uploaded.

There are little tick boxes on the left side which you can click in order to mark. Mark the videos that you want to edit and click on the “Actions” button on top. There is going to be a drop-down menu, and you can click on the delete option to remove the video permanently. Furthermore, you can also hide the video if you don’t want to delete it but only to hide it away from your subscribers. In order to do so, you should simply click on the Private or Unlisted button.
That’s pretty much it – there’s nothing further to it, and the entire thing is rather comprehensive and easy to carry out, which makes it convenient to go through.
Part 2: How to Remove YouTube Videos on Other Channels
Now that we’ve covered how to remove videos from your own channel, it’s time to dig a little bit deeper. There are certain instances in which you might want to remove YouTube videos from other channels as well. The reasons for this are usually rather personal. For instance – someone has uploaded a video including you or something yours without your consent, and this harms your reputation. Furthermore, it may display sensitive information that you don’t want to reveal to anyone else – the reasons are rather different, but they are related to your own individual privacy which is an important legal right.
You may also like:How to Blur Faces in YouTube Videos >>
The first thing you can do is contact the person who uploaded the video and kindly asks him to remove it using the procedure that we described above. This is going to be the best choice because it’s going to achieve the result quickly and without any hassle. However, in certain cases, the person might not be active, or he might disagree with you and keep the video posted. If that’s the case, you have one option which is likely to be the best alternative.
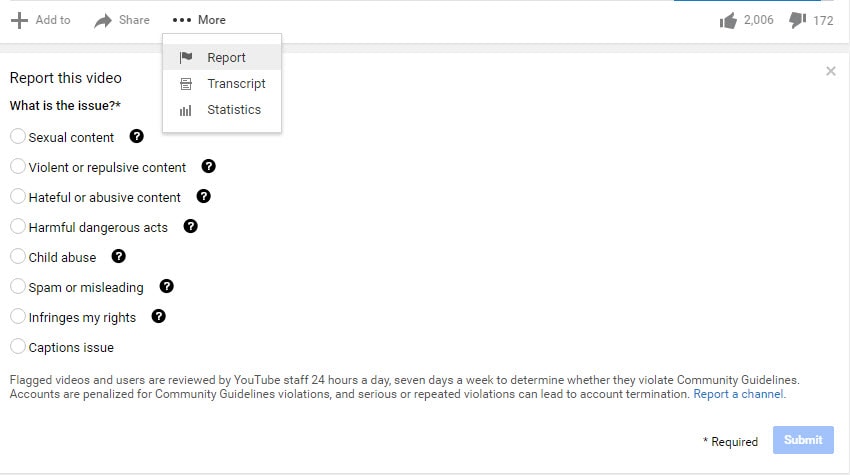
You need to report the video as an inappropriate and flag it with the remark that it’s invading your privacy. This is going to lead you to the page of the YouTube Safety Center. You will have to explain the issue in details in a six-step wizard which extensively asks you about how the video is invasive to your privacy rights. The process is quite comprehensive, and it’s easy to go through. However, you will have to wait for the YouTube support team to assess it and make the decision for the removal.
The truth is that being able to remove YouTube videos is something important that you should be able to do. It’s going to ensure that your channel is perfectly updated, aligned and structured while at the same time making sure that everything is in line with your privacy. YouTube is a powerful website, and you need to be able to stay in control in order to be protected.
Richard Bennett
Richard Bennett is a writer and a lover of all things video.
Follow @Richard Bennett
Richard Bennett
Mar 27, 2024• Proven solutions
There are quite a few different reasons for which you might want to consider removing your YouTube video. From outdated content to mistakes in editing – the reasons are quite extensive. In the part 1, we will teach you how to remove your own videos on YouTube and things you should note when removing. The part 2 will tell you how to remove the videos from other YouTube channel.
If you need more advanced features like PIP, Green Screen, or audio mixing, check this easy to use and powerful video editor-Wondershare Filmora , and ignite your video by clicks.
Download Mac Version ](https://tools.techidaily.com/wondershare/filmora/download/ )
You may also like:What is YouTube Creative Commons and How to Use it >>
Part 1: How to Remove YouTube Videos that You’ve Uploaded
You may also like:How to Edit Uploaded YouTube Videos >>
The first thing that we are going to show you is how to remove your own videos. This might be needed if you have uploaded content quite some time ago and it is already outdated. Or, if you have too many videos on your channel and you need to clear up those who aren’t that interesting.
The fact of the matter is that it’s quite easy to remove YouTube videos. The first thing that you would need to do is going ahead and hop on the website and log into your account. Afterwards, you need to go to the “My Channel” option and click on the “Video Manager”.
Upon doing this, a new page is going to pop up, and you are going to see a list of all the videos that you’ve uploaded.
There are little tick boxes on the left side which you can click in order to mark. Mark the videos that you want to edit and click on the “Actions” button on top. There is going to be a drop-down menu, and you can click on the delete option to remove the video permanently. Furthermore, you can also hide the video if you don’t want to delete it but only to hide it away from your subscribers. In order to do so, you should simply click on the Private or Unlisted button.
That’s pretty much it – there’s nothing further to it, and the entire thing is rather comprehensive and easy to carry out, which makes it convenient to go through.
Part 2: How to Remove YouTube Videos on Other Channels
Now that we’ve covered how to remove videos from your own channel, it’s time to dig a little bit deeper. There are certain instances in which you might want to remove YouTube videos from other channels as well. The reasons for this are usually rather personal. For instance – someone has uploaded a video including you or something yours without your consent, and this harms your reputation. Furthermore, it may display sensitive information that you don’t want to reveal to anyone else – the reasons are rather different, but they are related to your own individual privacy which is an important legal right.
You may also like:How to Blur Faces in YouTube Videos >>
The first thing you can do is contact the person who uploaded the video and kindly asks him to remove it using the procedure that we described above. This is going to be the best choice because it’s going to achieve the result quickly and without any hassle. However, in certain cases, the person might not be active, or he might disagree with you and keep the video posted. If that’s the case, you have one option which is likely to be the best alternative.
You need to report the video as an inappropriate and flag it with the remark that it’s invading your privacy. This is going to lead you to the page of the YouTube Safety Center. You will have to explain the issue in details in a six-step wizard which extensively asks you about how the video is invasive to your privacy rights. The process is quite comprehensive, and it’s easy to go through. However, you will have to wait for the YouTube support team to assess it and make the decision for the removal.
The truth is that being able to remove YouTube videos is something important that you should be able to do. It’s going to ensure that your channel is perfectly updated, aligned and structured while at the same time making sure that everything is in line with your privacy. YouTube is a powerful website, and you need to be able to stay in control in order to be protected.
Richard Bennett
Richard Bennett is a writer and a lover of all things video.
Follow @Richard Bennett
Balancing Act: Proper Techniques for Stable Photos
DIY Tripods| How to Stabilize Your Camera without Buying a Tripod
Richard Bennett
Oct 26, 2023• Proven solutions
When you’re trying to grow a channel on YouTube it can feel like equipment is a barrier, but it shouldn’t be. If you can’t afford a high-end tripod, for example, there are loads of ways to get by without one.
DIY Your Video with Wondershare Filmora
Wondershare Filmora has the best video stabilization tool is your videos have a bad frame or were recorded in dim lights. If a video is shot in bad weather or unfriendly situation where you don’t have all the equipment required for a quality recording, Wondershare Filmora can help you in the background to edit your videos like a pro. And it has all the relevant tools like effects, transitions, background removal, overlays, and background music that could turn your normal video to a professional one.

Here are 3 of our favorite DIY tripods.
DIY smartphone tripod using binder clips or hair clips
You’re a solo operation and your best camera is on your phone. That’s pretty common.
If you have a DSLR then you can set it down on any stable surface while filming yourself, but your phone can’t stand up by itself. It needs something or someone to hold it. Do you just accept that and shoot everything as a selfie?
No. No, you don’t, because there are common household items that can help you out of this problem. For this DIY tripod, you need either 2 binder clips or 2 ‘claw clips’ (also called ‘hair jaws’).
Hold your phone in landscape mode (horizontally, so it’s long rather than tall) and attach clips to the bottom corners. If you are worried about scratching your screen, fold up some paper to place between your clip and your phone.
Here it is with binder clips:

And here it is with hair clips:

Now you can set your smartphone upon any stable surface, like a table or a stack of books.
Here are some more cool ideas!
DIY adjustable tripod using books and a towel
You’ve probably heard a million times that you can stabilize your camera by sitting it down on any stable surface – on your desk, on a stack of books, up in a tree, etc. This is very true!
But if you can use any stable surface, why do people buy tripods?
Because it isn’t convenient to rearrange your furniture whenever you want to make a video, and also because tripods are adjustable. You can change their height, you can use them to pan or tilt, and it’s pretty easy to move them a bit forwards or backward while you’re setting up your shot.
To get similar functions from the ‘any stable surface’ solution you can use a table, a stack of books, and a towel.
- Set up the area where you’re going to sit while you’re filming on one end of the table.
- Put the towel down over the approximate spot you want your camera to be.
- Stack your books on top of the towel.
- Put your camera on top of the books.
Now if your camera isn’t up high enough, or is too high, you can adjust it just by adding or taking away books. If you want to move it closer or farther away from you, just pull the towel forwards or backward.
DIY gripping ‘Gorillapod’ using wire and tape
Gorillapod’s are cool because you can use them like normal tripods, carry them around like selfie sticks, or attach them to things like fences and posts. Here’s how you can make something similar using wire, electrical tape or duct tape, and a 1/4 bolt.
Your wire should be fairly stiff and you’ll need three pieces the same length, which should be at least 10 inches. Old clothes hangers work well. This needs to be something strong enough to support the weight of your camera, but soft enough that it’s not impossible for you to bend.

All of your supplies plus the finished product.
Readying your legs
Step 1: Bend 2 inches at one end of each wire into a ‘U’ shape. You will probably need pliers for this.
Step 2: Pick up one of your pieces of wire and wrap one end with electrical tape. Go around 5-10 times (to prevent it from coming undone at the end) and then, without cutting your tape, start moving up and wrapping the rest of your wire. Stop before your ‘U’ section.
Repeat this with the other two wires.
Attaching your legs
Step 1: Place the ‘U’ section of a leg against your bolt. The bolt’s threading should be pointing away from the leg. Now, use your tape to attach them. Wind it around 2 or 3 times, then repeat the process with both of the other legs individually.
Step 2: After all the legs are attached, wrap some more tape around all 3 as tightly as you can.
Your camera will mount onto the bolt! You’ll be able to use this as a normal table-top tripod or use the flexible legs to grab onto different things like a Gorillapod. Read more at Instructables.
Note: make sure the bolt is a fit for your camera before you get too far into this process.
Richard Bennett
Richard Bennett is a writer and a lover of all things video.
Follow @Richard Bennett
Richard Bennett
Oct 26, 2023• Proven solutions
When you’re trying to grow a channel on YouTube it can feel like equipment is a barrier, but it shouldn’t be. If you can’t afford a high-end tripod, for example, there are loads of ways to get by without one.
DIY Your Video with Wondershare Filmora
Wondershare Filmora has the best video stabilization tool is your videos have a bad frame or were recorded in dim lights. If a video is shot in bad weather or unfriendly situation where you don’t have all the equipment required for a quality recording, Wondershare Filmora can help you in the background to edit your videos like a pro. And it has all the relevant tools like effects, transitions, background removal, overlays, and background music that could turn your normal video to a professional one.
Here are 3 of our favorite DIY tripods.
DIY smartphone tripod using binder clips or hair clips
You’re a solo operation and your best camera is on your phone. That’s pretty common.
If you have a DSLR then you can set it down on any stable surface while filming yourself, but your phone can’t stand up by itself. It needs something or someone to hold it. Do you just accept that and shoot everything as a selfie?
No. No, you don’t, because there are common household items that can help you out of this problem. For this DIY tripod, you need either 2 binder clips or 2 ‘claw clips’ (also called ‘hair jaws’).
Hold your phone in landscape mode (horizontally, so it’s long rather than tall) and attach clips to the bottom corners. If you are worried about scratching your screen, fold up some paper to place between your clip and your phone.
Here it is with binder clips:
And here it is with hair clips:
Now you can set your smartphone upon any stable surface, like a table or a stack of books.
Here are some more cool ideas!
DIY adjustable tripod using books and a towel
You’ve probably heard a million times that you can stabilize your camera by sitting it down on any stable surface – on your desk, on a stack of books, up in a tree, etc. This is very true!
But if you can use any stable surface, why do people buy tripods?
Because it isn’t convenient to rearrange your furniture whenever you want to make a video, and also because tripods are adjustable. You can change their height, you can use them to pan or tilt, and it’s pretty easy to move them a bit forwards or backward while you’re setting up your shot.
To get similar functions from the ‘any stable surface’ solution you can use a table, a stack of books, and a towel.
- Set up the area where you’re going to sit while you’re filming on one end of the table.
- Put the towel down over the approximate spot you want your camera to be.
- Stack your books on top of the towel.
- Put your camera on top of the books.
Now if your camera isn’t up high enough, or is too high, you can adjust it just by adding or taking away books. If you want to move it closer or farther away from you, just pull the towel forwards or backward.
DIY gripping ‘Gorillapod’ using wire and tape
Gorillapod’s are cool because you can use them like normal tripods, carry them around like selfie sticks, or attach them to things like fences and posts. Here’s how you can make something similar using wire, electrical tape or duct tape, and a 1/4 bolt.
Your wire should be fairly stiff and you’ll need three pieces the same length, which should be at least 10 inches. Old clothes hangers work well. This needs to be something strong enough to support the weight of your camera, but soft enough that it’s not impossible for you to bend.
All of your supplies plus the finished product.
Readying your legs
Step 1: Bend 2 inches at one end of each wire into a ‘U’ shape. You will probably need pliers for this.
Step 2: Pick up one of your pieces of wire and wrap one end with electrical tape. Go around 5-10 times (to prevent it from coming undone at the end) and then, without cutting your tape, start moving up and wrapping the rest of your wire. Stop before your ‘U’ section.
Repeat this with the other two wires.
Attaching your legs
Step 1: Place the ‘U’ section of a leg against your bolt. The bolt’s threading should be pointing away from the leg. Now, use your tape to attach them. Wind it around 2 or 3 times, then repeat the process with both of the other legs individually.
Step 2: After all the legs are attached, wrap some more tape around all 3 as tightly as you can.
Your camera will mount onto the bolt! You’ll be able to use this as a normal table-top tripod or use the flexible legs to grab onto different things like a Gorillapod. Read more at Instructables.
Note: make sure the bolt is a fit for your camera before you get too far into this process.
Richard Bennett
Richard Bennett is a writer and a lover of all things video.
Follow @Richard Bennett
Also read:
- [New] Crafting Dissolves with Ableton Live
- [New] Incorporating Live Streaming Your Ultimate Website Guide
- [New] Prime Gear Picks for Beginning Creators
- [New] Spectacular Thumbnails Artistic Environments
- [Updated] Staying Positive in the Face of Internet Skeptics for 2024
- 2024 Approved Key Tools Every New YouTuber Needs
- 2024 Approved Premiere's Role in Your YouTube Creation Process
- 2024 Approved Skyrocket to Success Mastering SEO for YouTubers and Beyond
- 2024 Approved Social Media Showdown Comparing IGTV and YouTube's Unique Aspects
- 2024 Approved Unraveling the Best Video Formats for YouTube Success
- Discovering the Top AI: Gemini Enhanced or GPT++?
- Essential Tips for Live Video Features on Websites
- Exploring the YouTube Content Manager Toolkit for 2024
- Facebook Adopts a Prompt for Informed, Thoughtful Sharing
- MacSierra’s Top Picks for Dvd Creation Software
- The Master Key to a Clutter-Free Steam Account: Game Deletion Guide
- Top-Rated SD Cards for Ultra HD 4K Video Capture
- Title: In 2024, Mastery of Removal Eliminating Downloaded YouTube Clips
- Author: Thomas
- Created at : 2024-12-06 17:27:47
- Updated at : 2024-12-10 01:18:50
- Link: https://youtube-help.techidaily.com/in-2024-mastery-of-removal-eliminating-downloaded-youtube-clips/
- License: This work is licensed under CC BY-NC-SA 4.0.