In 2024, Maximizing Profits From Short YouTube Videos
Maximizing Profits From Short YouTube Videos
YouTube offers content creators a platform for creating a lucrative career. Of the major developments made in the recent past is the introduction of Shorts. These short vertical videos have grown in popularity as more people view videos on their phones. With this development, the YouTube Shorts fund was launched to reward creators for their efforts. The fund allows creators to monetize their Shorts quickly, supporting and incentivizing them to create high-quality Shorts content. In this article, we will explore the YouTube Shorts Fund 2023, including YouTube shorts fund eligibility.
YouTube Shorts Monetization A cross-platform for taking your overexposed footage to cinema-quality Shorts video!
Free Download Free Download Learn More

Part 1. YouTube Shorts Fund: Introduction and Benefits
YouTube launched YouTube Shorts Funds in 2021 to financially support creators who produce engaging and popular Shorts content. The monetization scheme would distribute $100 million to high-performing creators on the platform. The creators would receive high engagement and views from their Shorts for funding.
The main objective of the YouTube Shorts fund is to encourage creativity, diversity, and innovation in Shorts content creation. The fund operated between 2021 and 2022. It lets creators earn $100 - $10,000 a month for their content.
Participating in YouTube Shorts Funds offer several benefits to the creators:
- Additional Exposure: YouTube Shorts are predominately featured on the homepage, allowing creators to reach more people.
- Recognition: YouTube recognizes top Shorts creators through the Shorts Funding program, encouraging them to create more quality content.
- Potential Earnings: Creators can monetize their Shorts content in several ways including adding and other unique features.
YouTube incorporated monetization of Shorts in its YouTube Partner Program (YPP). Therefore, YouTube merged the Shorts Fund with the YPP in February 2023. This led to YouTube Shorts Fund 2023 which now offers creators more opportunities to make money quickly on YouTube.
Part 2. Making Money with YouTube Shorts: Eligibility and Earnings
The new YouTube Shorts monetization policy means that content creators on YouTube with access to the YPP can also earn from Shorts. The revenue-sharing model has now taken the place of the YouTube Shorts Fund, which only rewarded creators using YouTube’s money. However, creators don’t have to be members of the YPP to start receiving YouTube Shorts funding. They only need to meet certain requirements, make unique content, and adhere to Community Guidelines.
- YouTube Shorts Fund Eligibility
- Additional Steps of Actions to Activate YouTube Shorts Funding
- What the YPP Shorts Fund Entails
- How Much Can You Make with Short
YouTube Shorts Fund Eligibility
As of 2023, YouTube offers Shorts Funding as a monetization option. Creators can also choose to monetize with YPP combined with Shorts Fundings.
The eligibility requirements for Shorts funding include:
- At least 1,000 subscribers
- At least 10 million public Shorts views in the last 90 days
To become a member of the YPP and start accessing Shorts funding this way, the minimum requirements are as follows:
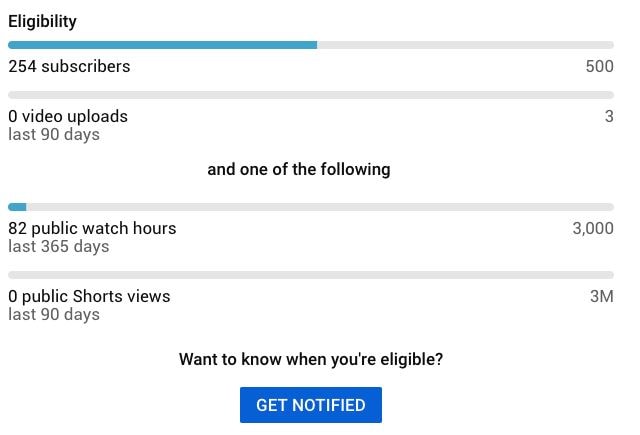
- At least 500 subscribers (You previously needed 1,000)
- At least 3,000 public watch hours over the last 13 months (You previously needed 4,000)
Additional Steps of Actions to Activate YouTube Shorts Funding
In addition to the basic eligibility requirements, creators are also required to take additional measures to comply with YouTube’s requirements. Additional steps include:
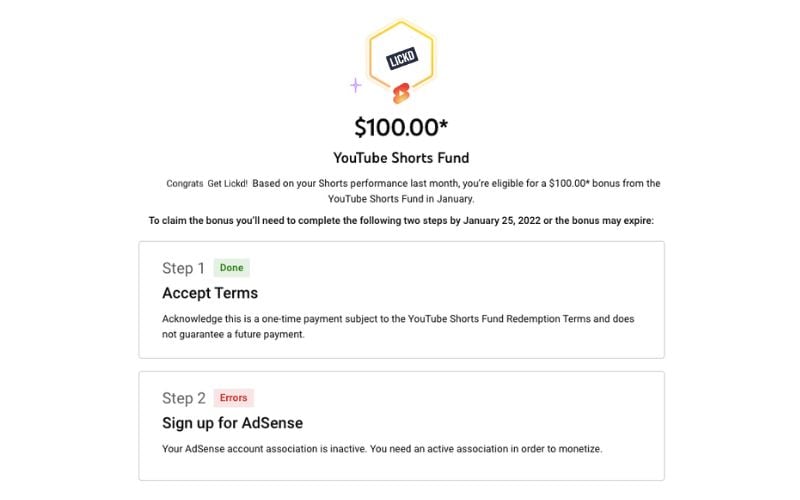
- Ensuring AdSense Account is active and in good standing: Since ad revenue will be paid through AdSense, you need to make sure your account is in good standing.
- Review and Accept the Terms of Shorts Monetization Module: In the YouTube Studio, head over to the Shorts Fund section and click on the Terms and Conditions link.
- Enable Monetization for Individual Shorts: Edit the monetization settings for each Short to start generating ad revenue.
- Comply with YouTube Policies and Guidelines: Visit the YouTube Creator Academy to learn more about the platform’s policies and guidelines.
What the YPP Shorts Fund Entails
The YPP Shorts Fund program includes the following features:
- Watch Page Monetization – Creators earn ad revenue from long-form content, YouTube Premium content, and live streams
- Shorts Monetization Module – Creators earn money from ads that play between YouTube Shorts.
- Commerce Product Addendum – Additional monetization features, including Super Chats. Channel Memberships, Super Thanks, and Super Stickers.
How Much Can You Make with Short s
The amount of money you can make on Shorts often varies. It can be hard to make decent money on Shorts sometimes, and other times it brings in a nice chunk of revenue. Unfortunately, the earnings are not as spectacular as the long YouTube videos. Most creators agree that the revenue per thousand views (RPM) for shorts is around $0.05 - $0.07. This would translate to about $50 - $70 for a million Shorts views. Although the ad revenue is relatively lower, you can generate more revenue with the shopping features. This will depend on how wee you keep your audience active and engaged.
Part 3. How to Use YouTube Shorts Funding: Application and Activation
The process of applying for and activating YouTube Short Funding is simple. You need to accept the Shorts Monetization Module in your terms and conditions. After activating, monetization starts immediately.
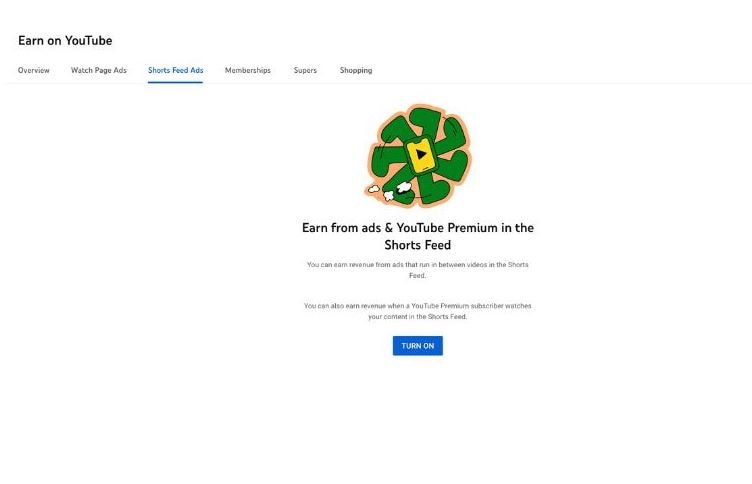
Head over to the YouTube Studio. Sign in to your account to accept the terms. Be sure to use a web browser because the YouTube app will not allow you to make these changes. Accept the terms and follow these steps to turn on the ads:
- Setp 1: Click the Content button at the bottom of the menu in the YouTube Studio
- Setp 2: Pick the video you want to monetize, and click Edit
- Setp 3: Select the Earn tab pick on, and choose the ads you want to turn on.
- Setp 4: Save your settings and the ads will be active.
Part 4. Editing YouTube Shorts for More Revenue with Wondershare Filmora
The best way to earn from the YouTube Shorts Fund is to create quality content. With good video editing software, you can achieve this and build a community of subscribers. Wondershare Filmora is a video editing software that is effective in creating quality Shorts videos. It supports various video resolutions, including vertical videos. It also has some fascinating features that make every creation unique and exciting. Take your overexposed footage to cinema-quality Shorts video that will keep your audience engaged.
Free Download For Win 7 or later(64-bit)
Free Download For macOS 10.14 or later
Filmora can help create visually appealing and engaging videos, ultimately increasing the chances of monetization on YouTube. The following features make editing videos on Filmora quick and easy.
1. Auto Reframe
You may have recorded horizontal videos and want to upload them as Shorts. The Auto Reframe feature allows you to automatically resize the video in seconds. You only need to choose the clip you want to resize and reframe it. No editing skills are required to do this.
2. Add Text to Video
Texts tell the audience what is happening in the video. It is also a great way to highlight major events in YouTube Shorts. The Add Text to Video feature on Filmora makes it easy to add text or captions to your videos.
3. Auto Synchronization
When editing Shorts, you will likely add many footage in a short video. It is common for the audio to end up being where it is not supposed to. The Auto Synchronization feature is the ultimate audio sync. It effortlessly matches your audio with the video, making sure viewers see what they hear
4. Mask & Blend
Creativity is a major component of YouTube Shorts content. The Filmora Masking and Blending mode helps you make creative video clips. It comes with a pen tool for creating free-form shapes on the go. Make your videos more impressive to your audience.
5. Auto Beat Sync
With YouTube Shorts, you need to entertain your audience in under a minute. A combination of visual and audio elements makes the video more entertaining. The Auto Beat Sync feature matches the footage with the music automatically. Be sure every beat corresponds to the scene.
Conclusion
The YouTube Shorts Fund offers an exceptional for creators to make additional income on the platform. Although the original Funds program has been updated with the latest monetization policy, creators can still generate nice revenue amount. As a creator, you need to publish quality and highly engaging content. With Wondershare Filmora, you can create content that will generate more revenue on the Shorts platform. The video editing software offers fantastic features that make video editing quick and fun.
Free Download Free Download Learn More
Part 1. YouTube Shorts Fund: Introduction and Benefits
YouTube launched YouTube Shorts Funds in 2021 to financially support creators who produce engaging and popular Shorts content. The monetization scheme would distribute $100 million to high-performing creators on the platform. The creators would receive high engagement and views from their Shorts for funding.
The main objective of the YouTube Shorts fund is to encourage creativity, diversity, and innovation in Shorts content creation. The fund operated between 2021 and 2022. It lets creators earn $100 - $10,000 a month for their content.
Participating in YouTube Shorts Funds offer several benefits to the creators:
- Additional Exposure: YouTube Shorts are predominately featured on the homepage, allowing creators to reach more people.
- Recognition: YouTube recognizes top Shorts creators through the Shorts Funding program, encouraging them to create more quality content.
- Potential Earnings: Creators can monetize their Shorts content in several ways including adding and other unique features.
YouTube incorporated monetization of Shorts in its YouTube Partner Program (YPP). Therefore, YouTube merged the Shorts Fund with the YPP in February 2023. This led to YouTube Shorts Fund 2023 which now offers creators more opportunities to make money quickly on YouTube.
Part 2. Making Money with YouTube Shorts: Eligibility and Earnings
The new YouTube Shorts monetization policy means that content creators on YouTube with access to the YPP can also earn from Shorts. The revenue-sharing model has now taken the place of the YouTube Shorts Fund, which only rewarded creators using YouTube’s money. However, creators don’t have to be members of the YPP to start receiving YouTube Shorts funding. They only need to meet certain requirements, make unique content, and adhere to Community Guidelines.
- YouTube Shorts Fund Eligibility
- Additional Steps of Actions to Activate YouTube Shorts Funding
- What the YPP Shorts Fund Entails
- How Much Can You Make with Short
YouTube Shorts Fund Eligibility
As of 2023, YouTube offers Shorts Funding as a monetization option. Creators can also choose to monetize with YPP combined with Shorts Fundings.
The eligibility requirements for Shorts funding include:
- At least 1,000 subscribers
- At least 10 million public Shorts views in the last 90 days
To become a member of the YPP and start accessing Shorts funding this way, the minimum requirements are as follows:
- At least 500 subscribers (You previously needed 1,000)
- At least 3,000 public watch hours over the last 13 months (You previously needed 4,000)
Additional Steps of Actions to Activate YouTube Shorts Funding
In addition to the basic eligibility requirements, creators are also required to take additional measures to comply with YouTube’s requirements. Additional steps include:
- Ensuring AdSense Account is active and in good standing: Since ad revenue will be paid through AdSense, you need to make sure your account is in good standing.
- Review and Accept the Terms of Shorts Monetization Module: In the YouTube Studio, head over to the Shorts Fund section and click on the Terms and Conditions link.
- Enable Monetization for Individual Shorts: Edit the monetization settings for each Short to start generating ad revenue.
- Comply with YouTube Policies and Guidelines: Visit the YouTube Creator Academy to learn more about the platform’s policies and guidelines.
What the YPP Shorts Fund Entails
The YPP Shorts Fund program includes the following features:
- Watch Page Monetization – Creators earn ad revenue from long-form content, YouTube Premium content, and live streams
- Shorts Monetization Module – Creators earn money from ads that play between YouTube Shorts.
- Commerce Product Addendum – Additional monetization features, including Super Chats. Channel Memberships, Super Thanks, and Super Stickers.
How Much Can You Make with Short s
The amount of money you can make on Shorts often varies. It can be hard to make decent money on Shorts sometimes, and other times it brings in a nice chunk of revenue. Unfortunately, the earnings are not as spectacular as the long YouTube videos. Most creators agree that the revenue per thousand views (RPM) for shorts is around $0.05 - $0.07. This would translate to about $50 - $70 for a million Shorts views. Although the ad revenue is relatively lower, you can generate more revenue with the shopping features. This will depend on how wee you keep your audience active and engaged.
Part 3. How to Use YouTube Shorts Funding: Application and Activation
The process of applying for and activating YouTube Short Funding is simple. You need to accept the Shorts Monetization Module in your terms and conditions. After activating, monetization starts immediately.
Head over to the YouTube Studio. Sign in to your account to accept the terms. Be sure to use a web browser because the YouTube app will not allow you to make these changes. Accept the terms and follow these steps to turn on the ads:
- Setp 1: Click the Content button at the bottom of the menu in the YouTube Studio
- Setp 2: Pick the video you want to monetize, and click Edit
- Setp 3: Select the Earn tab pick on, and choose the ads you want to turn on.
- Setp 4: Save your settings and the ads will be active.
Part 4. Editing YouTube Shorts for More Revenue with Wondershare Filmora
The best way to earn from the YouTube Shorts Fund is to create quality content. With good video editing software, you can achieve this and build a community of subscribers. Wondershare Filmora is a video editing software that is effective in creating quality Shorts videos. It supports various video resolutions, including vertical videos. It also has some fascinating features that make every creation unique and exciting. Take your overexposed footage to cinema-quality Shorts video that will keep your audience engaged.
Free Download For Win 7 or later(64-bit)
Free Download For macOS 10.14 or later
Filmora can help create visually appealing and engaging videos, ultimately increasing the chances of monetization on YouTube. The following features make editing videos on Filmora quick and easy.
1. Auto Reframe
You may have recorded horizontal videos and want to upload them as Shorts. The Auto Reframe feature allows you to automatically resize the video in seconds. You only need to choose the clip you want to resize and reframe it. No editing skills are required to do this.
2. Add Text to Video
Texts tell the audience what is happening in the video. It is also a great way to highlight major events in YouTube Shorts. The Add Text to Video feature on Filmora makes it easy to add text or captions to your videos.
3. Auto Synchronization
When editing Shorts, you will likely add many footage in a short video. It is common for the audio to end up being where it is not supposed to. The Auto Synchronization feature is the ultimate audio sync. It effortlessly matches your audio with the video, making sure viewers see what they hear
4. Mask & Blend
Creativity is a major component of YouTube Shorts content. The Filmora Masking and Blending mode helps you make creative video clips. It comes with a pen tool for creating free-form shapes on the go. Make your videos more impressive to your audience.
5. Auto Beat Sync
With YouTube Shorts, you need to entertain your audience in under a minute. A combination of visual and audio elements makes the video more entertaining. The Auto Beat Sync feature matches the footage with the music automatically. Be sure every beat corresponds to the scene.
Conclusion
The YouTube Shorts Fund offers an exceptional for creators to make additional income on the platform. Although the original Funds program has been updated with the latest monetization policy, creators can still generate nice revenue amount. As a creator, you need to publish quality and highly engaging content. With Wondershare Filmora, you can create content that will generate more revenue on the Shorts platform. The video editing software offers fantastic features that make video editing quick and fun.
The Ultimate Guide: Incorporating Informative Commentary in YouTube Videos
How to Add YouTube Annotations and Cards?

Richard Bennett
Mar 27, 2024• Proven solutions
Update: YouTube has replaced annotation with end screen. You can find the latest informaiton about YouTube screen and YouTube cards here.
YouTube Cards and Annotations are very useful if you want to encourage your viewrs to take an action, like Subscribe, go to another video or associated website, etc. Today, we’re going to show you the differences between cards and annotations, and how to add them in YouTube videos.
Do you want to make your YouTube video more attractive? Wondershare Filmora is a such video editing software designed for YouTube creator. It not only allows you cut, trim, crop, zoom, reverse, rotate the video clips, but also makes the advanced features like green screen, PIP, tilt-shift and mosaic easy like a piece of cake. With Wondershare Filmora, you can ignite your YouTube videos with over 300 effects like Fashion, Beauty, Block Buster, Travel, etc.
 Download Mac Version ](https://tools.techidaily.com/wondershare/filmora/download/ )
The main difference between annotation and cards is their outlook. Cards are more graphical whereas annotations are text based. The cards slide in once you click the small “i” button on the video where as the annotation is there based on the timings set by the user. Moreover the main differences between the two are:
1. YouTube Cards are small and unobtrusive, unless a viewer chooses to click on them, which is why they are the better option when you are trying to get views on other videos. Irritating a few people with a big annotation might be worth it if you also draw other people’s attention to your cause or website, but it is not a good way to endear yourself to people you are trying to get views and subscriptions from. When a card is clicked a thumbnail will appear with a link to your additional content. YouTube Cards are often better than annotations for adding links to your videos because they look much tidier. Also, unlike annotations, cards will be visible to people watching your videos on their mobile devices.
2. You cannot use Cards just to insert notes into your videos, though, and you cannot adjust their size like you can with annotations. So, if you do need a link to be large and extremely noticeable, annotations might still be your best option. Cards and annotations can even be used in combination sometimes.
How to add YouTube Cards
YouTube Cards are similar to annotations but more interactive. They allow the owner of the video to add images and other links. A small box appears, clicking on which will activate the cards.
- Click on the “Video Manager” tab

- Click “Edit” tab under the video screen shot you want to add the card on
- Click on the “Cards” tab

- On the right panel click on “Add Card” drop down menu and select the type of card you want to add
- Click on the create button which will open the corresponding video
- Once you finish the subsequent information required click create card
- Select the timeline for the playhead to appear which leads to the card slide

- Apply changes and exit
How to add YouTube annotations
YouTube Annotation is addition of a text layer, link or hotspots over your video. They add interactive boxes which link to other websites or videos (any link you want).
- Click on the video manager tab
- Click edit tab under the video screen shot you want to add the annotation on
- Click on the “End screen & Annotation” tab

- On the right panel click on “+ Add Element” and select the kind of annotation you want to add
- Adjust the position of Annotation, you can drag the rectangle to locate it at any position of the video, move the slide to set the start and end time of the annotation

- Apply changes
The types of YouTube annotations:
1. Speech Bubbles
Speech Bubbles: look like the dialogue box in a comic strip. There is a tail which you can adjust so it looks like one of the people in your video is saying what is written in the annotation. Speech bubbles are great for adding in funny comments.
2. Notes
Notes: come in a limited selection of colors and can be adjusted to take up a maximum of 30% of your player screen. Sometimes you need a huge annotation to get an important point across, but using huge note annotations too often – especially near the beginnings of your videos – will annoy viewers. If you need a large note annotation make sure to place it later in your video, when a viewer will already be invested in what they are watching and less likely to click away.
3. Titles
Titles: are large pieces of text that go either at the beginning of your video or in-between different topics within your video. YouTube’s titles are not very nice to look at, but they are a decent option if you do not have access to video editing software.
4. Spotlights
Spotlights: have a subtle border and are completely clear inside. Your text only appears when a user hovers over the spotlight. Spotlights are great for turning elements within your video into links.
5. Labels
Labels: are completely transparent, like spotlights, but the user does not have to hover over them for your text to be visible.
6. Pauses
Pauses: are no longer available to add to your videos, although Pause Annotations added before they were removed still work. Pause Annotations used to stop your video for a set period of time when your annotation appeared.
If somebody watches your video and gets to the end then that means they enjoyed it and will probably be open to checking out more of your content. Rather than hoping that your other videos show up in the ‘Suggested Videos’ YouTube will show after yours has finished playing you should always include an outro, or ending card, after your video to recommend your own work. Annotations are used in a lot of successful YouTuber’s ending cards.
One form this takes is small Note annotations in the bottom corners of the screen, one linking to your previous video and one to the next. Sometimes your viewers might not necessarily get the most enjoyment out of your videos by watching them in order, though. Sometimes you want to link viewers to the videos that are most related to the one they just watched.
The best outros also include a subscribe button, which can be created using annotations. These annotations work best when combined with a verbal call to action. Make sure your outro lasts long enough for people to make the decision to subscribe or click another video.
No matter what kind of annotations you are using, you should never use more than two of them at a time anywhere except for your outro. You should also never place annotations at the very top of your screen, or in the middle at the bottom. If your video is embedding on a separate website then the player will cover annotations at the top of the screen, and ads might cover annotations placed in the bottom-middle of the screen. Keep in mind when using annotations that they will not be visible to users watching your videos on mobile devices. If mobile traffic is very important to you then consider using YouTube Cards.
Richard Bennett
Richard Bennett is a writer and a lover of all things video.
Follow @Richard Bennett
Richard Bennett
Mar 27, 2024• Proven solutions
Update: YouTube has replaced annotation with end screen. You can find the latest informaiton about YouTube screen and YouTube cards here.
YouTube Cards and Annotations are very useful if you want to encourage your viewrs to take an action, like Subscribe, go to another video or associated website, etc. Today, we’re going to show you the differences between cards and annotations, and how to add them in YouTube videos.
Do you want to make your YouTube video more attractive? Wondershare Filmora is a such video editing software designed for YouTube creator. It not only allows you cut, trim, crop, zoom, reverse, rotate the video clips, but also makes the advanced features like green screen, PIP, tilt-shift and mosaic easy like a piece of cake. With Wondershare Filmora, you can ignite your YouTube videos with over 300 effects like Fashion, Beauty, Block Buster, Travel, etc.
Download Mac Version ](https://tools.techidaily.com/wondershare/filmora/download/ )
The main difference between annotation and cards is their outlook. Cards are more graphical whereas annotations are text based. The cards slide in once you click the small “i” button on the video where as the annotation is there based on the timings set by the user. Moreover the main differences between the two are:
1. YouTube Cards are small and unobtrusive, unless a viewer chooses to click on them, which is why they are the better option when you are trying to get views on other videos. Irritating a few people with a big annotation might be worth it if you also draw other people’s attention to your cause or website, but it is not a good way to endear yourself to people you are trying to get views and subscriptions from. When a card is clicked a thumbnail will appear with a link to your additional content. YouTube Cards are often better than annotations for adding links to your videos because they look much tidier. Also, unlike annotations, cards will be visible to people watching your videos on their mobile devices.
2. You cannot use Cards just to insert notes into your videos, though, and you cannot adjust their size like you can with annotations. So, if you do need a link to be large and extremely noticeable, annotations might still be your best option. Cards and annotations can even be used in combination sometimes.
How to add YouTube Cards
YouTube Cards are similar to annotations but more interactive. They allow the owner of the video to add images and other links. A small box appears, clicking on which will activate the cards.
- Click on the “Video Manager” tab
- Click “Edit” tab under the video screen shot you want to add the card on
- Click on the “Cards” tab
- On the right panel click on “Add Card” drop down menu and select the type of card you want to add
- Click on the create button which will open the corresponding video
- Once you finish the subsequent information required click create card
- Select the timeline for the playhead to appear which leads to the card slide
- Apply changes and exit
How to add YouTube annotations
YouTube Annotation is addition of a text layer, link or hotspots over your video. They add interactive boxes which link to other websites or videos (any link you want).
- Click on the video manager tab
- Click edit tab under the video screen shot you want to add the annotation on
- Click on the “End screen & Annotation” tab
- On the right panel click on “+ Add Element” and select the kind of annotation you want to add
- Adjust the position of Annotation, you can drag the rectangle to locate it at any position of the video, move the slide to set the start and end time of the annotation
- Apply changes
The types of YouTube annotations:
1. Speech Bubbles
Speech Bubbles: look like the dialogue box in a comic strip. There is a tail which you can adjust so it looks like one of the people in your video is saying what is written in the annotation. Speech bubbles are great for adding in funny comments.
2. Notes
Notes: come in a limited selection of colors and can be adjusted to take up a maximum of 30% of your player screen. Sometimes you need a huge annotation to get an important point across, but using huge note annotations too often – especially near the beginnings of your videos – will annoy viewers. If you need a large note annotation make sure to place it later in your video, when a viewer will already be invested in what they are watching and less likely to click away.
3. Titles
Titles: are large pieces of text that go either at the beginning of your video or in-between different topics within your video. YouTube’s titles are not very nice to look at, but they are a decent option if you do not have access to video editing software.
4. Spotlights
Spotlights: have a subtle border and are completely clear inside. Your text only appears when a user hovers over the spotlight. Spotlights are great for turning elements within your video into links.
5. Labels
Labels: are completely transparent, like spotlights, but the user does not have to hover over them for your text to be visible.
6. Pauses
Pauses: are no longer available to add to your videos, although Pause Annotations added before they were removed still work. Pause Annotations used to stop your video for a set period of time when your annotation appeared.
If somebody watches your video and gets to the end then that means they enjoyed it and will probably be open to checking out more of your content. Rather than hoping that your other videos show up in the ‘Suggested Videos’ YouTube will show after yours has finished playing you should always include an outro, or ending card, after your video to recommend your own work. Annotations are used in a lot of successful YouTuber’s ending cards.
One form this takes is small Note annotations in the bottom corners of the screen, one linking to your previous video and one to the next. Sometimes your viewers might not necessarily get the most enjoyment out of your videos by watching them in order, though. Sometimes you want to link viewers to the videos that are most related to the one they just watched.
The best outros also include a subscribe button, which can be created using annotations. These annotations work best when combined with a verbal call to action. Make sure your outro lasts long enough for people to make the decision to subscribe or click another video.
No matter what kind of annotations you are using, you should never use more than two of them at a time anywhere except for your outro. You should also never place annotations at the very top of your screen, or in the middle at the bottom. If your video is embedding on a separate website then the player will cover annotations at the top of the screen, and ads might cover annotations placed in the bottom-middle of the screen. Keep in mind when using annotations that they will not be visible to users watching your videos on mobile devices. If mobile traffic is very important to you then consider using YouTube Cards.
Richard Bennett
Richard Bennett is a writer and a lover of all things video.
Follow @Richard Bennett
Also read:
- [New] Streamline Production Workflow Elevate Video Quality
- [New] Visualizing Perfection Our #1-10 Camera Lens Picks for Amazing Photography
- [Updated] 2024 Approved Diving Deep Into the World of Immersive Gaming with HTC Vive
- [Updated] In 2024, Beyond Likes & Shares Concealed Factors That Impact Story Consumption
- 2024 Approved Innovative Strategies for iPhone/iPad Screenshots in Media
- 2024 Approved Invaluable List of Costless Photographic and Moving Images
- 2024 Approved Peering Into TSeries' Earnings Processes on YouTube Networks
- 2024 Approved Streamlining Problems in Creating Effective YouTube Shorts
- Copyright Clash, Immediate Consequences
- How to Convert Your ISO Files Into High-Quality MKV Format Efficiently
- How to Use Google Assistant on Your Lock Screen Of Honor Magic 5 Lite Phone
- In 2024, Express Thumbnails for Epic Battle Royale
- In 2024, How to Make Collab Videos And Grow Your Channel?
- In 2024, Online Video Arena Showdown Who Wins – Vimeo or Giants Like YouTube+DailyMotion?
- In 2024, Optimize Your Auditory Experience Convert and Share Via YouTube
- In 2024, Tutorial to Change Tecno Spark 10C IMEI without Root A Comprehensive Guide
- Unveiling Gadgets with Tom
- Title: In 2024, Maximizing Profits From Short YouTube Videos
- Author: Thomas
- Created at : 2024-12-14 16:38:35
- Updated at : 2024-12-16 16:53:49
- Link: https://youtube-help.techidaily.com/in-2024-maximizing-profits-from-short-youtube-videos/
- License: This work is licensed under CC BY-NC-SA 4.0.