
In 2024, Navigating the Process of Clearing Up Browser's Watched Videos
Navigating the Process of Clearing Up Browser’s Watched Videos
How to Remove YouTube Videos

Richard Bennett
Mar 27, 2024• Proven solutions
There are quite a few different reasons for which you might want to consider removing your YouTube video. From outdated content to mistakes in editing – the reasons are quite extensive. In the part 1, we will teach you how to remove your own videos on YouTube and things you should note when removing. The part 2 will tell you how to remove the videos from other YouTube channel.
If you need more advanced features like PIP, Green Screen, or audio mixing, check this easy to use and powerful video editor-Wondershare Filmora , and ignite your video by clicks.
 Download Mac Version ](https://tools.techidaily.com/wondershare/filmora/download/ )
You may also like:What is YouTube Creative Commons and How to Use it >>
Part 1: How to Remove YouTube Videos that You’ve Uploaded
You may also like:How to Edit Uploaded YouTube Videos >>
The first thing that we are going to show you is how to remove your own videos. This might be needed if you have uploaded content quite some time ago and it is already outdated. Or, if you have too many videos on your channel and you need to clear up those who aren’t that interesting.
The fact of the matter is that it’s quite easy to remove YouTube videos. The first thing that you would need to do is going ahead and hop on the website and log into your account. Afterwards, you need to go to the “My Channel” option and click on the “Video Manager”.
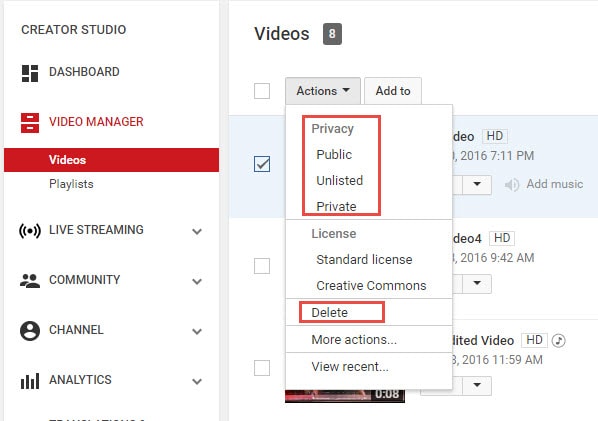
Upon doing this, a new page is going to pop up, and you are going to see a list of all the videos that you’ve uploaded.

There are little tick boxes on the left side which you can click in order to mark. Mark the videos that you want to edit and click on the “Actions” button on top. There is going to be a drop-down menu, and you can click on the delete option to remove the video permanently. Furthermore, you can also hide the video if you don’t want to delete it but only to hide it away from your subscribers. In order to do so, you should simply click on the Private or Unlisted button.
That’s pretty much it – there’s nothing further to it, and the entire thing is rather comprehensive and easy to carry out, which makes it convenient to go through.
Part 2: How to Remove YouTube Videos on Other Channels
Now that we’ve covered how to remove videos from your own channel, it’s time to dig a little bit deeper. There are certain instances in which you might want to remove YouTube videos from other channels as well. The reasons for this are usually rather personal. For instance – someone has uploaded a video including you or something yours without your consent, and this harms your reputation. Furthermore, it may display sensitive information that you don’t want to reveal to anyone else – the reasons are rather different, but they are related to your own individual privacy which is an important legal right.
You may also like:How to Blur Faces in YouTube Videos >>
The first thing you can do is contact the person who uploaded the video and kindly asks him to remove it using the procedure that we described above. This is going to be the best choice because it’s going to achieve the result quickly and without any hassle. However, in certain cases, the person might not be active, or he might disagree with you and keep the video posted. If that’s the case, you have one option which is likely to be the best alternative.
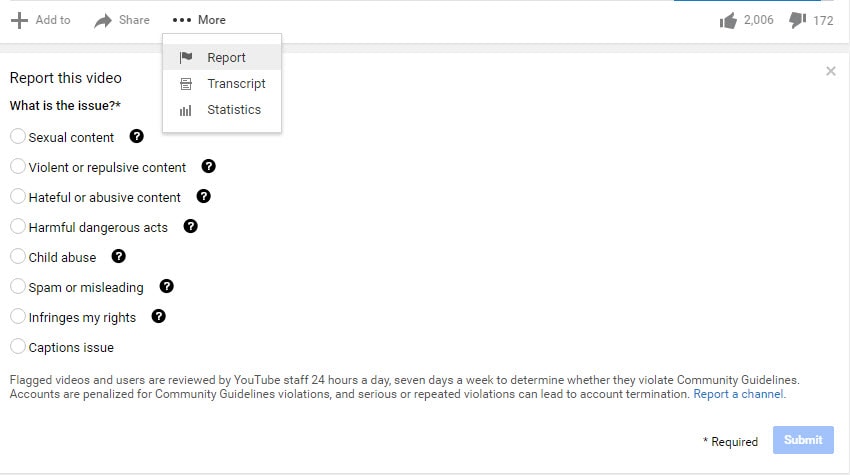
You need to report the video as an inappropriate and flag it with the remark that it’s invading your privacy. This is going to lead you to the page of the YouTube Safety Center. You will have to explain the issue in details in a six-step wizard which extensively asks you about how the video is invasive to your privacy rights. The process is quite comprehensive, and it’s easy to go through. However, you will have to wait for the YouTube support team to assess it and make the decision for the removal.
The truth is that being able to remove YouTube videos is something important that you should be able to do. It’s going to ensure that your channel is perfectly updated, aligned and structured while at the same time making sure that everything is in line with your privacy. YouTube is a powerful website, and you need to be able to stay in control in order to be protected.
Richard Bennett
Richard Bennett is a writer and a lover of all things video.
Follow @Richard Bennett
Richard Bennett
Mar 27, 2024• Proven solutions
There are quite a few different reasons for which you might want to consider removing your YouTube video. From outdated content to mistakes in editing – the reasons are quite extensive. In the part 1, we will teach you how to remove your own videos on YouTube and things you should note when removing. The part 2 will tell you how to remove the videos from other YouTube channel.
If you need more advanced features like PIP, Green Screen, or audio mixing, check this easy to use and powerful video editor-Wondershare Filmora , and ignite your video by clicks.
Download Mac Version ](https://tools.techidaily.com/wondershare/filmora/download/ )
You may also like:What is YouTube Creative Commons and How to Use it >>
Part 1: How to Remove YouTube Videos that You’ve Uploaded
You may also like:How to Edit Uploaded YouTube Videos >>
The first thing that we are going to show you is how to remove your own videos. This might be needed if you have uploaded content quite some time ago and it is already outdated. Or, if you have too many videos on your channel and you need to clear up those who aren’t that interesting.
The fact of the matter is that it’s quite easy to remove YouTube videos. The first thing that you would need to do is going ahead and hop on the website and log into your account. Afterwards, you need to go to the “My Channel” option and click on the “Video Manager”.
Upon doing this, a new page is going to pop up, and you are going to see a list of all the videos that you’ve uploaded.
There are little tick boxes on the left side which you can click in order to mark. Mark the videos that you want to edit and click on the “Actions” button on top. There is going to be a drop-down menu, and you can click on the delete option to remove the video permanently. Furthermore, you can also hide the video if you don’t want to delete it but only to hide it away from your subscribers. In order to do so, you should simply click on the Private or Unlisted button.
That’s pretty much it – there’s nothing further to it, and the entire thing is rather comprehensive and easy to carry out, which makes it convenient to go through.
Part 2: How to Remove YouTube Videos on Other Channels
Now that we’ve covered how to remove videos from your own channel, it’s time to dig a little bit deeper. There are certain instances in which you might want to remove YouTube videos from other channels as well. The reasons for this are usually rather personal. For instance – someone has uploaded a video including you or something yours without your consent, and this harms your reputation. Furthermore, it may display sensitive information that you don’t want to reveal to anyone else – the reasons are rather different, but they are related to your own individual privacy which is an important legal right.
You may also like:How to Blur Faces in YouTube Videos >>
The first thing you can do is contact the person who uploaded the video and kindly asks him to remove it using the procedure that we described above. This is going to be the best choice because it’s going to achieve the result quickly and without any hassle. However, in certain cases, the person might not be active, or he might disagree with you and keep the video posted. If that’s the case, you have one option which is likely to be the best alternative.
You need to report the video as an inappropriate and flag it with the remark that it’s invading your privacy. This is going to lead you to the page of the YouTube Safety Center. You will have to explain the issue in details in a six-step wizard which extensively asks you about how the video is invasive to your privacy rights. The process is quite comprehensive, and it’s easy to go through. However, you will have to wait for the YouTube support team to assess it and make the decision for the removal.
The truth is that being able to remove YouTube videos is something important that you should be able to do. It’s going to ensure that your channel is perfectly updated, aligned and structured while at the same time making sure that everything is in line with your privacy. YouTube is a powerful website, and you need to be able to stay in control in order to be protected.
Richard Bennett
Richard Bennett is a writer and a lover of all things video.
Follow @Richard Bennett
Audio Improvement for Effective Online Communication
How To Remove Background Noise from Your Youtube Video
Richard Bennett
Mar 27, 2024• Proven solutions
There are few things more annoying to viewers on YouTube than background noise. It is distracting and makes it difficult to engage with the content of a video. If there is noticeable background noise in a video, even a small noise like the faint hum of a computer fan, then it will increase the chances of viewers clicking away. The good news is that these kinds of noises are fairly easy to get rid of.
In order to remove background noise from your video clip, you will first need to create an MP3 of your audio. Then you will be able to take out the unwanted noise in a free program called Audacity and reintroduce your corrected audio into your Filmora project. This article will walk you through the audio editing process.

How To Remove Background Noise from Your Youtube Video
Background Noise Removal

Open up Filmora, import your clip, and drag it into the timeline. Then, play your clip and listen for background noise. If you hear a noise that you wish to remove move on to the first step of background noise removal .
1. Creating An MP3
If you do not already have it you will need to download VLC Media Player from videoLAN.org. VLC is a completely free media player that can play almost any type of file, is great for converting files, and can even be used as a screen recorder. If you consume a lot of media online then chances are you already have VLC. You could also use is Free Video to MP3 Converter by DVDVideoSoft.
If you choose to use VLC, open it up and select Convert/Save under Media. Select your video in the Open Media window that pops up. After you click Convert/Save you will be able to choose your format, in this case, MP3, under Save as type.
2. Removing Background Noise in Audacity
You can download Audacity for free at Audacityteam.org.
Once you have Audacity use it to open your MP3. Then, find a section of your audio that is silent aside from your background noise and highlight it by clicking and dragging. The idea is to point out to the program exactly what sound is a problem for you so it knows what to remove. If you have trouble finding a significant stretch of background noise that does not also include dialogue remember to record a pause before or after the content of your video next time you film.
With your section of background noise highlighted, go to Effect and then Noise Reduction. Then, click on Get Noise Profile. After that, you will select your entire audio timeline before going back to Noise Reduction under Effect. This time click on OK (the default settings are the best in most situations so you do not need to worry about changing them).
Audacity will remove everything that sounds like the sound profile, eliminating your background noise. Sometimes this method will also dull your dialogue, which can be fixed by selecting your entire track and then going to Effect and Amplify. Increasing amplification will fix any muffling of your audio.
3. Syncing in Filmora
Export your corrected MP3 from Audacity and import it into Filmora. Then, drag it into your music track. Syncing your audio should not be difficult, but you can always use your original audio to help you line it up properly if you need to. Just look for a significant spike in your audio waves in both your MP3 and the original audio and make sure they are right on top of each other.
Then, since you no longer need your original audio, you can delete it. Right-click on your clip and select Audio Detach. Once your audio is on its own track just select it and click delete.
Covering Background Noise
Sometimes background noise is so minor that you do not want to bother going through the process of removing it. In these situations, it may be easier to cover up your background noise than to remove it. This is as simple as dragging a song into the music track of your timeline and adjusting its volume so it is not loud enough to draw attention away from your dialogue. Chances are you want to add background music anyways and this is not even an extra step.
Richard Bennett
Richard Bennett is a writer and a lover of all things video.
Follow @Richard Bennett
Richard Bennett
Mar 27, 2024• Proven solutions
There are few things more annoying to viewers on YouTube than background noise. It is distracting and makes it difficult to engage with the content of a video. If there is noticeable background noise in a video, even a small noise like the faint hum of a computer fan, then it will increase the chances of viewers clicking away. The good news is that these kinds of noises are fairly easy to get rid of.
In order to remove background noise from your video clip, you will first need to create an MP3 of your audio. Then you will be able to take out the unwanted noise in a free program called Audacity and reintroduce your corrected audio into your Filmora project. This article will walk you through the audio editing process.
How To Remove Background Noise from Your Youtube Video
Background Noise Removal
Open up Filmora, import your clip, and drag it into the timeline. Then, play your clip and listen for background noise. If you hear a noise that you wish to remove move on to the first step of background noise removal .
1. Creating An MP3
If you do not already have it you will need to download VLC Media Player from videoLAN.org. VLC is a completely free media player that can play almost any type of file, is great for converting files, and can even be used as a screen recorder. If you consume a lot of media online then chances are you already have VLC. You could also use is Free Video to MP3 Converter by DVDVideoSoft.
If you choose to use VLC, open it up and select Convert/Save under Media. Select your video in the Open Media window that pops up. After you click Convert/Save you will be able to choose your format, in this case, MP3, under Save as type.
2. Removing Background Noise in Audacity
You can download Audacity for free at Audacityteam.org.
Once you have Audacity use it to open your MP3. Then, find a section of your audio that is silent aside from your background noise and highlight it by clicking and dragging. The idea is to point out to the program exactly what sound is a problem for you so it knows what to remove. If you have trouble finding a significant stretch of background noise that does not also include dialogue remember to record a pause before or after the content of your video next time you film.
With your section of background noise highlighted, go to Effect and then Noise Reduction. Then, click on Get Noise Profile. After that, you will select your entire audio timeline before going back to Noise Reduction under Effect. This time click on OK (the default settings are the best in most situations so you do not need to worry about changing them).
Audacity will remove everything that sounds like the sound profile, eliminating your background noise. Sometimes this method will also dull your dialogue, which can be fixed by selecting your entire track and then going to Effect and Amplify. Increasing amplification will fix any muffling of your audio.
3. Syncing in Filmora
Export your corrected MP3 from Audacity and import it into Filmora. Then, drag it into your music track. Syncing your audio should not be difficult, but you can always use your original audio to help you line it up properly if you need to. Just look for a significant spike in your audio waves in both your MP3 and the original audio and make sure they are right on top of each other.
Then, since you no longer need your original audio, you can delete it. Right-click on your clip and select Audio Detach. Once your audio is on its own track just select it and click delete.
Covering Background Noise
Sometimes background noise is so minor that you do not want to bother going through the process of removing it. In these situations, it may be easier to cover up your background noise than to remove it. This is as simple as dragging a song into the music track of your timeline and adjusting its volume so it is not loud enough to draw attention away from your dialogue. Chances are you want to add background music anyways and this is not even an extra step.
Richard Bennett
Richard Bennett is a writer and a lover of all things video.
Follow @Richard Bennett
Also read:
- [New] 2024 Approved MAGIX's Image Sphere A Thorough Exploration
- [New] Expertise in Enhancing Photos via Online Tools
- [New] Filmora's Quick-Start Approach for YouTube Trailers
- [New] Flipping the Script Mobile Filmmaking & YouTube Thumbnail Tricks
- [New] Simplified Strategies for Muting or Disabling Youtube Channels (Computer/Mobile)
- [New] Unlocking Creative Potential Integrating Custom Graphic Elements Into Your Story for 2024
- [Updated] EasyCast Essential Steps for Beginner Podcast Streamers for 2024
- [Updated] Final Flair Free & Paid Templates to Express Thanks
- [Updated] Leading Device Editors for App Development Art
- 2024 Approved Future of Cosmetics YouTube Gurus on the Rise
- 2024 Approved Infographic Exploration Premier FIFA Videos
- 2024 Approved Mastering Media with Top 5 Photo & Video Apps on iOS/Android Devices
- Comprehensive Guide to Retrieving and Reading SMS From iCloud Backup
- In 2024, Leveraging Video Features Annotations & Cards
- Mastering Short-Form Trimming Videos for YouTube for 2024
- Title: In 2024, Navigating the Process of Clearing Up Browser's Watched Videos
- Author: Thomas
- Created at : 2024-12-03 16:44:43
- Updated at : 2024-12-10 02:10:08
- Link: https://youtube-help.techidaily.com/in-2024-navigating-the-process-of-clearing-up-browsers-watched-videos/
- License: This work is licensed under CC BY-NC-SA 4.0.