
:max_bytes(150000):strip_icc()/corinne-kutz-tMI2_-r5Nfo-unsplash-aec79963aac341289ac3bb16be99df9b.jpg)
"In 2024, Overcome Vanished YouTube Minute Media"
Overcome: Vanished YouTube Minute Media
How to Fix the YouTube Shorts Not Showing Up Issue?

Liza Brown
Oct 26, 2023• Proven solutions
Well, a YouTube Shorts is said to be YouTube’s short-form answer to TikTok. You can quickly scroll via algorithmically-driven feed, discover other similar short videos, and subscribe to your favorite creators.
Here, creators can record, share, and edit short-form video content that’s 60 seconds or less and vertically oriented. And, unlike Instagram stories, YouTube Shorts won’t disappear but will remain on your channel. So, that’s the brief intro of YouTube Shorts which we think everyone is aware of after YouTube has announced its YouTube Shorts availability globally.
However, certain factors are still there, raising the issue or concern of YouTube Shorts not showing. Thus, if you can’t find the YouTube Shorts option or videos, or YouTube Shorts disappeared, find a solution in this post.
Part 1: Why Do YouTube Shorts Not Showing Up?
There could be multiple reasons why YouTube Shorts not showing on your phone, the channel’s home page etc.
Besides, many scenarios arise with this issue, namely the YouTube Shorts option not showing up, the YouTube Shorts button missing, and YouTube Shorts videos not showing correctly.
And, there are valid reasons as well as to why these situations are happening to you. So, let’s discuss each of them separately in brief, along with the solutions in the next section.
- YouTube Shorts are not showing on the channel’s homepage
The standard and the most common reason why YouTube Shorts are not showing on the channel’s homepage is that you have not updated the YouTube app.
- YouTube Shorts option not showing up
This may be happening either because you’ve not updated the app or your internet connection is pretty slow to show you the option. There could be another reason as you may not have cleared the YouTube mobile app’s cache and data.
- YouTube Shorts button missing
Again, you may not have updated the YouTube app, or your internet connection is slow is the most common reason here. Moreover, the button of YouTube Shorts stays hidden behind the +icon.
- YouTube Shorts videos not showing correctly
The most valid reason for YouTube Shorts not showing correctly or YouTube Shorts disappearing is that you have a poor internet connection. Plus, we’ve discussed proper steps below if you’ve missed something while uploading the YouTube Shorts triggering this scenario.
Before we move on to fixing YouTube Shorts not showing the issue, here’s a quick note on which videos qualify as YouTube Shorts. Shorts are different from YouTube stories. Unlike YouTube stories, it gets displayed in your regular channel feed along with your other YouTube videos.
And, you must note that a YouTube Shorts video consists of two criteria as follows.
- The video has to be vertical (portrait-style)
- The video must be 60 seconds or less
Part 2: How to Fix YouTube Shorts Not Showing Up?
Here’s the section covering fixes on YouTube Shorts not showing. Please give it a read and resolve your issue happily!
Fix 1: Update the YouTube App
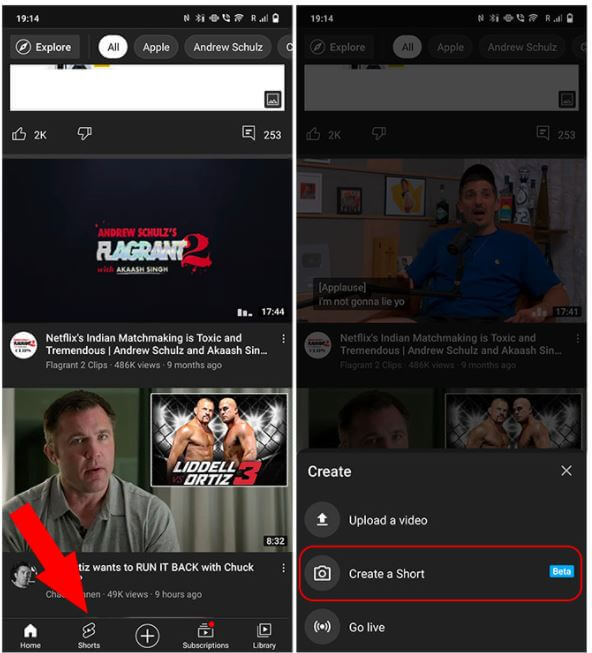
As we’ve already discussed above, check if your YouTube mobile app has the latest version. The newest version of the YouTube mobile app (Version: 16.17.36) has a dedicated Shorts button at the bottom. And, it replaces the Trending button from the YouTube app.
Moreover, the option to upload Shorts is now hidden behind the + icon. Tap on the + icon and hit the Create a Short option.
Fix 2: Check If Shorts Is Available in Your Country
Now, YouTube Shorts is available globally, but there was a phase when YouTube Shorts was a beta feature. It was only available in India and the US, which could be why you could not view Shorts in the YouTube app.
Fix 3: YouTube Shorts Is Mobile-only
As of now, YouTube Shorts is only available on a smartphone because it’s still in beta version. However, you can create Shorts via smartphone and the camera option in YouTube mobile app. Hence, there’s no point in searching for Shorts on your computer.
You can upload Shorts videos from your laptop. The entire process is similar to uploading a regular video. However, you have to mention #Shorts in the title and description to differentiate it as a Shorts video.
Common Fixes to YouTube Shorts Not Working
- Update the YouTube App to the latest version.
- Clear the YouTube mobile app’s data and cache.
- Check if your internet is connected or your internet connection is strong.
- Restart your smartphone and try again.
- The YouTube server can be down, busy, or under maintenance. Wait for a while and try again.
The fixes above are also applicable if the YouTube Shorts are not showing on iPhone as well.
Or, you can try the VPN solution before contacting the YouTube team.
If Videos Are Not Visible under YouTube Shorts
Solution 1: Ensure that you’ve added #shorts in the title and description. Those who have YouTube Shorts, they can make shorts videos via the Shorts camera. Those who can’t access this camera can also upload their current vertical videos that are less than 60 seconds after adding the hashtag #Shorts in the title or description.
All in all, you must include #shorts to let the YouTube algorithm figure out the video is created for Shorts, and the issue of YouTube Shorts not showing up will also be resolved.
Solution 2: Sometimes, you may not find YouTube Shorts videos if they’re precisely 60 seconds in duration because YouTube sometimes adds 1-2 seconds to a Shorts video for some reason. So, be alert here and ensure your Shorts video is around 58 seconds or less.
Solution 3: If your YouTube Shorts is not getting views, you need to wait more here because it takes a while for YouTube to index a Shorts video and suggest them to people. So, it’s the task of the algorithm that varies from person to person. Some Shorts videos take several days while others take weeks.
If YouTube Shorts Videos Are Not Showing up Correctly
Once uploaded, the YouTube Shorts will be displayed in a vertical thumbnail on YouTube and other regular content already there in your account. Or, it’s your choice to create a new channel for the YouTube shorts videos. If the YouTube shorts not showing correctly, you can try as follows:
Step 1. Go to your channel and select the “customize channel” option.
Step 2. Hop on to the Featured section, and choose the add section.
Step 3. You’ll see shorts videos under the “videos” section. Click that, and the videos you have which are tagged in with #shorts in the title or description will automatically display here.
Bonus Tip: How to Easily Create Vertical Videos for YouTube Shorts on PC
The YouTube Shorts app is pretty convenient to use nowadays. However, it doesn’t allow you to fine-edit the videos if you’ve explored the app or specifically when you want your videos to look more professional. The app doesn’t even have many filtering options, such as Effects, Elements, etc., to make your videos more interactive.
With that said, you can always use an efficient third-party program like Wondershare Filmora to create professional-looking YouTube Shorts videos to engage your viewers highly. Even no famous YouTuber uploads their videos directly from the app without using any third-party tool.
We recommend Wondershare Filmora because it is a production and post-production app available for Windows and Mac computers. It gives tough competition to some globally renowned tools like Final Cut Pro X, Adobe Premiere Pro, etc., because of its simplicity. Furthermore, Filmora has its inbuilt screen, voice recording features, and webcam that can be useful to create game walkthroughs, interactive videos, and voiceovers as needed.


Moreover, a YouTube Shorts video can be made through Wondershare Filmora using the below-mentioned guide.
Note: We are assuming that you have already recorded a vertical video using your smartphone and that it has been transferred to your PC.
So, the signature feature to create YouTube Shorts videos on Wondershare Filmora is Auto Reframe.
Powered by AI technology, Auto Reframe automatically identifies the focal point of your video and crops it while always maintaining it within the frame. This way, the main object or action in your video never goes out of vision.
You can choose an aspect ratio that best fits YouTube Shorts which is 9:16.
How to Use Auto Reframe in Filmora?
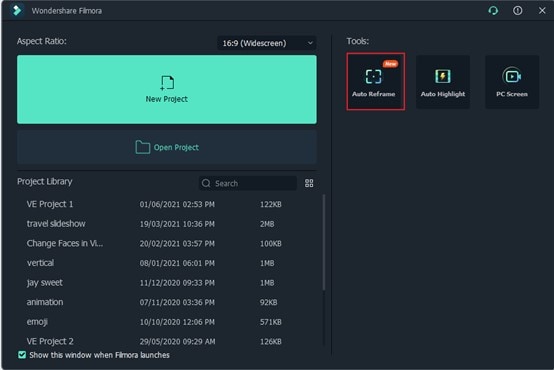
Step 1. Open Filmora and Select Auto Reframe
You can choose among three ways to open the Auto Reframe feature in Filmora.
* **Way 1:** Once you open Filmora, the main interface will display the **Auto Reframe** tab on the right-hand panel. Click it to open directly
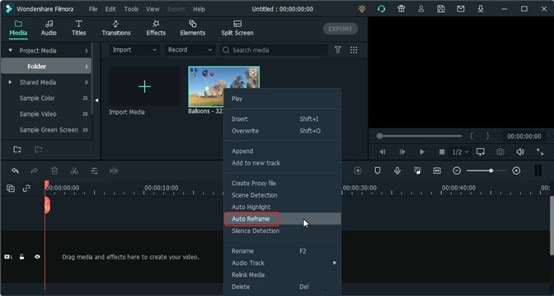
- Way 2: Import media as File > Import Media Files and select the file. After you import the media, right-click and choose the Auto Reframe.
- Way 3: Lastly, you can choose the Tools option on the top menu bar and hit the Auto Reframe.

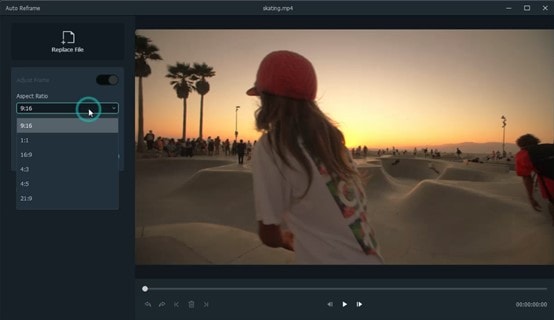
Step 2. Adjust the Aspect Ratio and Motion Speed
A separate dialog box will display once you have selected the Auto Reframe option. Now, click on Import Media and choose a single video to import. You can change the imported video by hitting the Replace File at the top menu.
There are multiple aspect ratio templates available such as square (1:1), vertical (9:16), standard (4:3), widescreen (16:9), and cinema (21:9). As you are making YouTube Shorts, so you need to select 9:16.
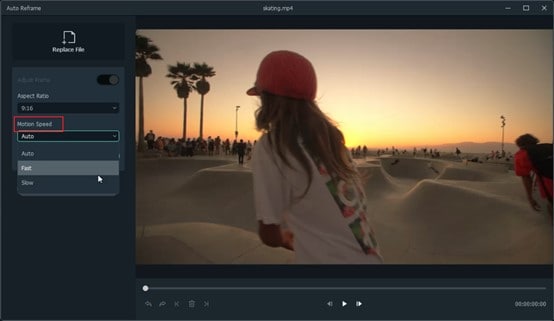
You can adjust the speed of your video in multiple options: keep it at Auto or make it Slow or Fast as per your requirements.
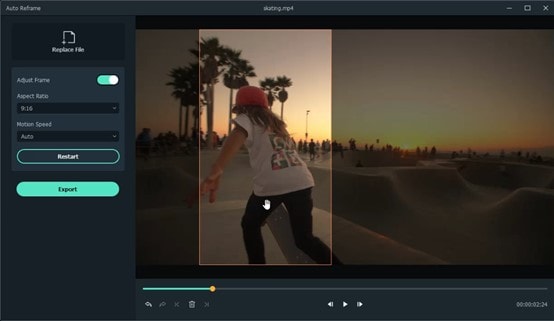
Step 3. Analyze, and Auto Reframe the Video
Once you finish the above adjustments, hit the Analysis tab. Filmora will take a few seconds to finish analyzing your video project.
Then the video will be automatically and quickly reframed to your specified speed and aspect ratio. You can modify these aspect ratios and speed options by hitting the Restart option as well.
Step 4. Preview the Reframed Video and Check
Lastly, you can preview your final video. If the video needs more work, you can also play and pause it at the point you want to adjust the frame. You can use Next Edit Point, Undo, Redo, and Previous Edit Point at the bottom panel.
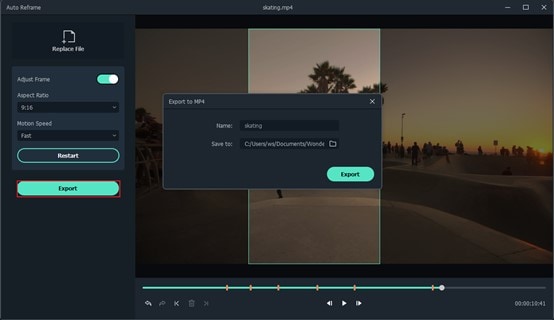
Step 5. Export the Reframed Video
Finally, after all the final adjustments, you can hit the Export tab, name your file and choose the destination folder.
Part 3: FAQs about YouTube Shorts
1. Where to download the YouTube Shorts app?
The YouTube Shorts app is currently available in the YouTube app that your iOS or Android smartphone has. To access it, sign in to your Google account, tap the + button at the bottom, and select the Create a Short option in the popup box that shows off.
2. What’s the YouTube Shorts video duration?
A YouTube Shorts video can be of only up to 60 seconds.
3. Can I Upload Shorts Video on Computer?
Yes. You can upload a Short video by following the traditional method.
- Click the Create camera icon on your PC.
- Click on Upload Videos.
- Locate the file on the PC you want to upload, and you are all done.
However, the option best works in smartphones, and still, if you are uploading through a laptop or PC, make sure to add #shorts in the title or description of the uploaded video.
4. What’s the YouTube Shorts size limitation?
YouTube hasn’t provided any information related to this as of now. However, you can rest assured that a 60 seconds long video file wouldn’t be too large for YouTube to handle.
5. How many subs do you need to access Shorts?
YouTube Shorts is available for everyone no matter how many subscribers the YouTube channel has.
6. Can you make money on Shorts?
Short-form video creators do not share revenue from advertisements played in the Shorts player right now. Instead, start the YouTube Shorts Fund, a $100M fund for creators that helps build the future of short-form video on YouTube.
Conclusion
Hopefully, you have resolved the concern of YouTube Shorts not showing. You can access your total dose of entertainment by getting the YouTube Shorts through our editing tips mentioned in the last section.
However, we’ve mainly defined the editing part of Wondershare Filmora except creating YouTube Shorts through its Auto Reframe feature. But, as you go through Filmora, you will find that editing is not a cumbersome task to follow over this platform. It’s the easiest!
Liza Brown
Liza Brown is a writer and a lover of all things video.
Follow @Liza Brown
Liza Brown
Oct 26, 2023• Proven solutions
Well, a YouTube Shorts is said to be YouTube’s short-form answer to TikTok. You can quickly scroll via algorithmically-driven feed, discover other similar short videos, and subscribe to your favorite creators.
Here, creators can record, share, and edit short-form video content that’s 60 seconds or less and vertically oriented. And, unlike Instagram stories, YouTube Shorts won’t disappear but will remain on your channel. So, that’s the brief intro of YouTube Shorts which we think everyone is aware of after YouTube has announced its YouTube Shorts availability globally.
However, certain factors are still there, raising the issue or concern of YouTube Shorts not showing. Thus, if you can’t find the YouTube Shorts option or videos, or YouTube Shorts disappeared, find a solution in this post.
Part 1: Why Do YouTube Shorts Not Showing Up?
There could be multiple reasons why YouTube Shorts not showing on your phone, the channel’s home page etc.
Besides, many scenarios arise with this issue, namely the YouTube Shorts option not showing up, the YouTube Shorts button missing, and YouTube Shorts videos not showing correctly.
And, there are valid reasons as well as to why these situations are happening to you. So, let’s discuss each of them separately in brief, along with the solutions in the next section.
- YouTube Shorts are not showing on the channel’s homepage
The standard and the most common reason why YouTube Shorts are not showing on the channel’s homepage is that you have not updated the YouTube app.
- YouTube Shorts option not showing up
This may be happening either because you’ve not updated the app or your internet connection is pretty slow to show you the option. There could be another reason as you may not have cleared the YouTube mobile app’s cache and data.
- YouTube Shorts button missing
Again, you may not have updated the YouTube app, or your internet connection is slow is the most common reason here. Moreover, the button of YouTube Shorts stays hidden behind the +icon.
- YouTube Shorts videos not showing correctly
The most valid reason for YouTube Shorts not showing correctly or YouTube Shorts disappearing is that you have a poor internet connection. Plus, we’ve discussed proper steps below if you’ve missed something while uploading the YouTube Shorts triggering this scenario.
Before we move on to fixing YouTube Shorts not showing the issue, here’s a quick note on which videos qualify as YouTube Shorts. Shorts are different from YouTube stories. Unlike YouTube stories, it gets displayed in your regular channel feed along with your other YouTube videos.
And, you must note that a YouTube Shorts video consists of two criteria as follows.
- The video has to be vertical (portrait-style)
- The video must be 60 seconds or less
Part 2: How to Fix YouTube Shorts Not Showing Up?
Here’s the section covering fixes on YouTube Shorts not showing. Please give it a read and resolve your issue happily!
Fix 1: Update the YouTube App
As we’ve already discussed above, check if your YouTube mobile app has the latest version. The newest version of the YouTube mobile app (Version: 16.17.36) has a dedicated Shorts button at the bottom. And, it replaces the Trending button from the YouTube app.
Moreover, the option to upload Shorts is now hidden behind the + icon. Tap on the + icon and hit the Create a Short option.
Fix 2: Check If Shorts Is Available in Your Country
Now, YouTube Shorts is available globally, but there was a phase when YouTube Shorts was a beta feature. It was only available in India and the US, which could be why you could not view Shorts in the YouTube app.
Fix 3: YouTube Shorts Is Mobile-only
As of now, YouTube Shorts is only available on a smartphone because it’s still in beta version. However, you can create Shorts via smartphone and the camera option in YouTube mobile app. Hence, there’s no point in searching for Shorts on your computer.
You can upload Shorts videos from your laptop. The entire process is similar to uploading a regular video. However, you have to mention #Shorts in the title and description to differentiate it as a Shorts video.
Common Fixes to YouTube Shorts Not Working
- Update the YouTube App to the latest version.
- Clear the YouTube mobile app’s data and cache.
- Check if your internet is connected or your internet connection is strong.
- Restart your smartphone and try again.
- The YouTube server can be down, busy, or under maintenance. Wait for a while and try again.
The fixes above are also applicable if the YouTube Shorts are not showing on iPhone as well.
Or, you can try the VPN solution before contacting the YouTube team.
If Videos Are Not Visible under YouTube Shorts
Solution 1: Ensure that you’ve added #shorts in the title and description. Those who have YouTube Shorts, they can make shorts videos via the Shorts camera. Those who can’t access this camera can also upload their current vertical videos that are less than 60 seconds after adding the hashtag #Shorts in the title or description.
All in all, you must include #shorts to let the YouTube algorithm figure out the video is created for Shorts, and the issue of YouTube Shorts not showing up will also be resolved.
Solution 2: Sometimes, you may not find YouTube Shorts videos if they’re precisely 60 seconds in duration because YouTube sometimes adds 1-2 seconds to a Shorts video for some reason. So, be alert here and ensure your Shorts video is around 58 seconds or less.
Solution 3: If your YouTube Shorts is not getting views, you need to wait more here because it takes a while for YouTube to index a Shorts video and suggest them to people. So, it’s the task of the algorithm that varies from person to person. Some Shorts videos take several days while others take weeks.
If YouTube Shorts Videos Are Not Showing up Correctly
Once uploaded, the YouTube Shorts will be displayed in a vertical thumbnail on YouTube and other regular content already there in your account. Or, it’s your choice to create a new channel for the YouTube shorts videos. If the YouTube shorts not showing correctly, you can try as follows:
Step 1. Go to your channel and select the “customize channel” option.
Step 2. Hop on to the Featured section, and choose the add section.
Step 3. You’ll see shorts videos under the “videos” section. Click that, and the videos you have which are tagged in with #shorts in the title or description will automatically display here.
Bonus Tip: How to Easily Create Vertical Videos for YouTube Shorts on PC
The YouTube Shorts app is pretty convenient to use nowadays. However, it doesn’t allow you to fine-edit the videos if you’ve explored the app or specifically when you want your videos to look more professional. The app doesn’t even have many filtering options, such as Effects, Elements, etc., to make your videos more interactive.
With that said, you can always use an efficient third-party program like Wondershare Filmora to create professional-looking YouTube Shorts videos to engage your viewers highly. Even no famous YouTuber uploads their videos directly from the app without using any third-party tool.
We recommend Wondershare Filmora because it is a production and post-production app available for Windows and Mac computers. It gives tough competition to some globally renowned tools like Final Cut Pro X, Adobe Premiere Pro, etc., because of its simplicity. Furthermore, Filmora has its inbuilt screen, voice recording features, and webcam that can be useful to create game walkthroughs, interactive videos, and voiceovers as needed.
Moreover, a YouTube Shorts video can be made through Wondershare Filmora using the below-mentioned guide.
Note: We are assuming that you have already recorded a vertical video using your smartphone and that it has been transferred to your PC.
So, the signature feature to create YouTube Shorts videos on Wondershare Filmora is Auto Reframe.
Powered by AI technology, Auto Reframe automatically identifies the focal point of your video and crops it while always maintaining it within the frame. This way, the main object or action in your video never goes out of vision.
You can choose an aspect ratio that best fits YouTube Shorts which is 9:16.
How to Use Auto Reframe in Filmora?
Step 1. Open Filmora and Select Auto Reframe
You can choose among three ways to open the Auto Reframe feature in Filmora.
* **Way 1:** Once you open Filmora, the main interface will display the **Auto Reframe** tab on the right-hand panel. Click it to open directly
- Way 2: Import media as File > Import Media Files and select the file. After you import the media, right-click and choose the Auto Reframe.
- Way 3: Lastly, you can choose the Tools option on the top menu bar and hit the Auto Reframe.
Step 2. Adjust the Aspect Ratio and Motion Speed
A separate dialog box will display once you have selected the Auto Reframe option. Now, click on Import Media and choose a single video to import. You can change the imported video by hitting the Replace File at the top menu.
There are multiple aspect ratio templates available such as square (1:1), vertical (9:16), standard (4:3), widescreen (16:9), and cinema (21:9). As you are making YouTube Shorts, so you need to select 9:16.
You can adjust the speed of your video in multiple options: keep it at Auto or make it Slow or Fast as per your requirements.
Step 3. Analyze, and Auto Reframe the Video
Once you finish the above adjustments, hit the Analysis tab. Filmora will take a few seconds to finish analyzing your video project.
Then the video will be automatically and quickly reframed to your specified speed and aspect ratio. You can modify these aspect ratios and speed options by hitting the Restart option as well.
Step 4. Preview the Reframed Video and Check
Lastly, you can preview your final video. If the video needs more work, you can also play and pause it at the point you want to adjust the frame. You can use Next Edit Point, Undo, Redo, and Previous Edit Point at the bottom panel.
Step 5. Export the Reframed Video
Finally, after all the final adjustments, you can hit the Export tab, name your file and choose the destination folder.
Part 3: FAQs about YouTube Shorts
1. Where to download the YouTube Shorts app?
The YouTube Shorts app is currently available in the YouTube app that your iOS or Android smartphone has. To access it, sign in to your Google account, tap the + button at the bottom, and select the Create a Short option in the popup box that shows off.
2. What’s the YouTube Shorts video duration?
A YouTube Shorts video can be of only up to 60 seconds.
3. Can I Upload Shorts Video on Computer?
Yes. You can upload a Short video by following the traditional method.
- Click the Create camera icon on your PC.
- Click on Upload Videos.
- Locate the file on the PC you want to upload, and you are all done.
However, the option best works in smartphones, and still, if you are uploading through a laptop or PC, make sure to add #shorts in the title or description of the uploaded video.
4. What’s the YouTube Shorts size limitation?
YouTube hasn’t provided any information related to this as of now. However, you can rest assured that a 60 seconds long video file wouldn’t be too large for YouTube to handle.
5. How many subs do you need to access Shorts?
YouTube Shorts is available for everyone no matter how many subscribers the YouTube channel has.
6. Can you make money on Shorts?
Short-form video creators do not share revenue from advertisements played in the Shorts player right now. Instead, start the YouTube Shorts Fund, a $100M fund for creators that helps build the future of short-form video on YouTube.
Conclusion
Hopefully, you have resolved the concern of YouTube Shorts not showing. You can access your total dose of entertainment by getting the YouTube Shorts through our editing tips mentioned in the last section.
However, we’ve mainly defined the editing part of Wondershare Filmora except creating YouTube Shorts through its Auto Reframe feature. But, as you go through Filmora, you will find that editing is not a cumbersome task to follow over this platform. It’s the easiest!
Liza Brown
Liza Brown is a writer and a lover of all things video.
Follow @Liza Brown
Crafting the Perfect Aesthetic with Controlled Lighting
Lighting Tips for Vlogging: How to Light

Richard Bennett
Mar 27, 2024• Proven solutions
One of the best things you can do for your video quality is to ensure you have great lighting. Viewers find poor lighting distracting and it’s hard for them to see how great your content is if they are busy thinking about why your video is so dark. By creating a great lighting set up you can ensure that the people watching your videos are only thinking about how much they’re enjoying them.
Going outside and using natural light is the cheapest way to get a lot of light for your videos. If your vlog is not suited to the great outdoors then you need to get more strategic. You can turn on all the lights in your living room and still end up with a dark, grainy, video.
Video Lighting Basics: Three Point Lighting

The most common technique of lighting a scene is called three-point lighting. It involves three different sources of light in the shot and is used by portrait photographers, which is also a great method for lighting your vlog.
The brightest source of light is also known as the key light which need to be high quality. A window will work, but if you do not have access to one where you are filming then consider an LED panel light or a softbox light like the ones used in portrait photography.
This first light will create a dramatic shadow across half of your face. You want to reduce this shadow, but not get rid of it completely.
Rather than setting up another light source on the opposite side of the camera, put up a reflector to bounce some light back onto your face. This reflector is called your ‘Fill Light’.
The fill light is less bright than the primary source of light and it is placed on the side opposite to the key light. Its purpose is to reduce shadows produced by the key light and the reflector will need to be mounted on a stand.
The final step to creating three point lighting is to set up another light behind you. This is your ‘Backlight’, and it will help you stand out from your background. Backlight or Hair light is always placed behind and above the subject to create separation between the subject in the shot and the background. This basic lighting technique can be applied in almost every scene you shoot, which is why it is important to keep an open mind and to continue experimenting with possible light setups.
Watch Video! Top Lighting Tips for Vlogging
Lightning Tips for Aspiring YouTube Videographers
Becoming the master of light will take some time and practice, so it is crucial to remain curious and anxious to learn new tricks throughout that process if you want to continually become better. These tips will help you make the first steps on that journey.
1. Focus Your Key Light
Try to focus your Key Light so that it lights only you and not your background. Do this by mounting anything that can cast a shadow onto your Key Light to control the area where the light hits. If you are using a window for your Key Light then you can use a curtain. If you use a softbox light then your light will already be somewhat focused.
2. Use Natural Lighting
The light provided by the Sun is still the best light source, you can have in your video. The trouble is that natural light changes quickly, which makes it highly unpredictable. The best way to deal with this challenge is to come prepared to the set and to get the shot you want as quickly as you can.
3. Try DIY Lightning
Literally, anything from candles to LED light bulbs can serve as a source of light in a shot. You just need to pay attention to the light temperature, because warmer light sources may highlight reds and yellows that can make your footage look less realistic.
4. Use Lightning Kits
This is by far the best option if you want to be in complete control of the light on your set. You can adjust the intensity of the lights, use filters, diffusers and all sorts of other accessories to create the light that flatters the subjects of your videos. The only downside is that you’ll have to spend a considerable amount of money if you want to have a professional lighting kit.
5. Set up reflectors
Sets of reflectors are often under $50, so they are fairly affordable. However, some vloggers choose to forgo purchasing reflectors and make their own out of tinfoil.

If your strong main light is too hard on your eyes then you can use a translucent ‘reflector’ to soften it. Set your translucent reflector, or other screen, up in front of your main light to diffuse it.
If you are hosting a beauty vlog then you might consider a slightly different set up. Instead of having your main light off to one side set it up directly in front of you so your entire face is lit evenly. It is still a good idea to use fill lights in this set up to give you some dimension, and a backlight is even more essential for helping you stand out from the background. The even light hitting your face will also make you look flat if you do not use a backlight.

If you are using all of the lighting options available to you and your video still looks too dark then you can try brightening it by opening up the aperture of your camera lens/setting a lower f-stop. Letting more light into your camera can help your footage look brighter, although you also run the risk of making things look overexposed/ washed out if you are not careful.
If you are stuck shooting in low light conditions it is best to use a lens with a wider aperture/lower f-stop. This will make the best of the light you do have.
Richard Bennett
Richard Bennett is a writer and a lover of all things video.
Follow @Richard Bennett
Richard Bennett
Mar 27, 2024• Proven solutions
One of the best things you can do for your video quality is to ensure you have great lighting. Viewers find poor lighting distracting and it’s hard for them to see how great your content is if they are busy thinking about why your video is so dark. By creating a great lighting set up you can ensure that the people watching your videos are only thinking about how much they’re enjoying them.
Going outside and using natural light is the cheapest way to get a lot of light for your videos. If your vlog is not suited to the great outdoors then you need to get more strategic. You can turn on all the lights in your living room and still end up with a dark, grainy, video.
Video Lighting Basics: Three Point Lighting
The most common technique of lighting a scene is called three-point lighting. It involves three different sources of light in the shot and is used by portrait photographers, which is also a great method for lighting your vlog.
The brightest source of light is also known as the key light which need to be high quality. A window will work, but if you do not have access to one where you are filming then consider an LED panel light or a softbox light like the ones used in portrait photography.
This first light will create a dramatic shadow across half of your face. You want to reduce this shadow, but not get rid of it completely.
Rather than setting up another light source on the opposite side of the camera, put up a reflector to bounce some light back onto your face. This reflector is called your ‘Fill Light’.
The fill light is less bright than the primary source of light and it is placed on the side opposite to the key light. Its purpose is to reduce shadows produced by the key light and the reflector will need to be mounted on a stand.
The final step to creating three point lighting is to set up another light behind you. This is your ‘Backlight’, and it will help you stand out from your background. Backlight or Hair light is always placed behind and above the subject to create separation between the subject in the shot and the background. This basic lighting technique can be applied in almost every scene you shoot, which is why it is important to keep an open mind and to continue experimenting with possible light setups.
Watch Video! Top Lighting Tips for Vlogging
Lightning Tips for Aspiring YouTube Videographers
Becoming the master of light will take some time and practice, so it is crucial to remain curious and anxious to learn new tricks throughout that process if you want to continually become better. These tips will help you make the first steps on that journey.
1. Focus Your Key Light
Try to focus your Key Light so that it lights only you and not your background. Do this by mounting anything that can cast a shadow onto your Key Light to control the area where the light hits. If you are using a window for your Key Light then you can use a curtain. If you use a softbox light then your light will already be somewhat focused.
2. Use Natural Lighting
The light provided by the Sun is still the best light source, you can have in your video. The trouble is that natural light changes quickly, which makes it highly unpredictable. The best way to deal with this challenge is to come prepared to the set and to get the shot you want as quickly as you can.
3. Try DIY Lightning
Literally, anything from candles to LED light bulbs can serve as a source of light in a shot. You just need to pay attention to the light temperature, because warmer light sources may highlight reds and yellows that can make your footage look less realistic.
4. Use Lightning Kits
This is by far the best option if you want to be in complete control of the light on your set. You can adjust the intensity of the lights, use filters, diffusers and all sorts of other accessories to create the light that flatters the subjects of your videos. The only downside is that you’ll have to spend a considerable amount of money if you want to have a professional lighting kit.
5. Set up reflectors
Sets of reflectors are often under $50, so they are fairly affordable. However, some vloggers choose to forgo purchasing reflectors and make their own out of tinfoil.
If your strong main light is too hard on your eyes then you can use a translucent ‘reflector’ to soften it. Set your translucent reflector, or other screen, up in front of your main light to diffuse it.
If you are hosting a beauty vlog then you might consider a slightly different set up. Instead of having your main light off to one side set it up directly in front of you so your entire face is lit evenly. It is still a good idea to use fill lights in this set up to give you some dimension, and a backlight is even more essential for helping you stand out from the background. The even light hitting your face will also make you look flat if you do not use a backlight.
If you are using all of the lighting options available to you and your video still looks too dark then you can try brightening it by opening up the aperture of your camera lens/setting a lower f-stop. Letting more light into your camera can help your footage look brighter, although you also run the risk of making things look overexposed/ washed out if you are not careful.
If you are stuck shooting in low light conditions it is best to use a lens with a wider aperture/lower f-stop. This will make the best of the light you do have.
Richard Bennett
Richard Bennett is a writer and a lover of all things video.
Follow @Richard Bennett
- Title: "In 2024, Overcome Vanished YouTube Minute Media"
- Author: Thomas
- Created at : 2024-05-31 12:39:09
- Updated at : 2024-06-01 12:39:09
- Link: https://youtube-help.techidaily.com/in-2024-overcome-vanished-youtube-minute-media/
- License: This work is licensed under CC BY-NC-SA 4.0.
