"In 2024, Perfect Your YouTube Presence Learn to Create Engaging Ads & Thumbnails"
Perfect Your YouTube Presence: Learn to Create Engaging Ads & Thumbnails
How to Make YouTube Banners and Thumbnails

Richard Bennett
Mar 27, 2024• Proven solutions
The art on your YouTube channel – banners, thumbnails, icons, and watermarks – will help to determine how viewers feel about your vlog. If your art does not look like it all goes together then people will get a sloppy, amateurish, impression of your channel. However, if your different pieces of channel art all seem to complement each other and match the tone and theme of your channel then it will help viewers to have a pleasant browsing experience. They will get the impression that you take your YouTube channel seriously and that they can trust you as a source of information, comedy, or general entertainment.
How to Make YouTube Banners and Thumbnails
YouTube Banners and Thumbnails are two of the most important pieces of channel art you will need. This article will explain the best practices for both, and suggest sites where you will be able to build your own banners and thumbnails for free.
1. YouTube Banners
Quick Tips:
- The image you upload for your YouTube banner should be 2560 x 1440px (pixels).
- The ‘safe area’ for text, logos, and other important visual information (like faces) is 1546 x 423px.
Your banner is probably the first thing that comes to mind when you think about channel art. Banners are the headers that rest at the tops of channel pages on YouTube. Your banner should be 2560 x 1440 px, although not all of it will always be visible. On a desktop computer or mobile device only a 1546 x 423 px ‘safe area’ will be visible. When viewed on a TV screen your entire image will be visible. YouTube does support PNG, but if your PNG file does not upload properly (as has been the case for some YouTubers) then changing your file type to JPEG might help.
YouTube Banners are extremely important to the success of your channel. If you do not have a banner then it looks like you do not really care about your vlog. If you have a basic banner that is not at all personalized then it certainly looks like you care, but it might also look like you are new to YouTube.
The best banners are customized to reflect the kind of experience you want viewers to have on your channel. The banner of a comedic YouTube channel might use bright colors, where the banner for a gaming channel will probably use darker colors similar to the ones that are in the games the vlogger plays. Connecting your banner to the theme of your channel is part of how you define the style of your vlog. It is the difference between being a Beauty Guru and a general YouTuber who gives makeup tips sometimes.
Including a photo of yourself, or your logo if you have one, is a great way to personalize your banner.
2. YouTube Thumbnails
Quick Tips:
- Search for your video’s topic to see the thumbnails your thumbnail will be competing against.
- Make any text huge so people can read it on their smartphone screens.
- Emojis, colored boarders, and graphics are all potential ways to stand out.
Thumbnails are often ignored by newer YouTubers. YouTube selects a thumbnail for every one of your videos and it is always a still image from that video. You can choose which frame you want to use and a lot of people feel like that is good enough. When you create a custom thumbnail, however, you get to not only choose your image but insert a title.
If you are choosing the images you are using for thumbnails you can make sure they are always similar frames. This will help people identify your videos quickly in searches. Using titles in your thumbnails will also help searchers identify your videos, if you always use the same title style. Another benefit of titles is that they capture the attention of people looking for your specific topic. Remember when building your thumbnails that they will appear smaller on YouTube than they probably are while you edit them. On mobile devices, they will look even smaller. So, if you are going to use text in your thumbnail, make sure it is huge.
One thumbnail taboo that you should never break is using an image that has nothing to do with your video. Using an image of a cute cat for a vlog post that has nothing to do with cats is misleading and will anger viewers. You may draw in a lot of viewers who want to see a cat video, but they will leave right away when they do not see a cat and they will never watch anything by you again.
3.Where To Create Banners and Thumbnails
There are sites online that will allow you to edit images and use them in templates for YouTube banners. You can also use these services to edit your thumbnails. Two of the most popular, free, online photo editors are PicMonkey.com and Canva.com.

Canva has templates you can use to create YouTube banners, as well as a variety of stock images you can use in combination with your own when creating channel art. It is free to edit images on Canva, but they do have some premium features which cost $1 each to access. This service has both a desktop version and an iPad app.

PicMonkey lets you import images from your computer or social media accounts, edit them, and use them in templates for YouTube banners or other kinds of social media graphics. PicMonkey is free to use, but you can only access their more advanced editing tools if you buy a paid subscription. Monthly subscriptions are $4.99 per month, and yearly subscriptions are $2.75 per month.
Richard Bennett
Richard Bennett is a writer and a lover of all things video.
Follow @Richard Bennett
Richard Bennett
Mar 27, 2024• Proven solutions
The art on your YouTube channel – banners, thumbnails, icons, and watermarks – will help to determine how viewers feel about your vlog. If your art does not look like it all goes together then people will get a sloppy, amateurish, impression of your channel. However, if your different pieces of channel art all seem to complement each other and match the tone and theme of your channel then it will help viewers to have a pleasant browsing experience. They will get the impression that you take your YouTube channel seriously and that they can trust you as a source of information, comedy, or general entertainment.
How to Make YouTube Banners and Thumbnails
YouTube Banners and Thumbnails are two of the most important pieces of channel art you will need. This article will explain the best practices for both, and suggest sites where you will be able to build your own banners and thumbnails for free.
1. YouTube Banners
Quick Tips:
- The image you upload for your YouTube banner should be 2560 x 1440px (pixels).
- The ‘safe area’ for text, logos, and other important visual information (like faces) is 1546 x 423px.
Your banner is probably the first thing that comes to mind when you think about channel art. Banners are the headers that rest at the tops of channel pages on YouTube. Your banner should be 2560 x 1440 px, although not all of it will always be visible. On a desktop computer or mobile device only a 1546 x 423 px ‘safe area’ will be visible. When viewed on a TV screen your entire image will be visible. YouTube does support PNG, but if your PNG file does not upload properly (as has been the case for some YouTubers) then changing your file type to JPEG might help.
YouTube Banners are extremely important to the success of your channel. If you do not have a banner then it looks like you do not really care about your vlog. If you have a basic banner that is not at all personalized then it certainly looks like you care, but it might also look like you are new to YouTube.
The best banners are customized to reflect the kind of experience you want viewers to have on your channel. The banner of a comedic YouTube channel might use bright colors, where the banner for a gaming channel will probably use darker colors similar to the ones that are in the games the vlogger plays. Connecting your banner to the theme of your channel is part of how you define the style of your vlog. It is the difference between being a Beauty Guru and a general YouTuber who gives makeup tips sometimes.
Including a photo of yourself, or your logo if you have one, is a great way to personalize your banner.
2. YouTube Thumbnails
Quick Tips:
- Search for your video’s topic to see the thumbnails your thumbnail will be competing against.
- Make any text huge so people can read it on their smartphone screens.
- Emojis, colored boarders, and graphics are all potential ways to stand out.
Thumbnails are often ignored by newer YouTubers. YouTube selects a thumbnail for every one of your videos and it is always a still image from that video. You can choose which frame you want to use and a lot of people feel like that is good enough. When you create a custom thumbnail, however, you get to not only choose your image but insert a title.
If you are choosing the images you are using for thumbnails you can make sure they are always similar frames. This will help people identify your videos quickly in searches. Using titles in your thumbnails will also help searchers identify your videos, if you always use the same title style. Another benefit of titles is that they capture the attention of people looking for your specific topic. Remember when building your thumbnails that they will appear smaller on YouTube than they probably are while you edit them. On mobile devices, they will look even smaller. So, if you are going to use text in your thumbnail, make sure it is huge.
One thumbnail taboo that you should never break is using an image that has nothing to do with your video. Using an image of a cute cat for a vlog post that has nothing to do with cats is misleading and will anger viewers. You may draw in a lot of viewers who want to see a cat video, but they will leave right away when they do not see a cat and they will never watch anything by you again.
3.Where To Create Banners and Thumbnails
There are sites online that will allow you to edit images and use them in templates for YouTube banners. You can also use these services to edit your thumbnails. Two of the most popular, free, online photo editors are PicMonkey.com and Canva.com.
Canva has templates you can use to create YouTube banners, as well as a variety of stock images you can use in combination with your own when creating channel art. It is free to edit images on Canva, but they do have some premium features which cost $1 each to access. This service has both a desktop version and an iPad app.
PicMonkey lets you import images from your computer or social media accounts, edit them, and use them in templates for YouTube banners or other kinds of social media graphics. PicMonkey is free to use, but you can only access their more advanced editing tools if you buy a paid subscription. Monthly subscriptions are $4.99 per month, and yearly subscriptions are $2.75 per month.

Richard Bennett
Richard Bennett is a writer and a lover of all things video.
Follow @Richard Bennett
Richard Bennett
Mar 27, 2024• Proven solutions
The art on your YouTube channel – banners, thumbnails, icons, and watermarks – will help to determine how viewers feel about your vlog. If your art does not look like it all goes together then people will get a sloppy, amateurish, impression of your channel. However, if your different pieces of channel art all seem to complement each other and match the tone and theme of your channel then it will help viewers to have a pleasant browsing experience. They will get the impression that you take your YouTube channel seriously and that they can trust you as a source of information, comedy, or general entertainment.
How to Make YouTube Banners and Thumbnails
YouTube Banners and Thumbnails are two of the most important pieces of channel art you will need. This article will explain the best practices for both, and suggest sites where you will be able to build your own banners and thumbnails for free.
1. YouTube Banners
Quick Tips:
- The image you upload for your YouTube banner should be 2560 x 1440px (pixels).
- The ‘safe area’ for text, logos, and other important visual information (like faces) is 1546 x 423px.
Your banner is probably the first thing that comes to mind when you think about channel art. Banners are the headers that rest at the tops of channel pages on YouTube. Your banner should be 2560 x 1440 px, although not all of it will always be visible. On a desktop computer or mobile device only a 1546 x 423 px ‘safe area’ will be visible. When viewed on a TV screen your entire image will be visible. YouTube does support PNG, but if your PNG file does not upload properly (as has been the case for some YouTubers) then changing your file type to JPEG might help.
YouTube Banners are extremely important to the success of your channel. If you do not have a banner then it looks like you do not really care about your vlog. If you have a basic banner that is not at all personalized then it certainly looks like you care, but it might also look like you are new to YouTube.
The best banners are customized to reflect the kind of experience you want viewers to have on your channel. The banner of a comedic YouTube channel might use bright colors, where the banner for a gaming channel will probably use darker colors similar to the ones that are in the games the vlogger plays. Connecting your banner to the theme of your channel is part of how you define the style of your vlog. It is the difference between being a Beauty Guru and a general YouTuber who gives makeup tips sometimes.
Including a photo of yourself, or your logo if you have one, is a great way to personalize your banner.
2. YouTube Thumbnails
Quick Tips:
- Search for your video’s topic to see the thumbnails your thumbnail will be competing against.
- Make any text huge so people can read it on their smartphone screens.
- Emojis, colored boarders, and graphics are all potential ways to stand out.
Thumbnails are often ignored by newer YouTubers. YouTube selects a thumbnail for every one of your videos and it is always a still image from that video. You can choose which frame you want to use and a lot of people feel like that is good enough. When you create a custom thumbnail, however, you get to not only choose your image but insert a title.
If you are choosing the images you are using for thumbnails you can make sure they are always similar frames. This will help people identify your videos quickly in searches. Using titles in your thumbnails will also help searchers identify your videos, if you always use the same title style. Another benefit of titles is that they capture the attention of people looking for your specific topic. Remember when building your thumbnails that they will appear smaller on YouTube than they probably are while you edit them. On mobile devices, they will look even smaller. So, if you are going to use text in your thumbnail, make sure it is huge.
One thumbnail taboo that you should never break is using an image that has nothing to do with your video. Using an image of a cute cat for a vlog post that has nothing to do with cats is misleading and will anger viewers. You may draw in a lot of viewers who want to see a cat video, but they will leave right away when they do not see a cat and they will never watch anything by you again.
3.Where To Create Banners and Thumbnails
There are sites online that will allow you to edit images and use them in templates for YouTube banners. You can also use these services to edit your thumbnails. Two of the most popular, free, online photo editors are PicMonkey.com and Canva.com.
Canva has templates you can use to create YouTube banners, as well as a variety of stock images you can use in combination with your own when creating channel art. It is free to edit images on Canva, but they do have some premium features which cost $1 each to access. This service has both a desktop version and an iPad app.
PicMonkey lets you import images from your computer or social media accounts, edit them, and use them in templates for YouTube banners or other kinds of social media graphics. PicMonkey is free to use, but you can only access their more advanced editing tools if you buy a paid subscription. Monthly subscriptions are $4.99 per month, and yearly subscriptions are $2.75 per month.
Richard Bennett
Richard Bennett is a writer and a lover of all things video.
Follow @Richard Bennett
Pro-Level Mobile Media Capture: IPhone and Android’s Top 5 Apps
Best Camera Apps to Shoot and Record Videos on iPhone and Andriod Phones
Richard Bennett
Oct 26, 2023• Proven solutions
Smartphone cameras, especially the newest models, are capable of recording great videos. Depending on what kind of videos you make, you might not actually need a separate camera.
The majority of phone cameras record in full HD now, and some can even manage 4K. Where things get tricky is shooting in less than ideal conditions, i.e low light. You cannot make the same adjustments and customizations to your settings with a smartphone camera as you can with a DSLR.
You don’t have the same level of control.
But don’t worry – there are 5 camera apps that will allow you to record videos and get even more creative with how you use your phone’s camera.
- Part 1: Bonus Tip-Make Your Own Video with Wondershare Filmora
- Part 2: Best 5 Camera Apps to Record Videos on iPhone and Android
Part 1: Bonus Tip-Make Your Own Video with Wondershare Filmora
Wondershare Filmora is an amazing video editor for both professional staff and beginners. Its intuitive interface, fast timeline rendering, advanced color tuning, and surprising video effects, etc will make your video stand out! Just download it and edit your smartphone videos with Wondershare Filmora!


Part 2: Best 5 Camera Apps to Record Videos on iPhone and Android
Let’s dive!
1. Open Camera – Free, Android Only

This camera app gives you control over your exposure, flash, focus, ISO, shutter speed, torch, and white balance. How much control you have is up to you. If managing all these things manually is a hassle for you, you can use its automatic or semi-manual modes instead of manual mode.
This is a great camera app to record time-lapses. It is simplistic compared to some of the other apps on this list, but it is also extremely easy to use.
2. ProShot - $4, iOS or Android
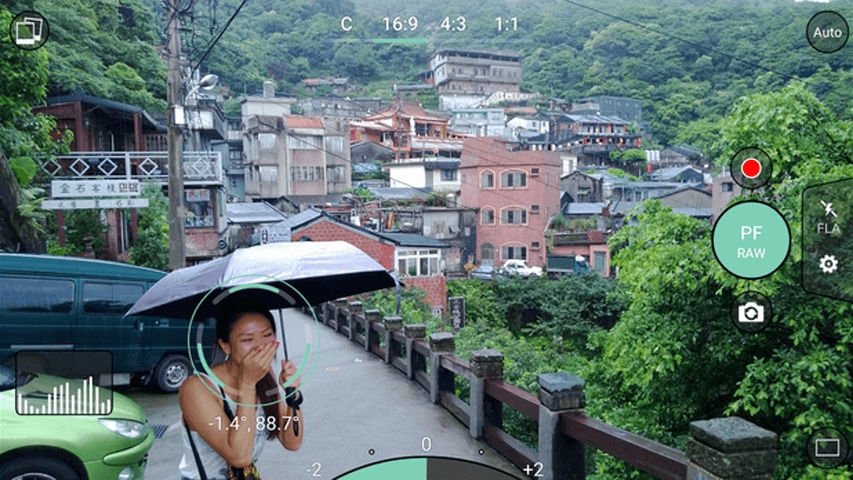
ProShot lets you adjust your frame rate, which is important if you want to shoot slow motion or time-lapse videos. You can also adjust your brightness while filming. One of the most useful features of this camera app is that it provides a real-time audio level meter, so you won’t be surprised by a poor sound recording when you watch your videos back.
3. ProCamera - $5, iOS Only
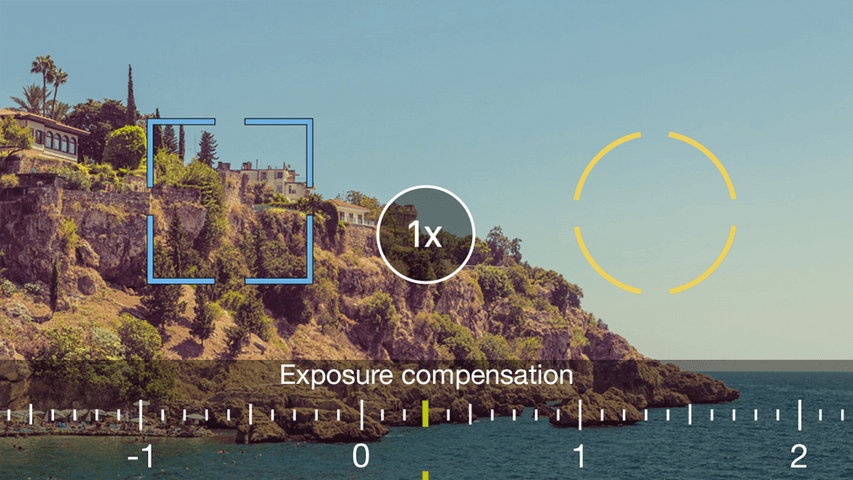
This is one of the most frequently recommended camera apps for iPhones. It makes it easy for you to adjust your focus, iOS, and exposure. You can also play with different filters and effects right in the app. One of the only downsides of this app is that some of its most useful features, like Lowlight Plus, are in-app purchases.
4. Sun Seeker - $10, iOS or Android

A lot of the time when you’re shooting with your phone, you’re shooting outside. When you’re shooting outside, the most important thing you need to keep track of is the sun. Sun Seeker is the perfect app for figuring out where the sun will be in the sky at any given time, which will tell you the best time to go out and make your video.
For more information on making videos with natural light, check out Indoor Natural Lighting Tips .
Besides just keeping track of the sun, Sun Seeker provides an augmented reality view of its path and how it will affect specific locations.
5. FiLMiC Pro - $10, iOS or Android
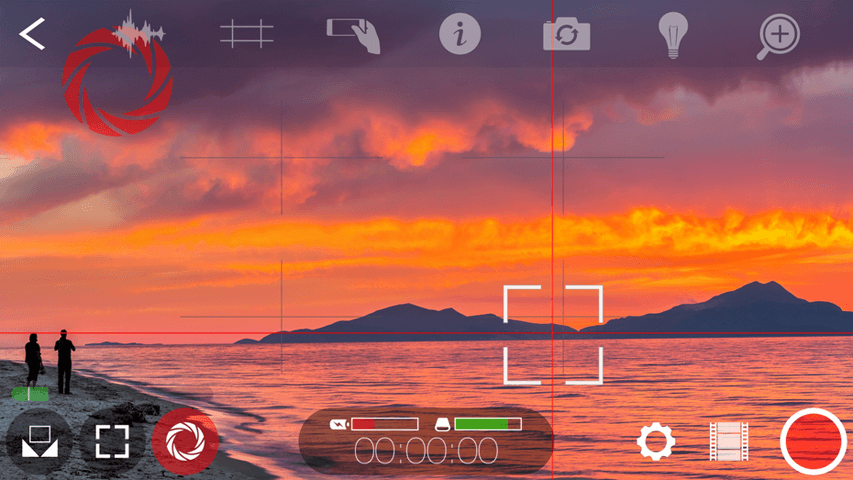
This is probably the best all-purpose camera app available. It gives you exactly the same kind of control over your smartphone camera as you would have over a DSLR. You can manually adjust your focus, exposure, ISO, shutter speed, tint, and color temperature. There are even voice processing audio filters, so you can capture better audio while you’re shooting and have less to fix in post.
Final Words
Because mobile cameras already perform so well, it can be easy to think to have more to adjust would only make things more complicated. However, there are occasions where you need to be able to make these adjustments. Are the videos you take inside at night at a lower quality than the ones you record during the day, for example? If you could set a higher ISO, you would be able to fix that.
Another example: just the other day, there was a question here about shooting green screen videos on a mobile device. One of our community members, Vivekpanwar, was having an issue with motion blur. Motion blur isn’t always distracting in normal videos, but it becomes a huge issue when you apply a Chroma key effect. The best way to avoid motion blur is to set a high shutter speed, which you can do if you download a quality camera app.
Richard Bennett
Richard Bennett is a writer and a lover of all things video.
Follow @Richard Bennett
Richard Bennett
Oct 26, 2023• Proven solutions
Smartphone cameras, especially the newest models, are capable of recording great videos. Depending on what kind of videos you make, you might not actually need a separate camera.
The majority of phone cameras record in full HD now, and some can even manage 4K. Where things get tricky is shooting in less than ideal conditions, i.e low light. You cannot make the same adjustments and customizations to your settings with a smartphone camera as you can with a DSLR.
You don’t have the same level of control.
But don’t worry – there are 5 camera apps that will allow you to record videos and get even more creative with how you use your phone’s camera.
- Part 1: Bonus Tip-Make Your Own Video with Wondershare Filmora
- Part 2: Best 5 Camera Apps to Record Videos on iPhone and Android
Part 1: Bonus Tip-Make Your Own Video with Wondershare Filmora
Wondershare Filmora is an amazing video editor for both professional staff and beginners. Its intuitive interface, fast timeline rendering, advanced color tuning, and surprising video effects, etc will make your video stand out! Just download it and edit your smartphone videos with Wondershare Filmora!
Part 2: Best 5 Camera Apps to Record Videos on iPhone and Android
Let’s dive!
1. Open Camera – Free, Android Only
This camera app gives you control over your exposure, flash, focus, ISO, shutter speed, torch, and white balance. How much control you have is up to you. If managing all these things manually is a hassle for you, you can use its automatic or semi-manual modes instead of manual mode.
This is a great camera app to record time-lapses. It is simplistic compared to some of the other apps on this list, but it is also extremely easy to use.
2. ProShot - $4, iOS or Android
ProShot lets you adjust your frame rate, which is important if you want to shoot slow motion or time-lapse videos. You can also adjust your brightness while filming. One of the most useful features of this camera app is that it provides a real-time audio level meter, so you won’t be surprised by a poor sound recording when you watch your videos back.
3. ProCamera - $5, iOS Only
This is one of the most frequently recommended camera apps for iPhones. It makes it easy for you to adjust your focus, iOS, and exposure. You can also play with different filters and effects right in the app. One of the only downsides of this app is that some of its most useful features, like Lowlight Plus, are in-app purchases.
4. Sun Seeker - $10, iOS or Android
A lot of the time when you’re shooting with your phone, you’re shooting outside. When you’re shooting outside, the most important thing you need to keep track of is the sun. Sun Seeker is the perfect app for figuring out where the sun will be in the sky at any given time, which will tell you the best time to go out and make your video.
For more information on making videos with natural light, check out Indoor Natural Lighting Tips .
Besides just keeping track of the sun, Sun Seeker provides an augmented reality view of its path and how it will affect specific locations.
5. FiLMiC Pro - $10, iOS or Android
This is probably the best all-purpose camera app available. It gives you exactly the same kind of control over your smartphone camera as you would have over a DSLR. You can manually adjust your focus, exposure, ISO, shutter speed, tint, and color temperature. There are even voice processing audio filters, so you can capture better audio while you’re shooting and have less to fix in post.
Final Words
Because mobile cameras already perform so well, it can be easy to think to have more to adjust would only make things more complicated. However, there are occasions where you need to be able to make these adjustments. Are the videos you take inside at night at a lower quality than the ones you record during the day, for example? If you could set a higher ISO, you would be able to fix that.
Another example: just the other day, there was a question here about shooting green screen videos on a mobile device. One of our community members, Vivekpanwar, was having an issue with motion blur. Motion blur isn’t always distracting in normal videos, but it becomes a huge issue when you apply a Chroma key effect. The best way to avoid motion blur is to set a high shutter speed, which you can do if you download a quality camera app.
Richard Bennett
Richard Bennett is a writer and a lover of all things video.
Follow @Richard Bennett
Also read:
- [New] In 2024, Call Recorder IPhone Captures All Calls
- [Updated] 2024 Approved Extract and Convert FB Videos to MP3 Files Efficiently
- 11 Best Location Changers for Sony Xperia 1 V | Dr.fone
- 2024 Approved Crafting Effective, Affordable YouTube Intros with Templates
- 2024 Approved Love in Motion Discovering YouTube & Vimeo's Top 7 Wedding Films
- 2024 Approved Realigning Your Personal Soundtracks From Spotify to YouTube Music
- 2024 Approved Seamless Sound Shift Ultimate Guide to Video-to-Audio Tools
- 2024 Approved Superior Sound Modification Equipment for Video Artists
- 2024 Approved Unlock Your Potential YouTube Thumbnail Creation on macOS
- How to use iSpoofer on Asus ROG Phone 8 Pro? | Dr.fone
- In 2024, Million Visioners Dissecting the Money Behind the Numbers
- In 2024, Stop Unsolicited YouTube Suggestion Rollouts
- In 2024, Tactics for Making YouTube Videos Go Viral
- Key View Figures for Earning Living on YouTube for 2024
- MediaMover Elite - Perfektes Synchronisieren Ihrer Fotos & Videos Auf iPhone/iPad-PCs
- Pro Broadcast Beats The Ultimate Showdown Between VMix and Wirecast for 2024
- Resolved: Troubleshooting Windows 7 Network Adapter Drivers
- Title: In 2024, Perfect Your YouTube Presence Learn to Create Engaging Ads & Thumbnails
- Author: Thomas
- Created at : 2024-10-16 17:56:45
- Updated at : 2024-10-18 19:22:14
- Link: https://youtube-help.techidaily.com/in-2024-perfect-your-youtube-presence-learn-to-create-engaging-ads-and-thumbnails/
- License: This work is licensed under CC BY-NC-SA 4.0.