
:max_bytes(150000):strip_icc()/001_airpods-wont-turn-on-f721d401944949bcbd88afb727c19214.jpg)
"In 2024, Precision-Guided Tour Unearthing Hidden YouTube Gems"
Precision-Guided Tour: Unearthing Hidden YouTube Gems
You may have noticed that some videos in your YouTube playlist are unavailable. This is because the platform allows content creators to categorize their videos into public, private, or unlisted based on their preferences.
To help you uncover the content that you otherwise wouldn’t have access to, we’ve compiled a detailed guide to show you how to find YouTube hidden videos. We’ve also explained why so many unlisted videos are now labeled as private.
So, let’s get started with our guide without any further delay!
4 Types of Videos on YouTube
Firstly, let’s learn about the background of the types of YouTube videos. YouTube videos fall into the following four broad categories:
Public Videos: YouTube contains videos on many themes and topics. It makes it impossible to watch all uploaded content under a specific category.
So, whenever you search for a video or theme, a list of content is displayed in the search result: “Public Videos.” It means that they are visible to everyone around the globe (depending on the terms and conditions). Moreover, you can share, like, unlike, download, or add these videos to your playlists for later watching.
Private Videos: Private videos on YouTube can only be seen by people invited by the person who uploaded the video. This means that only those with access to the video’s shareable link can watch it.
Private videos are not visible to the public or to people who are not logged into YouTube. Hence, it is a great way to share sensitive or personal information with a select group.
Unlisted Video Unlisted videos on YouTube are not publicly visible on the site. They can only be seen by people who have the URL. This category works as a bridge between private and public videos. It is accessible only through sharable links without appealing in any YouTube public playlist or search result.
You might upload an unlisted video to YouTube if you do not want everyone to see it. However, you still want to share it with specific people, like your friends or family. You might also use an unlisted video to test out a new idea before making it public on the video-sharing platform.
Age-Restricted Videos: Age-restricted videos on YouTube are not suitable for all audiences. It may contain content that includes violence, profanity, sexual content, and other inappropriate material. YouTube requires that users be at least 18 years old to view these types of videos.
If you search on YouTube and come across an age-restricted video, you will be asked to confirm your age before viewing its content.

How To Find Unlisted YouTube Videos
Now that we’ve learned about the four types of YouTube content, let’s discuss how you can find unlisted YouTube videos:
How To Find Other People’s Unlisted YouTube Videos?
Since unavailable videos in YouTube playlists are hidden from general public viewers, you cannot find them on YouTube or Google search results.
However, the following workaround can help you watch these YouTube videos without facing much trouble:
Step 1: First, open a browser on your PC and visit the Unlisted Videos website. This platform contains over 600,000 unlisted YouTube videos from 2016 and earlier. You can also submit your unlisted video on the site.

Step 2: Use the search bar at the top of your screen to search for other people’s YouTube playlists. You can also click the “All Video” or “Random Videos” option to find the hidden content of a user.
How To See Unlisted Videos on My YouTube Channel?
To see your unlisted videos on your YouTube channel, do the following steps in sequence:
Step 1: In the first step, install the YouTube Studio app on your mobile device or visit its website using a browser on your computer. Next, launch the app and sign in to your channel’s account using your email and password.
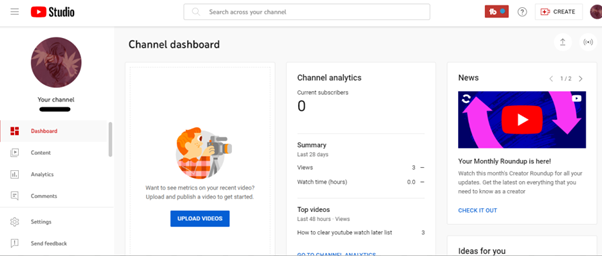
Step 2: In the next step, tap/ click the “Content” tab and tap/click the “Funnel” icon at the top of the video list to access the visibility options.
Step 3:
- Now, choose the “Visibility” option.
- Select “Unlisted” to change the visibility.
- Click the “Save” option to apply changes.
- See the hidden videos on your channel.

Since YouTube has marked the videos uploaded before 2017 as private as of July 2021, you can find your old unlisted videos under the “Private” list. To access it, choose “Private” as the visibility option.
How To Find Unlisted YouTube Videos with Google
Sometimes, unlisted YouTube videos appear on Google when someone shares the link to them on a public forum or website.
To confirm this, open a browser on your computer or a mobile device, head to the Google website, and search for your query. With some luck, you can find these unlisted YouTube videos in the search results.
You May Want to Know: Why Are So Many Unlisted Videos Now Private?
All unlisted videos uploaded to YouTube before January 2017 were switched to private. Therefore, if you have any older unlisted videos added to your Playlist or embedded on your website, you won’t be able to access them now.
However, the channel’s owner can restore access to the video by switching it back to unlisted or public. If now, the video will be labeled as “Private” indefinitely or until its settings are changed.
Conclusion
In this detailed guide, we’ve explored the four types of videos on YouTube and how to find YouTube hidden videos in three different ways. We’ve also explained why so many videos are now listed as “Private” and inaccessible.
Hopefully, you’ve found this article helpful and can now access the unlisted videos on YouTube without hassle.
You may have noticed that some videos in your YouTube playlist are unavailable. This is because the platform allows content creators to categorize their videos into public, private, or unlisted based on their preferences.
To help you uncover the content that you otherwise wouldn’t have access to, we’ve compiled a detailed guide to show you how to find YouTube hidden videos. We’ve also explained why so many unlisted videos are now labeled as private.
So, let’s get started with our guide without any further delay!
4 Types of Videos on YouTube
Firstly, let’s learn about the background of the types of YouTube videos. YouTube videos fall into the following four broad categories:
Public Videos: YouTube contains videos on many themes and topics. It makes it impossible to watch all uploaded content under a specific category.
So, whenever you search for a video or theme, a list of content is displayed in the search result: “Public Videos.” It means that they are visible to everyone around the globe (depending on the terms and conditions). Moreover, you can share, like, unlike, download, or add these videos to your playlists for later watching.
Private Videos: Private videos on YouTube can only be seen by people invited by the person who uploaded the video. This means that only those with access to the video’s shareable link can watch it.
Private videos are not visible to the public or to people who are not logged into YouTube. Hence, it is a great way to share sensitive or personal information with a select group.
Unlisted Video Unlisted videos on YouTube are not publicly visible on the site. They can only be seen by people who have the URL. This category works as a bridge between private and public videos. It is accessible only through sharable links without appealing in any YouTube public playlist or search result.
You might upload an unlisted video to YouTube if you do not want everyone to see it. However, you still want to share it with specific people, like your friends or family. You might also use an unlisted video to test out a new idea before making it public on the video-sharing platform.
Age-Restricted Videos: Age-restricted videos on YouTube are not suitable for all audiences. It may contain content that includes violence, profanity, sexual content, and other inappropriate material. YouTube requires that users be at least 18 years old to view these types of videos.
If you search on YouTube and come across an age-restricted video, you will be asked to confirm your age before viewing its content.
How To Find Unlisted YouTube Videos
Now that we’ve learned about the four types of YouTube content, let’s discuss how you can find unlisted YouTube videos:
How To Find Other People’s Unlisted YouTube Videos?
Since unavailable videos in YouTube playlists are hidden from general public viewers, you cannot find them on YouTube or Google search results.
However, the following workaround can help you watch these YouTube videos without facing much trouble:
Step 1: First, open a browser on your PC and visit the Unlisted Videos website. This platform contains over 600,000 unlisted YouTube videos from 2016 and earlier. You can also submit your unlisted video on the site.
Step 2: Use the search bar at the top of your screen to search for other people’s YouTube playlists. You can also click the “All Video” or “Random Videos” option to find the hidden content of a user.
How To See Unlisted Videos on My YouTube Channel?
To see your unlisted videos on your YouTube channel, do the following steps in sequence:
Step 1: In the first step, install the YouTube Studio app on your mobile device or visit its website using a browser on your computer. Next, launch the app and sign in to your channel’s account using your email and password.
Step 2: In the next step, tap/ click the “Content” tab and tap/click the “Funnel” icon at the top of the video list to access the visibility options.
Step 3:
- Now, choose the “Visibility” option.
- Select “Unlisted” to change the visibility.
- Click the “Save” option to apply changes.
- See the hidden videos on your channel.
Since YouTube has marked the videos uploaded before 2017 as private as of July 2021, you can find your old unlisted videos under the “Private” list. To access it, choose “Private” as the visibility option.
How To Find Unlisted YouTube Videos with Google
Sometimes, unlisted YouTube videos appear on Google when someone shares the link to them on a public forum or website.
To confirm this, open a browser on your computer or a mobile device, head to the Google website, and search for your query. With some luck, you can find these unlisted YouTube videos in the search results.
You May Want to Know: Why Are So Many Unlisted Videos Now Private?
All unlisted videos uploaded to YouTube before January 2017 were switched to private. Therefore, if you have any older unlisted videos added to your Playlist or embedded on your website, you won’t be able to access them now.
However, the channel’s owner can restore access to the video by switching it back to unlisted or public. If now, the video will be labeled as “Private” indefinitely or until its settings are changed.
Conclusion
In this detailed guide, we’ve explored the four types of videos on YouTube and how to find YouTube hidden videos in three different ways. We’ve also explained why so many videos are now listed as “Private” and inaccessible.
Hopefully, you’ve found this article helpful and can now access the unlisted videos on YouTube without hassle.
Elevate Your YouTube Livestream Game Plan
The Ultimate Guide to YouTube Live Streaming

Richard Bennett
Mar 27, 2024• Proven solutions
Live streaming on YouTube is a great way to get more engagement from your audience, even if you do not have a huge following. As long as you have some reliable subscribers leaving comments on your videos you should be able to schedule a live stream and know it will have an audience. People feel a personal connection with their favorite vloggers so if you give your subscribers a chance to interact with you in real time they will probably plan to join in. The key to a good live streaming is to respond to comments and questions from people who are watching. Besides watching the live chat of your video you can create a hashtag for your stream and monitor it on twitter.
Table of Contents
- Why Livestream?
- Type of Content to Livestream
- What You Need to Livestream On YouTube
- 4 Ways to Setup Your Livestream On YouTube
- 8 Tips to Improve Your Livestream on YouTube
- How to Grow As A Livestreamer on YouTube
Why Livestream?
You have grown your audience, and now you want to take your channel to the next level and diversify your content.
Whether you are vlogging, gaming, or running tutorials on YouTube, there is potential to host a live broadcast. It’s not limited to any genre, you simply need to create content that people are interested in watching.
Before we get started into the How, let’s start with a few reasons Why you should be live streaming your content.
Connect and engage with your audience
When a viewer leaves a comment during a livestream you will be able to see it right away and respond. Having an instantaneous conversation with a viewer while they are watching your video will encourage more engagement and establish a ber relationship with your viewers — and you will know that these viewers are not bots.
Increase watch time and session watch time on your channel
If you are making YouTube videos on average 10 minutes long, and the viewer only watches half of it, that’s only 5 minutes of watch time, which is fine… But if you are live streaming for 45 minutes, and you are able to hold the viewer’s attention, you can surpass what your regular videos can do.
Make videos faster
As a YouTuber, you are always striving to be more efficient. Live streaming allows you to do that as you can set up and go. The content you end up creating during the duration of your livestream can then also be condensed into a highlight reel or a recap.
With a bit of planning before you go live, you can create a week’s worth of content in one go, instead of having multiple schedules for livestream content and your standard publishing videos.
Type of Content to Livestream
Live streaming has a lot of value, but what type of content should you be streaming?
Here are a few popular ideas for content that will attract viewers to your livestream:
Q&A session
Unboxing
Game or challenge
Sneak preview or review
Live events (just make sure the Internet can support it)
A demo or a tutorial
A live commentary or (if you are a gamer) Let’s Play video
What You Need to Livestream On YouTube
A Plan or Outline
It’s good to know what your livestream is going to be about before you start. Is there a key message you want to hit, an action you want your viewers to take, or a structure you want to follow.
Just because it’s live, doesn’t mean it all has to be improvised. If you go in without a plan, you might end up feeling flustered or getting stressed out. Allow for spontaneous comments or events to take you off your initial plan, but always return to your outline so you know how to wrap up your livestream when you have to.
Stable Internet Connection
You cannot conduct a quality livestream, if your Internet is bad. When evaluating your internet connection for live streaming on YouTube, look at the Upload speed. Depending on the quality of your video, these are the minimum upload speed rates your Internet will need to perform:
480p = 1.5 mbps
720p = 3 mbps
1080 = 5 mbps
In addition, be aware of external causes that may be slowing down your internet such as someone else using it, a poorly performing router, or a damaged cable.
Camera
If you have a smartphone or a laptop with a webcam built in, that is the best camera for you to get started live streaming. It’s good to have a milestone and work towards a more advanced camera, but until then, don’t feel discouraged because you don’t have expensive gear. If you have a smartphone, a laptop, or a basic webcam, that’s perfectly fine.
Microphone
You don’t need a great microphone for live streaming, you only need a good one. If you do want to spend several hundred to a thousand dollars for a professional studio microphone, nobody will stop you, but know this, a mic that is easy to use is as important as the audio quality as you develop a consistent live streaming schedule.
Streaming Software (For Higher Quality Streams)
Once upon a time, to livestream on YouTube, you needed additional software to capture content from desktop, camera, microphone, etc, called encoding software — but not anymore.
Those encoding software, such as OBS , Wirecast , and VMix , are required if you are producing content that requires a high frame rate such as gaming, but not mandatory if you are simply vlogging or running a tutorial.
If you are using Chrome, you canstream live on YouTube without using an encoder .
A Capture Card (For Higher Quality Streams)
You will need a capture card when you are capturing footage from a different PC or console. If you are a gamer and you are using one PC to stream and one PC to play your game, then you should consider getting a capture card.
4 Ways to Setup Your Livestream On YouTube
There are 4 main ways you can start live streaming on YouTube. The one that works best for you depends on the content you are going to be streaming.
1. Camera/Go Live (Chrome Browser)
By accessing www.youtube.com/webcam on the Google Chrome browser, you can start streaming immediately through your connected webcam. This way is best for a simple Q&A or letting your viewers know your thoughts in a timely situation. This method does not require an encoder.
There are 3 ways to access livestream this way:
1. Click here to connect to your YouTube channel
2. You can access it from the top menu on YouTube

3. You can access it by clicking Camera under the Live Streaming tab in your Creator Studio
2. Google Hangouts On Air (Quick)
Another way to livestream without an encoding software is by using the Google Hangouts On Air feature.
This is great if you want the feel of your livestream to be similar to a board meeting, where you can invite people, split screen, and share screen to illustrate your point.
Here’s how you can access this Google Hangouts On Air:
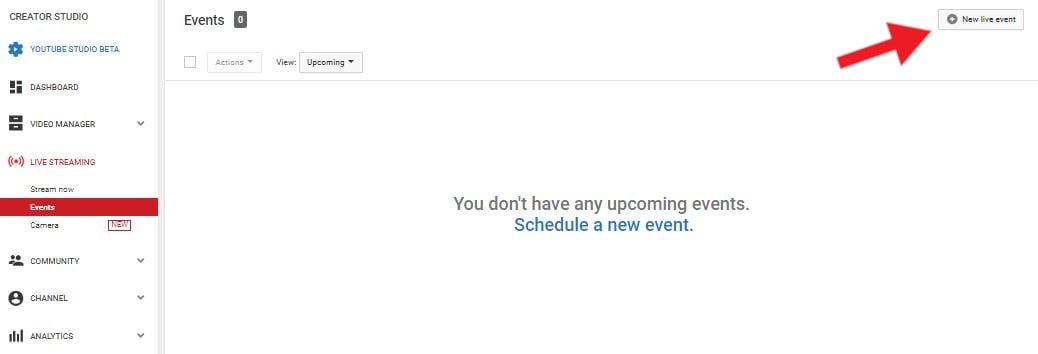
Step 1: Go to Events under the Live Streaming tab in your Creator Studio
Step 2: Click New Live Event button on the top right corner
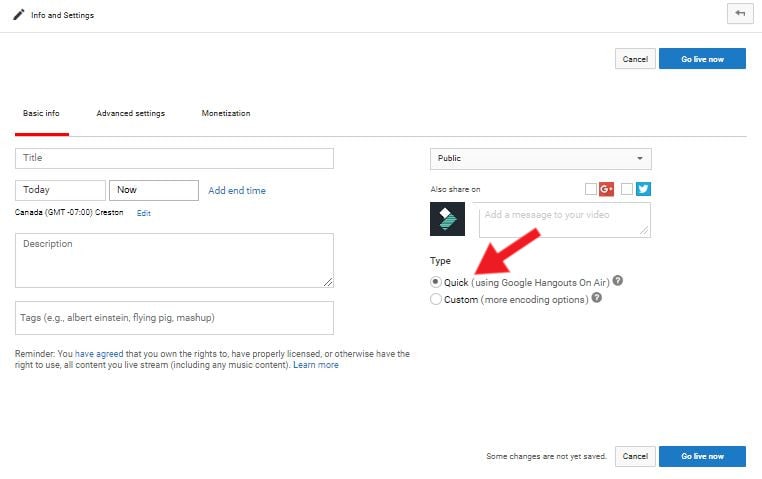
Step 3: Enter the event’s Info and Setting page. Fill out the details of your Livestream, and under Type, select Quick (using Google Hangouts On Air).
Step 4: You can schedule your livestream or Go Live immediately by clicking one of the blue buttons on the left-hand side.
3. Mobile
Live streaming via your mobile device gives you a lot more freedom to maneuver. You can walk around and give your viewers a tour — but remember to stay within the WiFi or LTE range. That means you still won’t be able to livestream well inside an elevator.
Here’s how you can livestream on mobile:
Step 1: Access the YouTube app and make sure you are signed in to the account you want to livestream from.
Step 2: At the top, click on the camera icon
Step 3: Click on Go Live
Pro Tip: When live streaming, always hold your smartphone horizontally. This allows your video to be oriented as a landscape, instead of a portrait.
4. Custom Encoder
The fourth way of live streaming on YouTube is with encoding software. This is the recommended method if video quality is essential, such as gaming videos.
Step 1: Download and install an encoding software. In this example, we’ll be using OBS .
Step 2: Open OBS
Step 3: Go to YouTube Creator Studio and enter the Stream Now page
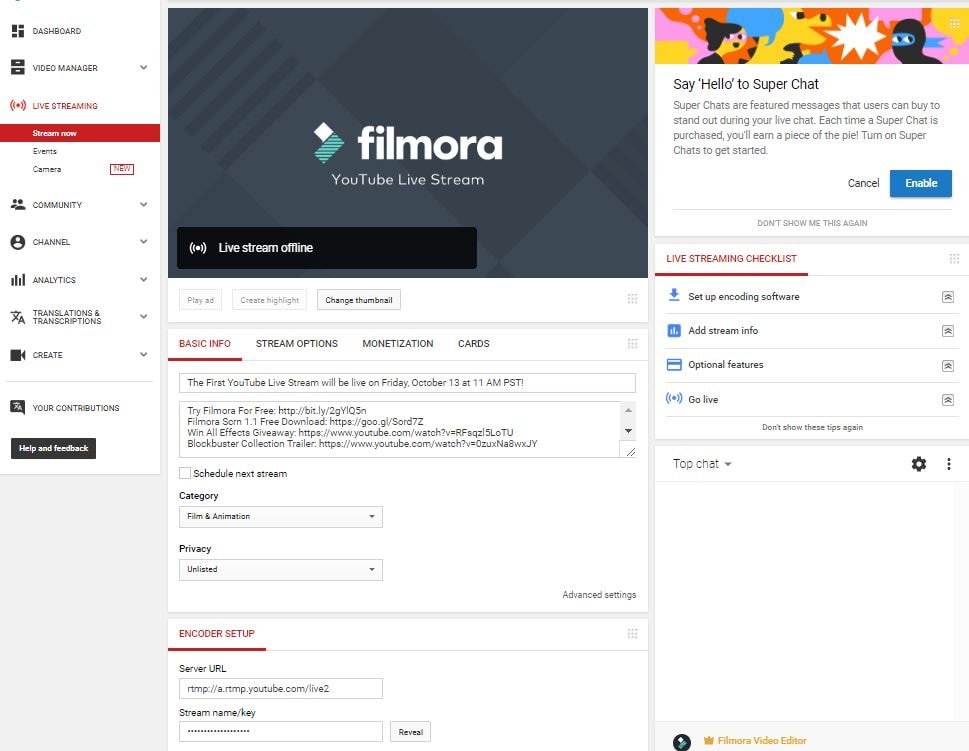
Step 4: Under Encoder Setup, copy Stream name/key (Warning: DO NOT share this key with anyone)
Step 5: Return to OBS and enter the Setting menu on the lower right-hand side of the application
Step 6: Click into the Stream tab
a) Under Stream Type, select Streaming Services
b) Under Service, select YouTube/YouTube Gaming
c) Under Server, select Primary YouTube ingest server
d) In Stream Key box, paste the Stream Key you copied from YouTube
e) Click Apply and then OK
Step 7: Plug in your webcam
Step 8: In the main OBS dashboard, under the Sources menu, click the + icon and add Video Capture Device. You should now see visuals from your Webcam.
Step 9: Select the Resolution you want for your video and click OK
Step 10: Return to your YouTube Streaming Page and fill out the details of your livestream
Step 11: Go back to OBS and click Start Streaming
Step 12: See on YouTube Streaming Page at the top that you are Live. You are officially streaming. Once You are finished streaming, return to OBS and click Stop Streaming to end the stream.
8 Tips to Improve Your Livestream on YouTube
Do Speed Test
Before you start your livestream, do a speed test of your Internet. Check out from here.
Have Good Lighting
Be aware of your surroundings when you are about to livestream. You don’t need the top-notch lighting kit, you can simply sit beside a window and allow natural lights to illuminate your stream.
Shoot A Live Test (Unlisted)
Have a technical rehearsal by doing a livestream test, then rewatching it, and evaluating the quality of the audio and visual.
You don’t have to worry about your audience logging in and seeing your test if you set the Privacy of the stream to Unlisted.
Look at the Lens, Not the Screen
If you are streaming with the selfie camera on your smartphone or using your camera’s viewfinder to make sure you are in the frame, remember that you need to be looking at the lens — not the image of yourself.
Eye contact is important in building trust, and if you are looking at yourself, it will appear as if you are looking past your viewers instead of at them.
Show It To Your Viewers
Whatever you are talking about, if you can, show it to your viewers. YouTube is a visual medium, and that means your viewers can become disinterested if there’s nothing visual holding their attention.
In the beginning, you probably won’t have a multi-camera setup, so you cannot cut away from your livestream. However, you can share the screen and you can bring physical objects into a frame.
If you are talking about your dog, show her on camera. If you’re presenting something with a lot of steps, create a Powerpoint slideshow.
Consider what visuals or props you can add to your livestream to enhance your performance.
Find A Way to Make it Evergreen
Evergreen content refers to content that is relevant for a great length of time. Talking about an event isn’t evergreen, because the event will soon pass and become old news. However, giving some tips for how to plan an event would be evergreen content.
Since your livestream will be saved on YouTube and your viewers can replay and watch it. They’re more likely to enjoy it if the content is relevant and interesting.
It Doesn’t Have to Be Long
A livestream doesn’t need to be 40 minutes long. It only needs to be long enough for you to get your story across — and if you want to answer some questions and engage with your audience. As soon as your story is over, even if it’s only 5 minutes, that’s okay. Don’t stress about the length of your stream, it’s not an endurance competition.
Allow Yourself to Make Mistakes
Another thing you shouldn’t worry about at all is making mistakes. When you are doing livestreams pretend you are engaging with someone in real life. In real life, you aren’t able to edit out your mistakes, whether it’s a word mispronounced or coffee spilling. Roll with it and laugh it off.
How to Grow As A Livestreamer on YouTube
Let People Know When You Are Streaming
Give people enough time to schedule it in, don’t spring it on them in the last minute. Share it on social media, your website, and any other means.
Create a Streaming Link 2 Days Before
Share your livestream link via social media to remind everyone to tune in when you go live. Looking for your link? It should look something like this: <www.youtube.com/user/\[channelname\]/live>
Reach Out To the Communities Most Interested
If you are going to be live streaming about a specific topic, such as photography, you should reach out to those who are interested in the topic. Highlight what aspect of photography you are going to be streaming and attract new viewers to your content.
Be Aware of Time Difference
If you have an international audience, find time to livestream where you can get the optimal amount of viewers.
You can find the location of your main demographic in your YouTube analytics .
Create a Channel Trailer to Promote Livestream
Make a video and host it as your channel trailer, that way anyone who lands on your YouTube page will see the promo for your livestream.
Promote Through Feature Content and Channel
YouTube has a feature that enables you to use your existing content to promote your upcoming livestream.
Here’s how to set it up:
Key Takeaways
- Live streaming will help you make more videos, engage with your audience, and grow your channel.
- You don’t need expensive equipment to livestream on YouTube, you only need a webcam and a microphone.
- YouTube has made live streaming as easy as a few clicks, no additional software needed unless you are gaming.
- Always do a test run of your livestream to ensure the internet, audio, and visual are all working properly.
- Create content and reach out to communities to promote your livestream.
Have you encountered any obstacles when setting up your livestream on YouTube? Let us know in the comments below, we are happy to help!
Richard Bennett
Richard Bennett is a writer and a lover of all things video.
Follow @Richard Bennett
Richard Bennett
Mar 27, 2024• Proven solutions
Live streaming on YouTube is a great way to get more engagement from your audience, even if you do not have a huge following. As long as you have some reliable subscribers leaving comments on your videos you should be able to schedule a live stream and know it will have an audience. People feel a personal connection with their favorite vloggers so if you give your subscribers a chance to interact with you in real time they will probably plan to join in. The key to a good live streaming is to respond to comments and questions from people who are watching. Besides watching the live chat of your video you can create a hashtag for your stream and monitor it on twitter.
Table of Contents
- Why Livestream?
- Type of Content to Livestream
- What You Need to Livestream On YouTube
- 4 Ways to Setup Your Livestream On YouTube
- 8 Tips to Improve Your Livestream on YouTube
- How to Grow As A Livestreamer on YouTube
Why Livestream?
You have grown your audience, and now you want to take your channel to the next level and diversify your content.
Whether you are vlogging, gaming, or running tutorials on YouTube, there is potential to host a live broadcast. It’s not limited to any genre, you simply need to create content that people are interested in watching.
Before we get started into the How, let’s start with a few reasons Why you should be live streaming your content.
Connect and engage with your audience
When a viewer leaves a comment during a livestream you will be able to see it right away and respond. Having an instantaneous conversation with a viewer while they are watching your video will encourage more engagement and establish a ber relationship with your viewers — and you will know that these viewers are not bots.
Increase watch time and session watch time on your channel
If you are making YouTube videos on average 10 minutes long, and the viewer only watches half of it, that’s only 5 minutes of watch time, which is fine… But if you are live streaming for 45 minutes, and you are able to hold the viewer’s attention, you can surpass what your regular videos can do.
Make videos faster
As a YouTuber, you are always striving to be more efficient. Live streaming allows you to do that as you can set up and go. The content you end up creating during the duration of your livestream can then also be condensed into a highlight reel or a recap.
With a bit of planning before you go live, you can create a week’s worth of content in one go, instead of having multiple schedules for livestream content and your standard publishing videos.
Type of Content to Livestream
Live streaming has a lot of value, but what type of content should you be streaming?
Here are a few popular ideas for content that will attract viewers to your livestream:
Q&A session
Unboxing
Game or challenge
Sneak preview or review
Live events (just make sure the Internet can support it)
A demo or a tutorial
A live commentary or (if you are a gamer) Let’s Play video
What You Need to Livestream On YouTube
A Plan or Outline
It’s good to know what your livestream is going to be about before you start. Is there a key message you want to hit, an action you want your viewers to take, or a structure you want to follow.
Just because it’s live, doesn’t mean it all has to be improvised. If you go in without a plan, you might end up feeling flustered or getting stressed out. Allow for spontaneous comments or events to take you off your initial plan, but always return to your outline so you know how to wrap up your livestream when you have to.
Stable Internet Connection
You cannot conduct a quality livestream, if your Internet is bad. When evaluating your internet connection for live streaming on YouTube, look at the Upload speed. Depending on the quality of your video, these are the minimum upload speed rates your Internet will need to perform:
480p = 1.5 mbps
720p = 3 mbps
1080 = 5 mbps
In addition, be aware of external causes that may be slowing down your internet such as someone else using it, a poorly performing router, or a damaged cable.
Camera
If you have a smartphone or a laptop with a webcam built in, that is the best camera for you to get started live streaming. It’s good to have a milestone and work towards a more advanced camera, but until then, don’t feel discouraged because you don’t have expensive gear. If you have a smartphone, a laptop, or a basic webcam, that’s perfectly fine.
Microphone
You don’t need a great microphone for live streaming, you only need a good one. If you do want to spend several hundred to a thousand dollars for a professional studio microphone, nobody will stop you, but know this, a mic that is easy to use is as important as the audio quality as you develop a consistent live streaming schedule.
Streaming Software (For Higher Quality Streams)
Once upon a time, to livestream on YouTube, you needed additional software to capture content from desktop, camera, microphone, etc, called encoding software — but not anymore.
Those encoding software, such as OBS , Wirecast , and VMix , are required if you are producing content that requires a high frame rate such as gaming, but not mandatory if you are simply vlogging or running a tutorial.
If you are using Chrome, you canstream live on YouTube without using an encoder .
A Capture Card (For Higher Quality Streams)
You will need a capture card when you are capturing footage from a different PC or console. If you are a gamer and you are using one PC to stream and one PC to play your game, then you should consider getting a capture card.
4 Ways to Setup Your Livestream On YouTube
There are 4 main ways you can start live streaming on YouTube. The one that works best for you depends on the content you are going to be streaming.
1. Camera/Go Live (Chrome Browser)
By accessing www.youtube.com/webcam on the Google Chrome browser, you can start streaming immediately through your connected webcam. This way is best for a simple Q&A or letting your viewers know your thoughts in a timely situation. This method does not require an encoder.
There are 3 ways to access livestream this way:
1. Click here to connect to your YouTube channel
2. You can access it from the top menu on YouTube
3. You can access it by clicking Camera under the Live Streaming tab in your Creator Studio
2. Google Hangouts On Air (Quick)
Another way to livestream without an encoding software is by using the Google Hangouts On Air feature.
This is great if you want the feel of your livestream to be similar to a board meeting, where you can invite people, split screen, and share screen to illustrate your point.
Here’s how you can access this Google Hangouts On Air:
Step 1: Go to Events under the Live Streaming tab in your Creator Studio
Step 2: Click New Live Event button on the top right corner
Step 3: Enter the event’s Info and Setting page. Fill out the details of your Livestream, and under Type, select Quick (using Google Hangouts On Air).
Step 4: You can schedule your livestream or Go Live immediately by clicking one of the blue buttons on the left-hand side.
3. Mobile
Live streaming via your mobile device gives you a lot more freedom to maneuver. You can walk around and give your viewers a tour — but remember to stay within the WiFi or LTE range. That means you still won’t be able to livestream well inside an elevator.
Here’s how you can livestream on mobile:
Step 1: Access the YouTube app and make sure you are signed in to the account you want to livestream from.
Step 2: At the top, click on the camera icon
Step 3: Click on Go Live
Pro Tip: When live streaming, always hold your smartphone horizontally. This allows your video to be oriented as a landscape, instead of a portrait.
4. Custom Encoder
The fourth way of live streaming on YouTube is with encoding software. This is the recommended method if video quality is essential, such as gaming videos.
Step 1: Download and install an encoding software. In this example, we’ll be using OBS .
Step 2: Open OBS
Step 3: Go to YouTube Creator Studio and enter the Stream Now page
Step 4: Under Encoder Setup, copy Stream name/key (Warning: DO NOT share this key with anyone)
Step 5: Return to OBS and enter the Setting menu on the lower right-hand side of the application
Step 6: Click into the Stream tab
a) Under Stream Type, select Streaming Services
b) Under Service, select YouTube/YouTube Gaming
c) Under Server, select Primary YouTube ingest server
d) In Stream Key box, paste the Stream Key you copied from YouTube
e) Click Apply and then OK
Step 7: Plug in your webcam
Step 8: In the main OBS dashboard, under the Sources menu, click the + icon and add Video Capture Device. You should now see visuals from your Webcam.
Step 9: Select the Resolution you want for your video and click OK
Step 10: Return to your YouTube Streaming Page and fill out the details of your livestream
Step 11: Go back to OBS and click Start Streaming
Step 12: See on YouTube Streaming Page at the top that you are Live. You are officially streaming. Once You are finished streaming, return to OBS and click Stop Streaming to end the stream.
8 Tips to Improve Your Livestream on YouTube
Do Speed Test
Before you start your livestream, do a speed test of your Internet. Check out from here.
Have Good Lighting
Be aware of your surroundings when you are about to livestream. You don’t need the top-notch lighting kit, you can simply sit beside a window and allow natural lights to illuminate your stream.
Shoot A Live Test (Unlisted)
Have a technical rehearsal by doing a livestream test, then rewatching it, and evaluating the quality of the audio and visual.
You don’t have to worry about your audience logging in and seeing your test if you set the Privacy of the stream to Unlisted.
Look at the Lens, Not the Screen
If you are streaming with the selfie camera on your smartphone or using your camera’s viewfinder to make sure you are in the frame, remember that you need to be looking at the lens — not the image of yourself.
Eye contact is important in building trust, and if you are looking at yourself, it will appear as if you are looking past your viewers instead of at them.
Show It To Your Viewers
Whatever you are talking about, if you can, show it to your viewers. YouTube is a visual medium, and that means your viewers can become disinterested if there’s nothing visual holding their attention.
In the beginning, you probably won’t have a multi-camera setup, so you cannot cut away from your livestream. However, you can share the screen and you can bring physical objects into a frame.
If you are talking about your dog, show her on camera. If you’re presenting something with a lot of steps, create a Powerpoint slideshow.
Consider what visuals or props you can add to your livestream to enhance your performance.
Find A Way to Make it Evergreen
Evergreen content refers to content that is relevant for a great length of time. Talking about an event isn’t evergreen, because the event will soon pass and become old news. However, giving some tips for how to plan an event would be evergreen content.
Since your livestream will be saved on YouTube and your viewers can replay and watch it. They’re more likely to enjoy it if the content is relevant and interesting.
It Doesn’t Have to Be Long
A livestream doesn’t need to be 40 minutes long. It only needs to be long enough for you to get your story across — and if you want to answer some questions and engage with your audience. As soon as your story is over, even if it’s only 5 minutes, that’s okay. Don’t stress about the length of your stream, it’s not an endurance competition.
Allow Yourself to Make Mistakes
Another thing you shouldn’t worry about at all is making mistakes. When you are doing livestreams pretend you are engaging with someone in real life. In real life, you aren’t able to edit out your mistakes, whether it’s a word mispronounced or coffee spilling. Roll with it and laugh it off.
How to Grow As A Livestreamer on YouTube
Let People Know When You Are Streaming
Give people enough time to schedule it in, don’t spring it on them in the last minute. Share it on social media, your website, and any other means.
Create a Streaming Link 2 Days Before
Share your livestream link via social media to remind everyone to tune in when you go live. Looking for your link? It should look something like this: <www.youtube.com/user/\[channelname\]/live>
Reach Out To the Communities Most Interested
If you are going to be live streaming about a specific topic, such as photography, you should reach out to those who are interested in the topic. Highlight what aspect of photography you are going to be streaming and attract new viewers to your content.
Be Aware of Time Difference
If you have an international audience, find time to livestream where you can get the optimal amount of viewers.
You can find the location of your main demographic in your YouTube analytics .
Create a Channel Trailer to Promote Livestream
Make a video and host it as your channel trailer, that way anyone who lands on your YouTube page will see the promo for your livestream.
Promote Through Feature Content and Channel
YouTube has a feature that enables you to use your existing content to promote your upcoming livestream.
Here’s how to set it up:
Key Takeaways
- Live streaming will help you make more videos, engage with your audience, and grow your channel.
- You don’t need expensive equipment to livestream on YouTube, you only need a webcam and a microphone.
- YouTube has made live streaming as easy as a few clicks, no additional software needed unless you are gaming.
- Always do a test run of your livestream to ensure the internet, audio, and visual are all working properly.
- Create content and reach out to communities to promote your livestream.
Have you encountered any obstacles when setting up your livestream on YouTube? Let us know in the comments below, we are happy to help!
Richard Bennett
Richard Bennett is a writer and a lover of all things video.
Follow @Richard Bennett
- Title: "In 2024, Precision-Guided Tour Unearthing Hidden YouTube Gems"
- Author: Thomas
- Created at : 2024-05-31 12:46:50
- Updated at : 2024-06-01 12:46:50
- Link: https://youtube-help.techidaily.com/in-2024-precision-guided-tour-unearthing-hidden-youtube-gems/
- License: This work is licensed under CC BY-NC-SA 4.0.
