"In 2024, Propel Content to Prominence Leverage TubeBuddy's Power"
Propel Content to Prominence: Leverage TubeBuddy’s Power
The Benefits of TubeBuddy | Manage Your YouTube Channel More Easily

Richard Bennett
Nov 01, 2022• Proven solutions
TubeBuddy is a YouTube certified extension for your Google Chrome browser. When you visit YouTube after installing TubeBuddy a whole new set of useful tools becomes available.
TubeBuddy’s tools were designed to save you time and effort when performing some of the more mundane tasks involved in running a YouTube channel, like adding cards. Many of TubeBuddy’s tools are completely free to use, but others might require a paid license. There are three levels of licensing: $9, $19, or $39 per month.
The Benefits of Using TubeBuddy for YouTube
- Increased Productivity
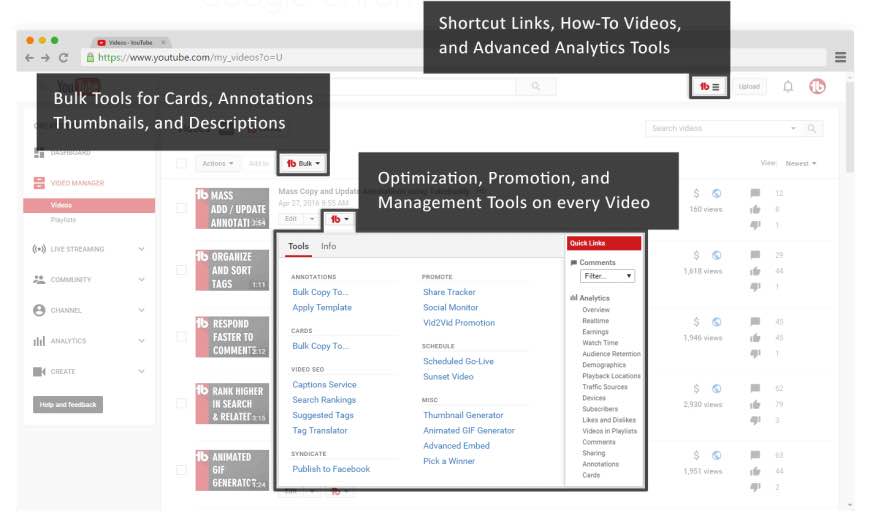
- Bulk Tools for Annotations, Cards, Thumbnails and More
- Quick Optimization for Your Video’s Tags
- Useful Data
Benefits of TubeBuddy
YouTubers who use TubeBuddy are able to spend less time on busy-work and more time on coming up with creative video ideas. Here are some of the ways TubeBuddy can help you, especially if you have a large or mid-sized channel:
1. Increased Productivity
Most of TubeBuddy’s Productivity Tools are available for free, but some require a $9 per month Pro license.
You can use these tools to get your videos ready for posting faster, embed them off-YouTube more easily, and save time by creating canned responses or templates for cards and annotations.
For example, you might find yourself creating the same YouTube Card over and over again to include it in every video you make. Creating a template through TubeBuddy will save you this effort.
Another great productivity tool is the Video Topic Planner. You can save video ideas you come up with, or ideas viewers have suggested to you, and arrange them in a queue so you never forget what you are planning to make next.
2. Bulk Tools for Annotations, Cards, Thumbnails and More
Most of TubeBuddy’s bulk processing tools require a $19 per month Star license.
Two of the most time-saving tools in this section are the Bulk Copy tools for cards and annotations. They will save you from having to recreate the same ones over and over. Then, using the Bulk Update tools, you will be able to make changes to all of your cards or annotations at once.
For example: if you use a YouTube Card to link to your personal website and include it in every video, and then you change your website, you change the link in all of your existing cards at once.
Another useful Bulk tool is Bulk Thumbnail Overlays, which will allow you to add a logo to all of your existing video thumbnails at once.
3. Quick Optimization for Your Video’s Tags
The SEO Tools in TubeBuddy will help you find the best tags for your videos and suggest tags you might want to target. Many of these tools are free, but others require a $19 Star license.
One of the best free tools in this category is View and Copy Video Tags. It allows you to see and copy the tags of other people’s videos. You will be able to see which keywords your competitors are targeting (and look for opportunities to target them more effectively). This can also save you a lot of time writing out tags that should really be the same as the ones on an existing video.
4. Useful Data
The most useful piece of data under Data and Research Tools is the Best Time to Publish. How many views you get on a video could vary greatly depending on when you post, and the best times to post vary depending on the demographics of your audience. This free tool from TubeBuddy will show you when you should be uploading.
Another interesting tool, which is unfortunately only available with $39 licenses, is the Competitor Scoreboard. It allows creators to compare their channels stats to those of their rival channels.
Have you ever tried TubeBuddy for YouTube?
Richard Bennett
Richard Bennett is a writer and a lover of all things video.
Follow @Richard Bennett
Richard Bennett
Nov 01, 2022• Proven solutions
TubeBuddy is a YouTube certified extension for your Google Chrome browser. When you visit YouTube after installing TubeBuddy a whole new set of useful tools becomes available.
TubeBuddy’s tools were designed to save you time and effort when performing some of the more mundane tasks involved in running a YouTube channel, like adding cards. Many of TubeBuddy’s tools are completely free to use, but others might require a paid license. There are three levels of licensing: $9, $19, or $39 per month.
The Benefits of Using TubeBuddy for YouTube
- Increased Productivity
- Bulk Tools for Annotations, Cards, Thumbnails and More
- Quick Optimization for Your Video’s Tags
- Useful Data
Benefits of TubeBuddy
YouTubers who use TubeBuddy are able to spend less time on busy-work and more time on coming up with creative video ideas. Here are some of the ways TubeBuddy can help you, especially if you have a large or mid-sized channel:
1. Increased Productivity
Most of TubeBuddy’s Productivity Tools are available for free, but some require a $9 per month Pro license.
You can use these tools to get your videos ready for posting faster, embed them off-YouTube more easily, and save time by creating canned responses or templates for cards and annotations.
For example, you might find yourself creating the same YouTube Card over and over again to include it in every video you make. Creating a template through TubeBuddy will save you this effort.
Another great productivity tool is the Video Topic Planner. You can save video ideas you come up with, or ideas viewers have suggested to you, and arrange them in a queue so you never forget what you are planning to make next.
2. Bulk Tools for Annotations, Cards, Thumbnails and More
Most of TubeBuddy’s bulk processing tools require a $19 per month Star license.
Two of the most time-saving tools in this section are the Bulk Copy tools for cards and annotations. They will save you from having to recreate the same ones over and over. Then, using the Bulk Update tools, you will be able to make changes to all of your cards or annotations at once.
For example: if you use a YouTube Card to link to your personal website and include it in every video, and then you change your website, you change the link in all of your existing cards at once.
Another useful Bulk tool is Bulk Thumbnail Overlays, which will allow you to add a logo to all of your existing video thumbnails at once.
3. Quick Optimization for Your Video’s Tags
The SEO Tools in TubeBuddy will help you find the best tags for your videos and suggest tags you might want to target. Many of these tools are free, but others require a $19 Star license.
One of the best free tools in this category is View and Copy Video Tags. It allows you to see and copy the tags of other people’s videos. You will be able to see which keywords your competitors are targeting (and look for opportunities to target them more effectively). This can also save you a lot of time writing out tags that should really be the same as the ones on an existing video.
4. Useful Data
The most useful piece of data under Data and Research Tools is the Best Time to Publish. How many views you get on a video could vary greatly depending on when you post, and the best times to post vary depending on the demographics of your audience. This free tool from TubeBuddy will show you when you should be uploading.
Another interesting tool, which is unfortunately only available with $39 licenses, is the Competitor Scoreboard. It allows creators to compare their channels stats to those of their rival channels.
Have you ever tried TubeBuddy for YouTube?
Richard Bennett
Richard Bennett is a writer and a lover of all things video.
Follow @Richard Bennett
Mobilize Your Storytelling: Crafting Content with a Phone
How To Make YouTube Videos on Your Smartphone
Richard Bennett
Mar 27, 2024• Proven solutions
It is fun to be able to record a vlog entry whenever inspiration strikes you, and your smartphone is a great choice for recording on the go. Smartphones have really great cameras, and you probably always have your phone with you. You can even post directly from your phone to YouTube!
How To Make YouTube Videos on Your Smartphone
Making a video on your smartphone is similar to making a video with any other camera in a lot of ways. There are also a lot of ways in which it is different. You always have to watch out for camera shake, for example, but it can be even harder to control when you’re walking around shooting on your mobile device. Here are three things to keep in mind when vlogging with your smartphone.
Part 1. Keep It Steady
For a nice, smooth, shot consider resting your hand up on a railing, table, or anything else that will keep it steady while you film. Camera shake is always distracting to viewers, and smartphone videos are notoriously unstable because you are almost always holding your phone in your hand.
There is equipment you can use to cut out camera shake. You can get a smartphone mount for your tripod, or you can even stabilize your phone using a selfie stick. Many of the very newest smartphones have built in hardware called ‘OIS’ – optical image stabilization – that helps reduce shakiness.
Part 2. Be Heard
You have a lot to say, so make sure people can hear you say it! Smartphones do not tend to have very good microphones built in (neither do most cameras), so try to vlog from somewhere without a lot of background noise. It will help a lot if your voice has nothing to compete with.
Ideally, you should get an external mic to record your voice while you vlog on your phone. There are shotgun mics you can plug directly into the audio jack on your phone which will record great audio, or you can get a high quality MP3 recorder and carry it around in your pocket.
Part 3. Tilt Your Phone
When recording on the spur of the moment with your smartphone it is easy to automatically hold it the same way you would while texting or taking a selfie. If you record a video with your phone held so that it is tall – a ‘portrait’ shot – then your video will have thick black bars on either side when you post it to YouTube. If you tilt your phone so that it is wide you will record a ‘landscape’ shot, which will match the dimensions YouTube plays videos in.
The exception to this is videos you plan to post on Instagram. On Instagram everything is cropped into a square, and it is easier to imagine what your footage will look like as a square when you hold your phone strait up. Simply focus on the top of your screen and treat a portion of the bottom of your screen as if it is not there. When you hold your phone horizontally you need to try and estimate how much of the middle of your screen will make it in to your Instagram video, which can be awkward.
Those are the three main things to keep in mind, but if you are planning on posting directly to YouTube from your phone then you should also make sure you have a mobile app you can use to edit it first.
Filmora is a full-feature video editing app available for both Android and iPhone operating systems. With Filmora you can make awesome YouTube videos quickly using Filmora’s one-touch themes, or take a little bit more time personalizing your creation. One-touch themes are sets of related features, like filters and animated titles, which you can apply to your videos all at once. Filmora’s simple interface also makes it easy to apply filters, titles, overlays, transitions, and even royalty free music to your project one at a time.
After you’ve edited your video in Filmora you can post it directly to YouTube or other social media sites right from the app.
Richard Bennett
Richard Bennett is a writer and a lover of all things video.
Follow @Richard Bennett
Richard Bennett
Mar 27, 2024• Proven solutions
It is fun to be able to record a vlog entry whenever inspiration strikes you, and your smartphone is a great choice for recording on the go. Smartphones have really great cameras, and you probably always have your phone with you. You can even post directly from your phone to YouTube!
How To Make YouTube Videos on Your Smartphone
Making a video on your smartphone is similar to making a video with any other camera in a lot of ways. There are also a lot of ways in which it is different. You always have to watch out for camera shake, for example, but it can be even harder to control when you’re walking around shooting on your mobile device. Here are three things to keep in mind when vlogging with your smartphone.
Part 1. Keep It Steady
For a nice, smooth, shot consider resting your hand up on a railing, table, or anything else that will keep it steady while you film. Camera shake is always distracting to viewers, and smartphone videos are notoriously unstable because you are almost always holding your phone in your hand.
There is equipment you can use to cut out camera shake. You can get a smartphone mount for your tripod, or you can even stabilize your phone using a selfie stick. Many of the very newest smartphones have built in hardware called ‘OIS’ – optical image stabilization – that helps reduce shakiness.
Part 2. Be Heard
You have a lot to say, so make sure people can hear you say it! Smartphones do not tend to have very good microphones built in (neither do most cameras), so try to vlog from somewhere without a lot of background noise. It will help a lot if your voice has nothing to compete with.
Ideally, you should get an external mic to record your voice while you vlog on your phone. There are shotgun mics you can plug directly into the audio jack on your phone which will record great audio, or you can get a high quality MP3 recorder and carry it around in your pocket.
Part 3. Tilt Your Phone
When recording on the spur of the moment with your smartphone it is easy to automatically hold it the same way you would while texting or taking a selfie. If you record a video with your phone held so that it is tall – a ‘portrait’ shot – then your video will have thick black bars on either side when you post it to YouTube. If you tilt your phone so that it is wide you will record a ‘landscape’ shot, which will match the dimensions YouTube plays videos in.
The exception to this is videos you plan to post on Instagram. On Instagram everything is cropped into a square, and it is easier to imagine what your footage will look like as a square when you hold your phone strait up. Simply focus on the top of your screen and treat a portion of the bottom of your screen as if it is not there. When you hold your phone horizontally you need to try and estimate how much of the middle of your screen will make it in to your Instagram video, which can be awkward.
Those are the three main things to keep in mind, but if you are planning on posting directly to YouTube from your phone then you should also make sure you have a mobile app you can use to edit it first.
Filmora is a full-feature video editing app available for both Android and iPhone operating systems. With Filmora you can make awesome YouTube videos quickly using Filmora’s one-touch themes, or take a little bit more time personalizing your creation. One-touch themes are sets of related features, like filters and animated titles, which you can apply to your videos all at once. Filmora’s simple interface also makes it easy to apply filters, titles, overlays, transitions, and even royalty free music to your project one at a time.
After you’ve edited your video in Filmora you can post it directly to YouTube or other social media sites right from the app.
Richard Bennett
Richard Bennett is a writer and a lover of all things video.
Follow @Richard Bennett
Also read:
- [New] Easy Strategies for Editing Social Media Banners
- [New] From Barely There to Top Rated The Youtube Growth Arc
- [New] Navigating Through Youtube’s AdSense Revenue Understanding Payments per Thousand Views
- [Updated] Decoding Instagram Selfies The Validation Handbook
- [Updated] Flip the Script Instagram's Video Trick for 2024
- 2024 Approved Keyword Kickstart The Top 7 Free, User-Friendly Video Tag Extractors Analyzed
- Boost Productivity on Your Mac An Overview of Great TTS Apps
- Capture & Save Your LinkedIn Content The Ultimate Guide to Best Tools
- In 2024, Masterpiece Moments Top 15 Musician Behind-the-Scenes Vlogs
- In 2024, Remove Device Supervision From your Apple iPhone 8 Plus | Dr.fone
- In 2024, The Artisan's Guide to Animation Enchantment
- Legality of Recording on YouTube Platform, In 2024
- Maximizing Reach Strategies From Seasoned TubeBuddy Experts for 2024
- Swift Systems for Rearranging YouTube Video Lineup for 2024
- Top 3 Essentials for Maintaining an Immaculate Appearance on Your iPhone 13: A Guide
- Ultimate Guide: Dealing with Mac Overheating & Persistent Cooling Fan Noise
- Title: In 2024, Propel Content to Prominence Leverage TubeBuddy's Power
- Author: Thomas
- Created at : 2025-01-03 16:23:31
- Updated at : 2025-01-10 16:16:03
- Link: https://youtube-help.techidaily.com/in-2024-propel-content-to-prominence-leverage-tubebuddys-power/
- License: This work is licensed under CC BY-NC-SA 4.0.