
In 2024, Seamless Transitions for YouTube Videos in Adobe Premiere
Seamless Transitions for YouTube Videos in Adobe Premiere
How to Edit YouTube Videos in Adobe Premiere

Richard Bennett
Mar 27, 2024• Proven solutions
You just made a few videos, and you want to edit them first before uploading to YouTube. The truth is that you may find the editing part a bit more challenging compared to uploading. However, there are now tools like Adobe Premiere that can help make the editing process easier. Read on and learn how to edit YouTube videos with Adobe Premier so that you can create amazing videos.
Related article:Adobe Premiere User Guide
Adobe Premiere is largely targeted towards professional users, and the best alternative you can use today, whether you are a professional user or just a casual YouTube user, is Wondershare Filmora . This is not only a highly effective video editing program, but it is also user-friendly and very easy to use.
 Download Mac Version ](https://tools.techidaily.com/wondershare/filmora/download/ )
Adobe is well known for having some of the leading video production tools in the industry. In fact, most of their tools ranging from the Premier Pro and Photoshop to Audition and many others have been used in many video and movie productions, including some of the popular theatrical releases of our times. Their latest professional video editor, Adobe Premier can be summarized as one of the best editors with versatility, depth, and power for high-quality video editing.
How to edit YouTube Videos with Adobe Premier
Step 1: Import the Video Clips
The first step in how to edit YouTube videos with Adobe Premier is to basically import the video clips you want to edit. This is achieved using a simple process of clicking “import” from the “file” drop-down menu. Once you have finished importing your photos or video files, you can then drag them from the sidebar and into the editing area.

Note
- If the videos you want to import are already published online, you can start the process by first downloading them directly from YouTube first, making sure to save them as MP4 files.
- The best way of importing videos from YouTube is by using an innovative video converter like Wondershare Video Converter Ultimate. This program will help in downloading and converting files to a format that is supported by Adobe Premier.
Step 2: Editing
The next step in how edit YouTube videos with Adobe Premiere is to start modifying the video files or photos the way you want. To achieve this, click on “Effects Control” and apply the desired effects. If you want to insert some text or words into your video, select “title” and then click “new title.” Now choose how you would like the words to behave, for instance, “Default Roll” makes the text roll upwards in the page.
Now drag the text that you have created into the editor area. If you want to edit the text, simply double-click to select it, and it will bring up a separate page where you can make further edits. You can then modify the text, font, and the positioning as well. This page also allows you to set whether the text will crawl or roll.

The final part of the process is to import your chosen audio file. This could be the chosen soundtrack for your presentation. Simply drag the audio file onto your editor. You can then modify how the length of your videos or photos by selecting and dragging the specific photo or video. Finally, press enter and your video will start rendering.
Step 3: Save the Edited File and Upload to YouTube
It is important to note that even as you edit YouTube videos with Adobe Premier, the software does not allow direct uploads to YouTube. This means you will need to save the edited file first on your computer and ensure you use a YouTube supported format. The most effective option is to use the codec, which will then save your file in the MPEG-4 format. This is the preferred format for YouTube and Video uploads.
Richard Bennett
Richard Bennett is a writer and a lover of all things video.
Follow @Richard Bennett
Richard Bennett
Mar 27, 2024• Proven solutions
You just made a few videos, and you want to edit them first before uploading to YouTube. The truth is that you may find the editing part a bit more challenging compared to uploading. However, there are now tools like Adobe Premiere that can help make the editing process easier. Read on and learn how to edit YouTube videos with Adobe Premier so that you can create amazing videos.
Related article:Adobe Premiere User Guide
Adobe Premiere is largely targeted towards professional users, and the best alternative you can use today, whether you are a professional user or just a casual YouTube user, is Wondershare Filmora . This is not only a highly effective video editing program, but it is also user-friendly and very easy to use.
Download Mac Version ](https://tools.techidaily.com/wondershare/filmora/download/ )
Adobe is well known for having some of the leading video production tools in the industry. In fact, most of their tools ranging from the Premier Pro and Photoshop to Audition and many others have been used in many video and movie productions, including some of the popular theatrical releases of our times. Their latest professional video editor, Adobe Premier can be summarized as one of the best editors with versatility, depth, and power for high-quality video editing.
How to edit YouTube Videos with Adobe Premier
Step 1: Import the Video Clips
The first step in how to edit YouTube videos with Adobe Premier is to basically import the video clips you want to edit. This is achieved using a simple process of clicking “import” from the “file” drop-down menu. Once you have finished importing your photos or video files, you can then drag them from the sidebar and into the editing area.
Note
- If the videos you want to import are already published online, you can start the process by first downloading them directly from YouTube first, making sure to save them as MP4 files.
- The best way of importing videos from YouTube is by using an innovative video converter like Wondershare Video Converter Ultimate. This program will help in downloading and converting files to a format that is supported by Adobe Premier.
Step 2: Editing
The next step in how edit YouTube videos with Adobe Premiere is to start modifying the video files or photos the way you want. To achieve this, click on “Effects Control” and apply the desired effects. If you want to insert some text or words into your video, select “title” and then click “new title.” Now choose how you would like the words to behave, for instance, “Default Roll” makes the text roll upwards in the page.
Now drag the text that you have created into the editor area. If you want to edit the text, simply double-click to select it, and it will bring up a separate page where you can make further edits. You can then modify the text, font, and the positioning as well. This page also allows you to set whether the text will crawl or roll.
The final part of the process is to import your chosen audio file. This could be the chosen soundtrack for your presentation. Simply drag the audio file onto your editor. You can then modify how the length of your videos or photos by selecting and dragging the specific photo or video. Finally, press enter and your video will start rendering.
Step 3: Save the Edited File and Upload to YouTube
It is important to note that even as you edit YouTube videos with Adobe Premier, the software does not allow direct uploads to YouTube. This means you will need to save the edited file first on your computer and ensure you use a YouTube supported format. The most effective option is to use the codec, which will then save your file in the MPEG-4 format. This is the preferred format for YouTube and Video uploads.
Richard Bennett
Richard Bennett is a writer and a lover of all things video.
Follow @Richard Bennett
Maximizing Video Success on YouTube: Long-Term Creativity Commons Strategy
How to Force YouTube CC to Stay On and Get More Views
Richard Bennett
Oct 26, 2023• Proven solutions
Table of Content:
How YouTube CC Helps You Get More Views?
Benefits of Having YouTube CC Always On
How to Force YouTube CC to Always Turn On?
How to Embed Your Videos with Closed Captions on Your Website
Bonus Tip-Add Subtitles to YouTube Video with Wondershare Filmora
Wondershare Filmora serves as an inevitable video editing software for video lovers. It has a variety of subtitle templates for you to make great creations. Let’s see how to add subtitles to a YouTube video with Wondershare Filmora!

How YouTube CC Helps You to Get More Views?
YouTube CC (Closed Captions) is much capable of bringing more views to your videos.
Why? Because YouTube algorithms prefer to highlight YouTube videos that contain closed captions because such content appears universally acceptable and it helps to boost the experience for viewers. So when your YouTube video has some kind of relevant audio or speech information then it is essential to add closed captions (YouTube CC) to it.
Benefits of Having YouTube CC Always On
YouTube CC can easily bring more viewers to your terminal. But not all users know how to turn it on or bother to turn it on when it can actually help improve the watching experience. So there are few benefits that you can enjoy by having CCs ALWAYS on your videos.
- Closed captions play an important role when you have poor audio quality in your videos. For instance, if your videos did not follow the best audio recording practices , and are affected by background noise or bad audio equipment. In such cases, YouTube subtitles help viewers to understand what is going on videos even if they cannot hear it.
- For those who make videos with a unique accent, discuss something complex, or speaks too fast, turning on the closed captions help your viewers understand explanations and maintain their attention.
- This feature makes videos more accessible and can also appear useful for viewers that are hearing impaired.
How to Force YouTube CC to Always Turn On?
So, as you have gone through several benefits associated with YouTube video closed captions, now it is time to learn the technique to keep them always On.
Go through the steps below to force CCs always on your YouTube videos:
Step 1: Login and click the video in which you wish to add your captions.
Step 2: Click Edit underneath the video
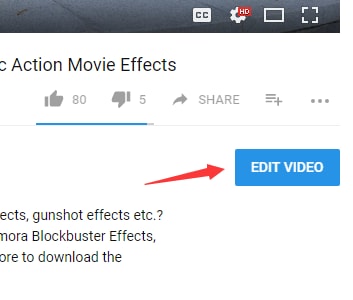
Step 3: Add a specific tag to your content: “yt:cc=on”

Step 4: Click Save Edit
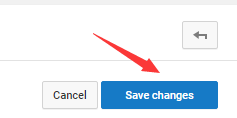
There you go!

How to Embed your Videos with Closed Captions on your website
Some of you might also want to embed YouTube videos on your website. In this case, also you will need to use closed captions during display.
To do this, write “?cc_load_policy=1” at the end of your video source URL; it will be inside the iframe.
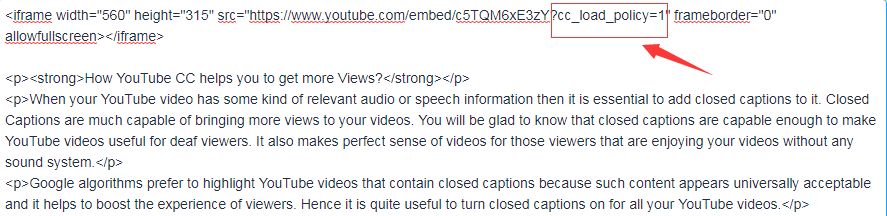
These simple steps will help you to create videos with the most impactful content and this collection will be enjoyed by all viewers on your channel. The Closed Captioned videos are valued higher by Google because they are capable enough to please the viewers throughout the world.
Even though CCs can be a powerful addition to your videos, it’s always important to prioritize audio, and it all starts with a good microphone. Find out what the best microphones are in this blog post: The Best Microphone for All Types of Creators
Richard Bennett
Richard Bennett is a writer and a lover of all things video.
Follow @Richard Bennett
Richard Bennett
Oct 26, 2023• Proven solutions
Table of Content:
How YouTube CC Helps You Get More Views?
Benefits of Having YouTube CC Always On
How to Force YouTube CC to Always Turn On?
How to Embed Your Videos with Closed Captions on Your Website
Bonus Tip-Add Subtitles to YouTube Video with Wondershare Filmora
Wondershare Filmora serves as an inevitable video editing software for video lovers. It has a variety of subtitle templates for you to make great creations. Let’s see how to add subtitles to a YouTube video with Wondershare Filmora!
How YouTube CC Helps You to Get More Views?
YouTube CC (Closed Captions) is much capable of bringing more views to your videos.
Why? Because YouTube algorithms prefer to highlight YouTube videos that contain closed captions because such content appears universally acceptable and it helps to boost the experience for viewers. So when your YouTube video has some kind of relevant audio or speech information then it is essential to add closed captions (YouTube CC) to it.
Benefits of Having YouTube CC Always On
YouTube CC can easily bring more viewers to your terminal. But not all users know how to turn it on or bother to turn it on when it can actually help improve the watching experience. So there are few benefits that you can enjoy by having CCs ALWAYS on your videos.
- Closed captions play an important role when you have poor audio quality in your videos. For instance, if your videos did not follow the best audio recording practices , and are affected by background noise or bad audio equipment. In such cases, YouTube subtitles help viewers to understand what is going on videos even if they cannot hear it.
- For those who make videos with a unique accent, discuss something complex, or speaks too fast, turning on the closed captions help your viewers understand explanations and maintain their attention.
- This feature makes videos more accessible and can also appear useful for viewers that are hearing impaired.
How to Force YouTube CC to Always Turn On?
So, as you have gone through several benefits associated with YouTube video closed captions, now it is time to learn the technique to keep them always On.
Go through the steps below to force CCs always on your YouTube videos:
Step 1: Login and click the video in which you wish to add your captions.
Step 2: Click Edit underneath the video
Step 3: Add a specific tag to your content: “yt:cc=on”
Step 4: Click Save Edit
There you go!
How to Embed your Videos with Closed Captions on your website
Some of you might also want to embed YouTube videos on your website. In this case, also you will need to use closed captions during display.
To do this, write “?cc_load_policy=1” at the end of your video source URL; it will be inside the iframe.
These simple steps will help you to create videos with the most impactful content and this collection will be enjoyed by all viewers on your channel. The Closed Captioned videos are valued higher by Google because they are capable enough to please the viewers throughout the world.
Even though CCs can be a powerful addition to your videos, it’s always important to prioritize audio, and it all starts with a good microphone. Find out what the best microphones are in this blog post: The Best Microphone for All Types of Creators
Richard Bennett
Richard Bennett is a writer and a lover of all things video.
Follow @Richard Bennett
Also read:
- [New] Alternatives to WIndows' Traditional Video Editing
- [New] Daily Digital Deluge YouTube's Prime Videos Ranked #1-10
- [New] Groundbreaking Films in the VR World
- [Updated] 2024 Approved Free and Easy FB Link Collection Services
- [Updated] In 2024, 8 Premier iOS Sketch Tools
- Easy Guide: Setting Up Parental Controls via Control Panel - Tips From YL Software Solutions
- Expert Picks: Ideal Internet Filters and Routers for Families
- From Chat Room to Screen Step-by-Step Google Meet YouTube Streams for 2024
- How to Outsmart Youtube Sanctions for 2024
- In 2024, Skyrocket Your YouTube Speed with Effective Render Techniques
- In 2024, Streamlining Your FreeFire YouTube Experience
- In 2024, Tailoring Audio Rate on Mobile and Desktops for YouTube
- Master Your Hashtags The Path to 6-Figure Youtube Success for 2024
- Navigating the Metaverse with Elite Headsets
- Title: In 2024, Seamless Transitions for YouTube Videos in Adobe Premiere
- Author: Thomas
- Created at : 2025-01-25 18:54:42
- Updated at : 2025-01-29 20:23:55
- Link: https://youtube-help.techidaily.com/in-2024-seamless-transitions-for-youtube-videos-in-adobe-premiere/
- License: This work is licensed under CC BY-NC-SA 4.0.