"In 2024, Shield Yourself Online A Step-by-Step Guide for Smoothing Images"
Shield Yourself Online: A Step-by-Step Guide for Smoothing Images
How to Blur Faces or Objects in YouTube Videos

Richard Bennett
Mar 27, 2024• Proven solutions
Suppose you are interested in preserving the identity of people in your YouTube videos, or you are simply interested in luring out some of the faces of the objects in your YouTube videos to retain filming rights. In that case, you can do it quite easily. With the help of a proper editing application and some online tools, you can very quickly blur out faces or objects from your YouTube videos.
Blur Faces With the Best YouTube Video Editing Software
Wondershare Filmora is one of the best video editing tools for YouTube videos. Through the Filmora editing suite, you can quickly import the video and then go to the power town to blur out faces, distort objects, and more.
 Download Mac Version ](https://tools.techidaily.com/wondershare/filmora/download/ )
- You first need to download and install Wondershare Filmora
- Then it is time to load the video you wish to edit
- You can either browse the tape from your computer or drag and drop it
- Once loading is finished, you can drag and drop the video to the Video Timeline
- Afterward, you must target the exact video on the timeline
- Right-click and choose the Power Tool available
- A pop-up window will appear, where you must choose Face-Off and then Apply Face Off to the Clip
- The effect you want is the first option you get, or else the mosaic
- By clicking on the mosaic, it will be applied to your video
- Click OK
- Now you must choose Export to save the video
- Please choose the right format and the save option of your choosing (instant post on YouTube, burn the video on CD/DVD or save it on your PC)
If you are recording your tutorial for YouTube or your demonstration videos, you may need to blur or hide the private and sensitive information. Click to check how did I hide the personal info in the video .
How to Blur Faces or Objects in Videos With YouTube Video Editor
YouTube has offered the chance to blur out images, faces, and more since 2012. The face blur tool available on YouTube works quite well.
Here is what you need to do:
- First of all, open YouTube Video Manager
- Click on the Edit button
- Choose the Enhancements
- Click on the Blurring option (it is on the right of your screen)
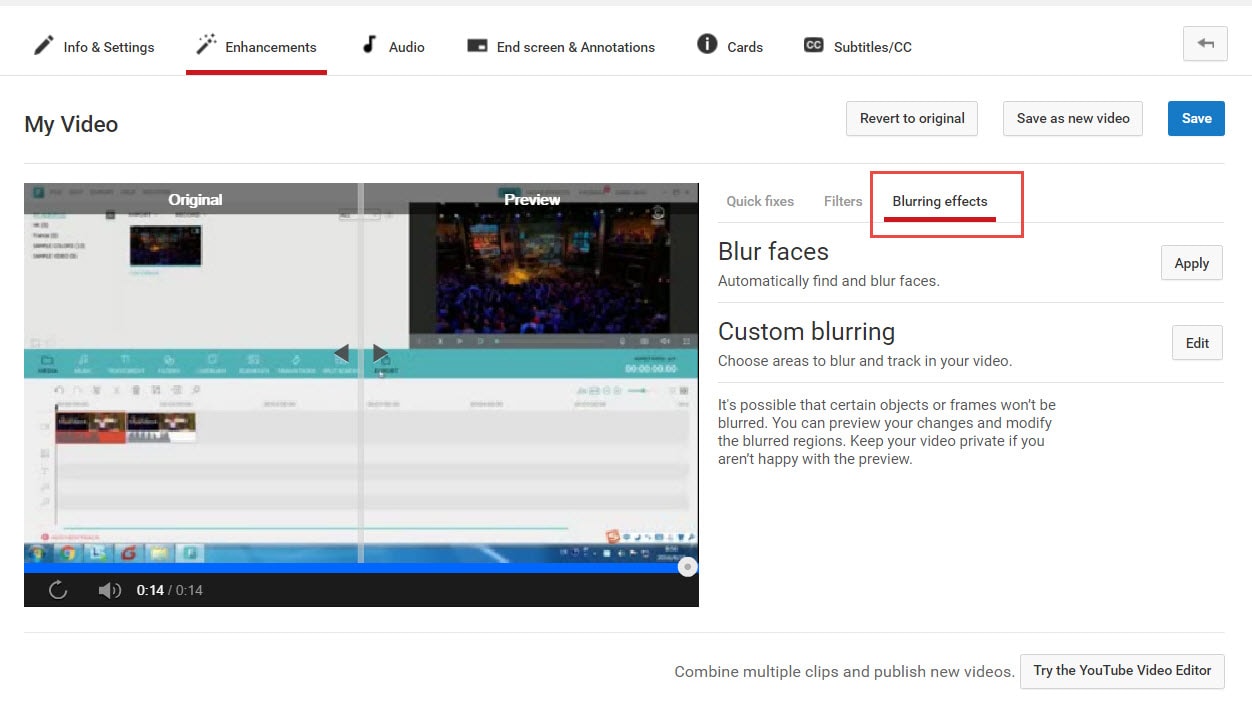

- Click on the Edit button of the Custom blurring option
- This time, a pop-up window will appear
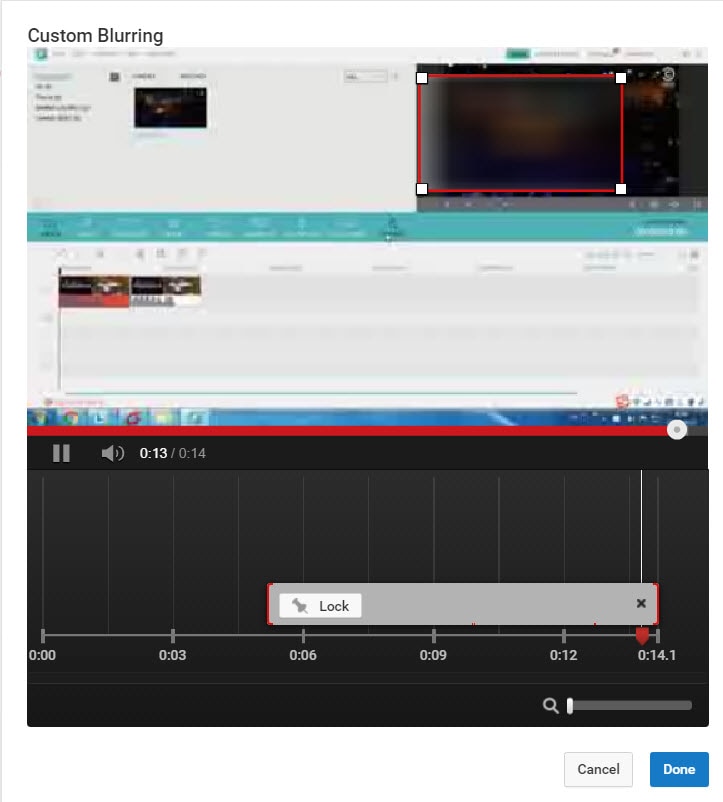
- With the use of click and drag properties, you can create the blurred content
- Click on Done
- Save the video, as per your preferences (Save as new video, revert to the original or overwrite)
Here is a tutorial video for how to blur faces or objects on YouTube:
Richard Bennett
Richard Bennett is a writer and a lover of all things video.
Follow @Richard Bennett
Richard Bennett
Mar 27, 2024• Proven solutions
Suppose you are interested in preserving the identity of people in your YouTube videos, or you are simply interested in luring out some of the faces of the objects in your YouTube videos to retain filming rights. In that case, you can do it quite easily. With the help of a proper editing application and some online tools, you can very quickly blur out faces or objects from your YouTube videos.
Blur Faces With the Best YouTube Video Editing Software
Wondershare Filmora is one of the best video editing tools for YouTube videos. Through the Filmora editing suite, you can quickly import the video and then go to the power town to blur out faces, distort objects, and more.
Download Mac Version ](https://tools.techidaily.com/wondershare/filmora/download/ )
- You first need to download and install Wondershare Filmora
- Then it is time to load the video you wish to edit
- You can either browse the tape from your computer or drag and drop it
- Once loading is finished, you can drag and drop the video to the Video Timeline
- Afterward, you must target the exact video on the timeline
- Right-click and choose the Power Tool available
- A pop-up window will appear, where you must choose Face-Off and then Apply Face Off to the Clip
- The effect you want is the first option you get, or else the mosaic
- By clicking on the mosaic, it will be applied to your video
- Click OK
- Now you must choose Export to save the video
- Please choose the right format and the save option of your choosing (instant post on YouTube, burn the video on CD/DVD or save it on your PC)
If you are recording your tutorial for YouTube or your demonstration videos, you may need to blur or hide the private and sensitive information. Click to check how did I hide the personal info in the video .
How to Blur Faces or Objects in Videos With YouTube Video Editor
YouTube has offered the chance to blur out images, faces, and more since 2012. The face blur tool available on YouTube works quite well.
Here is what you need to do:
- First of all, open YouTube Video Manager
- Click on the Edit button
- Choose the Enhancements
- Click on the Blurring option (it is on the right of your screen)
- Click on the Edit button of the Custom blurring option
- This time, a pop-up window will appear
- With the use of click and drag properties, you can create the blurred content
- Click on Done
- Save the video, as per your preferences (Save as new video, revert to the original or overwrite)
Here is a tutorial video for how to blur faces or objects on YouTube:
Richard Bennett
Richard Bennett is a writer and a lover of all things video.
Follow @Richard Bennett
Mastering the Art of Thumbnail Design with Your Mac
How to Make a YouTube Thumbnail On Mac

Shanoon Cox
Oct 26, 2023• Proven solutions
As a Youtuber, the first thing you would want is to achieve is a high number of views on your videos. One of the most crucial factors that determine whether the video will be a success or not is the thumbnail.
You need to design an attractive youtube custom thumbnail as it can up your game and get you significantly more views. this calls for you to exercise your artistic skills to the best, to be able to create thumbnails that make it almost irresistible for the viewers to scroll down without watching the video.
However, if you are wondering how that can be achieved then fret no longer for this article will explain the simple process of creating youtube thumbnails easily. All you need is a capable thumbnail maker like FilmoraX that can do it all for you in one automagical flourish!

What is a Youtube Thumbnail?
A youtube thumbnail is a smaller version of the video, a snapshot that you choose as a preview of your video. A Thumbnail is extremely important because it is essentially the outer packaging of your video; its front cover.
Much like the cover of a book, a thumbnail has to be attractive so that it can tempt your potential viewers to stop and watch your video while they are scrolling on youtube.
thumbnails are a significant factor in determining the number of views a Youtuber gets on his videos.
If you don’t create a thumbnail then youtube will generate one by itself which may not be so enticing for viewers. The purpose of the thumbnail is to make your videos stand out among the rest so you need to pay attention to it!
How to make Youtube Thumbnails on Mac
You can easily create interesting thumbnails for youtube videos using a thumbnail maker likeFilmoraX . Here is a step by step guide:
1. Preview the video and choose the still snapshot
The first step in creating a thumbnail is to import the final video into the FilmoraX editor on your MacBook.

Then, use the thumbnail editor to play your video and choose the snapshot that you want to be appearing as your thumbnail.
You can easily choose the frame from the video or use the preview frame button to view the frames one by one!

2. Add text, shape, and image overlays
Once you’ve chosen the frame for the thumbnail, the next step would be to add text to it to catch the attention of the audience. You can also adjust the thumbnail size as per your requirement, however, the ideal size would be 1280x720 pixels with a minimum width of 640 pixels.

3. Add effects
FilmoraX has a wide range of effects that you can apply to your videos or pictures to make them look more attractive.

4. Save the thumbnail
After you are done with all the editing, the final step would be to save the youtube thumbnail by hitting the save button.
Once you save you’ll see how your thumbnail will feature on different platforms like Facebook, Youtube, and Twitter.
So, using this thumbnail maker you can easily create custom thumbnails for your videos!
Conclusion
Hopefully, the above-mentioned steps have given you enough insight and clarity on making creative and good youtube thumbnails. Using FilmoraX will further simplify the process for you with its amazing tools and features!

Shanoon Cox
Shanoon Cox is a writer and a lover of all things video.
Follow @Shanoon Cox
Shanoon Cox
Oct 26, 2023• Proven solutions
As a Youtuber, the first thing you would want is to achieve is a high number of views on your videos. One of the most crucial factors that determine whether the video will be a success or not is the thumbnail.
You need to design an attractive youtube custom thumbnail as it can up your game and get you significantly more views. this calls for you to exercise your artistic skills to the best, to be able to create thumbnails that make it almost irresistible for the viewers to scroll down without watching the video.
However, if you are wondering how that can be achieved then fret no longer for this article will explain the simple process of creating youtube thumbnails easily. All you need is a capable thumbnail maker like FilmoraX that can do it all for you in one automagical flourish!
What is a Youtube Thumbnail?
A youtube thumbnail is a smaller version of the video, a snapshot that you choose as a preview of your video. A Thumbnail is extremely important because it is essentially the outer packaging of your video; its front cover.
Much like the cover of a book, a thumbnail has to be attractive so that it can tempt your potential viewers to stop and watch your video while they are scrolling on youtube.
thumbnails are a significant factor in determining the number of views a Youtuber gets on his videos.
If you don’t create a thumbnail then youtube will generate one by itself which may not be so enticing for viewers. The purpose of the thumbnail is to make your videos stand out among the rest so you need to pay attention to it!
How to make Youtube Thumbnails on Mac
You can easily create interesting thumbnails for youtube videos using a thumbnail maker likeFilmoraX . Here is a step by step guide:
1. Preview the video and choose the still snapshot
The first step in creating a thumbnail is to import the final video into the FilmoraX editor on your MacBook.
Then, use the thumbnail editor to play your video and choose the snapshot that you want to be appearing as your thumbnail.
You can easily choose the frame from the video or use the preview frame button to view the frames one by one!
2. Add text, shape, and image overlays
Once you’ve chosen the frame for the thumbnail, the next step would be to add text to it to catch the attention of the audience. You can also adjust the thumbnail size as per your requirement, however, the ideal size would be 1280x720 pixels with a minimum width of 640 pixels.
3. Add effects
FilmoraX has a wide range of effects that you can apply to your videos or pictures to make them look more attractive.
4. Save the thumbnail
After you are done with all the editing, the final step would be to save the youtube thumbnail by hitting the save button.
Once you save you’ll see how your thumbnail will feature on different platforms like Facebook, Youtube, and Twitter.
So, using this thumbnail maker you can easily create custom thumbnails for your videos!
Conclusion
Hopefully, the above-mentioned steps have given you enough insight and clarity on making creative and good youtube thumbnails. Using FilmoraX will further simplify the process for you with its amazing tools and features!
Shanoon Cox
Shanoon Cox is a writer and a lover of all things video.
Follow @Shanoon Cox
Also read:
- [New] Click Magic Secrets to Stunning, Polished Pics
- [New] From Idea to Screen Smartphone Video Creation Tips
- [New] In 2024, Xbox Gameplay Perfect Screen Recording Guide
- [New] No-Root Audio Recording on Android Devices [Tutorial]
- [Updated] 2024 Approved Unveiling ITop A Screencast Game-Changer?
- 2024 Approved Free Banner Templates & Makers for YouTube
- 2024 Approved IMovie Skills Producing Engaging and Profitable Square Video Feeds
- 2024 Approved Navigate Your Net Worth with YouTube The Threefold Approach to Assessing Earnings
- 2024 Approved Pioneering Proficiency The Complete Guide to Music & Media Fusion on YouTube
- 2024 Approved SnapMaster Z7 Pro Excellence in Picture Magnification
- 2024 Approved The Evolution of YouTube Shorts Popularity Metrics
- Breaking Language Barriers in Emulated Games
- Earning Success on TikTok Unraveling the Top 8 Pathways for 2024
- In 2024, No Paywalls Here! Learn How To Record and Save Your YouTube Experience For Free
- In 2024, Pro Tools for Non-Pro YouTubers
- In 2024, Streamlining Your Twitch Content on YouTube
- In 2024, The Truth Behind ASMR Video Enthusiasm
- Streamline Your YT Content with Background Softening Tricks for 2024
- The Ultimate List: 5 Highly Recommended Video Editors Unveiled
- Title: In 2024, Shield Yourself Online A Step-by-Step Guide for Smoothing Images
- Author: Thomas
- Created at : 2024-10-19 06:43:35
- Updated at : 2024-10-23 20:07:48
- Link: https://youtube-help.techidaily.com/in-2024-shield-yourself-online-a-step-by-step-guide-for-smoothing-images/
- License: This work is licensed under CC BY-NC-SA 4.0.