
:max_bytes(150000):strip_icc()/GettyImages-1139003653-835c81e938ba43e8be021cc8d0364b71.jpg)
"In 2024, Simplify Your Videos - Discover the Top 10 Online Trimmers"
Simplify Your Videos - Discover the Top 10 Online Trimmers
YouTube is one of the most popular video-sharing social media websites. It offers a wide range of media, including music videos, trailers, live broadcasts, games, and how-to videos. It also has the greatest societal influence because most artists, musicians, and significant corporations utilize this platform to promote their work.
However, because of the growing consumer interest in media content, many providers utilize it to advertise businesses and products. These paid marketing videos aren’t always relevant to the material you want to see. With these circumstances in mind, this article will help you find an excellent YouTube Video Trimmer Online, which you may use to clip and trim YouTube videos.
In this article
01 Part 1: Best YouTube Video Trimmer Online
02 Part 2: FAQs About Online YouTube Video Trimmer
Part 1: Best YouTube Video Trimmer Online
YouTube is amongst the most frequently used social media platform. People get their content ideas and teach others about them. However, videos might contain some unnecessary parts, and it can be a problem if you want to save the video. The following YouTube trimmers online can assist you.
1. Filmora Instant Cutter Tool [Offline but More Powerful]
Before you try the below online tools, Filmora Instant Cutter tool will be another choice when you need more powerful features. It lets you input huge video clips in formats and rapidly reduce or combine them without re-encoding. This is a very valuable tool when working with high-resolution movies. It supports MP4/MOV and MTS/M2TS video files.It maintains the quality of the video It supports 4K UHD video formats It allows you to merge the videos You can trim massive files with ease.
You can download Youtube videos first and then make trimming or add effects on it.
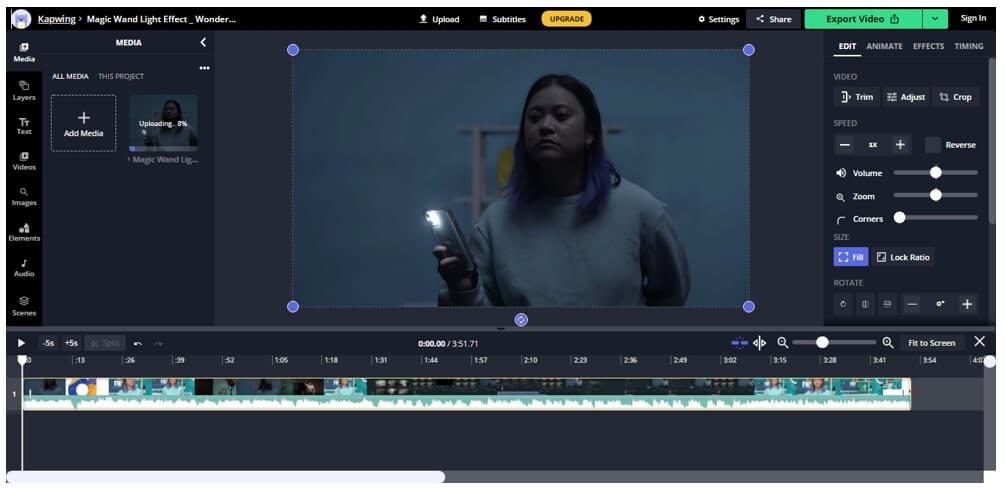
2. Kapwing
Kapwing is an online video editor that helps you edit videos without downloading the software. It features several editing tools with an easy-to-use interface. There’s no need to register yourself for editing the videos through Kapwing. That’s why it has millions of users worldwide.
Kapwing’s Video Trimmer makes it simple to trim YouTube videos. The service includes the same video cutting functionality as before but with a much prettier UI. After pasting the YouTube video URL to crop, you may use the easy-to-use timestamp slider to decide the sections of the YouTube video to edit.
Pros
- Different templates
- Multiple editing features
- Easy-to-use interface
- Fast
Cons
- Leaves a watermark if you don’t sign up
Find out more online video editors without a watermark.
3. VEED .iO
VEED.io video editor is a simple yet powerful video-editing program that allow s users to make stunning videos. VEED may be an important element of your sales funnel. With this program, you may edit, enhance, and add a lot of creativity to presentations, marketing videos, review videos, or video blogging.
You need to choose a file and start trimming it. After that, download the video with its easy-to-use interface. You need to sign up for editing the video with the VEED online tool. Moreover, there’s no watermark in the exported video.
Pros
- Fast and straightforward
- Multiple output options
- No watermark
Cons
- Minor bugs
4. Flixier
Flixier provides powerful video editing software with 1-minute exports to any device, easy collaboration, and enough cloud storage, all in one window. Flixier enables users to export any video, independent of technology. Cloud storage and complete version history are available, including feedback comments, sophisticated exporting, and email notifications.
Select a file and begin cutting it. Then, using the simple interface, download the video. No sign-up is required for the Flixier online tool to modify the video. In addition, there is no watermark in the exported video.
Pros
- 4x faster
- Cloud storage and history
- No registration
- Supports multiple operating systems
Cons
- Exports video up to one minute
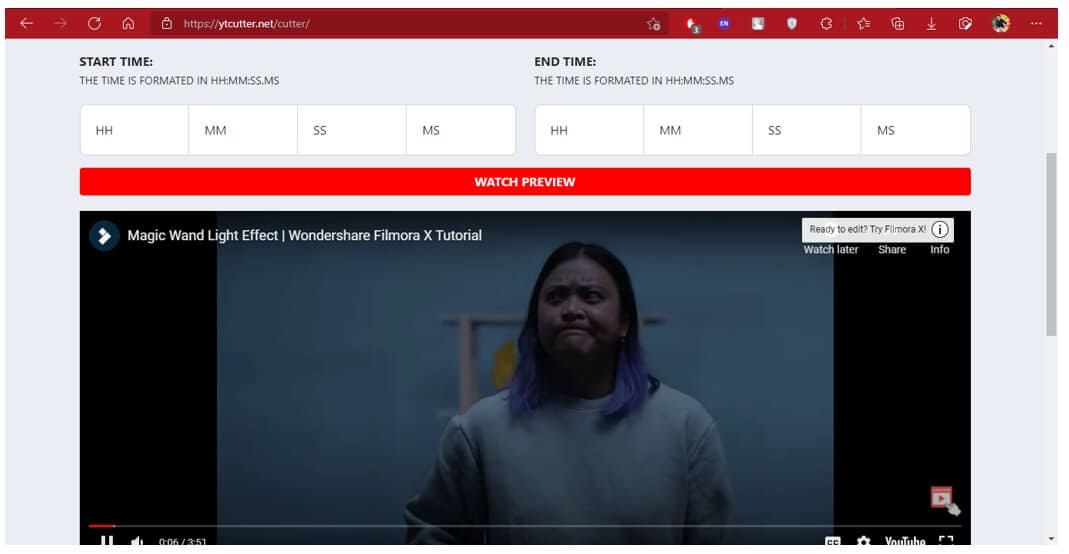
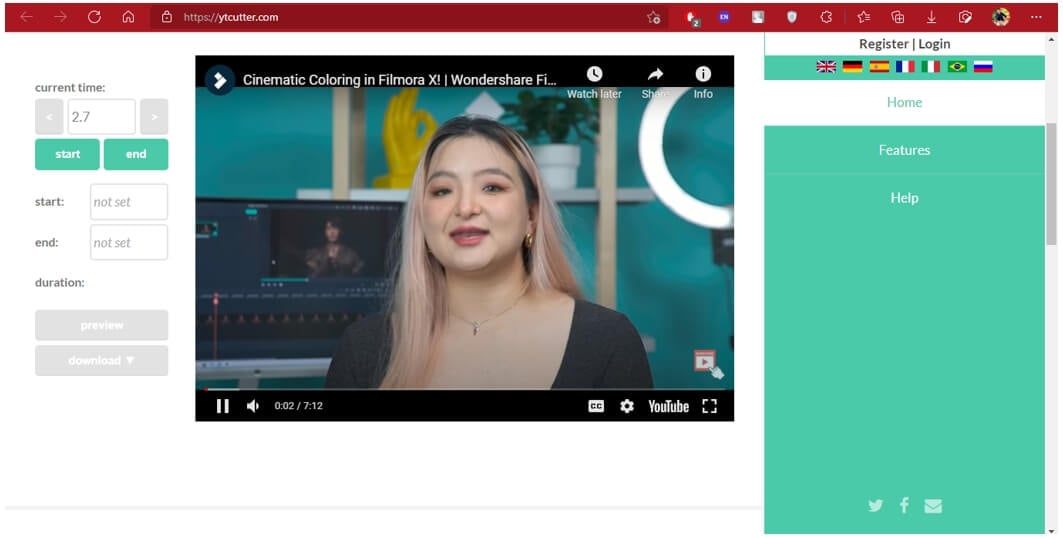
5. YTCutter.net
It is one of the best YouTube to mp3 converters online with trimmer available. YTCutter.net has various editing features that help you easily trim and modify the videos. It allows you to watch the video in preview mode before downloading it. It does not leave any watermark on the exported video.
You may extract favourite moments from YouTube videos with this ad-supported web tool. The app’s operation is rather simple. You have to paste a YouTube URL and set the start and end times. After that, you may download the cropped video, audio, or GIF. However, you need to register yourself for downloading the video through this tool.
Pros
- No watermark
- Simple interface
- Several editing features
Cons
- Requires an account to save the video to your profile or your device
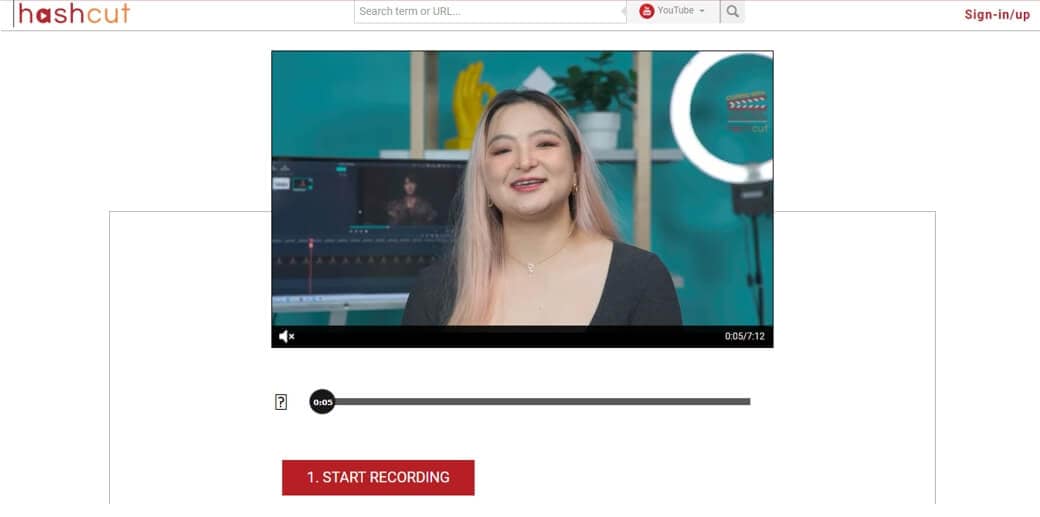
6. HashCut
HashCut is a unique YouTube online trimmer that allows you to save the highlights. It is possible to extract a segment from a YouTube video by tracing the section you require. Even better, you may customize the text and stickers with your tastes.
To begin, open your favourite web browser and navigate to the online YouTube trimmer. Paste the URL and specify the start and finish points of the clip you wish to obtain. Then, save the video. Furthermore, you may use its many capabilities to enhance the video, such as previewing footage, adding annotation, and embedding stickers on the film. It requires sign-up to edit the video and leaves a watermark on the exported one.
Pros
- Adds text and animations
- Chrome extension
- Preview Mode
- Embeds stickers
Cons
- Slow uploading procedure
7. YT Cutter
As the name indicates, YT Cutter is a YouTube video trimmer and downloader online that allows you to remove specific segments from YouTube videos. It can operate successfully online without any registration. Furthermore, you may accurately clip YouTube videos to 0.1 seconds, capture screenshots, and output files to video, animation GIF, or audio.
Paste the URL into the YT Cutter search field and wait for the video to refresh. Then, press the start and finish buttons to give your movie a beginning and an endpoint. Then, save the movie to your device in the format of your choice. Moreover, it does not leave any watermark on the exported video.
Pros
- No watermark
- User-friendly interface
- Supports multiple output formats
Cons
- Limited input formats
8. YouTube4kDownloader
Because of its simple interface, YouTube4kdownloader is a thorough and simple online YouTube video trimmer. It has a tool that allows you to trim or edit video segments from YouTube videos. One of its cutting features includes the ability to go to the beginning and conclusion of the choice for fast and easy clip trimming.
It also features a play and stop button that allows you to crop a specific scene from a YouTube video. Aside from that, it demonstrates three methods for sharing the cropped video link, including copying the plugin, the URL or media link, and watching the trimmed video on the YouTube website. It does not require sign-up for editing the video and leaves a watermark on the exported one.
Pros
- Trim specific segments
- No sign-up
- No watermark
Cons
- Completely web-based
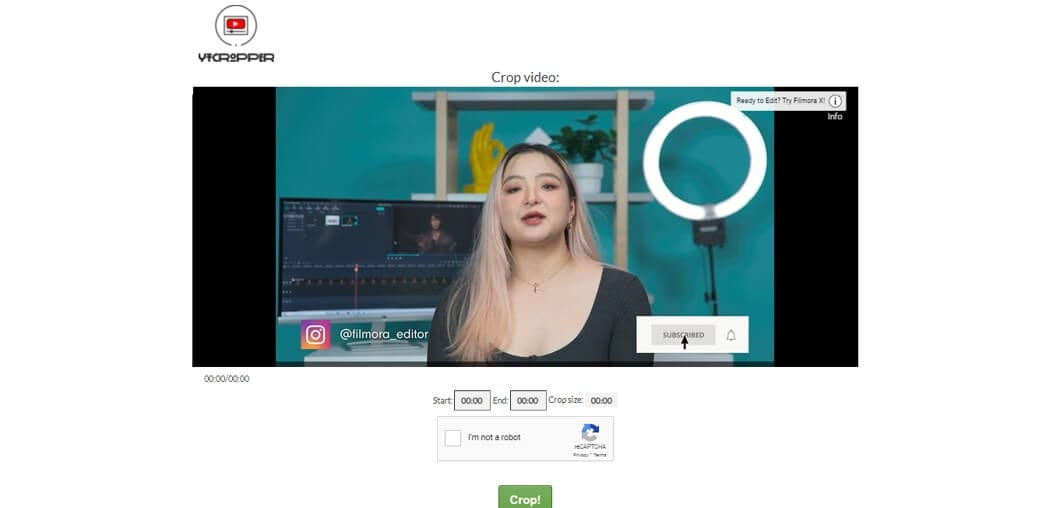
9. YT Cropper
Another YouTube video clipper online is YT Cropper, allowing users to extract particular clips from YouTube videos. Its Drag function allows users to choose a beginning and finishing point for the clips, and the markers will assist users in locating the clips that can be obtained that they desire. Users can make use of a one-of-a-kind feature known as looping.
Copy and paste the URL into the search field. Wait for the system to evaluate the video. Finally, use the markers to crop a select scene from a YouTube video. Then, to evaluate your clips, click the trim button. No sign-up and watermark are required for this YouTube trimmer.
Pros
- Looping feature
- Drag and drop function
- Easy trimming
Cons
- Slow
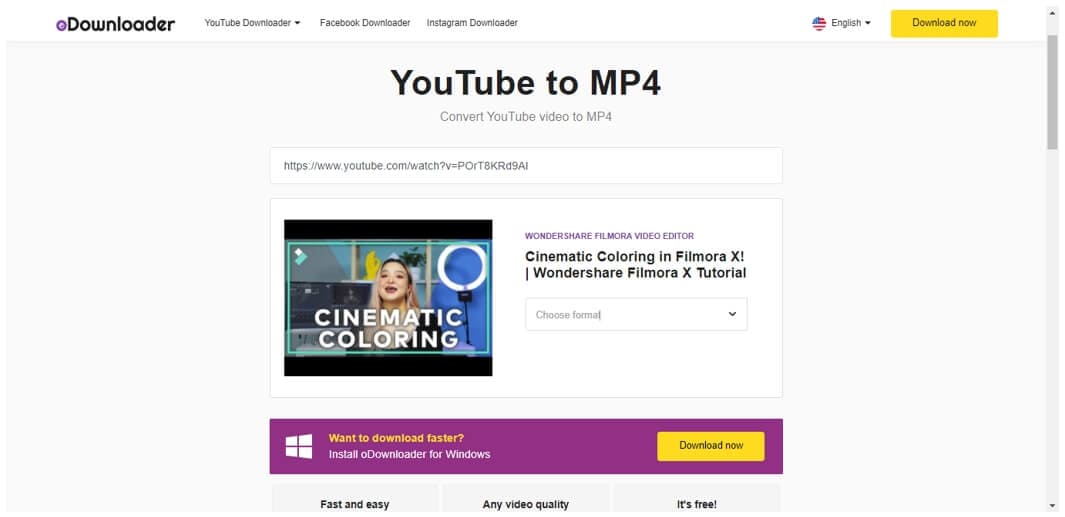
10. Odownloader
Odownloader Is another ad-supported YouTube trimmer that allows you to chop YouTube videos quickly. It allows you to download either audio alone or complete video. You may also choose between .webm and.mp4 formats.
Paste the link or URL into the search field and wait for the video to refresh. Then, press the start and finish buttons to give your movie a beginning and an endpoint. Then, save the movie to your device in the format of your choice. Moreover, it does not leave any watermark on the exported video.
Pros
- Exports in audio format as well
- Multiple output formats
- Easy-to-use
Cons
- Several ads
11. VideoCrops
It allows users to crop YouTube videos by dragging the two marks to the beginning and conclusion of the clip. It provides a high level of security, as only the users can access their data, which cannot be viewed by other users or on any site.
Cropping a video entails three steps. The video is first downloaded to the server. This may potentially take some time, depending on the length of the video. Second, the video has been trimmed. Finally, the video is saved as.MP4. You should also consider that this is a free site with limited resources.
Pros
- Easy trimming
- No watermark
- Free website
- High-level security
Cons
- Limited resources

Part 2: FAQs About Online YouTube Video Trimmer
Does YouTube have a trimmer?
Yes, you may cut videos after they’ve been uploaded to the YouTube site. You may chop off the beginning, middle, or ending of your movie on a computer. It is not necessary to re-upload a video to cut it. The video’s URL, view counts, and comments will remain unchanged. This functionality is only accessible for less than 6 hours long videos.
What is the difference between cut and trim in video editing?
Cutting is the process of separating pieces of a clip. You can reuse these portions in another video or delete them entirely. On the other hand, trimming is the process of eliminating or expanding the duration of a video clip’s front or tail regions in video editing.
Conclusion
Numerous programs will swiftly upload and trim your tiny movies, ideal for folks who make YouTube videos. Then, some tools can handle huge and bulky files and are ideal for file output and video quality. It’s a shame that some of these tools need payment to access their additional editing features. However, you have an excellent YouTube Video Trimmer Online, which is completely free and listed in detail within this article.
02 Part 2: FAQs About Online YouTube Video Trimmer
Part 1: Best YouTube Video Trimmer Online
YouTube is amongst the most frequently used social media platform. People get their content ideas and teach others about them. However, videos might contain some unnecessary parts, and it can be a problem if you want to save the video. The following YouTube trimmers online can assist you.
1. Filmora Instant Cutter Tool [Offline but More Powerful]
Before you try the below online tools, Filmora Instant Cutter tool will be another choice when you need more powerful features. It lets you input huge video clips in formats and rapidly reduce or combine them without re-encoding. This is a very valuable tool when working with high-resolution movies. It supports MP4/MOV and MTS/M2TS video files.It maintains the quality of the video It supports 4K UHD video formats It allows you to merge the videos You can trim massive files with ease.
You can download Youtube videos first and then make trimming or add effects on it.
2. Kapwing
Kapwing is an online video editor that helps you edit videos without downloading the software. It features several editing tools with an easy-to-use interface. There’s no need to register yourself for editing the videos through Kapwing. That’s why it has millions of users worldwide.
Kapwing’s Video Trimmer makes it simple to trim YouTube videos. The service includes the same video cutting functionality as before but with a much prettier UI. After pasting the YouTube video URL to crop, you may use the easy-to-use timestamp slider to decide the sections of the YouTube video to edit.
Pros
- Different templates
- Multiple editing features
- Easy-to-use interface
- Fast
Cons
- Leaves a watermark if you don’t sign up
Find out more online video editors without a watermark.
3. VEED .iO
VEED.io video editor is a simple yet powerful video-editing program that allow s users to make stunning videos. VEED may be an important element of your sales funnel. With this program, you may edit, enhance, and add a lot of creativity to presentations, marketing videos, review videos, or video blogging.
You need to choose a file and start trimming it. After that, download the video with its easy-to-use interface. You need to sign up for editing the video with the VEED online tool. Moreover, there’s no watermark in the exported video.
Pros
- Fast and straightforward
- Multiple output options
- No watermark
Cons
- Minor bugs
4. Flixier
Flixier provides powerful video editing software with 1-minute exports to any device, easy collaboration, and enough cloud storage, all in one window. Flixier enables users to export any video, independent of technology. Cloud storage and complete version history are available, including feedback comments, sophisticated exporting, and email notifications.
Select a file and begin cutting it. Then, using the simple interface, download the video. No sign-up is required for the Flixier online tool to modify the video. In addition, there is no watermark in the exported video.
Pros
- 4x faster
- Cloud storage and history
- No registration
- Supports multiple operating systems
Cons
- Exports video up to one minute
5. YTCutter.net
It is one of the best YouTube to mp3 converters online with trimmer available. YTCutter.net has various editing features that help you easily trim and modify the videos. It allows you to watch the video in preview mode before downloading it. It does not leave any watermark on the exported video.
You may extract favourite moments from YouTube videos with this ad-supported web tool. The app’s operation is rather simple. You have to paste a YouTube URL and set the start and end times. After that, you may download the cropped video, audio, or GIF. However, you need to register yourself for downloading the video through this tool.
Pros
- No watermark
- Simple interface
- Several editing features
Cons
- Requires an account to save the video to your profile or your device
6. HashCut
HashCut is a unique YouTube online trimmer that allows you to save the highlights. It is possible to extract a segment from a YouTube video by tracing the section you require. Even better, you may customize the text and stickers with your tastes.
To begin, open your favourite web browser and navigate to the online YouTube trimmer. Paste the URL and specify the start and finish points of the clip you wish to obtain. Then, save the video. Furthermore, you may use its many capabilities to enhance the video, such as previewing footage, adding annotation, and embedding stickers on the film. It requires sign-up to edit the video and leaves a watermark on the exported one.
Pros
- Adds text and animations
- Chrome extension
- Preview Mode
- Embeds stickers
Cons
- Slow uploading procedure
7. YT Cutter
As the name indicates, YT Cutter is a YouTube video trimmer and downloader online that allows you to remove specific segments from YouTube videos. It can operate successfully online without any registration. Furthermore, you may accurately clip YouTube videos to 0.1 seconds, capture screenshots, and output files to video, animation GIF, or audio.
Paste the URL into the YT Cutter search field and wait for the video to refresh. Then, press the start and finish buttons to give your movie a beginning and an endpoint. Then, save the movie to your device in the format of your choice. Moreover, it does not leave any watermark on the exported video.
Pros
- No watermark
- User-friendly interface
- Supports multiple output formats
Cons
- Limited input formats
8. YouTube4kDownloader
Because of its simple interface, YouTube4kdownloader is a thorough and simple online YouTube video trimmer. It has a tool that allows you to trim or edit video segments from YouTube videos. One of its cutting features includes the ability to go to the beginning and conclusion of the choice for fast and easy clip trimming.
It also features a play and stop button that allows you to crop a specific scene from a YouTube video. Aside from that, it demonstrates three methods for sharing the cropped video link, including copying the plugin, the URL or media link, and watching the trimmed video on the YouTube website. It does not require sign-up for editing the video and leaves a watermark on the exported one.
Pros
- Trim specific segments
- No sign-up
- No watermark
Cons
- Completely web-based
9. YT Cropper
Another YouTube video clipper online is YT Cropper, allowing users to extract particular clips from YouTube videos. Its Drag function allows users to choose a beginning and finishing point for the clips, and the markers will assist users in locating the clips that can be obtained that they desire. Users can make use of a one-of-a-kind feature known as looping.
Copy and paste the URL into the search field. Wait for the system to evaluate the video. Finally, use the markers to crop a select scene from a YouTube video. Then, to evaluate your clips, click the trim button. No sign-up and watermark are required for this YouTube trimmer.
Pros
- Looping feature
- Drag and drop function
- Easy trimming
Cons
- Slow
10. Odownloader
Odownloader Is another ad-supported YouTube trimmer that allows you to chop YouTube videos quickly. It allows you to download either audio alone or complete video. You may also choose between .webm and.mp4 formats.
Paste the link or URL into the search field and wait for the video to refresh. Then, press the start and finish buttons to give your movie a beginning and an endpoint. Then, save the movie to your device in the format of your choice. Moreover, it does not leave any watermark on the exported video.
Pros
- Exports in audio format as well
- Multiple output formats
- Easy-to-use
Cons
- Several ads
11. VideoCrops
It allows users to crop YouTube videos by dragging the two marks to the beginning and conclusion of the clip. It provides a high level of security, as only the users can access their data, which cannot be viewed by other users or on any site.
Cropping a video entails three steps. The video is first downloaded to the server. This may potentially take some time, depending on the length of the video. Second, the video has been trimmed. Finally, the video is saved as.MP4. You should also consider that this is a free site with limited resources.
Pros
- Easy trimming
- No watermark
- Free website
- High-level security
Cons
- Limited resources
Part 2: FAQs About Online YouTube Video Trimmer
Does YouTube have a trimmer?
Yes, you may cut videos after they’ve been uploaded to the YouTube site. You may chop off the beginning, middle, or ending of your movie on a computer. It is not necessary to re-upload a video to cut it. The video’s URL, view counts, and comments will remain unchanged. This functionality is only accessible for less than 6 hours long videos.
What is the difference between cut and trim in video editing?
Cutting is the process of separating pieces of a clip. You can reuse these portions in another video or delete them entirely. On the other hand, trimming is the process of eliminating or expanding the duration of a video clip’s front or tail regions in video editing.
Conclusion
Numerous programs will swiftly upload and trim your tiny movies, ideal for folks who make YouTube videos. Then, some tools can handle huge and bulky files and are ideal for file output and video quality. It’s a shame that some of these tools need payment to access their additional editing features. However, you have an excellent YouTube Video Trimmer Online, which is completely free and listed in detail within this article.
Text That Moves: Two Fascinating Techniques Revealed
How to Create Animated Bouncing Text

Liza Brown
Mar 27, 2024• Proven solutions
Earlier, you learned how to have a bounce text effect in Adobe After Effects . However, because AE is a complex application and has a steep learning curve, this section explains the two alternative ways to get the same effect on your existing video footage.
Method 1: How to Create Bouncing Text in Filmora Video Editor?
When talking about Wondershare Filmora , the application is populated with several presets for texts and titles, animations, effects, filters, and much more.
These pre-built templates not only make your task easier, they also save your decent amount of time that you would spend while working with After Effects or any other similar app that requires you to build things from scratch.
You can follow the instructions given below to add animated bounce text to any of your video footages with Filmora:
Step 1: Add a Footage to Timeline
Launch Wondershare Filmora on your Windows or Mac PC. By default, the aspect ratio of the project is set to 16:9. Click anywhere inside the Media window at the upper-left section, and select and import footage you want to add bounce text to.
Step 2: Insert Text and Add Bounce Effect
Click Titles from the standard toolbar at the top, and click and drag your preferred title template from the Library to the timeline. In case you don’t want any specific animation or style on the title, you can use the default title.
In the timeline, double-click the title you just added, use the upper-left section to edit the text, go to the Animation tab from the left pane, scroll down the list, and double-click the Up Down 1 or Up Down 2 preset to apply the bounce effect to the credits. Click OK to save the changes and to get back to the main window.

Step 3: Add Shake Filters
Go to Effects from the standard toolbar, expand the Filters category from the left pane, and click Shake. From the Library window, click and drag your preferred shake filter to the timeline. Here, I will choose Mild.

You can customize the default effect by double-clicking the shake filter in the timeline, using the sliders in the upper-left area of the interface to make necessary adjustments, and then clicking OK to save the changes and to get back to the previous interface.

Step 4: Export the Final Output
Click EXPORT from the top of the interface, go to the Local tab in the Export box, choose your preferred output format from the list in the left, make required customizations from the right pane, and click EXPORT from the bottom-right corner to export the video.

Now, you can add the bouncing text video and the background video to the timeline, and then place the bouncing text video above the background video track.
Double click the text track, go to the Chroma Key effect, select the Color Picker tool, and click anywhere in the Preview window to get things right. Finally, export the entire project to your preferred output format as explained in Step 4.
As explained before, Wondeshare Filmora makes the entire process of creating and adding bounce text effect pretty simple. With all the pre-build templates, and the versatility of the options that can be used to customize those presets, you can come up with the effects that are usually obtained when you start generating them from the scratch.


Method 2: Generate Animated Bouncing Texts Online
If you don’t want any heavy and resource-intensive app on your PC merely for some special text effects, you can try any of the online solutions instead. The benefit of using any such web app is that all the processing is done on site’s server, and it is only a web browser and an Internet connection that you need to have at your side.
Some most trusted websites to generate bounce text are listed below:
1. ENGFTO
Website: https://engfto.com/index/create%5Fanimated%5Fbouncing%5Ftext/0-26

You can follow the instructions given below to use Engfto to generate bouncing text for your footages:
Step 1: Get to the Animated Bouncing Text Page
Launch your favorite web browser, and go to the link given above to get to the Engfto’s animated bouncing text page.
Step 2: Customize Text and Preferences
Modify the values in the fields under the SIZE AREA and TEXT sections to customize the text area, the text itself, its size, and font. Next, adjust the values in the fields under the EFFECT PARAMETERS section to get the required bounce effect. Also, use the fields under the BACKGROUND section to either change the background color, or pick a background image from your PC.
Step 3: Obtain the Animated Text
Click the SAVE GIF ANIMATION button from the lower section of the page to download the animated text to your PC.
2. Loading.io
The instructions given below explain how to use Loading.io to get animated bounce text effect for your footages:
Step 1: Get to the Loading.io Webpage
Launch your favorite web browser and go to https://loading.io/animation/text/ .
Step 2: Customize the Text and Choose Animation Effect

Use the options available on the webpage to type your text, and change its font, color, background, transparency level etc. Select Bounce (or any of its variants) from the Animation drop-down list, and adjust the speed using the Speed slider.
Step 3: Obtain the Text
Click your preferred option from next to the Download As section to download the animated text to your PC.
Note: Regardless of the web solution you choose to generate and obtain animated bounce text, you will still need a post-production tool to add the downloaded text to your footage.
Conclusion
Generating bounce text effect is much simpler when you use Wondershare Filmora or any of the online solutions as explained in Method 2. While the former gives you more flexibility when it comes to customizations, the latter doesn’t require any app to be installed on your PC. In addition, many times the web apps offer their services for free, and therefore they are preferred by the novice users who are not much into post-production processes.
Liza Brown
Liza Brown is a writer and a lover of all things video.
Follow @Liza Brown
Liza Brown
Mar 27, 2024• Proven solutions
Earlier, you learned how to have a bounce text effect in Adobe After Effects . However, because AE is a complex application and has a steep learning curve, this section explains the two alternative ways to get the same effect on your existing video footage.
Method 1: How to Create Bouncing Text in Filmora Video Editor?
When talking about Wondershare Filmora , the application is populated with several presets for texts and titles, animations, effects, filters, and much more.
These pre-built templates not only make your task easier, they also save your decent amount of time that you would spend while working with After Effects or any other similar app that requires you to build things from scratch.
You can follow the instructions given below to add animated bounce text to any of your video footages with Filmora:
Step 1: Add a Footage to Timeline
Launch Wondershare Filmora on your Windows or Mac PC. By default, the aspect ratio of the project is set to 16:9. Click anywhere inside the Media window at the upper-left section, and select and import footage you want to add bounce text to.
Step 2: Insert Text and Add Bounce Effect
Click Titles from the standard toolbar at the top, and click and drag your preferred title template from the Library to the timeline. In case you don’t want any specific animation or style on the title, you can use the default title.
In the timeline, double-click the title you just added, use the upper-left section to edit the text, go to the Animation tab from the left pane, scroll down the list, and double-click the Up Down 1 or Up Down 2 preset to apply the bounce effect to the credits. Click OK to save the changes and to get back to the main window.
Step 3: Add Shake Filters
Go to Effects from the standard toolbar, expand the Filters category from the left pane, and click Shake. From the Library window, click and drag your preferred shake filter to the timeline. Here, I will choose Mild.
You can customize the default effect by double-clicking the shake filter in the timeline, using the sliders in the upper-left area of the interface to make necessary adjustments, and then clicking OK to save the changes and to get back to the previous interface.
Step 4: Export the Final Output
Click EXPORT from the top of the interface, go to the Local tab in the Export box, choose your preferred output format from the list in the left, make required customizations from the right pane, and click EXPORT from the bottom-right corner to export the video.
Now, you can add the bouncing text video and the background video to the timeline, and then place the bouncing text video above the background video track.
Double click the text track, go to the Chroma Key effect, select the Color Picker tool, and click anywhere in the Preview window to get things right. Finally, export the entire project to your preferred output format as explained in Step 4.
As explained before, Wondeshare Filmora makes the entire process of creating and adding bounce text effect pretty simple. With all the pre-build templates, and the versatility of the options that can be used to customize those presets, you can come up with the effects that are usually obtained when you start generating them from the scratch.
Method 2: Generate Animated Bouncing Texts Online
If you don’t want any heavy and resource-intensive app on your PC merely for some special text effects, you can try any of the online solutions instead. The benefit of using any such web app is that all the processing is done on site’s server, and it is only a web browser and an Internet connection that you need to have at your side.
Some most trusted websites to generate bounce text are listed below:
1. ENGFTO
Website: https://engfto.com/index/create%5Fanimated%5Fbouncing%5Ftext/0-26
You can follow the instructions given below to use Engfto to generate bouncing text for your footages:
Step 1: Get to the Animated Bouncing Text Page
Launch your favorite web browser, and go to the link given above to get to the Engfto’s animated bouncing text page.
Step 2: Customize Text and Preferences
Modify the values in the fields under the SIZE AREA and TEXT sections to customize the text area, the text itself, its size, and font. Next, adjust the values in the fields under the EFFECT PARAMETERS section to get the required bounce effect. Also, use the fields under the BACKGROUND section to either change the background color, or pick a background image from your PC.
Step 3: Obtain the Animated Text
Click the SAVE GIF ANIMATION button from the lower section of the page to download the animated text to your PC.
2. Loading.io
The instructions given below explain how to use Loading.io to get animated bounce text effect for your footages:
Step 1: Get to the Loading.io Webpage
Launch your favorite web browser and go to https://loading.io/animation/text/ .
Step 2: Customize the Text and Choose Animation Effect
Use the options available on the webpage to type your text, and change its font, color, background, transparency level etc. Select Bounce (or any of its variants) from the Animation drop-down list, and adjust the speed using the Speed slider.
Step 3: Obtain the Text
Click your preferred option from next to the Download As section to download the animated text to your PC.
Note: Regardless of the web solution you choose to generate and obtain animated bounce text, you will still need a post-production tool to add the downloaded text to your footage.
Conclusion
Generating bounce text effect is much simpler when you use Wondershare Filmora or any of the online solutions as explained in Method 2. While the former gives you more flexibility when it comes to customizations, the latter doesn’t require any app to be installed on your PC. In addition, many times the web apps offer their services for free, and therefore they are preferred by the novice users who are not much into post-production processes.
Liza Brown
Liza Brown is a writer and a lover of all things video.
Follow @Liza Brown
- Title: "In 2024, Simplify Your Videos - Discover the Top 10 Online Trimmers"
- Author: Thomas
- Created at : 2024-05-31 12:43:21
- Updated at : 2024-06-01 12:43:21
- Link: https://youtube-help.techidaily.com/in-2024-simplify-your-videos-discover-the-top-10-online-trimmers/
- License: This work is licensed under CC BY-NC-SA 4.0.
