
"In 2024, Step-by-Step Capturing iOS Device Screen on Video"
Step-by-Step: Capturing iOS Device Screen on Video
How to Record your iPhone or iPad Screen for YouTube

Richard Bennett
Mar 27, 2024• Proven solutions
There are a lot of reasons why you might want to use footage recorded from the screen of your apple device in your YouTube videos. Some people like to make YouTube tutorials about iPhone or iPad apps, others like to share their gaming experiences, and some need to use footage taken from their devices for presentations. Even if you do not think these kinds of videos suit your vlog, screen recording is a useful tool to have on your belt. You never know when one of your subscribers is going to ask you about your favorite mobile games.
Basically, there are three ways to record YouTube video on iPhone/iPad, including the built-in screen recorder (if you have updated to iOS 11 ), connecting iPhone to Mac and the last, some third party screen recorder. In this article, you will learn the three powerful methods one by one.
- Part1: Recording your iPhone screen in iOS 11
- Part2: Wired Using QuickTime on your Mac
- Part3: Wirelessly Using AirPlay and Reflector
Note: We resolutely oppose all forms of copyright-infringing downloads. This tutorial is only for downloading YouTube videos/audio materials from your own channel.
1. Recording your iPhone screen in iOS 11
You can find more information in this article: How to Record iPhone/iPad’s Screen in iOS 11 >>


2. Wired Using QuickTime on your Mac
If you have a Mac then you already have all the software you need.
Step 1: Connect your tablet or smartphone to your computer using a USB port, and then open QuickTime on your Mac. In QuickTime select ‘File’ and ‘New Movie Recording’. A recording window will pop up.
Step 2: In the recording window there will be a red ‘record’ button. Next to that button there will be an arrow. Click the arrow and a menu of recording options will appear. In the section where it says ‘Camera’ select your iPhone or iPad. In this menu you can also choose whether or not to record audio from your device, such sound effects from games.
Step 3: Once you are finished in this menu click record to begin recording the screen of your device. Click ‘stop’ when you are finished recording.
Although you can download a version of QuickTime for PC, the PC version does not have a screen recording option. If you have a PC you will need to use the second method.
3. Wirelessly Using AirPlay and Reflector(For Mac or PC!)
If you either prefer to do things wirelessly or own a PC then you will need to use a slightly more round-about method. Rather than recording directly from your iPhone you will be mirroring your device’s interface onto your computer screen and then recording it there.
Step 1: First, you will need to download a third party mirroring app. Reflector is the popular choice. You can download Reflector at Airsquirrels.com .Next, you need to have Apple’s Airplay on your device. Make sure Reflector that your computer and device are connected to the same wifi network.
Step 2: Open Reflector on your PC. Initially it will tell you there is no device connected.
Step 3: Open AirPlay on your device and make sure mirroring is turned on. Your computer’s name will show up as a receiver option. Select it.
Step 4: This will cause the display of your smartphone or tablet to pop up on your computer screen. Once your device is being mirrored on your computer, record your computer screen.
You can record your Mac or PC screen using Filmora Video Editor. Using Filmora you can crop out and record only your iPhone display instead of your entire computer screen. You can download the latest version of Filmora Video Editor at Filmora.wondershare.com.
If you have a Mac you can also record your computer screen in QuickTime following the same steps listed above, until it comes time to choose your camera. Then you record your desktop instead of your device. There are a few different screen recording programs you can download for PC.

Conclusion
After reading the three ways to record YouTube on iPhone/iPad, I am sure you want to give it a try. If you have any questions, please let us know!
Richard Bennett
Richard Bennett is a writer and a lover of all things video.
Follow @Richard Bennett
Richard Bennett
Mar 27, 2024• Proven solutions
There are a lot of reasons why you might want to use footage recorded from the screen of your apple device in your YouTube videos. Some people like to make YouTube tutorials about iPhone or iPad apps, others like to share their gaming experiences, and some need to use footage taken from their devices for presentations. Even if you do not think these kinds of videos suit your vlog, screen recording is a useful tool to have on your belt. You never know when one of your subscribers is going to ask you about your favorite mobile games.
Basically, there are three ways to record YouTube video on iPhone/iPad, including the built-in screen recorder (if you have updated to iOS 11 ), connecting iPhone to Mac and the last, some third party screen recorder. In this article, you will learn the three powerful methods one by one.
- Part1: Recording your iPhone screen in iOS 11
- Part2: Wired Using QuickTime on your Mac
- Part3: Wirelessly Using AirPlay and Reflector
Note: We resolutely oppose all forms of copyright-infringing downloads. This tutorial is only for downloading YouTube videos/audio materials from your own channel.
1. Recording your iPhone screen in iOS 11
You can find more information in this article: How to Record iPhone/iPad’s Screen in iOS 11 >>
2. Wired Using QuickTime on your Mac
If you have a Mac then you already have all the software you need.
Step 1: Connect your tablet or smartphone to your computer using a USB port, and then open QuickTime on your Mac. In QuickTime select ‘File’ and ‘New Movie Recording’. A recording window will pop up.
Step 2: In the recording window there will be a red ‘record’ button. Next to that button there will be an arrow. Click the arrow and a menu of recording options will appear. In the section where it says ‘Camera’ select your iPhone or iPad. In this menu you can also choose whether or not to record audio from your device, such sound effects from games.
Step 3: Once you are finished in this menu click record to begin recording the screen of your device. Click ‘stop’ when you are finished recording.
Although you can download a version of QuickTime for PC, the PC version does not have a screen recording option. If you have a PC you will need to use the second method.

3. Wirelessly Using AirPlay and Reflector(For Mac or PC!)
If you either prefer to do things wirelessly or own a PC then you will need to use a slightly more round-about method. Rather than recording directly from your iPhone you will be mirroring your device’s interface onto your computer screen and then recording it there.
Step 1: First, you will need to download a third party mirroring app. Reflector is the popular choice. You can download Reflector at Airsquirrels.com .Next, you need to have Apple’s Airplay on your device. Make sure Reflector that your computer and device are connected to the same wifi network.
Step 2: Open Reflector on your PC. Initially it will tell you there is no device connected.
Step 3: Open AirPlay on your device and make sure mirroring is turned on. Your computer’s name will show up as a receiver option. Select it.
Step 4: This will cause the display of your smartphone or tablet to pop up on your computer screen. Once your device is being mirrored on your computer, record your computer screen.
You can record your Mac or PC screen using Filmora Video Editor. Using Filmora you can crop out and record only your iPhone display instead of your entire computer screen. You can download the latest version of Filmora Video Editor at Filmora.wondershare.com.
If you have a Mac you can also record your computer screen in QuickTime following the same steps listed above, until it comes time to choose your camera. Then you record your desktop instead of your device. There are a few different screen recording programs you can download for PC.
Conclusion
After reading the three ways to record YouTube on iPhone/iPad, I am sure you want to give it a try. If you have any questions, please let us know!
Richard Bennett
Richard Bennett is a writer and a lover of all things video.
Follow @Richard Bennett
Richard Bennett
Mar 27, 2024• Proven solutions
There are a lot of reasons why you might want to use footage recorded from the screen of your apple device in your YouTube videos. Some people like to make YouTube tutorials about iPhone or iPad apps, others like to share their gaming experiences, and some need to use footage taken from their devices for presentations. Even if you do not think these kinds of videos suit your vlog, screen recording is a useful tool to have on your belt. You never know when one of your subscribers is going to ask you about your favorite mobile games.
Basically, there are three ways to record YouTube video on iPhone/iPad, including the built-in screen recorder (if you have updated to iOS 11 ), connecting iPhone to Mac and the last, some third party screen recorder. In this article, you will learn the three powerful methods one by one.
- Part1: Recording your iPhone screen in iOS 11
- Part2: Wired Using QuickTime on your Mac
- Part3: Wirelessly Using AirPlay and Reflector
Note: We resolutely oppose all forms of copyright-infringing downloads. This tutorial is only for downloading YouTube videos/audio materials from your own channel.

1. Recording your iPhone screen in iOS 11
You can find more information in this article: How to Record iPhone/iPad’s Screen in iOS 11 >>
2. Wired Using QuickTime on your Mac
If you have a Mac then you already have all the software you need.
Step 1: Connect your tablet or smartphone to your computer using a USB port, and then open QuickTime on your Mac. In QuickTime select ‘File’ and ‘New Movie Recording’. A recording window will pop up.
Step 2: In the recording window there will be a red ‘record’ button. Next to that button there will be an arrow. Click the arrow and a menu of recording options will appear. In the section where it says ‘Camera’ select your iPhone or iPad. In this menu you can also choose whether or not to record audio from your device, such sound effects from games.
Step 3: Once you are finished in this menu click record to begin recording the screen of your device. Click ‘stop’ when you are finished recording.
Although you can download a version of QuickTime for PC, the PC version does not have a screen recording option. If you have a PC you will need to use the second method.
3. Wirelessly Using AirPlay and Reflector(For Mac or PC!)
If you either prefer to do things wirelessly or own a PC then you will need to use a slightly more round-about method. Rather than recording directly from your iPhone you will be mirroring your device’s interface onto your computer screen and then recording it there.
Step 1: First, you will need to download a third party mirroring app. Reflector is the popular choice. You can download Reflector at Airsquirrels.com .Next, you need to have Apple’s Airplay on your device. Make sure Reflector that your computer and device are connected to the same wifi network.
Step 2: Open Reflector on your PC. Initially it will tell you there is no device connected.
Step 3: Open AirPlay on your device and make sure mirroring is turned on. Your computer’s name will show up as a receiver option. Select it.
Step 4: This will cause the display of your smartphone or tablet to pop up on your computer screen. Once your device is being mirrored on your computer, record your computer screen.
You can record your Mac or PC screen using Filmora Video Editor. Using Filmora you can crop out and record only your iPhone display instead of your entire computer screen. You can download the latest version of Filmora Video Editor at Filmora.wondershare.com.
If you have a Mac you can also record your computer screen in QuickTime following the same steps listed above, until it comes time to choose your camera. Then you record your desktop instead of your device. There are a few different screen recording programs you can download for PC.
Conclusion
After reading the three ways to record YouTube on iPhone/iPad, I am sure you want to give it a try. If you have any questions, please let us know!
Richard Bennett
Richard Bennett is a writer and a lover of all things video.
Follow @Richard Bennett
Richard Bennett
Mar 27, 2024• Proven solutions
There are a lot of reasons why you might want to use footage recorded from the screen of your apple device in your YouTube videos. Some people like to make YouTube tutorials about iPhone or iPad apps, others like to share their gaming experiences, and some need to use footage taken from their devices for presentations. Even if you do not think these kinds of videos suit your vlog, screen recording is a useful tool to have on your belt. You never know when one of your subscribers is going to ask you about your favorite mobile games.
Basically, there are three ways to record YouTube video on iPhone/iPad, including the built-in screen recorder (if you have updated to iOS 11 ), connecting iPhone to Mac and the last, some third party screen recorder. In this article, you will learn the three powerful methods one by one.
- Part1: Recording your iPhone screen in iOS 11
- Part2: Wired Using QuickTime on your Mac
- Part3: Wirelessly Using AirPlay and Reflector
Note: We resolutely oppose all forms of copyright-infringing downloads. This tutorial is only for downloading YouTube videos/audio materials from your own channel.
1. Recording your iPhone screen in iOS 11
You can find more information in this article: How to Record iPhone/iPad’s Screen in iOS 11 >>
 Forex Robotron Gold Package
2. Wired Using QuickTime on your Mac
If you have a Mac then you already have all the software you need.
Step 1: Connect your tablet or smartphone to your computer using a USB port, and then open QuickTime on your Mac. In QuickTime select ‘File’ and ‘New Movie Recording’. A recording window will pop up.
Step 2: In the recording window there will be a red ‘record’ button. Next to that button there will be an arrow. Click the arrow and a menu of recording options will appear. In the section where it says ‘Camera’ select your iPhone or iPad. In this menu you can also choose whether or not to record audio from your device, such sound effects from games.
Step 3: Once you are finished in this menu click record to begin recording the screen of your device. Click ‘stop’ when you are finished recording.
Although you can download a version of QuickTime for PC, the PC version does not have a screen recording option. If you have a PC you will need to use the second method.

3. Wirelessly Using AirPlay and Reflector(For Mac or PC!)
If you either prefer to do things wirelessly or own a PC then you will need to use a slightly more round-about method. Rather than recording directly from your iPhone you will be mirroring your device’s interface onto your computer screen and then recording it there.
Step 1: First, you will need to download a third party mirroring app. Reflector is the popular choice. You can download Reflector at Airsquirrels.com .Next, you need to have Apple’s Airplay on your device. Make sure Reflector that your computer and device are connected to the same wifi network.
Step 2: Open Reflector on your PC. Initially it will tell you there is no device connected.
Step 3: Open AirPlay on your device and make sure mirroring is turned on. Your computer’s name will show up as a receiver option. Select it.
Step 4: This will cause the display of your smartphone or tablet to pop up on your computer screen. Once your device is being mirrored on your computer, record your computer screen.
You can record your Mac or PC screen using Filmora Video Editor. Using Filmora you can crop out and record only your iPhone display instead of your entire computer screen. You can download the latest version of Filmora Video Editor at Filmora.wondershare.com.
If you have a Mac you can also record your computer screen in QuickTime following the same steps listed above, until it comes time to choose your camera. Then you record your desktop instead of your device. There are a few different screen recording programs you can download for PC.

Conclusion
After reading the three ways to record YouTube on iPhone/iPad, I am sure you want to give it a try. If you have any questions, please let us know!
Richard Bennett
Richard Bennett is a writer and a lover of all things video.
Follow @Richard Bennett
Creating Compelling Content with Powerful YouTube Titles
How to Use Video Titles and YouTube Tags for More Views?
Richard Bennett
Nov 01, 2022• Proven solutions
In order to make sure that your videos get the appreciation they deserve, you will need to optimize your titles and YouTube tags for more views. By optimizing your titles and tags, I mean using the right keywords so that YouTube knows how to sort your videos and the viewers who are interested in your content can find it.
YouTube videos rank on Google just like any other piece of content, and YouTube itself is a lot of people’s go-to search engine. The success of your YouTube videos will largely depend on your ability to optimize your videos so they are ranked in people’s search results. People can’t fall in love with your videos they never stumble across them.
If you optimize your titles, tags, and descriptions to include relevant keywords you will see much better traffic from Google as well as from YouTube’s search results. Here are some tips:
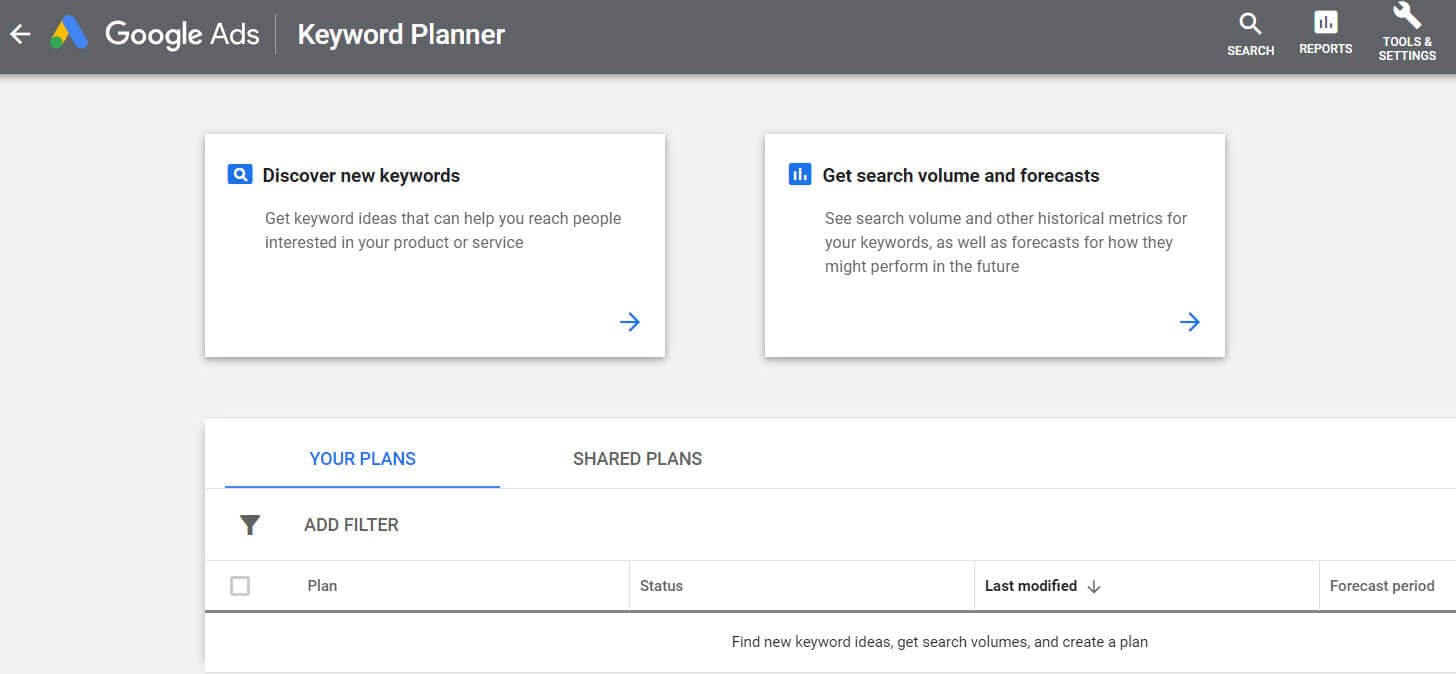
Find the Best Keywords
One of the most important steps to ensuring SEO success is to identify the keywords that you should be using.
You can use the Google keyword planner to find keywords related to your video’s topic. Input one of your competitors’ video links to detect some of the top searches that were used to find the video. The keyword planner will scan through the top searches for that video link and determine the keywords that are used most often.
The keyword list can be a bit overwhelming the first time. Remember to use keywords that get at least 300 searches per month on Google. Using popular keywords will help you match up against competitors in your niche.
 DEX 3 RE is Easy-To-Use DJ Mixing Software for MAC and Windows Designed for Today’s Versatile DJ.
Mix from your own library of music, iTunes or use the Pulselocker subsciprtion service for in-app access to over 44 million songs. Use with over 85 supported DJ controllers or mix with a keyboard and mouse.
DEX 3 RE is everything you need without the clutter - the perfect 2-deck mixing software solution for mobile DJs or hard-core hobbiests.
PCDJ DEX 3 RE (DJ Software for Win & MAC - Product Activation For 3 Machines)
How to Optimize Your Titles, Descriptions, and Tags
Your keyword research will help you craft title, description, and tags of your videos.
 CollageIt Pro
How to Optimize YouTube Titles
The ideal YouTube title intrigues the potential viewer, drawing them in and making them want to click the link.
A video title should include your most important keyword. Usually, your most important keyword will be the first word in your title. Great titles are accurate and descriptive, but also exciting and captivating.
You should also consider using general keywords that are popular on Google like “funny video” “Tutorial” “Review” and “Fitness”.
How to Optimize Your Video’s Description
The description of your video is the next big important challenge. The text description of your video is how Google and other search engines determine the subject matter of your video for ranking.
Some tips for success with your description include; using 2-3 important keywords in the first 25 words and making each YouTube description more than 250 words.
Your ideal description will help to index your video without over-utilizing keywords and being flagged as spam.
How to Optimize YouTube Tags
Tags will help decide which videos your video will be displayed beside as similar content and which searches it will appear in.
By using targeted and optimized tags you can gain more traffic and views. Some of the top rules that you should consider with tags are; using 8-12 in every video and making sure the top keyword you used in your title is included as a tag.
Tags on previous videos can also be rearranged and edited as you do keyword research. This will help improve the ranking of some of your older videos. If you all the tags you usually use to a notepad or text edit file and separate them with commas you can paste them all back into YouTube in the new order. This is the simplest way to mass edit tags.
Click here for more tips about YouTube search optimization.
These tips will help you optimize your YouTube tags for more views, as well as your other YouTube metadata.
Richard Bennett
Richard Bennett is a writer and a lover of all things video.
Follow @Richard Bennett
Richard Bennett
Nov 01, 2022• Proven solutions
In order to make sure that your videos get the appreciation they deserve, you will need to optimize your titles and YouTube tags for more views. By optimizing your titles and tags, I mean using the right keywords so that YouTube knows how to sort your videos and the viewers who are interested in your content can find it.
YouTube videos rank on Google just like any other piece of content, and YouTube itself is a lot of people’s go-to search engine. The success of your YouTube videos will largely depend on your ability to optimize your videos so they are ranked in people’s search results. People can’t fall in love with your videos they never stumble across them.
If you optimize your titles, tags, and descriptions to include relevant keywords you will see much better traffic from Google as well as from YouTube’s search results. Here are some tips:
Find the Best Keywords
One of the most important steps to ensuring SEO success is to identify the keywords that you should be using.
You can use the Google keyword planner to find keywords related to your video’s topic. Input one of your competitors’ video links to detect some of the top searches that were used to find the video. The keyword planner will scan through the top searches for that video link and determine the keywords that are used most often.
The keyword list can be a bit overwhelming the first time. Remember to use keywords that get at least 300 searches per month on Google. Using popular keywords will help you match up against competitors in your niche.
How to Optimize Your Titles, Descriptions, and Tags
Your keyword research will help you craft title, description, and tags of your videos.
 Jet Profiler for MySQL, Enterprise Version: Jet Profiler for MySQL is real-time query performance and diagnostics tool for the MySQL database server. Its detailed query information, graphical interface and ease of use makes this a great tool for finding performance bottlenecks in your MySQL databases.
 How to Optimize YouTube Titles
The ideal YouTube title intrigues the potential viewer, drawing them in and making them want to click the link.
A video title should include your most important keyword. Usually, your most important keyword will be the first word in your title. Great titles are accurate and descriptive, but also exciting and captivating.
You should also consider using general keywords that are popular on Google like “funny video” “Tutorial” “Review” and “Fitness”.
How to Optimize Your Video’s Description
The description of your video is the next big important challenge. The text description of your video is how Google and other search engines determine the subject matter of your video for ranking.
Some tips for success with your description include; using 2-3 important keywords in the first 25 words and making each YouTube description more than 250 words.
Your ideal description will help to index your video without over-utilizing keywords and being flagged as spam.
How to Optimize YouTube Tags
Tags will help decide which videos your video will be displayed beside as similar content and which searches it will appear in.
By using targeted and optimized tags you can gain more traffic and views. Some of the top rules that you should consider with tags are; using 8-12 in every video and making sure the top keyword you used in your title is included as a tag.
Tags on previous videos can also be rearranged and edited as you do keyword research. This will help improve the ranking of some of your older videos. If you all the tags you usually use to a notepad or text edit file and separate them with commas you can paste them all back into YouTube in the new order. This is the simplest way to mass edit tags.
Click here for more tips about YouTube search optimization.
These tips will help you optimize your YouTube tags for more views, as well as your other YouTube metadata.
Richard Bennett
Richard Bennett is a writer and a lover of all things video.
Follow @Richard Bennett
Richard Bennett
Nov 01, 2022• Proven solutions
In order to make sure that your videos get the appreciation they deserve, you will need to optimize your titles and YouTube tags for more views. By optimizing your titles and tags, I mean using the right keywords so that YouTube knows how to sort your videos and the viewers who are interested in your content can find it.
YouTube videos rank on Google just like any other piece of content, and YouTube itself is a lot of people’s go-to search engine. The success of your YouTube videos will largely depend on your ability to optimize your videos so they are ranked in people’s search results. People can’t fall in love with your videos they never stumble across them.
If you optimize your titles, tags, and descriptions to include relevant keywords you will see much better traffic from Google as well as from YouTube’s search results. Here are some tips:
Find the Best Keywords
One of the most important steps to ensuring SEO success is to identify the keywords that you should be using.
You can use the Google keyword planner to find keywords related to your video’s topic. Input one of your competitors’ video links to detect some of the top searches that were used to find the video. The keyword planner will scan through the top searches for that video link and determine the keywords that are used most often.
The keyword list can be a bit overwhelming the first time. Remember to use keywords that get at least 300 searches per month on Google. Using popular keywords will help you match up against competitors in your niche.

How to Optimize Your Titles, Descriptions, and Tags
Your keyword research will help you craft title, description, and tags of your videos.
![]() FX PRO (Gold Robot + Silver Robot(Basic Package))
FX PRO (Gold Robot + Silver Robot(Basic Package))
How to Optimize YouTube Titles
The ideal YouTube title intrigues the potential viewer, drawing them in and making them want to click the link.
A video title should include your most important keyword. Usually, your most important keyword will be the first word in your title. Great titles are accurate and descriptive, but also exciting and captivating.
You should also consider using general keywords that are popular on Google like “funny video” “Tutorial” “Review” and “Fitness”.
 /a>
/a>How to Optimize Your Video’s Description
The description of your video is the next big important challenge. The text description of your video is how Google and other search engines determine the subject matter of your video for ranking.
Some tips for success with your description include; using 2-3 important keywords in the first 25 words and making each YouTube description more than 250 words.
Your ideal description will help to index your video without over-utilizing keywords and being flagged as spam.
How to Optimize YouTube Tags
Tags will help decide which videos your video will be displayed beside as similar content and which searches it will appear in.
By using targeted and optimized tags you can gain more traffic and views. Some of the top rules that you should consider with tags are; using 8-12 in every video and making sure the top keyword you used in your title is included as a tag.
Tags on previous videos can also be rearranged and edited as you do keyword research. This will help improve the ranking of some of your older videos. If you all the tags you usually use to a notepad or text edit file and separate them with commas you can paste them all back into YouTube in the new order. This is the simplest way to mass edit tags.
Click here for more tips about YouTube search optimization.
These tips will help you optimize your YouTube tags for more views, as well as your other YouTube metadata.
Richard Bennett
Richard Bennett is a writer and a lover of all things video.
Follow @Richard Bennett
Richard Bennett
Nov 01, 2022• Proven solutions

In order to make sure that your videos get the appreciation they deserve, you will need to optimize your titles and YouTube tags for more views. By optimizing your titles and tags, I mean using the right keywords so that YouTube knows how to sort your videos and the viewers who are interested in your content can find it.
YouTube videos rank on Google just like any other piece of content, and YouTube itself is a lot of people’s go-to search engine. The success of your YouTube videos will largely depend on your ability to optimize your videos so they are ranked in people’s search results. People can’t fall in love with your videos they never stumble across them.
If you optimize your titles, tags, and descriptions to include relevant keywords you will see much better traffic from Google as well as from YouTube’s search results. Here are some tips:
Find the Best Keywords
One of the most important steps to ensuring SEO success is to identify the keywords that you should be using.
You can use the Google keyword planner to find keywords related to your video’s topic. Input one of your competitors’ video links to detect some of the top searches that were used to find the video. The keyword planner will scan through the top searches for that video link and determine the keywords that are used most often.
The keyword list can be a bit overwhelming the first time. Remember to use keywords that get at least 300 searches per month on Google. Using popular keywords will help you match up against competitors in your niche.
How to Optimize Your Titles, Descriptions, and Tags
Your keyword research will help you craft title, description, and tags of your videos.
How to Optimize YouTube Titles
The ideal YouTube title intrigues the potential viewer, drawing them in and making them want to click the link.
A video title should include your most important keyword. Usually, your most important keyword will be the first word in your title. Great titles are accurate and descriptive, but also exciting and captivating.
You should also consider using general keywords that are popular on Google like “funny video” “Tutorial” “Review” and “Fitness”.
How to Optimize Your Video’s Description
The description of your video is the next big important challenge. The text description of your video is how Google and other search engines determine the subject matter of your video for ranking.
Some tips for success with your description include; using 2-3 important keywords in the first 25 words and making each YouTube description more than 250 words.
Your ideal description will help to index your video without over-utilizing keywords and being flagged as spam.
How to Optimize YouTube Tags
Tags will help decide which videos your video will be displayed beside as similar content and which searches it will appear in.
By using targeted and optimized tags you can gain more traffic and views. Some of the top rules that you should consider with tags are; using 8-12 in every video and making sure the top keyword you used in your title is included as a tag.
Tags on previous videos can also be rearranged and edited as you do keyword research. This will help improve the ranking of some of your older videos. If you all the tags you usually use to a notepad or text edit file and separate them with commas you can paste them all back into YouTube in the new order. This is the simplest way to mass edit tags.
Click here for more tips about YouTube search optimization.
These tips will help you optimize your YouTube tags for more views, as well as your other YouTube metadata.
Richard Bennett
Richard Bennett is a writer and a lover of all things video.
Follow @Richard Bennett
- Title: In 2024, Step-by-Step Capturing iOS Device Screen on Video
- Author: Thomas
- Created at : 2024-07-29 18:39:39
- Updated at : 2024-07-30 18:39:39
- Link: https://youtube-help.techidaily.com/in-2024-step-by-step-capturing-ios-device-screen-on-video/
- License: This work is licensed under CC BY-NC-SA 4.0.