
"In 2024, Strategic Use of Jump Cuts for Non-Linear Storytelling"
Strategic Use of Jump Cuts for Non-Linear Storytelling
How To Use Jump Cuts in Your Vlog

Richard Bennett
Mar 27, 2024• Proven solutions
A common problem for new YouTubers and Vlogers is that they cannot get through a recording without feeling like they have messed up and need to restart. It can be extremely discouraging at first. More experienced vloggers know that mistakes happen and they are no reason to stop recording. Instead of trying to record a perfect clip it is common for vloggers to remove errors from their videos in editing using jump cuts.
How To Use Jump Cuts in Your Vlog
1. What is a Jump Cut?
A jump cut is when you jump from one part of your clip to a later part of that same clip, cutting out the section in-between.
In movies or tv shows jump cuts can be distracting. In vlogs it is the exact opposite; jump cuts are used to remove distractions. It is not strange for a YouTube video to contain a lot of jump cuts. If you go and re-watch a video by your favorite vlogger you will probably notice that every once in a while the vlogger is suddenly sitting differently or that something else has suddenly changed. That is a jump cut, and chances are you did not even think twice about it when you first watched the video.
2. When to use Jump Cuts in your Youtube Video
There are a lot of things you might want to take out of your clips using jump cuts. Here are some examples:
Repetition: You may have had to repeat yourself because you misspoke. Or, you might watch your clip back and realize that two sections you intended – perhaps even scripted – are very similar and you only need one.
Off-Topic Tangents: Once you get comfortable talking to the camera it is easy to find yourself getting off-topic while recording. These tangents might be funny or feel important, but you should still cut them out of your final video. Rather than scrapping them completely, though, consider giving your tangent its very own video. Successful vloggers post new videos frequently, after all.
Silence: Use jump cuts to take out any pauses in your video. Every period of silence is an opportunity for viewers to get distracted and decide to click on something else. Adding music to the background of your video can help with shorter pauses, but cutting out any silence is still a good way to go.
In the video tutorial below, we will share with you some practical and creative jump cuts tips that you can try in video editing. And most of the jump cuts are done with the cutting features in Filmora . You can download the free trial version below by clicking the Free Download button based on your system.
 Download Mac Version ](https://tools.techidaily.com/wondershare/filmora/download/ )
3. How to Make Jump Cuts in Vlog & YouTube Videos
You can make jump cuts in almost every editing program, from free software like Windows Movie Maker to professional programs like Adobe Premiere. Remember no matter which video editing software you are using to edit your videos with jump cut, you need to ensure that the software can scroll through your video clips and audio files frame-by-frame. And some video editors may only allow you to scroll video footage frame by frame. This tutorial is for Filmora Video Editor (Now upgraded to Filmora), but many of the same steps will apply to other software.
Download Mac Version ](https://tools.techidaily.com/wondershare/filmora/download/ )
You may also like: How to trim and cut videos in Windows Movie Maker for Free
Open up Filmora Video Editor and add a clip into the timeline. Watch it through, and then revisit sections where you think you might want to make cuts.
Find a place in your clip that has silence and use the scissors icon to cut your clip into two. Then start playing your clip and pause as soon as you hear sound.
Make sure your clip is selected, and then go back frame by frame until you hear nothing.
Use the scissors icon to make another cut. You will now have three clips; one before the silence, the silent pause, and the section where sound starts again. Delete the quiet middle clip.
4. Keep video shorter for more views
The videos that get the most views on YouTube are an average of three minutes long. People will use the length of a video as a reason not to click on it. Viewers are also more likely to get distracted and stop watching longer videos before they are over. That does not mean you should not take as long as you need to properly explain your ideas, just that you should be careful your video is not longer than it needs to be. It is common for youtubers to use only about a third of the clip they record. The rest is removed using jump cuts.
Filmora video editor will help you to be more creative in video editing and saving your time at the same time. Download and leave a comment below about how do you like it.


Richard Bennett
Richard Bennett is a writer and a lover of all things video.
Follow @Richard Bennett
Richard Bennett
Mar 27, 2024• Proven solutions
A common problem for new YouTubers and Vlogers is that they cannot get through a recording without feeling like they have messed up and need to restart. It can be extremely discouraging at first. More experienced vloggers know that mistakes happen and they are no reason to stop recording. Instead of trying to record a perfect clip it is common for vloggers to remove errors from their videos in editing using jump cuts.
How To Use Jump Cuts in Your Vlog
1. What is a Jump Cut?
A jump cut is when you jump from one part of your clip to a later part of that same clip, cutting out the section in-between.
In movies or tv shows jump cuts can be distracting. In vlogs it is the exact opposite; jump cuts are used to remove distractions. It is not strange for a YouTube video to contain a lot of jump cuts. If you go and re-watch a video by your favorite vlogger you will probably notice that every once in a while the vlogger is suddenly sitting differently or that something else has suddenly changed. That is a jump cut, and chances are you did not even think twice about it when you first watched the video.
2. When to use Jump Cuts in your Youtube Video
There are a lot of things you might want to take out of your clips using jump cuts. Here are some examples:
Repetition: You may have had to repeat yourself because you misspoke. Or, you might watch your clip back and realize that two sections you intended – perhaps even scripted – are very similar and you only need one.
Off-Topic Tangents: Once you get comfortable talking to the camera it is easy to find yourself getting off-topic while recording. These tangents might be funny or feel important, but you should still cut them out of your final video. Rather than scrapping them completely, though, consider giving your tangent its very own video. Successful vloggers post new videos frequently, after all.
Silence: Use jump cuts to take out any pauses in your video. Every period of silence is an opportunity for viewers to get distracted and decide to click on something else. Adding music to the background of your video can help with shorter pauses, but cutting out any silence is still a good way to go.
In the video tutorial below, we will share with you some practical and creative jump cuts tips that you can try in video editing. And most of the jump cuts are done with the cutting features in Filmora . You can download the free trial version below by clicking the Free Download button based on your system.
Download Mac Version ](https://tools.techidaily.com/wondershare/filmora/download/ )
3. How to Make Jump Cuts in Vlog & YouTube Videos
You can make jump cuts in almost every editing program, from free software like Windows Movie Maker to professional programs like Adobe Premiere. Remember no matter which video editing software you are using to edit your videos with jump cut, you need to ensure that the software can scroll through your video clips and audio files frame-by-frame. And some video editors may only allow you to scroll video footage frame by frame. This tutorial is for Filmora Video Editor (Now upgraded to Filmora), but many of the same steps will apply to other software.
Download Mac Version ](https://tools.techidaily.com/wondershare/filmora/download/ )
You may also like: How to trim and cut videos in Windows Movie Maker for Free
Open up Filmora Video Editor and add a clip into the timeline. Watch it through, and then revisit sections where you think you might want to make cuts.
Find a place in your clip that has silence and use the scissors icon to cut your clip into two. Then start playing your clip and pause as soon as you hear sound.
Make sure your clip is selected, and then go back frame by frame until you hear nothing.
Use the scissors icon to make another cut. You will now have three clips; one before the silence, the silent pause, and the section where sound starts again. Delete the quiet middle clip.
4. Keep video shorter for more views
The videos that get the most views on YouTube are an average of three minutes long. People will use the length of a video as a reason not to click on it. Viewers are also more likely to get distracted and stop watching longer videos before they are over. That does not mean you should not take as long as you need to properly explain your ideas, just that you should be careful your video is not longer than it needs to be. It is common for youtubers to use only about a third of the clip they record. The rest is removed using jump cuts.
Filmora video editor will help you to be more creative in video editing and saving your time at the same time. Download and leave a comment below about how do you like it.
Richard Bennett
Richard Bennett is a writer and a lover of all things video.
Follow @Richard Bennett
Richard Bennett
Mar 27, 2024• Proven solutions
A common problem for new YouTubers and Vlogers is that they cannot get through a recording without feeling like they have messed up and need to restart. It can be extremely discouraging at first. More experienced vloggers know that mistakes happen and they are no reason to stop recording. Instead of trying to record a perfect clip it is common for vloggers to remove errors from their videos in editing using jump cuts.
How To Use Jump Cuts in Your Vlog
1. What is a Jump Cut?
A jump cut is when you jump from one part of your clip to a later part of that same clip, cutting out the section in-between.
In movies or tv shows jump cuts can be distracting. In vlogs it is the exact opposite; jump cuts are used to remove distractions. It is not strange for a YouTube video to contain a lot of jump cuts. If you go and re-watch a video by your favorite vlogger you will probably notice that every once in a while the vlogger is suddenly sitting differently or that something else has suddenly changed. That is a jump cut, and chances are you did not even think twice about it when you first watched the video.
2. When to use Jump Cuts in your Youtube Video
There are a lot of things you might want to take out of your clips using jump cuts. Here are some examples:
Repetition: You may have had to repeat yourself because you misspoke. Or, you might watch your clip back and realize that two sections you intended – perhaps even scripted – are very similar and you only need one.
Off-Topic Tangents: Once you get comfortable talking to the camera it is easy to find yourself getting off-topic while recording. These tangents might be funny or feel important, but you should still cut them out of your final video. Rather than scrapping them completely, though, consider giving your tangent its very own video. Successful vloggers post new videos frequently, after all.
Silence: Use jump cuts to take out any pauses in your video. Every period of silence is an opportunity for viewers to get distracted and decide to click on something else. Adding music to the background of your video can help with shorter pauses, but cutting out any silence is still a good way to go.
In the video tutorial below, we will share with you some practical and creative jump cuts tips that you can try in video editing. And most of the jump cuts are done with the cutting features in Filmora . You can download the free trial version below by clicking the Free Download button based on your system.

Download Mac Version ](https://tools.techidaily.com/wondershare/filmora/download/ )
3. How to Make Jump Cuts in Vlog & YouTube Videos
You can make jump cuts in almost every editing program, from free software like Windows Movie Maker to professional programs like Adobe Premiere. Remember no matter which video editing software you are using to edit your videos with jump cut, you need to ensure that the software can scroll through your video clips and audio files frame-by-frame. And some video editors may only allow you to scroll video footage frame by frame. This tutorial is for Filmora Video Editor (Now upgraded to Filmora), but many of the same steps will apply to other software.
Download Mac Version ](https://tools.techidaily.com/wondershare/filmora/download/ )
You may also like: How to trim and cut videos in Windows Movie Maker for Free
Open up Filmora Video Editor and add a clip into the timeline. Watch it through, and then revisit sections where you think you might want to make cuts.
Find a place in your clip that has silence and use the scissors icon to cut your clip into two. Then start playing your clip and pause as soon as you hear sound.
Make sure your clip is selected, and then go back frame by frame until you hear nothing.
Use the scissors icon to make another cut. You will now have three clips; one before the silence, the silent pause, and the section where sound starts again. Delete the quiet middle clip.
4. Keep video shorter for more views
The videos that get the most views on YouTube are an average of three minutes long. People will use the length of a video as a reason not to click on it. Viewers are also more likely to get distracted and stop watching longer videos before they are over. That does not mean you should not take as long as you need to properly explain your ideas, just that you should be careful your video is not longer than it needs to be. It is common for youtubers to use only about a third of the clip they record. The rest is removed using jump cuts.
Filmora video editor will help you to be more creative in video editing and saving your time at the same time. Download and leave a comment below about how do you like it.
Richard Bennett
Richard Bennett is a writer and a lover of all things video.
Follow @Richard Bennett
Synchronized Screenscapes: YouTube Clips in TV Loops
Loop is a YouTube video format that allows viewers to watch a continuous sequence of videos. Loop is similar to traditional YouTube videos, but it can be played on a TV screen like a traditional TV show. Loop is a great way to keep viewers engaged with your content. It’s like a one-stop shop for all your content needs. You can use it to promote your latest video series.
Why looping YouTube videos on a TV is a great idea? First, it can be a fun way to watch your favorite videos without having to worry about the time. Second, it can be a way to save money on your cable. By watching your favorite videos on loop, you can cut down on the number of times you need to watch them.
If you are watching a series of videos, for example, looping them can help you to remember what happened in each one. Secondly, it can help you to learn new information more easily. If you are watching a tutorial or a video about a new topic, looping can help you to remember the details better.
Free Download For Win 7 or later(64-bit)
Free Download For macOS 10.14 or later


 vMix Basic HD - Software based live production. vMix Basic HD includes 4 inputs, 3 cameras, streaming, recording, playlist.
Part 1: How to Create a Loop Video for YouTube
There is a lot of debate around whether or not creating a loop video is necessary for success on YouTube. Some people believe that it’s not necessary, while others believe that it is a must. The main benefit of creating a loop video is that it helps to keep your audience engaged. It also helps to create a sense of continuity between your videos.
Creating a loop video for your YouTube channel increases engagement because viewers can watch the video over and over again. This can lead to more clicks on your ads, which can lead to more revenue. It can also increase your subscribers and views. Maybe some people want to watch the same video multiple times in a row without having to keep pressing the play button on the remote.
Filmora is the best video loop editor:
If you need a powerful video editing tool that will let you create high-quality clips with multiple loops, look no further than Filmora . This software allows you to make various loops of your videos for use in social media, on your website or wherever desired. Plus, with Filmora, there is no limit on the number of loops you can create.
Loop video works well for corporate presentations, tutorials, explainer videos, and much more. You can create looping videos by choosing from one of Filmora’s many templates or creating your own. It’s easy to get started with looping video editing in Filmora! Some people want to watch a video while they do other things, like work on the computer.
Filmora is incredibly easy to use. You can quickly create videos by importing footage, editing and adding effects, and exporting your videos. Plus, the software has several built-in tools that let you customize your videos further. It has many features that make it an excellent choice for anyone looking to create high-quality videos quickly and easily.
How can we loop a video on Filmora? Follow these steps to create a looping video on Filmora:
Step 1 Download the Filmora and create a project
Free Download For Win 7 or later(64-bit)
Free Download For macOS 10.14 or later
You can download the Filmora for free. After installation of this software open it and click on Create New Project. Filmora is not only the video maker or editor, you can also add text and music to your videos, and share them on social media or with friends.

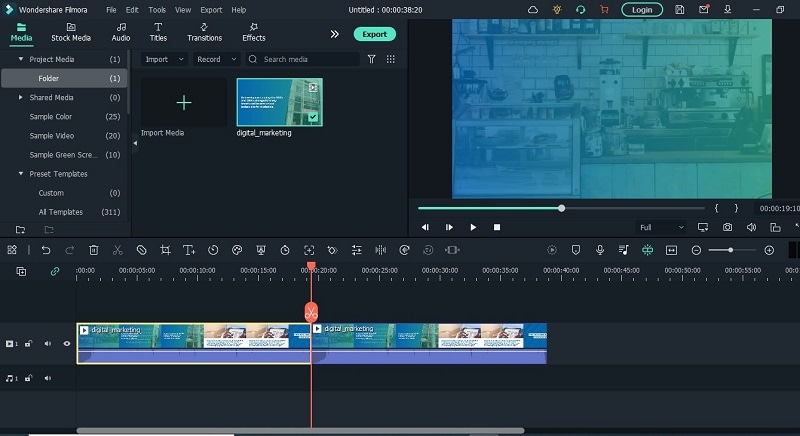
Step 2 Open the video and make copies
Open the video in your timeline. All you need to do is right-click on the video and click on copy. Then simply click or press Ctrl+V on your keyboard and do that for times. You can make as many copies as you want. Then you will have the same clip over and over again which creates the loop effect.
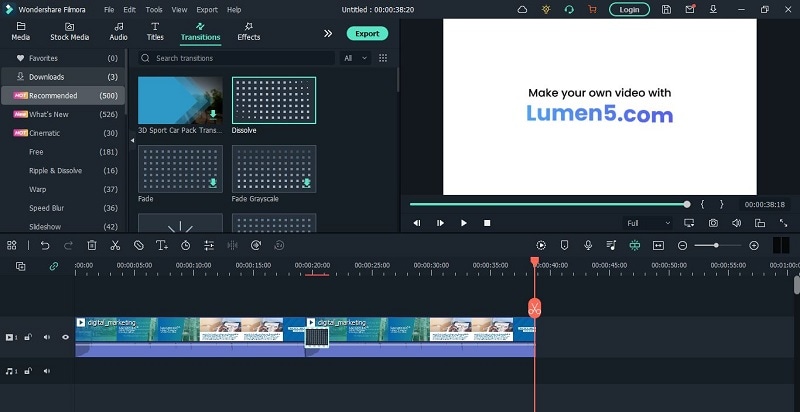
Step 3 Add Transition or any title in the video
After making copies of your video. Add some transitions in your video. Adding transitions to videos can help to keep your videos looking polished and professional. Not only do transitions add an extra layer of visual interest, but they can also help to underscore specific points in your video.
 With Screensaver Wonder you can easily make a screensaver from your own pictures and video files. Create screensavers for your own computer or create standalone, self-installing screensavers for easy sharing with your friends. Together with its sister product Screensaver Factory, Screensaver Wonder is one of the most popular screensaver software products in the world, helping thousands of users decorate their computer screens quickly and easily.
Benefits to create loop video on Filmora
There are many benefits to creating looping videos, especially when using a tool like Filmora. Loop videos are great for social media since they can be set to play on a loop and are viewable without sound. They’re also perfect for short attention spans since you can watch them over and over again without getting bored.
This can be useful for marketing purposes, as it can keep people interested in your video content. Additionally, looping can create a more engaging video experience for viewers, as it keeps them engaged by playing the same clip over and over again. You can easily add captions, and titles to your loop video.
When viewers can pause, rewind, and playback a video over and over again, they are more engaged with it. This increases the chances that they will watch the entire video, and may even share it with friends. You can create a sense of community and connection with your customers. And best of all? You can keep the magic going by adding sound effects and music!
Part 2: Loop a YouTube Video on TV from a Mobile
One of the great features of YouTube is that you can loop YouTube videos on your TV. This means that you can watch a video over and over again without having to fast forward through it. This is great for kids who are constantly asking to watch the same video over and over again. You can also use this feature to watch videos that you have missed.
There is something about relaxing music on the loop that can help to take the edge off. Whether it’s to help you wind down before bed, or to help you relax after a long day, there’s no doubt that looping YouTube on TV can be helpful. Whether you’re looking for something light and calming, or something to help you wind down after a long day, there’s sure to be something on YouTube that can fit the bill.
Let’s have a look at some steps that how to repeat YouTube videos on smart TV.
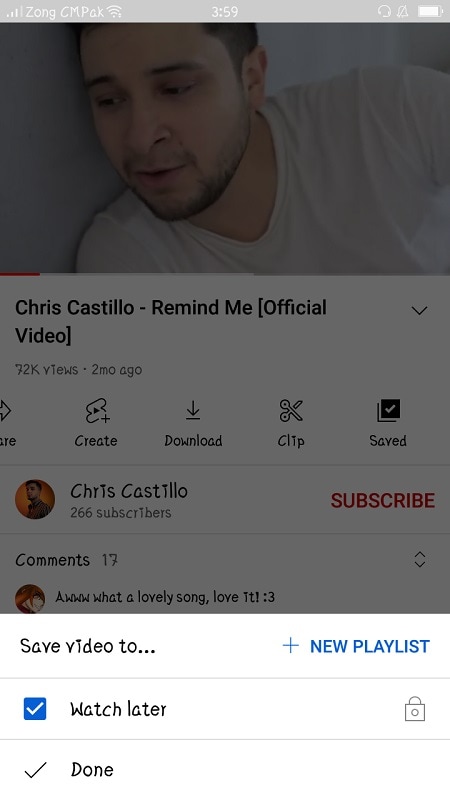
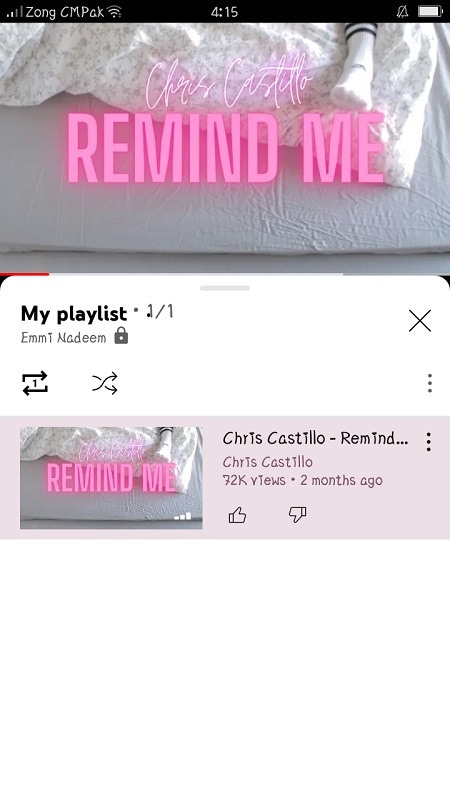
Step 1 Create a Playlist of one or multiple videos
The YouTube app is available on the google play store. You can easily download it from your mobile phones, android, etc. When you open a video on YouTube, several options will appear (like, share, subscribe). You can save the video in your existing playlist or you can create a new playlist.
Step 2 Go to the library and select the loop symbol
Click on library this will take you to a list of libraries that have YouTube collections. This can be a great way to find new material to watch, or to find old material that you may have missed. Play back the playlist that you want to loop on the smart TV.
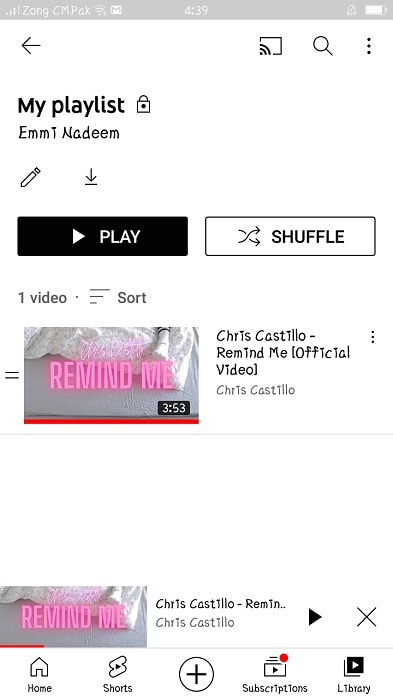
Step 3 Loop the playlist and send the list to the TV
Play the list and click on the loop symbol. At last, launch the YouTube video on your TV. The video will start playing in a loop. It can only be stopped from your mobile phone on which you start playing the list.
Why you might want to loop a YouTube video on a smart TV?
Some people want to watch a video over and over again without having to wait for it to load each time. Looping in a YouTube video can help you do this. Another reason to loop a YouTube video on your TV is if you want to watch it while you are doing something else. YouTube only loops the playlist.
Looping a YouTube video on your TV can also be useful if you have a lot of videos that you want to watch but don’t have enough time for. Looping YouTube videos on your television is a great way to keep your young ones entertained and engaged. Not only are they getting their daily dose of educational content, but they are also being kept enertained.
Wondershare Filmora Loop YouTube videos on PC and Mac with simple clicks.
Free Download Free Download Learn More

![]()
Conclusion
Looping YouTube videos on smart TV is an excellent way to watch the content you love, no matter where you are. While it may be true that loop YouTube videos on a smart TV are not imminent, there are some major benefits to be gained from implementing the new technology.
It’s easy to do, and it can be a great way to spend time with family members and friends. Looping YouTube videos on a smart TV is a great way to add some fun and excitement to your experience. The best part is, there are no limitations or restrictions you can loop as many videos as you want, and watch them in any order!
Free Download For Win 7 or later(64-bit)
Free Download For macOS 10.14 or later

Part 1: How to Create a Loop Video for YouTube
There is a lot of debate around whether or not creating a loop video is necessary for success on YouTube. Some people believe that it’s not necessary, while others believe that it is a must. The main benefit of creating a loop video is that it helps to keep your audience engaged. It also helps to create a sense of continuity between your videos.
Creating a loop video for your YouTube channel increases engagement because viewers can watch the video over and over again. This can lead to more clicks on your ads, which can lead to more revenue. It can also increase your subscribers and views. Maybe some people want to watch the same video multiple times in a row without having to keep pressing the play button on the remote.
Filmora is the best video loop editor:
If you need a powerful video editing tool that will let you create high-quality clips with multiple loops, look no further than Filmora . This software allows you to make various loops of your videos for use in social media, on your website or wherever desired. Plus, with Filmora, there is no limit on the number of loops you can create.
Loop video works well for corporate presentations, tutorials, explainer videos, and much more. You can create looping videos by choosing from one of Filmora’s many templates or creating your own. It’s easy to get started with looping video editing in Filmora! Some people want to watch a video while they do other things, like work on the computer.
Filmora is incredibly easy to use. You can quickly create videos by importing footage, editing and adding effects, and exporting your videos. Plus, the software has several built-in tools that let you customize your videos further. It has many features that make it an excellent choice for anyone looking to create high-quality videos quickly and easily.
How can we loop a video on Filmora? Follow these steps to create a looping video on Filmora:
Step 1 Download the Filmora and create a project
Free Download For Win 7 or later(64-bit)
Free Download For macOS 10.14 or later
You can download the Filmora for free. After installation of this software open it and click on Create New Project. Filmora is not only the video maker or editor, you can also add text and music to your videos, and share them on social media or with friends.
Step 2 Open the video and make copies
Open the video in your timeline. All you need to do is right-click on the video and click on copy. Then simply click or press Ctrl+V on your keyboard and do that for times. You can make as many copies as you want. Then you will have the same clip over and over again which creates the loop effect.
Step 3 Add Transition or any title in the video
After making copies of your video. Add some transitions in your video. Adding transitions to videos can help to keep your videos looking polished and professional. Not only do transitions add an extra layer of visual interest, but they can also help to underscore specific points in your video.

Benefits to create loop video on Filmora
There are many benefits to creating looping videos, especially when using a tool like Filmora. Loop videos are great for social media since they can be set to play on a loop and are viewable without sound. They’re also perfect for short attention spans since you can watch them over and over again without getting bored.
This can be useful for marketing purposes, as it can keep people interested in your video content. Additionally, looping can create a more engaging video experience for viewers, as it keeps them engaged by playing the same clip over and over again. You can easily add captions, and titles to your loop video.
When viewers can pause, rewind, and playback a video over and over again, they are more engaged with it. This increases the chances that they will watch the entire video, and may even share it with friends. You can create a sense of community and connection with your customers. And best of all? You can keep the magic going by adding sound effects and music!
Part 2: Loop a YouTube Video on TV from a Mobile
One of the great features of YouTube is that you can loop YouTube videos on your TV. This means that you can watch a video over and over again without having to fast forward through it. This is great for kids who are constantly asking to watch the same video over and over again. You can also use this feature to watch videos that you have missed.
There is something about relaxing music on the loop that can help to take the edge off. Whether it’s to help you wind down before bed, or to help you relax after a long day, there’s no doubt that looping YouTube on TV can be helpful. Whether you’re looking for something light and calming, or something to help you wind down after a long day, there’s sure to be something on YouTube that can fit the bill.
Let’s have a look at some steps that how to repeat YouTube videos on smart TV.
Step 1 Create a Playlist of one or multiple videos
The YouTube app is available on the google play store. You can easily download it from your mobile phones, android, etc. When you open a video on YouTube, several options will appear (like, share, subscribe). You can save the video in your existing playlist or you can create a new playlist.
Step 2 Go to the library and select the loop symbol
Click on library this will take you to a list of libraries that have YouTube collections. This can be a great way to find new material to watch, or to find old material that you may have missed. Play back the playlist that you want to loop on the smart TV.
Step 3 Loop the playlist and send the list to the TV
Play the list and click on the loop symbol. At last, launch the YouTube video on your TV. The video will start playing in a loop. It can only be stopped from your mobile phone on which you start playing the list.
Why you might want to loop a YouTube video on a smart TV?
Some people want to watch a video over and over again without having to wait for it to load each time. Looping in a YouTube video can help you do this. Another reason to loop a YouTube video on your TV is if you want to watch it while you are doing something else. YouTube only loops the playlist.
Looping a YouTube video on your TV can also be useful if you have a lot of videos that you want to watch but don’t have enough time for. Looping YouTube videos on your television is a great way to keep your young ones entertained and engaged. Not only are they getting their daily dose of educational content, but they are also being kept enertained.
Wondershare Filmora Loop YouTube videos on PC and Mac with simple clicks.
Free Download Free Download Learn More
![]()
Conclusion
Looping YouTube videos on smart TV is an excellent way to watch the content you love, no matter where you are. While it may be true that loop YouTube videos on a smart TV are not imminent, there are some major benefits to be gained from implementing the new technology.
It’s easy to do, and it can be a great way to spend time with family members and friends. Looping YouTube videos on a smart TV is a great way to add some fun and excitement to your experience. The best part is, there are no limitations or restrictions you can loop as many videos as you want, and watch them in any order!
- Title: In 2024, Strategic Use of Jump Cuts for Non-Linear Storytelling
- Author: Thomas
- Created at : 2024-07-29 18:39:11
- Updated at : 2024-07-30 18:39:11
- Link: https://youtube-help.techidaily.com/in-2024-strategic-use-of-jump-cuts-for-non-linear-storytelling/
- License: This work is licensed under CC BY-NC-SA 4.0.