
In 2024, Streamlining Video Quality on YouTube – Top Formats Revealed
Streamlining Video Quality on YouTube – Top Formats Revealed
Best Video Format for YouTube Uploading

Richard Bennett
Feb 01, 2024• Proven solutions
Uploading your content in the best video format for YouTube can save you a lot of frustration. In this article, we will teach you about some of the best video formats and settings .
To upload a video to YouTube you have to make sure that you are using one of the video file formats that is supported by the platform itself. Here they are:
- MP4
- MOV
- AVI
- FLV
- 3GPP
- WMV
- WebM
- MPEGS
YouTube recommends uploading your videos as MP4 files. Some benefits of MP4s are that the files are not as large as AVIs, they provide better quality than FLVs, and they often display with the same quality or better as you would get watching the video on a native video player. Other file formats like 3GPP and MPEG-PS generally have resolutions too small for high-resolution tablets or desktop devices.
If your phone or video editing software does not output MP4 videos, consider getting video editing software or a conversion program that can (like Filmora Video Editor).
Filmora is an easy-to-use video editing program that can export to MP4, WMV, AVI, MOV, F4V, MKV, TS, 3GP, MPEG-2, WEBM, GIF, and MP3. You can convert a video to an MP4 simply by importing it into Filmora, dragging it into the timeline, and exporting it in the MP4 format.
The Best Upload Settings for YouTube
The best video code:
The best video format: MP4
Audio should be produced using the LC format and stereo 5.1 or standard stereo. You can upload separate MP3 audio format files for voiceovers if you need to.
The aspect ratio for a video should be 16:9 so that it won’t have black bars on the side when uploaded to YouTube. YouTube has also made it possible for 9:16 (portrait) style videos to be viewed without black bars, full screen, using their iOS app.
You should export in at least 30 frames per second. Many creators push that to 60 frames per second, which is better for most types of videos (although it may not make a noticeable difference for others).
The maximum size for quick upload and load time on YouTube is generally under 2gb. Luckily MP4 offers a great degree of compression without sacrificing too much image quality.
If you scale down the file size of the video by reducing the resolution or choosing a format with more compression, that can cause you to lose quality. If you need a smaller file, it’s always better to scale down the length of a video rather than continually compress the file or lose frames from the video.
Although a 2 GB file of a very long will easily upload to YouTube, it will probably be very low quality.
Do you agree that MP4 is the best video format for YouTube, or do you use something else?
Create Stunning Videos with a High-Quality Video Editor


Richard Bennett
Richard Bennett is a writer and a lover of all things video.
Follow @Richard Bennett
Richard Bennett
Feb 01, 2024• Proven solutions
Uploading your content in the best video format for YouTube can save you a lot of frustration. In this article, we will teach you about some of the best video formats and settings .
To upload a video to YouTube you have to make sure that you are using one of the video file formats that is supported by the platform itself. Here they are:
- MP4
- MOV
- AVI
- FLV
- 3GPP
- WMV
- WebM
- MPEGS
YouTube recommends uploading your videos as MP4 files. Some benefits of MP4s are that the files are not as large as AVIs, they provide better quality than FLVs, and they often display with the same quality or better as you would get watching the video on a native video player. Other file formats like 3GPP and MPEG-PS generally have resolutions too small for high-resolution tablets or desktop devices.
If your phone or video editing software does not output MP4 videos, consider getting video editing software or a conversion program that can (like Filmora Video Editor).
Filmora is an easy-to-use video editing program that can export to MP4, WMV, AVI, MOV, F4V, MKV, TS, 3GP, MPEG-2, WEBM, GIF, and MP3. You can convert a video to an MP4 simply by importing it into Filmora, dragging it into the timeline, and exporting it in the MP4 format.
The Best Upload Settings for YouTube
The best video code:
The best video format: MP4
Audio should be produced using the LC format and stereo 5.1 or standard stereo. You can upload separate MP3 audio format files for voiceovers if you need to.
The aspect ratio for a video should be 16:9 so that it won’t have black bars on the side when uploaded to YouTube. YouTube has also made it possible for 9:16 (portrait) style videos to be viewed without black bars, full screen, using their iOS app.
You should export in at least 30 frames per second. Many creators push that to 60 frames per second, which is better for most types of videos (although it may not make a noticeable difference for others).
The maximum size for quick upload and load time on YouTube is generally under 2gb. Luckily MP4 offers a great degree of compression without sacrificing too much image quality.
If you scale down the file size of the video by reducing the resolution or choosing a format with more compression, that can cause you to lose quality. If you need a smaller file, it’s always better to scale down the length of a video rather than continually compress the file or lose frames from the video.
Although a 2 GB file of a very long will easily upload to YouTube, it will probably be very low quality.
Do you agree that MP4 is the best video format for YouTube, or do you use something else?
Create Stunning Videos with a High-Quality Video Editor
Richard Bennett
Richard Bennett is a writer and a lover of all things video.
Follow @Richard Bennett
Elevate Your Channel Game - TubeBuddy Insights
The Benefits of TubeBuddy | Manage Your YouTube Channel More Easily
Richard Bennett
Nov 01, 2022• Proven solutions
TubeBuddy is a YouTube certified extension for your Google Chrome browser. When you visit YouTube after installing TubeBuddy a whole new set of useful tools becomes available.
TubeBuddy’s tools were designed to save you time and effort when performing some of the more mundane tasks involved in running a YouTube channel, like adding cards. Many of TubeBuddy’s tools are completely free to use, but others might require a paid license. There are three levels of licensing: $9, $19, or $39 per month.
The Benefits of Using TubeBuddy for YouTube
- Increased Productivity
- Bulk Tools for Annotations, Cards, Thumbnails and More
- Quick Optimization for Your Video’s Tags
- Useful Data
Benefits of TubeBuddy
YouTubers who use TubeBuddy are able to spend less time on busy-work and more time on coming up with creative video ideas. Here are some of the ways TubeBuddy can help you, especially if you have a large or mid-sized channel:
1. Increased Productivity
Most of TubeBuddy’s Productivity Tools are available for free, but some require a $9 per month Pro license.
You can use these tools to get your videos ready for posting faster, embed them off-YouTube more easily, and save time by creating canned responses or templates for cards and annotations.
For example, you might find yourself creating the same YouTube Card over and over again to include it in every video you make. Creating a template through TubeBuddy will save you this effort.
Another great productivity tool is the Video Topic Planner. You can save video ideas you come up with, or ideas viewers have suggested to you, and arrange them in a queue so you never forget what you are planning to make next.
2. Bulk Tools for Annotations, Cards, Thumbnails and More
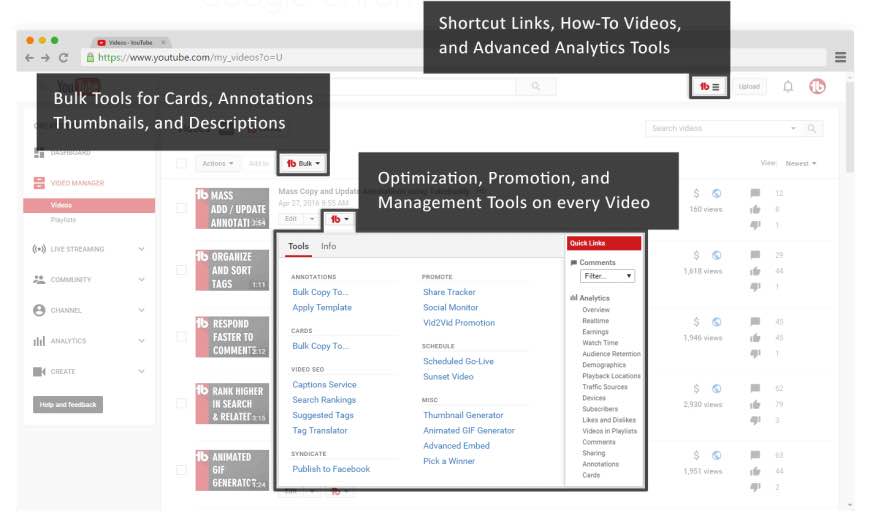
Most of TubeBuddy’s bulk processing tools require a $19 per month Star license.
Two of the most time-saving tools in this section are the Bulk Copy tools for cards and annotations. They will save you from having to recreate the same ones over and over. Then, using the Bulk Update tools, you will be able to make changes to all of your cards or annotations at once.
For example: if you use a YouTube Card to link to your personal website and include it in every video, and then you change your website, you change the link in all of your existing cards at once.
Another useful Bulk tool is Bulk Thumbnail Overlays, which will allow you to add a logo to all of your existing video thumbnails at once.
3. Quick Optimization for Your Video’s Tags
The SEO Tools in TubeBuddy will help you find the best tags for your videos and suggest tags you might want to target. Many of these tools are free, but others require a $19 Star license.
One of the best free tools in this category is View and Copy Video Tags. It allows you to see and copy the tags of other people’s videos. You will be able to see which keywords your competitors are targeting (and look for opportunities to target them more effectively). This can also save you a lot of time writing out tags that should really be the same as the ones on an existing video.
4. Useful Data
The most useful piece of data under Data and Research Tools is the Best Time to Publish. How many views you get on a video could vary greatly depending on when you post, and the best times to post vary depending on the demographics of your audience. This free tool from TubeBuddy will show you when you should be uploading.
Another interesting tool, which is unfortunately only available with $39 licenses, is the Competitor Scoreboard. It allows creators to compare their channels stats to those of their rival channels.
Have you ever tried TubeBuddy for YouTube?
Richard Bennett
Richard Bennett is a writer and a lover of all things video.
Follow @Richard Bennett
Richard Bennett
Nov 01, 2022• Proven solutions
TubeBuddy is a YouTube certified extension for your Google Chrome browser. When you visit YouTube after installing TubeBuddy a whole new set of useful tools becomes available.
TubeBuddy’s tools were designed to save you time and effort when performing some of the more mundane tasks involved in running a YouTube channel, like adding cards. Many of TubeBuddy’s tools are completely free to use, but others might require a paid license. There are three levels of licensing: $9, $19, or $39 per month.
The Benefits of Using TubeBuddy for YouTube
- Increased Productivity
- Bulk Tools for Annotations, Cards, Thumbnails and More
- Quick Optimization for Your Video’s Tags
- Useful Data
Benefits of TubeBuddy
YouTubers who use TubeBuddy are able to spend less time on busy-work and more time on coming up with creative video ideas. Here are some of the ways TubeBuddy can help you, especially if you have a large or mid-sized channel:
1. Increased Productivity
Most of TubeBuddy’s Productivity Tools are available for free, but some require a $9 per month Pro license.
You can use these tools to get your videos ready for posting faster, embed them off-YouTube more easily, and save time by creating canned responses or templates for cards and annotations.
For example, you might find yourself creating the same YouTube Card over and over again to include it in every video you make. Creating a template through TubeBuddy will save you this effort.
Another great productivity tool is the Video Topic Planner. You can save video ideas you come up with, or ideas viewers have suggested to you, and arrange them in a queue so you never forget what you are planning to make next.
2. Bulk Tools for Annotations, Cards, Thumbnails and More
Most of TubeBuddy’s bulk processing tools require a $19 per month Star license.
Two of the most time-saving tools in this section are the Bulk Copy tools for cards and annotations. They will save you from having to recreate the same ones over and over. Then, using the Bulk Update tools, you will be able to make changes to all of your cards or annotations at once.
For example: if you use a YouTube Card to link to your personal website and include it in every video, and then you change your website, you change the link in all of your existing cards at once.
Another useful Bulk tool is Bulk Thumbnail Overlays, which will allow you to add a logo to all of your existing video thumbnails at once.
3. Quick Optimization for Your Video’s Tags
The SEO Tools in TubeBuddy will help you find the best tags for your videos and suggest tags you might want to target. Many of these tools are free, but others require a $19 Star license.
One of the best free tools in this category is View and Copy Video Tags. It allows you to see and copy the tags of other people’s videos. You will be able to see which keywords your competitors are targeting (and look for opportunities to target them more effectively). This can also save you a lot of time writing out tags that should really be the same as the ones on an existing video.
4. Useful Data
The most useful piece of data under Data and Research Tools is the Best Time to Publish. How many views you get on a video could vary greatly depending on when you post, and the best times to post vary depending on the demographics of your audience. This free tool from TubeBuddy will show you when you should be uploading.
Another interesting tool, which is unfortunately only available with $39 licenses, is the Competitor Scoreboard. It allows creators to compare their channels stats to those of their rival channels.
Have you ever tried TubeBuddy for YouTube?
Richard Bennett
Richard Bennett is a writer and a lover of all things video.
Follow @Richard Bennett
Also read:
- [New] Maximize Your Mobile Experience with These 7 Blockers
- [New] Snapshots of Success Jake Paul’s YouTube Milestones
- [New] Swiftly Swap Songs in Your YouTube Collection
- [Updated] Expanding Possibilities with Virtual Reality
- 2024 Approved A Treasure Trove Guide to Public Domain Images
- 2024 Approved Nine All-Inclusive Free Holiday Movies Streamed on YouTube
- 2024 Approved Safe Audio Conversion Techniques Turning YouTube to MP3 Easily & Securely
- A Ciência da Religião | Free Book
- Fast Track to Compatibility: Update Your Surface Drivers Today
- Free HP Wireless Network Drivers for Windows: Download and Install
- From Vlogs to Viral Jake Paul’s Online Empire Expansion for 2024
- How to Transfer Text Messages from Poco C51 to New Phone | Dr.fone
- In 2024, Explore Our Collection 50+ Unique, Free YouTube Banner Ads
- In 2024, The Essential Guide to Merging YouTube & TikTok Content Flows
- In 2024, The Latest on YouTube Ad Income Guidelines
- Recover your messages after Camon 20 Pro 5G has been deleted
- The Ultimate Guide to Removing Backdrops A Comprehensive Approach for 2024
- Title: In 2024, Streamlining Video Quality on YouTube – Top Formats Revealed
- Author: Thomas
- Created at : 2024-12-07 17:19:50
- Updated at : 2024-12-09 21:28:18
- Link: https://youtube-help.techidaily.com/in-2024-streamlining-video-quality-on-youtube-top-formats-revealed/
- License: This work is licensed under CC BY-NC-SA 4.0.