
:max_bytes(150000):strip_icc()/WeiliDai-acfe647b60c149869466ebd6d3bd574a.jpg)
In 2024, The Essentials of Making Viral Haul Videos Online
The Essentials of Making Viral Haul Videos Online
Versatile Video Editor - Wondershare Filmora
An easy yet powerful editor
Numerous effects to choose from
Detailed tutorials provided by the official channel
You’re probably familiar with haul videos if you’re highly familiar with YouTube in recent years. This type of content can offer immense benefits to both influencers and small retail businesses.
Though they may not be quite as existent as they once were, it’s still essential to know the potential effect of these try-on-haul videos. They are valuable to spread the word about your brand and attract helpful content for your target audience. Here’s a quick guide to learn the ins and outs of haul videos.
In this article
02 Why is Haul Videos Popular?
03 Get Inspired from Fashion YouTubers to Find Out the Point of Try on Hauls
04 How to Make a Catchy Haul Video?
Part 1: What is a Haul Video?
Generally, a haul video is a recording of someone showcasing a collection of purchases. They may go into depth about what each product is, their shopping experience, and their initial impressions as a whole. A haul generally consists of products from a single retailer, a specific collection of shops, or at least a particular category. The products can be confined to one niche or brand, or type.
Such haul videos initially gained importance or hype around 2006/2007 through the community of beauty vloggers on YouTube as YouTube try-on-haul videos. And since the market for them isn’t that saturated, it could be an exciting time for businesses to dive in.
Haul videos generally contain products that the influencer has selected to define why they liked each item promptly. In certain sections or niches like makeup or clothing haul videos, the person may even try to offer the viewer an honest whole first impression.
Part 2: Why is Haul Videos Popular?
Having YouTube as a source of everyone’s daily dose of entertainment, we can’t help but wonder why haul videos tend to be so famous. Most YouTubers create at least one haul video regardless of their niche. They could be grocery hauls; underwear hauls, weird candy hauls, face mask hauls, candle hauls, and more. And the list goes on and on.
They are popular because they can help you connect to potential consumers via influencers as a small retail business. Generally, viewers watch and subscribe to YouTube videos of influencers or creators they trust or share similar preferences in products.
So when that influencer shares a collection of their favorite products, the viewers might decide to purchase one as well.
On the influencer side, haul videos can offer a way to share valuable content with your audience. If you have a YouTube channel, Instagram account, Facebook page, or blog, providing insights on the products you love can help your audience shape their own purchasing decisions.
It also creates a natural way to infuse some brand-related content into your content creation strategy. This can lead to profitable connections for your business in the future.
And since we’re very much intrigued by the glorifying fast fashion, excessive materialism, and hoarding, I’m getting my hands dirty with information. So, here’s what I’ve gathered:
Part 3: Get Inspired from Fashion YouTubers to Find Out the Point of Try on Hauls
Admit it; we gather most of our fashion inspiration from celebrities or YouTubers who know what’s cooking in the fashion scenes. They’ve become trendsetters, and thus we follow in their footsteps as all of us want to look great, which is why we’ve culled up a shortlist of YouTubers who you can follow for your seasonal or daily fashion or beauty inspiration! So, read on and put your glam on!
1. Tanya Burr

Tanya is a UK-based influencer who continuously posts all you need to know about fashion and makeup. Her sense of style, comfy outfits, and easy-going personality will surely attract you and give you a good idea of some unique international brands as well.
2. Heli Ved
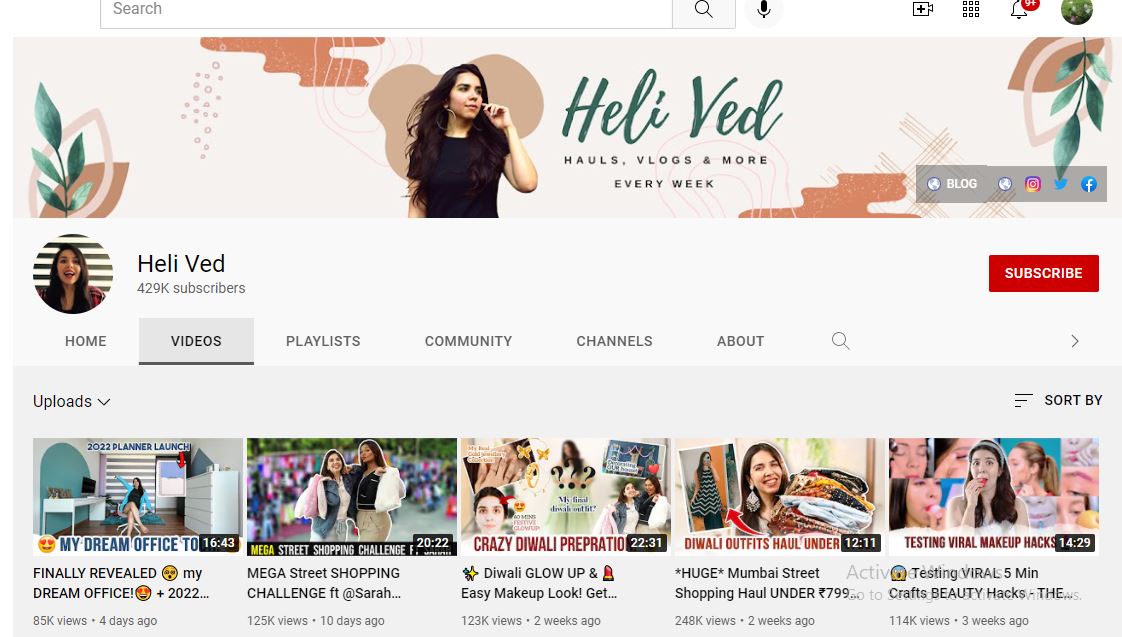
With her tons of try-on-haul videos and vlogs, she will entertain you like no other. A lively diva who preaches fashion, style, shopping, and much more.
3. Debasree Banerjee
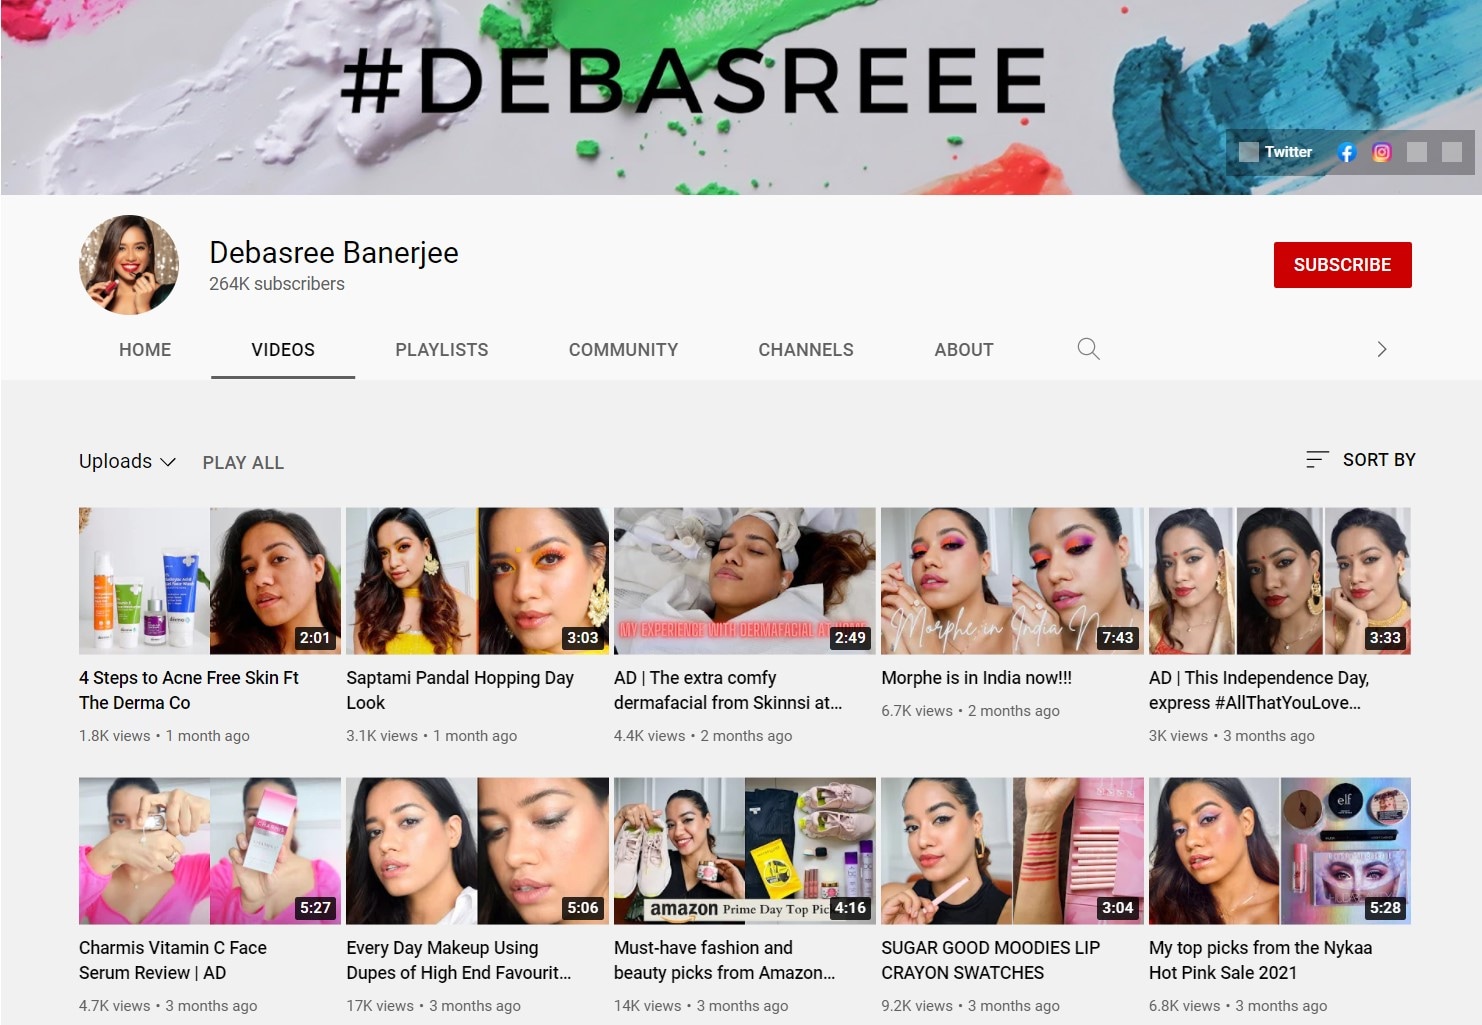
This YouTuber can be your long-distance shopping and makeup partner by showing you a diverse range of products that’ll suit you best, from high-end styles to skincare basics.
4. Kathleen Lights
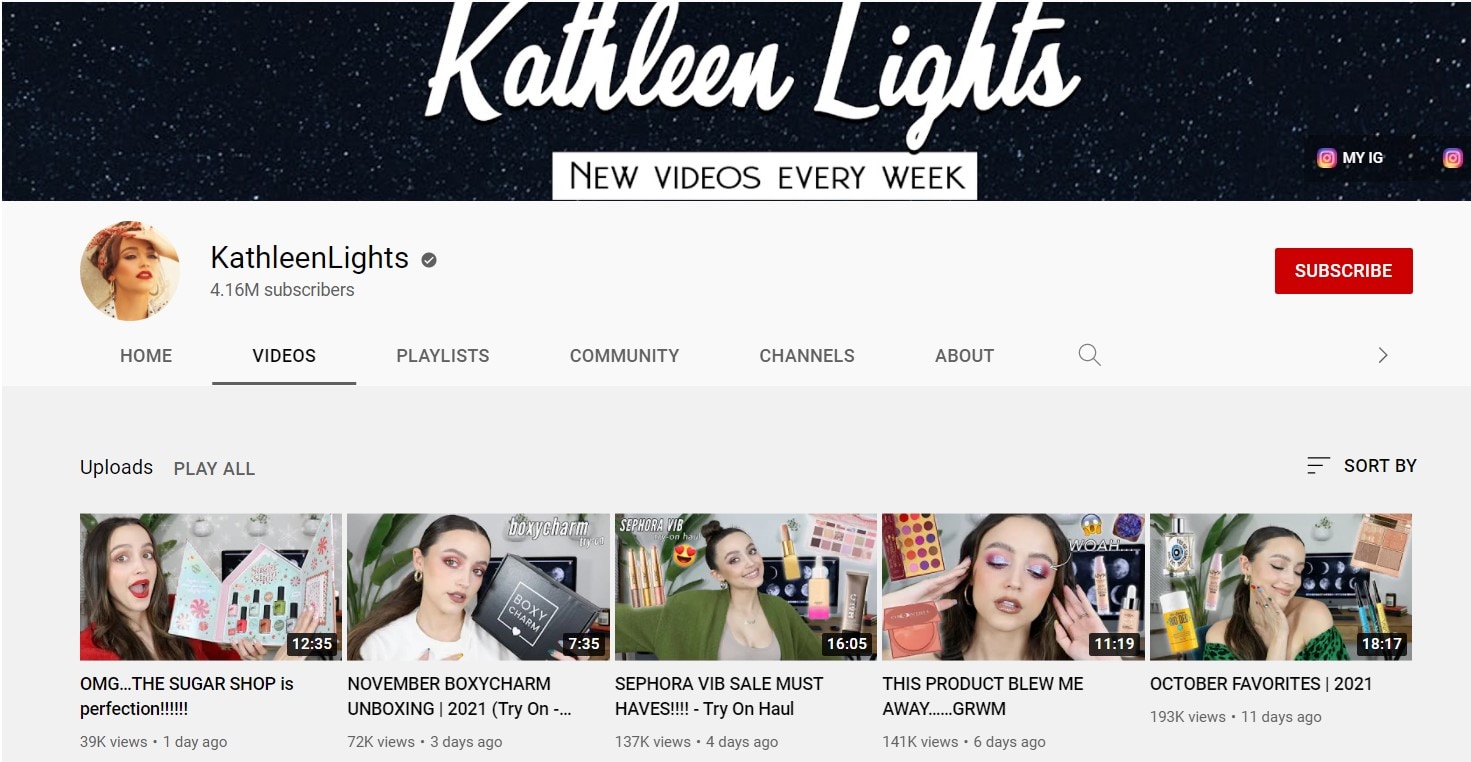
Kathleen is a 22-year-old beauty Youtuber who discusses everything from comparisons to product reviews to collection videos and entire product hauls.
5. Alexandra Garza
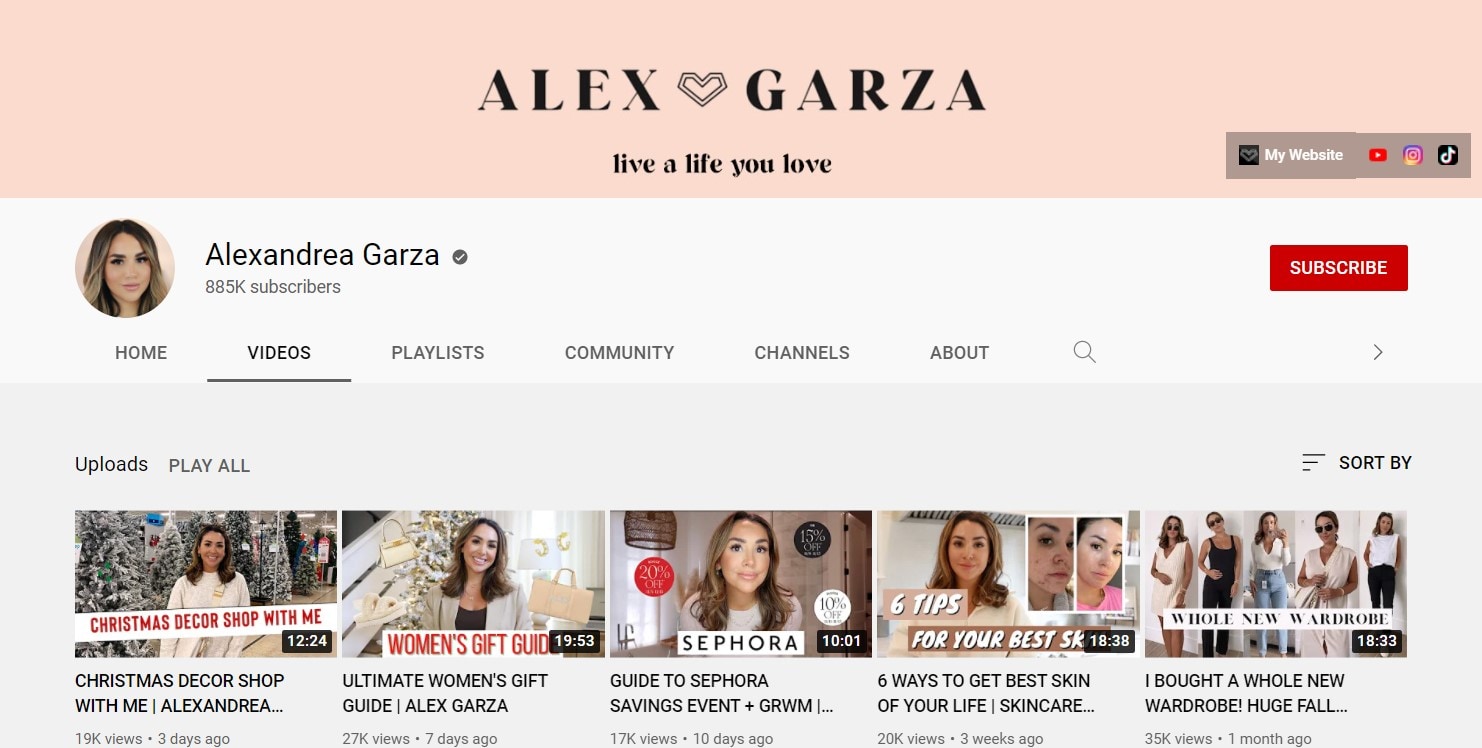
Alex Garza is a licensed cosmetologist, and she also works as a makeup artist for Benefit Cosmetics. Her channel features a cornucopia of reviews, haul videos, tutorials, and even wedding advice.
Part 4: How to Make a Catchy Haul Video?
Haul videos are easy and fun to shoot. It’s a great way of showcasing your followers and subscribers your personal style, how you shop and what your favorite stores are. Keeping in mind the mantras used by famous haul video creators, we’ve gathered a step-by-step guide below using which you can instantly create a catchy try-on haul video.
1. Create a good setup
Have ideal filming set up or area. Make sure that the lighting is accurate – not enough light will make the video dark. It is often best to film such haul videos during the day, using natural sunlight. However, you can also use desk lamps to help enhance the lighting situation.
2. Do a test video first with your shooting equipment
Put your camera on a flat surface if available. You can also use your computer’s webcam to shoot your haul video, once it is of excellent quality. You can sit on a chair or desk while facing the camera or even on the floor.
You can even take someone else to film the video for you! Try filming some test videos to check if the camera position is fine and the microphone is working. You’re ready to film once you’re satisfied.
3. Speak clearly and perform better
Speak in a clear voice, and gaze directly at the camera. You need to crack a few jokes or smile often throughout the video – you don’t want to come across as a serious or boring person to your viewers! Make sure that you’re comfortable presenting in front of a camera.
Begin by greeting the viewers (a simple “Hello, everyone!”), then you can offer a prompt description of your shopping trip. You can tell them the stores you visited or in-store events that occurred while there, like giveaways.
Act as if you’re directly conversing with one of your friends – it’s one of the comfy tricks you can follow. You can write some keywords if you think it would help and pin it somewhere where you can look through it quickly, such as the camera tripod or on the wall surface behind the camera or computer.
4. Clearly show off the products you bought
Show off the products you got! Hold the camera and show them to the audience in depth. You can also describe why you purchased each item, the price, plus any special discounts. Moreover, it is a great idea to keep all of your receipts and bills.
5. Don’t forget to use an ideal video editor
Use a video editing program to revamp your raw footage and make it look more professional. In excitement, you’d want to upload it as quickly as you can, but it’s better to invest a little time editing it so that you can publish a video with superb quality.
If there are any sections in your video that you don’t look for in the finished product, you can remove them. Plus, you can add special effects such as floating text and captions. All of this can be instantly done with the beginner-friendly and popular video editing program by Wondershare Filmora.
Within the new era of Filmora! Wondershare Filmora X is here with features like keyframing, motion tracking, audio ducking, and more. The audio ducking element is reliable for haul videos, notably as it lowers the background volume when a voiceover appears. And, this can be implemented in different ways while editing the video.
Wondershare Filmora
Get started easily with Filmora’s powerful performance, intuitive interface, and countless effects!
Try It Free Try It Free Try It Free Learn More >

6. Share among social network
If you have a social network page or a blog that you would like your YouTube viewers to consider worth checking, you can create short-form content either at the beginning or end of the video, with the short message and a URL. They’ll indeed check out your blog if your subscribers enjoy your content! And, it’s a friendly manner to build an audience and get traffic to your other pages!
Conclusion
Our final verdict is that haul videos are just entertaining to make and fun to watch with all the discussion above! Such videos can manipulate consumer trends and shape the meaning-making of individuals. They allow you to explore fun even just by living vicariously and shopping all the way long! Also, it’s equally important to consider further beautifying video through the most accessible yet professional editing programs like the Wondershare Filmora. What’s your favorite haul video to watch? Comment them down below.
You’re probably familiar with haul videos if you’re highly familiar with YouTube in recent years. This type of content can offer immense benefits to both influencers and small retail businesses.
Though they may not be quite as existent as they once were, it’s still essential to know the potential effect of these try-on-haul videos. They are valuable to spread the word about your brand and attract helpful content for your target audience. Here’s a quick guide to learn the ins and outs of haul videos.
In this article
02 Why is Haul Videos Popular?
03 Get Inspired from Fashion YouTubers to Find Out the Point of Try on Hauls
04 How to Make a Catchy Haul Video?
Part 1: What is a Haul Video?
Generally, a haul video is a recording of someone showcasing a collection of purchases. They may go into depth about what each product is, their shopping experience, and their initial impressions as a whole. A haul generally consists of products from a single retailer, a specific collection of shops, or at least a particular category. The products can be confined to one niche or brand, or type.
Such haul videos initially gained importance or hype around 2006/2007 through the community of beauty vloggers on YouTube as YouTube try-on-haul videos. And since the market for them isn’t that saturated, it could be an exciting time for businesses to dive in.
Haul videos generally contain products that the influencer has selected to define why they liked each item promptly. In certain sections or niches like makeup or clothing haul videos, the person may even try to offer the viewer an honest whole first impression.
Part 2: Why is Haul Videos Popular?
Having YouTube as a source of everyone’s daily dose of entertainment, we can’t help but wonder why haul videos tend to be so famous. Most YouTubers create at least one haul video regardless of their niche. They could be grocery hauls; underwear hauls, weird candy hauls, face mask hauls, candle hauls, and more. And the list goes on and on.
They are popular because they can help you connect to potential consumers via influencers as a small retail business. Generally, viewers watch and subscribe to YouTube videos of influencers or creators they trust or share similar preferences in products.
So when that influencer shares a collection of their favorite products, the viewers might decide to purchase one as well.
On the influencer side, haul videos can offer a way to share valuable content with your audience. If you have a YouTube channel, Instagram account, Facebook page, or blog, providing insights on the products you love can help your audience shape their own purchasing decisions.
It also creates a natural way to infuse some brand-related content into your content creation strategy. This can lead to profitable connections for your business in the future.
And since we’re very much intrigued by the glorifying fast fashion, excessive materialism, and hoarding, I’m getting my hands dirty with information. So, here’s what I’ve gathered:
Part 3: Get Inspired from Fashion YouTubers to Find Out the Point of Try on Hauls
Admit it; we gather most of our fashion inspiration from celebrities or YouTubers who know what’s cooking in the fashion scenes. They’ve become trendsetters, and thus we follow in their footsteps as all of us want to look great, which is why we’ve culled up a shortlist of YouTubers who you can follow for your seasonal or daily fashion or beauty inspiration! So, read on and put your glam on!
1. Tanya Burr
Tanya is a UK-based influencer who continuously posts all you need to know about fashion and makeup. Her sense of style, comfy outfits, and easy-going personality will surely attract you and give you a good idea of some unique international brands as well.
2. Heli Ved
With her tons of try-on-haul videos and vlogs, she will entertain you like no other. A lively diva who preaches fashion, style, shopping, and much more.
3. Debasree Banerjee
This YouTuber can be your long-distance shopping and makeup partner by showing you a diverse range of products that’ll suit you best, from high-end styles to skincare basics.
4. Kathleen Lights
Kathleen is a 22-year-old beauty Youtuber who discusses everything from comparisons to product reviews to collection videos and entire product hauls.
5. Alexandra Garza
Alex Garza is a licensed cosmetologist, and she also works as a makeup artist for Benefit Cosmetics. Her channel features a cornucopia of reviews, haul videos, tutorials, and even wedding advice.
Part 4: How to Make a Catchy Haul Video?
Haul videos are easy and fun to shoot. It’s a great way of showcasing your followers and subscribers your personal style, how you shop and what your favorite stores are. Keeping in mind the mantras used by famous haul video creators, we’ve gathered a step-by-step guide below using which you can instantly create a catchy try-on haul video.
1. Create a good setup
Have ideal filming set up or area. Make sure that the lighting is accurate – not enough light will make the video dark. It is often best to film such haul videos during the day, using natural sunlight. However, you can also use desk lamps to help enhance the lighting situation.
2. Do a test video first with your shooting equipment
Put your camera on a flat surface if available. You can also use your computer’s webcam to shoot your haul video, once it is of excellent quality. You can sit on a chair or desk while facing the camera or even on the floor.
You can even take someone else to film the video for you! Try filming some test videos to check if the camera position is fine and the microphone is working. You’re ready to film once you’re satisfied.
3. Speak clearly and perform better
Speak in a clear voice, and gaze directly at the camera. You need to crack a few jokes or smile often throughout the video – you don’t want to come across as a serious or boring person to your viewers! Make sure that you’re comfortable presenting in front of a camera.
Begin by greeting the viewers (a simple “Hello, everyone!”), then you can offer a prompt description of your shopping trip. You can tell them the stores you visited or in-store events that occurred while there, like giveaways.
Act as if you’re directly conversing with one of your friends – it’s one of the comfy tricks you can follow. You can write some keywords if you think it would help and pin it somewhere where you can look through it quickly, such as the camera tripod or on the wall surface behind the camera or computer.
4. Clearly show off the products you bought
Show off the products you got! Hold the camera and show them to the audience in depth. You can also describe why you purchased each item, the price, plus any special discounts. Moreover, it is a great idea to keep all of your receipts and bills.
5. Don’t forget to use an ideal video editor
Use a video editing program to revamp your raw footage and make it look more professional. In excitement, you’d want to upload it as quickly as you can, but it’s better to invest a little time editing it so that you can publish a video with superb quality.
If there are any sections in your video that you don’t look for in the finished product, you can remove them. Plus, you can add special effects such as floating text and captions. All of this can be instantly done with the beginner-friendly and popular video editing program by Wondershare Filmora.
Within the new era of Filmora! Wondershare Filmora X is here with features like keyframing, motion tracking, audio ducking, and more. The audio ducking element is reliable for haul videos, notably as it lowers the background volume when a voiceover appears. And, this can be implemented in different ways while editing the video.
Wondershare Filmora
Get started easily with Filmora’s powerful performance, intuitive interface, and countless effects!
Try It Free Try It Free Try It Free Learn More >
6. Share among social network
If you have a social network page or a blog that you would like your YouTube viewers to consider worth checking, you can create short-form content either at the beginning or end of the video, with the short message and a URL. They’ll indeed check out your blog if your subscribers enjoy your content! And, it’s a friendly manner to build an audience and get traffic to your other pages!
Conclusion
Our final verdict is that haul videos are just entertaining to make and fun to watch with all the discussion above! Such videos can manipulate consumer trends and shape the meaning-making of individuals. They allow you to explore fun even just by living vicariously and shopping all the way long! Also, it’s equally important to consider further beautifying video through the most accessible yet professional editing programs like the Wondershare Filmora. What’s your favorite haul video to watch? Comment them down below.
Achieve Wider Exposure by Transferring Twitch Broadcasts to YouTube
Create High-Quality Video - Wondershare Filmora
An easy and powerful YouTube video editor
Numerous video and audio effects to choose from
Detailed tutorials provided by the official channel
Amidst many online applications is Twitch. This live streaming platform takes your experience to another level. You can use it to make crafts, play games, attract broadcasters, and many more. Twitch was launched in 2011, and since then, it has attracted millions of users, managing a database of about 4 million broadcasters by early 2020. With it, users can stream their activities as others watch in real-time. Just browse a category to find a stream.
You can also follow streamers that you like on the platform and get updates and notifications immediately after they are posted. But how do you start a career on a platform like Twitch? You need to broadcast and gather a large following. You can use built-in audiences from other platforms like Facebook. Let’s dive into the core of the matter and look at how to upload Twitch streams to YouTube and build your platform.

In this article
02 What is the benefit of uploading your Twitch Streams to YouTube
03 How to upload your Twitch Streams to YouTube
What is Twitch VOD?
Twitch Video on Demand (VOD) is a recording of previously streamed content. It provides briefings if you missed catching the Twitch live stream. Just watch the VOD from your favorite streamer and be engaged the best way possible. However, VODs don’t last forever. They are removed after two weeks of broadcast. But streamers with Partner Status can have their VODs last up to 60 days.
- How to enable Twitch VOD?
VODs are the best form to archive streams that your fans missed. Even though they are not enabled by default, you can manually enable them and not let your fans miss any important event from your channel. They’ll find it under the “Videos” tab on any Twitch channel. Follow these steps to enable VOD on your channel.
Step 1. Go to your profile icon in the top right corner of Twitch
Check in the “Channel & Video” section and locate the “Stream Key & Preferences” menu.

Step 2. Click on “Creator Dashboard”
Remember, you can enable VODs from your creator dashboard. Just go under the “Settings” tab and click on the “Stream section” of the creator dashboard. Check under the subtitle “VOD Settings” and get the option to store past broadcasts. You can also toggle the slider to store your past broadcasts.

Step 3 Click on the “Settings” tab on the left-hand side and go to Stream
You’ll get various drop-down menu options. Click on the “Settings” tab and choose the “Stream” option. The system will navigate to a new page, thus setting your preferences for VODs and clips.
Step 4. Go to “VOD Settings” and toggle on the “Store Past Broadcast.”
Ensure you have the toggle option turned ON under the “VOD Settings.” If it’s “ON,” you’ll realize the toggle will be purple, with a checkmark in it. Twitch will be confirmed to be enabled if it’s purple.

- Frequently Asked Question about Twitch VOD
These are some questions frequently asked by Twitch users.
1. How long will Twitch store my VOD
Your Twitch can either be stored for 14 or 60 days, depending on your level. For Twitch Prime, Twitch Partner or a Twitch Turbo user has their past broadcasts automatically saved for 60 days before deletion. But if you are not connected to these three options, your past broadcasts will be saved for only 14 days before deletion.
Since your past broadcasts cannot be live for more than 60 days, you have the option to download the video to your computer before the validity days expire and Twitch deletes it. You can use an External Hard drive to save the past broadcast content. Likewise, it is possible to turn your past broadcast content into Highlight and, in turn, permanently store them on Twitch.
2. What is the difference between Twitch VOD, Highlights, and Clips
Twitch VOD is a previously saved video of your live stream content. You choose to save either part or the entire content of your previously streamed content. More so, you don’t need any additional requirements to use VOD.
Highlights are short videos that have been edited from your past broadcast content. You can save them on Twitch permanently. Streamers majorly use highlights to save video game achievements. Unlike VOD Twitch that can be saved up to 60 days, Highlights usually lasts no more than 3 minutes.
- To make Highlights on Twitch, first, navigate to your Dashboard.
- Then scroll down and click on “Content” > “Video Producer.
- Next, press on “All Videos” to change them to “Past Broadcasts.”
- Now press the “Highlight” button, and Twitch will immediately open a new tab for “Twitch Highlighter Tool.”
- Then select the video part to include as “Highlight” and press the “Create Highlights” button.
- Wait a while for the process to be completed, and Voila! You have your Highlights created.
When it comes to Twitch Clip, you can capture special moments in a stream you are currently watching. On the same note, you can share clips with friends and other users on social media platforms. Such shared clips contain a link where others view the source or video from.
The clips you create will automatically be saved on the streamer’s channel on the “Clips” page, where other viewers can see them too. Nonetheless, you can download “clips” to your computer and, in turn, upload them whenever you want to. And note that you can help your stream grow via “Clips” by letting your viewers clip and share your stream moments.
- To create “Clips” on Twitch, identify which Streamers channel you wish to create a clip from.
- Then click on the “Clapper board” icon. Next, edit your clip between 5 and 60 seconds long.
- Finally, create a title and publish your Clip. You’ll also enjoy the privilege to share your clip’s link to other social media networks.
What is the benefit of uploading your Twitch Streams to YouTube
You stand to gain a lot when you upload your Twitch Streams to YouTube.
1) To enlighten your followers
Your followers will see your streams and make the best decisions. Viewers can check out your recordings and other highlights from past streams. It will help them decide whether they like what they see and probably join your live streams.
2) Twitch provides content for you to share and monetize on YouTube
Since Twitch streaming is more popular nowadays, many people throng it for content. It is not wise to rely entirely on Twitch to discover as a Twitch Streamer. Posting to YouTube will make it known within a short time. You would have announced your streams most nobly and kept your followers up to date, attracting new ones as well.
3) To keep your followers engaged even when you are offline
Even though live streaming is important, some viewers may not attend the live sessions due to different time zones or other commitments. In this regard, when uploaded to YouTube, Twitch will give them a chance to watch your content just whenever they log in. They, therefore, have the option to watch a Twitch VOD of the live stream they missed.
How to upload your Twitch Streams to YouTube
Check how to upload Twitch streams to YouTube from the Twitch website.
Step 1. Identify the little arrow next to your name on the Twitch website and click on it. Then click on the “Video Producer” to take you to a list of your Twitch videos.

Step 2. Check out and click on the “three-dots” on the video you wish to upload to YouTube. Click on the “Export” tab.
Step 3. A menu will then pop up. Here, you can fill in the description, title, and tags that you would like to appear on the YouTube video. There is an option for Twitch to split your video automatically. If you wish so, then tick the “Checkbox” to enable it. Then click on the “Start Export” option to export your Twitch streams to YouTube.

Bouns! Edit Your Twitch Video with Filmora
The quality of your video matters when it comes to uploading Twitch Streams to YouTube. Using a third-party tool to edit your video is the first step in ensuring your videos communicate meaningful content. Filmora comes in handy to bring your imaginations to life. Use it for simple creation without limits, even for beginners.
- Use it to track moving objects in video clips
- Easily match any image of the selected clip
- Its powerful tools let you edit your video by cropping, splitting, adjusting speed, etc
- The video keyframe easily indicates the beginning and end of the parameters
For Win 7 or later (64-bit)
For macOS 10.12 or later
Conclusion
● Don’t just focus on how to upload Twitch streams to YouTube but also consider the quality of video you are posting to YouTube. Remember, your video quality will speak much more of you than any other description. So, strive to produce quality videos using the best tool, Filmora. The app is easy to use and will elevate your views and imaginations through your video in the most impactful way.
Amidst many online applications is Twitch. This live streaming platform takes your experience to another level. You can use it to make crafts, play games, attract broadcasters, and many more. Twitch was launched in 2011, and since then, it has attracted millions of users, managing a database of about 4 million broadcasters by early 2020. With it, users can stream their activities as others watch in real-time. Just browse a category to find a stream.
You can also follow streamers that you like on the platform and get updates and notifications immediately after they are posted. But how do you start a career on a platform like Twitch? You need to broadcast and gather a large following. You can use built-in audiences from other platforms like Facebook. Let’s dive into the core of the matter and look at how to upload Twitch streams to YouTube and build your platform.
In this article
02 What is the benefit of uploading your Twitch Streams to YouTube
03 How to upload your Twitch Streams to YouTube
What is Twitch VOD?
Twitch Video on Demand (VOD) is a recording of previously streamed content. It provides briefings if you missed catching the Twitch live stream. Just watch the VOD from your favorite streamer and be engaged the best way possible. However, VODs don’t last forever. They are removed after two weeks of broadcast. But streamers with Partner Status can have their VODs last up to 60 days.
- How to enable Twitch VOD?
VODs are the best form to archive streams that your fans missed. Even though they are not enabled by default, you can manually enable them and not let your fans miss any important event from your channel. They’ll find it under the “Videos” tab on any Twitch channel. Follow these steps to enable VOD on your channel.
Step 1. Go to your profile icon in the top right corner of Twitch
Check in the “Channel & Video” section and locate the “Stream Key & Preferences” menu.
Step 2. Click on “Creator Dashboard”
Remember, you can enable VODs from your creator dashboard. Just go under the “Settings” tab and click on the “Stream section” of the creator dashboard. Check under the subtitle “VOD Settings” and get the option to store past broadcasts. You can also toggle the slider to store your past broadcasts.
Step 3 Click on the “Settings” tab on the left-hand side and go to Stream
You’ll get various drop-down menu options. Click on the “Settings” tab and choose the “Stream” option. The system will navigate to a new page, thus setting your preferences for VODs and clips.
Step 4. Go to “VOD Settings” and toggle on the “Store Past Broadcast.”
Ensure you have the toggle option turned ON under the “VOD Settings.” If it’s “ON,” you’ll realize the toggle will be purple, with a checkmark in it. Twitch will be confirmed to be enabled if it’s purple.
- Frequently Asked Question about Twitch VOD
These are some questions frequently asked by Twitch users.
1. How long will Twitch store my VOD
Your Twitch can either be stored for 14 or 60 days, depending on your level. For Twitch Prime, Twitch Partner or a Twitch Turbo user has their past broadcasts automatically saved for 60 days before deletion. But if you are not connected to these three options, your past broadcasts will be saved for only 14 days before deletion.
Since your past broadcasts cannot be live for more than 60 days, you have the option to download the video to your computer before the validity days expire and Twitch deletes it. You can use an External Hard drive to save the past broadcast content. Likewise, it is possible to turn your past broadcast content into Highlight and, in turn, permanently store them on Twitch.
2. What is the difference between Twitch VOD, Highlights, and Clips
Twitch VOD is a previously saved video of your live stream content. You choose to save either part or the entire content of your previously streamed content. More so, you don’t need any additional requirements to use VOD.
Highlights are short videos that have been edited from your past broadcast content. You can save them on Twitch permanently. Streamers majorly use highlights to save video game achievements. Unlike VOD Twitch that can be saved up to 60 days, Highlights usually lasts no more than 3 minutes.
- To make Highlights on Twitch, first, navigate to your Dashboard.
- Then scroll down and click on “Content” > “Video Producer.
- Next, press on “All Videos” to change them to “Past Broadcasts.”
- Now press the “Highlight” button, and Twitch will immediately open a new tab for “Twitch Highlighter Tool.”
- Then select the video part to include as “Highlight” and press the “Create Highlights” button.
- Wait a while for the process to be completed, and Voila! You have your Highlights created.
When it comes to Twitch Clip, you can capture special moments in a stream you are currently watching. On the same note, you can share clips with friends and other users on social media platforms. Such shared clips contain a link where others view the source or video from.
The clips you create will automatically be saved on the streamer’s channel on the “Clips” page, where other viewers can see them too. Nonetheless, you can download “clips” to your computer and, in turn, upload them whenever you want to. And note that you can help your stream grow via “Clips” by letting your viewers clip and share your stream moments.
- To create “Clips” on Twitch, identify which Streamers channel you wish to create a clip from.
- Then click on the “Clapper board” icon. Next, edit your clip between 5 and 60 seconds long.
- Finally, create a title and publish your Clip. You’ll also enjoy the privilege to share your clip’s link to other social media networks.
What is the benefit of uploading your Twitch Streams to YouTube
You stand to gain a lot when you upload your Twitch Streams to YouTube.
1) To enlighten your followers
Your followers will see your streams and make the best decisions. Viewers can check out your recordings and other highlights from past streams. It will help them decide whether they like what they see and probably join your live streams.
2) Twitch provides content for you to share and monetize on YouTube
Since Twitch streaming is more popular nowadays, many people throng it for content. It is not wise to rely entirely on Twitch to discover as a Twitch Streamer. Posting to YouTube will make it known within a short time. You would have announced your streams most nobly and kept your followers up to date, attracting new ones as well.
3) To keep your followers engaged even when you are offline
Even though live streaming is important, some viewers may not attend the live sessions due to different time zones or other commitments. In this regard, when uploaded to YouTube, Twitch will give them a chance to watch your content just whenever they log in. They, therefore, have the option to watch a Twitch VOD of the live stream they missed.
How to upload your Twitch Streams to YouTube
Check how to upload Twitch streams to YouTube from the Twitch website.
Step 1. Identify the little arrow next to your name on the Twitch website and click on it. Then click on the “Video Producer” to take you to a list of your Twitch videos.
Step 2. Check out and click on the “three-dots” on the video you wish to upload to YouTube. Click on the “Export” tab.
Step 3. A menu will then pop up. Here, you can fill in the description, title, and tags that you would like to appear on the YouTube video. There is an option for Twitch to split your video automatically. If you wish so, then tick the “Checkbox” to enable it. Then click on the “Start Export” option to export your Twitch streams to YouTube.
Bouns! Edit Your Twitch Video with Filmora
The quality of your video matters when it comes to uploading Twitch Streams to YouTube. Using a third-party tool to edit your video is the first step in ensuring your videos communicate meaningful content. Filmora comes in handy to bring your imaginations to life. Use it for simple creation without limits, even for beginners.
- Use it to track moving objects in video clips
- Easily match any image of the selected clip
- Its powerful tools let you edit your video by cropping, splitting, adjusting speed, etc
- The video keyframe easily indicates the beginning and end of the parameters
For Win 7 or later (64-bit)
For macOS 10.12 or later
Conclusion
● Don’t just focus on how to upload Twitch streams to YouTube but also consider the quality of video you are posting to YouTube. Remember, your video quality will speak much more of you than any other description. So, strive to produce quality videos using the best tool, Filmora. The app is easy to use and will elevate your views and imaginations through your video in the most impactful way.
- Title: In 2024, The Essentials of Making Viral Haul Videos Online
- Author: Thomas
- Created at : 2024-05-31 12:41:50
- Updated at : 2024-06-01 12:41:50
- Link: https://youtube-help.techidaily.com/in-2024-the-essentials-of-making-viral-haul-videos-online/
- License: This work is licensed under CC BY-NC-SA 4.0.
