"In 2024, The Key to Enhanced Viewership Designing Impactful YouTube Thumbnails"
The Key to Enhanced Viewership: Designing Impactful YouTube Thumbnails
How to Make Video Thumbnails for YouTube

Richard Bennett
Oct 26, 2023• Proven solutions
The video thumbnails you use for YouTube are vital to getting views and subscribers. There are a lot of things that go into making people watch your videos, but your video thumbnail might be the most important factor.
Here are 5 easy tips for creating thumbnails that get views.
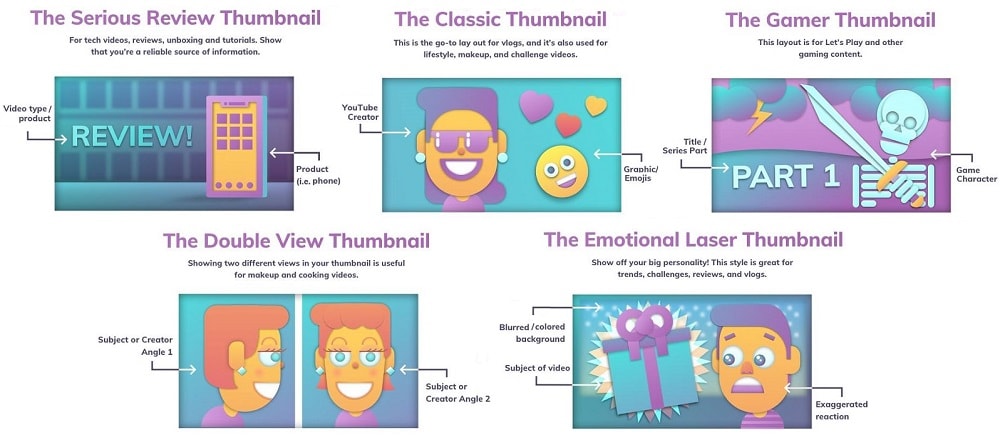
- Have a Consistent Layout
- Use Your Face
- Use Graphics/Emojis That is On Topic
- Make Your Text Huge
- Keep It Clutter-Free!
Contest now closed.
Edit Your Videos Before Creating Video Thumbnails


1. Have a Consistent Layout
Your thumbnails all must look like part of the same set. You want viewers to recognize your videos like yours, and they are more likely to do that if you build up a standard layout that they can start associating with you.
An example of a standard layout could be you in the middle of the screen wearing an expression that matches the theme of your video, with your title written underneath your face. Every individual thumbnail would still be different, but you and the text would always be in the same spot.
2. Use Your Face
People feel automatically connected and drawn into images that make eye contact. This makes thumbnails which feature faces more click-able than thumbnails which don’t, in most genres (i.e. if you make food videos then this may not apply – featuring the food might be more important than featuring your face). Check out more tips like this here .
Also, if somebody recognizes you in your thumbnail from a previous video of yours, that will go a long way towards making them click.
3. Use Graphics/Emojis that are On Topic
Anybody can take a screenshot of themselves in their video and use it as a thumbnail. To make your thumbnails look polished, consider using small images (like emojis or hearts) to stand out. This will add color and personality to your thumbnail.
Make sure the images you choose are relevant to the topic of your video.
4. Make Your Text Huge
If you use text in your thumbnail (you don’t have to) then it should be to add context. For example, if the main image is just you smiling then you might need some text to let viewers know the video is a makeup tutorial.
Thumbnails might look large while you’re putting them together in your image editor, but when they’re displayed on YouTube they’re a lot smaller. That goes double if a viewer is watching on their phone. So, make sure that any text you use is large enough that it can be read easily on small screens.
5. Keep it Clutter-Free
It’s great to add text and emojis to your thumbnails, but you do need to be careful not to add too much. You never want your thumbnails to look cluttered. Viewers should be able to glance at your thumbnails and know exactly what kind of video to expect – that’s difficult to do if there’s too much to process.
A good rule for text is to use only 1-3 words. That way they won’t clutter your screen, and you can make them large enough to read on small-screened devices.
For even more tips on making great YouTube thumbnails, click here .
Use these tips to make video thumbnails for YouTube, and tell us what kind of results you get!
Richard Bennett
Richard Bennett is a writer and a lover of all things video.
Follow @Richard Bennett
Richard Bennett
Oct 26, 2023• Proven solutions
The video thumbnails you use for YouTube are vital to getting views and subscribers. There are a lot of things that go into making people watch your videos, but your video thumbnail might be the most important factor.
Here are 5 easy tips for creating thumbnails that get views.
- Have a Consistent Layout
- Use Your Face
- Use Graphics/Emojis That is On Topic
- Make Your Text Huge
- Keep It Clutter-Free!
Contest now closed.
Edit Your Videos Before Creating Video Thumbnails
1. Have a Consistent Layout
Your thumbnails all must look like part of the same set. You want viewers to recognize your videos like yours, and they are more likely to do that if you build up a standard layout that they can start associating with you.
An example of a standard layout could be you in the middle of the screen wearing an expression that matches the theme of your video, with your title written underneath your face. Every individual thumbnail would still be different, but you and the text would always be in the same spot.
2. Use Your Face
People feel automatically connected and drawn into images that make eye contact. This makes thumbnails which feature faces more click-able than thumbnails which don’t, in most genres (i.e. if you make food videos then this may not apply – featuring the food might be more important than featuring your face). Check out more tips like this here .
Also, if somebody recognizes you in your thumbnail from a previous video of yours, that will go a long way towards making them click.
3. Use Graphics/Emojis that are On Topic
Anybody can take a screenshot of themselves in their video and use it as a thumbnail. To make your thumbnails look polished, consider using small images (like emojis or hearts) to stand out. This will add color and personality to your thumbnail.
Make sure the images you choose are relevant to the topic of your video.
4. Make Your Text Huge
If you use text in your thumbnail (you don’t have to) then it should be to add context. For example, if the main image is just you smiling then you might need some text to let viewers know the video is a makeup tutorial.
Thumbnails might look large while you’re putting them together in your image editor, but when they’re displayed on YouTube they’re a lot smaller. That goes double if a viewer is watching on their phone. So, make sure that any text you use is large enough that it can be read easily on small screens.
5. Keep it Clutter-Free
It’s great to add text and emojis to your thumbnails, but you do need to be careful not to add too much. You never want your thumbnails to look cluttered. Viewers should be able to glance at your thumbnails and know exactly what kind of video to expect – that’s difficult to do if there’s too much to process.
A good rule for text is to use only 1-3 words. That way they won’t clutter your screen, and you can make them large enough to read on small-screened devices.
For even more tips on making great YouTube thumbnails, click here .
Use these tips to make video thumbnails for YouTube, and tell us what kind of results you get!
Richard Bennett
Richard Bennett is a writer and a lover of all things video.
Follow @Richard Bennett
The Ultimate Guide: Undoing Your YT Playback Sequence
If you have ever created a playlist on YouTube, you may have noticed that the order of the videos is automatically set and based on when they were added to the list. However, it would help if you played them in reverse order.
Surprisingly, there is no built-in way to do this on YouTube. However, four simple workarounds only take a few minutes to complete.
So, keep reading to learn how to reverse a YouTube playlist so you can watch the videos in the order you want!
How to Reverse a YouTube Playlist?
Below we’ve provided four different solutions to help you reverse your YouTube playlist on your computer:
Using Chrome Web Extension
One of the most straightforward and convenient methods of reversing the YouTube playlist is to install a Chrome browser extension that will let you play any playlist in the opposite order.
The “Iridium for YouTube” and “Improve YouTube” extensions on your Google Chrome can play any YouTube video queue or playlist in reverse.
Here’s how to install the “Iridium for YouTube” extension on your Chrome browser to reverse the playlist:
Step 1: In the first step, launch a browser on your computer and click the three dots (ellipsis icon) in the top-right corner of the screen. Scroll down, select “More Tools,” and click Extensions.”

Step 2:
- Now, click the three horizontal-line”Menu”icon.
- Click the”Open Chrome Web Store”option.
- Search for theIridium for YouTubeextension using the search bar.

Step 3:
- Open the extension page.
- Click”Add to Chrome.”
- Click the”Add Extension”option in the pop-up menu.

Step 4:Open a new page, visit YouTube , and a pop-up window will appear. Select”Close”to terminate it, and clickthe”Menu”(hamburger) icon in the top left corner of the screen. Next, scroll down and open your savedPlaylistthat you want to reverse.

Step 5: Click the “Play All” option in the details section of the playlist and click the Iridium button on the right side of the screen. This will open a new tab with different settings for your playlist. Go to the Video tab, and under the “Playlist” header, toggle the button next to “Enable reverse playlist control” to change the settings.

That’s about it. You will now be able to watch a YouTube playlist in reverse order.
Using The Third Website
Several trusted and reliable third-party websites, such as “Playlist. tools,” can help you reverse your YouTube playlists quickly. The platform is free and fully dedicated to instantly changing the order of your Playlist.
Here’s how you can use the Playlist.tools to reverse your videos’ order in a playlist on YouTube:
Step 1: Launch a browser on your laptop or desktop, head to theYouTube website, and click the three-line “Menu” icon. Now, scroll down to access the playlist you want to reverse, click the “Share” icon, and click “Copy” to save the URL to your clipboard.
Step 2: In the next step, open a new tab and visit the “Playlist.Tools” website. Now, paste the copied playlist URL in the provided text box, and the platform will start retrieving it.

Step 3: Finally, click the “Sort” icon and select descending order to reverse your playlist. You can always return to the original sequence by clicking the “Original Sequence” option in the top right corner of the screen.
Changing the Ordering in Settings
If you are a content creator on YouTube and want to reverse the videos’ order in a playlist on your channel, do the following steps in sequence:
Step 1: In the first step, launch the YouTube app on your device or visit the YouTube website on a browser. Go to “Library” and open the playlist of your choice.
Step 2: Hover over the video, and you will see two horizontal lines next to it. Click/tap & hold the video and drag it to a new location to change its order.
You can also utilize the “Sort” option to reverse the playlist. To do so, click “Sort” at the top of the playlist above the videos and select “Date Published (Oldest)” to change the order.

A Bonus Tip for YouTube Creator: Make Your Own YouTube Channel Trailer
As a YouTube content creator, you need to set your videos’ order in your Playlist. Besides, the video’s trailer also influences your audiences’ browsing and watching experience. To help you with this part in case you are in need, we have prepared a video tutorial for you - How To Make Your Own YouTube Channel Trailer. If you have any interests, please don’t miss it, and see how to make a fantastic video trailer with a user-friendly video editor Wondershare Filmora :
Adding Playlist to Your Private Playlist
If you want to reverse a YouTube playlist order, you can create a new private playlist. This quick and easy method will help you get the desired results.
For this method to work, you don’t need to download any third-party app or use a website; all you have to do is open YouTube on any browser or use the YouTube app in the following way:
Step 1: In the first step, launch the YouTube app on your device or visit the YouTube website (if you are logged out, sign into your account using your credentials).
Step 2: In the next step, click your Profile at the top right of the screen and select the “Your Channel” option from the drop-down menu to access your YouTube channel.
Step 3: Scroll down on your channel’s dashboard, select a video, and click the three dots next to it. Next, click “Add to Playlist” from the drop-down list and select the “Create a New Playlist” option to make a new one.

Next, provide a name, set the privacy settings to “Private,” and click “Create.”
Step 4: In the final step, head to the Playlist tab, click “View Full Playlist” to open the new playlist, and click the “three dots” in the details area on the left. Next, select “Playlist Settings” and toggle the button next to “Add new videos to top of playlist” to enable it.
You can now add more videos to your playlist, and each one will be added to the top. This method helps you arrange the YouTube playlist as you desire.
The Bottom Line
In this article, we’ve provided four different step-by-step solutions to show you how to reverse a YouTube playlist on your PC and mobile device using Chrome extension, a third-party website, changing settings, and adding videos to a new private playlist.
Hopefully, you’ve found this article helpful and can now watch your favorite playlist in the order you like without any issues.
If you have ever created a playlist on YouTube, you may have noticed that the order of the videos is automatically set and based on when they were added to the list. However, it would help if you played them in reverse order.
Surprisingly, there is no built-in way to do this on YouTube. However, four simple workarounds only take a few minutes to complete.
So, keep reading to learn how to reverse a YouTube playlist so you can watch the videos in the order you want!
How to Reverse a YouTube Playlist?
Below we’ve provided four different solutions to help you reverse your YouTube playlist on your computer:
Using Chrome Web Extension
One of the most straightforward and convenient methods of reversing the YouTube playlist is to install a Chrome browser extension that will let you play any playlist in the opposite order.
The “Iridium for YouTube” and “Improve YouTube” extensions on your Google Chrome can play any YouTube video queue or playlist in reverse.
Here’s how to install the “Iridium for YouTube” extension on your Chrome browser to reverse the playlist:
Step 1: In the first step, launch a browser on your computer and click the three dots (ellipsis icon) in the top-right corner of the screen. Scroll down, select “More Tools,” and click Extensions.”
Step 2:
- Now, click the three horizontal-line”Menu”icon.
- Click the”Open Chrome Web Store”option.
- Search for theIridium for YouTubeextension using the search bar.
Step 3:
- Open the extension page.
- Click”Add to Chrome.”
- Click the”Add Extension”option in the pop-up menu.
Step 4:Open a new page, visit YouTube , and a pop-up window will appear. Select”Close”to terminate it, and clickthe”Menu”(hamburger) icon in the top left corner of the screen. Next, scroll down and open your savedPlaylistthat you want to reverse.
Step 5: Click the “Play All” option in the details section of the playlist and click the Iridium button on the right side of the screen. This will open a new tab with different settings for your playlist. Go to the Video tab, and under the “Playlist” header, toggle the button next to “Enable reverse playlist control” to change the settings.
That’s about it. You will now be able to watch a YouTube playlist in reverse order.
Using The Third Website
Several trusted and reliable third-party websites, such as “Playlist. tools,” can help you reverse your YouTube playlists quickly. The platform is free and fully dedicated to instantly changing the order of your Playlist.
Here’s how you can use the Playlist.tools to reverse your videos’ order in a playlist on YouTube:
Step 1: Launch a browser on your laptop or desktop, head to theYouTube website, and click the three-line “Menu” icon. Now, scroll down to access the playlist you want to reverse, click the “Share” icon, and click “Copy” to save the URL to your clipboard.
Step 2: In the next step, open a new tab and visit the “Playlist.Tools” website. Now, paste the copied playlist URL in the provided text box, and the platform will start retrieving it.
Step 3: Finally, click the “Sort” icon and select descending order to reverse your playlist. You can always return to the original sequence by clicking the “Original Sequence” option in the top right corner of the screen.
Changing the Ordering in Settings
If you are a content creator on YouTube and want to reverse the videos’ order in a playlist on your channel, do the following steps in sequence:
Step 1: In the first step, launch the YouTube app on your device or visit the YouTube website on a browser. Go to “Library” and open the playlist of your choice.
Step 2: Hover over the video, and you will see two horizontal lines next to it. Click/tap & hold the video and drag it to a new location to change its order.
You can also utilize the “Sort” option to reverse the playlist. To do so, click “Sort” at the top of the playlist above the videos and select “Date Published (Oldest)” to change the order.
A Bonus Tip for YouTube Creator: Make Your Own YouTube Channel Trailer
As a YouTube content creator, you need to set your videos’ order in your Playlist. Besides, the video’s trailer also influences your audiences’ browsing and watching experience. To help you with this part in case you are in need, we have prepared a video tutorial for you - How To Make Your Own YouTube Channel Trailer. If you have any interests, please don’t miss it, and see how to make a fantastic video trailer with a user-friendly video editor Wondershare Filmora :
Adding Playlist to Your Private Playlist
If you want to reverse a YouTube playlist order, you can create a new private playlist. This quick and easy method will help you get the desired results.
For this method to work, you don’t need to download any third-party app or use a website; all you have to do is open YouTube on any browser or use the YouTube app in the following way:
Step 1: In the first step, launch the YouTube app on your device or visit the YouTube website (if you are logged out, sign into your account using your credentials).
Step 2: In the next step, click your Profile at the top right of the screen and select the “Your Channel” option from the drop-down menu to access your YouTube channel.
Step 3: Scroll down on your channel’s dashboard, select a video, and click the three dots next to it. Next, click “Add to Playlist” from the drop-down list and select the “Create a New Playlist” option to make a new one.
Next, provide a name, set the privacy settings to “Private,” and click “Create.”
Step 4: In the final step, head to the Playlist tab, click “View Full Playlist” to open the new playlist, and click the “three dots” in the details area on the left. Next, select “Playlist Settings” and toggle the button next to “Add new videos to top of playlist” to enable it.
You can now add more videos to your playlist, and each one will be added to the top. This method helps you arrange the YouTube playlist as you desire.
The Bottom Line
In this article, we’ve provided four different step-by-step solutions to show you how to reverse a YouTube playlist on your PC and mobile device using Chrome extension, a third-party website, changing settings, and adding videos to a new private playlist.
Hopefully, you’ve found this article helpful and can now watch your favorite playlist in the order you like without any issues.
Also read:
- [New] In 2024, Crafting Engaging YouTube Beginnings Two Methods
- [New] Increasing YouTube Shorts Views Effective Tactics
- [Updated] Crafting Squares for Viral Videos in a Social Media World
- 2024 Approved Satire Spectacle YouTube's Top Comedic Talent List
- 2024 Approved Step-by-Step Applying Color Grading and Keying
- 2024 Approved Understanding the Fundamental Contrasts in Video Streaming
- End the Frustration - No More Crashing in Sea of Thieves! Learn How Today
- Enhance Video Production - 7 Best Free Sounds for Editors
- In 2024, How To Check if Your Motorola Moto G14 Is Unlocked
- In 2024, How to Make a Creative Split-Screen Video for YouTube?
- In 2024, Stock Photos Without Watermarks – A Guide
- In 2024, Turning Views Into Revenue Mastering YouTube's Financial Landscape
- Method: Rectifying Disks Not Available on Windows PCs
- Periscope Streaming Made Simple
- Revolutionize Your RPG Sessions: Creating D&D Characters with AI Tools
- Title: In 2024, The Key to Enhanced Viewership Designing Impactful YouTube Thumbnails
- Author: Thomas
- Created at : 2024-10-05 19:16:22
- Updated at : 2024-10-07 04:08:40
- Link: https://youtube-help.techidaily.com/in-2024-the-key-to-enhanced-viewership-designing-impactful-youtube-thumbnails/
- License: This work is licensed under CC BY-NC-SA 4.0.