
In 2024, Thumbnail Design 101 for Video Promotion on YouTube
Thumbnail Design 101 for Video Promotion on YouTube
How to Make YouTube Banners and Thumbnails

Richard Bennett
Mar 27, 2024• Proven solutions
The art on your YouTube channel – banners, thumbnails, icons, and watermarks – will help to determine how viewers feel about your vlog. If your art does not look like it all goes together then people will get a sloppy, amateurish, impression of your channel. However, if your different pieces of channel art all seem to complement each other and match the tone and theme of your channel then it will help viewers to have a pleasant browsing experience. They will get the impression that you take your YouTube channel seriously and that they can trust you as a source of information, comedy, or general entertainment.
How to Make YouTube Banners and Thumbnails
YouTube Banners and Thumbnails are two of the most important pieces of channel art you will need. This article will explain the best practices for both, and suggest sites where you will be able to build your own banners and thumbnails for free.
1. YouTube Banners
Quick Tips:
- The image you upload for your YouTube banner should be 2560 x 1440px (pixels).
- The ‘safe area’ for text, logos, and other important visual information (like faces) is 1546 x 423px.
Your banner is probably the first thing that comes to mind when you think about channel art. Banners are the headers that rest at the tops of channel pages on YouTube. Your banner should be 2560 x 1440 px, although not all of it will always be visible. On a desktop computer or mobile device only a 1546 x 423 px ‘safe area’ will be visible. When viewed on a TV screen your entire image will be visible. YouTube does support PNG, but if your PNG file does not upload properly (as has been the case for some YouTubers) then changing your file type to JPEG might help.
YouTube Banners are extremely important to the success of your channel. If you do not have a banner then it looks like you do not really care about your vlog. If you have a basic banner that is not at all personalized then it certainly looks like you care, but it might also look like you are new to YouTube.
The best banners are customized to reflect the kind of experience you want viewers to have on your channel. The banner of a comedic YouTube channel might use bright colors, where the banner for a gaming channel will probably use darker colors similar to the ones that are in the games the vlogger plays. Connecting your banner to the theme of your channel is part of how you define the style of your vlog. It is the difference between being a Beauty Guru and a general YouTuber who gives makeup tips sometimes.
Including a photo of yourself, or your logo if you have one, is a great way to personalize your banner.
2. YouTube Thumbnails
Quick Tips:
- Search for your video’s topic to see the thumbnails your thumbnail will be competing against.
- Make any text huge so people can read it on their smartphone screens.
- Emojis, colored boarders, and graphics are all potential ways to stand out.
Thumbnails are often ignored by newer YouTubers. YouTube selects a thumbnail for every one of your videos and it is always a still image from that video. You can choose which frame you want to use and a lot of people feel like that is good enough. When you create a custom thumbnail, however, you get to not only choose your image but insert a title.
If you are choosing the images you are using for thumbnails you can make sure they are always similar frames. This will help people identify your videos quickly in searches. Using titles in your thumbnails will also help searchers identify your videos, if you always use the same title style. Another benefit of titles is that they capture the attention of people looking for your specific topic. Remember when building your thumbnails that they will appear smaller on YouTube than they probably are while you edit them. On mobile devices, they will look even smaller. So, if you are going to use text in your thumbnail, make sure it is huge.
One thumbnail taboo that you should never break is using an image that has nothing to do with your video. Using an image of a cute cat for a vlog post that has nothing to do with cats is misleading and will anger viewers. You may draw in a lot of viewers who want to see a cat video, but they will leave right away when they do not see a cat and they will never watch anything by you again.
3.Where To Create Banners and Thumbnails
There are sites online that will allow you to edit images and use them in templates for YouTube banners. You can also use these services to edit your thumbnails. Two of the most popular, free, online photo editors are PicMonkey.com and Canva.com.

Canva has templates you can use to create YouTube banners, as well as a variety of stock images you can use in combination with your own when creating channel art. It is free to edit images on Canva, but they do have some premium features which cost $1 each to access. This service has both a desktop version and an iPad app.

PicMonkey lets you import images from your computer or social media accounts, edit them, and use them in templates for YouTube banners or other kinds of social media graphics. PicMonkey is free to use, but you can only access their more advanced editing tools if you buy a paid subscription. Monthly subscriptions are $4.99 per month, and yearly subscriptions are $2.75 per month.
Richard Bennett
Richard Bennett is a writer and a lover of all things video.
Follow @Richard Bennett
Richard Bennett
Mar 27, 2024• Proven solutions
The art on your YouTube channel – banners, thumbnails, icons, and watermarks – will help to determine how viewers feel about your vlog. If your art does not look like it all goes together then people will get a sloppy, amateurish, impression of your channel. However, if your different pieces of channel art all seem to complement each other and match the tone and theme of your channel then it will help viewers to have a pleasant browsing experience. They will get the impression that you take your YouTube channel seriously and that they can trust you as a source of information, comedy, or general entertainment.
How to Make YouTube Banners and Thumbnails
YouTube Banners and Thumbnails are two of the most important pieces of channel art you will need. This article will explain the best practices for both, and suggest sites where you will be able to build your own banners and thumbnails for free.
1. YouTube Banners
Quick Tips:
- The image you upload for your YouTube banner should be 2560 x 1440px (pixels).
- The ‘safe area’ for text, logos, and other important visual information (like faces) is 1546 x 423px.
Your banner is probably the first thing that comes to mind when you think about channel art. Banners are the headers that rest at the tops of channel pages on YouTube. Your banner should be 2560 x 1440 px, although not all of it will always be visible. On a desktop computer or mobile device only a 1546 x 423 px ‘safe area’ will be visible. When viewed on a TV screen your entire image will be visible. YouTube does support PNG, but if your PNG file does not upload properly (as has been the case for some YouTubers) then changing your file type to JPEG might help.
YouTube Banners are extremely important to the success of your channel. If you do not have a banner then it looks like you do not really care about your vlog. If you have a basic banner that is not at all personalized then it certainly looks like you care, but it might also look like you are new to YouTube.
The best banners are customized to reflect the kind of experience you want viewers to have on your channel. The banner of a comedic YouTube channel might use bright colors, where the banner for a gaming channel will probably use darker colors similar to the ones that are in the games the vlogger plays. Connecting your banner to the theme of your channel is part of how you define the style of your vlog. It is the difference between being a Beauty Guru and a general YouTuber who gives makeup tips sometimes.
Including a photo of yourself, or your logo if you have one, is a great way to personalize your banner.
2. YouTube Thumbnails
Quick Tips:
- Search for your video’s topic to see the thumbnails your thumbnail will be competing against.
- Make any text huge so people can read it on their smartphone screens.
- Emojis, colored boarders, and graphics are all potential ways to stand out.
Thumbnails are often ignored by newer YouTubers. YouTube selects a thumbnail for every one of your videos and it is always a still image from that video. You can choose which frame you want to use and a lot of people feel like that is good enough. When you create a custom thumbnail, however, you get to not only choose your image but insert a title.
If you are choosing the images you are using for thumbnails you can make sure they are always similar frames. This will help people identify your videos quickly in searches. Using titles in your thumbnails will also help searchers identify your videos, if you always use the same title style. Another benefit of titles is that they capture the attention of people looking for your specific topic. Remember when building your thumbnails that they will appear smaller on YouTube than they probably are while you edit them. On mobile devices, they will look even smaller. So, if you are going to use text in your thumbnail, make sure it is huge.
One thumbnail taboo that you should never break is using an image that has nothing to do with your video. Using an image of a cute cat for a vlog post that has nothing to do with cats is misleading and will anger viewers. You may draw in a lot of viewers who want to see a cat video, but they will leave right away when they do not see a cat and they will never watch anything by you again.
3.Where To Create Banners and Thumbnails
There are sites online that will allow you to edit images and use them in templates for YouTube banners. You can also use these services to edit your thumbnails. Two of the most popular, free, online photo editors are PicMonkey.com and Canva.com.
Canva has templates you can use to create YouTube banners, as well as a variety of stock images you can use in combination with your own when creating channel art. It is free to edit images on Canva, but they do have some premium features which cost $1 each to access. This service has both a desktop version and an iPad app.
PicMonkey lets you import images from your computer or social media accounts, edit them, and use them in templates for YouTube banners or other kinds of social media graphics. PicMonkey is free to use, but you can only access their more advanced editing tools if you buy a paid subscription. Monthly subscriptions are $4.99 per month, and yearly subscriptions are $2.75 per month.

Richard Bennett
Richard Bennett is a writer and a lover of all things video.
Follow @Richard Bennett
Richard Bennett
Mar 27, 2024• Proven solutions
The art on your YouTube channel – banners, thumbnails, icons, and watermarks – will help to determine how viewers feel about your vlog. If your art does not look like it all goes together then people will get a sloppy, amateurish, impression of your channel. However, if your different pieces of channel art all seem to complement each other and match the tone and theme of your channel then it will help viewers to have a pleasant browsing experience. They will get the impression that you take your YouTube channel seriously and that they can trust you as a source of information, comedy, or general entertainment.
How to Make YouTube Banners and Thumbnails
YouTube Banners and Thumbnails are two of the most important pieces of channel art you will need. This article will explain the best practices for both, and suggest sites where you will be able to build your own banners and thumbnails for free.
1. YouTube Banners
Quick Tips:
- The image you upload for your YouTube banner should be 2560 x 1440px (pixels).
- The ‘safe area’ for text, logos, and other important visual information (like faces) is 1546 x 423px.
Your banner is probably the first thing that comes to mind when you think about channel art. Banners are the headers that rest at the tops of channel pages on YouTube. Your banner should be 2560 x 1440 px, although not all of it will always be visible. On a desktop computer or mobile device only a 1546 x 423 px ‘safe area’ will be visible. When viewed on a TV screen your entire image will be visible. YouTube does support PNG, but if your PNG file does not upload properly (as has been the case for some YouTubers) then changing your file type to JPEG might help.
YouTube Banners are extremely important to the success of your channel. If you do not have a banner then it looks like you do not really care about your vlog. If you have a basic banner that is not at all personalized then it certainly looks like you care, but it might also look like you are new to YouTube.
The best banners are customized to reflect the kind of experience you want viewers to have on your channel. The banner of a comedic YouTube channel might use bright colors, where the banner for a gaming channel will probably use darker colors similar to the ones that are in the games the vlogger plays. Connecting your banner to the theme of your channel is part of how you define the style of your vlog. It is the difference between being a Beauty Guru and a general YouTuber who gives makeup tips sometimes.
Including a photo of yourself, or your logo if you have one, is a great way to personalize your banner.
2. YouTube Thumbnails
Quick Tips:
- Search for your video’s topic to see the thumbnails your thumbnail will be competing against.
- Make any text huge so people can read it on their smartphone screens.
- Emojis, colored boarders, and graphics are all potential ways to stand out.
Thumbnails are often ignored by newer YouTubers. YouTube selects a thumbnail for every one of your videos and it is always a still image from that video. You can choose which frame you want to use and a lot of people feel like that is good enough. When you create a custom thumbnail, however, you get to not only choose your image but insert a title.
If you are choosing the images you are using for thumbnails you can make sure they are always similar frames. This will help people identify your videos quickly in searches. Using titles in your thumbnails will also help searchers identify your videos, if you always use the same title style. Another benefit of titles is that they capture the attention of people looking for your specific topic. Remember when building your thumbnails that they will appear smaller on YouTube than they probably are while you edit them. On mobile devices, they will look even smaller. So, if you are going to use text in your thumbnail, make sure it is huge.
One thumbnail taboo that you should never break is using an image that has nothing to do with your video. Using an image of a cute cat for a vlog post that has nothing to do with cats is misleading and will anger viewers. You may draw in a lot of viewers who want to see a cat video, but they will leave right away when they do not see a cat and they will never watch anything by you again.
3.Where To Create Banners and Thumbnails
There are sites online that will allow you to edit images and use them in templates for YouTube banners. You can also use these services to edit your thumbnails. Two of the most popular, free, online photo editors are PicMonkey.com and Canva.com.
Canva has templates you can use to create YouTube banners, as well as a variety of stock images you can use in combination with your own when creating channel art. It is free to edit images on Canva, but they do have some premium features which cost $1 each to access. This service has both a desktop version and an iPad app.
PicMonkey lets you import images from your computer or social media accounts, edit them, and use them in templates for YouTube banners or other kinds of social media graphics. PicMonkey is free to use, but you can only access their more advanced editing tools if you buy a paid subscription. Monthly subscriptions are $4.99 per month, and yearly subscriptions are $2.75 per month.
Richard Bennett
Richard Bennett is a writer and a lover of all things video.
Follow @Richard Bennett
Unlocking YouTube Potential: Expert Tips for WireCast Streaming
How to live stream to youtube with wirecast?
Richard Bennett
Mar 27, 2024• Proven solutions
Are you trying to use wirecast to stream to youtube? You are in the right place, here is our step by step guide to go live on youtube with wirecast.
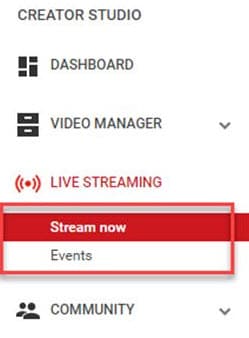
Step 1: First of all you need to login to your YouTube Creator Studio and then select Live Streaming option from available options on your screen.
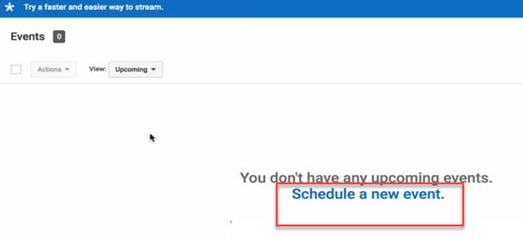
Step 2: Once you enter into the live streaming option then your application will ask you to schedule a new event; follow this option.
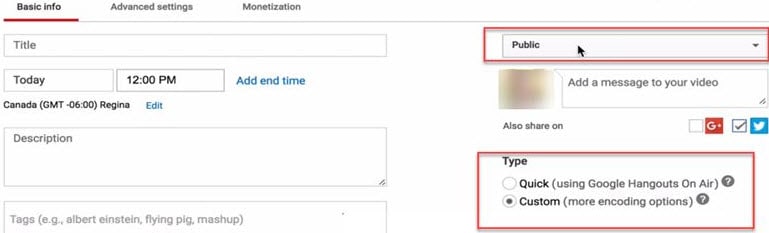
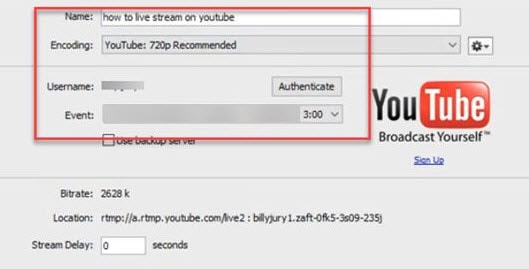
Step 3: Now you need to enter few basic details about your video that you are going to live stream. Do not forget to choose custom option under the Type category available on bottom right side of screen.
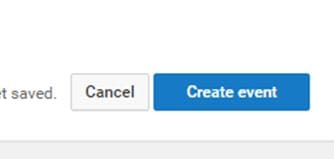
Step 4: It is time to hit the create event option.
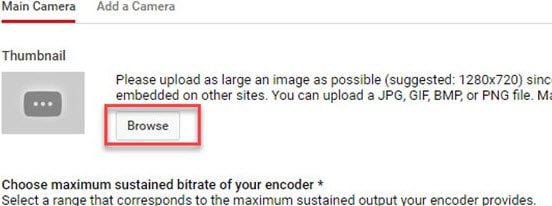
Step 5: Your system will now take you to the camera settings; here you need to enter your thumbnail. It can be done directly by using browse option.
Step 6: Now you need to select ‘basic ingestion’ option and secondly select ‘other encoders’ option from second set of information.

Step 7: Once you have completed above settings then you need to save all the changes and then move to the live control room on your screen.
Step 8: Open the wirecast software tool on your device and then simply move to the output settings. Hit the authenticate option, it will soon ask you to enter the YouTube login detail.
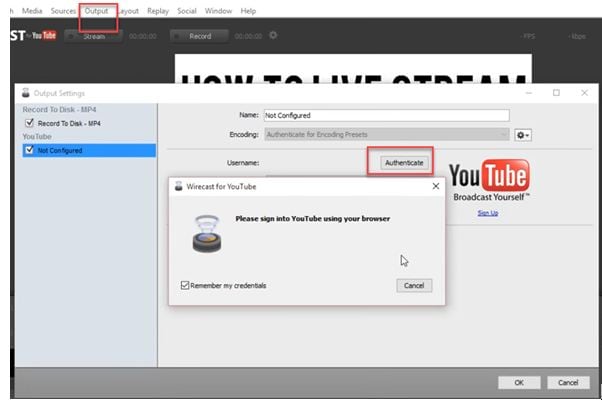
Step 9: As soon as you sign in with your account using browser, then your settings will be ready on screen. Simply hit Ok.
Step 10: It is time to make your video source or content ready for streaming. You need to hit on the stream button that is available on top portion of screen.

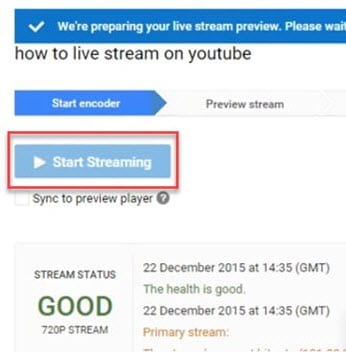
Step 11: Now simply move to the YouTube event page and start streaming your content.
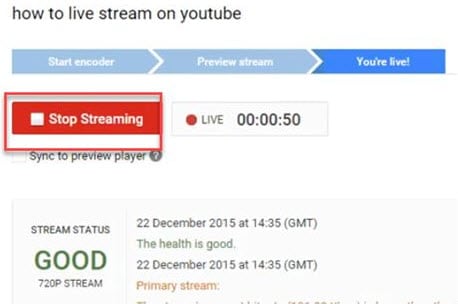
Step 12: Once you content for streaming is finished then click the stop streaming button that appears in red color on screen. You will also get information about duration of your video that is going live.
Step 13: When your streaming process ends then video will be saved to video manager. You can view it easily at later stage.
Richard Bennett
Richard Bennett is a writer and a lover of all things video.
Follow @Richard Bennett
Richard Bennett
Mar 27, 2024• Proven solutions
Are you trying to use wirecast to stream to youtube? You are in the right place, here is our step by step guide to go live on youtube with wirecast.
Step 1: First of all you need to login to your YouTube Creator Studio and then select Live Streaming option from available options on your screen.
Step 2: Once you enter into the live streaming option then your application will ask you to schedule a new event; follow this option.
Step 3: Now you need to enter few basic details about your video that you are going to live stream. Do not forget to choose custom option under the Type category available on bottom right side of screen.
Step 4: It is time to hit the create event option.
Step 5: Your system will now take you to the camera settings; here you need to enter your thumbnail. It can be done directly by using browse option.
Step 6: Now you need to select ‘basic ingestion’ option and secondly select ‘other encoders’ option from second set of information.
Step 7: Once you have completed above settings then you need to save all the changes and then move to the live control room on your screen.
Step 8: Open the wirecast software tool on your device and then simply move to the output settings. Hit the authenticate option, it will soon ask you to enter the YouTube login detail.
Step 9: As soon as you sign in with your account using browser, then your settings will be ready on screen. Simply hit Ok.
Step 10: It is time to make your video source or content ready for streaming. You need to hit on the stream button that is available on top portion of screen.
Step 11: Now simply move to the YouTube event page and start streaming your content.
Step 12: Once you content for streaming is finished then click the stop streaming button that appears in red color on screen. You will also get information about duration of your video that is going live.
Step 13: When your streaming process ends then video will be saved to video manager. You can view it easily at later stage.
Richard Bennett
Richard Bennett is a writer and a lover of all things video.
Follow @Richard Bennett
Also read:
- [Updated] 2024 Approved Clear Shots for YouTube Filmmakers
- [Updated] In 2024, Finding Prominent Comment Spotlights
- 2024 Approved Navigating Through Paid Product Evaluations Online
- 2024 Approved Secure Methods for Youtube-to-MP4 Conversion
- 2024 Approved Speedy Surfing Tips for YouTube's Playback Speed Control
- How to Fix and Avoid the Notorious Google Chrome Crash Scam
- In 2024, Master Your MP3 Ultimate Guide to YouTube Converters
- In 2024, Maximizing Your YouTube Click-Through Rate Upload Schedule Insights
- In 2024, Redefine Creativity The Ultimate Selection of Best Android Drawing Apps
- In 2024, Synchronizing Sequential Images for Impactful Storytelling
- Perfect Your Content Discover These Top 8 Mobile Editors
- Title: In 2024, Thumbnail Design 101 for Video Promotion on YouTube
- Author: Thomas
- Created at : 2024-10-09 21:02:39
- Updated at : 2024-10-12 18:06:50
- Link: https://youtube-help.techidaily.com/in-2024-thumbnail-design-101-for-video-promotion-on-youtube/
- License: This work is licensed under CC BY-NC-SA 4.0.