
:max_bytes(150000):strip_icc()/GettyImages-902220788-0b8a7714bcb44ac7b32884102030d4a1.jpg)
"In 2024, Top 12 Vlogger-Friendly Cameras Unveiled"
Top 12 Vlogger-Friendly Cameras Unveiled
Best Cameras for Vlogging

Liza Brown
Jan 10, 2024• Proven solutions
It can be challenging to make a decision on purchasing a camera when there’s just so many on the market. Camera manufacturers are racing to update their product line with all the new camera technology advancements. To simplify your search for the ultimate vlogging camera, we’ve come up with a top twelve list.
If you’re looking for a specific type of vlogging camera, check out our other posts on vlogging cameras:
Top 11 Cheap Vlogging Cameras (2024)
7 Best DSLR Cameras For Vlogging (2024)
8 Best Mirrorless Cameras For Vlogging (2024)
12 Best Vlogging Cameras With A Flip Screen (2024)
WHAT TO LOOK FOR IN A VLOGGING CAMERA
1. Fully articulated screen (flip screen)
2. Good continual autofocus while recording video
3. Good focus priority through face recognition
4. Touch to focus
5. Good low-light performance
6. external mic jack, hot/cold shoe bracket
7. optical image stabilization
8. good battery life
Check out my full list of 10 Things To Look For In A Vlogging Camera to understand the importance of these camera features.
12 BEST VLOGGING CAMERAS (2024)
| Camera | Release Date | Camera Type | Flip Screen | Mic Port | Price | |
|---|---|---|---|---|---|---|
| CanonEOSM50 |  |
February2018 | Mirrorless | Fully Articulated | Yes | $- |
| PanasonicLumixDC-GH5S | 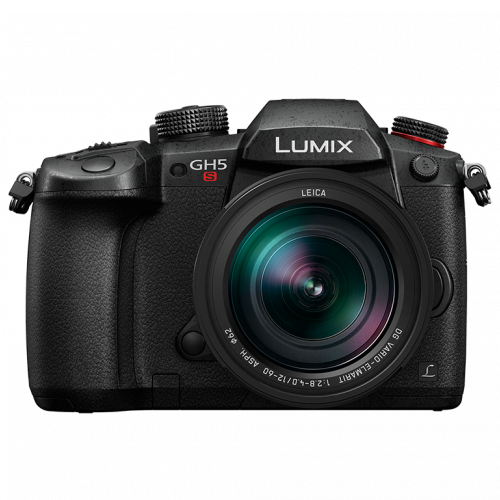 |
January2018 | Mirrorless | Fully Articulated | Yes | $$$ |
| SonyAlphaa7R III |  |
October2017 | Mirrorless | Tilting | Yes | $$$ |
| CanonEOSM100 | 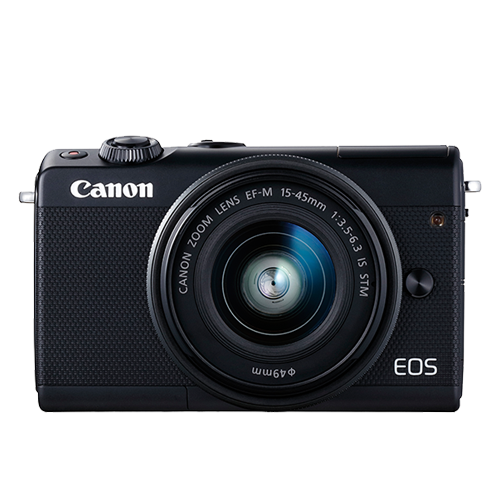 |
August2017 | Mirrorless | Flip Up | No | $ |
| CanonEOS6D Mark II | 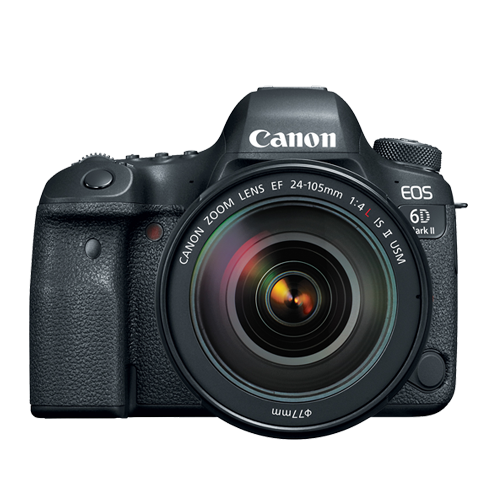 |
June2017 | Mid-size SLR | Fully Articulated | Yes | $$ |
| CanonEOS RebelSL2 | 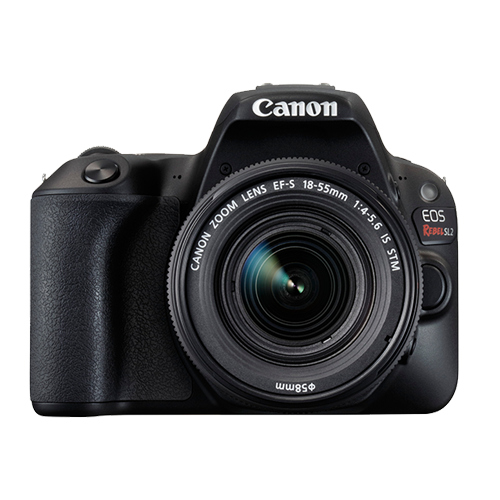 |
June2017 | Compact SLR | Fully Articulated | Yes | $ |
| CanonEOSM6 |  |
February2017 | Mirrorless | Flip Up | Yes | $ |
| SonyCyber-Shot DSCRX 100 V | 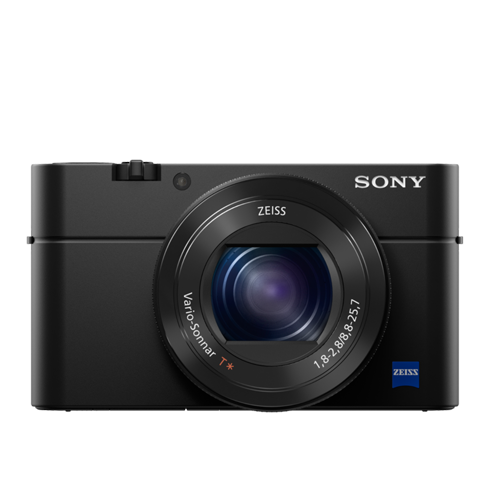 |
October2016 | Compact | Flip Up | No | $- |
| SonyAlphaa6500 |  |
October2016 | Mirrorless | Tilting | Yes | $$- |
| PanasonicLumix DMCLX10 | 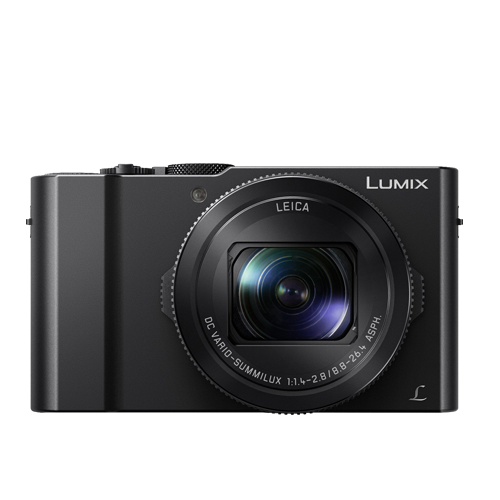 |
September2016 | Compact | Flip Up | No | $ |
| CanonEOS80D | 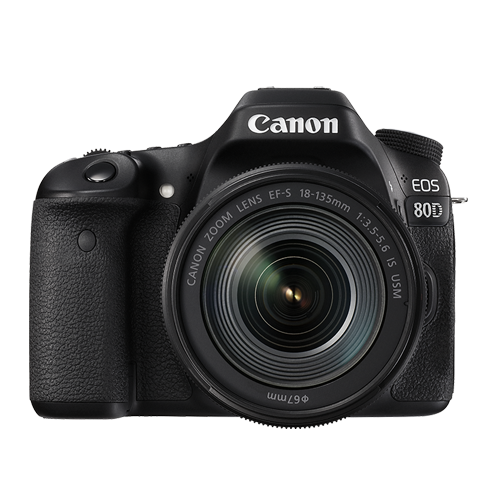 |
February2016 | Mid-size SLR | Fully Articulated | Yes | $$ |
| CanonPowerShotG7 X Mark II | 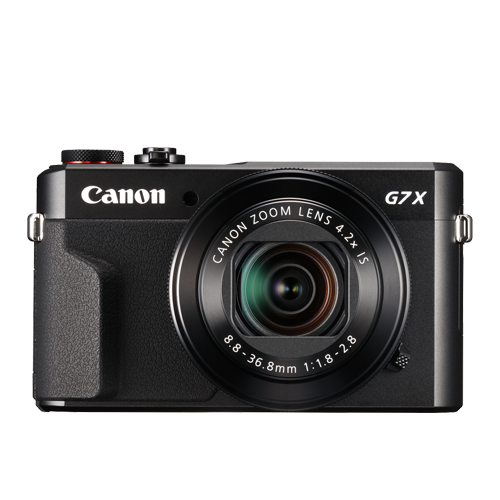 |
February2016 | Compact | Flip Up | No | $ |
At first, you can have a look at the below video.
What Gear Do Creators Actually Use | Vidcon 2023 | Sony vs Canon
|
Best daily vlogging camera: Sony Cyber-Shot DSC-RX 100 V You don’t have to be a filmmaking pro if you want to use a compact camera to record all sorts of videos. Sony’s Cyber-shot series is famous for its cutting-edge features and the DSC-RX 100 V model is not an exception. This camera is equipped with a 20.1 MP Exmor RS BSI CMOS Sensor that supports ISO sensitivities up to ISO 12800. You can record footage in UHD 4K at 30 or 24 fps, although with a five-minute limit, as well as Full HD videos at a maximum of 960 fps when recording in the HFR mode. The Sony Cyber-shot DSC-RX 100 V ships with a non-interchangeable Carl Zeiss Vario Sonnar T lens that performs well under low-light conditions and in broad daylight. The camera features a fast hybrid AF system with 315 phase-detection points and an anti-motion blur mode that allows you to keep the subjects of your vlogs in focus throughout your recording. DSC RX-100 V’s multi-functionality makes it one of the best cameras for daily vlogging, especially for vloggers who are planning on shooting vlogs in various locations. PROS - Light and easy to carry around - Produces high-res videos CONS - Short battery life - Lacking a touchscreen |
|---|---|
|
Best cheap vlogging camera: Canon EOS M100 Canon’s EOS M100 is small and powerful. This mirrorless camera produces full HD videos at 60 fps. It doesn’t, however, shoot 4K footage. The 24.2 MP APS-C CMOS sensor and the DIGIC 7 image processor ensure that your vlogs are always in focus and rich in detail. The Canon EOS M100 provides great ISO sensitivity options, offering ISO values as high as 25600, making it a great option for vloggers that often shoot their videos under difficult light conditions. The 3-inch touchscreen LCD lets you control focus points, navigate through the camera’s menu, or watch videos you’ve created. The screen can also be tilted in the upward direction to provide you a better preview of the shot you’re recording. The camera has a built-in Wi-Fi with NFC so you can transfer your videos seamlessly to a computer and have fun in the process. The Canon EOS M100 is currently one of the best entry-level cameras for daily vlogging on the market because it produces videos in great picture quality that you don’t have to spend a fortune for. PROS - Affordable - Great connectivity options CONS - Lacks advanced video recording features - No viewfinder |
|
Best entry-level mirrorless camera for vlogging: Canon EOS M100 The Canon EOS M100 wins this category as well in our books because it’s a powerful, feature-rich camera that’s also very affordable. In case you missed it, check out my review on the Canon EOS M100. |
|
Best mid-range mirrorless camera for vlogging: Canon EOS M50 The EOS M50 has been on the market for just a few months and it is already regarded as one of the best mirrorless cameras for vlogging. Its 24.1 MP APS-C CMOS sensor and DIGIC 8 Image Processor are improved versions of those in the Canon EOS M100 model. With the Canon EOS M50, you can crank up the ISO sensitivity to 51200. This camera uses the Canon EF lens mount, so you can choose the lens that best suits your needs. The Canon EOS M50 can capture UHD 4K videos at 23.98 fps, and it also lets you record 120 fps slow-motion videos at 720p. PROS - Has an external microphone port - Has a 2.36m-dot OLED electronic viewfinder CONS - No image stabilization - Battery life could be longer |
|
Best professional mirrorless camera for vlogging: Panasonic Lumix DC-GH5S The Panasonic’s GH series was made famous by the LUMIX DMC-GH4 model that will be remembered as the world’s first mirrorless interchangeable lens camera to offer the 4K video recording option. That’s why it comes as no surprise that the GH5S mirrorless micro four-thirds camera can record UHD 4K as well as DCI videos at 60 fps, and 150 Mbps. The full HD 1080p at 240 fps video recording option is also available if you want to capture slow-motion footage for your vlogs. The camera’s 10.28MP multi-aspect ratio MOS sensor enhances its low-light performance and produces high-quality videos even under very challenging lighting conditions. Recording the audio with an external microphone is one of the many advantages offered by the Lumix DC-GH5S, while the Advanced Depth-From-Focus technology is used to automatically focus the video in a fraction of a second. The GH5S’ touchscreen can be rotated in any direction, so you can clearly see your shot no matter where you are. There’s very little doubt that the GH5S is the best professional-level mirrorless camera for vlogging that will help you capture stunning vlogs. PROS - ISO sensitivity goes up to 204800 - High video bit rates CONS - Expensive - The camera body weighs about 1.5 lbs |
|
Best entry-level DSLR camera for vlogging: Canon EOS SL2 The Canon EOS Rebel SL2 is a great entry-level vlogging camera that delivers great power at a low price. The Canon EOS Rebel SL2 has a DIGIC 7 image processor and a 24.2 MP APS-C CMOS sensor that lets you extend the ISO value to 51200 and shoot your vlogs even under low light conditions. This camera can capture full HD 1080p videos at 60 fps, and it features a 9-point AF system and dual pixel CMOS AF technologies that provide precise and quick focusing even when there is not much light. The SL2 also has a microphone jack you can connect an external microphone too for better audio. PROS - Microphone jack - Wi-Fi connectivity CONS - No 4K video support - Optical image stabilizer could be better |
|
Best mid-range DSLR camera for vlogging: Canon EOS 80D The Canon EOS 80D is a feature-rich, mid-range DSLR camera great for vlogging. The 80D lets you capture full HD 1080p videos at 60 fps. It doesn’t provide support for 4K videos, though. The ISO on this camera can be set up to 25600. The 24.2 MP APS-C CMOS sensor and the DIGIC 6 image processor reduce the need for high ISO values, though, as they enable the camera to capture visually stunning footage even when the light in the shot is far from perfect. The 80D’s 45-point all cross phase detection autofocus system and its dual pixel CMOS AF system enable you to produce sharp images without having to pull-focus yourself. The various-angle 3-inch 1.04M-dot ClearView II LCD touchscreen display, as well as the pentaprism type intelligent viewfinder, let you compose shots effortlessly. PROS - Feature-rich - Continuous AF feature performs beautifully while recording high-res videos CONS - Just one SD card slot - PC sync connection features could be better |
|
Best professional DSLR camera for vlogging: Canon 6D Mark II The Canon EOS 6D Mark II is the best professional DSLR camera for vlogging. It is the only DSLR camera on the market (as of writing this review) that comes with a full-frame sensor along with a fully-articulated screen and a microphone jack. The camera’s 26.2 MP full-frame CMOS sensor can take in much more light, giving you the option to shoot with higher quality bokeh (unfocused areas appearing more blurry) and find focus much more quickly and accurately in more challenging lighting conditions. With this camera, you can shoot up to full HD 1080p videos at a maximum of 60 fps. Although the 6D Mark II comes with the same 45-point all cross-type autofocusing system as Canon’s crop sensor 80D camera, the 6D Mark II is equipped with the improved DIGIC 7 image processor unlike the 80D’s DIGIC 6 image processor. If you’re wanting to shoot your vlogs with a full-frame, The 6D Mark II is a great option. PROS - ISO sensitivity goes up to 102400 - Amazing touchscreen controls CONS - No 4K video recording option - No USB 3.0 |
Liza Brown
Liza Brown is a writer and a lover of all things video.
Follow @Liza Brown
Liza Brown
Jan 10, 2024• Proven solutions
It can be challenging to make a decision on purchasing a camera when there’s just so many on the market. Camera manufacturers are racing to update their product line with all the new camera technology advancements. To simplify your search for the ultimate vlogging camera, we’ve come up with a top twelve list.
If you’re looking for a specific type of vlogging camera, check out our other posts on vlogging cameras:
Top 11 Cheap Vlogging Cameras (2024)
7 Best DSLR Cameras For Vlogging (2024)
8 Best Mirrorless Cameras For Vlogging (2024)
12 Best Vlogging Cameras With A Flip Screen (2024)
WHAT TO LOOK FOR IN A VLOGGING CAMERA
1. Fully articulated screen (flip screen)
2. Good continual autofocus while recording video
3. Good focus priority through face recognition
4. Touch to focus
5. Good low-light performance
6. external mic jack, hot/cold shoe bracket
7. optical image stabilization
8. good battery life
Check out my full list of 10 Things To Look For In A Vlogging Camera to understand the importance of these camera features.
12 BEST VLOGGING CAMERAS (2024)
| Camera | Release Date | Camera Type | Flip Screen | Mic Port | Price | |
|---|---|---|---|---|---|---|
| CanonEOSM50 | |
February2018 | Mirrorless | Fully Articulated | Yes | $- |
| PanasonicLumixDC-GH5S | |
January2018 | Mirrorless | Fully Articulated | Yes | $$$ |
| SonyAlphaa7R III | |
October2017 | Mirrorless | Tilting | Yes | $$$ |
| CanonEOSM100 | |
August2017 | Mirrorless | Flip Up | No | $ |
| CanonEOS6D Mark II | |
June2017 | Mid-size SLR | Fully Articulated | Yes | $$ |
| CanonEOS RebelSL2 | |
June2017 | Compact SLR | Fully Articulated | Yes | $ |
| CanonEOSM6 | |
February2017 | Mirrorless | Flip Up | Yes | $ |
| SonyCyber-Shot DSCRX 100 V | |
October2016 | Compact | Flip Up | No | $- |
| SonyAlphaa6500 | |
October2016 | Mirrorless | Tilting | Yes | $$- |
| PanasonicLumix DMCLX10 | |
September2016 | Compact | Flip Up | No | $ |
| CanonEOS80D | |
February2016 | Mid-size SLR | Fully Articulated | Yes | $$ |
| CanonPowerShotG7 X Mark II | |
February2016 | Compact | Flip Up | No | $ |
At first, you can have a look at the below video.
What Gear Do Creators Actually Use | Vidcon 2023 | Sony vs Canon
|
Best daily vlogging camera: Sony Cyber-Shot DSC-RX 100 V You don’t have to be a filmmaking pro if you want to use a compact camera to record all sorts of videos. Sony’s Cyber-shot series is famous for its cutting-edge features and the DSC-RX 100 V model is not an exception. This camera is equipped with a 20.1 MP Exmor RS BSI CMOS Sensor that supports ISO sensitivities up to ISO 12800. You can record footage in UHD 4K at 30 or 24 fps, although with a five-minute limit, as well as Full HD videos at a maximum of 960 fps when recording in the HFR mode. The Sony Cyber-shot DSC-RX 100 V ships with a non-interchangeable Carl Zeiss Vario Sonnar T lens that performs well under low-light conditions and in broad daylight. The camera features a fast hybrid AF system with 315 phase-detection points and an anti-motion blur mode that allows you to keep the subjects of your vlogs in focus throughout your recording. DSC RX-100 V’s multi-functionality makes it one of the best cameras for daily vlogging, especially for vloggers who are planning on shooting vlogs in various locations. PROS - Light and easy to carry around - Produces high-res videos CONS - Short battery life - Lacking a touchscreen |
|---|---|
|
Best cheap vlogging camera: Canon EOS M100 Canon’s EOS M100 is small and powerful. This mirrorless camera produces full HD videos at 60 fps. It doesn’t, however, shoot 4K footage. The 24.2 MP APS-C CMOS sensor and the DIGIC 7 image processor ensure that your vlogs are always in focus and rich in detail. The Canon EOS M100 provides great ISO sensitivity options, offering ISO values as high as 25600, making it a great option for vloggers that often shoot their videos under difficult light conditions. The 3-inch touchscreen LCD lets you control focus points, navigate through the camera’s menu, or watch videos you’ve created. The screen can also be tilted in the upward direction to provide you a better preview of the shot you’re recording. The camera has a built-in Wi-Fi with NFC so you can transfer your videos seamlessly to a computer and have fun in the process. The Canon EOS M100 is currently one of the best entry-level cameras for daily vlogging on the market because it produces videos in great picture quality that you don’t have to spend a fortune for. PROS - Affordable - Great connectivity options CONS - Lacks advanced video recording features - No viewfinder |
|
Best entry-level mirrorless camera for vlogging: Canon EOS M100 The Canon EOS M100 wins this category as well in our books because it’s a powerful, feature-rich camera that’s also very affordable. In case you missed it, check out my review on the Canon EOS M100. |
|
Best mid-range mirrorless camera for vlogging: Canon EOS M50 The EOS M50 has been on the market for just a few months and it is already regarded as one of the best mirrorless cameras for vlogging. Its 24.1 MP APS-C CMOS sensor and DIGIC 8 Image Processor are improved versions of those in the Canon EOS M100 model. With the Canon EOS M50, you can crank up the ISO sensitivity to 51200. This camera uses the Canon EF lens mount, so you can choose the lens that best suits your needs. The Canon EOS M50 can capture UHD 4K videos at 23.98 fps, and it also lets you record 120 fps slow-motion videos at 720p. PROS - Has an external microphone port - Has a 2.36m-dot OLED electronic viewfinder CONS - No image stabilization - Battery life could be longer |
|
Best professional mirrorless camera for vlogging: Panasonic Lumix DC-GH5S The Panasonic’s GH series was made famous by the LUMIX DMC-GH4 model that will be remembered as the world’s first mirrorless interchangeable lens camera to offer the 4K video recording option. That’s why it comes as no surprise that the GH5S mirrorless micro four-thirds camera can record UHD 4K as well as DCI videos at 60 fps, and 150 Mbps. The full HD 1080p at 240 fps video recording option is also available if you want to capture slow-motion footage for your vlogs. The camera’s 10.28MP multi-aspect ratio MOS sensor enhances its low-light performance and produces high-quality videos even under very challenging lighting conditions. Recording the audio with an external microphone is one of the many advantages offered by the Lumix DC-GH5S, while the Advanced Depth-From-Focus technology is used to automatically focus the video in a fraction of a second. The GH5S’ touchscreen can be rotated in any direction, so you can clearly see your shot no matter where you are. There’s very little doubt that the GH5S is the best professional-level mirrorless camera for vlogging that will help you capture stunning vlogs. PROS - ISO sensitivity goes up to 204800 - High video bit rates CONS - Expensive - The camera body weighs about 1.5 lbs |
|
Best entry-level DSLR camera for vlogging: Canon EOS SL2 The Canon EOS Rebel SL2 is a great entry-level vlogging camera that delivers great power at a low price. The Canon EOS Rebel SL2 has a DIGIC 7 image processor and a 24.2 MP APS-C CMOS sensor that lets you extend the ISO value to 51200 and shoot your vlogs even under low light conditions. This camera can capture full HD 1080p videos at 60 fps, and it features a 9-point AF system and dual pixel CMOS AF technologies that provide precise and quick focusing even when there is not much light. The SL2 also has a microphone jack you can connect an external microphone too for better audio. PROS - Microphone jack - Wi-Fi connectivity CONS - No 4K video support - Optical image stabilizer could be better |
|
Best mid-range DSLR camera for vlogging: Canon EOS 80D The Canon EOS 80D is a feature-rich, mid-range DSLR camera great for vlogging. The 80D lets you capture full HD 1080p videos at 60 fps. It doesn’t provide support for 4K videos, though. The ISO on this camera can be set up to 25600. The 24.2 MP APS-C CMOS sensor and the DIGIC 6 image processor reduce the need for high ISO values, though, as they enable the camera to capture visually stunning footage even when the light in the shot is far from perfect. The 80D’s 45-point all cross phase detection autofocus system and its dual pixel CMOS AF system enable you to produce sharp images without having to pull-focus yourself. The various-angle 3-inch 1.04M-dot ClearView II LCD touchscreen display, as well as the pentaprism type intelligent viewfinder, let you compose shots effortlessly. PROS - Feature-rich - Continuous AF feature performs beautifully while recording high-res videos CONS - Just one SD card slot - PC sync connection features could be better |
|
Best professional DSLR camera for vlogging: Canon 6D Mark II The Canon EOS 6D Mark II is the best professional DSLR camera for vlogging. It is the only DSLR camera on the market (as of writing this review) that comes with a full-frame sensor along with a fully-articulated screen and a microphone jack. The camera’s 26.2 MP full-frame CMOS sensor can take in much more light, giving you the option to shoot with higher quality bokeh (unfocused areas appearing more blurry) and find focus much more quickly and accurately in more challenging lighting conditions. With this camera, you can shoot up to full HD 1080p videos at a maximum of 60 fps. Although the 6D Mark II comes with the same 45-point all cross-type autofocusing system as Canon’s crop sensor 80D camera, the 6D Mark II is equipped with the improved DIGIC 7 image processor unlike the 80D’s DIGIC 6 image processor. If you’re wanting to shoot your vlogs with a full-frame, The 6D Mark II is a great option. PROS - ISO sensitivity goes up to 102400 - Amazing touchscreen controls CONS - No 4K video recording option - No USB 3.0 |
Liza Brown
Liza Brown is a writer and a lover of all things video.
Follow @Liza Brown
Cutting Edge: Advanced Techniques in YouTube Video Editing
How To Edit YouTube Videos

Richard Bennett
Oct 26, 2023• Proven solutions
YouTube videos have a certain look and feel that many viewers have come to expect and enjoy. Much of the aesthetics of YouTube videos developed as a result of the biggest YouTubers having to quickly and efficiently edit videos together on a daily basis. Below is our list of some of the most common video editing techniques used by famous YouTubers.
Part 1: Introduction
1. Start Big
“I’m doing something really exciting… within the first ten seconds of this video. That way you stay here.” – Liza Koshy (How To Be A YouTuber 101!! | Lizzza)
In the same way that a teaser or trailer builds anticipation for a full film, many YouTubers start with a preview of the most high-energy part of their video.
In Jake Paul’s prank vlog (above), Jake shows his brother, Logan, chasing and beating him up as Jake screams for help at the top of his lungs. The already high-energy scene is even more intensified by the epic music playing in the background. This seven-second clip, which resurfaces halfway through the video, is enough to entice many viewers to continue watching. It very effectively leaves enough room for viewers to wonder, “How did Logan’s room actually look in the end?” “What was Logan’s initial reaction before he started chasing Jake?” By creating curiosity gaps like these, you can incentivize your viewers to close these gaps by watching longer.
2. Opening Title Introduction
Just as TV episodes begin with opening credits and theme music, quite similarly, some YouTubers start their YouTube videos with an intro.
Greg from “How To Drink” has an effective twenty-second intro (above). In this video, he shows you who he is and what his videos are generally about. Since these two things don’t change so much for him from video to video, he can start many of his videos off with this same intro.
Below is a video tutorial about how to add text and titles to video in Filmora, hope that helps you in creating your own YouTube video texts and titles.


For more information on intros, check out our post on How to Make a YouTube Intro?
Part 2: Cuts
1. Jump Cut
A jump cut is a simple and straightforward type of video editing cutting technique that “jumps” from one section of a clip to a later section of a clip, cutting out whatever happened in the middle. Some of the middle parts you might want to remove may include mistakes, long silent pauses, and filler words (umm, like, etc.).
Although the use of jump cuts to remove these parts had been discouraged for a long time in the film world, its extensive use by so many YouTubers has established it as its own style that many viewers have come to expect and enjoy. The jumpiness that comes from jump cuts can be effective in keeping your audience’s attention in a shock-inducing manner.
Jump cuts can also be used to show a passage of time in a creative way or make objects magically appear on-screen.
Zack King (above) makes a toy taxi magically appear in his hands using this video editing technique. Filmora allows you to do jump cut easily, you can watch the tutorial below and learn more jump cut tips and tricks .
2. Associative Cut
Not everyone in your audience may recognize the cultural or historical references you make in your videos. It can, therefore, be helpful (and also quite enjoyable) to show the original clip of the reference you are making.
In the same vlog that Jake Paul gets chased down by his brother (above), twenty-eight seconds into the video, Jake expresses his desire to go fast in his car. Right after he says “I want to go fast,” Jake cuts into a scene from the movie Talladega Nights. In that scene, Ricky Bobby, Will Ferrell’s character, also says that he wants to go fast.

Part 3: Transform
1. Zoom
Many YouTubers digitally adjust the zoom of their talking head shots in order to create additional emphasis or suspense. When zoom is used very slowly and smoothly, this technique can be effective in building up suspense and drawing a viewer deeper into the speaker’s message. When a drastic zoom is used suddenly, it can be effective in emphasizing a particular spoken line.
RiceGum is one YouTuber who uses zoom video editing effects extensively in his talking head videos. Want to pan and zoom your video footage too? Check our guide to getting Ken Burns Effect on Videos .
2. Camera Shake
Camera shake is a video effect that makes the original clip appear like it was filmed during a violent earthquake. Many YouTubers use this effect to emphasize their voice when they are talking about something erratic or out of control.
3. Color/Level Adjustment
A lot of comedy YouTubers change the color and levels of their videos in order to emphasize different moods. One common thing YouTubers do when they talk about anything slightly sad is to gradually fade out the colors in their talking head shots. In a cheesy way, the black and white look can emphasize a feeling of emptiness. For his “sad” reactions, PewDiePie often jump cuts into a black and white, slowed down clip of his sad face while playing some sad music in the background. To emphasize a darker message, some YouTubers increase the amount of shadows in their video. In the video below, while his daughter is delivering a darker message from 0:32 to 0:50, La Guardia Cross gradually adds more shadows around his daughter’s face through what appears to be a vignette effect.
Part 4: Transitions
1. Wipe
Many YouTubers transition from one scene into the next using a wipe transition. In a wipe transition, the next clip that you want to transition into slides into the frame horizontally or vertically until it completely covers the first clip. For additional wiping effect, many YouTubers also use a fast, high pitched “woosh” sound effect with this transition.
2. Zoom
The zoom transition is quite similar to the wipe transition, except it uses a zoom effect. Many of the top YouTubers combine this transition with a lower-pitched “woosh” sound effect.
Part 5: Visual Elements
In other genres of film, the only appropriate visual elements filmmakers can tastefully add to their footage seem to be clean looking, seamlessly integrated text and motion graphics. YouTube, on the other hand, is another world with much more room to get outrageous. Many of the top YouTubers add a lot of visual elements (emojis , images, filters, explosions) to their videos to emphasize their jokes, play-on-words, historical or cultural references, and mood.
1. Call-To-Action Visuals
Whether they’re prompting you to subscribe, like, comment, or check out their purchasable merchandise, many YouTubers include visuals to strengthen their calls-to-action.
Part 6: Time Manipulation
1. Timelapse
“The staple of any Casey Neistat vlog is the timelapse, which he uses both to further the narrative or set the time of day.” -@omgurheadsgone
A lot of cameras now come with a timelapse/hyperlapse function, requiring no further video editing. To achieve the kind of timelapses that Casey Neistat makes, though, you’ll have to film real-time footage and then manipulate the speed of it in post. Since sped up ambient sound is hardly ever pleasing to the ear, a lot of YouTubers replace the audio with music that enhances the mood of the timelapse.
2. Slow Motion
Slowing down footage is another way YouTubers like to manipulate the passage of time. This technique can draw the audience’s attention into the intricacies of a movement captured on film. But if you stretch your video clip digitally in order to achieve this look, your video may not look so smooth – your software will need to create extra frames of footage based on your existing footage. The solution around this problem is to make sure to record your video at a very high frame rate.

Part 7: Audio
1. Censor
The traditional practice for censoring out explicit language in television has been to replace profanity with a high pitched “bleep” sound effect . YouTubers, however, have popularized the use of animal sound effects to censor out explicit language. Epic Meal Time frequently uses the “caw” of a crow for this purpose.
2. Sound Effects
Whether it is pouring water into a cup or drinking a glass of water, adding louder sound effects can enhance your viewer’s experience of the action that is taking place on camera.
3. Background Music
Music is very effective in helping people feel all kinds of emotions. It is no wonder so many of the top YouTubers make gratuitous use of music in their videos. Some even add background music to every single clip of their entire YouTube video and only drop the music when the following technique (below) is used.
4. Muting Background Music
A lot of YouTubers who talk over background music abruptly mute the music when they want their audience to focus their attention on whatever it is that they have to say at that very moment. Isolating one’s speech in this way can be a very effective way to emphasize something serious or emphasize a punchline to a joke.
5. Voice-Over
Adding additional recorded verbal commentary is another technique used by many of the top YouTubers. This technique can be helpful when the visuals of your footage do not sufficiently communicate the full message you want to get across to your audience.
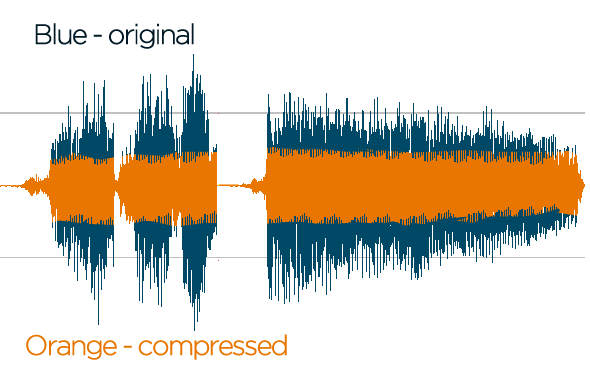
6. Compressor
A lot of video editing software programs give you the option to add compression to your video’s audio. Compression lessens the dynamic range between the softest and loudest parts of your audio. This technique can help your speech sound more uniform in volume.
For those who want to make their YouTube videos better, I recommend Wondershare Filmora for editing YouTube videos . Filmora video editor allows you to create and edit a YouTube video easily with plentiful templates and effects pre-programmed.
Richard Bennett
Richard Bennett is a writer and a lover of all things video.
Follow @Richard Bennett
Richard Bennett
Oct 26, 2023• Proven solutions
YouTube videos have a certain look and feel that many viewers have come to expect and enjoy. Much of the aesthetics of YouTube videos developed as a result of the biggest YouTubers having to quickly and efficiently edit videos together on a daily basis. Below is our list of some of the most common video editing techniques used by famous YouTubers.
Part 1: Introduction
1. Start Big
“I’m doing something really exciting… within the first ten seconds of this video. That way you stay here.” – Liza Koshy (How To Be A YouTuber 101!! | Lizzza)
In the same way that a teaser or trailer builds anticipation for a full film, many YouTubers start with a preview of the most high-energy part of their video.
In Jake Paul’s prank vlog (above), Jake shows his brother, Logan, chasing and beating him up as Jake screams for help at the top of his lungs. The already high-energy scene is even more intensified by the epic music playing in the background. This seven-second clip, which resurfaces halfway through the video, is enough to entice many viewers to continue watching. It very effectively leaves enough room for viewers to wonder, “How did Logan’s room actually look in the end?” “What was Logan’s initial reaction before he started chasing Jake?” By creating curiosity gaps like these, you can incentivize your viewers to close these gaps by watching longer.
2. Opening Title Introduction
Just as TV episodes begin with opening credits and theme music, quite similarly, some YouTubers start their YouTube videos with an intro.
Greg from “How To Drink” has an effective twenty-second intro (above). In this video, he shows you who he is and what his videos are generally about. Since these two things don’t change so much for him from video to video, he can start many of his videos off with this same intro.
Below is a video tutorial about how to add text and titles to video in Filmora, hope that helps you in creating your own YouTube video texts and titles.
For more information on intros, check out our post on How to Make a YouTube Intro?
Part 2: Cuts
1. Jump Cut
A jump cut is a simple and straightforward type of video editing cutting technique that “jumps” from one section of a clip to a later section of a clip, cutting out whatever happened in the middle. Some of the middle parts you might want to remove may include mistakes, long silent pauses, and filler words (umm, like, etc.).
Although the use of jump cuts to remove these parts had been discouraged for a long time in the film world, its extensive use by so many YouTubers has established it as its own style that many viewers have come to expect and enjoy. The jumpiness that comes from jump cuts can be effective in keeping your audience’s attention in a shock-inducing manner.
Jump cuts can also be used to show a passage of time in a creative way or make objects magically appear on-screen.
Zack King (above) makes a toy taxi magically appear in his hands using this video editing technique. Filmora allows you to do jump cut easily, you can watch the tutorial below and learn more jump cut tips and tricks .
2. Associative Cut
Not everyone in your audience may recognize the cultural or historical references you make in your videos. It can, therefore, be helpful (and also quite enjoyable) to show the original clip of the reference you are making.
In the same vlog that Jake Paul gets chased down by his brother (above), twenty-eight seconds into the video, Jake expresses his desire to go fast in his car. Right after he says “I want to go fast,” Jake cuts into a scene from the movie Talladega Nights. In that scene, Ricky Bobby, Will Ferrell’s character, also says that he wants to go fast.
Part 3: Transform
1. Zoom
Many YouTubers digitally adjust the zoom of their talking head shots in order to create additional emphasis or suspense. When zoom is used very slowly and smoothly, this technique can be effective in building up suspense and drawing a viewer deeper into the speaker’s message. When a drastic zoom is used suddenly, it can be effective in emphasizing a particular spoken line.
RiceGum is one YouTuber who uses zoom video editing effects extensively in his talking head videos. Want to pan and zoom your video footage too? Check our guide to getting Ken Burns Effect on Videos .
2. Camera Shake
Camera shake is a video effect that makes the original clip appear like it was filmed during a violent earthquake. Many YouTubers use this effect to emphasize their voice when they are talking about something erratic or out of control.
3. Color/Level Adjustment
A lot of comedy YouTubers change the color and levels of their videos in order to emphasize different moods. One common thing YouTubers do when they talk about anything slightly sad is to gradually fade out the colors in their talking head shots. In a cheesy way, the black and white look can emphasize a feeling of emptiness. For his “sad” reactions, PewDiePie often jump cuts into a black and white, slowed down clip of his sad face while playing some sad music in the background. To emphasize a darker message, some YouTubers increase the amount of shadows in their video. In the video below, while his daughter is delivering a darker message from 0:32 to 0:50, La Guardia Cross gradually adds more shadows around his daughter’s face through what appears to be a vignette effect.
Part 4: Transitions
1. Wipe
Many YouTubers transition from one scene into the next using a wipe transition. In a wipe transition, the next clip that you want to transition into slides into the frame horizontally or vertically until it completely covers the first clip. For additional wiping effect, many YouTubers also use a fast, high pitched “woosh” sound effect with this transition.
2. Zoom
The zoom transition is quite similar to the wipe transition, except it uses a zoom effect. Many of the top YouTubers combine this transition with a lower-pitched “woosh” sound effect.
Part 5: Visual Elements
In other genres of film, the only appropriate visual elements filmmakers can tastefully add to their footage seem to be clean looking, seamlessly integrated text and motion graphics. YouTube, on the other hand, is another world with much more room to get outrageous. Many of the top YouTubers add a lot of visual elements (emojis , images, filters, explosions) to their videos to emphasize their jokes, play-on-words, historical or cultural references, and mood.
1. Call-To-Action Visuals
Whether they’re prompting you to subscribe, like, comment, or check out their purchasable merchandise, many YouTubers include visuals to strengthen their calls-to-action.
Part 6: Time Manipulation
1. Timelapse
“The staple of any Casey Neistat vlog is the timelapse, which he uses both to further the narrative or set the time of day.” -@omgurheadsgone
A lot of cameras now come with a timelapse/hyperlapse function, requiring no further video editing. To achieve the kind of timelapses that Casey Neistat makes, though, you’ll have to film real-time footage and then manipulate the speed of it in post. Since sped up ambient sound is hardly ever pleasing to the ear, a lot of YouTubers replace the audio with music that enhances the mood of the timelapse.
2. Slow Motion
Slowing down footage is another way YouTubers like to manipulate the passage of time. This technique can draw the audience’s attention into the intricacies of a movement captured on film. But if you stretch your video clip digitally in order to achieve this look, your video may not look so smooth – your software will need to create extra frames of footage based on your existing footage. The solution around this problem is to make sure to record your video at a very high frame rate.
Part 7: Audio
1. Censor
The traditional practice for censoring out explicit language in television has been to replace profanity with a high pitched “bleep” sound effect . YouTubers, however, have popularized the use of animal sound effects to censor out explicit language. Epic Meal Time frequently uses the “caw” of a crow for this purpose.
2. Sound Effects
Whether it is pouring water into a cup or drinking a glass of water, adding louder sound effects can enhance your viewer’s experience of the action that is taking place on camera.
3. Background Music
Music is very effective in helping people feel all kinds of emotions. It is no wonder so many of the top YouTubers make gratuitous use of music in their videos. Some even add background music to every single clip of their entire YouTube video and only drop the music when the following technique (below) is used.
4. Muting Background Music
A lot of YouTubers who talk over background music abruptly mute the music when they want their audience to focus their attention on whatever it is that they have to say at that very moment. Isolating one’s speech in this way can be a very effective way to emphasize something serious or emphasize a punchline to a joke.
5. Voice-Over
Adding additional recorded verbal commentary is another technique used by many of the top YouTubers. This technique can be helpful when the visuals of your footage do not sufficiently communicate the full message you want to get across to your audience.
6. Compressor
A lot of video editing software programs give you the option to add compression to your video’s audio. Compression lessens the dynamic range between the softest and loudest parts of your audio. This technique can help your speech sound more uniform in volume.
For those who want to make their YouTube videos better, I recommend Wondershare Filmora for editing YouTube videos . Filmora video editor allows you to create and edit a YouTube video easily with plentiful templates and effects pre-programmed.
Richard Bennett
Richard Bennett is a writer and a lover of all things video.
Follow @Richard Bennett
- Title: "In 2024, Top 12 Vlogger-Friendly Cameras Unveiled"
- Author: Thomas
- Created at : 2024-05-31 12:47:04
- Updated at : 2024-06-01 12:47:04
- Link: https://youtube-help.techidaily.com/in-2024-top-12-vlogger-friendly-cameras-unveiled/
- License: This work is licensed under CC BY-NC-SA 4.0.
