
:max_bytes(150000):strip_icc():format(webp)/operationcouldnotcomplete-95695abe458d4062a2c2f7e46e656b08.png)
In 2024, Transform Standard Thumbnails Into Glowing Art Pieces
Transform Standard Thumbnails Into Glowing Art Pieces
Your YouTube video, or any other clip published on any forum, gets a larger number of hits if it has an attractive thumbnail. And, the fact is, a thumbnail becomes 10x more attractive when the main character that the image has have a neon border around it.
With that said, in the following sections, you will learn a couple of methods on how to add a YouTube thumbnail border around the main characters and/or objects that are significant to the clip.
In this article
01 Add Glowing Neon Border to YouTube Thumbnail with Filmora
02 Add a Glowing Neon Border in YouTube Thumbnail with Canva
03 Outline a Person in a YouTube Thumbnail with Photoshop
Part 1: How to Add Neon Border to YouTube Thumbnail for Free with Filmora
Being one of the most versatile and intuitive post-production tools available in the market today, Wondershare Filmora X allows you to add a neon border to a YouTube thumbnail quite conveniently. You can learn how to get this done on Windows or Mac by following the steps given below.
For Win 7 or later (64-bit)
For macOS 10.12 or later
Step 1: Define Project Settings and Add Image to the Timeline
Launch Wondershare Filmora X on your PC (a MacBook Pro M1 is used here), ensure that the project aspect ratio is set to 16:9 (Widescreen) on the splash screen, and click New Project. On the main interface, click the Preview quality and display settings icon from the upper-right area of the Timeline, click Change Project Aspect Ratio, click to select 1280 x 720 (HD) from the Resolution menu of the Project Settings box, and click OK to save the custom project settings.

Then select My Media from the menu bar if not already selected, click Project Media from the navigation pane, and click Import from the Media box to select and import the image of the main character or object that you want to use in the thumbnail.

Now, drag the image from the Media box to the Timeline at the bottom.

Step 2: Clear Image Background, Add Border, and Add Custom Background
Go to Effects from the menu bar, click to select the Default tab and then AI Portrait from the navigation pane, and click and drag the Human Segmentation preset from the right box, and place it over the image track in the Timeline.

Double-click the image layer, scroll down the upper-left box to the Video Effects section, and use the Edge Thickness and Edge Feather sliders to adjust the character’s edges to make them as realistic as possible. Click OK when done.

Next, click and drag the Human Border preset over the image track in the Timeline, and follow the same procedure to customize the border. This will give the character a neon border effect.

Now, use the method explained earlier to import a custom image for the background, and drag and place it under the previous track in the Timeline.

If you are running the latest version of Filmora, you will find there are some neon light effects available under AI Portrait as well.

Step 3: Add Titles to Thumbnail
Go to Titles from the menu bar, click to select the Default tab and then Lower 3rds from the navigation pane, and click and drag your preferred lower-third preset from the right window to a separate layer in the Timeline. Double-click the lower-third layer, and use the available options in the upper-left window to change the text, its color, etc., and drag the textbox to place it to your preferred position on the image as well. Click OK to save the changes.
Next, click to select Titles from the navigation pane, and drag your preferred title from the right window to the upper-most track in the Timeline. Now use the method explained earlier to edit the text, its color, position, etc. to make it look professional.

For more tips and tricks for creating YouTube thumbnail, you can check this You Tube thumbnail creating guide.
Step 4: Get the Neon Border Thumbnail
Click the Snapshot (Camera) icon from the upper-right area of the Timeline, go to My Media from the menu bar, right-click the thumbnail of the screenshot you captured, and click Reveal in Finder (on Mac) or Reveal in Explorer (on Windows) to get to the folder the YouTube thumbnail border is saved in.

Part 2: How to Add a Glowing Neon Border in Your YouTube Thumbnail with Canva
Canva is another intuitive editing program that works on the web interface rather than having you download and install an app on your PC. You can add a neon border for YouTube thumbnails using Canva by following the instructions given below:
Step 1: Define Project Settings and Add a Background
After signing in to your Canva account, click Create a design from the top-right corner of the page, click Custom size from the bottom, define 1280 and 720 in the Width and Height fields on the box that appears respectively, and click Create new design.

Now, click to select Background from the navigation bar on the left (if the Background tool is not visible, click More and then choose Background from the expanded list), and click to select a background from the images available in the center pane.

Step 2: Upload an Image and Add Effects
Click Uploads from the navigation bar, click the More icon from the right of the Upload media button present at the top of the center pane, choose your preferred method to upload the image (with the transparent background) that you want to use, upload the image, and drag it from the center pane to the Canvas.
Note: You can use any of the tools available online to remove the background from your image for free.

To add a YouTube thumbnail border, make sure that the image that you added to the Canvas is selected, click the Duplicate icon from the upper-right area, and use the scaling handles of the copy of the image to increase its size a bit. Reposition the image back to its original location as well.
Then, click Edit image from the upper-left corner of the Canvas, click Duotone from the Edit image pane at the center, if need be, click See all, choose your preferred duotone effect to apply on the image, choose your preferred highlight and shadow colors from the box that appears next, and click Back from the top of the pane.

Next, click See all next to the Adjust section from the center pane, and drag the Blur slider to the right to increase the blur effect on the image.

Step 3: Position the Layers
While keeping the duplicate image selected, click the Position button from the upper-right area of the Canvas, and click Background to send the second image behind the first one to get the neon border effect for the photo.

Part 3: How to Outline a Person in a YouTube Thumbnail with Photoshop
Because YouTube thumbnails are nothing but static images, creating YouTube thumbnail border with Adobe Photoshop is comparatively easier. The process of doing this is given below:
Step 1: Define Document Preferences and Import an Image
Launch Adobe Photoshop on your PC, click Create new, and on the New Document customization box, define the width and height values to 1280 and 720 pixels respectively. Select Transparent from the Background Contents menu as well if not already selected. Click Create from the bottom to create a new Photoshop document with the specified document settings. Next, open the folder that contains the source image, drag the photo to Photoshop, and press Enter to place the photo.

Step 2: Remove Background from the Image
Make sure that the image layer is selected in the Layers panel on the right, go to Select from the menu bar at the top, and click Subject. From the bottom of the Layers panel, click the Add a mask icon to get rid of the background, leaving only the human on the Canvas.

Step 3: Add a Custom Background and an Outline Around the Subject
Use the method explained earlier to import a background image of your choice to Photoshop. Drag the background image layer to the bottom in the Layers panel. Double-click the masked layer, click to select Stroke from the left pane of the Layer Style box, and use the options available on the right to manage the size, color, position, etc. of the stroke that has been added around the human subject. Click OK when done, and then export the image normally to use it as a YouTube thumbnail border.

Summary
It is important to know that the default resolution of a YouTube thumbnail is 1280 x 720 pixels that is usually written and referred to as 720p. While adding a YouTube thumbnail border, it is also imperative to have a good sense of color combination and fonts. Furthermore, a decent tool like Wondershare Filmora X must be used to add an appealing neon border around the main subject in the thumbnail image easily and quickly.
02 Add a Glowing Neon Border in YouTube Thumbnail with Canva
03 Outline a Person in a YouTube Thumbnail with Photoshop
Part 1: How to Add Neon Border to YouTube Thumbnail for Free with Filmora
Being one of the most versatile and intuitive post-production tools available in the market today, Wondershare Filmora X allows you to add a neon border to a YouTube thumbnail quite conveniently. You can learn how to get this done on Windows or Mac by following the steps given below.
For Win 7 or later (64-bit)
For macOS 10.12 or later
Step 1: Define Project Settings and Add Image to the Timeline
Launch Wondershare Filmora X on your PC (a MacBook Pro M1 is used here), ensure that the project aspect ratio is set to 16:9 (Widescreen) on the splash screen, and click New Project. On the main interface, click the Preview quality and display settings icon from the upper-right area of the Timeline, click Change Project Aspect Ratio, click to select 1280 x 720 (HD) from the Resolution menu of the Project Settings box, and click OK to save the custom project settings.
Then select My Media from the menu bar if not already selected, click Project Media from the navigation pane, and click Import from the Media box to select and import the image of the main character or object that you want to use in the thumbnail.
Now, drag the image from the Media box to the Timeline at the bottom.
Step 2: Clear Image Background, Add Border, and Add Custom Background
Go to Effects from the menu bar, click to select the Default tab and then AI Portrait from the navigation pane, and click and drag the Human Segmentation preset from the right box, and place it over the image track in the Timeline.
Double-click the image layer, scroll down the upper-left box to the Video Effects section, and use the Edge Thickness and Edge Feather sliders to adjust the character’s edges to make them as realistic as possible. Click OK when done.
Next, click and drag the Human Border preset over the image track in the Timeline, and follow the same procedure to customize the border. This will give the character a neon border effect.
Now, use the method explained earlier to import a custom image for the background, and drag and place it under the previous track in the Timeline.
If you are running the latest version of Filmora, you will find there are some neon light effects available under AI Portrait as well.
Step 3: Add Titles to Thumbnail
Go to Titles from the menu bar, click to select the Default tab and then Lower 3rds from the navigation pane, and click and drag your preferred lower-third preset from the right window to a separate layer in the Timeline. Double-click the lower-third layer, and use the available options in the upper-left window to change the text, its color, etc., and drag the textbox to place it to your preferred position on the image as well. Click OK to save the changes.
Next, click to select Titles from the navigation pane, and drag your preferred title from the right window to the upper-most track in the Timeline. Now use the method explained earlier to edit the text, its color, position, etc. to make it look professional.
For more tips and tricks for creating YouTube thumbnail, you can check this You Tube thumbnail creating guide.
Step 4: Get the Neon Border Thumbnail
Click the Snapshot (Camera) icon from the upper-right area of the Timeline, go to My Media from the menu bar, right-click the thumbnail of the screenshot you captured, and click Reveal in Finder (on Mac) or Reveal in Explorer (on Windows) to get to the folder the YouTube thumbnail border is saved in.
Part 2: How to Add a Glowing Neon Border in Your YouTube Thumbnail with Canva
Canva is another intuitive editing program that works on the web interface rather than having you download and install an app on your PC. You can add a neon border for YouTube thumbnails using Canva by following the instructions given below:
Step 1: Define Project Settings and Add a Background
After signing in to your Canva account, click Create a design from the top-right corner of the page, click Custom size from the bottom, define 1280 and 720 in the Width and Height fields on the box that appears respectively, and click Create new design.
Now, click to select Background from the navigation bar on the left (if the Background tool is not visible, click More and then choose Background from the expanded list), and click to select a background from the images available in the center pane.
Step 2: Upload an Image and Add Effects
Click Uploads from the navigation bar, click the More icon from the right of the Upload media button present at the top of the center pane, choose your preferred method to upload the image (with the transparent background) that you want to use, upload the image, and drag it from the center pane to the Canvas.
Note: You can use any of the tools available online to remove the background from your image for free.
To add a YouTube thumbnail border, make sure that the image that you added to the Canvas is selected, click the Duplicate icon from the upper-right area, and use the scaling handles of the copy of the image to increase its size a bit. Reposition the image back to its original location as well.
Then, click Edit image from the upper-left corner of the Canvas, click Duotone from the Edit image pane at the center, if need be, click See all, choose your preferred duotone effect to apply on the image, choose your preferred highlight and shadow colors from the box that appears next, and click Back from the top of the pane.
Next, click See all next to the Adjust section from the center pane, and drag the Blur slider to the right to increase the blur effect on the image.
Step 3: Position the Layers
While keeping the duplicate image selected, click the Position button from the upper-right area of the Canvas, and click Background to send the second image behind the first one to get the neon border effect for the photo.
Part 3: How to Outline a Person in a YouTube Thumbnail with Photoshop
Because YouTube thumbnails are nothing but static images, creating YouTube thumbnail border with Adobe Photoshop is comparatively easier. The process of doing this is given below:
Step 1: Define Document Preferences and Import an Image
Launch Adobe Photoshop on your PC, click Create new, and on the New Document customization box, define the width and height values to 1280 and 720 pixels respectively. Select Transparent from the Background Contents menu as well if not already selected. Click Create from the bottom to create a new Photoshop document with the specified document settings. Next, open the folder that contains the source image, drag the photo to Photoshop, and press Enter to place the photo.
Step 2: Remove Background from the Image
Make sure that the image layer is selected in the Layers panel on the right, go to Select from the menu bar at the top, and click Subject. From the bottom of the Layers panel, click the Add a mask icon to get rid of the background, leaving only the human on the Canvas.
Step 3: Add a Custom Background and an Outline Around the Subject
Use the method explained earlier to import a background image of your choice to Photoshop. Drag the background image layer to the bottom in the Layers panel. Double-click the masked layer, click to select Stroke from the left pane of the Layer Style box, and use the options available on the right to manage the size, color, position, etc. of the stroke that has been added around the human subject. Click OK when done, and then export the image normally to use it as a YouTube thumbnail border.
Summary
It is important to know that the default resolution of a YouTube thumbnail is 1280 x 720 pixels that is usually written and referred to as 720p. While adding a YouTube thumbnail border, it is also imperative to have a good sense of color combination and fonts. Furthermore, a decent tool like Wondershare Filmora X must be used to add an appealing neon border around the main subject in the thumbnail image easily and quickly.
Mobile Mastery: Establishing Your Brand’s YouTube Outlet
Versatile YouTube Video Editor - Filmora
An easy yet powerful editor
Numerous effects to choose from
Detailed tutorials provided by the official channel
The relevance of YouTube and the need to have a channel are visible with the rise in viewership. Having launched on February 14th, 2005, YouTube has become the 2nd most visited social media website according to Google statistics having a whopping over 2 billion users on the platform monthly.
As an entrepreneur or a company, one of the easiest and fastest ways of selling your brand or skill is via the YouTube platform. Thus, you must know how to make a YouTube channel on iPhone and how to make a YouTube channel on Android. Having overwhelming subscribers becomes an added advantage as not only will you and your business be known or recognized, YouTube has a way of appreciating and paying some of their influencers as well.
At this point, I know how hungry you are to kick-start your YouTube. This article will help guide you through creating a YouTube channel on your mobile, whether for personal or business purposes. Rather than scanning through, you should peruse through attentively.
In this article
01 How to Make a Personal YouTube Channel on Mobile
02 How to Create a Business YouTube on Mobile
03 Five Tips to Start a YouTube channel
Part 1: How to Make a Personal YouTube Channel on Mobile
Creating a YouTube channel on mobile is not a cumbersome one. It is as easy as ABC, and within split seconds you’ve created your own YouTube channel. The guideline entails the following steps:
- The first step to setting up your personal YouTube channel starts with creating a Google account for those who don’t have any yet.
- Whether you open your YouTube app or via the web browser of your phone, open the YouTube website.
- On the top right-hand side of your mobile, tap on your profile image
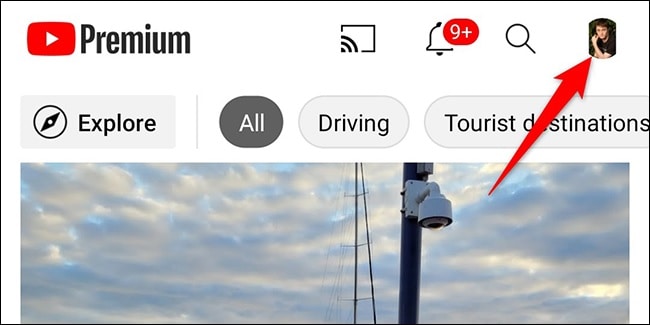
Source: howtogeek.com
- A drop-down menu will pop up. Click on your channel icon.
- An option to create a new channel comes up. (For those who have a channel already, an alternative to manage your channel or video will show.)
- An option to input your name pops up on the screen. Carefully insert your desired name and tap on Create.
- If you would love to halt and resume later in the setting up, you can scroll down to click on the ‘set up later.’
Part 2: How to Create a Business YouTube on Mobile
The clarity on the relevance of YouTube in this dispensation when it comes to branding or business-boosting is immense. Many savvy entrepreneurs and business companies have come to the known for their beautiful advantages. With over 2 billion people trooping into the site monthly, making your brand come to the limelight in this social media implies reaching one-tenth of the users,i.e., if you play by the rules of strategically planning your business growth, the top. However, this article may not reveal the different strategies to adopt so you can become an influencer in your line of business; instead, it will start from scratch on how to get your YouTube business page started. How then can one create his own business YouTube account?
1. Signing into a Google account
To successfully start using the YouTube app, there is a need to sign officially into Google. If you’ve it in mind to have a separate Google account for your business account, you kick-start it at this stage.
However, you can still use your name to open a Google account and create a business YouTube account for subsequent use. The truth is that YouTube gives room for you still to make a business account with a business name thus, eliminating the need to use a business name in creating your Google account.
2. Creating a business name
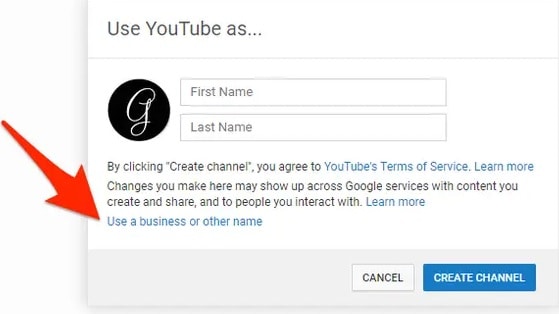
Once you create a Google account, the next step is to make your business a YouTube account. This you do by either signing into your YouTube app or via the YouTube website in your mobile browser. Once logged in to the app interface, you will see the profile photo you used in creating your Google account or the initial letter of the first name you used on the top right-hand side of your mobile. Tap on it, and a drop-down menu will come up, tap on the ‘create a channel’ icon, which will lead you to another interface where you have the option to select ‘Get started’ or ‘No thanks.’ A tap on the get started will reveal an option to either create your channel using the name and image of your Google account or use a customized name.
Source: buffer.com
Selecting the custom name gives you the autonomy to use the brand or business name of your choice, after which you tap on the create option.
3. Customize your business page
At this point, you can design the layout by utilizing the appealing icon and banner of your choice, just as provided by the likes of Facebook or Twitter. The customized templates in Canva are there for you to design your page to your state.
I know you would be wondering how to go about this; YouTube can directly upload your artwork with a preview option available. You can crop your artwork to fit your page, making it look more professional.
To be emphatic, creating a business account is still simple but with professionalism. Remember you are selling yourself and your brand, and it is expedient to give your best on your page. Do well to describe your page as excellent as you can, let your activity in terms of photo and video uploads be of the best. This way, subscribers will not hesitate to hit the like and subscribe button. Good luck as you kick-start your business page.
Part 3: Five Tips to Start a YouTube channel
Carefully observe how YouTube channels function and possibly how entrepreneurs and business owners make waves in the YouTube industry. Then, sit down and watch either your mobile phone or computer and think about making a YouTube Channel on iPhone or understand how to create a YouTube Channel on mobile and earn money, especially to beginners. This way, you can make it envy to all becomes a significant challenge—however, the crucial tips in starting your own YT channel.
Identify Goal of Channel
What are you trying to achieve? Customer education, testimonials or do you want people to subscribe? Be clear on what you want your YouTube channel to do for your brand and how it fits into your overall marketing strategy.
Gather Content Ideas
Gather content, even before you make a YouTube channel on mobile. You can start with a series of videos talking about your company, products, or industry and then launch the channel once they are all done. If you can’t think of any content on your own, try searching around online to see if others have already created videos of this sort and have posted them online. Then, use those videos as examples when you make your content.
Logo and Thumbnail Design
How to make a logo for YouTube on mobile?
Once you are up with content creation, you will have to create a thumbnail for your video. Attractive and catchy thumbnails that persuade searchers to click on your video are critical. Here we will see how to create a logo for a YouTube video on mobile. For this purpose, Canva.com can create attractive thumbnails and a Catchy logo. Using this tool, you can create, edit and customize graphics for your YouTube videos.
Quality of Video is Important
Don’t just put up videos willy-nilly. Think about what content would work for your brand and audience. The content needs to be engaging, relevant, and inspiring so people will keep coming back for more videos. You don’t have to have the latest video equipment either – think about the type of content that would work best.
Choose Video Editing Software
Wondershare Filmora
Get started easily with Filmora’s powerful performance, intuitive interface, and countless effects!
Try It Free Try It Free Try It Free Learn More >

Lastly, you must use high-quality producing software. So we recommend Filmora Video Editor that offers a wide range of effects, themes, and titles. It lets you create professional-looking videos with various presets for quick editing. It incorporates support for most common video formats. If you’re looking for a straightforward but potent video editor, Filmora is your best option.
Conclusion
I firmly believe that at this point, understanding how to create a YouTube channel in mobile will be an easy one. We discussed ways of not just developing your YT channel but also how to give your page the best of professional work. This article is truly an eye-opener and contains from scratch the step-wise order of growing and learning how to make a logo for YouTube Channel in mobile and creating personal and business accounts to earn some money.
The relevance of YouTube and the need to have a channel are visible with the rise in viewership. Having launched on February 14th, 2005, YouTube has become the 2nd most visited social media website according to Google statistics having a whopping over 2 billion users on the platform monthly.
As an entrepreneur or a company, one of the easiest and fastest ways of selling your brand or skill is via the YouTube platform. Thus, you must know how to make a YouTube channel on iPhone and how to make a YouTube channel on Android. Having overwhelming subscribers becomes an added advantage as not only will you and your business be known or recognized, YouTube has a way of appreciating and paying some of their influencers as well.
At this point, I know how hungry you are to kick-start your YouTube. This article will help guide you through creating a YouTube channel on your mobile, whether for personal or business purposes. Rather than scanning through, you should peruse through attentively.
In this article
01 How to Make a Personal YouTube Channel on Mobile
02 How to Create a Business YouTube on Mobile
03 Five Tips to Start a YouTube channel
Part 1: How to Make a Personal YouTube Channel on Mobile
Creating a YouTube channel on mobile is not a cumbersome one. It is as easy as ABC, and within split seconds you’ve created your own YouTube channel. The guideline entails the following steps:
- The first step to setting up your personal YouTube channel starts with creating a Google account for those who don’t have any yet.
- Whether you open your YouTube app or via the web browser of your phone, open the YouTube website.
- On the top right-hand side of your mobile, tap on your profile image
Source: howtogeek.com
- A drop-down menu will pop up. Click on your channel icon.
- An option to create a new channel comes up. (For those who have a channel already, an alternative to manage your channel or video will show.)
- An option to input your name pops up on the screen. Carefully insert your desired name and tap on Create.
- If you would love to halt and resume later in the setting up, you can scroll down to click on the ‘set up later.’
Part 2: How to Create a Business YouTube on Mobile
The clarity on the relevance of YouTube in this dispensation when it comes to branding or business-boosting is immense. Many savvy entrepreneurs and business companies have come to the known for their beautiful advantages. With over 2 billion people trooping into the site monthly, making your brand come to the limelight in this social media implies reaching one-tenth of the users,i.e., if you play by the rules of strategically planning your business growth, the top. However, this article may not reveal the different strategies to adopt so you can become an influencer in your line of business; instead, it will start from scratch on how to get your YouTube business page started. How then can one create his own business YouTube account?
1. Signing into a Google account
To successfully start using the YouTube app, there is a need to sign officially into Google. If you’ve it in mind to have a separate Google account for your business account, you kick-start it at this stage.
However, you can still use your name to open a Google account and create a business YouTube account for subsequent use. The truth is that YouTube gives room for you still to make a business account with a business name thus, eliminating the need to use a business name in creating your Google account.
2. Creating a business name
Once you create a Google account, the next step is to make your business a YouTube account. This you do by either signing into your YouTube app or via the YouTube website in your mobile browser. Once logged in to the app interface, you will see the profile photo you used in creating your Google account or the initial letter of the first name you used on the top right-hand side of your mobile. Tap on it, and a drop-down menu will come up, tap on the ‘create a channel’ icon, which will lead you to another interface where you have the option to select ‘Get started’ or ‘No thanks.’ A tap on the get started will reveal an option to either create your channel using the name and image of your Google account or use a customized name.
Source: buffer.com
Selecting the custom name gives you the autonomy to use the brand or business name of your choice, after which you tap on the create option.
3. Customize your business page
At this point, you can design the layout by utilizing the appealing icon and banner of your choice, just as provided by the likes of Facebook or Twitter. The customized templates in Canva are there for you to design your page to your state.
I know you would be wondering how to go about this; YouTube can directly upload your artwork with a preview option available. You can crop your artwork to fit your page, making it look more professional.
To be emphatic, creating a business account is still simple but with professionalism. Remember you are selling yourself and your brand, and it is expedient to give your best on your page. Do well to describe your page as excellent as you can, let your activity in terms of photo and video uploads be of the best. This way, subscribers will not hesitate to hit the like and subscribe button. Good luck as you kick-start your business page.
Part 3: Five Tips to Start a YouTube channel
Carefully observe how YouTube channels function and possibly how entrepreneurs and business owners make waves in the YouTube industry. Then, sit down and watch either your mobile phone or computer and think about making a YouTube Channel on iPhone or understand how to create a YouTube Channel on mobile and earn money, especially to beginners. This way, you can make it envy to all becomes a significant challenge—however, the crucial tips in starting your own YT channel.
Identify Goal of Channel
What are you trying to achieve? Customer education, testimonials or do you want people to subscribe? Be clear on what you want your YouTube channel to do for your brand and how it fits into your overall marketing strategy.
Gather Content Ideas
Gather content, even before you make a YouTube channel on mobile. You can start with a series of videos talking about your company, products, or industry and then launch the channel once they are all done. If you can’t think of any content on your own, try searching around online to see if others have already created videos of this sort and have posted them online. Then, use those videos as examples when you make your content.
Logo and Thumbnail Design
How to make a logo for YouTube on mobile?
Once you are up with content creation, you will have to create a thumbnail for your video. Attractive and catchy thumbnails that persuade searchers to click on your video are critical. Here we will see how to create a logo for a YouTube video on mobile. For this purpose, Canva.com can create attractive thumbnails and a Catchy logo. Using this tool, you can create, edit and customize graphics for your YouTube videos.
Quality of Video is Important
Don’t just put up videos willy-nilly. Think about what content would work for your brand and audience. The content needs to be engaging, relevant, and inspiring so people will keep coming back for more videos. You don’t have to have the latest video equipment either – think about the type of content that would work best.
Choose Video Editing Software
Wondershare Filmora
Get started easily with Filmora’s powerful performance, intuitive interface, and countless effects!
Try It Free Try It Free Try It Free Learn More >
Lastly, you must use high-quality producing software. So we recommend Filmora Video Editor that offers a wide range of effects, themes, and titles. It lets you create professional-looking videos with various presets for quick editing. It incorporates support for most common video formats. If you’re looking for a straightforward but potent video editor, Filmora is your best option.
Conclusion
I firmly believe that at this point, understanding how to create a YouTube channel in mobile will be an easy one. We discussed ways of not just developing your YT channel but also how to give your page the best of professional work. This article is truly an eye-opener and contains from scratch the step-wise order of growing and learning how to make a logo for YouTube Channel in mobile and creating personal and business accounts to earn some money.
- Title: In 2024, Transform Standard Thumbnails Into Glowing Art Pieces
- Author: Thomas
- Created at : 2024-05-31 12:46:55
- Updated at : 2024-06-01 12:46:55
- Link: https://youtube-help.techidaily.com/in-2024-transform-standard-thumbnails-into-glowing-art-pieces/
- License: This work is licensed under CC BY-NC-SA 4.0.
