
In 2024, Transform Your YouTube Channel URL in Minutes
Transform Your YouTube Channel URL in Minutes
How to Find and Change Your YouTube Channel URL – Super Easy

Richard Bennett
Oct 26, 2023• Proven solutions
In order to properly market your page on YouTube for sharing across social media, it is essential that you find your YouTube channel URL. How else can you share your channel? In this article, we are trying to give you a thorough understanding of the YouTube Channel URL and tell you how to get the custom channel URL.
Types of YouTube Channel URL
ID-based URL
YouTube channel URL of this type is based on your channel ID, which consists of numbers and letters. This is the URL of the universal form. For example, “youtube.com/channel/specific YouTube channel ID”.
You can find the YouTube channel URL of this kind by the following steps.
- Sign in to Youtube.com and click on your profile icon.
- Select Your Channel.
- Find the URL on the address bar of your browser. This is exactly the ID-based URL or the standard URL of your channel.
Legacy username URL
Legacy username URL was used by YouTube in the past. If you created your channel in the early days of YouTube, the URL for your channel might contain the username at the end. Although YouTube doesn’t apply username to forming channel URL anymore, you can still use this URL to direct to Your channel. But you should note that the exiting username can’t be changed even if you have changed your channel name. For example, “youtube.com/channel/specific YouTube channel ID”.
You can share the short form of the username URL with the “/user“ being left out, such as “youtube.com/specific YouTube channel ID”. But this may not be available if someone claimed to a custom URL whose short form is the same with the short form of your username URL.
Custom URL
This is a shorter and more easy-to-remember URL that is generated on the basis of your current display name, legacy username, or your linked and verified domain. You can claim for the custom URL if your channel meets certain qualifications.
The custom URL looks like this, “youtube.com/c/display name, legacy username, or your linked and verified domain”. You can also share this URL in its shorter form by leaving out the “/c“, for example, “youtube.com/customed part”.
How to Get a Custom URL for your YouTube Channel
To qualify for a custom URL – one which includes your channel name instead of a random sequence of letters, your channel needs to meet the following standards.
- Be at least 30 days old
- Have at least 100 subscribers
- Use a photo for the channel icon
- Have uploaded channel art
As long as your account meets these eligibility standards, then you can go over the following steps to claim a custom URL for your YouTube channel.
- Start by signing into YouTube.
- Click on your profile image on the top right of the screen.
- Find the “settings” and click on it.
- Select “Advanced settings”.
- Click on the link anchored with the word “here”.
- The “Get a custom URL” box will then pop out. You can select one from the approved options. You may need to add a suffix to make the URL of your channel to be unique.
- Read the “Terms of use” carefully and then click on the change URL.
Custom YouTube channel URLs are easier for your fans to remember, but once you have one, you can never change it. Your existing subscribers will automatically redirect to your new URL if they try to get to your channel through the old URL.
Where to Find Your Custom URL Once You Successfully Claimed for It?
After you successfully get the custom URL, you may want to know where you can find the custom URL and therefore you can share it anywhere you like. The way to find your custom URL is exactly the same as how you created it. You can get back to the “Advanced settings” by following the above-mentioned steps. You’ll find the custom URL lies right there under your user ID and channel ID.
Who read this article also read:
Good YouTube Names Generators + How to Brainstorm>>
How to Make a YouTube Subscribe Link - Easy!>>
If you want to find a video editing solution that empowers your imagination and creativity yet takes less effort, please try this robust and user-friendly video editing software Wondershare Filmora. It provides special effects, stock photo & video, sound library, etc., which will definitely enhance your productivity and helps to make money by making videos much accessible.


Richard Bennett
Richard Bennett is a writer and a lover of all things video.
Follow @Richard Bennett
Richard Bennett
Oct 26, 2023• Proven solutions
In order to properly market your page on YouTube for sharing across social media, it is essential that you find your YouTube channel URL. How else can you share your channel? In this article, we are trying to give you a thorough understanding of the YouTube Channel URL and tell you how to get the custom channel URL.
Types of YouTube Channel URL
ID-based URL
YouTube channel URL of this type is based on your channel ID, which consists of numbers and letters. This is the URL of the universal form. For example, “youtube.com/channel/specific YouTube channel ID”.
You can find the YouTube channel URL of this kind by the following steps.
- Sign in to Youtube.com and click on your profile icon.
- Select Your Channel.
- Find the URL on the address bar of your browser. This is exactly the ID-based URL or the standard URL of your channel.
Legacy username URL
Legacy username URL was used by YouTube in the past. If you created your channel in the early days of YouTube, the URL for your channel might contain the username at the end. Although YouTube doesn’t apply username to forming channel URL anymore, you can still use this URL to direct to Your channel. But you should note that the exiting username can’t be changed even if you have changed your channel name. For example, “youtube.com/channel/specific YouTube channel ID”.
You can share the short form of the username URL with the “/user“ being left out, such as “youtube.com/specific YouTube channel ID”. But this may not be available if someone claimed to a custom URL whose short form is the same with the short form of your username URL.
Custom URL
This is a shorter and more easy-to-remember URL that is generated on the basis of your current display name, legacy username, or your linked and verified domain. You can claim for the custom URL if your channel meets certain qualifications.
The custom URL looks like this, “youtube.com/c/display name, legacy username, or your linked and verified domain”. You can also share this URL in its shorter form by leaving out the “/c“, for example, “youtube.com/customed part”.
How to Get a Custom URL for your YouTube Channel
To qualify for a custom URL – one which includes your channel name instead of a random sequence of letters, your channel needs to meet the following standards.
- Be at least 30 days old
- Have at least 100 subscribers
- Use a photo for the channel icon
- Have uploaded channel art
As long as your account meets these eligibility standards, then you can go over the following steps to claim a custom URL for your YouTube channel.
- Start by signing into YouTube.
- Click on your profile image on the top right of the screen.
- Find the “settings” and click on it.
- Select “Advanced settings”.
- Click on the link anchored with the word “here”.
- The “Get a custom URL” box will then pop out. You can select one from the approved options. You may need to add a suffix to make the URL of your channel to be unique.
- Read the “Terms of use” carefully and then click on the change URL.
Custom YouTube channel URLs are easier for your fans to remember, but once you have one, you can never change it. Your existing subscribers will automatically redirect to your new URL if they try to get to your channel through the old URL.
Where to Find Your Custom URL Once You Successfully Claimed for It?
After you successfully get the custom URL, you may want to know where you can find the custom URL and therefore you can share it anywhere you like. The way to find your custom URL is exactly the same as how you created it. You can get back to the “Advanced settings” by following the above-mentioned steps. You’ll find the custom URL lies right there under your user ID and channel ID.
Who read this article also read:
Good YouTube Names Generators + How to Brainstorm>>
How to Make a YouTube Subscribe Link - Easy!>>
If you want to find a video editing solution that empowers your imagination and creativity yet takes less effort, please try this robust and user-friendly video editing software Wondershare Filmora. It provides special effects, stock photo & video, sound library, etc., which will definitely enhance your productivity and helps to make money by making videos much accessible.

Richard Bennett
Richard Bennett is a writer and a lover of all things video.
Follow @Richard Bennett
Richard Bennett
Oct 26, 2023• Proven solutions
In order to properly market your page on YouTube for sharing across social media, it is essential that you find your YouTube channel URL. How else can you share your channel? In this article, we are trying to give you a thorough understanding of the YouTube Channel URL and tell you how to get the custom channel URL.
Types of YouTube Channel URL
ID-based URL
YouTube channel URL of this type is based on your channel ID, which consists of numbers and letters. This is the URL of the universal form. For example, “youtube.com/channel/specific YouTube channel ID”.
You can find the YouTube channel URL of this kind by the following steps.
- Sign in to Youtube.com and click on your profile icon.
- Select Your Channel.
- Find the URL on the address bar of your browser. This is exactly the ID-based URL or the standard URL of your channel.
Legacy username URL
Legacy username URL was used by YouTube in the past. If you created your channel in the early days of YouTube, the URL for your channel might contain the username at the end. Although YouTube doesn’t apply username to forming channel URL anymore, you can still use this URL to direct to Your channel. But you should note that the exiting username can’t be changed even if you have changed your channel name. For example, “youtube.com/channel/specific YouTube channel ID”.
You can share the short form of the username URL with the “/user“ being left out, such as “youtube.com/specific YouTube channel ID”. But this may not be available if someone claimed to a custom URL whose short form is the same with the short form of your username URL.
Custom URL
This is a shorter and more easy-to-remember URL that is generated on the basis of your current display name, legacy username, or your linked and verified domain. You can claim for the custom URL if your channel meets certain qualifications.
The custom URL looks like this, “youtube.com/c/display name, legacy username, or your linked and verified domain”. You can also share this URL in its shorter form by leaving out the “/c“, for example, “youtube.com/customed part”.
How to Get a Custom URL for your YouTube Channel
To qualify for a custom URL – one which includes your channel name instead of a random sequence of letters, your channel needs to meet the following standards.
- Be at least 30 days old
- Have at least 100 subscribers
- Use a photo for the channel icon
- Have uploaded channel art
As long as your account meets these eligibility standards, then you can go over the following steps to claim a custom URL for your YouTube channel.
- Start by signing into YouTube.
- Click on your profile image on the top right of the screen.
- Find the “settings” and click on it.
- Select “Advanced settings”.
- Click on the link anchored with the word “here”.
- The “Get a custom URL” box will then pop out. You can select one from the approved options. You may need to add a suffix to make the URL of your channel to be unique.
- Read the “Terms of use” carefully and then click on the change URL.
Custom YouTube channel URLs are easier for your fans to remember, but once you have one, you can never change it. Your existing subscribers will automatically redirect to your new URL if they try to get to your channel through the old URL.
Where to Find Your Custom URL Once You Successfully Claimed for It?
After you successfully get the custom URL, you may want to know where you can find the custom URL and therefore you can share it anywhere you like. The way to find your custom URL is exactly the same as how you created it. You can get back to the “Advanced settings” by following the above-mentioned steps. You’ll find the custom URL lies right there under your user ID and channel ID.
Who read this article also read:
Good YouTube Names Generators + How to Brainstorm>>
How to Make a YouTube Subscribe Link - Easy!>>
If you want to find a video editing solution that empowers your imagination and creativity yet takes less effort, please try this robust and user-friendly video editing software Wondershare Filmora. It provides special effects, stock photo & video, sound library, etc., which will definitely enhance your productivity and helps to make money by making videos much accessible.
Richard Bennett
Richard Bennett is a writer and a lover of all things video.
Follow @Richard Bennett
A Quick Guide to Purging Watched YouTube Videos
How to Remove YouTube Videos
Richard Bennett
Mar 27, 2024• Proven solutions
There are quite a few different reasons for which you might want to consider removing your YouTube video. From outdated content to mistakes in editing – the reasons are quite extensive. In the part 1, we will teach you how to remove your own videos on YouTube and things you should note when removing. The part 2 will tell you how to remove the videos from other YouTube channel.
If you need more advanced features like PIP, Green Screen, or audio mixing, check this easy to use and powerful video editor-Wondershare Filmora , and ignite your video by clicks.
Download Mac Version ](https://tools.techidaily.com/wondershare/filmora/download/ )
You may also like:What is YouTube Creative Commons and How to Use it >>
Part 1: How to Remove YouTube Videos that You’ve Uploaded
You may also like:How to Edit Uploaded YouTube Videos >>
The first thing that we are going to show you is how to remove your own videos. This might be needed if you have uploaded content quite some time ago and it is already outdated. Or, if you have too many videos on your channel and you need to clear up those who aren’t that interesting.
The fact of the matter is that it’s quite easy to remove YouTube videos. The first thing that you would need to do is going ahead and hop on the website and log into your account. Afterwards, you need to go to the “My Channel” option and click on the “Video Manager”.
Upon doing this, a new page is going to pop up, and you are going to see a list of all the videos that you’ve uploaded.

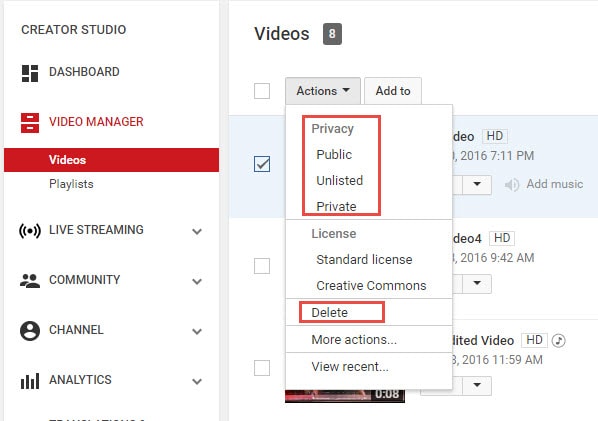
There are little tick boxes on the left side which you can click in order to mark. Mark the videos that you want to edit and click on the “Actions” button on top. There is going to be a drop-down menu, and you can click on the delete option to remove the video permanently. Furthermore, you can also hide the video if you don’t want to delete it but only to hide it away from your subscribers. In order to do so, you should simply click on the Private or Unlisted button.
That’s pretty much it – there’s nothing further to it, and the entire thing is rather comprehensive and easy to carry out, which makes it convenient to go through.
Part 2: How to Remove YouTube Videos on Other Channels
Now that we’ve covered how to remove videos from your own channel, it’s time to dig a little bit deeper. There are certain instances in which you might want to remove YouTube videos from other channels as well. The reasons for this are usually rather personal. For instance – someone has uploaded a video including you or something yours without your consent, and this harms your reputation. Furthermore, it may display sensitive information that you don’t want to reveal to anyone else – the reasons are rather different, but they are related to your own individual privacy which is an important legal right.
You may also like:How to Blur Faces in YouTube Videos >>
The first thing you can do is contact the person who uploaded the video and kindly asks him to remove it using the procedure that we described above. This is going to be the best choice because it’s going to achieve the result quickly and without any hassle. However, in certain cases, the person might not be active, or he might disagree with you and keep the video posted. If that’s the case, you have one option which is likely to be the best alternative.
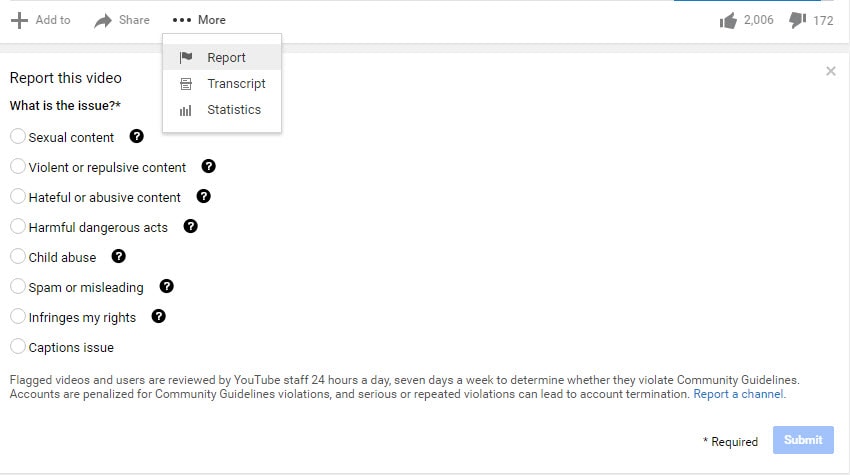
You need to report the video as an inappropriate and flag it with the remark that it’s invading your privacy. This is going to lead you to the page of the YouTube Safety Center. You will have to explain the issue in details in a six-step wizard which extensively asks you about how the video is invasive to your privacy rights. The process is quite comprehensive, and it’s easy to go through. However, you will have to wait for the YouTube support team to assess it and make the decision for the removal.
The truth is that being able to remove YouTube videos is something important that you should be able to do. It’s going to ensure that your channel is perfectly updated, aligned and structured while at the same time making sure that everything is in line with your privacy. YouTube is a powerful website, and you need to be able to stay in control in order to be protected.
Richard Bennett
Richard Bennett is a writer and a lover of all things video.
Follow @Richard Bennett
Richard Bennett
Mar 27, 2024• Proven solutions
There are quite a few different reasons for which you might want to consider removing your YouTube video. From outdated content to mistakes in editing – the reasons are quite extensive. In the part 1, we will teach you how to remove your own videos on YouTube and things you should note when removing. The part 2 will tell you how to remove the videos from other YouTube channel.
If you need more advanced features like PIP, Green Screen, or audio mixing, check this easy to use and powerful video editor-Wondershare Filmora , and ignite your video by clicks.
Download Mac Version ](https://tools.techidaily.com/wondershare/filmora/download/ )
You may also like:What is YouTube Creative Commons and How to Use it >>
Part 1: How to Remove YouTube Videos that You’ve Uploaded
You may also like:How to Edit Uploaded YouTube Videos >>
The first thing that we are going to show you is how to remove your own videos. This might be needed if you have uploaded content quite some time ago and it is already outdated. Or, if you have too many videos on your channel and you need to clear up those who aren’t that interesting.
The fact of the matter is that it’s quite easy to remove YouTube videos. The first thing that you would need to do is going ahead and hop on the website and log into your account. Afterwards, you need to go to the “My Channel” option and click on the “Video Manager”.
Upon doing this, a new page is going to pop up, and you are going to see a list of all the videos that you’ve uploaded.
There are little tick boxes on the left side which you can click in order to mark. Mark the videos that you want to edit and click on the “Actions” button on top. There is going to be a drop-down menu, and you can click on the delete option to remove the video permanently. Furthermore, you can also hide the video if you don’t want to delete it but only to hide it away from your subscribers. In order to do so, you should simply click on the Private or Unlisted button.
That’s pretty much it – there’s nothing further to it, and the entire thing is rather comprehensive and easy to carry out, which makes it convenient to go through.
Part 2: How to Remove YouTube Videos on Other Channels
Now that we’ve covered how to remove videos from your own channel, it’s time to dig a little bit deeper. There are certain instances in which you might want to remove YouTube videos from other channels as well. The reasons for this are usually rather personal. For instance – someone has uploaded a video including you or something yours without your consent, and this harms your reputation. Furthermore, it may display sensitive information that you don’t want to reveal to anyone else – the reasons are rather different, but they are related to your own individual privacy which is an important legal right.
You may also like:How to Blur Faces in YouTube Videos >>
The first thing you can do is contact the person who uploaded the video and kindly asks him to remove it using the procedure that we described above. This is going to be the best choice because it’s going to achieve the result quickly and without any hassle. However, in certain cases, the person might not be active, or he might disagree with you and keep the video posted. If that’s the case, you have one option which is likely to be the best alternative.
You need to report the video as an inappropriate and flag it with the remark that it’s invading your privacy. This is going to lead you to the page of the YouTube Safety Center. You will have to explain the issue in details in a six-step wizard which extensively asks you about how the video is invasive to your privacy rights. The process is quite comprehensive, and it’s easy to go through. However, you will have to wait for the YouTube support team to assess it and make the decision for the removal.
The truth is that being able to remove YouTube videos is something important that you should be able to do. It’s going to ensure that your channel is perfectly updated, aligned and structured while at the same time making sure that everything is in line with your privacy. YouTube is a powerful website, and you need to be able to stay in control in order to be protected.
Richard Bennett
Richard Bennett is a writer and a lover of all things video.
Follow @Richard Bennett
Also read:
- [New] 2024 Approved Invisible Viewers of Fb Episodes
- [New] Cutting the Edge Top Ten Camera Lenses as of 2024
- [New] How to Build Your Personal Brand on YouTube
- [New] Strategic Insightfulness Comparing Your Channel to Competitors' Crafts
- [Updated] 2024 Approved Efficient Ways to Delete Previewed Content From YouTube's Queue
- [Updated] Boosting Income A Complete Guide to YouTube Ad Profits
- 2024 Approved Navigating the Path of Global Storytelling Through Film
- 2024 Approved Realigning Your Personal Soundtracks From Spotify to YouTube Music
- In 2024, Graph Gala 2017 An Illuminated Expedition Into YT Data
- In 2024, How To Fix Auto Lock Greyed Out on iPhone XS Max | Dr.fone
- In 2024, How to Track Lava Blaze 2 Location without Installing Software? | Dr.fone
- In 2024, Master the Visuals Top Tips for Dynamic and Appealing Live Videos
- In 2024, Million Visioners Dissecting the Money Behind the Numbers
- In 2024, Stop Unsolicited YouTube Suggestion Rollouts
- Instant Access Granted: Remove Adobe Content Restrictions Today!
- Key View Figures for Earning Living on YouTube for 2024
- Masterclasses in Applying Online VHS Filters and Graphics for 2024
- Tailored Digital Personas Set to Revolutionize VR
- Updated In 2024, 8 Stellar Alternatives to Windows 10 Photos for Enhanced Photography Experience
- Title: In 2024, Transform Your YouTube Channel URL in Minutes
- Author: Thomas
- Created at : 2024-10-23 19:57:32
- Updated at : 2024-10-30 08:35:28
- Link: https://youtube-help.techidaily.com/in-2024-transform-your-youtube-channel-url-in-minutes/
- License: This work is licensed under CC BY-NC-SA 4.0.