
"In 2024, Unveiling the Art of YouTube Split-Screens"
Unveiling the Art of YouTube Split-Screens
How to Make a Creative Split-screen Video for YouTube?

Liza Brown
Oct 26, 2023• Proven solutions
If we talk about post-production techniques and visual effects, then Split Screen has to be one of the smartest picks. After all, it lets us narrate our story via two (or more) screens and gives our audience a superior viewing experience. Though, a lot of users find it hard to implement the split-screen effect on YouTube videos. Here, I will let you know how to come up with all kinds of YouTube split-screen videos by using a professional video editor.
Part 1: The Diverse Applications of Split-screen Videos
Before we discuss how to work on YouTube split-screen videos, let’s quickly consider some major applications of this video effect.
One of the most popular applications of split-screen videos is for comparing two or more instances or perspectives in the same frame. For example, you might wish to depict the lifestyle of two people from different parts of the world or simply compare the effect of various seasons in a single video.

Videos are the best visual storytelling tools and just like any story, they can also have different perspectives. Ideally, the split-screen effect would be one of the best ways to show your audience all kinds of perspectives that can take place in your story.
One of the best examples was depicted in the movie “500 Days of Summer” in which we got several Expectations vs. Reality shots. These split-screen shots depicted the two major perspectives of the story in a single frame.

Have you ever wondered how filmmakers create a clone of a person in movies? To do that, we make the protagonist record both the scenes in front of the same background. Later, we implement a split-screen effect in which both the clips are combined in such a way that it makes the audience believe as if the scene has both, the character and their clone placed flawlessly.

Watch Video! Use Split-Screen for Your YouTube Videos
Part 2: How to Make Creative YouTube Split-screen Videos with Wondershare Filmora ?
If you want to come up with professional YouTube split-screen videos, then consider using a resourceful tool like Wondershare Filmora. Recently, the company has launched Wondershare Filmora for Mac V10.2 with an upgraded set of newly-added split-screen templates . Therefore, you can simply use the wide range of split-screen templates in Filmora and drag-and-drop your videos to implement the effect.
- Wondershare Filmora has recently added an extensive range of split-screen templates that you can instantly use and customize to meet your requirements.
- Apart from YouTube split-screen templates, you can also find options for other social platforms such as Instagram, Facebook, TikTok, etc.
- Without undergoing any technical hassle, you can just drag and drop your videos to the split-screen template and further make the needed changes.
- There are also dedicated options to edit the split-screen video, apply color correction, and even implement different stunning animated effects.
- Besides that, you can use Filmora to access numerous other editing options like motion tracking, keyframing, audio ducking, auto reframing, action cam editing, and more.


Creating or editing YouTube split-screen videos in Wondershare Filmora is extremely easy and can be done in the following way:
Step 1: Import the Videos You Want to Edit to Wondershare Filmora
Before you edit your YouTube split-screen video, you need to import clips to the application. To do this, just launch Wondershare Filmora on your system and click on the “Import” button to load your videos. You can also go to its Menu > File > Import Media to do the same.

Step 2: Select the Split-screen Template and Add Your Videos
Great! Once you have loaded the interface of Filmora, you can locate a “Split Screen” section from the top. Just click on it to browse a wide range of split-screen video templates for YouTube to include two, three, or more clips. You can just double-click any template to get its preview and drag-and-drop it to the timeline to start working on it.

If you want, you can take the playhead and drag the pointer to adjust the length of the split-screen template on the timeline. To add your clips, just double-click on the split-screen template and click on the drop icon from the preview window. Now, click on the source clip to add it to the template and adjust its position to get the desired effects.

Step 3: Edit Your YouTube Split-screen Video
Following the same drill, you can include multiple clips to the YouTube split-screen template. You can further go to its editing features and explore the “Video” tab to scale, reposition, or rotate your clips. There are also options to add borders in the split-screen effect to separate the clips distinctively in the video.

Apart from that, you can also go to the “Color” section to access various color correction features. From here, you can adjust the brightness, temperature, saturation, tint, and other effects in the video.

If you want to make your YouTube split-screen video more appealing, then go to the “Motion” feature. Here, you can easily implement any existing animated template for transitions and other effects.

Besides that, you can also click on the edit icon from the bottom panel of the Preview section to edit your videos separately.

Step 4: Export the YouTube Split-screen Video
That’s it! Once you are done editing the split-screen video, you can export it from Filmora and save it on your Mac. Just click on the Export option and select a location to save the YouTube split-screen video. There are also additional features to save the video in different formats, video resolutions, and frame rates here that you can explore.

There you go! After following this guide, you would be able to come up with all kinds of YouTube split-screen videos on your Mac. Ideally, with the help of a resourceful tool like Wondershare Filmora, working on a split-screen video is an effortless task. Since the tool has numerous split-screen templates for YouTube, you can just select any template, and customize it to create a stunning YouTube split-screen video in minutes.
Liza Brown
Liza Brown is a writer and a lover of all things video.
Follow @Liza Brown
Liza Brown
Oct 26, 2023• Proven solutions
If we talk about post-production techniques and visual effects, then Split Screen has to be one of the smartest picks. After all, it lets us narrate our story via two (or more) screens and gives our audience a superior viewing experience. Though, a lot of users find it hard to implement the split-screen effect on YouTube videos. Here, I will let you know how to come up with all kinds of YouTube split-screen videos by using a professional video editor.
Part 1: The Diverse Applications of Split-screen Videos
Before we discuss how to work on YouTube split-screen videos, let’s quickly consider some major applications of this video effect.
One of the most popular applications of split-screen videos is for comparing two or more instances or perspectives in the same frame. For example, you might wish to depict the lifestyle of two people from different parts of the world or simply compare the effect of various seasons in a single video.
Videos are the best visual storytelling tools and just like any story, they can also have different perspectives. Ideally, the split-screen effect would be one of the best ways to show your audience all kinds of perspectives that can take place in your story.
One of the best examples was depicted in the movie “500 Days of Summer” in which we got several Expectations vs. Reality shots. These split-screen shots depicted the two major perspectives of the story in a single frame.
Have you ever wondered how filmmakers create a clone of a person in movies? To do that, we make the protagonist record both the scenes in front of the same background. Later, we implement a split-screen effect in which both the clips are combined in such a way that it makes the audience believe as if the scene has both, the character and their clone placed flawlessly.
Watch Video! Use Split-Screen for Your YouTube Videos
Part 2: How to Make Creative YouTube Split-screen Videos with Wondershare Filmora ?
If you want to come up with professional YouTube split-screen videos, then consider using a resourceful tool like Wondershare Filmora. Recently, the company has launched Wondershare Filmora for Mac V10.2 with an upgraded set of newly-added split-screen templates . Therefore, you can simply use the wide range of split-screen templates in Filmora and drag-and-drop your videos to implement the effect.
- Wondershare Filmora has recently added an extensive range of split-screen templates that you can instantly use and customize to meet your requirements.
- Apart from YouTube split-screen templates, you can also find options for other social platforms such as Instagram, Facebook, TikTok, etc.
- Without undergoing any technical hassle, you can just drag and drop your videos to the split-screen template and further make the needed changes.
- There are also dedicated options to edit the split-screen video, apply color correction, and even implement different stunning animated effects.
- Besides that, you can use Filmora to access numerous other editing options like motion tracking, keyframing, audio ducking, auto reframing, action cam editing, and more.
Creating or editing YouTube split-screen videos in Wondershare Filmora is extremely easy and can be done in the following way:
Step 1: Import the Videos You Want to Edit to Wondershare Filmora
Before you edit your YouTube split-screen video, you need to import clips to the application. To do this, just launch Wondershare Filmora on your system and click on the “Import” button to load your videos. You can also go to its Menu > File > Import Media to do the same.
Step 2: Select the Split-screen Template and Add Your Videos
Great! Once you have loaded the interface of Filmora, you can locate a “Split Screen” section from the top. Just click on it to browse a wide range of split-screen video templates for YouTube to include two, three, or more clips. You can just double-click any template to get its preview and drag-and-drop it to the timeline to start working on it.
If you want, you can take the playhead and drag the pointer to adjust the length of the split-screen template on the timeline. To add your clips, just double-click on the split-screen template and click on the drop icon from the preview window. Now, click on the source clip to add it to the template and adjust its position to get the desired effects.
Step 3: Edit Your YouTube Split-screen Video
Following the same drill, you can include multiple clips to the YouTube split-screen template. You can further go to its editing features and explore the “Video” tab to scale, reposition, or rotate your clips. There are also options to add borders in the split-screen effect to separate the clips distinctively in the video.
Apart from that, you can also go to the “Color” section to access various color correction features. From here, you can adjust the brightness, temperature, saturation, tint, and other effects in the video.
If you want to make your YouTube split-screen video more appealing, then go to the “Motion” feature. Here, you can easily implement any existing animated template for transitions and other effects.
Besides that, you can also click on the edit icon from the bottom panel of the Preview section to edit your videos separately.
Step 4: Export the YouTube Split-screen Video
That’s it! Once you are done editing the split-screen video, you can export it from Filmora and save it on your Mac. Just click on the Export option and select a location to save the YouTube split-screen video. There are also additional features to save the video in different formats, video resolutions, and frame rates here that you can explore.
There you go! After following this guide, you would be able to come up with all kinds of YouTube split-screen videos on your Mac. Ideally, with the help of a resourceful tool like Wondershare Filmora, working on a split-screen video is an effortless task. Since the tool has numerous split-screen templates for YouTube, you can just select any template, and customize it to create a stunning YouTube split-screen video in minutes.
Liza Brown
Liza Brown is a writer and a lover of all things video.
Follow @Liza Brown
Steps to Clear Out Your YouTube Watch Later Collection
The YouTube Watch Later playlist is a great way to save videos and view them later. But if you don’t keep on top of it, your Watch Later list can quickly become unmanageable and cluttered with content that you no longer want to watch afterward.
If you are wondering how, you can declutter the playlist, we’ve got you covered. To help you with the task, we’ve compiled a comprehensive step-by-step guide. In this article, we will show you how to clear Watch Later on YouTube with just a few clicks.
So, without beating around the bush, let’s get started with our tutorial!
How To Delete YouTube Watch Later Playlist
If your YouTube Watch Later playlist is filled with videos you’ll never watch again, or you are not interested in that specific content type, you can quickly delete these videos at any time.
Here’s the step-by-step process on how to clear Watch Later on YouTube Web and App:
How To Delete YouTube Watch Later Playlist On Web?
You can delete the YouTube Watch Later Playlist on your desktop in the following ways:
From YouTube Homepage
To clear the YouTube Watch Later Playlist from the YouTube Homepage, do the following steps:
Step1 First, open a browser on your PC and visit the YouTube homepage. Sign into your account if needed and click the “Library” option located at the left-hand side menu panel.

Step2 Croll down and click the “See All” option under the Watch Later header. Click the Three Dots below the Watch Later playlist details on the next page.
Step3 From the drop-down menu, click “Remove Watch Videos.” This will instantly remove all the videos you’ve watched but are still in the playlist.
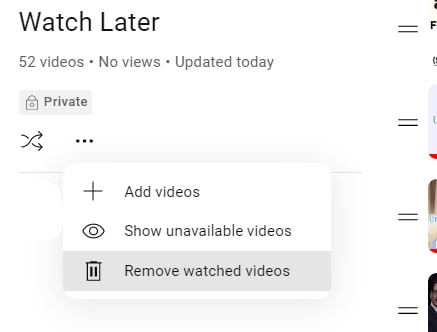
Step4 Finally, to remove the unwatched videos, hover over a video and click the Three Dots. Select the “Remove from Watch Later” option to delete the video. You can repeat this process to remove all the content from the playlist until it is decluttered at the point of your satisfaction.

Using A Script
Since the above process can be tiring, you can use a script to remove all the videos at once from the Watch Later playlist in the following way:
Step1 In the first step, launch the Google Chrome browser on your system and head to the YouTube website**.** Next, select the “Library” option in the left pane and click “Watch Later” from the menu.
Step2 Now, hit the “Ctrl + Shift + J” keys on Windows or the “Command + Option+ J” buttons on Mac to launch the developer mode and open the console window.

Step3 Copy and paste the following lines of the script at the end of the line under the Console tab where the cursor is blinking.
setInterval(function () { document.querySelector(‘#primary button[aria-label=”Action menu”]‘).click(); var things = document.evaluate( ‘//span[contains(text(),”Remove from”)]‘, document, null, XPathResult.ORDERED_NODE_SNAPSHOT_TYPE, null ); for (var i = 0; i < things.snapshotLength; i++) { things.snapshotItem(i).click(); } }, 1000);
Step4 In the last step, hit the “Enter” key to clear the Watch Later Playlist on YouTube. However, the process may take some time, depending on the number of videos in your playlist.
Although a bit tech-savvy, the script execution method is the most effective way to delete all Watch Later videos at once.
You can also replace the number at the end of the script with a lower entry to delete videos according to your preference. Also, choosing a lesser number can speed up the video deletion process from YouTube Watch Later list by a great deal.
![]()
Note: It is important to note that experimenting with scripts is only for some. The script above has been confirmed to work, but others still need to be thoroughly checked and could potentially damage your computer. To prevent this from happening, only look for scripts from reliable sources instead of those posted by random people in various forums.
How To Delete YouTube Watch Later Playlist On YouTube App?
If you are using YouTube on an Android or iOS device, it is possible to clear the Watch Later Playlist by doing the steps below:
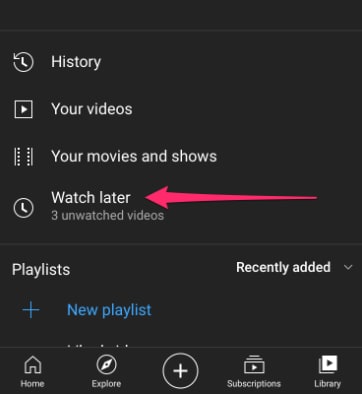
Step1 In the first step, swipe up on the Homescreen of your Android device or swipe right on your iOS device to launch App Drawer, and tap “YouTube” to launch the app.
Step2 Now, tap the “Library” option in the bottom-right corner of the screen and tap “Watch Later.”
Step3 Next, tap the three dots (vertical ellipses) icon on the top-right side of the screen and choose the “Remove Watched Videos” option to delete them from the playlist.
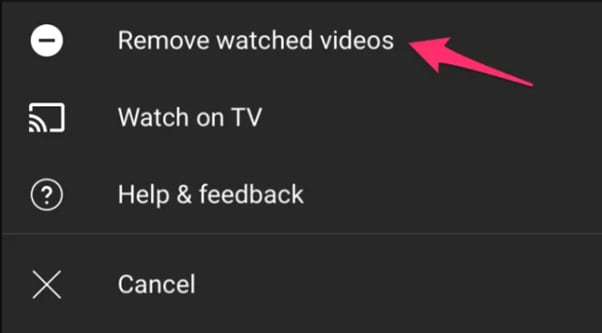
Step4 If there are still unwatched videos in the playlist, select a video and tap the three dots next to it. Now, tap the “Remove from Watch Later” option. Repeat the process to remove all the unwatched videos to clear the playlist.
Is there an Alternative Way to Download YouTube Videos without Using Software?
Now that you’ve learned how you can clear the Watch Later playlist on YouTube, you might be looking for a way to download your favorite videos on your PC for later watch without using any software. If so,click here to find out 13 proven ways to get this done.
Free Download For Win 7 or later(64-bit)
Free Download For macOS 10.14 or later
Bonus Video Tutorial: From a User to a Creator, How To Edit YouTube Videos Like a Pro
Hopefully, you have found the most appropriate solution to clear your YouTube Watcher Later playlist. However, while you are a YouTube user, how can you transfer your character from a user to a creator? In this video era, why not participate in the creation party and be one of them?
If you have any interests, you can watch the video we specially prepared for you. This video will show you how to use a user-friendly video editor, Filmora , to create your own YouTube videos!
Conclusion
In this article, we’ve discussed how to clear your YouTube watch later playlist from both the YouTube web from the homepage and using the script in the browser’s developer mode. We’ve also provided a step-by-step process for deleting the Watch Later playlist on the YouTube mobile app.
This guide was informative enough to answer most of your queries, and after reading it, you can now unclutter your YouTube Watch Later without any issues.
How To Delete YouTube Watch Later Playlist On YouTube App?
If you are using YouTube on an Android or iOS device, it is possible to clear the Watch Later Playlist by doing the steps below:
Step1 In the first step, swipe up on the Homescreen of your Android device or swipe right on your iOS device to launch App Drawer, and tap “YouTube” to launch the app.
Step2 Now, tap the “Library” option in the bottom-right corner of the screen and tap “Watch Later.”
Step3 Next, tap the three dots (vertical ellipses) icon on the top-right side of the screen and choose the “Remove Watched Videos” option to delete them from the playlist.
Step4 If there are still unwatched videos in the playlist, select a video and tap the three dots next to it. Now, tap the “Remove from Watch Later” option. Repeat the process to remove all the unwatched videos to clear the playlist.
Is there an Alternative Way to Download YouTube Videos without Using Software?
Now that you’ve learned how you can clear the Watch Later playlist on YouTube, you might be looking for a way to download your favorite videos on your PC for later watch without using any software. If so,click here to find out 13 proven ways to get this done.
Free Download For Win 7 or later(64-bit)
Free Download For macOS 10.14 or later
Bonus Video Tutorial: From a User to a Creator, How To Edit YouTube Videos Like a Pro
Hopefully, you have found the most appropriate solution to clear your YouTube Watcher Later playlist. However, while you are a YouTube user, how can you transfer your character from a user to a creator? In this video era, why not participate in the creation party and be one of them?
If you have any interests, you can watch the video we specially prepared for you. This video will show you how to use a user-friendly video editor, Filmora , to create your own YouTube videos!
Conclusion
In this article, we’ve discussed how to clear your YouTube watch later playlist from both the YouTube web from the homepage and using the script in the browser’s developer mode. We’ve also provided a step-by-step process for deleting the Watch Later playlist on the YouTube mobile app.
This guide was informative enough to answer most of your queries, and after reading it, you can now unclutter your YouTube Watch Later without any issues.
Also read:
- [New] 2024 Approved Cutting Edge Performance in Your Palm Sony's 4K Smartphone
- [New] Gain Massive Audience on YouTube in Minutes (2 Ways)
- [New] In 2024, Charismatic Oratory Study Part 8
- [New] Revolutionize Your Content with Innovative Tagging Approaches
- [New] Securing a Slot in YouTube Finding Your Market
- [Updated] Incorporating Markers A Step-By-Step Videography Guide for 2024
- 2024 Approved Free, Easy-to-Use Online Editors for Quick Postings
- 2024 Approved Transforming Footage The Ultimate Guide to YouTube Video Editing
- A Step-by-Step Approach to Fix Your Hardware Driver for a Seamless World of Warcraft Experience
- Enhance Your Singing Experience with the Updated Karaoke Software - PCDJ Beta Version 0.8.e654 Now for Free!
- How to Turn YouTube Shorts Into a Money Machine Key Requirements & Income Potential for 2024
- In 2024, Hassle-Free Ways to Remove FRP Lock on Vivo Y17s Phones with/without a PC
- In 2024, Supercharge Your Content Consumption These Best Free, Online Video Downloaders for YouTube Shorts
- In 2024, Unlocking YouTube's Full Potential with Top Video Formats
- Leveraging Video Shorts to Generate Income Online for 2024
- Mac Hard Drive Security: Step-by-Step Guide to Encryption, Decryption & Data Recovery Video Tutorial
- Windows Updates Now Successfully Installed: Fix Guide
- Title: In 2024, Unveiling the Art of YouTube Split-Screens
- Author: Thomas
- Created at : 2025-01-03 16:30:37
- Updated at : 2025-01-10 16:19:54
- Link: https://youtube-help.techidaily.com/in-2024-unveiling-the-art-of-youtube-split-screens/
- License: This work is licensed under CC BY-NC-SA 4.0.